|
|
|
Sept 20, 2020 13:29:49 GMT
|
Any ideas what the proper way of holding the spare wheel in place under the bonnet is? It's fairly tightly slotted in, so it shoulnd't be going anywhere, but I'm guessing there ought to be something holding it down to the big bolt you can see in this picture? And thinking about it, should the wheel go the other way up? 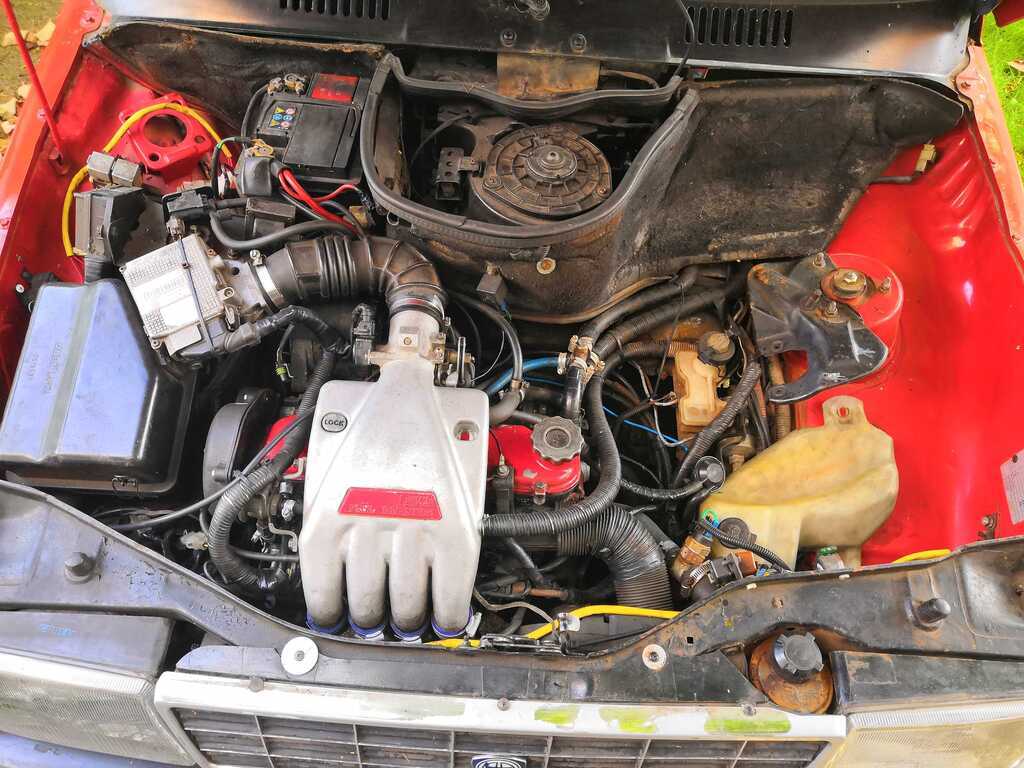 Different engine I know but on this Y10 wheel is stored in same location. Traditional bolt and cupped washer through middle...  |
| |
|
|
|
|
thomfr
Part of things
  Trying to assemble the Duett again..
Posts: 694
|
|
Sept 20, 2020 18:54:19 GMT
|
|
Faster indicator = defective Bulb??
|
| |
73' Alfa Giulia Super
64' Volvo Duett
65' Volvo Duett
67' Volvo Amazon 123GT
09' Ford Focus 1.8
20' VW ID4
71' Benelli Motorella
65' Cyrus Speciaal
The difference between men and boys is the price of their toys
|
|
duncanmartin
Club Retro Rides Member
Out of retro ownership
Posts: 1,320
Club RR Member Number: 70
|
1993 Lancia Y10 GTieduncanmartin
@duncanmartin
Club Retro Rides Member 70
|
Sept 21, 2020 7:09:06 GMT
|
The bulbs were OK a couple of weeks ago when I used it, so I'm guessing it's a contact issue - I didn't get around to looking at it yesterday. That domed washer thing looks like the answer for the spare wheel. Your picture also has the jack and toolkit in a similar position over on the other side of the engine bay. I think I have all the bits in the boot, and there is a mounting point for this in the right place, so I will try to sort that out at some point (will clear up the boot as well as sort out the under bonnet).  |
| |
|
|
duncanmartin
Club Retro Rides Member
Out of retro ownership
Posts: 1,320
Club RR Member Number: 70
|
1993 Lancia Y10 GTieduncanmartin
@duncanmartin
Club Retro Rides Member 70
|
Sept 22, 2020 16:26:47 GMT
|
The little toolkit and jack went under the bonnet here: 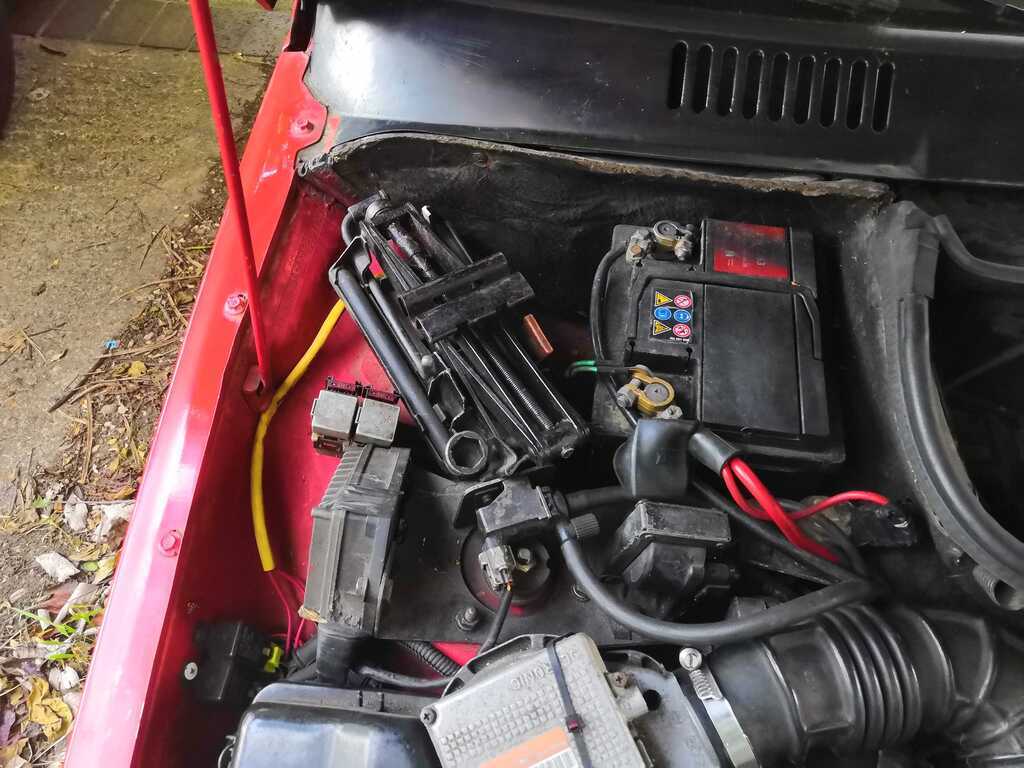 So aside from the nut to hold the wheel down (I've ordered one for a Vauxhall from eBay for a couple of quid), that little project is complete. There's loads more going on in my engine bay than in the FIRE one, but hopefully it's all as it should be. The gearlever clanging is almost certainly down to worn bushes, so that's something I'm keen to sort out (should make it nicer to drive too) - I think it's the same as for the later models of the Mk1 Panda, and kits for that exist, so that should be doable. |
| |
|
|
duncanmartin
Club Retro Rides Member
Out of retro ownership
Posts: 1,320
Club RR Member Number: 70
|
1993 Lancia Y10 GTieduncanmartin
@duncanmartin
Club Retro Rides Member 70
|
|
|
Damnit, the central nut thing I ordered (off a vauxhall) arrived today. The central bore is much too small to even fit over the unthreaded bit of the securing bolt.  Might try and drill it out to fit - will have to see. |
| |
|
|
thomfr
Part of things
  Trying to assemble the Duett again..
Posts: 694
|
|
|
|
|
No old Panda’s anymore at the scrappie? Bet that ome would fit 100%.
Thom
|
| |
73' Alfa Giulia Super
64' Volvo Duett
65' Volvo Duett
67' Volvo Amazon 123GT
09' Ford Focus 1.8
20' VW ID4
71' Benelli Motorella
65' Cyrus Speciaal
The difference between men and boys is the price of their toys
|
|
duncanmartin
Club Retro Rides Member
Out of retro ownership
Posts: 1,320
Club RR Member Number: 70
|
1993 Lancia Y10 GTieduncanmartin
@duncanmartin
Club Retro Rides Member 70
|
Oct 31, 2020 10:29:20 GMT
|
I called a few and they didn't have any. I finally managed to get the garage sorted (must update that thread) and put the car in there. While drying it before I put it away, I noticed these paint cracks on the roof: 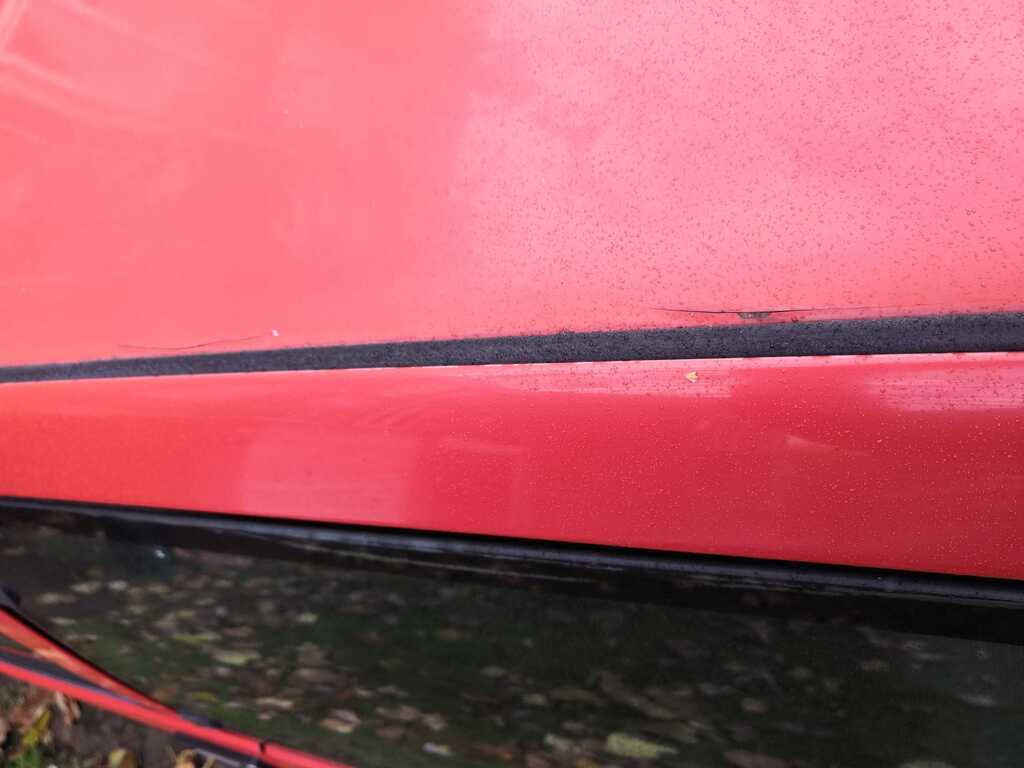 They are probably only an inch or 2 long, but at least one of them has flaked a little and you can see rust underneath. I assume I need to pick off the loose paint until I can see clean metal and clean/neutralize the rust. They are quite close to the roof strip though, so I'm probably going to have to remove that as well. Any suggestions for how, and what the best idea is to treat and solve this problem without then needing a roof respray? |
| |
|
|
|
|
|
Oct 31, 2020 11:04:11 GMT
|
|
Deal with the rust etc and have the roof panel wrapped contrasting colour ??
|
| |
Last Edit: Oct 31, 2020 11:04:25 GMT by westbay
|
|
duncanmartin
Club Retro Rides Member
Out of retro ownership
Posts: 1,320
Club RR Member Number: 70
|
1993 Lancia Y10 GTieduncanmartin
@duncanmartin
Club Retro Rides Member 70
|
Oct 31, 2020 12:49:47 GMT
|
|
I was wondering about that. The standard design is to have the boot matt black, so it might be interesting to have the roof and the tailgate wrapped the same. I even have some carbon look wrap kicking around the place from when I was thinking of doing it to my multipla bonnet! The Y10 bonnet kinda wraps around the sides a bit, so I think that would look especially odd if wrapped. Fundamentally, the car has a load of little dings and stuff (especially the bonnet), and the interior is somewhat knackered, so it's never going to be worth spending money on anyway, might as well make it look different and have fun with it...
|
| |
|
|
duncanmartin
Club Retro Rides Member
Out of retro ownership
Posts: 1,320
Club RR Member Number: 70
|
1993 Lancia Y10 GTieduncanmartin
@duncanmartin
Club Retro Rides Member 70
|
Oct 31, 2020 19:48:53 GMT
|
|
Apparently the rubber strips are held in from the inside and you've got to remove loads of trim to get them out. So I shall try to avoid removing them, and hope that the rust doesn't reach them - fingers crossed. At least it's out of the rain now.
|
| |
|
|
|
|
duncanmartin
Club Retro Rides Member
Out of retro ownership
Posts: 1,320
Club RR Member Number: 70
|
1993 Lancia Y10 GTieduncanmartin
@duncanmartin
Club Retro Rides Member 70
|
|
|
I decided to clay-bar the roof to see if there was any other sorts of damage on it. There are a few dents and some other paint defects, but these cracks are the only bits that go through the paint. So after claying the half of the roof I could get to, I decided to pick at the cracks and see what was underneath. Pound for scale. 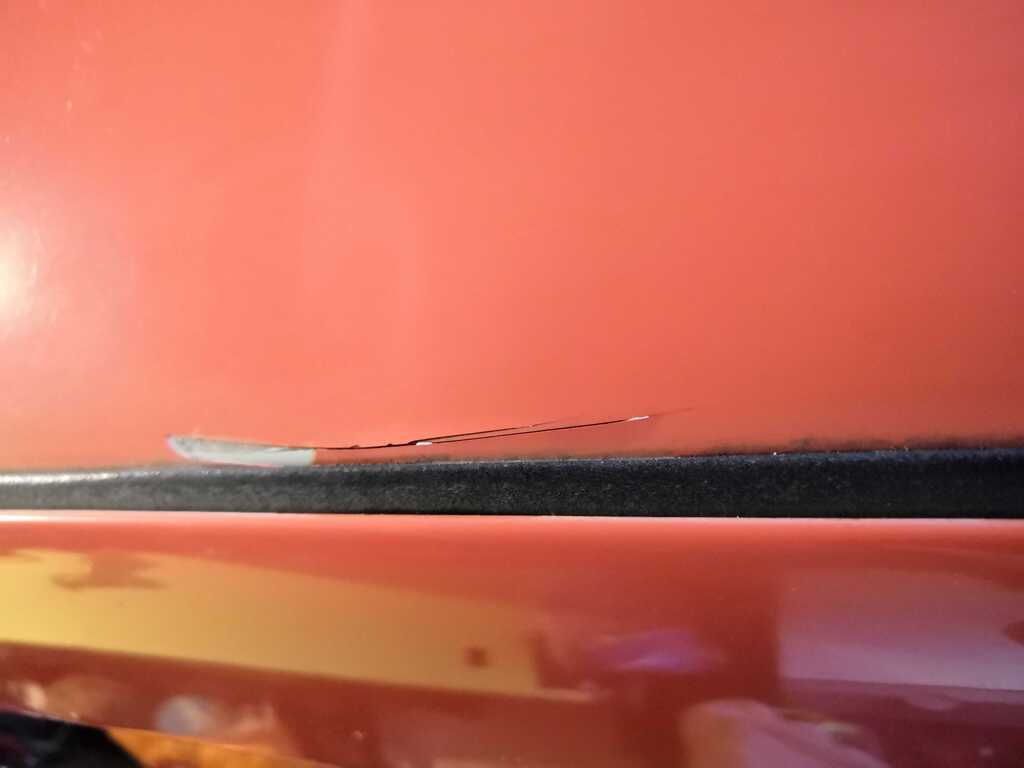 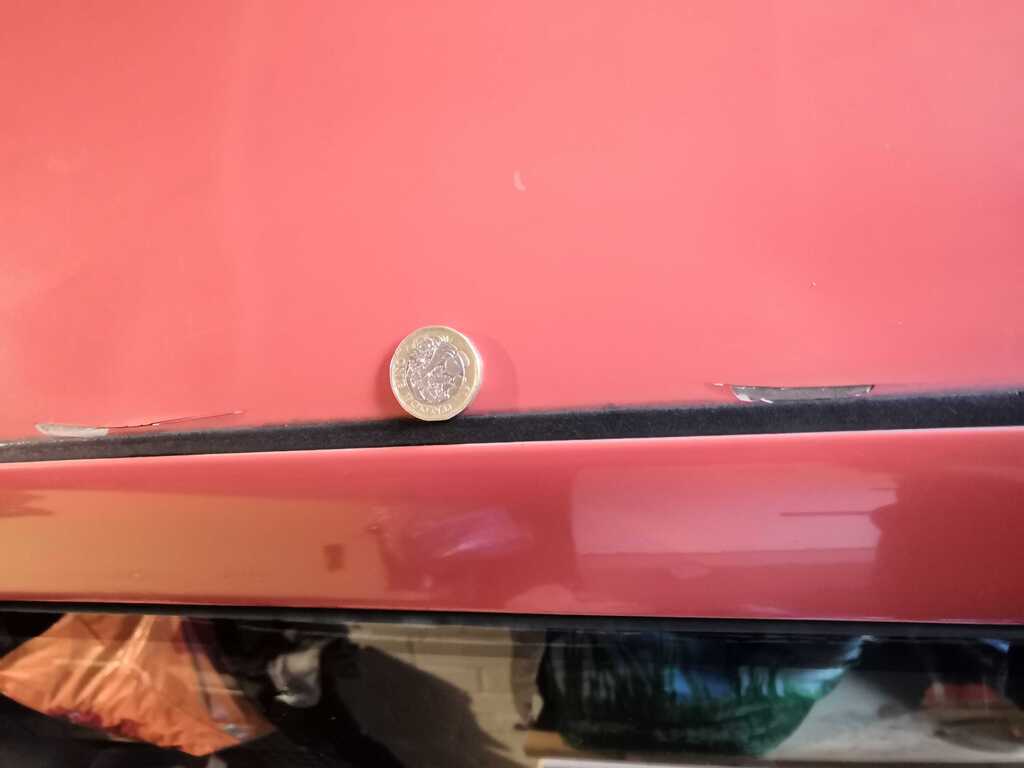 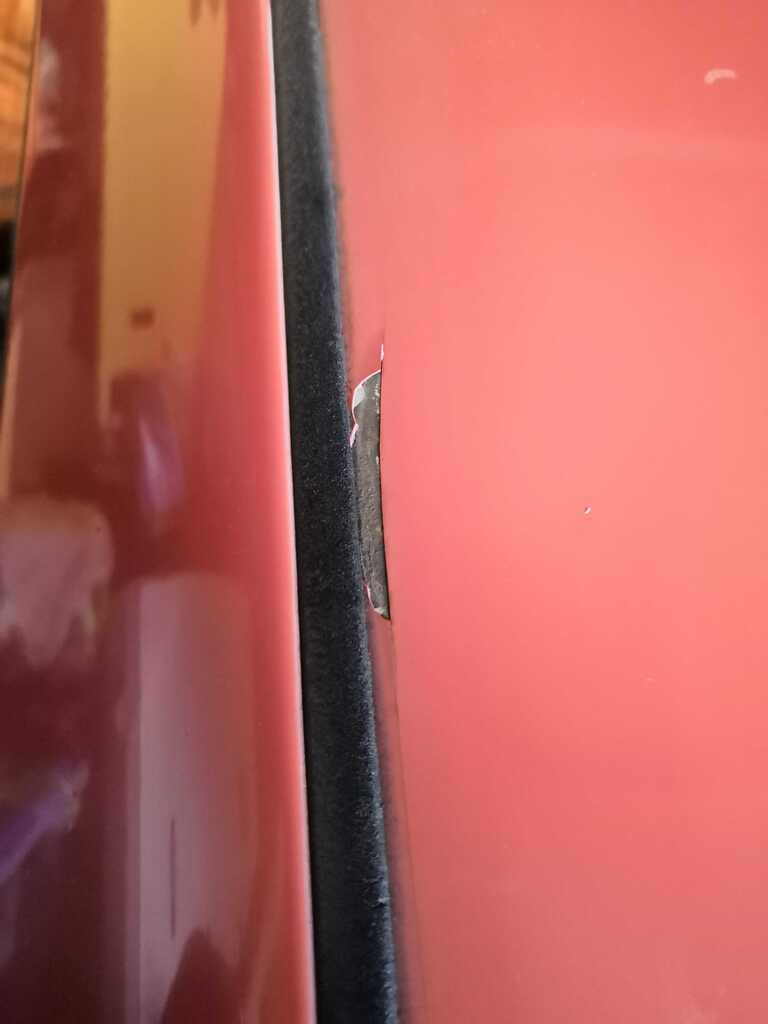 As you can see, the front crack doesn't have any rust and hasn't gone through the primer, but the back one has minor surface rust - I'm going to pick the length of the crack and then apply some kurust - I don't think there is anything else needed, and the paint seems reasonably well stuck underneath the black rubber strip. Once done I'll just whack some primer on and see if I can find a paint code so I can get some online. |
| |
|
|
goldnrust
West Midlands
Minimalist
Posts: 1,887
|
|
|
|
I don’t want to be the bearer of bad news but.... I think the only real solution to that will be to take those areas where it’s cracked back to bare metal and then repaint the area.  It shouldn’t be too bad though, it’s a pretty small localised area. In the short term you could try getting a touch up pen and just flooding the area with paint to fill the crack? But it won’t be especially pretty and isn’t really a proper solution. |
| |
|
|
duncanmartin
Club Retro Rides Member
Out of retro ownership
Posts: 1,320
Club RR Member Number: 70
|
1993 Lancia Y10 GTieduncanmartin
@duncanmartin
Club Retro Rides Member 70
|
|
|
|
Bare metal is definitely the proper way to do it. But to bare metal it and make make sure there's no rust means dismantling half the interior and taking the rubber piece out. It's never going to be perfect, and it's never going to be worth very much, so I'm not sure if I'm going to do it properly or if I'll do what I can get away with and spend some time sorting out something else instead.
|
| |
|
|
smart
Part of things
 
Posts: 134
|
|
|
|
|
its hard to see from the pics but looking at the thickness there I would say theres plenty of filler lurking in that area. As stated as a temp fix you might be best of getting a rust converter in there and then touch up. If you mess about with it youre going to open up a world of pain! A wrap (once treated) would be a lot cheaper than getting a bodyshop to sort that out
|
| |

1998 Rover 400 Derv |
|
duncanmartin
Club Retro Rides Member
Out of retro ownership
Posts: 1,320
Club RR Member Number: 70
|
1993 Lancia Y10 GTieduncanmartin
@duncanmartin
Club Retro Rides Member 70
|
|
|
|
I treated the roof - kurust gel, followed by filler and then some red paint. The match was horrible, but given I just brushed it into the gap I didn't treat a big area - if you know where to look it stands out like a sort thumb. I've not flatted it back yet either.
And I couldn't resist taking it for a spin this lunchtime. It reminded me why I like it so much (it's a rorty snorty little thing, even if it isn't fast) and all the issues with it - the seat is strange (it feels like it wants me to look at the A pillar), the dashboard is falling apart, the gearshift is somewhat imprecise, and now I've realised that the rear fog lights don't work (there's something odd going on with the switch, hence the investigation). One of the front ones does. Also, strangely, the indicators are twice as fast on the left as on the right - both sides have the required 3 bulbs lighting up though. And the heater isn't up to much.
Maybe when it's not so damn cold I'll start trying to fix those issues (though I suspect the only solution for the dashboard is to take it out, reinforce it, flock it and then put it back).
|
| |
|
|
duncanmartin
Club Retro Rides Member
Out of retro ownership
Posts: 1,320
Club RR Member Number: 70
|
1993 Lancia Y10 GTieduncanmartin
@duncanmartin
Club Retro Rides Member 70
|
|
|
I had half an hour to kill, so I figured I'd see what was holding the dashboard together. Turns out, not a lot! The whole section that is sitting on top of the dashboard in this (terrible) picture is supposed to be held on by 4 screws. 3 were MIA, with both broken holes and missing mounting points, and the last one (the leftmost one) was using a big washer to hold it in place because the hole is missing.  2021-01-03_04-14-01 2021-01-03_04-14-01 by duncancmartin, on Flickr The central (wonky) piece beneath it is supposed to be held by 6 screws - they are still there but the bit that they screw into is broken and there is only one corner that is still attached to the rest of the dash! I undid the screws so it wasn't held in at all, and it still didn't move - all the cables for the heater controls held it in place (I recon that's why that piece of dash hadn't expired)! The main part of the dashboard is bolted fairly securely to the bodyshell, so that's not falling apart (yet), but as well as all the broken mounting points it has some significant cracks in it, so I think it's time it all comes out. I'm thinking I'll try to epoxy some reinforcing steel in (and re-make some of the attachment points in steel, using the bodyshell mounting points as a base if possible), and then smooth it and give flocking a go. If I can't rescue some of the alcantara covered pieces, then I might try flocking them as well (in grey like the alcantara so it's not just a giant sea of black). I'm going to have a look for a steering wheel boss too as I have a nice wheel sat in the loft and the existing one is a bit meh (plus it's a bit far away and only adjusts up/down). Glad I got to drive it today, I don't think it's going to be the work of a moment to get this out and fixed up! |
| |
|
|
duncanmartin
Club Retro Rides Member
Out of retro ownership
Posts: 1,320
Club RR Member Number: 70
|
1993 Lancia Y10 GTieduncanmartin
@duncanmartin
Club Retro Rides Member 70
|
Jan 16, 2021 19:19:10 GMT
|
I've been doing little bits and pieces on this, but today I got on with it properly. So far, this is what I've managed to remove: 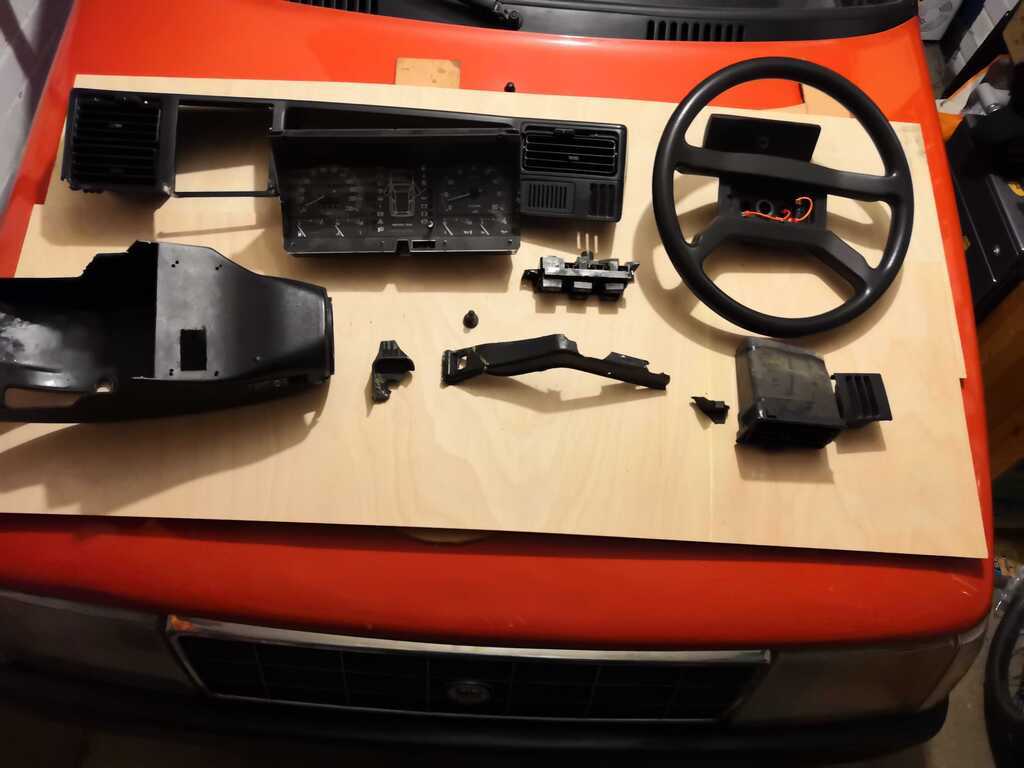 Obviously, various bits of flimsy plastic broke while I was removing things, the most annoying being the vent at the edge of the dash. The manual says "prise it out" and shows a picture of someone levering it out with a screwdriver, but it snapped in half (and a piece came off the front as well). The only thing that is stopping me from removing the dashboard now obviously aside from the one screw I probably didn't know existed and so will rip out some more plastic) is the heater controls. They are loose, but there are 3 cables that go through grommets in the dash and are going to need to be removed from the back of the control unit (the manual backs me up on this one). However, I can't work out how to disconnect them (on this the manual is less helpful). Anyone got any ideas? This is what it looks like behind the heater: 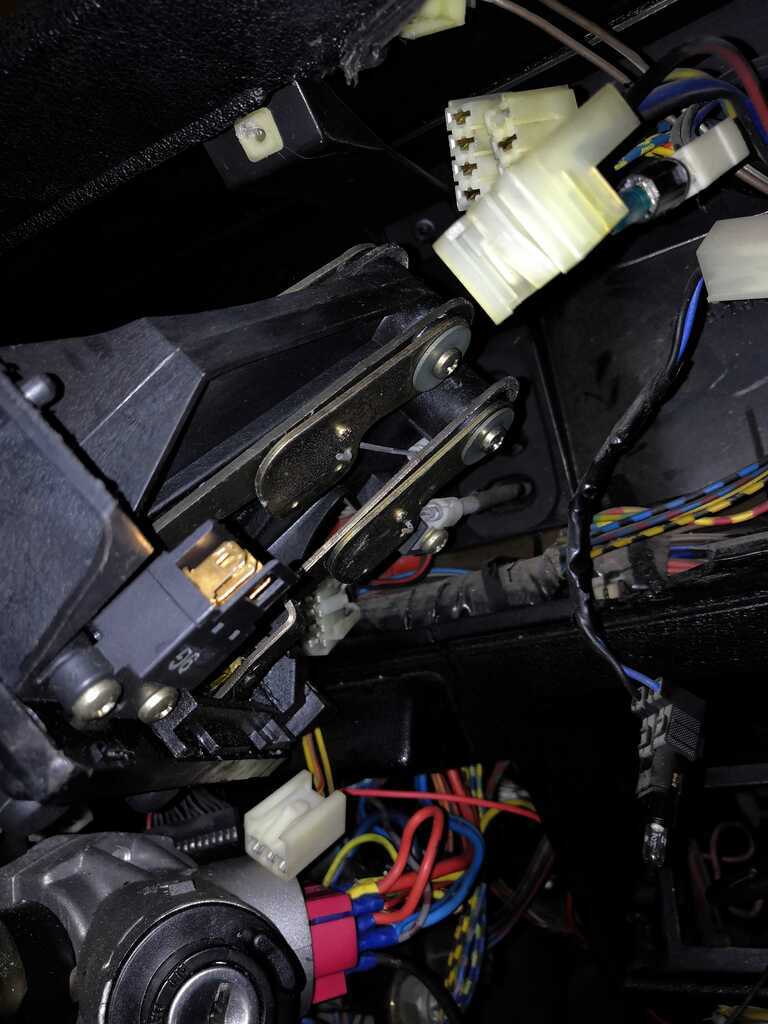 Once the dash is out, then I can look at how I'm going to hold it all together (need to order myself some fibreglass) and also how I recreate mounting points so it all goes back together again properly. This is what the dashboard looks like now. The Stereo turns on and changes radio channel, but wasn't making any noise in the car, having pulled it out of the dashboard, I discovered why. All the output leads weren't connected to anything! The install is a right shoddy job, the wires are just soldered up and individually taped, so when the dashboard is back together I'm going to have to restore some semblance of order and connect them all back through a sensible block, but that can wait for now. 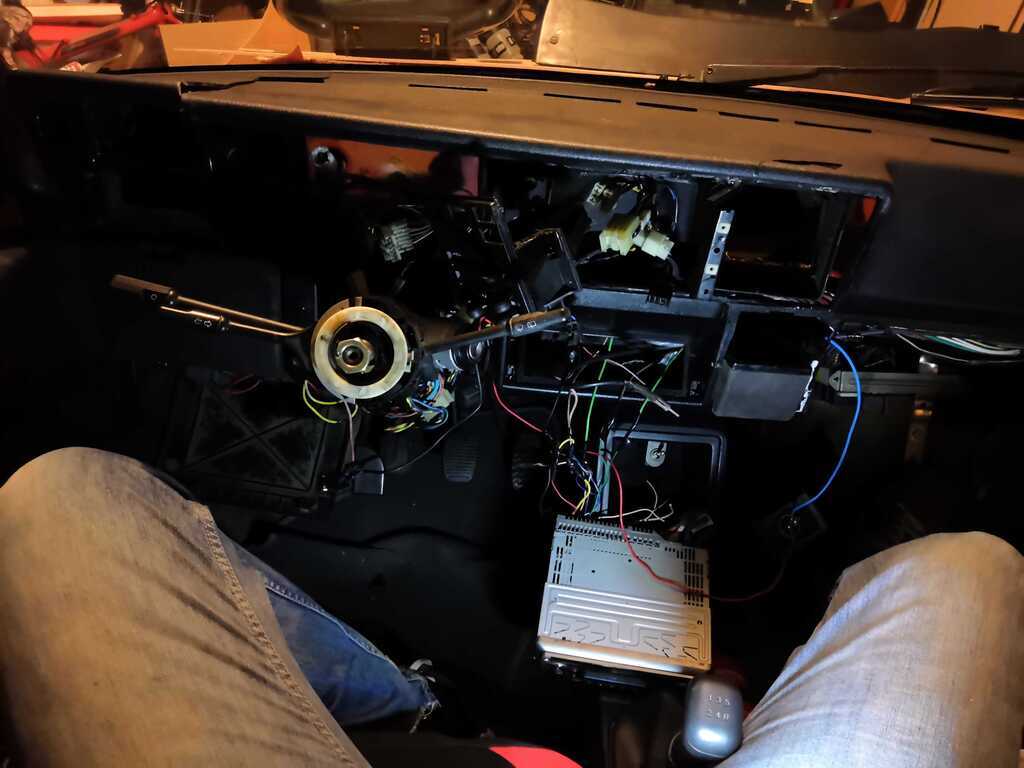 |
| |
|
|
|
|
|
Jan 16, 2021 19:33:42 GMT
|
|
I'm fairly sure that if you undo the screw that holds the outer cable sheath then you'll find the inner cable has a 'z' shaped kink at the very end, with the outer sheath free you should be able to manoeuvre the inner cable out of the hole it threads through.
I hope that makes sense.
|
| |
|
|
duncanmartin
Club Retro Rides Member
Out of retro ownership
Posts: 1,320
Club RR Member Number: 70
|
1993 Lancia Y10 GTieduncanmartin
@duncanmartin
Club Retro Rides Member 70
|
Jan 16, 2021 19:38:32 GMT
|
Yeah, I could see the Z shaped bit. I wasn't sure if I was supposed to get that out through the hole or if there was some other way of doing it. Also, the outer cable sheath stop is cracked on one of them (obviously). I'll give that a go tomorrow, thanks.  |
| |
|
|
duncanmartin
Club Retro Rides Member
Out of retro ownership
Posts: 1,320
Club RR Member Number: 70
|
1993 Lancia Y10 GTieduncanmartin
@duncanmartin
Club Retro Rides Member 70
|
|
|
I had a go at this yesterday. The Z shapes on the end of the cables are the wrong way around (the housing gets in the way of moving the housing to negotiate the first turn), so that was really tricky and I ended up putting it back together again so I didn't break anything. Someone suggested on the LMC forum that it's easier to undo the cables at the other end, so I had a look there. Once you get the battery, spare wheel, jack etc. and the heat shield out (that was a mess of broken plastic and old insulation - wonder if I can create something a bit better when it has to go back in), you are left with this: 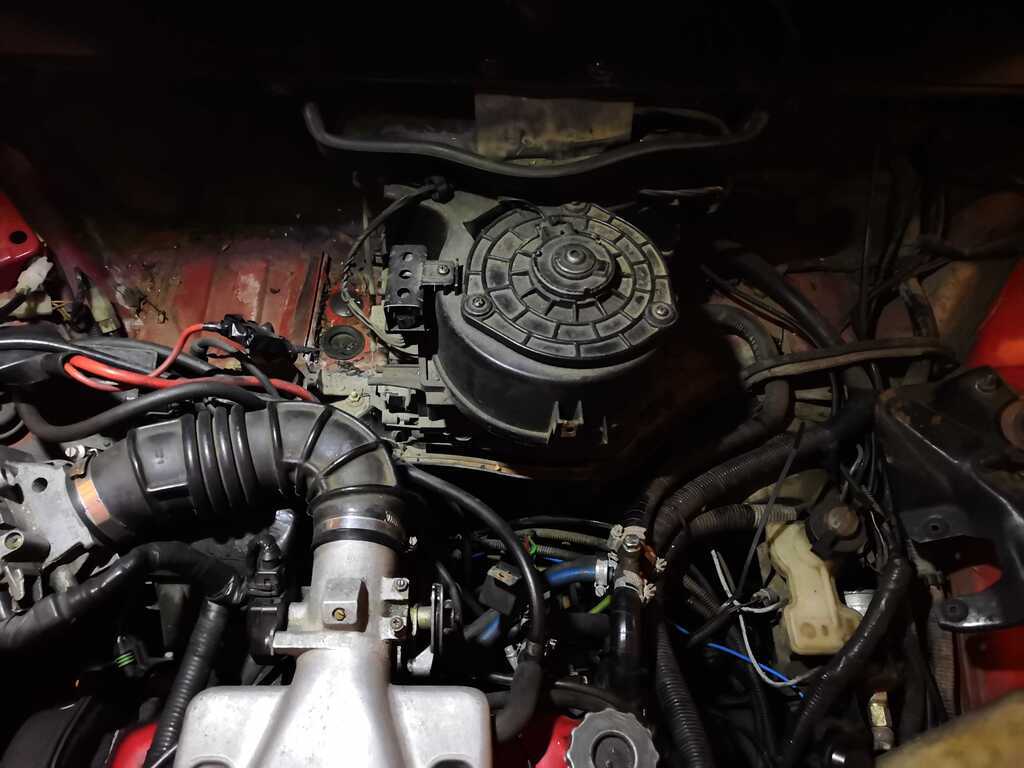 There's pretty easy access to the cables - 2 on one side and one on the other and they should just pull straight through and let me take the heater controls out through the dashboard: 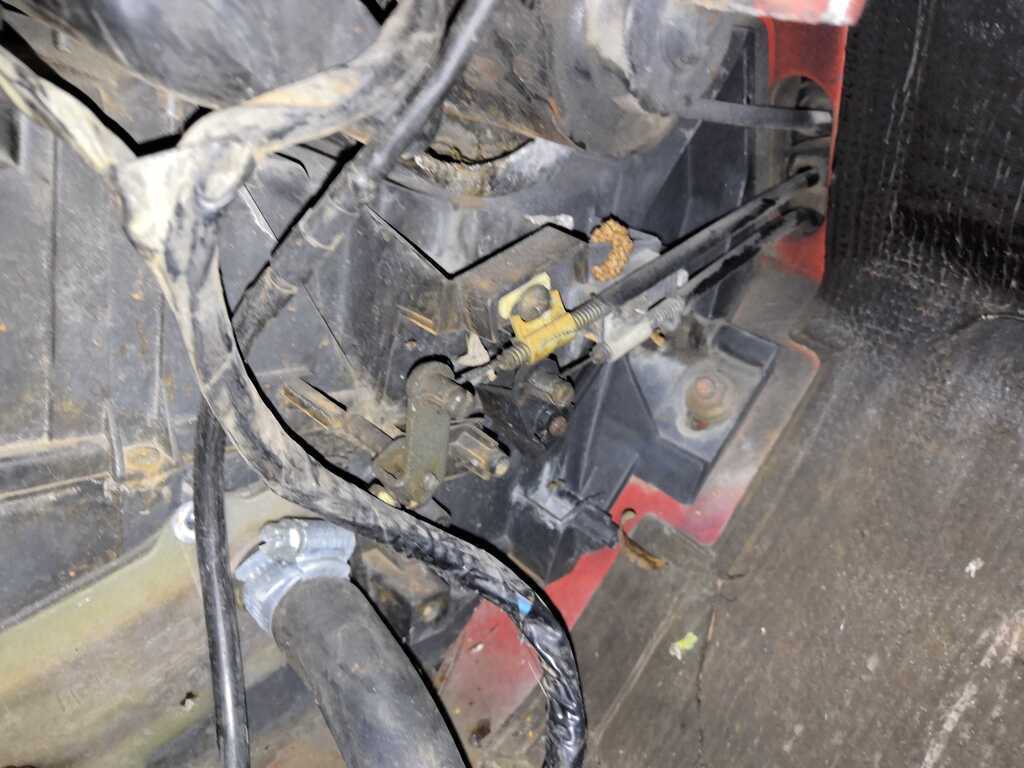 I didn't have time to complete this, but hopefully next time I can get this bit done and remove the dashboard. |
| |
|
|
|
|


 Might try and drill it out to fit - will have to see.


