|
|
|
Apr 27, 2021 11:39:26 GMT
|
Thanks for the comments guys! “140” Question is does she do a burn out? 😜 I am on my way..... You can make the 307 sort of respectable for not a lot of cash - grab a cold snack and watch Derek show you how.... Rare to see a 4 pillar less 4 door chevelle in the uk, would look epic with an adjustment in altitude and a set of big wheels. Along for the ride. P.  Big fan of vice grip garage! I've already been collecting parts to fix the horsepower issue, just trying to get all the boring stuff out of the way first. |
| |
|
|
|
|
|
|
|
Apr 25, 2021 19:53:49 GMT
|
Cool. Get the V55/5 sent off as soon as you can in that case. V55/5 sent off monday last week - lets see how efficient the DVLA are feeling! |
| |
|
|
|
|
|
Apr 25, 2021 19:52:53 GMT
|
First job was to get the thing running and see what does and doesnt work. It was sold as a running and driving car, but the shippers couldnt get it running in the UK. It ran on brake cleaner, so I chucked a couple of gallons of fuel into it and she fired right up! Next was a quick drive around the housing estate - again all seemed good, transmission works, brakes work, even the parking brake works well! Checked all the lights and they all work as well! so far so good then. Heres a few more pics of it sat on the drive in the sun. 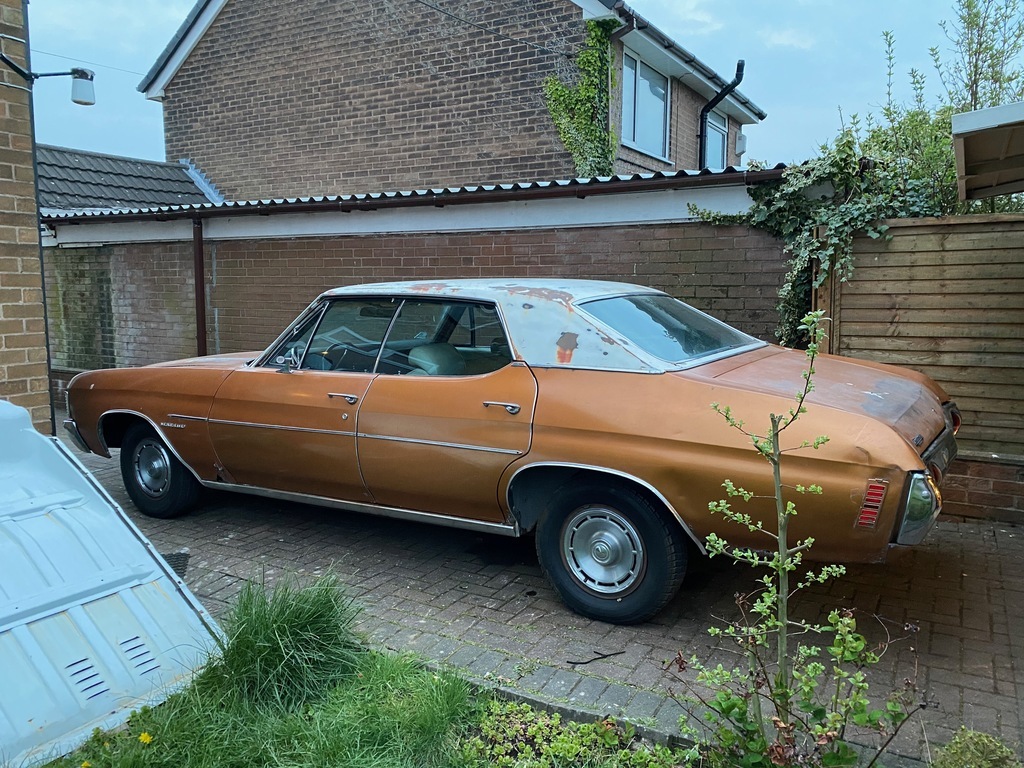 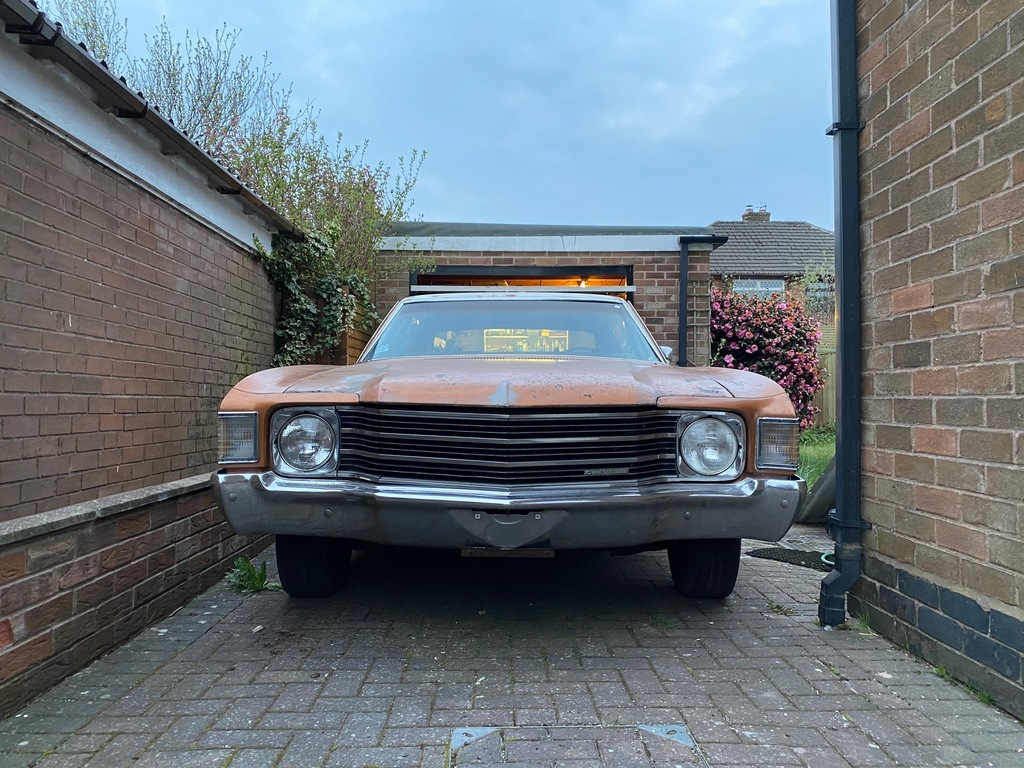 So first impressions are pretty good, but time to dig a bit deeper. The engine looks pretty good, the air filter is brand new, as is the oil filter but the oil, although I doubt its done many miles, looks decidedly old so a service is clearly required. The distributor has been replaced with a later HEI unit from any number of 80s GM vehicles, and has some good quality leads fitted, so we'll call that good enough. On the running gear front, the brakes look to have been replaced recently, including the hardlines, flexis and parking brake cables, but I did find this very dry looking front wheel bearing, so added that to the order list.  Also, all of the weatherstripping around the side windows is crumbling away to nothing. Since it does occasionally rain in the UK i figured this was a fairly high priority so ordered this as well. Amazingly there is a company that still makes weatherstripping for a 72 Chevelle 4 door hardtop, but man, it aint cheap! 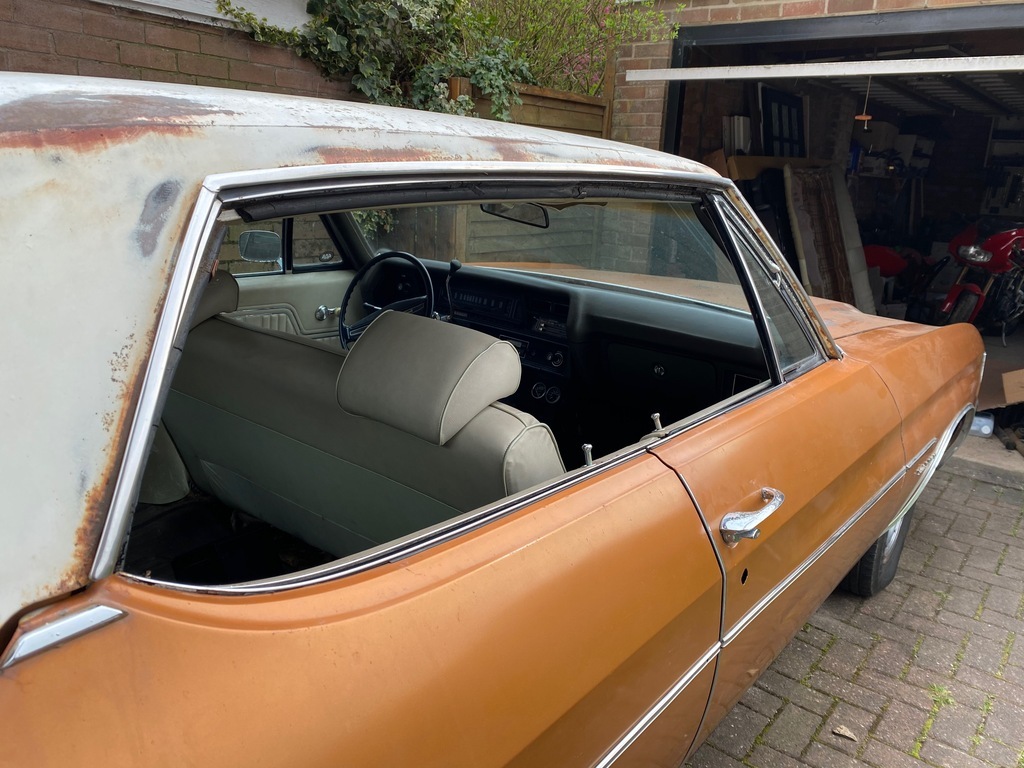 Next step is check for rust - I knew it needed a boot floor (the seller provided a boot floor patch panel), so I thought that was probably a good place to start. 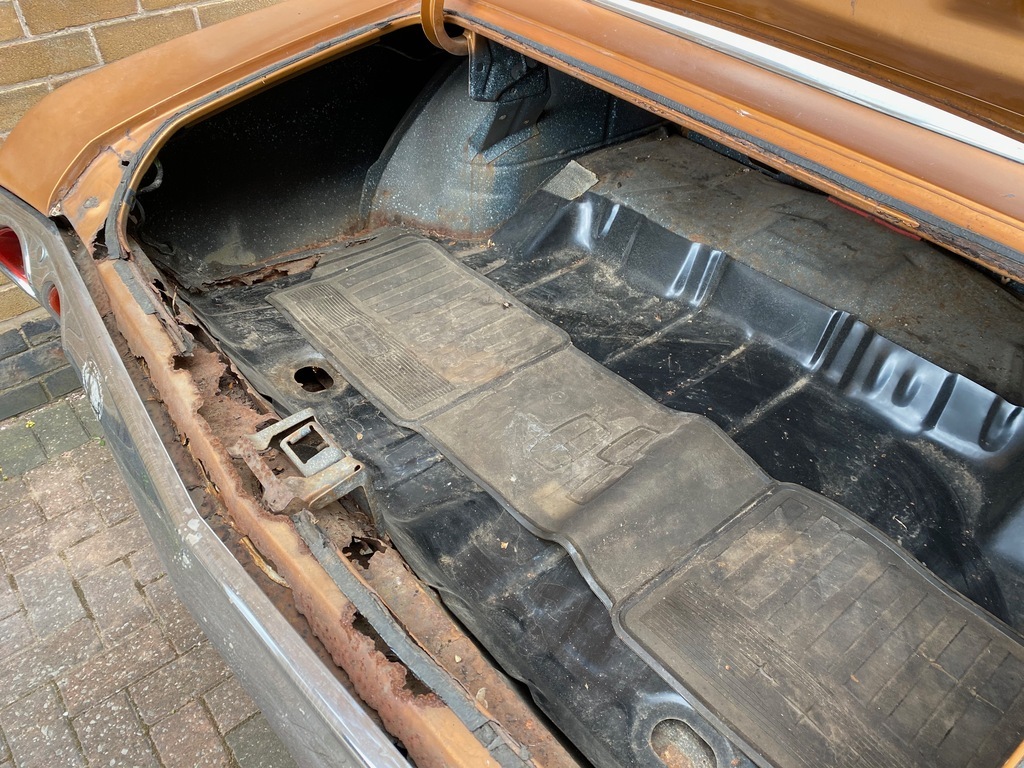 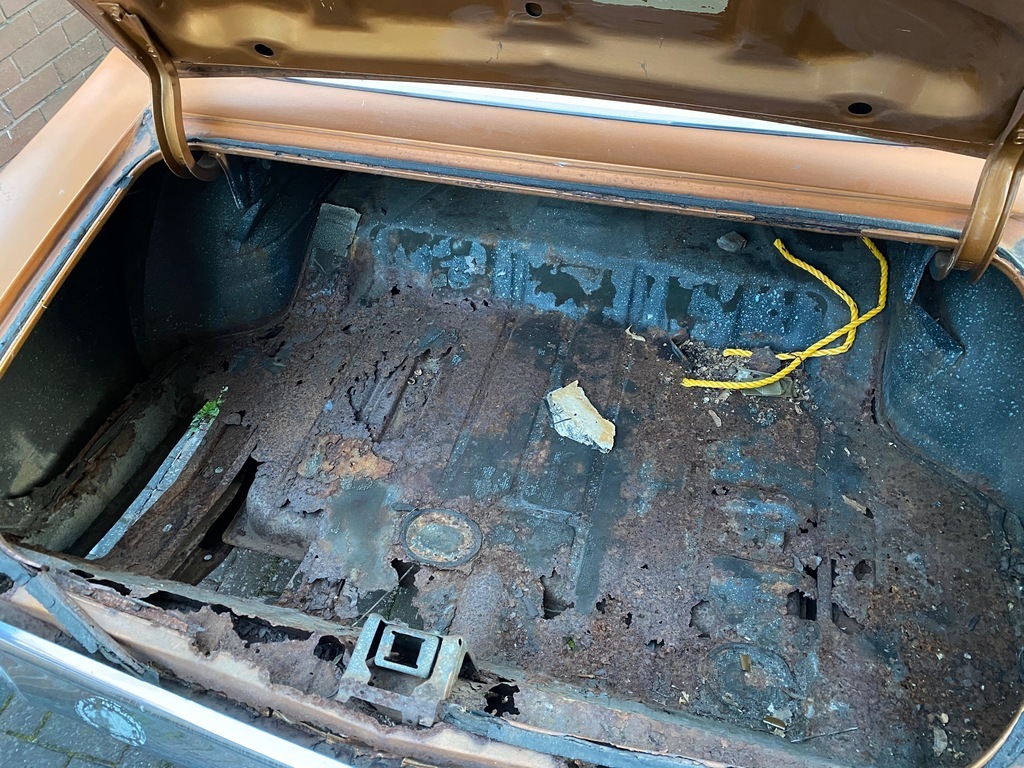 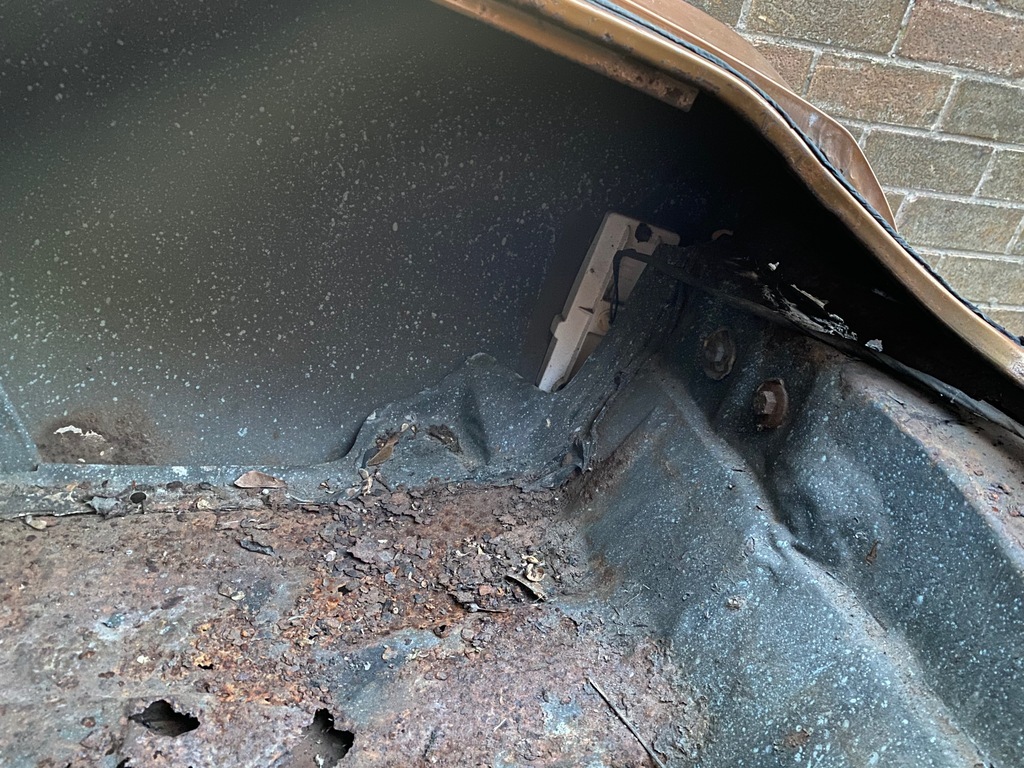 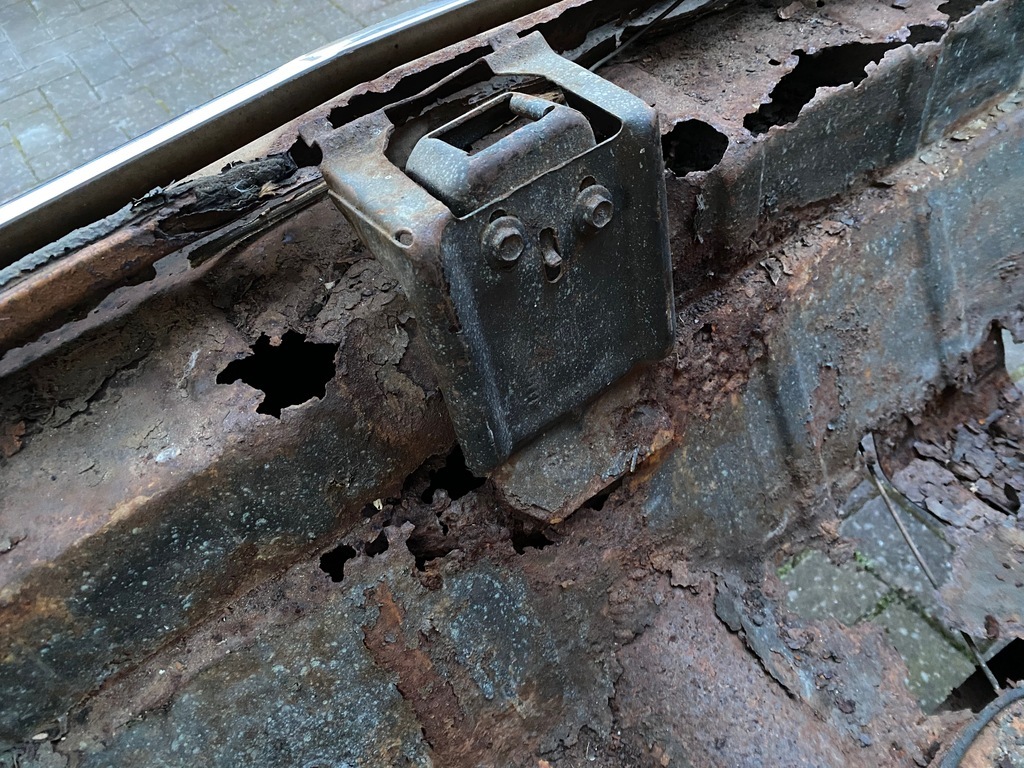 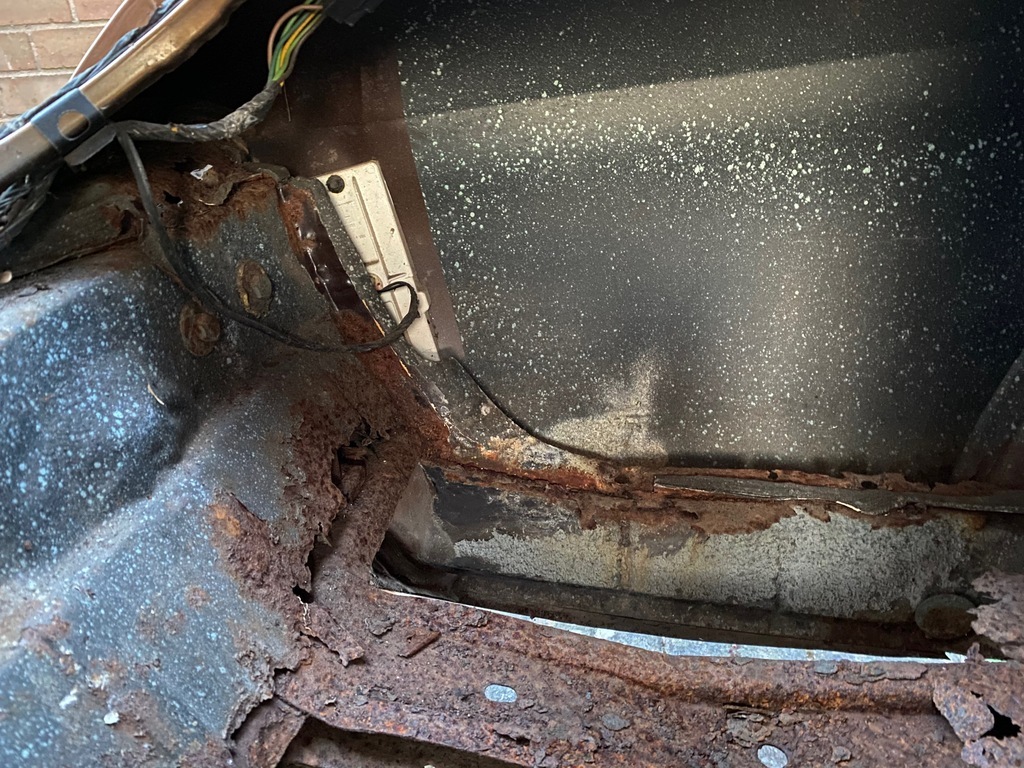 That is some fairly advanced weight reduction... The patch panel will cover most of it, but the very outside edges will need to be fabricated, as will several parts near the boot catch. I have ordered the rear tail panel (bit that holds the boot seal along the rear edge) as honestly there isn't enough left to make a template from! It would be nice to take luggage to goodwood and not have half of it fall through the boot floor, so i've started stripping the rear for a mini weldathon. Onlt 1 bumper bolt needed some persuation, but annoyingly both tank strap bolts will need cutting off. 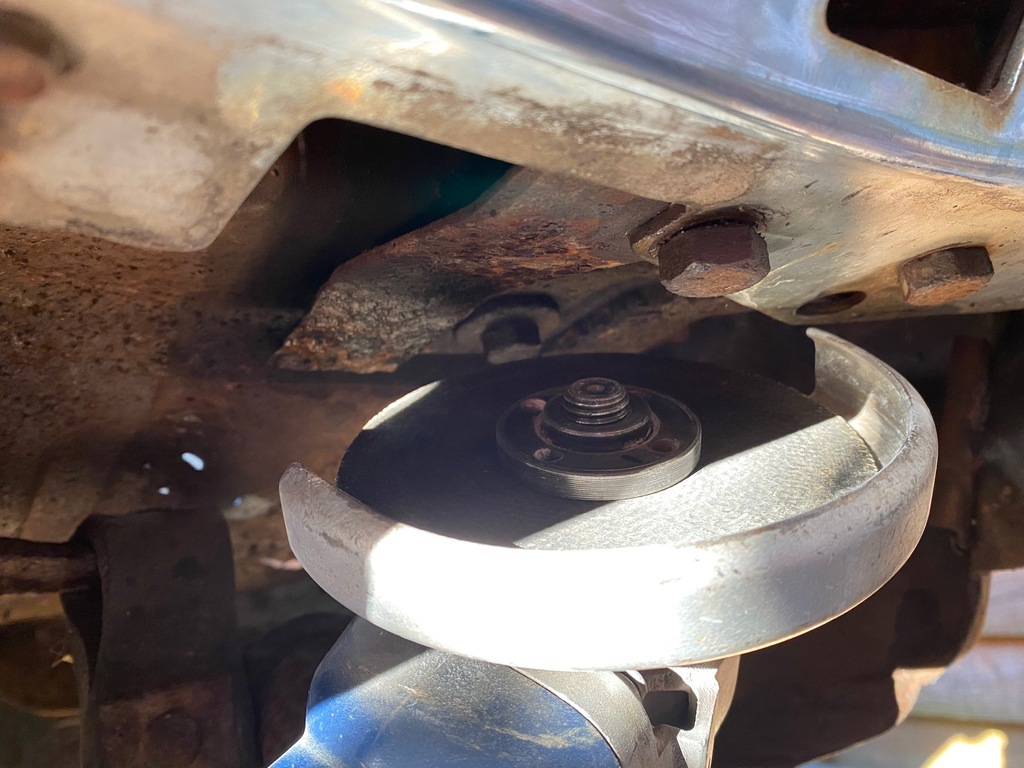 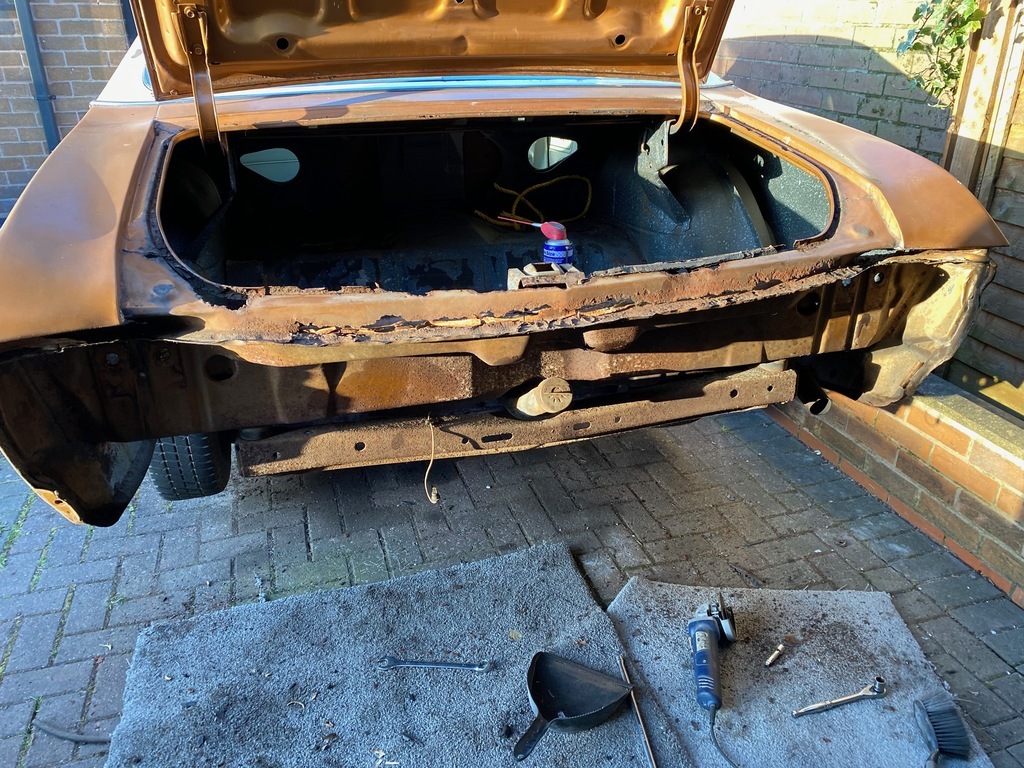 That is about it for now, i'll update you as parts arrive/things get done... |
| |
Last Edit: Apr 25, 2021 20:01:16 GMT by Splitty456
|
|
|
|
|
Apr 25, 2021 18:42:47 GMT
|
This is my latest project, a 1972 Chevelle Malibu sports sedan. Having fixed up and sold a couple of my retro cars to fund a house deposit, I found myself wanting another old car to play with, and for the first time ever I actually have some decent parking and a garage to work in. I've been after something american for a while now but always found them a bit too expensive, so I started looking into imporing one myself. The process actually looked fairly straightforward, especially for an older car, and with car prices in the states being so much lower I decided that was the way to go. I wasn't overly fussy about what car i wanted really - there are lots of old american cars i'd like to own - but in the end I settled on a 68-72 GM A-Body (Chevy Chevelle, Pontiac LeMans, Oldsmobile Cutlass & Buick Skylark). Theres still plenty of these things knocking around in the states, and aftermarket support for them is excellent, so after a bit of searching I purchased a 1972 Chevy Chevelle Malibu Sports Sedan and set about getting it shipped over. Here are a few pictures from the advert. 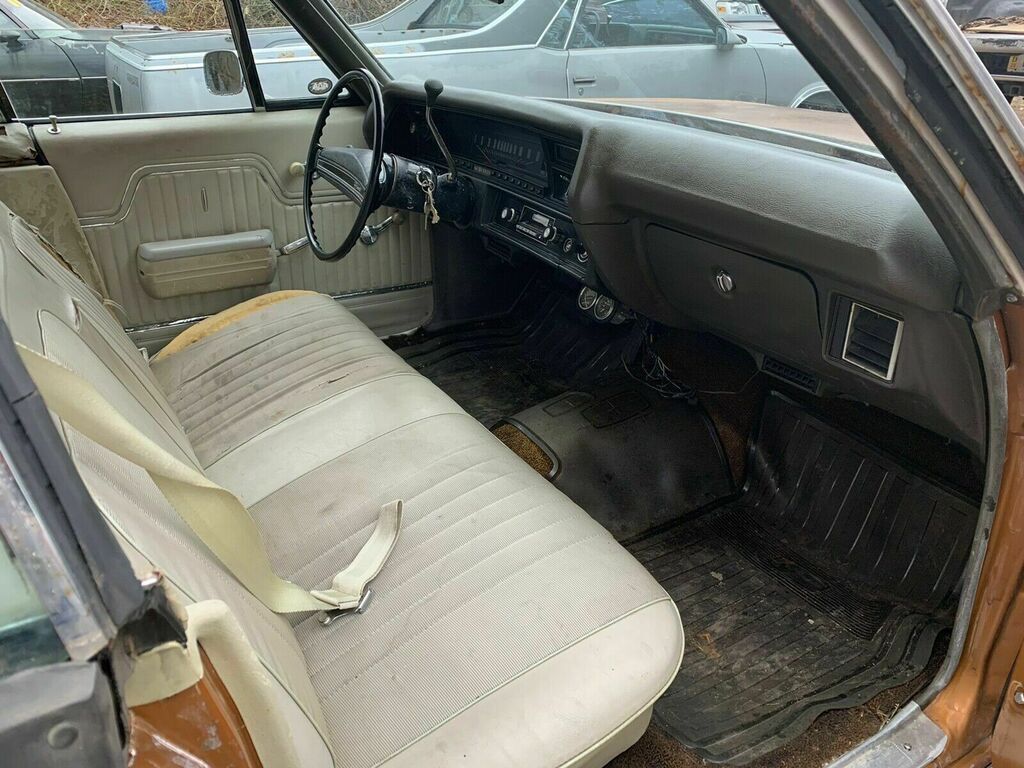 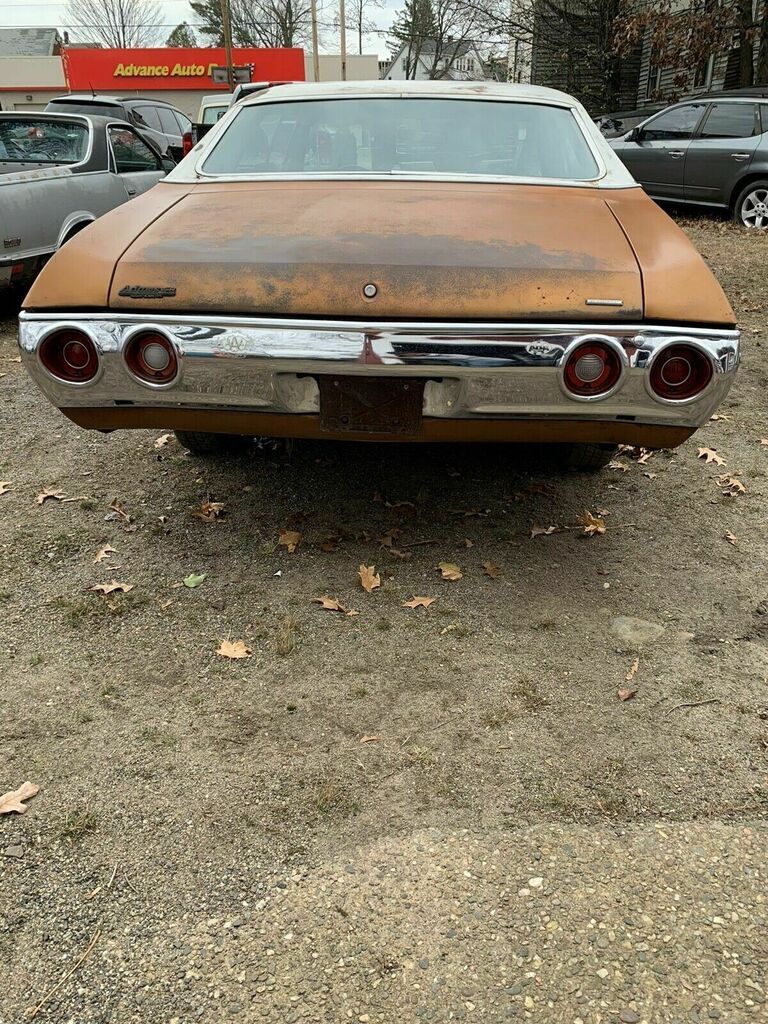 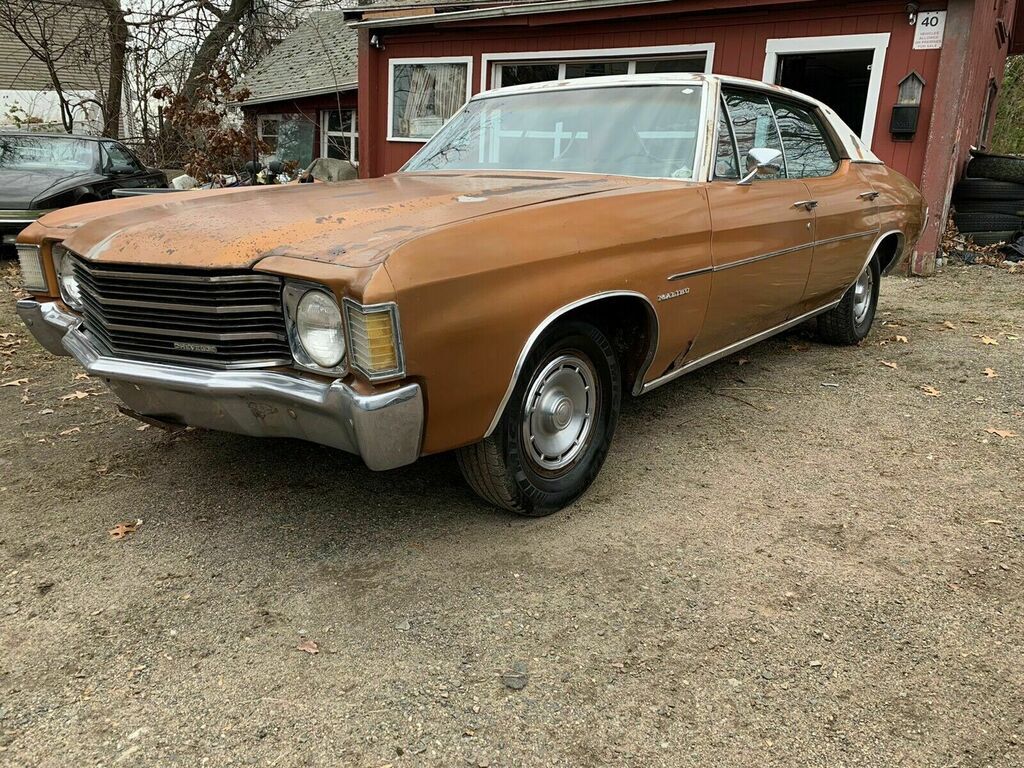 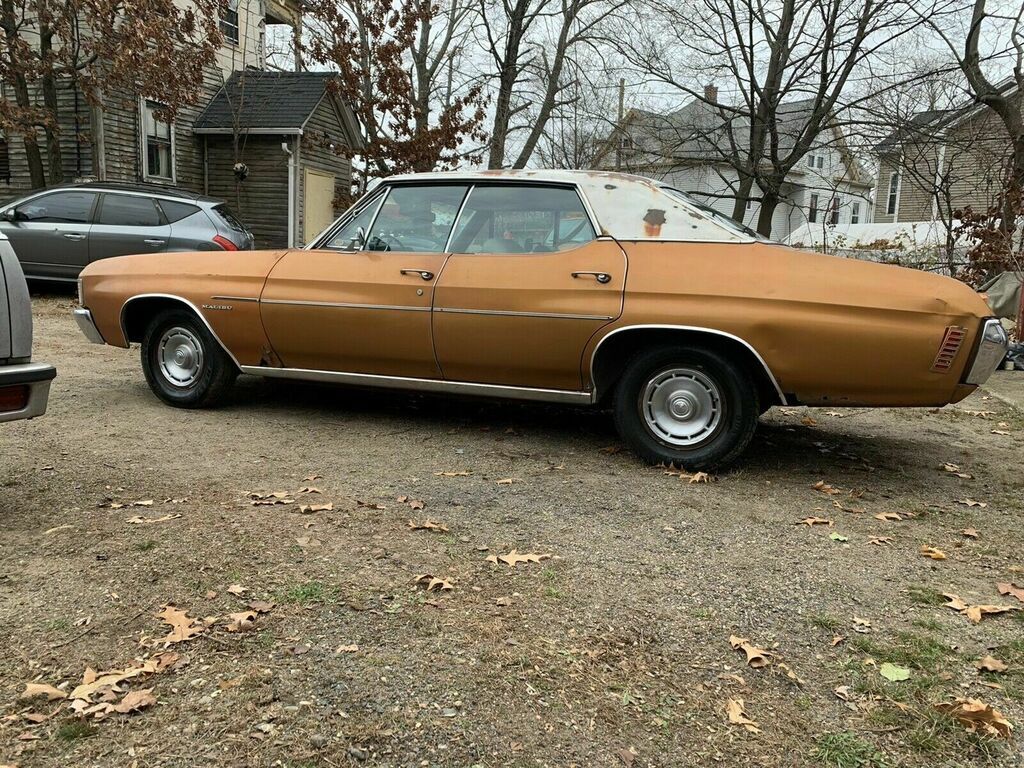 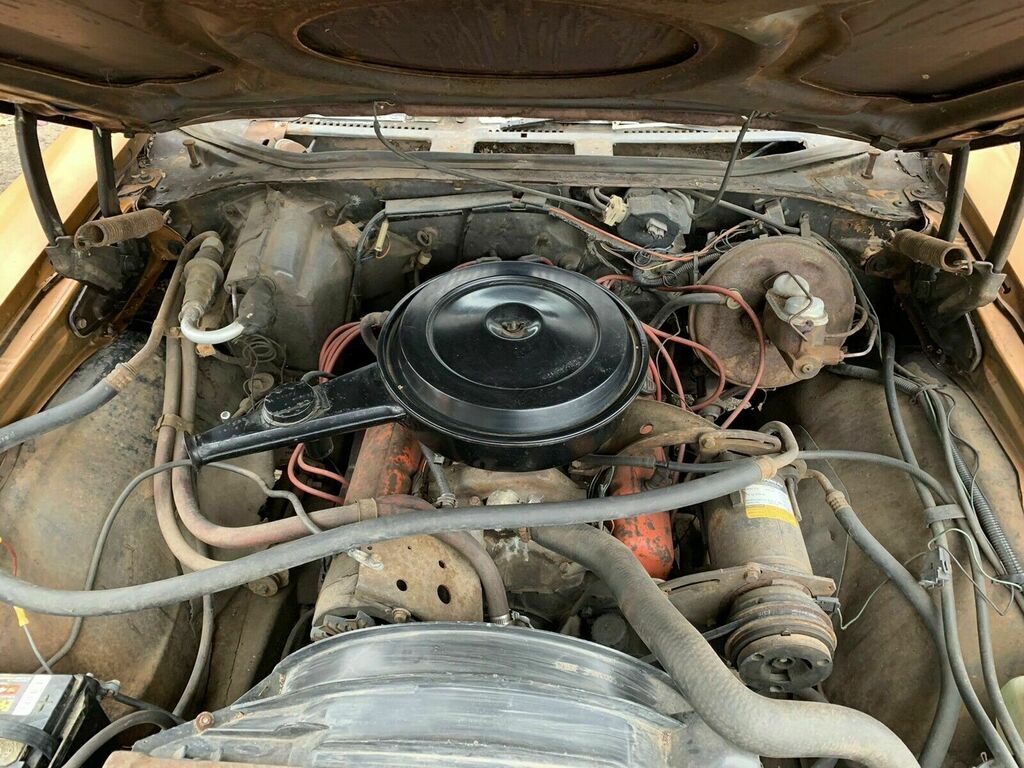 It's generally pretty undesirable being a 4 door, but that also means it's much much cheaper than a 2 door of similar condition. It's also 'only' a 307 or 5.0L V8, 72 was the first year for unleaded fuel and Net power ratings, so this 307ci powerhouse pumps out a full 140hp with its 8:1 compression ratio.  I bought the car back in Jan, and with so much uncertainty over shipping delays and port congestion I wasn't really expecting to see the car for a while yet. I knew it was on a ship and due to be in port 2nd week of april, but hadn't heard anythign from the UK side of the shippers. Then I checked my junk email folder to find about 6 emails from them confirming they had my car, it had cleared customs and was due to be unloaded from the container in the next day or so. So I sorted out payment for them and for the customs charges and organised collection of it from their faciity in Milton Keynes last friday. 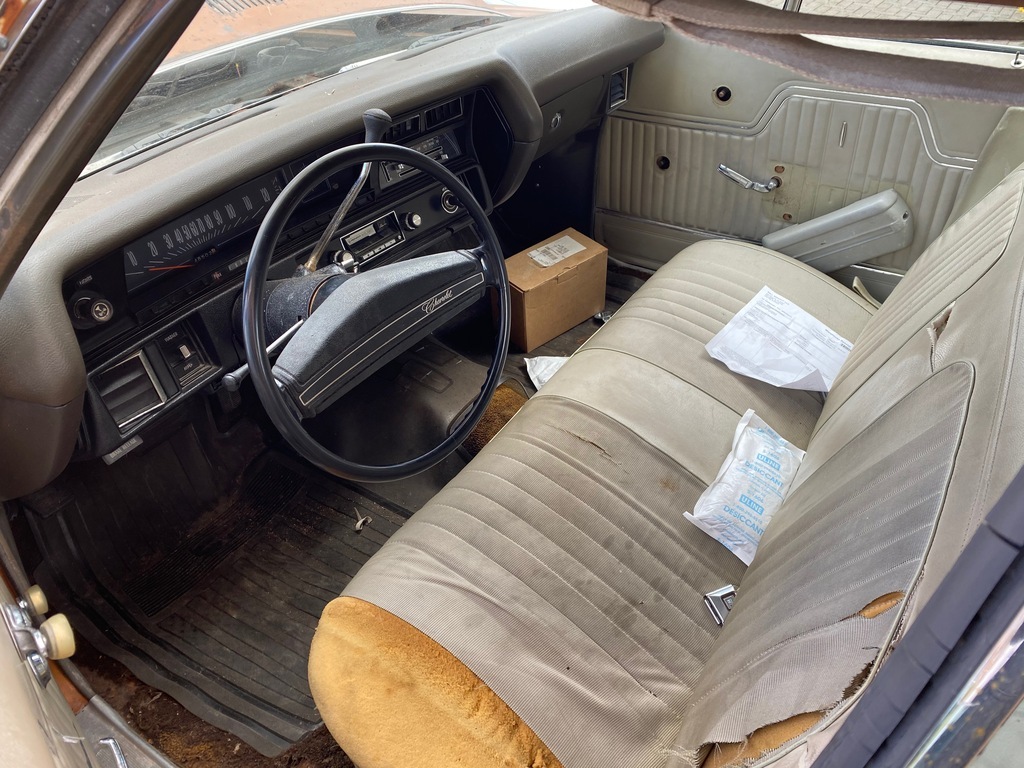 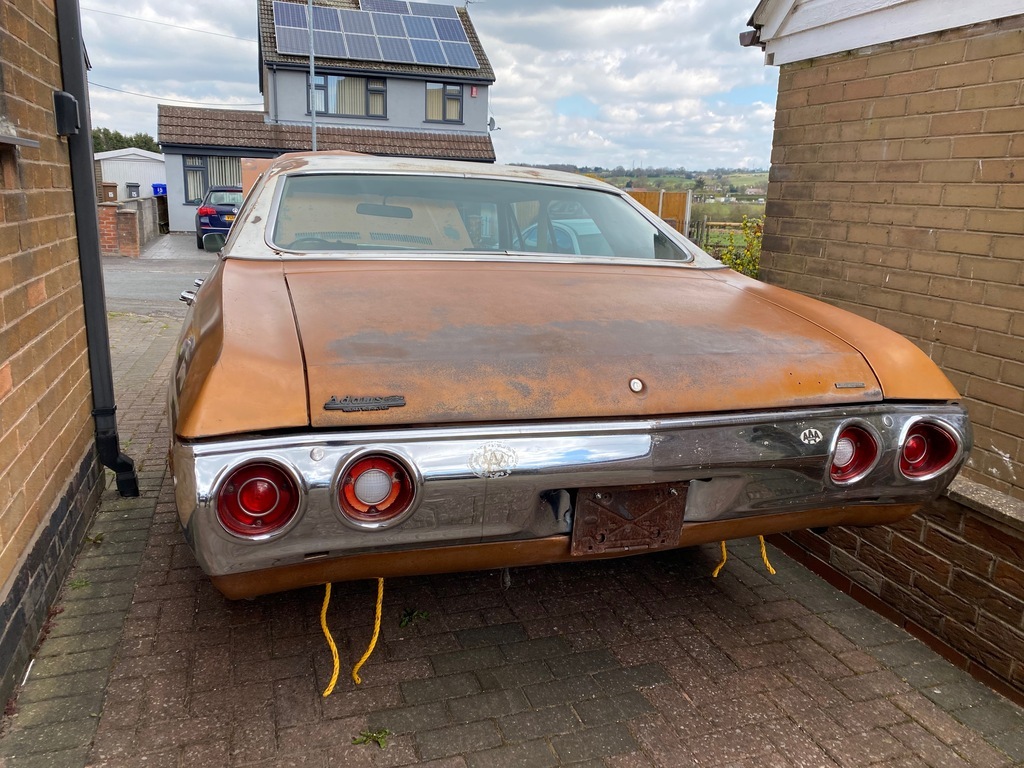 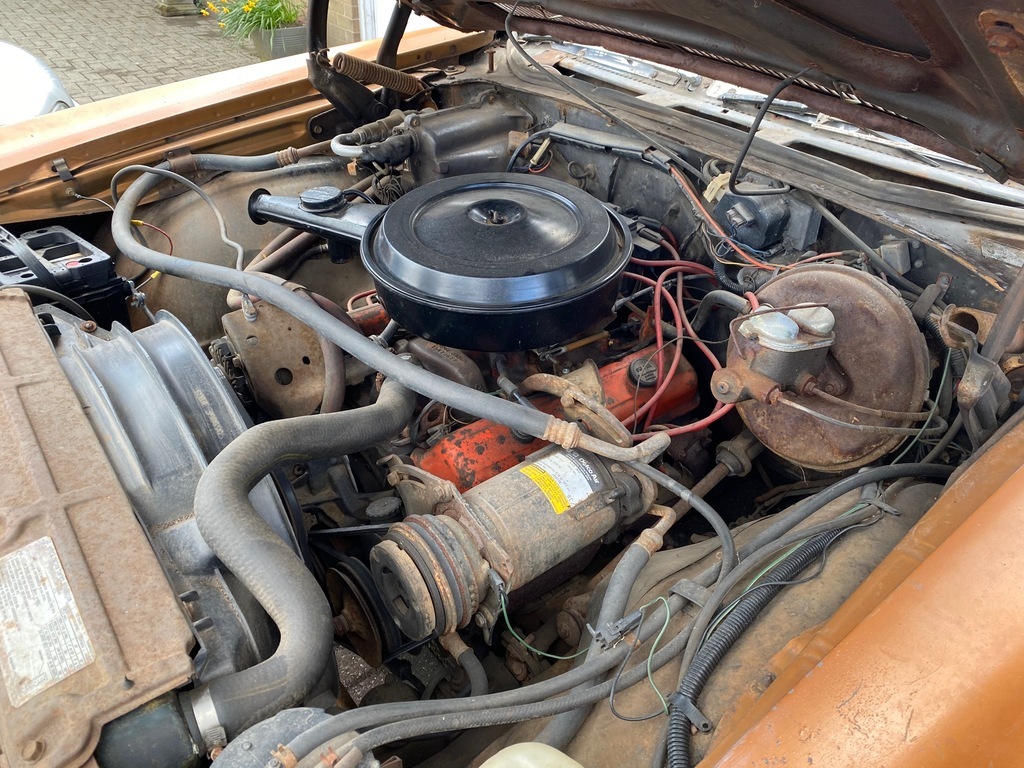 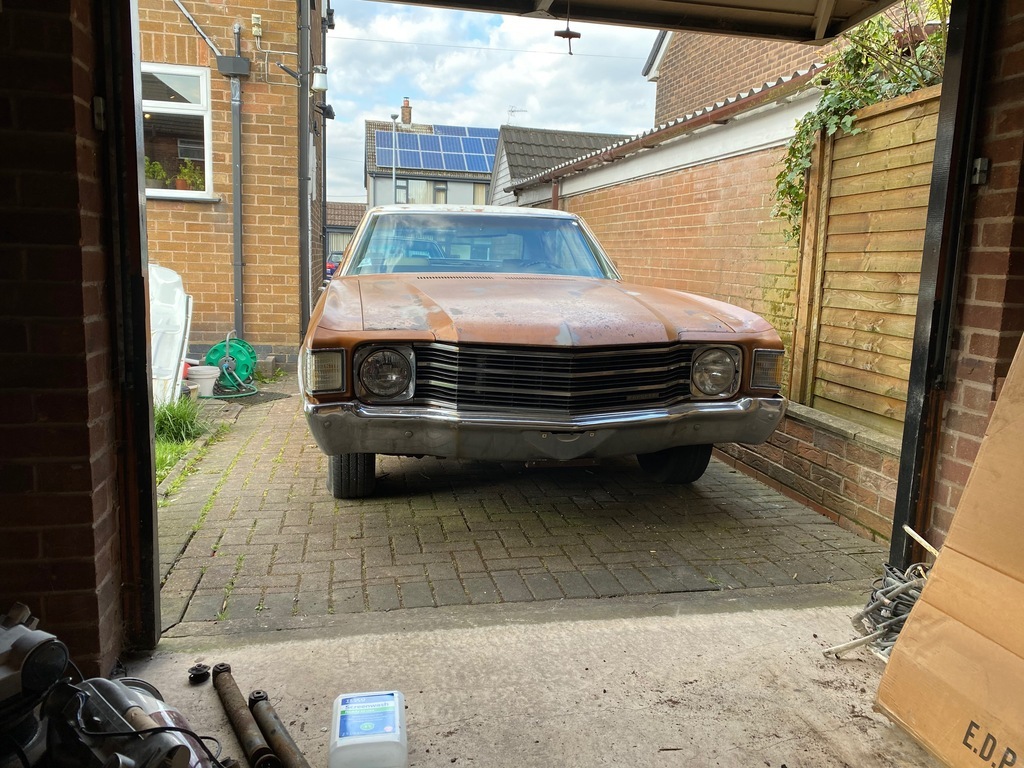 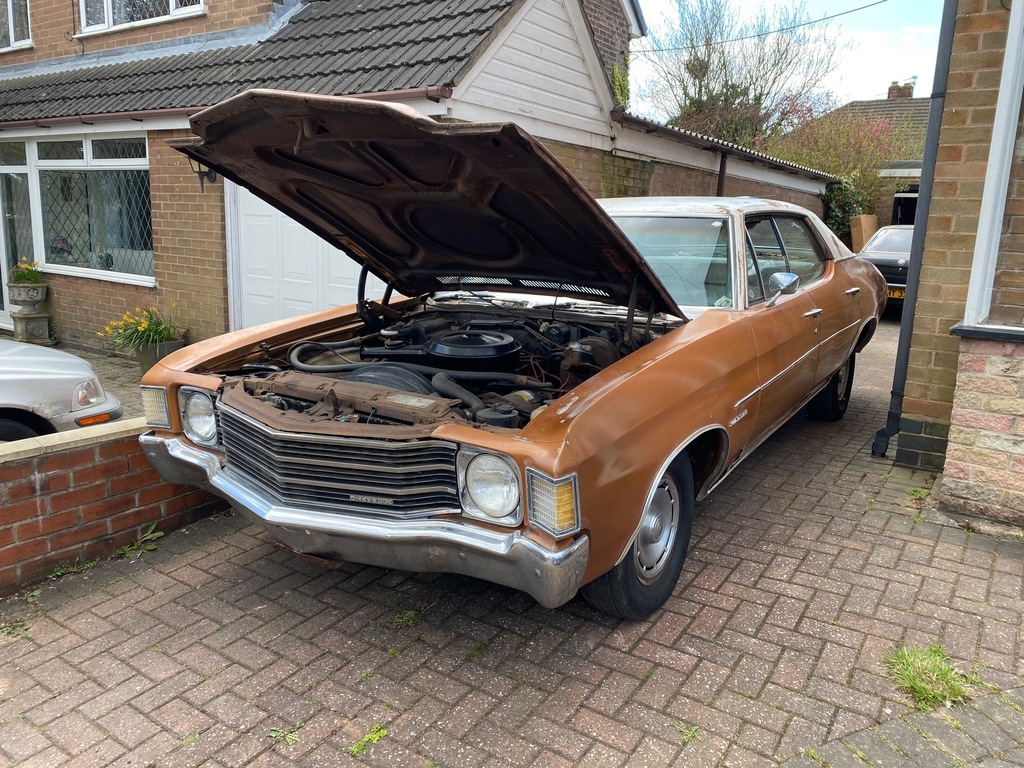 Now, this all happened quicker than expected, and I think theres even a chance I can get it to the weekender, so theres the challenge: get this chevelle registered, roadworthy and a bit cooler looking and take it down to goodwood! |
| |
|
|
|
|
|
|
|
|
Thanks! That interior was my lockdown part 1 project, it used to have a black textured vinyl dash and door cards with dodgy aftermarket speakers and it just didn't feel very 'Porsche' to me...
Also, thanks for posting the pictures, I couldn't figure an easy way of doing that on my work laptop!
|
| |
|
|
|
|
|
|
|
1997 Porsche Boxster 2.5 for sale 176k miles, MOT till october (no advisories) Lovely little porsche, only for sale as I fancy something different. Zenith Blue paintowrk with contrasting Boxster Red interior. Overall in good condition, high milage but has clearly been cared for by it's previous owners. It's mechanically very sound, the body is very solid indeed but does have a couple of minor paint blemishes and stone chips. I've done quite a bit to it in my ownership, mainly fixing little issues and generally cleaning it up. Apparently the 12th one imported into the country and rare being a Stuttgart made car (I believe most Boxster production was moved to austria when the 996 was launched) Bad Points: High Milage (but still going strong) Neither of the key remotes work - a new one will be required from porsche. The central locking and alarm still work fine using the key in the door so i've not bothered getting a new one. Small tear in the passengers seat Wheels could do with a refurb Good points: 18" 'Carrera' staggered wheels with 4x new Bridgestone Potenza tyres in April this year. New Renolite Flexglas rear window fitted this year Both window regulators replaced last year New exhaust manifolds and all bolts/clamps replaced - if you've ever owned a porsche you'll know rusted exhaust bolts are a common issue Red sports wingback seats, and red leather dash/doorcards Roof works perfectly and in good condition - I think the tension rods must have been replaced given the age as it seems to be the original roof De-ambered lights all round Facelift rear bumper/spoiler fitted Serviced earlier this year, including water pump, coolant and idler/tensioner pulleys All tuning forks and rear wheel bearings replaced before the MOT this year. Dual row IMS bearing Overall a well cared for example of the original Porsche boxster, drives very nicely with most big jobs already done and long MOT ready to be enjoyed Link to Ebay ad for pictures: www.ebay.co.uk/itm/174551150609?ssPageName=STRK:MESELX:IT&_trksid=p3984.m1555.l2649 |
| |
|
|
|
|
|
May 29, 2020 21:26:45 GMT
|
Well I haven't updated this in a while! I think I left off 2 weeks before RRW2019 where I had pretty much wrapped up the diff rebuild. So with 1 clear weekend before RRW I decided to rip apart the front suspension to fix the judder I was getting through the steering. Reading around on the internet this seems to be a common thing on E21s with lower suspension and wider wheels, so given the time pressure i went ahead and did everything i could think of. First off I polybushed everything, which isn't really that much on an E21 - 2 lower arm bushes and the anti roll bar bush on each side. 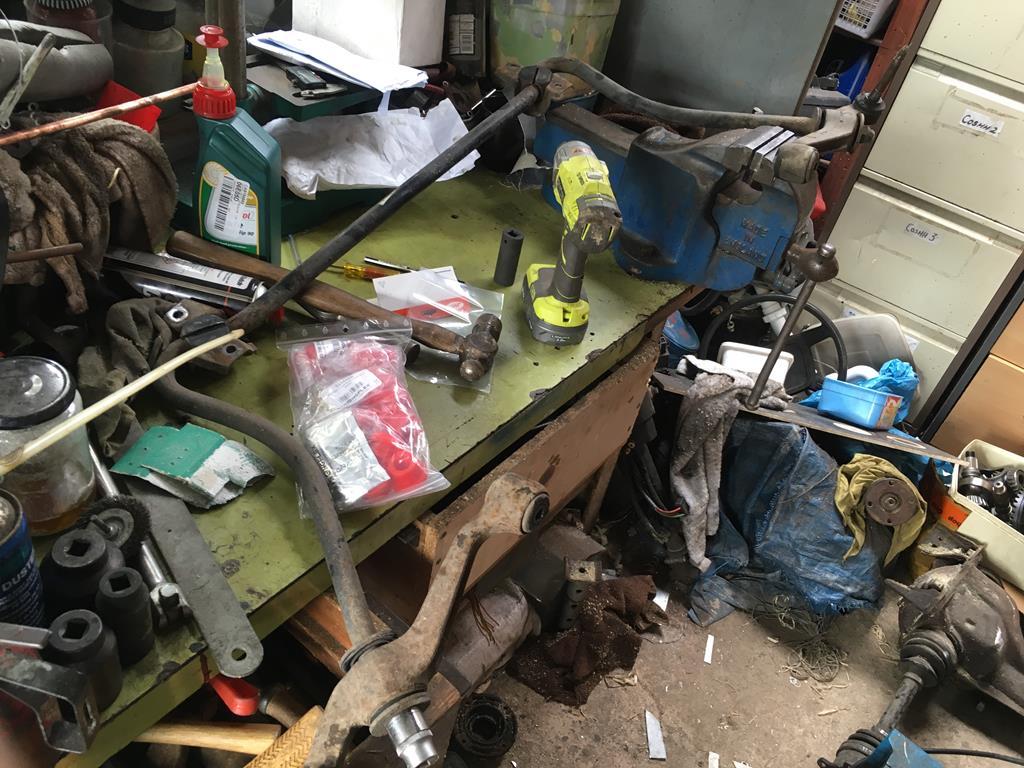 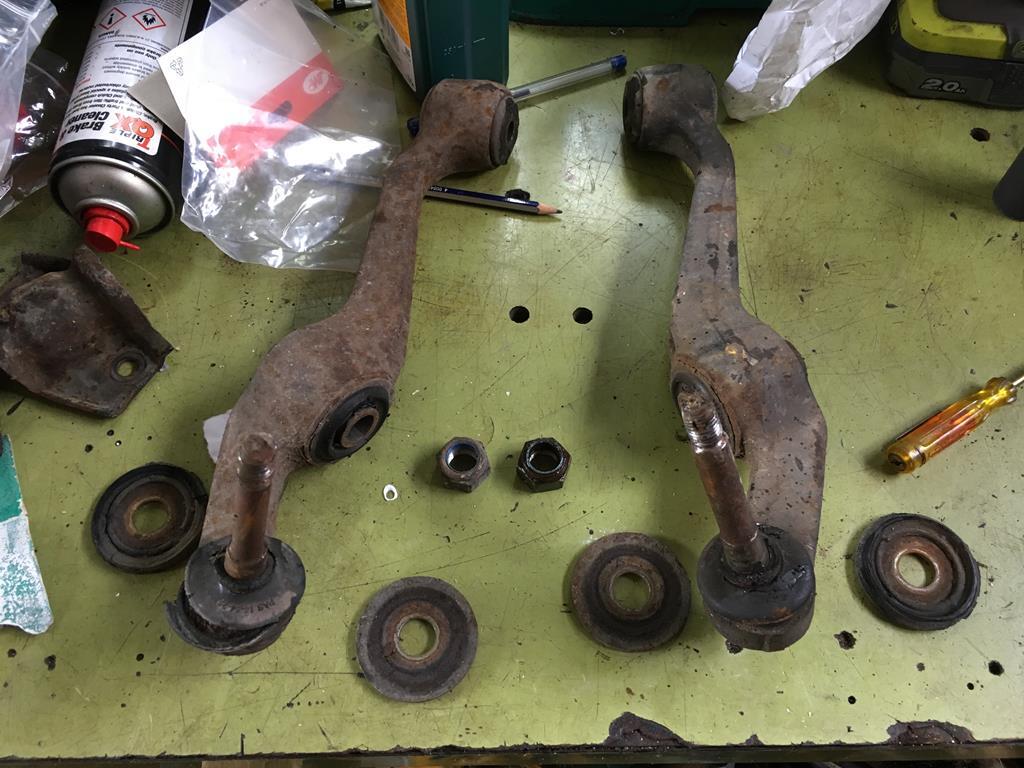 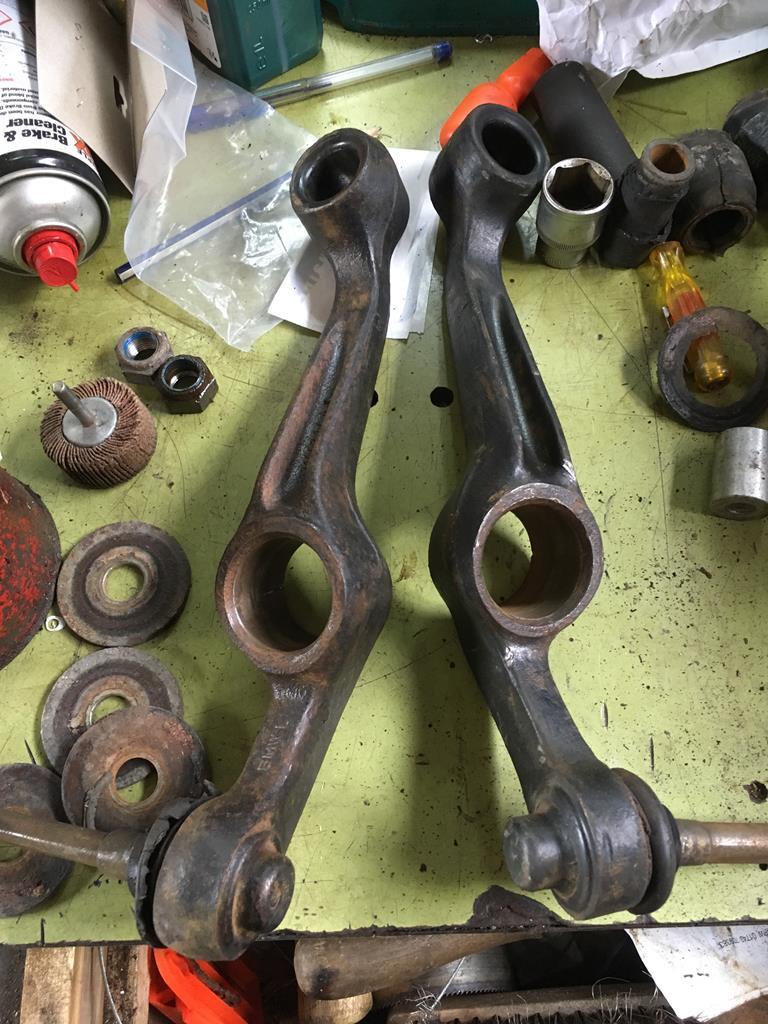 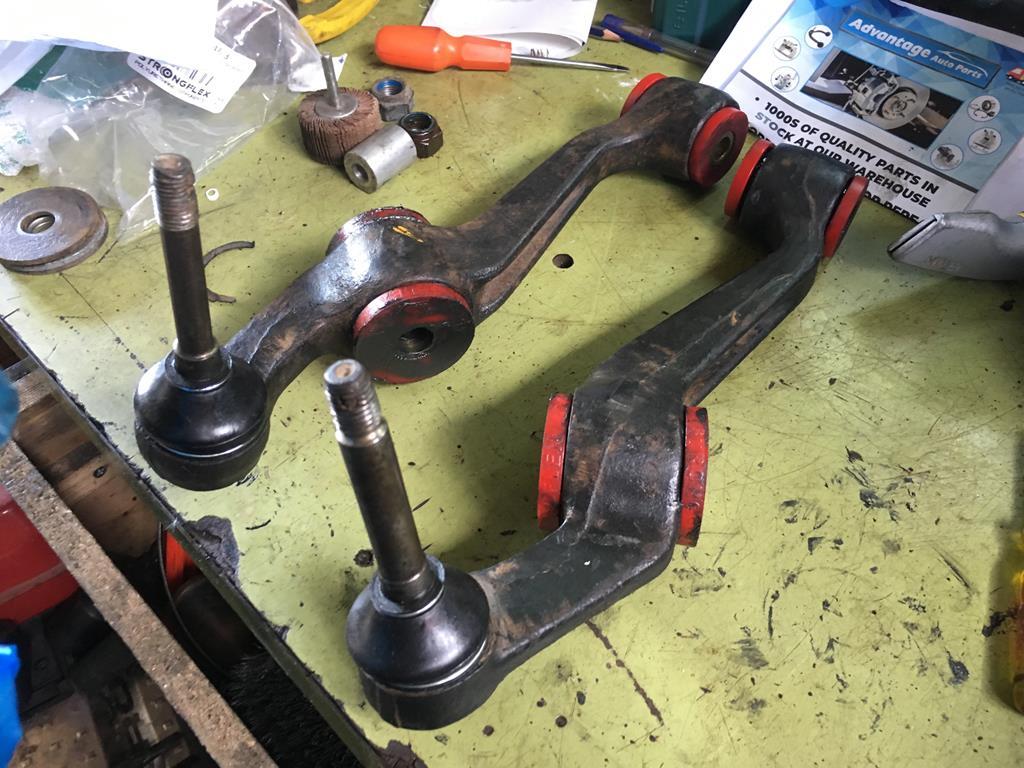 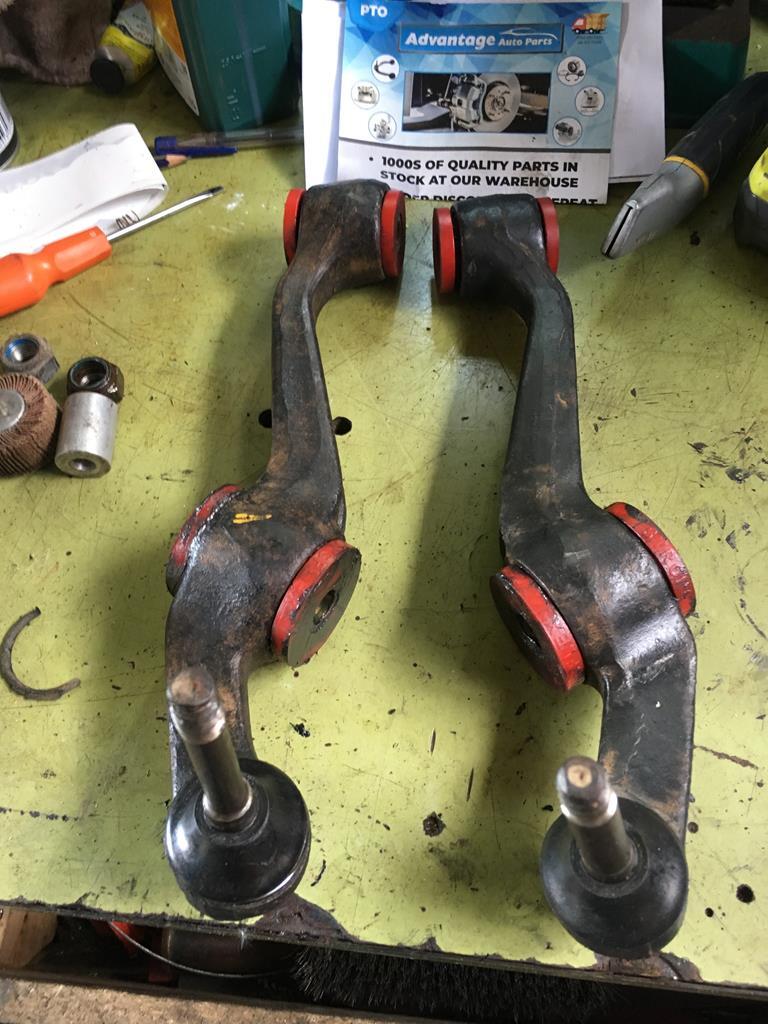 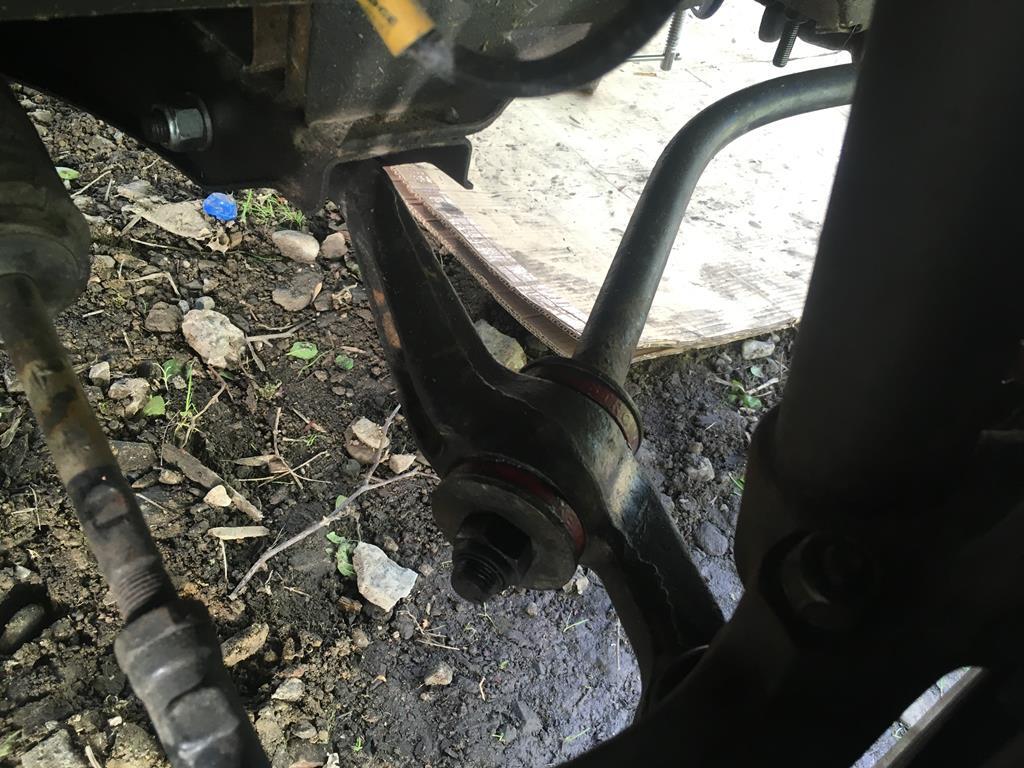 Next up was my interpretation of an Alpina lower brace or 'wonder bar', allegedly this really helps with the vibration on E21s. It's really just a brace between the 2 ARB mounts on the chassis rails, so I opted to weld a length of 40mm box between the chassis rails, should be stiffer than bolting to the ARB mounts. 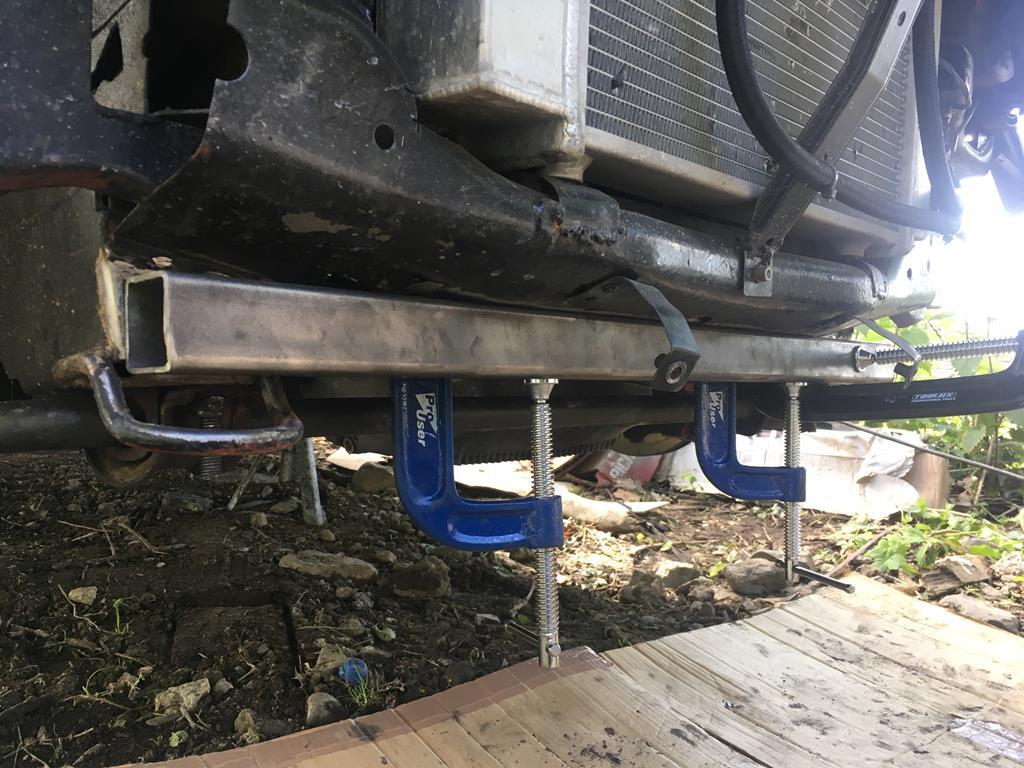 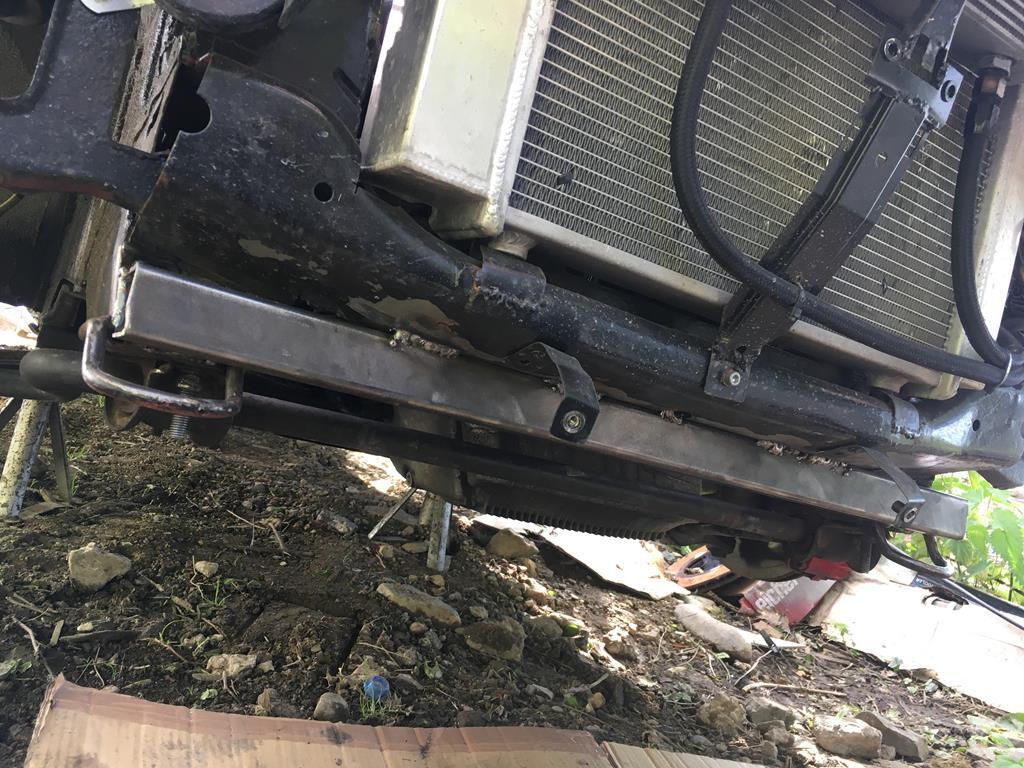 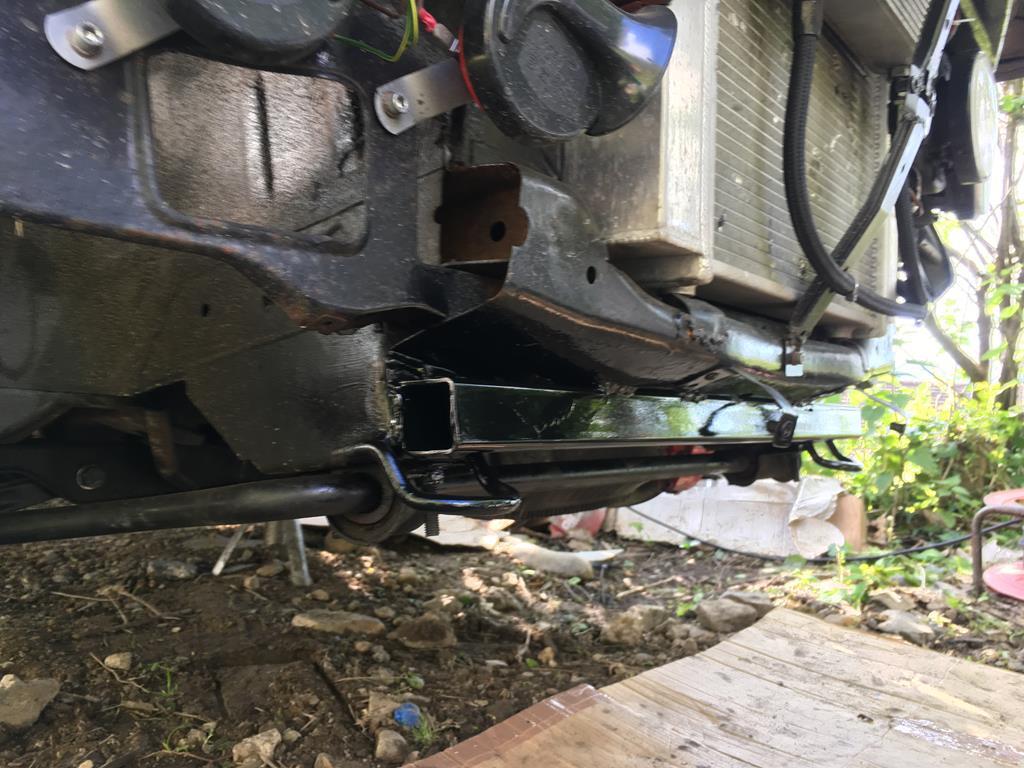 So did all of this work stop the judder I was having? Well, yes and no. The mild shudder while cruising was gone, but the judder under braking seemed to have gotten worse... Still, the car made it down to goodwood and hooned around the track with no issues (brake judder aside) so overall not bad Next up - power steering |
| |
|
|
|
|
|
Sept 19, 2019 21:00:03 GMT
|
|
yep as above - drill some drain holes and then cavity wax it
I'd probably also paint over the holes, don't just leave them in primer (not even zinc primer)
|
| |
|
|
|
|
|
May 30, 2019 21:23:27 GMT
|
|
A Ducati monster or old SS with a decent exhaust. Or if thats too pricey, a Suzuki SV650
Car wise, probably any old luxo barge with a V8 and the exhaust cut off. My mate once had a Merc E430 with the backboxes removed that we went to Le Mans in. It was savage.
|
| |
|
|
|
|
|
May 30, 2019 11:13:56 GMT
|
My brother lunched a brand new Precision turbo by ingesting a small offcut of silicone hose, one billet compressor wheel written off. They spin at 80,000rpm or something sillyAnd the rest! Max speed on a smaller turbo can be well over 200KRPM. As per other replies, i'd look at changing the CHRA. That turbo really is on borrowed time as it will be way out of balance with that damage. |
| |
|
|
|
|
|
|
|
May 23, 2019 20:57:16 GMT
|
|
I would say a Merc W124 300D, but they are very slow and only really return about 40MPG. But they feel bullet proof and are truly excellent things to own.
As an alternative, i guess a W202 250TD would be a good option? should be less slow and better on fuel, but i've never owned one.
Or, not technically retro, a jag X-type? I had a 2.0d, which was slow and only did 44mpg, but i think a 2.2d 6 speed manual would be much better. Just don't go expecting a real jag - it is fairly obviously a mondeo with nice seats.
The boring cheap derv i actually drive is a BMW E46 330d. Not at all retro, but i think it's cool, it has 200hp, is RWD, still does 44mpg and is a comfortable place to sit for 2.5 hours every day. And it's a touring, so doubles up as a van when i need parts collecting for one of my more retro rides.
|
| |
|
|
|
|
|
|
|
wow...what a big small job!....I finished a similar project on my truck a few months ago and got an education in the process... very nicely done! JP Haha i know what you mean, it sort of turned into it's own little project. I've enjoyed it and i've certainly learned a lot, but i can see why most people don't bother rebuilding diffs. It's not terribly difficult or complicated, it's just very very time consuming. |
| |
|
|
|
|
|
May 14, 2019 21:28:23 GMT
|
So, on with the diff assembly! First off the E36 pinion into the E21 case with new bearings. Place the pinion in the freezer  And this bit in the oven  And then simply drop the bearing onto the pinion! (no, seriously, it just dropped straight on)  Next the outer races into the case. You'll notice I stuck these in the freezer as well, but it didn't really make that much difference to be honest.  While we're at it, this is the difference between the E21 3.63 pinion and bearing and the E36 3.38 pinion. you can clearly see the size difference in the bearings and the slightly longer teeth of the 13 tooth (3.38) pinion. 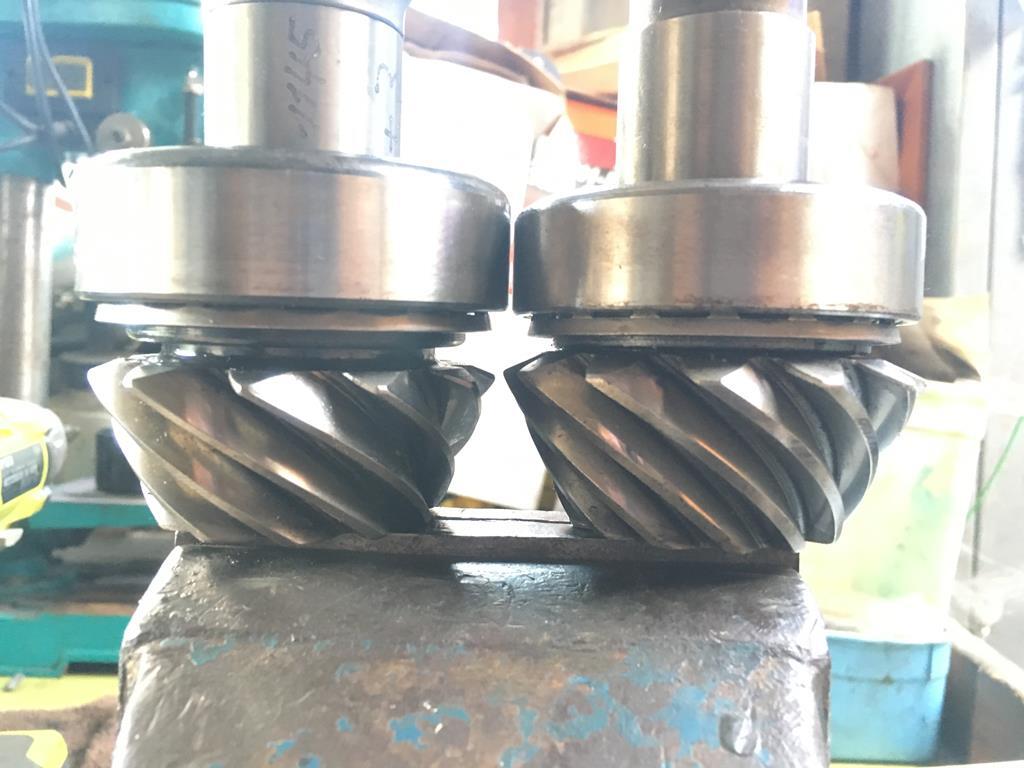 Then assemble the pinion WITHOUT the crush sleeve or seal - just tighten the nut until you reach a specific torque to turn. In my case this was 2.5kg @ 10cm from the centre (or 2.5nm if you happen to have a torque gauge). At this point you need to measure the pinion depth and adjust if necessary. BMW specify this from the face of the pinion gear to the centre of the carrier bearing holes, which required some awkward measuring and some maths. You adjust this by changing the shim that sits behind the inner pinion bearing race in the case. I had 3 shims to choose from and some 0.1mm shim washers just in case, typically it was the 3rd one i tried that got me closest to the specified depth. With that done, you need to set the carrier bearing pre-load and then the ring gear back lash. Ideally, you'd have a selection of shims available for the carrier bearings to do this, but at about £15 a pop i decided to make some out of some 0.5 and 0.1mm shim washers. 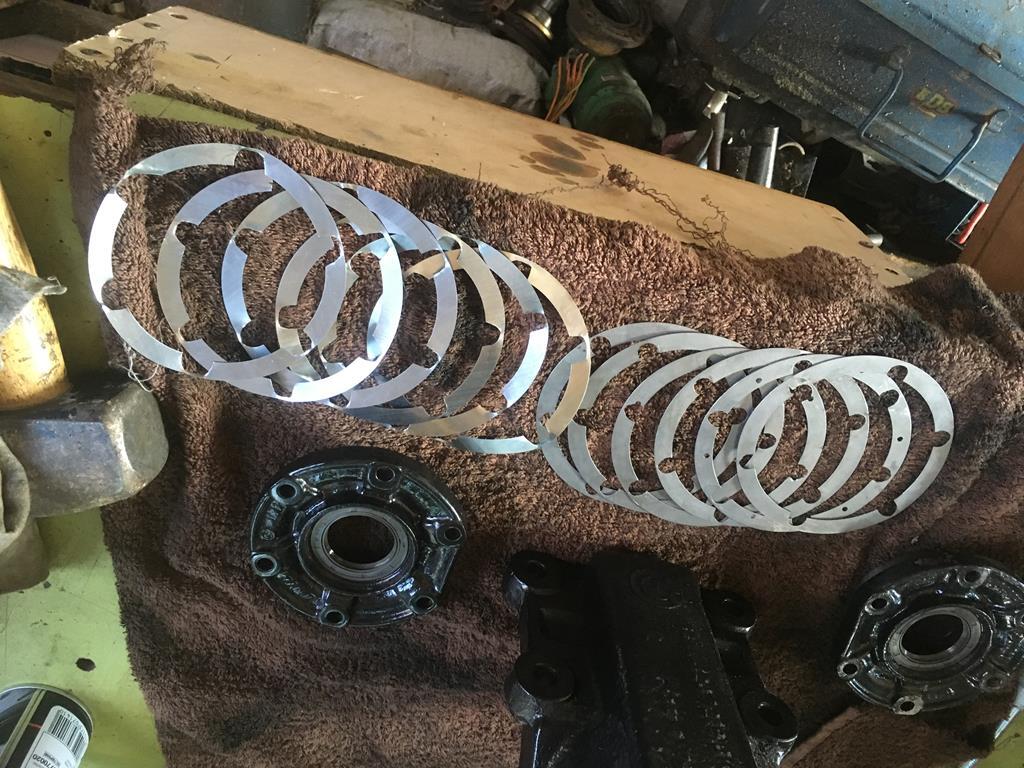 The carrier pre-load is set by the total shim thickness, and you need to determine this first. Again, it's a torque to turn value of around 2.5nm. Once you have the total shim thickness you halve this as a starting point for the backlash adjustment. The backlash is set by the thickness of the left hand shim, with the remaining shim thickness added to the right hand side to make up the pre-load. Backlash spec was between 0.05 and 0.15mm and needs to be measured in several places around the ring gear to obtain an average 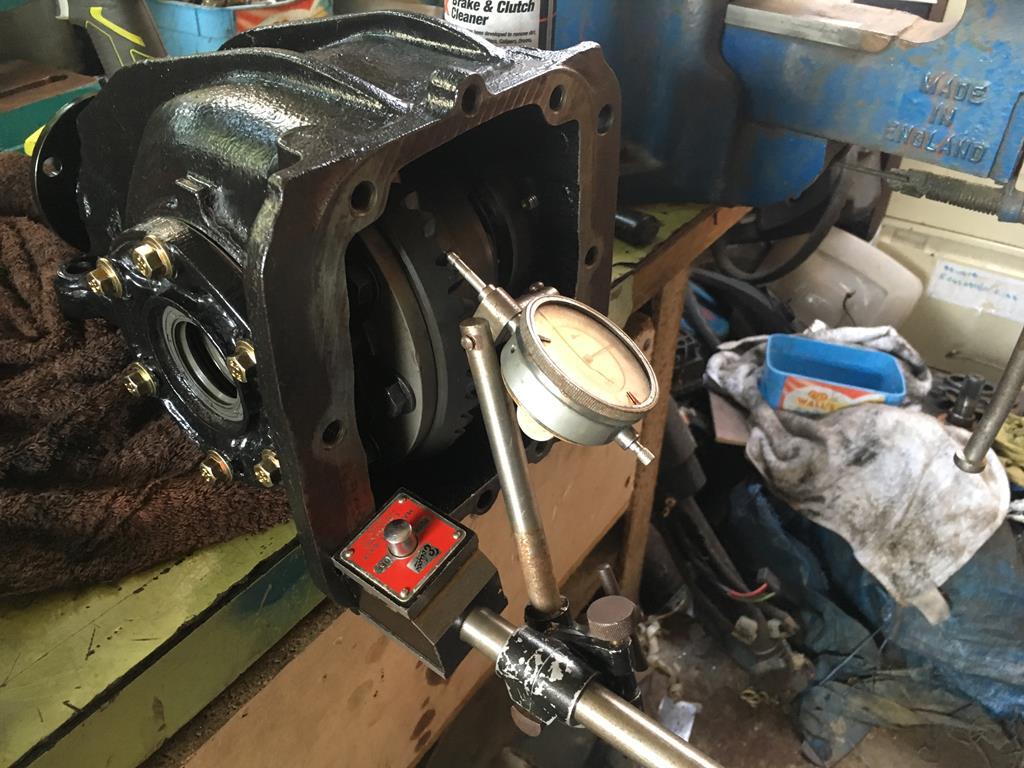 Once that is set you can check the contact pattern. Now, you can buy marking paste for this, but a bit of Cadmium yellow oil paint seems to do the trick. Simply paint a few ring gear teeth and rotate the pinion while applying pressure to the ring gear both forwards and backwards. Drive side: 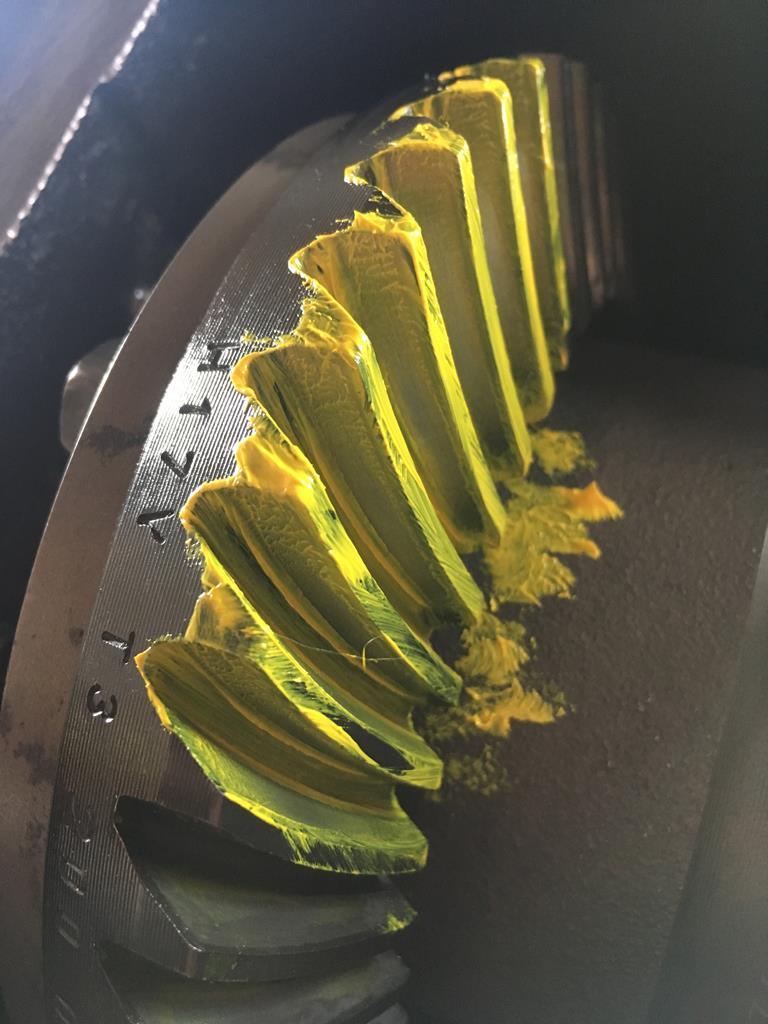 Coast Side: 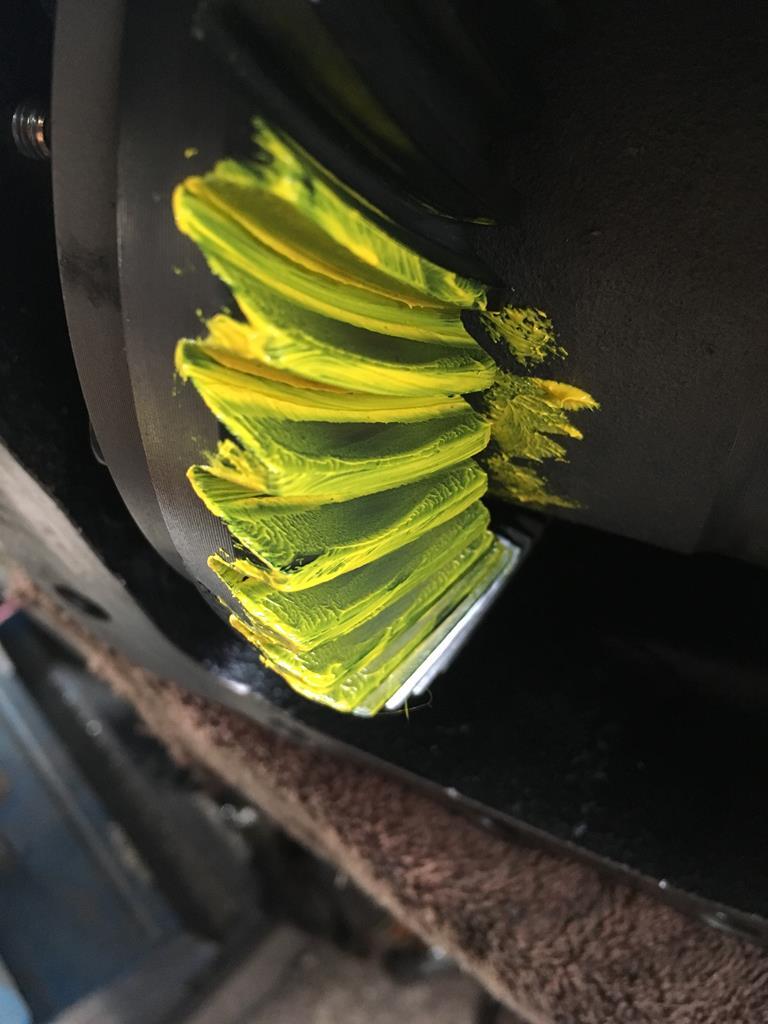 At this point you may need to adjust the backlash and/or pinion depth depending on what the contact pattern looks like, Mine was looking pretty good much to my surprise! To be honest, if you've got the pinion depth set correctly and the backlash set correctly it should be pretty damn close - I expect this is how they are assembled in the factory. With all that done you then get to take the whole thing apart again so you can install the pinion crush tube and the pinion seal. Then torque the pinion nut properly, this time to 3kg @ 10cm (3mn) to account for the added drag of the seal. It takes some serious force to crush the crush tube, I had the pinion holding tool in a vice and a 6 foot scaffold pole on a breaker bar to get it done. 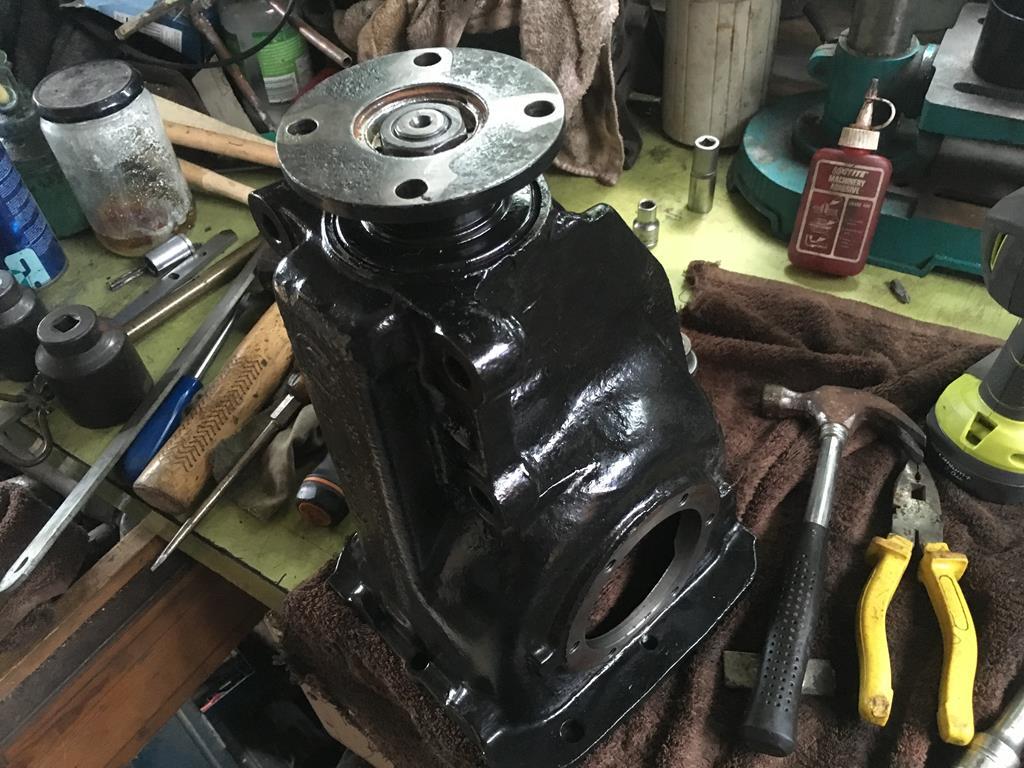 Then i could finally assemble the limited slip carrier with the new clutch plates etc 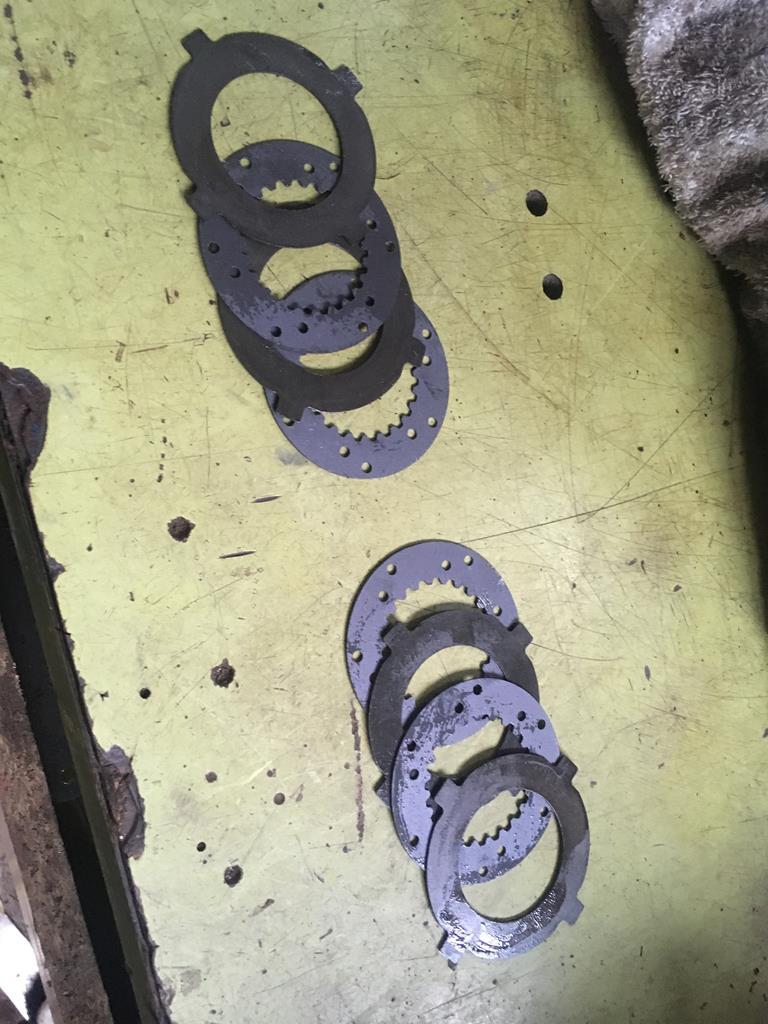 As it's an E36 centre it won't actually fit in the E21 case with a ring gear on it - you need to stack all the plates and springs in the carrier, then slide it into the case, then slide the top cap in and torque the bolts down awkwardly like this 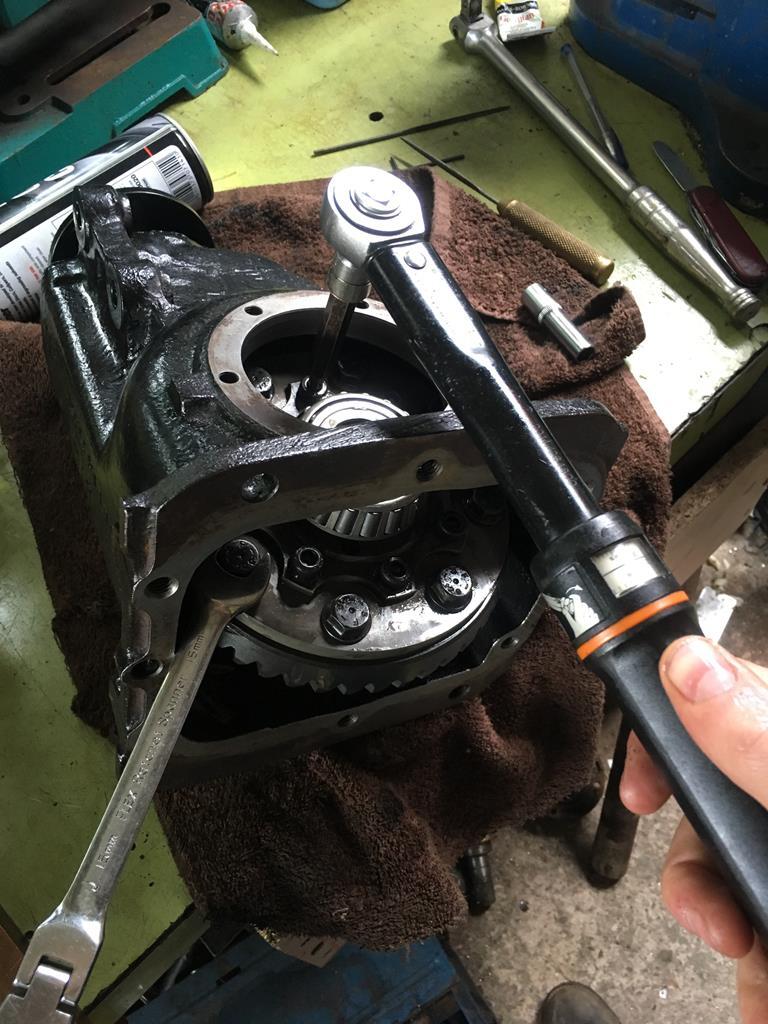 With all that done, it's really just a case of bolting the rest back together. The carrier bearing plates got new o-rings and new output shaft seals, and new bolts were used everywhere. I used silicone in place of a gasket to seal the rear cover. 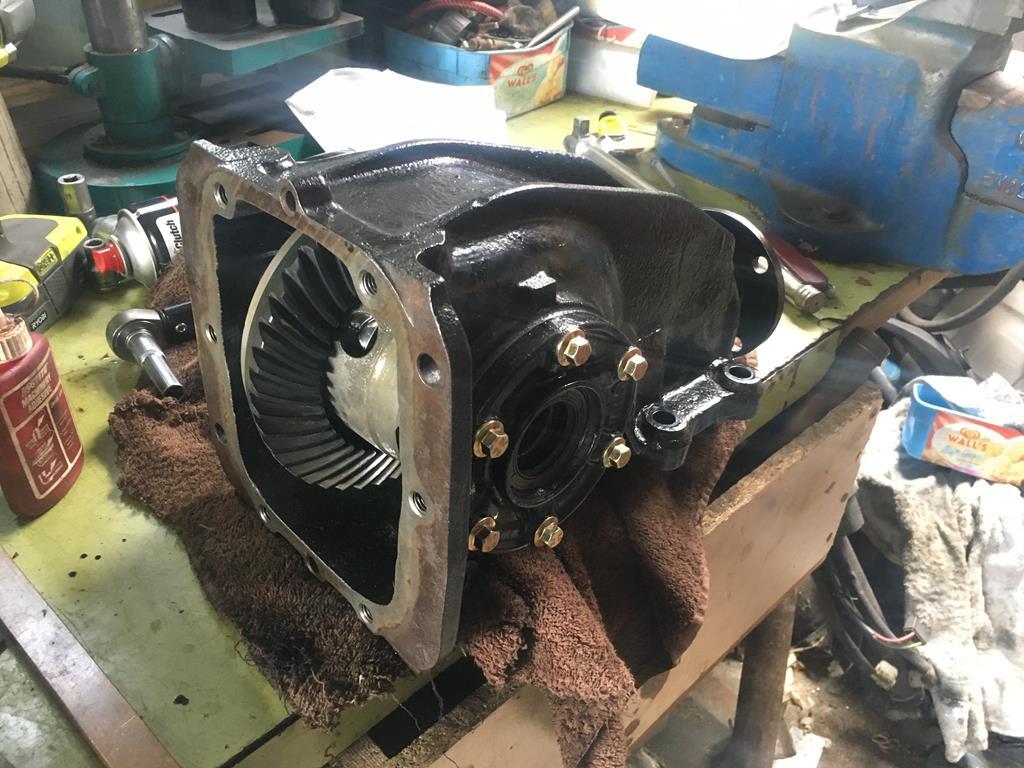 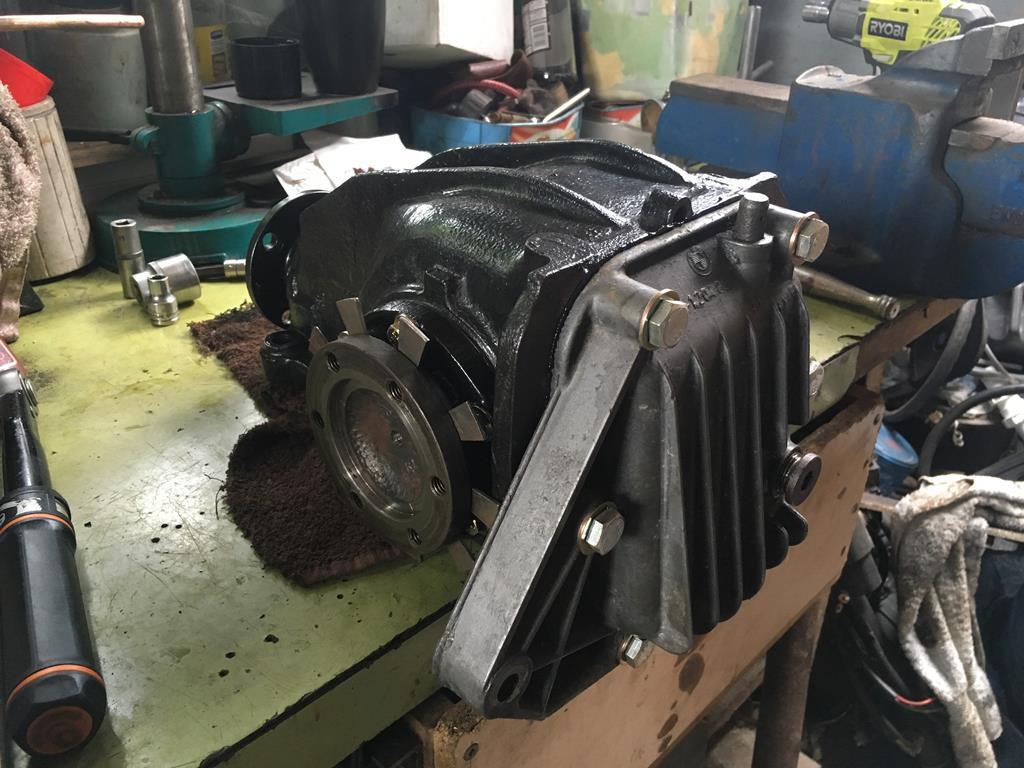  You'll also notice i added a trigger wheel to one of the output flanges, this was one of the ones removed from the E36 diffs, and it was a perfect fit around the E21 dust shield. 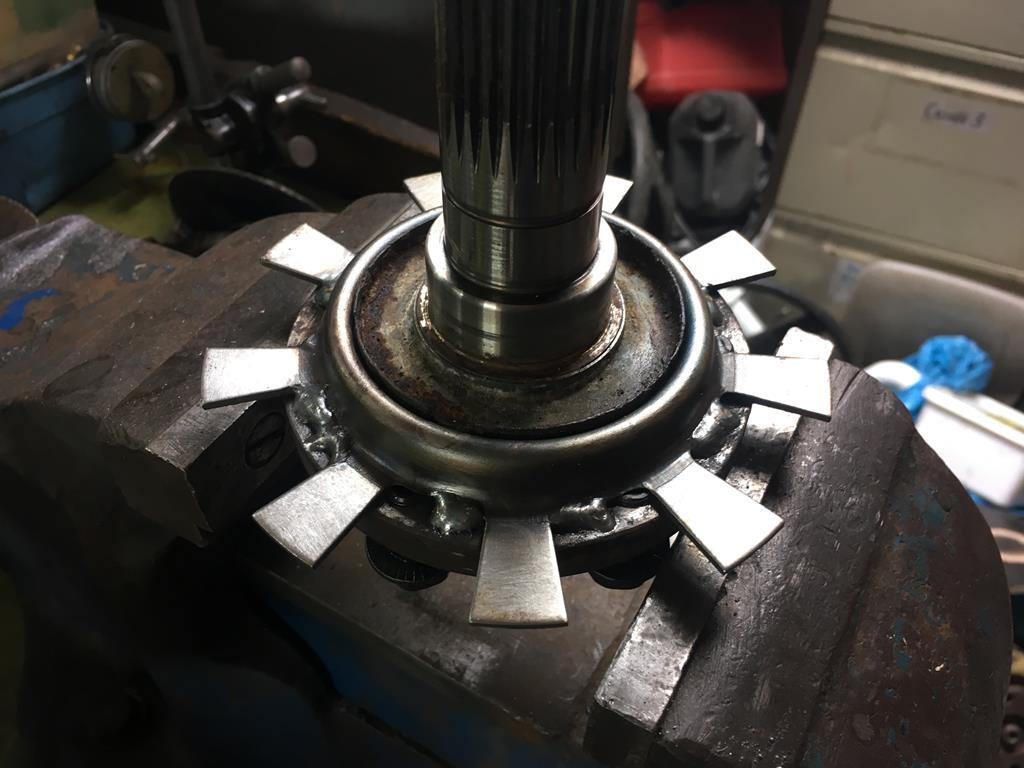 Combine this with a speed sensor and a fabricated bracket and my speedo should work finally! 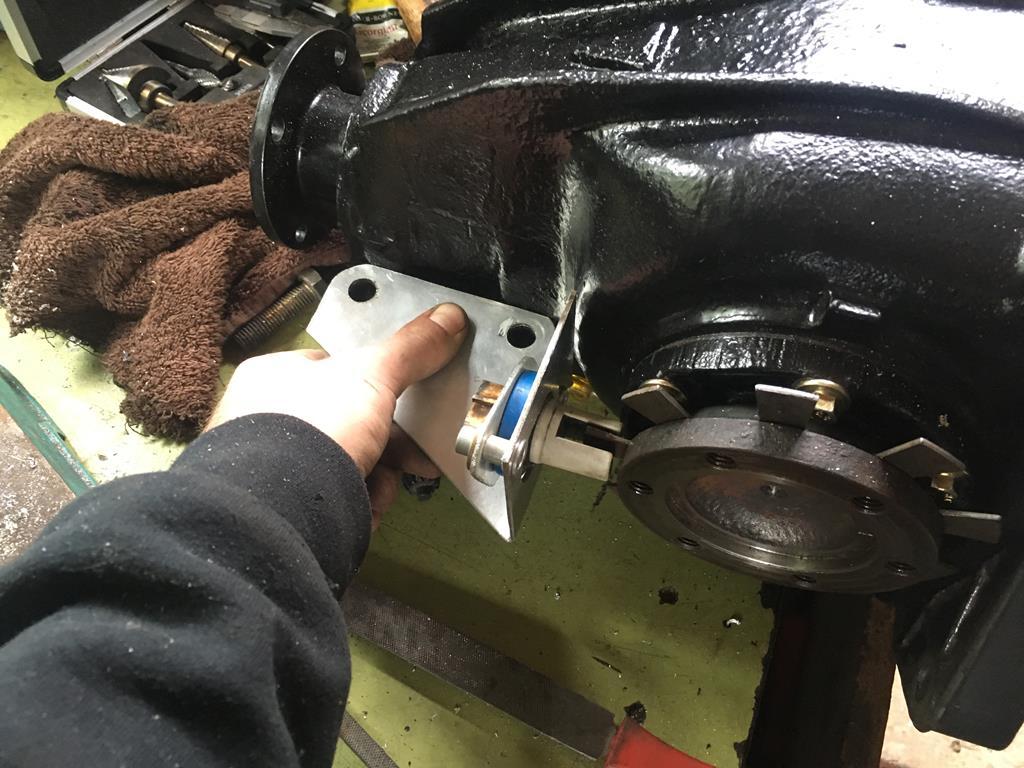 |
| |
|
|
|
|
|
May 13, 2019 19:20:40 GMT
|
|
Well this is excellent, great to hear you're planning on bringing it to goodwood, look forward to seeing it!
and yes, there is no legal requirement for a foglight pre 1980. I spent ages trying to figure out why the fogs on my E21 didn't work before realising it didn't actually have any from factory and the external ones had long gone missing
|
| |
|
|
|
|
|
|
|
I was going to reply yesterday to suggest you plot your desired torque curve on the compressor maps your looking at, but looks like you're way ahead of me! I'd suggest you plot a few more points, ideally every 1000 or 500rpm, for the various boost levels you're thinking of running. This should roughly show your surge margin on the way up to max boost (so from 2-4000 RPM). In OEM engine design, you tend to aim for 10% surge margin, but you can reduce that if you know the car is only every going to be driven at sea level for example. In answer to one of your previous questions, the turbine side has no effect on the compressor map, but will affect the transient response (or spool time). A large turbine on a small compressor may mean you can never reach the upper left hand side of the compressor map as you simply won't have enough flow to spin the turbine to the desired speed at that point. Likewise too small a turbine may mean you end up choking the turbine before reaching your desired flow through the compressor. Realistically this will never be an issue as any off the shelf turbo will have its turbine and compressor fairly well matched. Surge will damage the turbo, specifically it will wear the thrust bearing out. It sounds like classic turbo noises (shtuu tuu tuu!!) but you'll hear it as you're accelerating. Ported housings extend the surge margin in the mid-lower left hand portion of the compressor map (but not the upper left hand part of the map). This is really only advantageous on large high flowing turbos where you want a large range of flow rates with a moderate pressure ratio. Or you have a big turbo and are running a high pressure ratio but want to start spooling it earlier without the risk of surge. See this page for an example of ported and non ported housings: www.turnology.com/tech-stories/power-adders/understanding-compressor-maps-sizing-a-turbocharger/For your application i doubt it will offer much of an advantage - it looks like you want a high pressure ratio but over a fairly small range of flow rates, much like a typical diesel turbo! (as i'm sure you've figured). A diesel turbo will probably be a closer match in terms of compressor flow (they tend to be tall narrow maps - high pressure ratios but fairly low flow rates) but you need to be aware that they cannot withstand the same exhaust gas temperatures. A typical diesel turbine will be designed to cope with around 750 degrees exhaust temperature, a high powered gasoline engine can easily run EGTs of over 1000 degrees (although I doubt an 80's engine would run that hot). If you go down this route I'd suggest you get an EGT probe and you may end up running very rich under high boost to protect the turbine. Or just run it super rich and hope for the best! As for what actual turbo you should use, i've no idea! But you're certainly going about it the right way. I would say a compressor map is a must given you want to run so close to the surge line (and the max speed line in some cases) and you should re-visit the map once the engine is up and running and you can verify your flow rates. I will also say that the T3 frame is probably a bit big, and that the 'T' series turbos in general are a very old design - a GT22 or GT25 would be a better choice. Or there are of course several other manufacturers, Borg Warner (VAG, Porsche), MHI (Mitsubishi, Subaru), IHI (usually on subarus, some toyotas?) etc That turned into a bit of a ramble, but i hope some of it was useful |
| |
|
|
|
|
|
Apr 30, 2019 22:17:13 GMT
|
Some superb progress and it's a great take on an E21! The brake upgrade looks very good and well thought out. As for the sump plug, it has the wrong seal on. It should be a crushable washer. The filters from BMW (Also the Mahle OX187D), come with the crushable washer in the packet and I've yet to have a leaky sump. Sometimes, the old washer stays in place on the sump however, and yes it has caught me out! The sump plug will be fine  . I changed mine for a new one as I tend to on cars I buy, but there was no real need . I'm glad i read through the last few posts, i completely forgot about the sump plug issue! i've just ordered a new magnetic one that takes a copper washer instead. The one that was on it was just a random sump plug from ebay, not the BMW one (the sump actually came with a M14 bolt and nut welded together as a sump plug...) Anyway, the weekender is what, 2 and a half weeks away? So obviously my fully working and reliable E21 is in bits as i've decided it needs a propper LSD. One that actually sends torque where it is needed rather than just lighting up one wheel. Now I know I said i was going to use a starion diff for strength, but a) that required a LOT of fabrication work. b) i'll be stuck with a 3.63:1 ratio whether I like it or not and c) it will require custom driveshafts that will then probably break lots. So i've decided to stick to the E21 differential build the best E21 168mm LSD I possibly can. It's not blown up yet and if it does blow up i'll probably be able to fix it and sell it as a refurbished E21 LSD and make my money back. Anyway, the options were either buy a used E21 LSD for ~£600, or buy a shiny rebuilt one for upwards of £1200. Clearly i'm too cheap for that, so I went with a broken (and in pieces) E36 168mm LSD for £200 with a view to build it into my E21 case. Also i've decided the car could do with slightly taller gearing as 1st gear is useless and a taller gear ratio should be slightly stronger. This is the LSD centre from the broken E36 diff after cleaning. It has clearly been sat in pieces for quite a while as there was rust starting to form on almost every component. 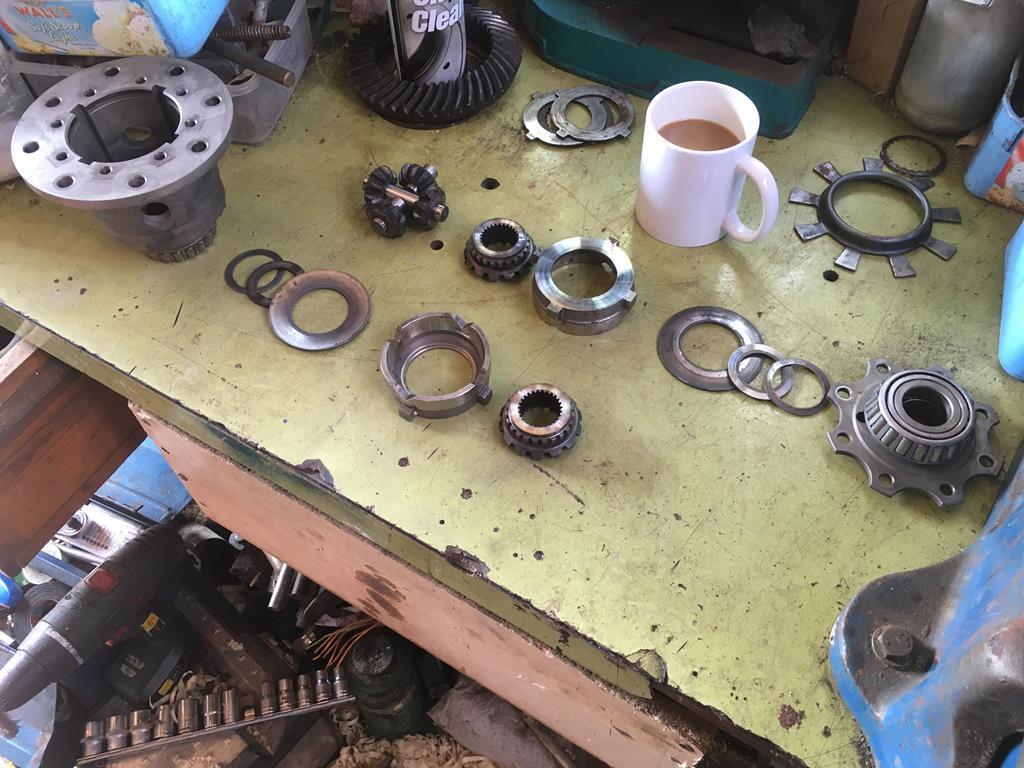 This is what was wrong with it, this is supposed to be the 2 clutch plates. 1 is clearly lacking in friction material... I'll be upgrading to a 4 clutch setup because i can and more is better. 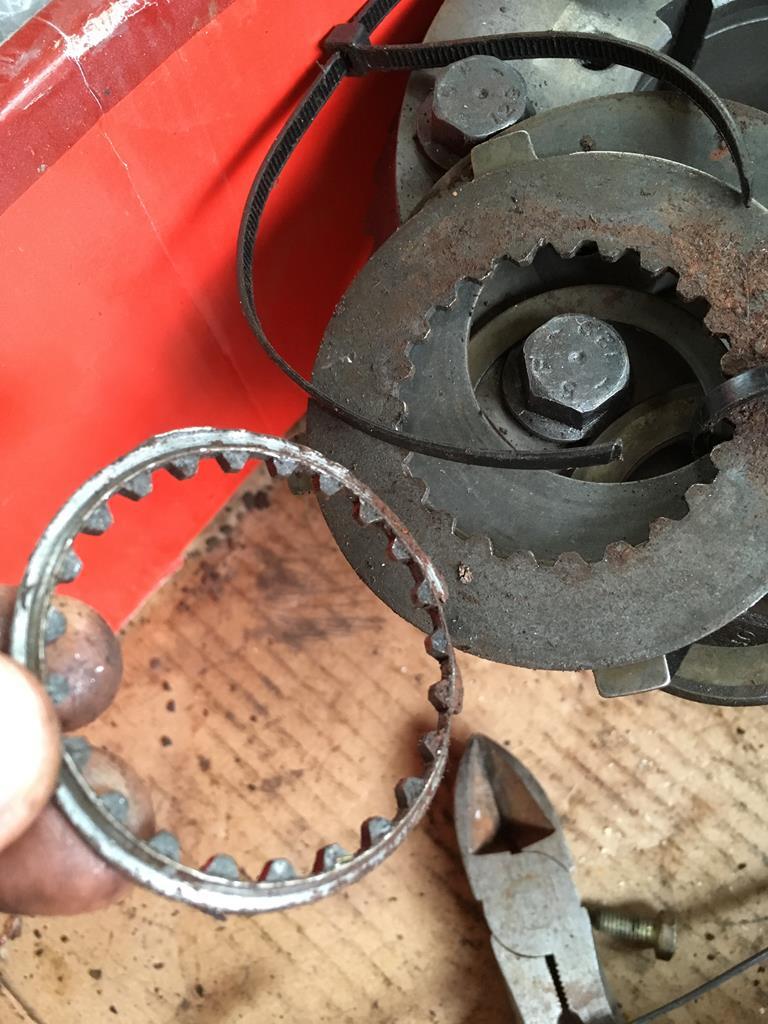 With that ordered I removed the E21 diff and stripped that down. 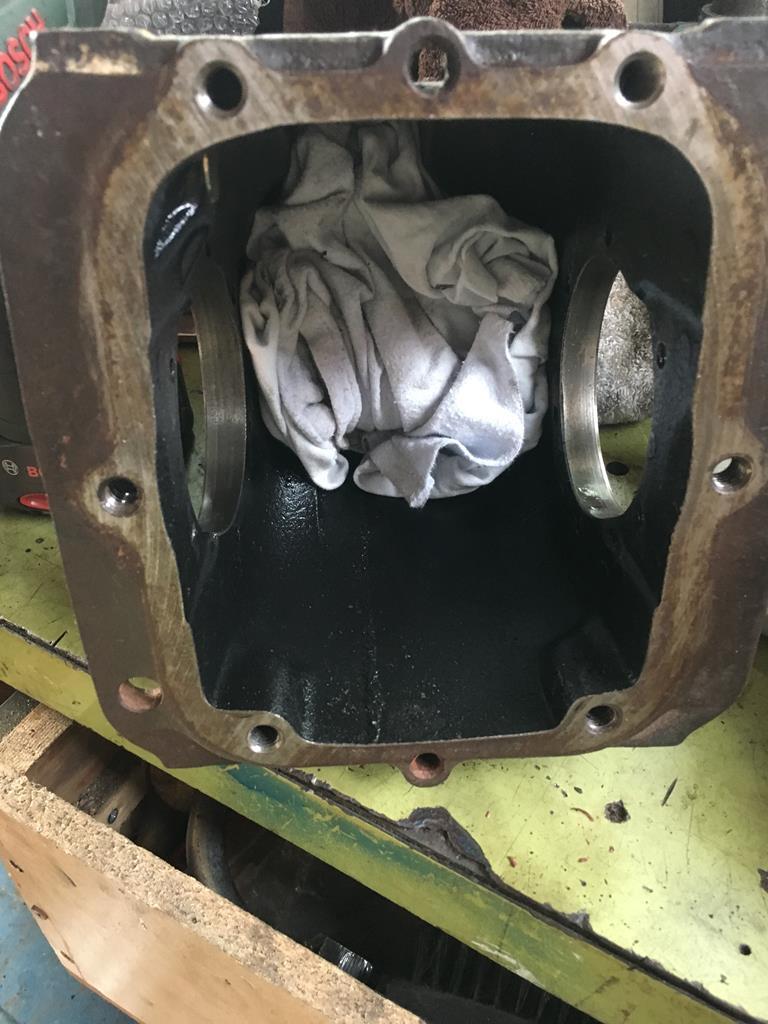 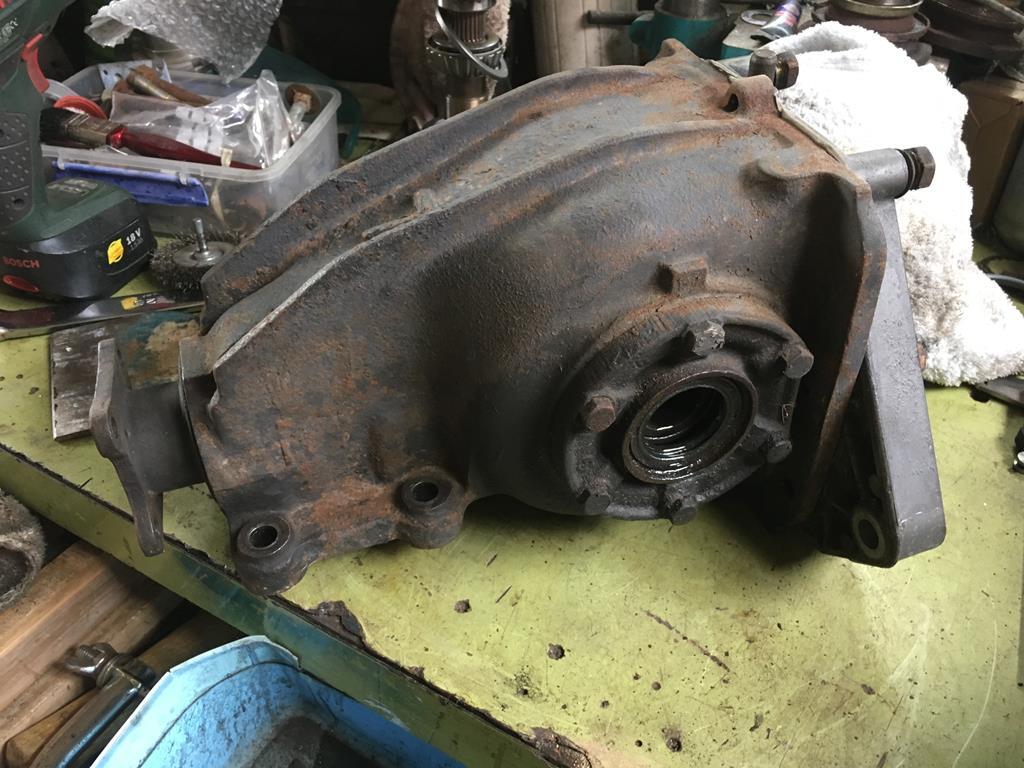 Funnily enough that £13 lsd converter wasn't looking to great - the spier gears were just eating away at it. The oil was full of metal particles. 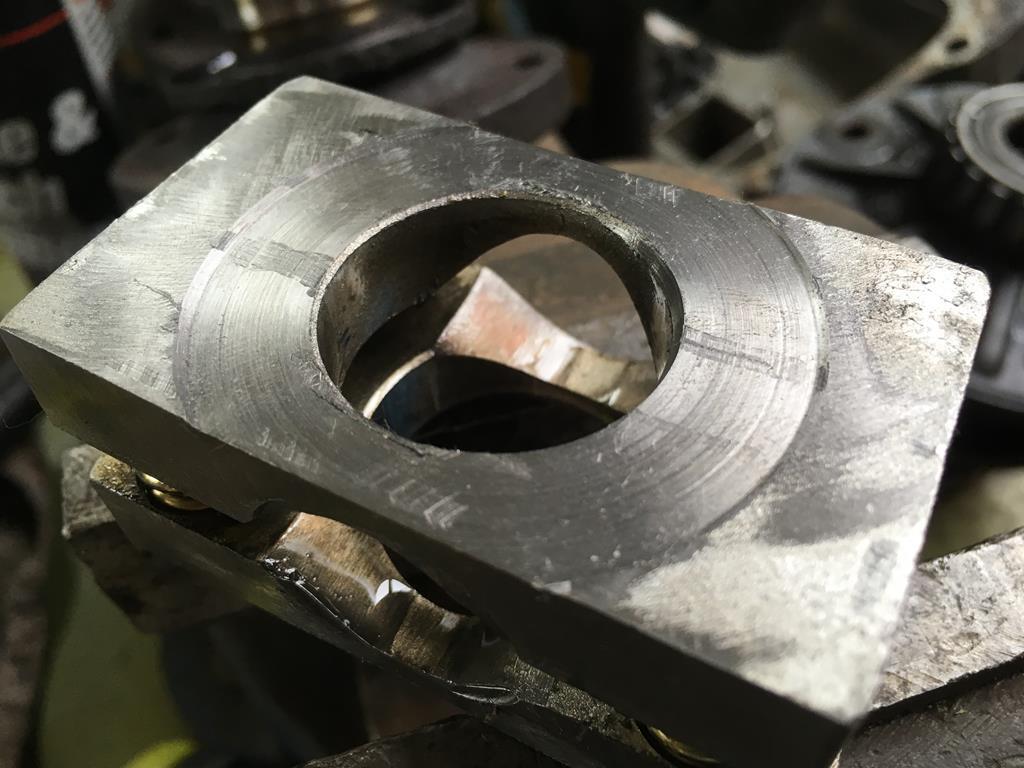 With that apart i gave it a decent coat of paint this time - the stuff i used last time hadn't fared very well. 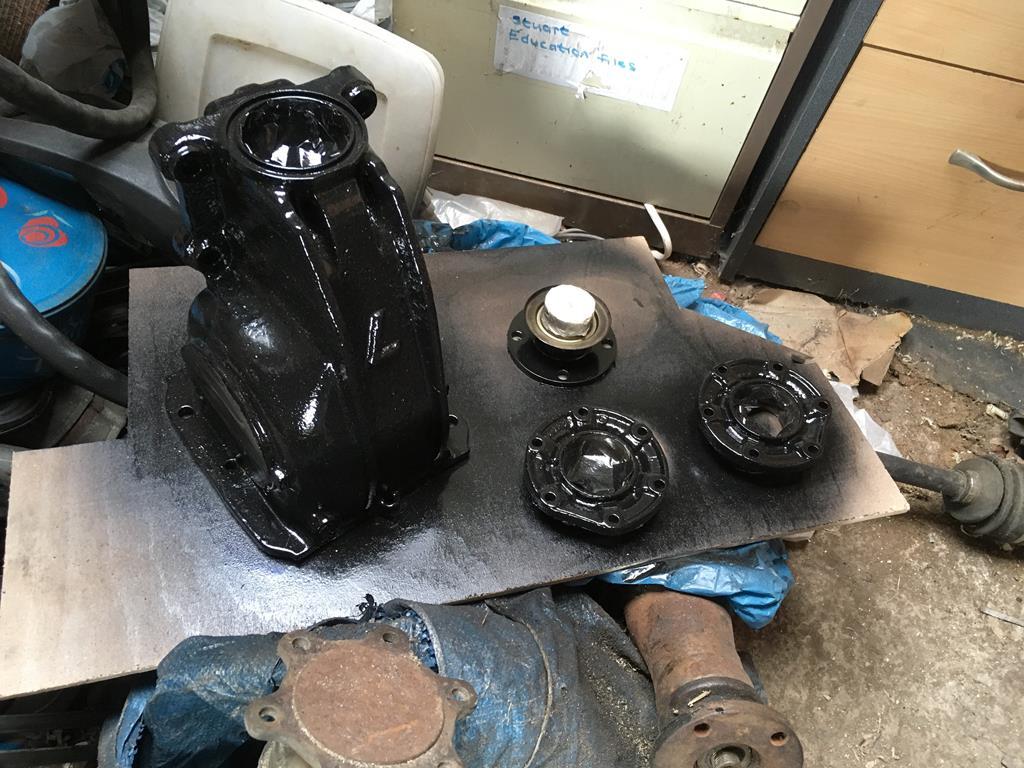 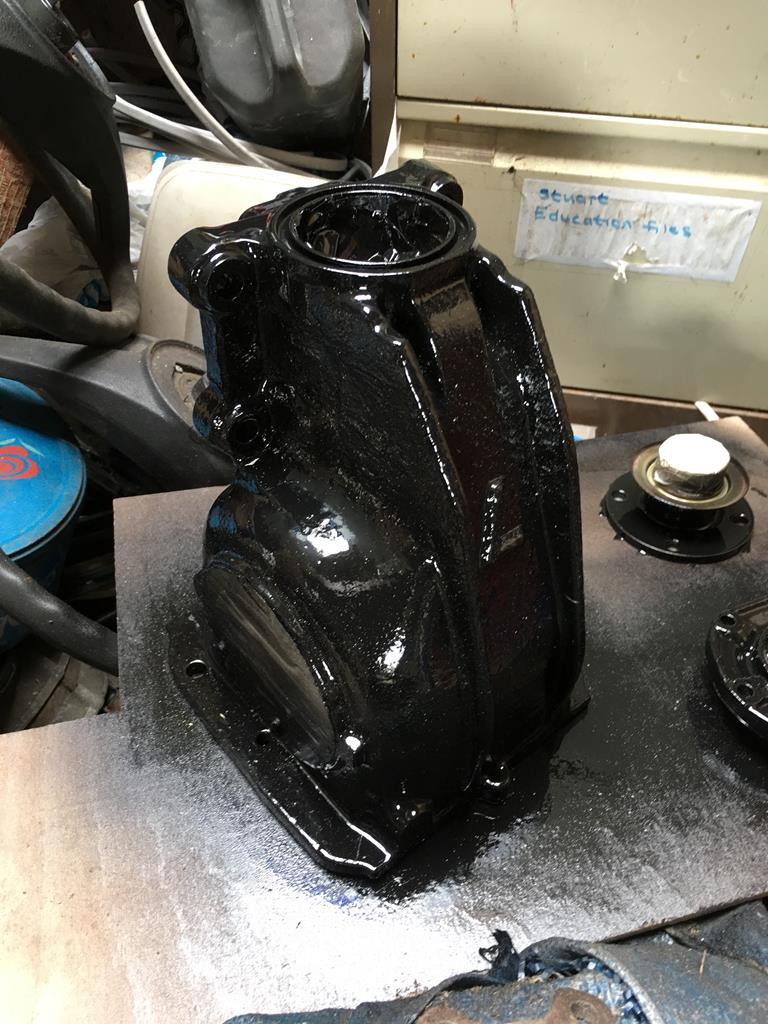 Now the E36 diff did come with a CROWN wheel and pinion that would have worked (3.38 to be precise) but they were starting to rust quite badly (pitting) so i decided agains using them. I also have a theory that a 3.45 ratio will be stronger as is uses an 11tooth pinion rather than a 13 tooth one (less teeth = bigger teeth = stronger). So I picked up an E36 compact diff off ebay for £40 for its 3.45 ring gear and pinion 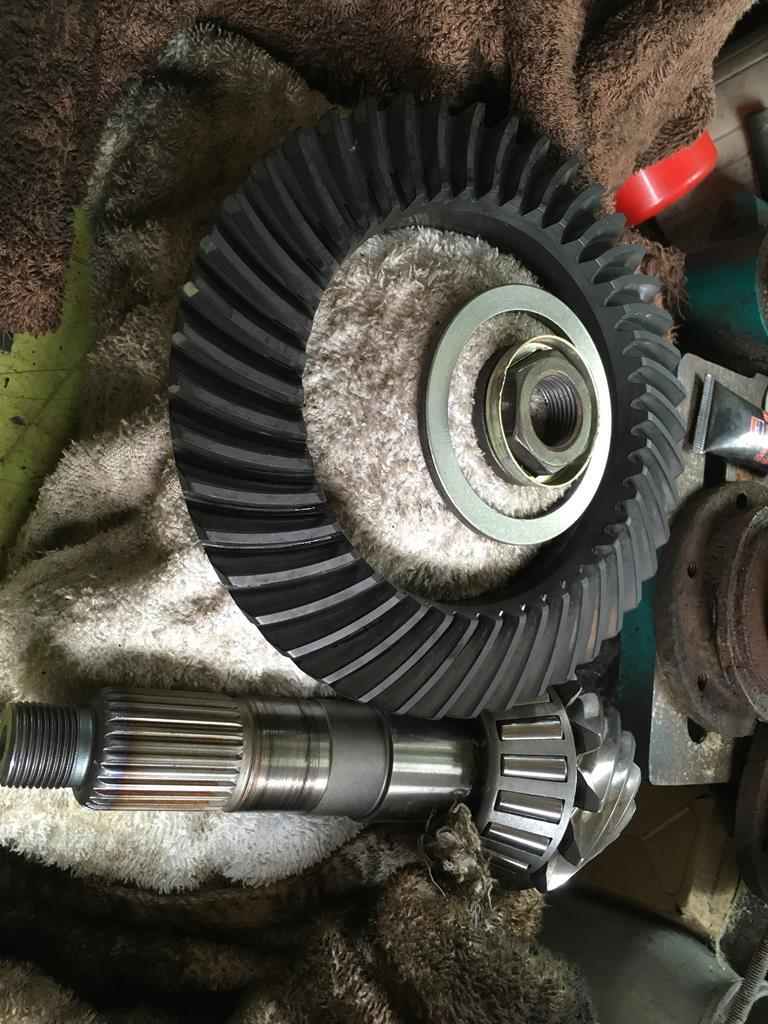 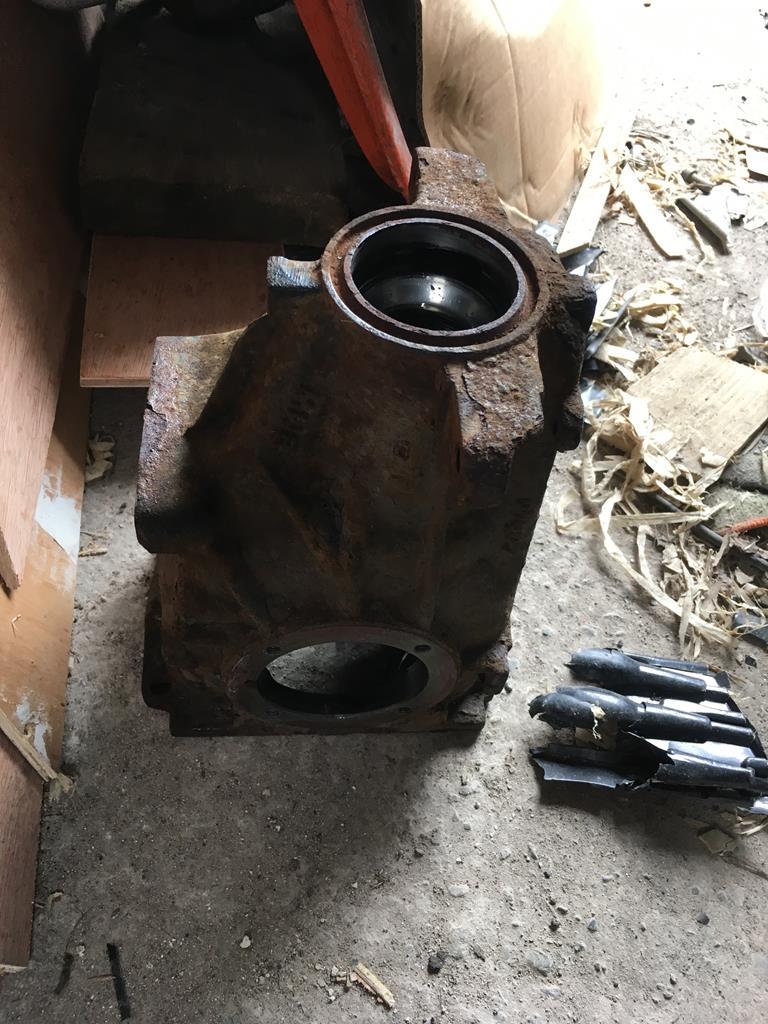 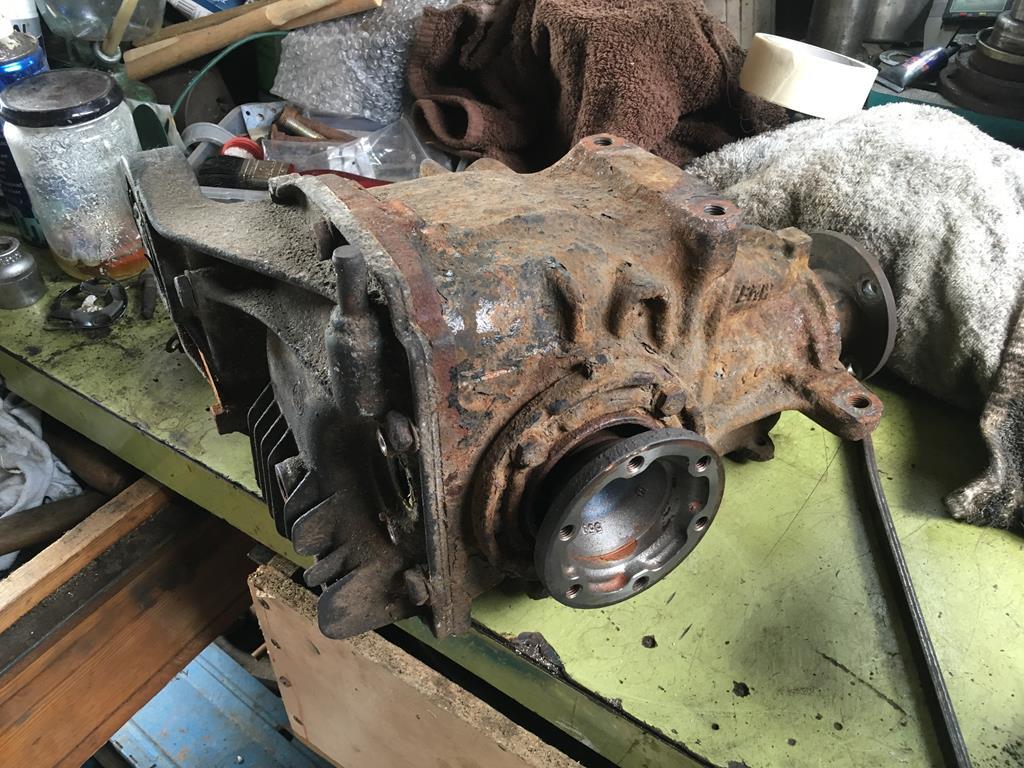 Only once i'd got it back and stripped it turned out to be another 3.38  Oh well. on closer inspection the 13 tooth pinion appears to be longer than the 11 tooth one, so i reckon they're probably about the same in terms of strength. Last job was to remove the inner pinion bearing from the pinion as i want new bearings and the E21 case uses bigger pinion bearings - actually (fun fact) the same 3 inch bearing as the medium case 188mm diffs. 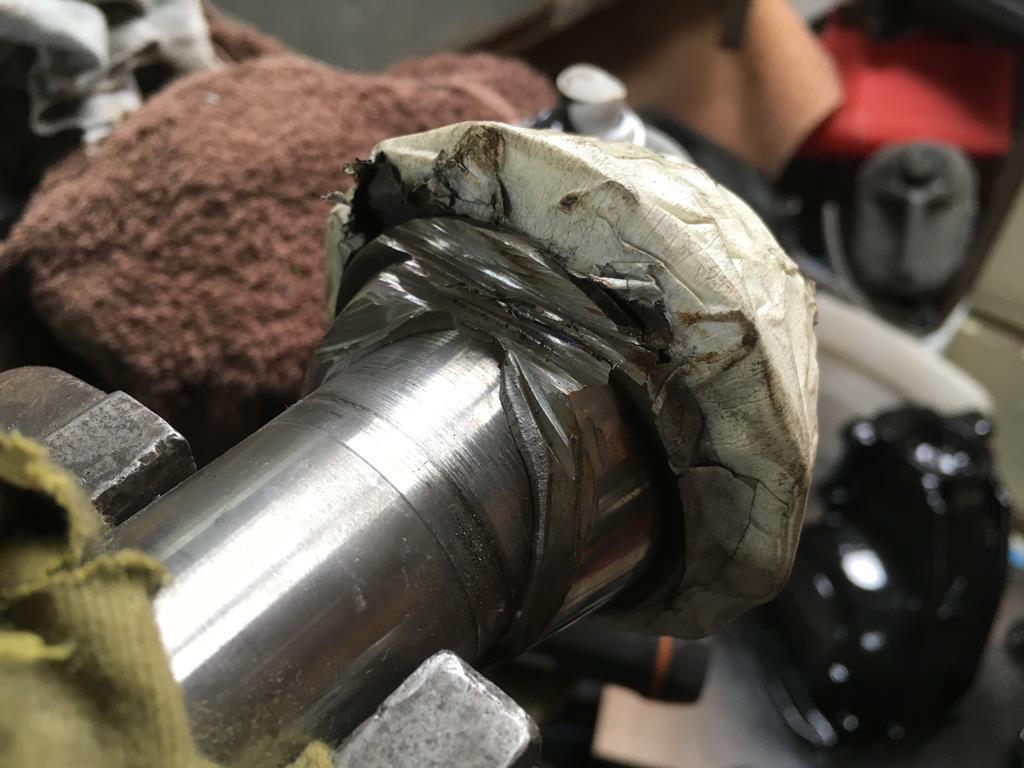 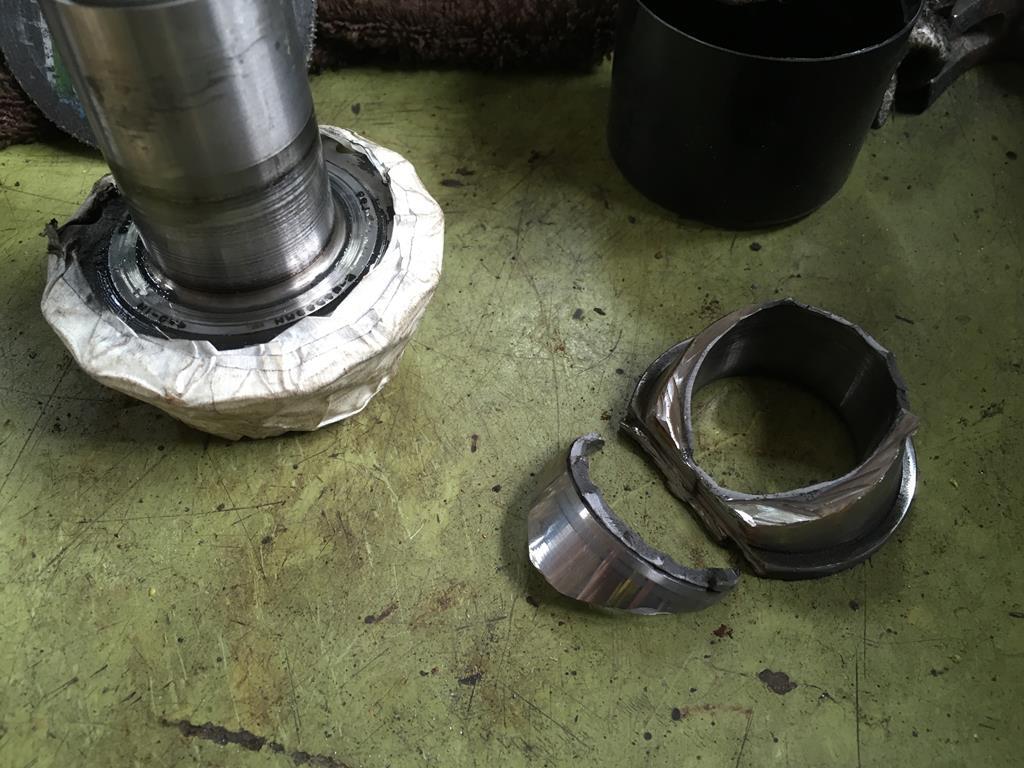 In case this wasn't evident from the pictures, this was an absolute curse word to get off! The small lip at the top just kept shattering with the 2 legged puller and eventually there was nothing left to grab it by so out with the angle grinder! Admittedly I probably should have just taken it to someone with a press but whatever, it came off in the end. Anyway, now my garage is full of BMW differential components and there are 2 bearing races and a pinion shaft chilling in my parents (industrial spec) freezer waiting for this weekend when I aim to assemble them into the ultimate BMW E21 LSD!! Wish me luck |
| |
|
|
|
|
|
Apr 30, 2019 20:49:36 GMT
|
Well this is excellent, look forward to seeing it at Goodwood! And no, I don't need another fast black BMW (Also i don't have anywhere near £15K spare  ) |
| |
Last Edit: Apr 30, 2019 20:49:56 GMT by Splitty456
|
|
|
|
|
Feb 22, 2019 10:48:53 GMT
|
ChasR Mark I'll be up for a game of 'who has the loudest S54' I mean, you guys definitely have me beat but still 
|
| |
Last Edit: Feb 22, 2019 10:50:55 GMT by Splitty456
|
|
|
|
|
Jan 18, 2019 21:54:17 GMT
|
Hmmm my 2019 in cars... 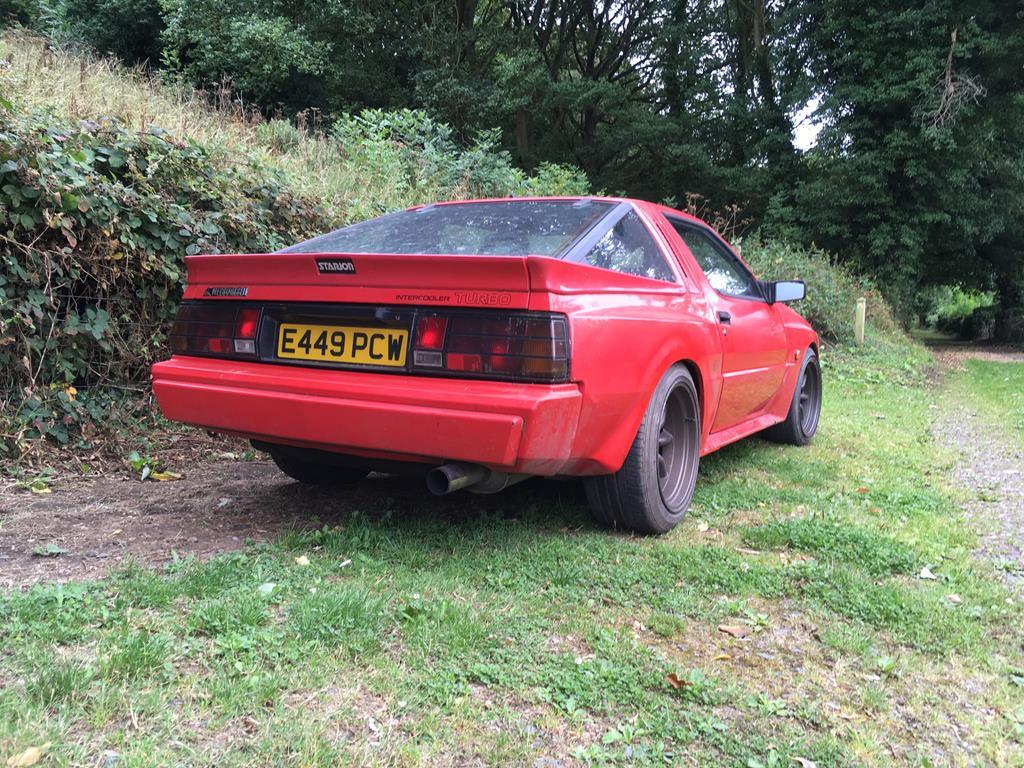 Well first off, fix the coolant leak the starion has. Then go make turbo noises Then actually map it properly and turn boost up to 1.4 bar. Then when its warmer sort out and make pretty the rear arches. Use starion for track days/shows/etc. Possibly sell for some other silly expensive turbo J car (but i'll probably just want to keep it when its mapped properly)  The E21 can stay dormant until it becomes tax exempt in the spring, then i will use it to rapidly turn tyres into smoke and also fix niggles and generally tart it up a bit. Also possibly get an LSD for it and some better tyres but thats expensive...  General maintenance/repairs on the daily. Maybe get it remapped but again, expense... 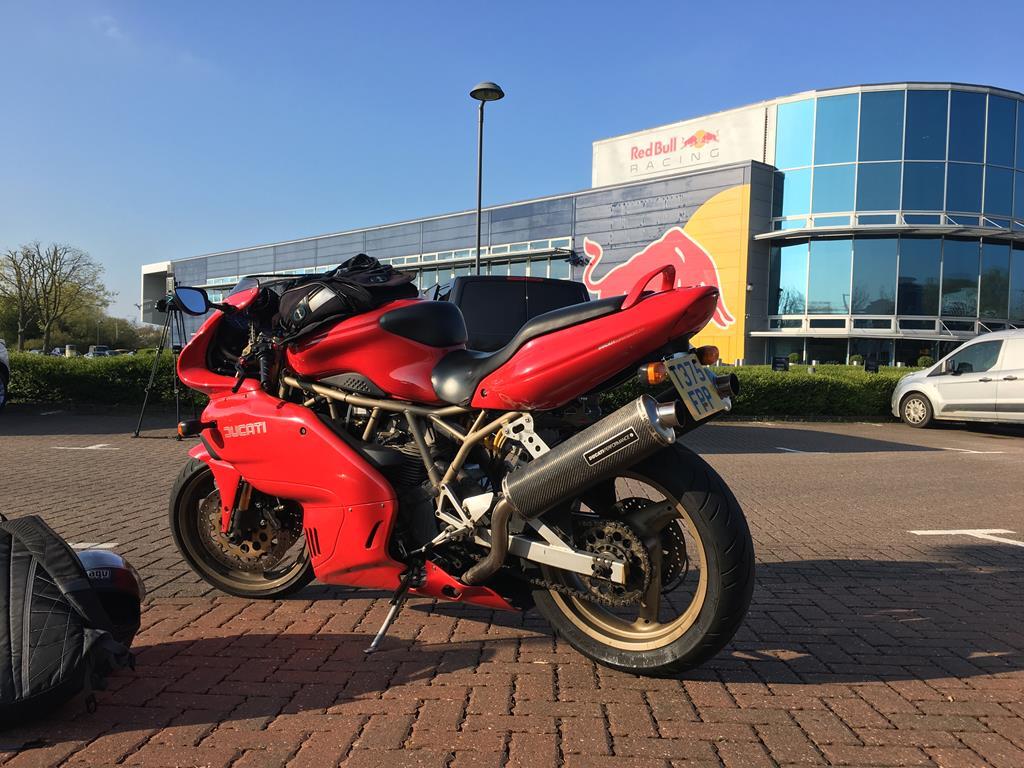 Service/Tax/Mot and ride the Ducati as much as possible over summer. 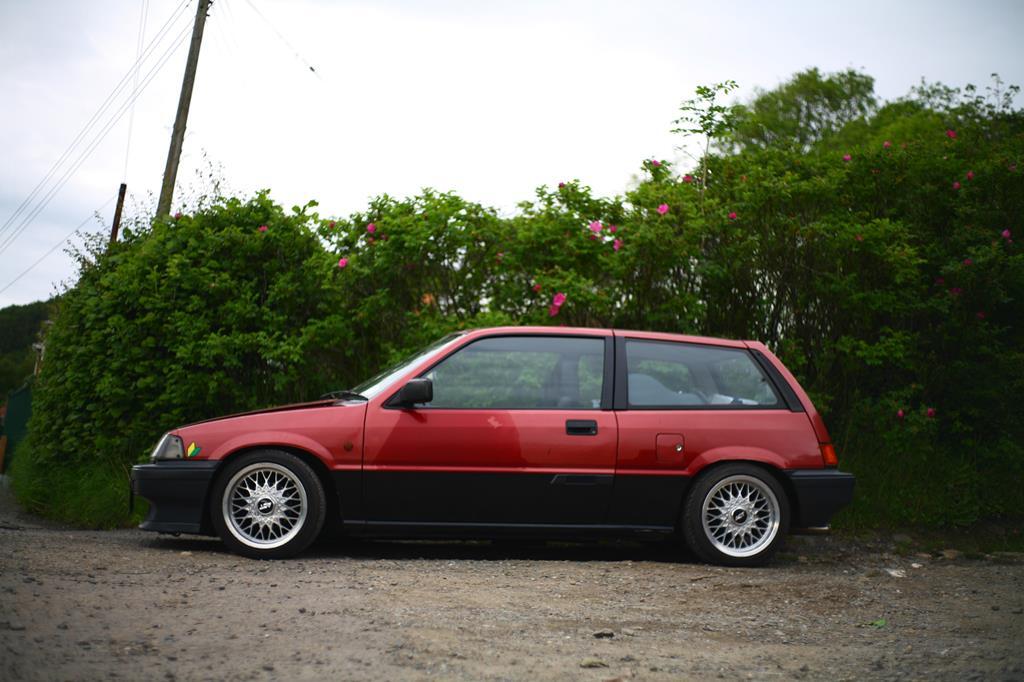 Then finally either fix up and sell, or (more likely) break for parts, the Civic. Which is sad, but realistically i'm not going to use it for anything and it's taking up space... Possibly use any cash gained from this to buy some other cheap fun vehicle, but then again, keeping 3 cars roadworthy is enough of a challenge as it is! |
| |
|
|
|
|
|
Sept 13, 2018 19:27:48 GMT
|
What us the audi quattro coup saying? Sadly nothing, it's a long term project at the MOT place, but I thought it made a good pic! How much oil did you lose? Any further damage? Quite a bit! But I pulled over as soon as the pressure gauge started flickering and the pressure was stable when back at idle, so won't have done any permanent damage. |
| |
|
|
|
|


 . I changed mine for a new one as I tend to on cars I buy, but there was no real need
  Oh well. on closer inspection the 13 tooth pinion appears to be longer than the 11 tooth one, so i reckon they're probably about the same in terms of strength.
 )
)