|
|
|
Jul 16, 2020 22:04:24 GMT
|
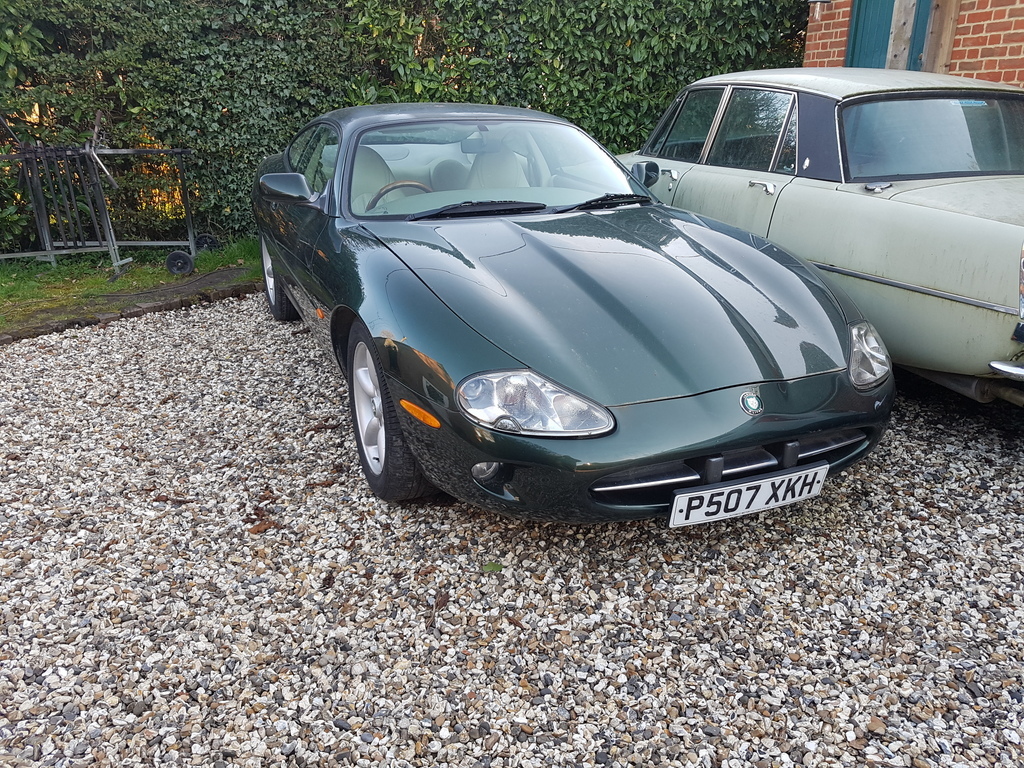
Kate the XK8 - Very curvy but bad breath..
A RR pass the parcel!
Originally bought by a regular RR car collector and then sold on here as they no time to sort the body work (flat paint , a rusty dent and rusty arches). She was bought by @grumpynorthener who after a few months was looking to sell her on as he had no time to sort it either.
I came along looking for a Jag XK8 and once I had moved on my Sandrail and Saab 9-3, GN kindly agreed to put her in for an MOT to make transport easier - based on previous MOT's and how well looked after she was, we were both expecting her to breeze through it. Alas not.
There was an MOT fail rust issue (not expected) along with general rust (definitely expected), a sticky brake, a wheel bearing and a few bushes and some other bits, all sortable at medium cost. But the big one - emissions. They were a fail on all points, both banks failed and the MOT garage's opinion was that she "needed 2 new cats". Mee..ouch.
This then made her a much bigger project as if the cats are dead then something killed them - which could be any number of things from cheap to making her a parts car.
But, I like a challenge so a deal was made, GN did the MOT welding (I can weld but not to his standard!) and helped with moving her.
|
| |
Last Edit: Sept 8, 2020 17:08:30 GMT by wightfug
|
|
|
|
|
|
|
Jul 16, 2020 22:06:30 GMT
|
Grumpy's pics as I have not taken any yet..
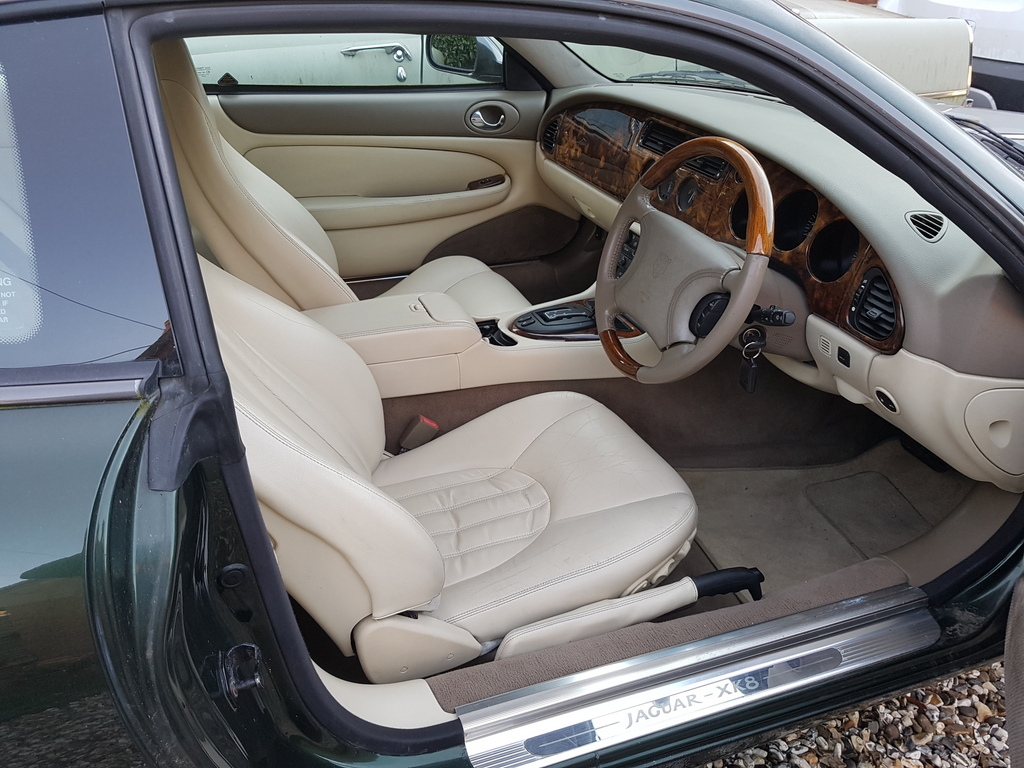
Overall pretty good - inside is en especially good shape. The colour is Sherwood Metallic Pearl which is a nice deep mossy colour- much better than BRG in my opinion. The paint is odd on the roof and boot, it looks as if the clear coat has gone milky. There is a nasty rusty dent in the back and the arches are shot. Mechanics I can do and diagnostics I love ... but I have done zero bodywork so this will be a steep learning curve. On to the To-Do list |
| |
Last Edit: Jul 16, 2020 22:08:39 GMT by wightfug: Picture problems!
|
|
|
|
|
Jul 16, 2020 22:24:45 GMT
|
|
Nice, I worked at a Jag dealer when these were new. Very civilized automobile! John
|
| |
|
|
|
|
|
Jul 16, 2020 22:55:21 GMT
|
To Do first - emissions

Looking at the RH bank I can see that with Lambda at 0.81 it is running really, really rich - in fact you don't need any fancy kit to notice that she smells like a bonfire at a petrol station. So rich in fact that the cat would not be able to operate at all. and of course the CO and HC are way out as what is burning can't fully burn so it leaves lots of CO and what does not burn is left as HC - ie un-burnt petrol.
LH bank was a fail too though not so bad - I wondered if in fact the LH bank was fine but the exhaust X over was contaminating it from the Right side.
Plugging her in and there are no codes stored but looking at the fuel trims I see
Bank 1 RH/OS)
LTFT = 15%, STFT = 19.6%
Bank 2 LH/NS
LTFT = -3.9%, STFT = +3.9%
This translates as RH = Richer than Bezos, LH = perfect, like the wife (mine, not Mrs Bezos).
So the O2 sensor on the RH bank is telling the ECU to extra fuel as there is "lots of free air available", the stink of petrol out the back end tells us that is not correct.
Couple of things that can cause that, but as there is no obvious rough running I suspect the O2 sensor is telling fibs. The scan tool helpfully shows the voltage coming out of the two O2 sensors, RH =0v - dead or very lean, LH=0.51v - spot on.
If the O2 sensor died of old age- that's a bonus, if it has not been run for long like that then the cat might be ok. or not. If the O2 sensor was killed by oil or coolant then that is a bit more expensive.
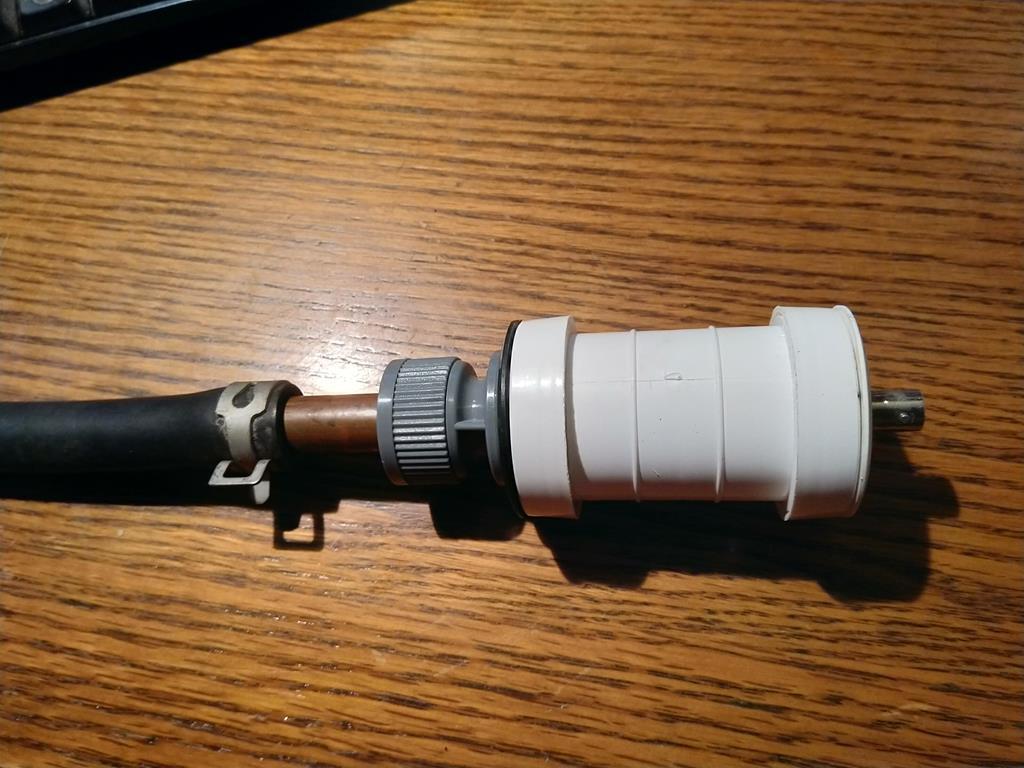
I could feel a slight vibration in the engine at idle so wanted to check for a misfire so I built an exhaust pressure sensor for the oscilloscope from a few bits of waste pipe and a 99p piezo sensor. - The commercial version "Firstlook" is £350
Shove the pipe up the exhaust and you can see the pressure waves caused by the exhaust valve opening - all seems OK as the peaks and shapes are nice and even.
RH top, LH bottom
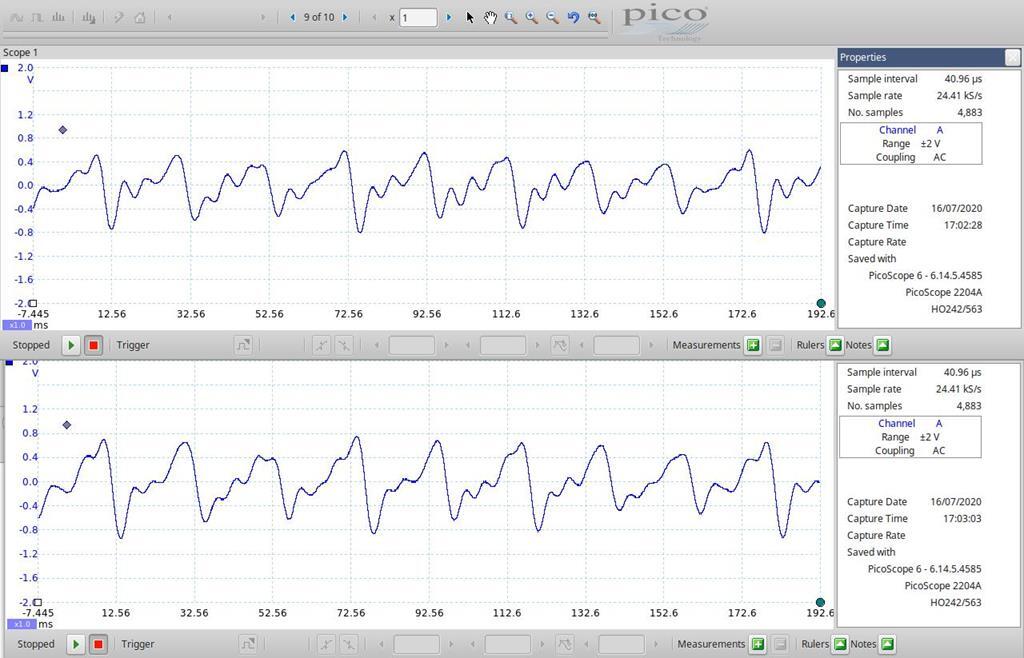
That makes me happy so next stop check for power at the RH O2 sensor and likely replace it.
|
| |
|
|
|
|
|
Jul 16, 2020 23:03:32 GMT
|
|
Seems like this car found the right bloke to make it healthy again.
|
| |
|
|
|
|
|
|
|
Enjoying this already.  Bookmarked! |
| |
Last Edit: Jul 17, 2020 3:03:25 GMT by georgeb
|
|
|
|
|
|
|
You've got to admire a good detective  |
| |
|
|
|
|
|
|
|
Yep this is going to be interesting! Budget exhaust pulse sensor is definitely a win  |
| |
|
|
|
|
|
|
|
|
Bookmarked for what I'll no doubt learn on this journey.
|
| |
|
|
|
|
|
Jul 17, 2020 18:53:19 GMT
|
|
Thanks all!
An oscilloscope makes for a great diag tool, on my X-type diesel for example I scoped the rail pressure sensor and injector firing current (with a clamp), I was able to see not only pump performance but if the injectors were being fired and actually passing fuel.
With a £25 scope from ebay you can do a 5 minute "relative compression test" that will tell you if you have any compression issues - or if your timing is (way) out, that same scope can test a crank or cam sensor...
Back to the To-Do list
The windows were randomly going up and down instead of dropping when you open the door and closing when shut - that was an easy reset procedure. Shut the doors and hold the window button down until it clicks, same with the up repeat x 3 for good luck and all sorted.
There were various spurious gearbox/abs/engine warning lights at start up, along with about 10 different codes set in the BCM (body control module) - that could only mean one thing.... a low battery! These cars really do not like a low battery.
|
| |
|
|
|
|
|
|
|
Jul 17, 2020 23:11:18 GMT
|
The P38's the same. Does all sorts of random stuff when the battery gets low. At least it gives you fair warning it's on the way out, not just leave you stranded in a car park.  |
| |
|
|
|
|
|
Jul 18, 2020 12:21:06 GMT
|
Next on the To-Do list is the wheel bearing - pfff how difficult can that be ?
Very, apparently Once you have removed the upright to the bench, you need a £50 special tool to remove the nut- and not one you can fudge or easily replicate. 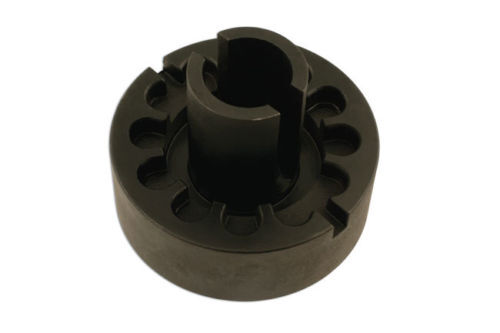 The ABS ring/hub nut is done up to 330Nm that is a 6ft pole on 3/4" drive job - and a VERY strong bench / vice to hold it. - That is three times tighter than your average wheel nut - and that was when it was done up 23 years ago... Then you need a press to apply up to 20T to remove the actual bearing that costs about £25
Alternatively I can find a whole hub replacement for £40-£150 and save myself the agro even though I have access to all of the above.
No I can't, ebay was telling fibs, better turn up the Uga-dugga machine to max...
|
| |
Last Edit: Jul 18, 2020 14:04:15 GMT by wightfug
|
|
|
|
|
Jul 18, 2020 17:06:19 GMT
|
Next on the To-Do list is the wheel bearing - pfff how difficult can that be ?
Very, apparently Once you have removed the upright to the bench, you need a £50 special tool to remove the nut- and not one you can fudge or easily replicate.  The ABS ring/hub nut is done up to 330Nm that is a 6ft pole on 3/4" drive job - and a VERY strong bench / vice to hold it. - That is three times tighter than your average wheel nut - and that was when it was done up 23 years ago... Then you need a press to apply up to 20T to remove the actual bearing that costs about £25
Alternatively I can find a whole hub replacement for £40-£150 and save myself the agro even though I have access to all of the above.
No I can't, ebay was telling fibs, better turn up the Uga-dugga machine to max
I have never changed the wheel bearings on an XJ or XK but I have done on the modern S-Types and its dead easy on them, the fronts are just a whole hub replacement and the rears are just a press in bearing. I had a look at the XK rear bearing replacement and what a hassle it looks! One of the threads I found the person had the correct tool to remove the nut but it wouldn't budge so he cut it off and replaced it, I don't know how much they are but knowing Jaguar they will be either incredibly cheap or horrendously expensive. Good look with this job, I think you will need some serious leverage to get it off from what I've read. What was wrong with the ones you found on e-bay? Something like this perhaps? www.ebay.co.uk/itm/1998-JAGUAR-XK8-4-0-V8-PETROL-OFFSIDE-REAR-WHEEL-HUB-BEARING-1996-2002/293434175145?hash=item44520a2ea9:g:IwUAAOSwo49eJZr0 |
| |
|
|
|
|
|
Jul 18, 2020 17:34:04 GMT
|
|
Are they so different from XJ40 ones? As far as I was aware they share rear setups with X300s, and the only difference between those is a (nearly) interchangeable lower wishbone.
Could change to '40 ones and save yourself the trouble in future...
|
| |
|
|
|
|
|
Jul 18, 2020 23:39:32 GMT
|
Sorry, vital info missing - Front wheel bearing !
New supposedly genuine Denso O2 sensor arrived - Heater resistance of 1.1ohms - can not find the spec anywhere for either the Jag or the sensor! But I think the Jag expects 9 ohms and Hella says heater range is 2-14ohms. have to get out and measure tomorrow.
|
| |
Last Edit: Jul 18, 2020 23:43:22 GMT by wightfug
|
|
|
|
|
|
|
|
Ah I see!
There are some differences I've discovered between the XJ8/XK8 and XJ40 front hubs. Different lower balljoint arrangement, different hubs ('40 ones have a step for the brake disc), different caliper mounting lug position etc.
Special tool it is I'm afraid...
A technique for doing them up though that worked on my Citroen. Got a piece of scaffolding pole to slip over my breaker bar. Measured my weight. Did the maths to work out the distance I needed for the lb-ft and marked that bit of the pole. Stood on it a smidge further along to account for bending and waited til it stopped moving. Worked well enough 👍
|
| |
|
|
|
|
|
Jul 19, 2020 13:14:16 GMT
|
|
After much googling I found a post of someone testing the very same O2 sensor 7 years ago and they got 0.9 ohms on the heater and it worked fine.
Parts like O2 sensors, cam and crank sensors that are part of the ECU self testing I stick to good branded gear Denso/Delphi/Bosch etc. Ideally the OEM for the manufacturer. Lots of instances of cheap after-market parts causing more trouble as they are not exactly the same spec and the ECU does not like it.
The other time to buy good branded gear is when the part is cheap but the install is hours - that wheel bearing will not be the 5.99 ebay special that's for sure!
Brand fakes are an issue though which is why I test what I can before install and take a good hard look at the quality of finish.
|
| |
|
|
|
|
|
Jul 19, 2020 13:32:43 GMT
|
X308 has the same hubs. I think I posted about the spanner I made for that nut on DIY Welding - check there for details:
If you didn't live in such an obscure place I'd lend it to you!
Old bearings removed by heat soak the hub in the oven, quench the bearing and getting medieval with drifts and BFHs. New bearings in the freezer overnight, hub back in the oven and the damned things quite literally dropped in, perfectly square and fully ungauged! ungauged? that's new. Engaged might make slightly more sense.
Edit: Found it unrelated thread:
But weirdly the link included there was about XK8 hubs!
|
| |
Last Edit: Jul 19, 2020 13:42:59 GMT by theoldman
|
|
|
|
|
Jul 19, 2020 14:12:46 GMT
|
|
Fortunately I have access to the Jaguar tool, a 20T press and a big Ugga dugga machine - not sure about a 330Nm Torque wrench though. I am hoping it will not be too much of a PITA.
|
| |
|
|
|
|
|
Jul 19, 2020 14:17:38 GMT
|
Fortunately I have access to the Jaguar tool, a 20T press and a big Ugga dugga machine - not sure about a 330Nm Torque wrench though. I am hoping it will not be too much of a PITA.
Sheesh!
That's tantamount to cheating!
|
| |
|
|
|
|


