The Doctor
Club Retro Rides Member
Posts: 3,434
Club RR Member Number: 48
|
|
|
|
Right, went for an APK last friday and it failed  Small list though, not too hard to fix (only the leaky steeringrack..) - NO rear brakes - sticking handbrake - rust on rear brake lines - balljoint cover has a hole - leaky steeringrack. Started on the rear brakes today, wasn't that bad, all came apart pretty easy, ordered new wheel cillnders and need to make another brakeline and then it can go back together.    Hopefully that fixes all the problems at the rear in one go |
| |
|
|
|
|
breng
Part of things

Posts: 223
|
|
|
|
|
Looking at the photo of the rear of the car, has the back of the sill disappeared where it has been covered by the spat?
|
| |
|
|
The Doctor
Club Retro Rides Member
Posts: 3,434
Club RR Member Number: 48
|
|
|
|
good spotting there, yes it has |
| |
|
|
breng
Part of things
Posts: 223
|
|
|
|
|
Get the welder out - I would fabricate a repair section and do it now rather than leaving it and having to replace the entire sill.
I like the spats, however they do have to be taken off periodically to check for tin worm, it will munch away and you won't be able to see it.
|
| |
|
|
The Doctor
Club Retro Rides Member
Posts: 3,434
Club RR Member Number: 48
|
|
|
|
Guess what happend today on our weekly monday evening get together in the barn   According to my mate it's not to hard to fix, so friday i'm going to clean it all up and try to make a repair panel for it.  In the mean while got an email from RimmerBros that my brake parts are on their way, so they'll be here soon aswell! |
| |
|
|
rodney
Posted a lot
https://www.facebook.com/RD-vehicle-transport-and-recovery-services-525622614268010/
Posts: 1,677
|
|
|
|
|
I'm impressed , the inner sill is very good , get plenty of wax in there,.
|
| |
facebook: rodney dean / rd transport  |
|
breng
Part of things
Posts: 223
|
|
|
|
|
At least you have caught it early - a decent repair and a bit of rustproofing and you should'nt have to touch it again.
Incidentally, I have just managed to obtain a pair of OE rubber spats that have large chunks of the car's sill still attached to them.
I think that tells you everything you need to know.
|
| |
|
|
The Doctor
Club Retro Rides Member
Posts: 3,434
Club RR Member Number: 48
|
|
|
|
haha, yes i'll get it filled with wax as soon as the repair panel is in!  Today I received a big box from Rimmer Bros again Containing all the parts I need to fix the rear brakes and all the parts to refurb the engine as I suspect one (or both?) of the headgaskets is on it's last leg. On top of the coolant dissapearing, overheating and mayo on the fillercap it's now also pushing out water on the overflow bottle every now and then. Still thinking what to do, I can buy a 100.000km engine for €250 and refurb that and then swap it in in a weekends time, or do the engine which is in there right now. I want to take out the engine anyway, as the enginebay is still full of old battery acid when the battery fell on the alternator some months before I bought it. |
| |
|
|
ChasR
RR Helper
motivation
Posts: 10,194
Club RR Member Number: 170
|
|
|
|
With the last statement in that post I reckon your mind is already made on taking the engine out . Good to see you are getting stuck in. You can't go wrong with an SD1 V8 in Vitesse form . |
| |
|
|
The Doctor
Club Retro Rides Member
Posts: 3,434
Club RR Member Number: 48
|
|
|
|
Yes, it's going out, whatever i'll do. But it's just me thinking between buying a second engine and then try and drive it like it is now (topping up the coolant after each run, and being red-lamped from the coolant level warning sensor after 30 km ) or save me the €250 and take the car off the road to do the current engine. Pain is i don't have a working car atm, so i'm leaning towards the first option, but it's another €250 i didn't take into account |
| |
|
|
|
|
rodney
Posted a lot
https://www.facebook.com/RD-vehicle-transport-and-recovery-services-525622614268010/
Posts: 1,677
|
|
|
|
|
put a new engine for now and rebuild and modify the old engine when you can afford to and have the time,.
|
| |
facebook: rodney dean / rd transport |
|
breng
Part of things
Posts: 223
|
|
|
|
|
Does the car still have the original 9.75:1 compression motor?
|
| |
|
|
The Doctor
Club Retro Rides Member
Posts: 3,434
Club RR Member Number: 48
|
|
|
|
|
i don't know what engine it has, all i know that it's leaking oil and water and it's a V8 ;D
The other engine is a 9.35 compression engine with carbs.
|
| |
|
|
teaboy
Posted a lot
Make tea, not war.
Posts: 1,943
Member is Online
|
|
|
|
|
Do the headgaskets.
Just because it is an eight cylinder does not mean that it is in any way a sophisticated or difficult engine to work on.
If you could do the HG on a mini you could do them on this.
|
| |
|
|
The Doctor
Club Retro Rides Member
Posts: 3,434
Club RR Member Number: 48
|
|
|
|
 everything cleaned and renewed, handbrake works as it should again. Now need to bleed the system and try if the rear brakes start to work as well! But that's a job for tomorrow. |
| |
|
|
The Doctor
Club Retro Rides Member
Posts: 3,434
Club RR Member Number: 48
|
|
Mar 11, 2012 21:05:42 GMT
|
Didn't bleed the brakes yet, as one of my mates who we share the barn with was kind enough to help me welding the rear (read: i was professionally standing in his way, while he was welding up my rusty rover ;D ). It's looking very good now (almost a TonyBMW repair, right?  ) and i'm sure it won't fail the APK on the rusty sill now.   Tomorrow i'm going to bleed the brakes, and then turn the car around to finish all the little jobs at the front. Then a retry for APK. |
| |
|
|
The Doctor
Club Retro Rides Member
Posts: 3,434
Club RR Member Number: 48
|
|
|
|
|
The problems with the brakes where worse then i thought, after replacing the rear lines, i wanted to do the fronts as well, just in case. Off course i stripped the thread of the 4th and last brake line. So i ordered some braided lines, those refitted and the brakes bled, they feel LOADS better then before, so that's great!
Last and final problem was a little drip from the steering rack everynow and then. When i took off the boot to see how big the problem was, i was greeted by a nice gush of PAS fluid, the leaking rack had filled the boot.
After loads of swearing and undoing parts, i got it out and last sunday i picked up a nice 2nd hand rack from a nice guy from the SD1 Club in Central London, who i passed on the way back from a holiday in Ireland.
So now i have some small parts in order, and then i can refit it and go for another APK!
|
| |
|
|
ToolsnTrack
Posted a lot
Homebrew Raconteur
Posts: 4,117
Club RR Member Number: 134
|
|
|
|
|
Sounds like its turned into a bit of a mission. good to see your commited though!
Keep at it, its a lovely big bus!
|
| |
|
|
The Doctor
Club Retro Rides Member
Posts: 3,434
Club RR Member Number: 48
|
|
May 22, 2012 14:44:30 GMT
|
Whilest waiting on some parts to swap the steering rack i started to investigate the water and oil leaks it had and the mayonaise which occured on the oilfillercap every now and then. After a couple of hours of working, it turned out to this:  I love this detail of the intake, shame i have to cover it up with a cover, maybe i'll make one with glass in to be able to see them. ALMOST CanAm style y0!  The heads where skimmed (they where round instead of hollow? never seen that happen before  ). In the same time i got the starter and alternator refurbished so they are all as new now.  Next weekend i'm going to bolt it back together and then gungum the exhaust one more time and try to get an MoT on it. |
| |
|
|
The Doctor
Club Retro Rides Member
Posts: 3,434
Club RR Member Number: 48
|
|
May 23, 2012 22:29:56 GMT
|
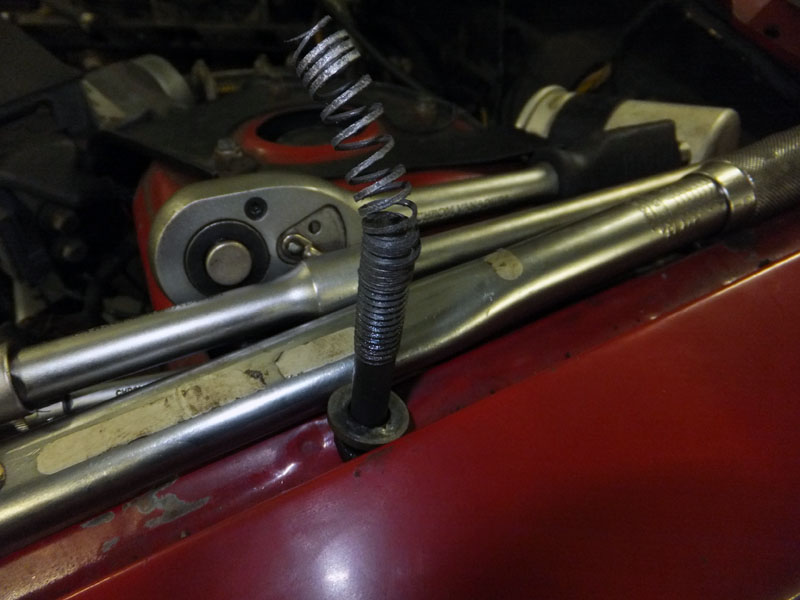 argh.... i should've stayed home this evening. I think my torquewrench is off it's settings, cause this is what happend when i went from 50 to 70 lbs ft (HBOL said 65-70 lbs ft for the headbolts). Helicoil time it is... |
| |
|
|
|
|


 ) and i'm sure it won't fail the APK on the rusty sill now.
 ). In the same time i got the starter and alternator refurbished so they are all as new now.