bstardchild
Club Retro Rides Member
Posts: 14,975
Club RR Member Number: 71
|
|
|
|
I'm just going to have to get used to your "that'll do" being the goal of perfection to to me PS It's OK - I won't tell anyone that you've lowered your stds it can be our secret  |
| |
|
|
|
|
braaap
Posted a lot
  
Posts: 2,750
|
|
|
|
And we won't tell potential buyers that Your car is only 99,5% rust free when You finally decide to give up and sell it on one day!  |
| |
|
|
ChasR
RR Helper
motivation
Posts: 10,309
Club RR Member Number: 170
|
|
|
|
I do enjoy the relentless quest for a rot free car  . This will be quite something when it is done. |
| |
|
|
teaboy
Posted a lot
   Make tea, not war.
Posts: 2,126
Member is Online
|
|
|
|
Yesterday the lovely Doctor was going for a spa day with her friend and staying over at the hotel so I would be able to get stuck into finishing off this repair section straight after work. Except her friend ended up having a car accident on the way there so she couldn't make it. She was ok but her car wasn't. The Doc asked me if I would like to join her in the evening as an emergency backup. As an evening meal was part of the deal I thought why not. I like steak... The Doc had a poached pear as dessert, I thought you might like to see it.  The only real downside to this adventure was that I missed out on breakfast at Ten Acres cafe and we were too late back to get any good creamy buns from the shop. I did eventually get into the tent in the late afternoon. I was offering this bit up to tack in place.  But it became clear that the groovey bit which runs horizontally on the picture was a good three or four millimetres too wide. This wouldn't be a problem if it didn't have to mate up to an existing groovey bit in the floor but it does and it was a country mile out from doing so. I spent considerable time moving the nearest edge of the groovey bit but that also effects all the rest of the piece which then has to be knocked back into place. I eventually got it somewhere like and tacked it in.  There was a bit more tweaking of the edges to do once in place before I could finally weld it in.  I am still not really enjoying welding this really thin stuff. I did notice that the welder I am using operates in a bit of a strange way. If you pull the trigger for a quick tack it sets off the gas and the arc but the wire feed lags behind so the wire burns back. You have to give it a much firmer squeeze of the trigger for it to work better. It is quite odd. Anyway, it is in now. I wire brushed it up.  But I haven't got around to cleaning the weld back because the Doc told me it was time to pack up and get ready for the F1 qualifying. We are off to Ten Acres tomorrow for a coronation dinner so I don't know when or if I will get chance to do anymore. Cheers. |
| |
|
|
ChrisT
Club Retro Rides Member
Posts: 1,670
Club RR Member Number: 225
|
|
|
|
|
Nice, is that pear desert cthulhu?
|
| |
|
|
teaboy
Posted a lot
   Make tea, not war.
Posts: 2,126
Member is Online
|
|
|
|
Nice, is that pear desert cthulhu? It does look like it could be one of the characters from Spongebob... |
| |
|
|
teaboy
Posted a lot
   Make tea, not war.
Posts: 2,126
Member is Online
|
|
|
|
I had a bit of time this morning before the coronation dinner at Ten Acres. I did a bit of a clean up of the welds on the underside. I've not gone too mad as I don't want to over thin the already thin metal.   I also cleaned up the inside, this has revealed one pin hole on the left hand edge, I've marked it with a felt pen so I don't forget.  I was going to spooge the lot up but as it needs that hole welding up there is no point. I don't have time to drag the welder out now because I need to go and get into my union jack suit ready for dinner (that's lunch if you're darn sarf). Cheers. |
| |
|
|
teaboy
Posted a lot
   Make tea, not war.
Posts: 2,126
Member is Online
|
|
|
|
We went for the coronation dinner, it was very nice. They even had creamy buns.  They gave me a bag of sausages for Fat Al, I tried to get a picture of him eating them but he wolfed them down and went back into the other room before I could get my phone out of my pocket. The Lovely Doctor has gone to bed to sleep it off so I decided to get that pin hole welded up, which I did. I've just spooged it up for now.   This was the old bit that came out.  The bottom half of it was not too bad but the top half has had it. It is the grommet hole to the right of this bit that is the next piece on the list. Cheers. |
| |
|
|
teaboy
Posted a lot
   Make tea, not war.
Posts: 2,126
Member is Online
|
|
|
|
Well, yesterday was a strange day indeed. The mother in law's moving out day so she decides that she's having a heart attack to liven things up a bit.  They came and carted her off on a gurney. It wasn't a connery (as Del boy would call it) but trapped wind. Anyway, she is now free to untrap that wind in her new abode, yay! After all the hullabaloo, I started making my repair piece.  I put the vertical fold in it at the same distance the old bit was at. 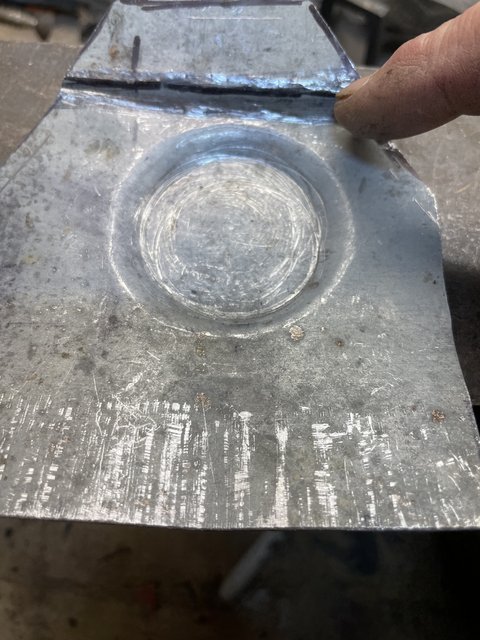 Except when I looked at the other side I had left a larger gap between the circley bit and the bendy bit when I repaired that.  The reason for that was that the rust hole on the side I did first was much bigger so I had less to copy when I made the bit. I never thought to look at the other side. Anyway, the larger gap between the circley bit and the foldy bit is now the new proper way it should be, so I had to chuck the first attempt and start again. Once I had hammered a new circley bit and done the new further away bendy bit I had this.  That foldey bit is not a straight line fold so it gives you a wrinkly bit to contend with.  This means there is too much metal there and you need to lose it somewhere. This is where the shrinker comes in.  Once the upward foldy bit is unwrinkled, we need a downward foldy bit. I did this by clamping it between two lumps of metal and bending it.  Then chase in the groovey bits. Side one.  Front one.  These were done with a chisel against the open jaws of the vice then tidied up a bit after. Doing the groovey bits against the vice gives us a straight groove.  But we really need a curvey groove, so it gets tapped up on a dolly clamped in the vice.  This gives us the bit of curve we need.  There is just the little triangle groovey bit on the right. 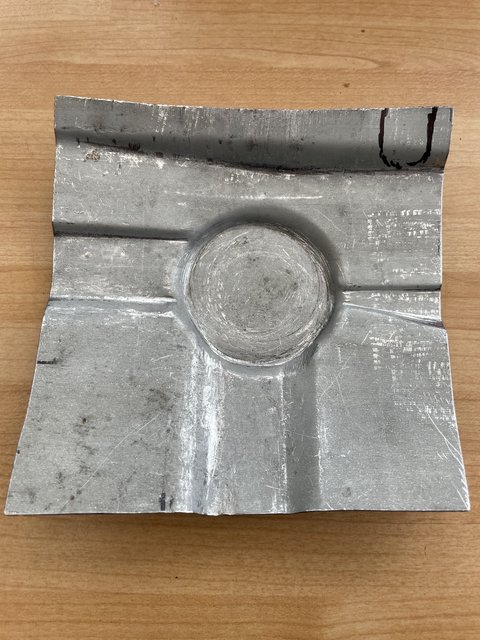 You might notice I had marked out the top right hand edge to knock in another groovey thing. Then I realised that I don't have to bother knocking that in at all. If I just cut that corner off instead.  Time to cut the old bit out. This is looking up from underneath. All that cardboard is grinding spark protection.  Check that the new bit looks at least something like the old bit.  Offer it into the hole to see what final tweaking is needed. 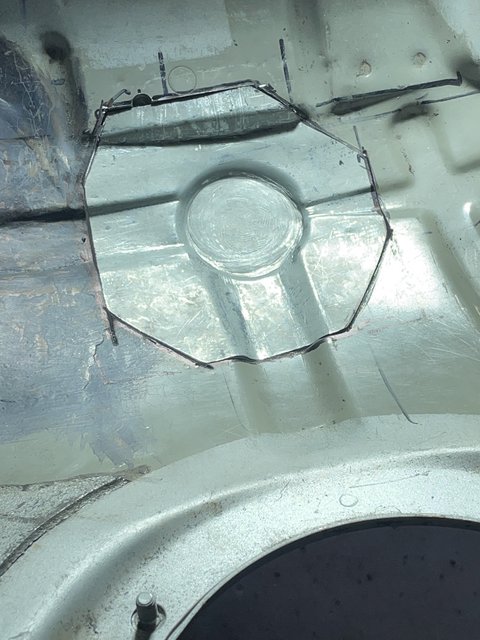 Do the tweaks and struggle welding the really thin stuff together.  Quick clean up to reveal any pin holes.  And that's where I am at, couldn't do any more because my knees were telling me they had had enough. Sadly there was nobody available to cart me off on a gurney so I had to hobble into the house under my own steam. Cheers. |
| |
Last Edit: May 9, 2023 22:49:19 GMT by teaboy
|
|
Frankenhealey
Club Retro Rides Member
And I looked, and behold, a pale horse! And its rider's name was Death
Posts: 3,887
Club RR Member Number: 15
|
|
|
|
|
This is going to be the ‘Trigger’s Broom’ of cars but in a good way.
|
| |
Tales of the Volcano Lair hereFrankenBug - Vulcan Power hereThe Frankenhealey here |
|
|
|
|
|
|
|
Fabulous fabrication once again
|
| |
|
|
jamesd1972
Club Retro Rides Member
Posts: 2,921  Club RR Member Number: 40
|
|
|
|
|
All this success and the MIL gone, but not in that way!
Interesting day by all accounts.
Nice job on sharing the nice job.
James
|
| |
|
|
teaboy
Posted a lot
   Make tea, not war.
Posts: 2,126
Member is Online
|
|
May 15, 2023 20:37:37 GMT
|
This is going to be the ‘Trigger’s Broom’ of cars but in a good way. I Think Trigger got an award for his broom.  Fabulous fabrication once again Cheers, Phil. All this success and the MIL gone, but not in that way! Interesting day by all accounts. Nice job on sharing the nice job. James Cheers, James. I'm living the dream!  Well, I have been deep undercover for a few days. Actually, we went on holiday by mistake.  To some place in France called Nantes. They have a cathedral there and apparently it took a while to build.  According to the guide above it took over 400 years, so perhaps ten years not to complete a 911 oil tank is not so bad after all. They also built a massive mechanical elephant.  Why they did that lord only knows, but they did. The real reason I went to Nantes was to go here.  I believe it is one of the largest arenas in France, outside of Paris. I went there for this.  I like geriatric German rockers, ok? The 9000 capacity arena was sold out so I'm not alone in that. If you are not into the Scorpions, there is always the Jules Verne museum.  The big fella with the sextant is Captain Nemo. Anyway, I'm back in Blighty now so back to reality. According to my daughter, it had rained all week. That might explain why the grass was growing wildly out of control so I needed to have a go at that before I could look in the tent. I didn't have chance to do much besides welding up any pin holes in that last piece and treating it with some spooge.  In the middle of the rear seat there are two globs of sealer.  There were similar globs of sealer in the rear floor pans and they hid drainage slots, some of which were very rusty indeed so I had to pull the stuff out to check it.  They are not too bad. The ones in the floor I hammered flush and welded shut and I will do the same with these, but not yet. I can't get to the underside until the axle carrier panel comes off so they got some spooge too.  Not the most exciting update I know, but give me a break, my garden is massive! Cheers. |
| |
Last Edit: May 15, 2023 22:07:47 GMT by teaboy
|
|
bstardchild
Club Retro Rides Member
Posts: 14,975
Club RR Member Number: 71
|
|
May 15, 2023 22:57:41 GMT
|
|
|
| |
|
|
teaboy
Posted a lot
   Make tea, not war.
Posts: 2,126
Member is Online
|
|
May 18, 2023 20:01:51 GMT
|
After easing myself back into it very cautiously on Monday it slowed back down straight away. It was the lovely Doctor's birthday on Tuesday so we went out for a celebratory bite to eat. Wednesday was quiz night and we were runners up, first of the losers... Now where was I? Oh yes, finishing off the rear seat area.  All this means that I'm getting dangerously close to having to drop the back axle. In order to do that I need to get the back end of the car up on axle stands because, despite being elevated, it is still standing on its wheels. I need to refit the plastic blocks back into the now strengthened jacking points so I thought it wise to paint some of my nearly e-coat colour epoxy on there first.  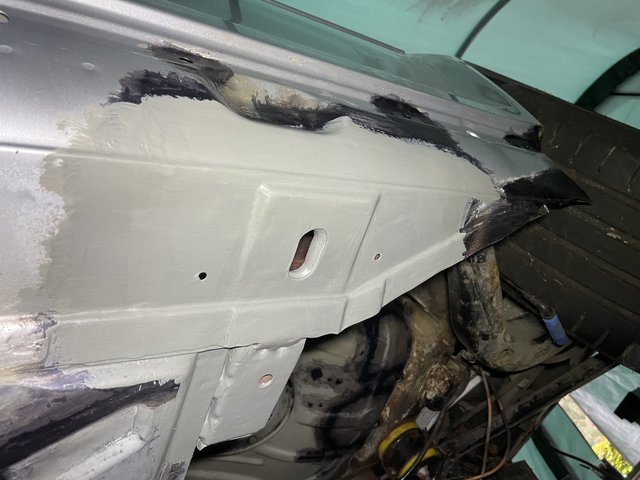 As there was a drop left I used it up on the rear seat.   I didn't go right to the back because I will need to weld there when I do the axle carrier panel. Whilst that stuff was drying I knocked up some thingmys.  I even painted those too but didn't bother to take any pictures when I was making them. Why on earth do I need two black painted thingmys? Find out in the next thrilling episode... Cheers. |
| |
|
|
nze12
Part of things
 
Posts: 193
|
|
May 18, 2023 21:02:59 GMT
|
|
Is it just me or are the latest pics not loading?
|
| |
1986 BMW E30 refreshed to original spec
1973 BMW E12 520 converting to Motorsport 530
1982 XJS V12 converting to 5 speed manual
Many landscaping projects overriding above!
Cogito cogito ergo cogito sum!
|
|
Frankenhealey
Club Retro Rides Member
And I looked, and behold, a pale horse! And its rider's name was Death
Posts: 3,887
Club RR Member Number: 15
|
|
May 18, 2023 21:07:16 GMT
|
|
It's you. I can see them.
|
| |
Tales of the Volcano Lair hereFrankenBug - Vulcan Power hereThe Frankenhealey here |
|
bstardchild
Club Retro Rides Member
Posts: 14,975
Club RR Member Number: 71
|
|
May 18, 2023 21:12:55 GMT
|
It's you. I can see them. I can too............... If I couldn't see them it wouldn't make much difference - I'd just remember the previous pics, the quality fabrication and metal bashing followed by neatly hot glue gunning and imagine same thing on a different bit  |
| |
|
|
teaboy
Posted a lot
   Make tea, not war.
Posts: 2,126
Member is Online
|
|
May 19, 2023 21:23:32 GMT
|
The paint has dried on the sill so I can get the jack point block things.  And stick them back in.  My pal Luke lent me some big-ish axle stands.  Obviously one of the pins was missing because they always are.  But the tops of the stands are too big to fit onto the jack point blocky things.  Hence the black thingmys I made previously.  Which worked lovely.  So now the wheels are in the air.   Now I need to remove the brake pipes to the rear brakes. There is a (semi) convenient join in the pipes where they come down off the front bulkhead and head off under the floor. For that, I thought I would be organised and made these. 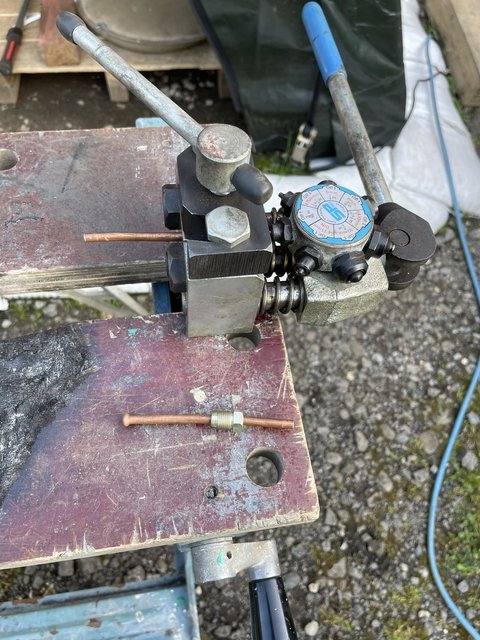 Which finished up like this.  These are to bung up the pipes which remain on the car at the front bulkhead. Of course being organised ready to plug brake pipes is a fantastic idea if your bungs fit... Actually, one bung did fit but the other didn't.  BMW in their wisdom used two different sized fittings presumably so that you don't mix up the left and right brake circuits. As I didn't have any of those bigger ones I had to snip it off the old pipe and make a new stopper, post-haste. The flow of fluid is now stemmed.  That black hose in the foreground is the clutch hose, it was perfectly positioned to obscure my view of the job. Anyway, the brake pipes are now off and I am one step closer to dropping the axle. When that will be I'm not sure, the doc has got some work lined up for me in the garden this weekend... Cheers. |
| |
|
|
Darkspeed
Club Retro Rides Member
Posts: 4,882
Club RR Member Number: 39
|
|
May 19, 2023 21:39:35 GMT
|
|
As you are not going to be watching the F1 - you have time to spare anyway
|
| |
|
|


 .
.


