|
|
|
|
|
Hey, all so my buddy has a truck that is near and dear to him. its a 1999 Toyota Tacoma v6 4x4. its in great shape because he has kept up on the frame rot repair and other issues that have cropped up. These little trucks are known for frame rot, but also, like most pick ups, suffer from a few other areas to watch for. Namely, the fender arches and bed floor where that meets with the inner fenders. I was just going to touch up the fender flares...thats how this whole things started. ![]()  I noticed that previous repairs done 2 years ago by a professional body shop had begun to fail. I wasn't going to take the bed off intially...but now it was not an option....  Boy, its nice having the lift. I didnt have to worry about scratching the cab, or pulling favors from neighbors...it just lifted it straight up...no fuss... Then I started looking at a few suspect areas..This one, I decided to tackle first:  it looks bad enought, but the surface just above the rot through is actually the bed liner!...they had filled the (then) smaller hole with bondo and smeared it all over the bed liner and onto the metal surrounding the holes. This of course, made things much worse and the holes grew from roughly 6-10" long to over 24" long! arrrgghhhh. 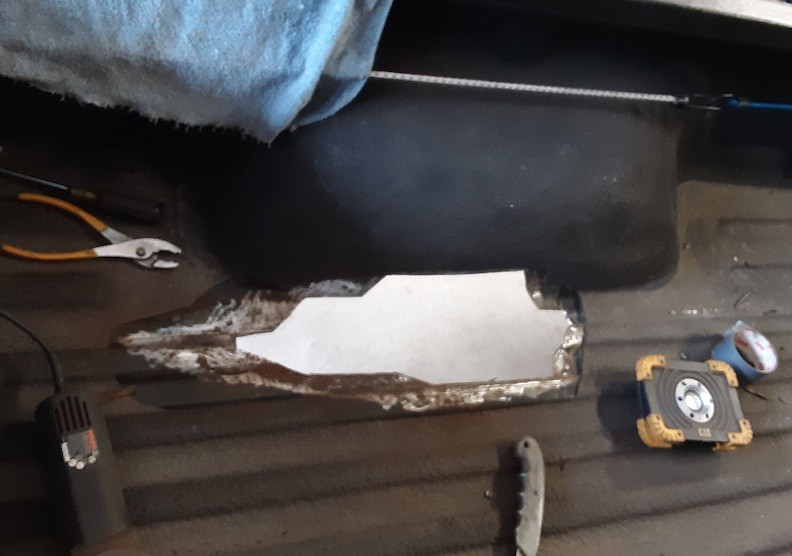 I had to cut through the 3/4" thick Rhino liner product to expose the damage...that Rhino liner is tough stuff! what a mess. and the results:  the big pieces are the rubberized bed coating (Rhino Lining) you can see the bondo still stuck to the bottom of it.......(grooves in it) Heres where it gets a little nuts. I cut out part of the floor from my old Dakota bed and believe it or not, it actually fits the Tacoma!...(for the most part) Now I really have to finish the Dakota!  First piece held in place with a couple of magnets:  second piece:  The gap you see is because there are two layers of metal. The inner fender lies on top of the floor piece....So that will be next...  they really made this much worse.....but hid things pretty well...for a while. nutjobs. thanks for looking.... JP |
| |
I know its spelled Norman Luxury Yacht, but its pronounced Throat Wobbler Mangrove!
|
|
|
|
|
|
|
|
|
|
Tried to get those patches welded in today, but my welding helmet is on the fritz...time for another one. I'm not taking any chances...
JP
|
| |
I know its spelled Norman Luxury Yacht, but its pronounced Throat Wobbler Mangrove!
|
|
|
|
|
Sept 8, 2019 20:24:51 GMT
|
got the floor pieces welded up...a few pin holes to clean up....then I'm going with Grumpy's Dinitrol products for the cavity fluid and undercoating....  JP |
| |
I know its spelled Norman Luxury Yacht, but its pronounced Throat Wobbler Mangrove!
|
|
recarouk
Yorkshire and The Humber
Posts: 435 
|
|
Sept 9, 2019 12:22:28 GMT
|
nice progress, shame it was supposedly fixed before. keep up the effort  |
| |
|
|
|
|
|
Sept 9, 2019 12:38:44 GMT
|
See, that's what I love about RR. A coupla years ago, 07lilredwagon was taking tentative steps into playing with his own motors/trailer. Now already, he's a to-go-to guy. Brilliant and I'm sure your mate's truck is in good hands!  Please note, for some of our American cousins, there is no irony or sarcasm intended or implied!  Genuinely impressed. |
| |
Last Edit: Sept 10, 2019 6:44:44 GMT by georgeb
|
|
|
|
|
Sept 10, 2019 2:54:40 GMT
|
|
thank you very much, georgeb!
RR is the BEST source for DIY save it at all costs projects. The quality and dedication on this site are amazing.
much appreciated.
JP
|
| |
I know its spelled Norman Luxury Yacht, but its pronounced Throat Wobbler Mangrove!
|
|
|
|
|
Sept 10, 2019 7:34:22 GMT
|
|
Great progress,
Looking forward to all future updates,
Nigel
|
| |
BMW E39 525i Sport
BMW E46 320d Sport Touring (now sold on.)
BMW E30 325 Touring (now sold on.)
BMW E30 320 Cabriolet (Project car - currently for sale.)
|
|
|
|
|
Sept 11, 2019 2:05:18 GMT
|
A lot of figuring out how to source some odd brackets for this truck today. I can find most of the items I need, but (cant believe I'm going with a design that caused the rust in the first place, albeit after 18 years or so)......I need the central inner to outer fender brackets that support the wheel arches...I may have to make them up myself, perhaps improving on the design if I can figure out how to do that..... but they did eventually trap enough dirt and road salt mist to rot the fenders.... anyway, I did get the inner fender patch in place 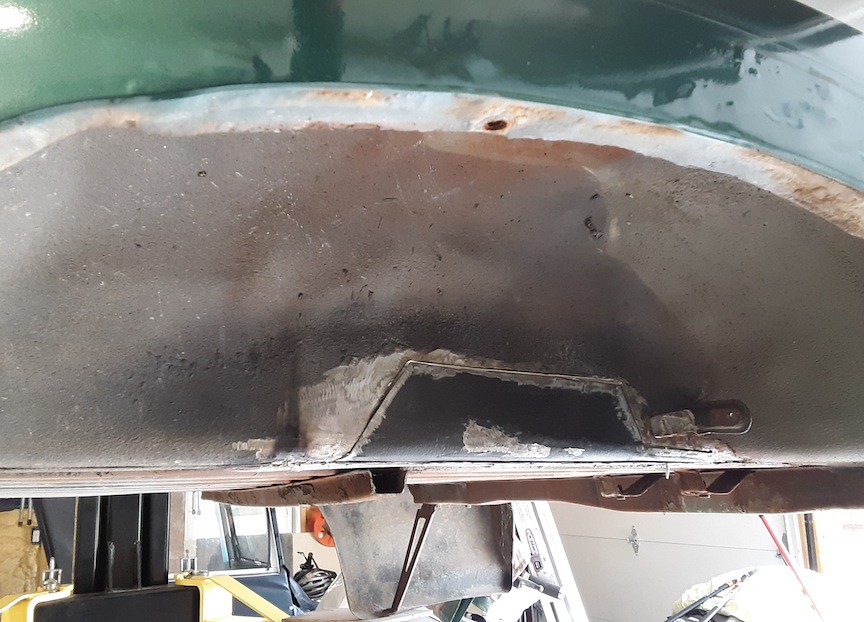 and welded in...pretty happy with the results.  One thing I learned, though cant believe I didnt already know this...is to oversize the patch a small amount, and trim the older metal (if possible) so the piece fits. I have been trimming the new piece all this time, which only leads to a greater chance of hitting thin spots in the older metal, or more rust... actually, I learned two things....and began pushing the welds with less torch angle. This helps with thin metal and overcuts from the grinder, and especially on places where there are gaps. Sometimes, though, the weld bead can get too big. re-angling the torch back toward the last bead tends to smooth it out a bit. coming straight down on the bead, overlapping by half helps with not blowing through as well.... of course, just when you think you have found a new way to weld, you realize there is no one way to do it...and the combination of techniques is the key...push, pull, angle, no angle, more wire speed, less, more amps.....you know.... I'm still learning...so any comments are welcome! JP |
| |
I know its spelled Norman Luxury Yacht, but its pronounced Throat Wobbler Mangrove!
|
|
|
|
|
Sept 13, 2019 0:33:23 GMT
|
Some new parts arrived today. The gas tank skid plate is made from heavy plate steel...heavier than needed, but wow....is it impressive!....and the repair patches came in too....now I can tackle those... I will need to make some new fender opening support brackets...and they are a little complicated...but I think I have an idea of how to make a "less prone to rusting" bracket from some tubing and gusset plates. ( been watching Binky too much!) 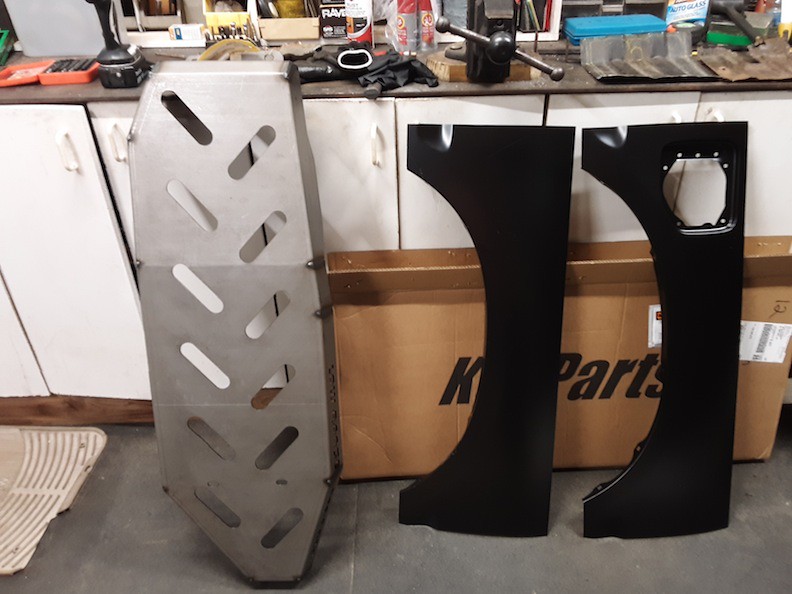 thanks for looking JP |
| |
I know its spelled Norman Luxury Yacht, but its pronounced Throat Wobbler Mangrove!
|
|
|
|
|
Sept 15, 2019 1:15:11 GMT
|
work continues on the Tacoma....Satisfied for now with the inner fender and floor, I decided to tackle the outer fender. the previous repair WAS done with SOME metal...but I don't know why they would waste time welding onto rust, and putting more than 1/8" of bondo all over the place. why not cut back to clean metal?.....I guess I didnt know much better a few years ago, but I don't run a body shop! They should know better.....Especially when told by the owner to "do it right, please".... too bad..the paint work is pretty good, the body work was shaped nicely, too...its just so unfortunate that it all had to be ruined by crappy "metalwork" rant over....Heres the first pic. you can see the rust that was separating the bondo from the metal and causing bubbles in several places.... 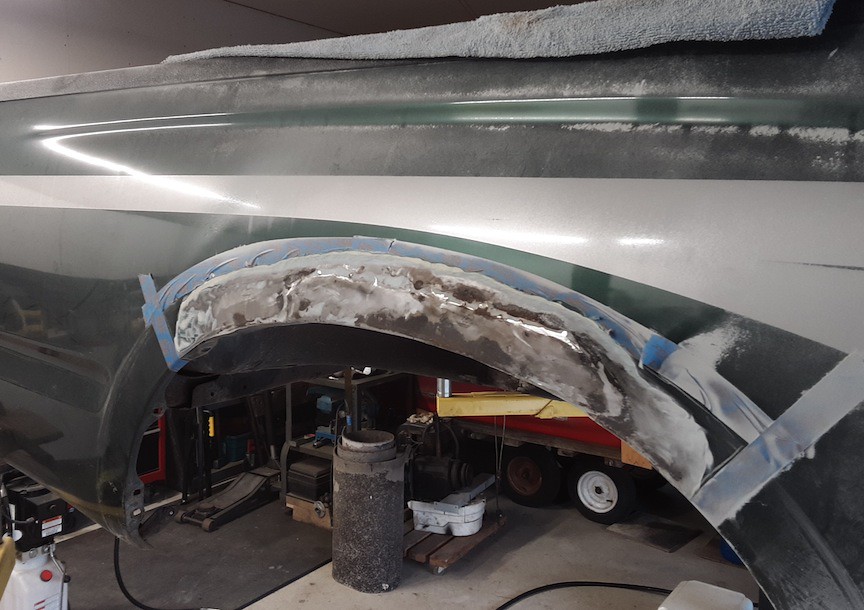 And what the old repair looked like from the backside. There is a bracket that bolts or welds to the fender lip here, which, as I said before, was the cause of the rot in the first place. I'm still trying to come up with a better designed bracket that will not cause the same rust to come back later....  And the first test fitting. I oversized the repair section a bit. glad I did....it gave me options. I realized here that I had to locate the holes in the fender lip exactly as the fender flare bolts on under there. so I had to make some careful markings and be sure I didnt loose the alignment. In hindsight....I would have made a flat template for the fender lip with the location of the holes...but this sufficed.....  I just clamped the fender flare onto the new piece and then put everything in place and marked the bed for final trimming...it worked! and the final piece in place and trimmed for welding. it was a good place to leave it for tonight.  JP |
| |
I know its spelled Norman Luxury Yacht, but its pronounced Throat Wobbler Mangrove!
|
|
|
|
|
|
|
Sept 15, 2019 18:26:48 GMT
|
Some fabulous work there. One day I'll have a crack at metal bodywork. One day...  Bookmarked this - coz I like it!! Cheers, Dave |
| |
|
|
|
|
|
Sept 18, 2019 23:48:24 GMT
|
Making some progress on the Tacoma... repair panel is trimmed to size for welding, now to clean the edges. 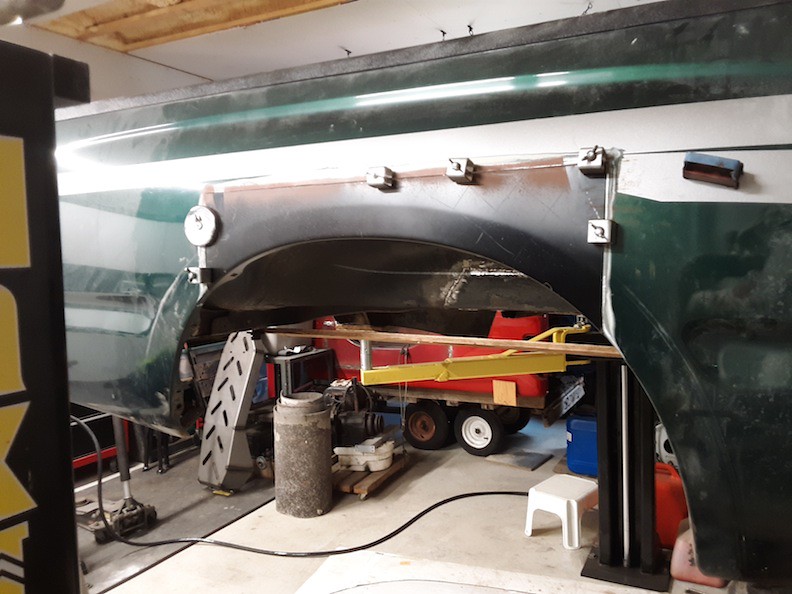 When cutting the rusty section out, the panel on either side of the cut shifted quite a bit...as there is some tension there. Getting a measurement based on something would be a small challenge...I used the bed to frame bolt holes, took measurements from the other side and shimmed the back of the panel so it all went back into the proper location. glad I didnt cut both sides at once without measuring! so its all even steven and ready to go....(you can see the board at the bottom of the pic....)  working tomorrow, so it will have to wait til Friday....getting there though... thanks for looking JP |
| |
I know its spelled Norman Luxury Yacht, but its pronounced Throat Wobbler Mangrove!
|
|
|
|
|
Sept 19, 2019 8:58:53 GMT
|
|
Always good watching you do the right thing.
|
| |
|
|
|
|
|
Sept 20, 2019 1:17:53 GMT
|
Always good watching you do the right thing. heh, heh.... sometimes its not always planned...and somehow, I occasionally get there in the end!  JP |
| |
I know its spelled Norman Luxury Yacht, but its pronounced Throat Wobbler Mangrove!
|
|
|
|
|
Sept 21, 2019 1:58:02 GMT
|
Hey, all I made some good progress today and got one repair panel welded in. Its just tacked in several places in the picture, but since then, I'm nearly done with the first round of welding. I did manage to get the panels to line up really well as I went...I also really took my time with each tack's placement. I waited until I was sure I was lined up with each one before squeezing that trigger.....  thanks for looking JP |
| |
I know its spelled Norman Luxury Yacht, but its pronounced Throat Wobbler Mangrove!
|
|
|
|
|
Sept 22, 2019 14:37:57 GMT
|
inch by inch...just filling in tack by tack moving around the panel...its slow going, but it is going!  So far, it looks pretty straight. A nice feeling to have the panel becoming solid again.... JP |
| |
I know its spelled Norman Luxury Yacht, but its pronounced Throat Wobbler Mangrove!
|
|
|
|
|
Sept 23, 2019 1:02:55 GMT
|
So I got some time in on the Tacoma this afternoon. The rear differential locker/unlocker has not worked in a while, so I put that on the bench to see why...sometimes its just an electrical connection and in need of grease....in our case...well, take a look what was INSIDE the housing!  the whole thing was filled with gravel!...I did find a small hole in the backside of the housing, but how this much dirt and gravel got in the housing is amazing! here is the hole with housing fragments I found inside...not sure how this happened, but there is evidence of someone being in there before me.  I cleaned up the mounting point on the rear differential and got some paint on there.....I was happy to get the electrical connections off without breaking them...  Then I started on the gas tank skid plate. Heres the old one out...not much left of it.....  of course the gas tank hanger strap was toast as well...so I'm actually glad we decided to replace the skid plate...  Then I was able to get some paint on the new skid plate after cleaning it up....This thing is really heavy duty.... 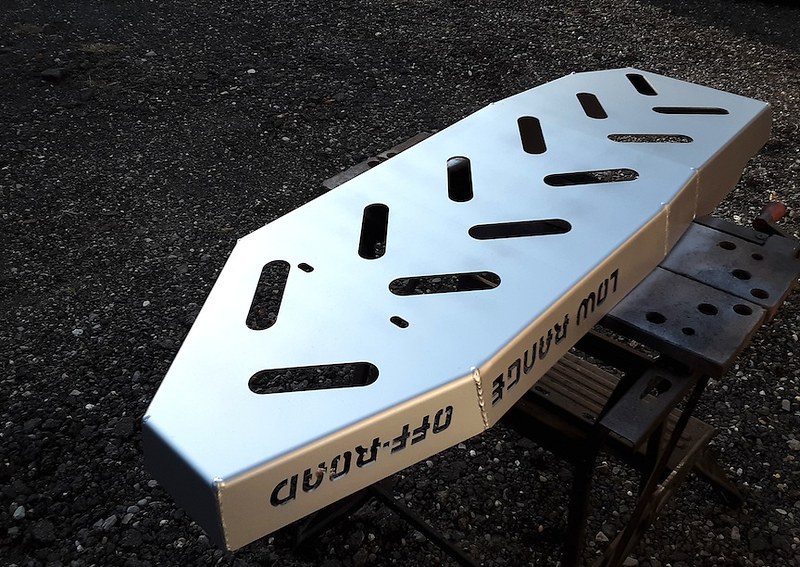 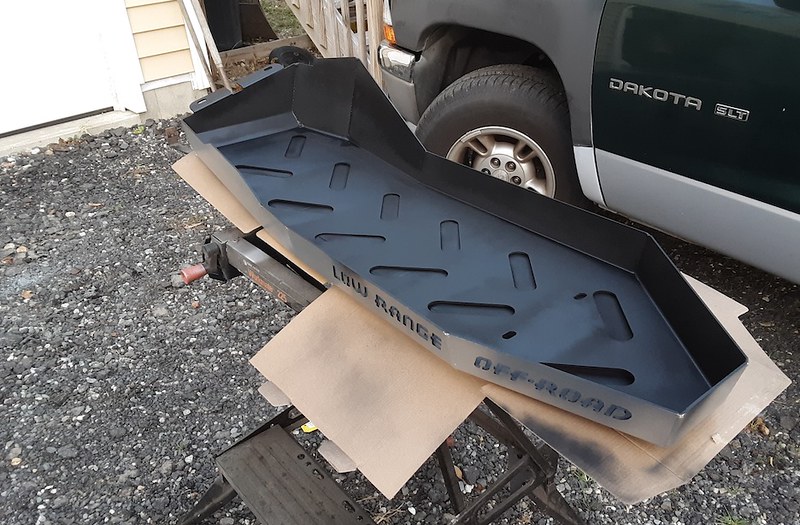 and a lick of paint on the cleaned ( took ages, very fiddly) diff locker shield  and thats about it...it was nice to take a break from welding...but now I'm excited to get back on that part of the project. thanks for looking... JP |
| |
I know its spelled Norman Luxury Yacht, but its pronounced Throat Wobbler Mangrove!
|
|
|
|
|
Sept 23, 2019 6:34:20 GMT
|
|
The old vs new is so different.
Loved the gas tank skid plate.
Worthy wall hanger somewhere 😏
|
| |
|
|
|
|
|
Sept 27, 2019 3:00:20 GMT
|
|
I think I finally worked out how to make my inner fender bracket..its really quite simple and made from bits from a metal swingset I just took down in the back yard. (I needed the tube steel) Ill get some pics out tomorrow.
I also finished up all but a few spots on the repair patch panel so thats looking pretty good too...
so whats next:
-sand blast the underside
-rust treatment/converstion
-weld in drivers side patch panel on the bed
-sand blast the frame
-repair a frame crossmember that I discovered is only sitting in place because its above the gas tank!
-replace a rusted out gas tank strap
-install gas tank skid plate
-paint then undercoat the under side of the bed and frame
-replace the differential lock mechanism and test it
-sand blast the inside of the rear bumper, then rust treat and coat in bed liner material.
more later!
ttfn
JP
|
| |
I know its spelled Norman Luxury Yacht, but its pronounced Throat Wobbler Mangrove!
|
|
|
|
|
Sept 27, 2019 22:59:15 GMT
|
Got a fair amount done on the Tacoma today..... outer patch just about done with the welding.... 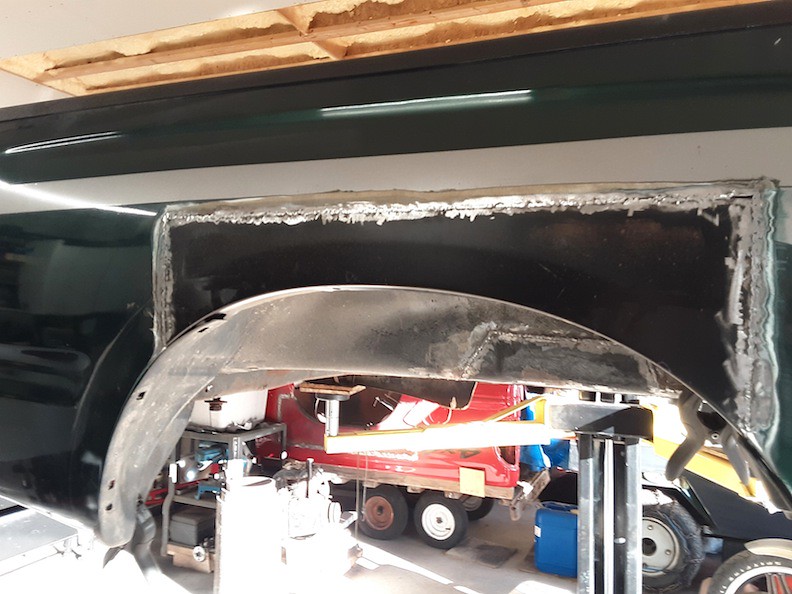 And I did get started on prepping the frame for paint and undercoating....I wire wheeled what I could reach and primed the surface in those areas...I do have access to a sand blaster, so will be getting the inside of the frame rails with that....  I knew one of the crossmembers was a bit toasty...but upon closer inspection, decided it had to come out....which was not easy. The bodges here were frustrating. They had removed the bed before...and from there, you can simply unbolt the crossmember. They did not...They just welded onto it and then welded it to the frame rails for strength instead of fixing the or replacing the part. arrrggghhh. this of course, made the job much harder, and the part is now toast. curse word!  the lower "ears" are completely gone which gave structural strength to the frame rail. Now, of course, there is a crack in one of the rails that I have to fix. here is the space where the crossmember fits...pretty nasty in there. You can make out the crack just above the small bracket...  Heres where I had to cut and reshape the bolt which they had run weld around for some reason. 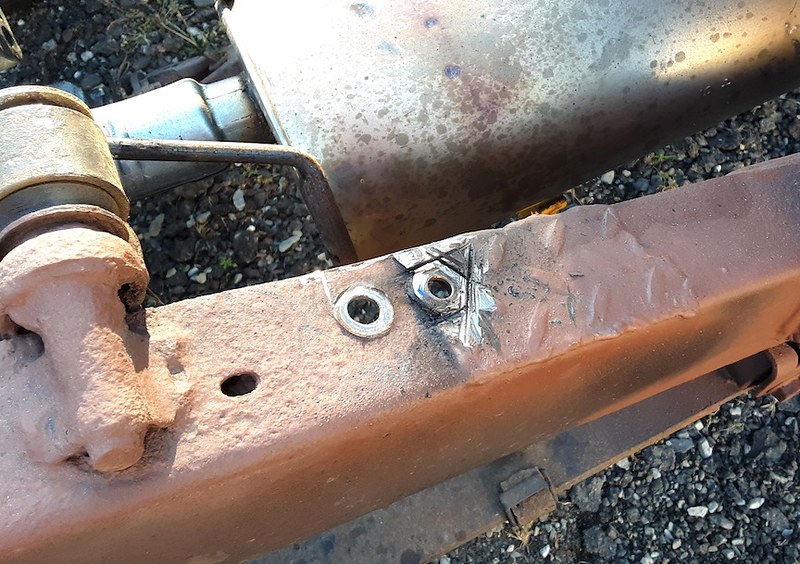 I dropped the tank so I could cut the crossmember out, and touched up any rusty areas...  and finally, I'm happy with the results of figuring out how to make my own version of the inner bracket. This bracket also holds up part of the plastic fender liner. There will be a "backbone" sort of brace to support the bolt hole arms. Ive been binge watching Binky and the bracket happy Nick...which gave me some great ideas....and though my efforts are Neanderthal in comparison, I think it will work out great. I have kept the bendy part away from the fender side wall (no more rust?), and where it bends further to match the angle of the liner in the pic (lower left on bracket) , Ill run a screw or plastic fastener to hold it all together. this will secure the liner, outer fender panel to the inner fender panel and hopefully not cause any further rust!  all in all a good day...I'm beat!...time for dinner and a nice beverage! thanks for looking JP |
| |
I know its spelled Norman Luxury Yacht, but its pronounced Throat Wobbler Mangrove!
|
|
|
|
![]()


