|
|
|
|
|
Where is that list? Nothing to check off but I did get some figuring done regarding the inner fender shields and inner brackets. I decided to redesign the cross piece. Using what I learned from making the heat shield brackets, I turned the edges up on either side of the cross pieces and this strengthened them quite a bit. very happy with the result. You can see the 4 pieces that will make up the 2 brackets. I will weld the bracket to the inner fender and have decided to bolt the other end to the fender arch return lip. The edge of the bracket will not touch the inside of the quarter panel like in the original design...I'm hoping this allows airspace between the bracket and the inside of the panel. It will be undercoated quite a bit too...and it is all up above the inner shield.  tacoma inner fender bracket 1 small tacoma inner fender bracket 1 small by jpgraphics2012, on Flickr  tacoma inner fender bracket 2 small tacoma inner fender bracket 2 small by jpgraphics2012, on Flickr and the inner fender shield. I did order 100 new plastic anchors that clip into the fender return...these made it easy to temporarily fit some self tapping screws to hold it in place....  tacoma inner fender shield 1 small tacoma inner fender shield 1 small by jpgraphics2012, on Flickr and finally, the heat shield...not very exciting, but also not available anymore...so it had to be repaired. ( I probably could have wrapped the muffler or something, used an aftermarket heat shield, but what the heck....  tacoma muffler heat shield 1 small tacoma muffler heat shield 1 small by jpgraphics2012, on Flickr Ill get the brackets figured out tomorrow then I can cross another thing off that list! thanks for looking JP Lists are for disorganised wimps. Morning mate. Progress...... |
| |
|
|
|
|
|
|
|
|
|
A bit more done today in between doing family stuff and running errands for more clips and parts, and undercoating and cavity wax....... Here are the inner fender brackets welded together after a great deal of trial fitting and measuring. They are up above the inner fender shields, so are very difficult to position. I ended up bolting them into place on the fender opening and used a magnet to hold the crossbars in place to line up with the holes in the shield. it worked eventually!  heres where I had traced the fender liner edge and measured using what I thought to be parallel lines from the edge of the shield to the holes for the bracket. It looks like Ill need minimal spacers between where the shield sits more or less relaxed and the bottom of the crossbars. I found some threaded clips and got some stainless bolts for them. Ill probably use a light duty thread locker just to make sure they stay in place. 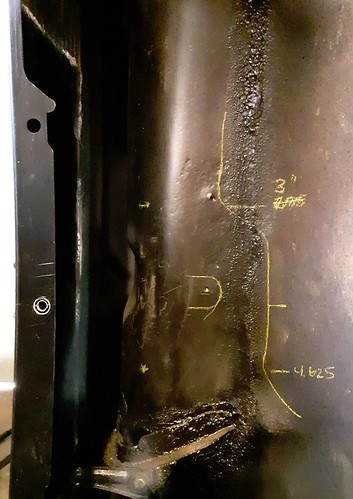 In the end, I got everything to line up nicely. The passenger side shield was ripped in two spots and it looks like the previous body shop melted a big hole in it right where the inner fender bracket was. hmmm, wonder why it rusted so badly right there?!? I used a hot glue gun and sort of plastic riveted a couple of patches in place. I did this by melting through the patch and liner with the glue gun just enough to inject some hot glue/liner mixture into each hole. then I seam welded the edges of the patch. it seems to have worked great. anyway, thanks for looking. JP |
| |
I know its spelled Norman Luxury Yacht, but its pronounced Throat Wobbler Mangrove!
|
|
|
|
|
|
|
So the final push continues! I got most of my listed items finished today save for a few reassembly items. -weld in DS fender arch repair panel-position and weld fuel filler brackets-position and weld inner to outer fender arch /fender liner brackets-Drill and mount rear mud guard brackets to new lower rear patches -install hub caps-tighten new shiny chrome lug nuts-attach heat shield-Undercoat bed with rubberized material and cavity wax-reinstall bed to chassis!-apply first skim coat of glass fiber reinforced filler, smooth and prime -take truck to body shop for final prep and paint! it was a long day, but we finally have our garage back just in time for a very big storm which is about to dump serious snow in our area...the Tacoma is parked safely and covered. The first pic is of the inner to outer fender brackets...I did get them buzzed in and undercoated. below is just after the seam sealer was applied.... 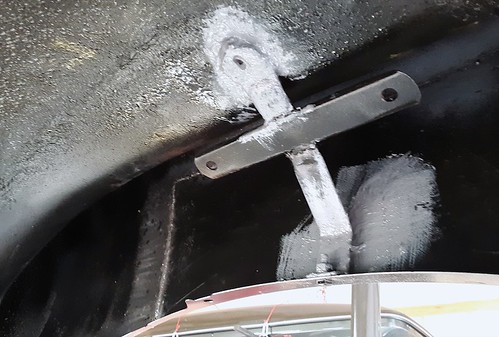 I was able to get the undercoating, cavity wax and welding done. The back of all repair panels have seam sealer applied too.... Heres the frame with its last coat of cavity wax, fluid film applied  and finally....the bed starts going back in place!  it looks like we are back at the beginning of this thread!  lower, lower lower....I used a jack to move the truck slightly so all the mounting bolts would line up  back in place!  Its really nice to be at this end of the project...it was not what I expected in the beginning...and honestly, I still have not painted those blasted fender flares!  thanks for looking JP |
| |
I know its spelled Norman Luxury Yacht, but its pronounced Throat Wobbler Mangrove!
|
|
|
|
|
|
|
working down to the finishing touches. The body shop cannot take the truck until after Christmas, so in the interim, Ill be sealing everything up so it can driven until then. The inner panels are all protected with the fender liners back in place to keep mud and grime out of there, too. I was able to refit the liners, rear mudflap supports, and a few other reassembly items today... I started with stuff that needed to be painted...like the rear mud guard brackets. I cleaned them up, painted and finished them with a couple of coats of bedliner material  Then I ground back the last of the weld beads on the arch repairs. I think Most of the welds are sitting below the surface of the rest of the panel and a few thin coats of filler should help get me on my way to a finished repair. I made a tool from some C-channel and welded a handle to it so that I could lightly hammer any high spots of weld bead back a little. I didnt want to distort the panel. I positioned the tool behind the weld bead so that the C-channel was on either side of the back of the bead. Then I just tapped it back until it was at least flush with the rest of the panel. Ill take a sanding block to it tomorrow and check for any lingering high spots.  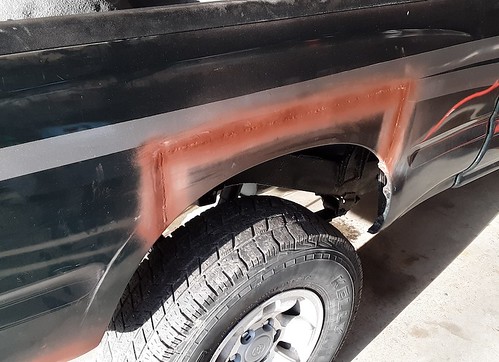 Then it was on to the inner fender liners: heres the one that needed a bit more "filler" work done. I added a lip to the repair so that debris from the spinning tire below would not accumulate right where the inner fender bracket attaches to the fender arch...  Then the wiring loom was zip tied to the underside of the bed (getting cavity wax all over my hands...its a good thing!) and the tail lights were repaired here and there and put back in place. (I cleaned up the bulb sockets in the back and gave them a coat of zinc paint)  Then it started getting cold and dark, so that was it for the day....tomorrow Ill get the first coat of filler applied! I'm looking forward to that. thanks for looking JP |
| |
I know its spelled Norman Luxury Yacht, but its pronounced Throat Wobbler Mangrove!
|
|
|
|
|
|
|
|
Feeling good yet ??
You should be.
|
| |
|
|
|
|
|
|
|
Feeling good yet ?? You should be. Almost, Grizz!...today will determine my mood moving forward! I'm hoping that my repairs did not leave me with too much extra work with the filler. wish me luck! JP |
| |
I know its spelled Norman Luxury Yacht, but its pronounced Throat Wobbler Mangrove!
|
|
|
|
|
|
|
Feeling good yet ?? You should be. Almost, Grizz!...today will determine my mood moving forward! I'm hoping that my repairs did not leave me with too much extra work with the filler. wish me luck! JP Good luck Keep the skimming light. Add as needed rather than lump it on. |
| |
|
|
|
|
|
|
|
Thanks, Grizz...I took your advice and made some good progress today. Now, I know I'm getting ahead of myself here, but look what I started on:  Yep, the fender flares!...Satin black should do nicely, I think. and on to the bondo..skim coat after skim coat, after skim coat. I gotta hand it to you guys that do this on large projects. I cannot imagine doing a whole panel or a roof, or something with a really long compound curve!....I did use Grumpynortherner's trick of penciling in the good sections, and drew circles around any low spots, ready for the next coat of filler. I used the bondoglass for the first few coats for added strength...and that stuff is tougher to sand back down...   sanded back and then the next coat! 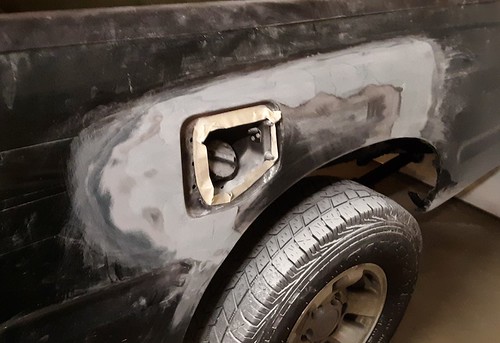 and again!   This went on for some time and went fairly well. I didnt sand too much off with each coat and just kept at it...I wont bore you with more pics of that, but it is looking good. I test fitted the flares several times and they tell me where any low spots are. amazingly, they are looking like they will fit quite well.... Mood going forward: good! thanks for looking JP |
| |
I know its spelled Norman Luxury Yacht, but its pronounced Throat Wobbler Mangrove!
|
|
|
|
|
|
|
Final details continued! Bumper went back on after rust treating the brackets, ect....man is it messy with undercoating under there...I had to clean all my tools after installation.....  And the body work is starting to look like something!...Kept plugging away at it today.  I was able to get some definition back into the fender lip. Its a subtle feature (hidden by the fender flares, of course) but it is there, for sure. Getting it right means the seal around the flares seals well.... I used a compass to draw in the dimension for the lip 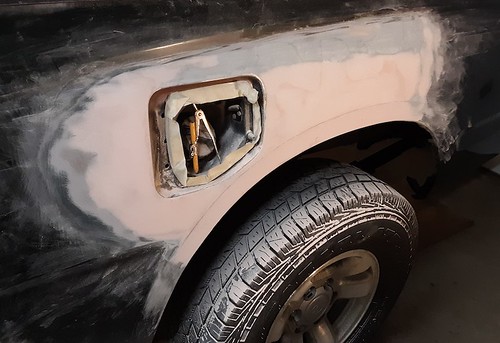 and on the other side...roughed in  The flares have been spot putty'd and painted satin black. The hard part was taping the bonded to the flare rubber seal back away from the surface so I could repair/repaint them cleanly...just taping them in place was not working well...so I had to clean inside the lip of the seal, tape there and fold it up and out of the way. tomorrow, Ill finish up the bondo, get some primer and temporary paint on there and button things up. thanks for looking! JP |
| |
I know its spelled Norman Luxury Yacht, but its pronounced Throat Wobbler Mangrove!
|
|
|
|
|
|
|
So the truck was picked up today by my buddy Paul and it was with mixed emotions for me to see it pulling out of the driveway. Cant believe it was 3 months ago that we started this project!...Thats a long time to paint some fender flares. We still need to coordinate with the body shop in a few weeks to finish up the final body work and get it painted. I don't think I left too much work for the body shop....I'm happy with the results. Its maddening and therapeutic all at the same time! I think I went 6 rounds with the bondo and 3 with the bondo glass. anyhoo...here are the last pics for a while...I used some all purpose primer and flat black paint as it will all be sanded back down for final prep, then the real stuff can go on.... last application of bondo!  and some flat black paint. Its a nice color as it does not stand out much against the green paint. its tolerable for a couple of weeks until its painted for good!   and the fender flares are done too...They had taken quite a bit of abuse from road debris and whatnot...so required several applications of spot putty...but they look nice now.  sorry for the crappy photos tonight...not sure what the deal is with this phone...sometimes it takes good pics, other times....not so much.... thanks for looking! JP |
| |
I know its spelled Norman Luxury Yacht, but its pronounced Throat Wobbler Mangrove!
|
|
|
|
|
|
|
|
|
|
Wise move blowing some paint over it.
And Fender flares are good too.
|
| |
|
|
|
|
|
|
|
Progress continues with some professional work at my friends body shop. I was able to pitch in and help with sanding and preparation, masking, ect. Its good to be in that environment and see how the pros make things happen. The temporary paint was removed and sanded back to the filler. My buddies Pete and Paul worked their magic on the final skim coat of polyester and primer and it looked better and better as the day went on.   high build primer   and finally ready for the booth with some masking and seal coat. Its a durable coat of primer that is resistant to corrosion and the elements.  I cleaned it with prep all, then cleaned it again, then again, and finally once in the booth, cleaned it again!  all so that the good stuff could go on.  it will sit over the weekend, then get some color. I was offered to try my hand at applying the color, but passed on it...Ill stick to painting smaller stuff! pretty excited about the finished product! JP |
| |
I know its spelled Norman Luxury Yacht, but its pronounced Throat Wobbler Mangrove!
|
|
|
|
|
|
|
|
Very cool. Any time spent around good pro's (like your friends) always reinforces for me why they deserve every penny they get paid. John
|
| |
|
|
|
|
|
|
|
Very cool. Any time spent around good pro's (like your friends) always reinforces for me why they deserve every penny they get paid. John Very true but you will be amazed at the amount of people that have little understanding of the costs involved in painting vehicles |
| |
|
|
|
|
|
|
|
Very cool. Any time spent around good pro's (like your friends) always reinforces for me why they deserve every penny they get paid. John Very true but you will be amazed at the amount of people that have little understanding of the costs involved in painting vehicles This is so true. I am helping in the shop to help mitigate the cost there. Just the paint and materials are expensive...not to mention professional labor. they are putting aside insurance jobs for this refurb.... My buddy decided to have them repaint the roof too....so will now have peace of mind that the truck will be good to go for a while longer! Ill be there tomorrow to help them finish up and at some point refit those darn fender flares! jP |
| |
I know its spelled Norman Luxury Yacht, but its pronounced Throat Wobbler Mangrove!
|
|
|
|
|
|
|
Very cool. Any time spent around good pro's (like your friends) always reinforces for me why they deserve every penny they get paid. John Very true but you will be amazed at the amount of people that have little understanding of the costs involved in painting vehicles Very true, I used to work at a bodyshop when I was younger and learnt a lot from the guy who ran it, a lot of the customers had the attitude "while you have the paint in the gun" as if we could just paint over the massive dent in the wing or a rust hole in the bonnet while we were painting a door and it would be fine.
I'm afraid I believe the problem stems from people decorating their houses and house paints and materials are very forgiving where as car paints are not. Imagine painting the inside of a house in high gloss white car paint sprayed on, it would look awful with all the marks on walls, wood etc.
|
| |
|
|
|
|
|
|
|
So true, you guys. Spending the day there today was a real learning experience. I prepped a few hoods, fenders and doors while my buddy painted and cleared the Toyota. You cant just paint the parts when they come in. they need to be prepped, cleaned, sometimes fixed or returned, ect, ect. Getting them to fit on the vehicle with acceptable panel gaps is also another issue... I did relearn how to use a good DA sander, watch the pros at work, and see the results of using a good paint booth. I also went and got lunch at the market down the road. Whatever they needed! Color goes on, then the clear. Once the booth went through its computer controlled drying cycles, we were able to open the doors and check out the results. I am very pleased. I was the "flatter backer" and got the fender sides looking nice and smooth   The roof needed very little flatting back for some reason.  Tail gate came up great too.  What a milestone!...tomorrow, we buff and polish and reassemble the parts! thanks for looking JP |
| |
I know its spelled Norman Luxury Yacht, but its pronounced Throat Wobbler Mangrove!
|
|
|
|
|
|
|
|
Lovely! Great results on a worthy vehicle. John
|
| |
|
|
|
|
|
|
|
|
Well done !!!
And Happy New Year !!
|
| |
|
|
|
|
|
|
|
Happy New Year everyone! Truck is done for now until the Springtime when we put the graphics back on the bedsides. An application of glazing magically removed any minor swirls left from the buffing process. I moved it outside to give it a bath and took a few pics.  I was a little nervous when fitting the flares back in place, but apart from having to massage one of the bolt holes, they went right in, fit tight and look good....  the tailgate needed a bushing....  and outside  this could be a favorite shot  thanks for all the support and good wishes. JP |
| |
I know its spelled Norman Luxury Yacht, but its pronounced Throat Wobbler Mangrove!
|
|
|
|


