RobinJI
Posted a lot
 "Driven by the irony that only being shackled to the road could ever I be free"
Posts: 2,995
|
|
|
|
 Admittedly, the cage is quite over the top for a road legal track day car, but hey, better safe than sorry, and easier to do a proper job of it now than re-visit later. Also I used up my share of luck when I was 18 by tumbling a Mk2 golf through some local woods. Somehow I got out without a mark on me, but I was bloody luck to do so! Even if it's OTT, I'll be a lot happier in the 924 knowing I've done all I really can to keep me (and more importantly in my eyes, my passengers) safe.
|
| |
|
|
|
|
RobinJI
Posted a lot
"Driven by the irony that only being shackled to the road could ever I be free"
Posts: 2,995
|
|
|
|
|
Thanks JP, I'm really happy with how it's come out. I'll feel a lot safer pushing the car hard on track now!
I'm not 100% what's next, I'd like to get the suspension done next and get it rolling, but the change of jobs has thrown things a little. I'll be changing software from Creo to Solidworks, which I find better for analysing moving systems. The front end's simple enough, but I feel like solid-works might let me do some clever things with the back end to hopefully improve the geometry over the fairly simple system I'd previously settled on. In the mean time I'll likely just keep tidying the shell up, and maybe dig out the engine and start taking measurements and making plans.
|
| |
|
|
RobinJI
Posted a lot
"Driven by the irony that only being shackled to the road could ever I be free"
Posts: 2,995
|
|
Nov 30, 2017 15:29:09 GMT
|
It's done! 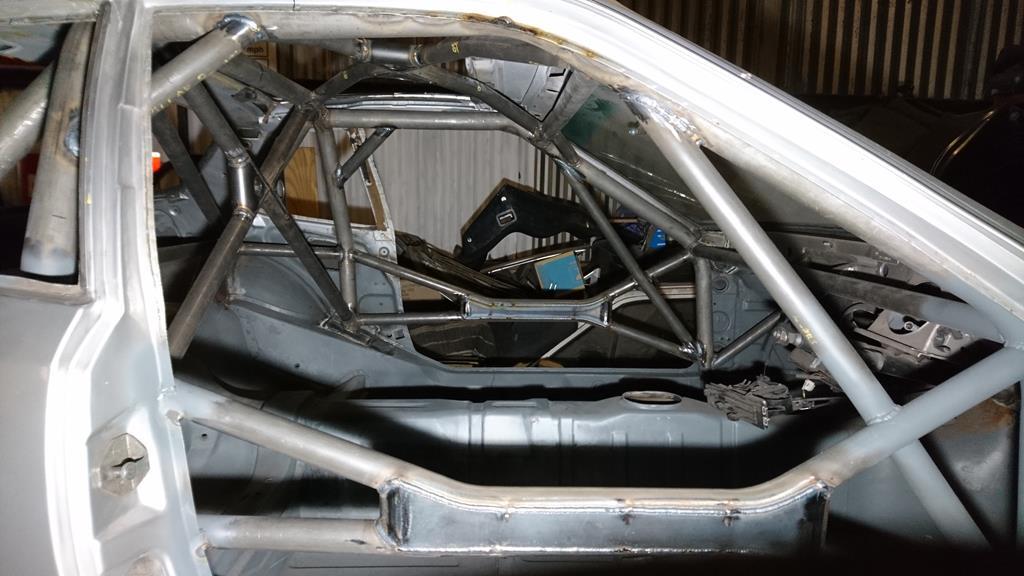 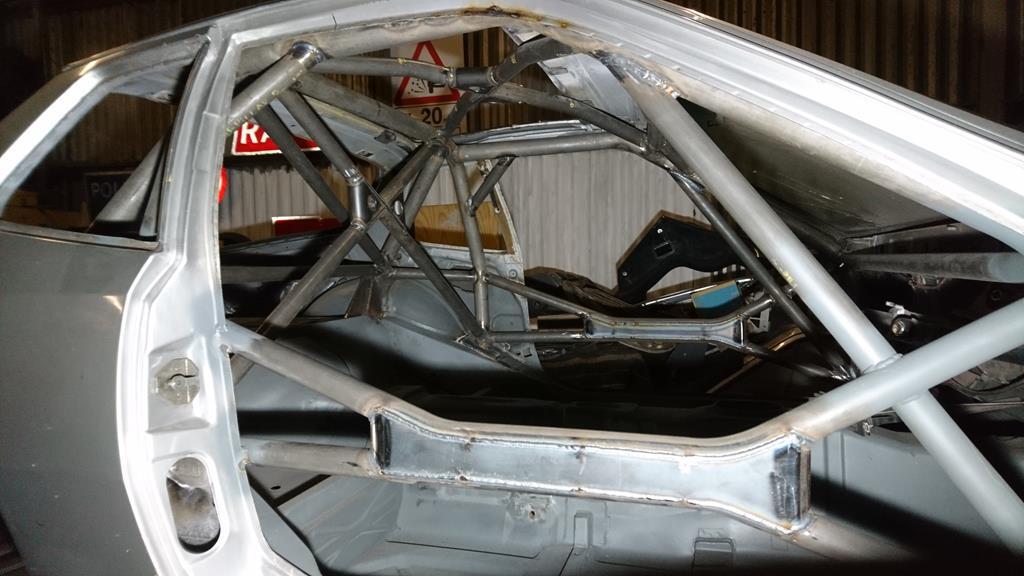 That's the gussets finished off, which is the last of the cage. There's some tidying up to do on the bulkhead still, but the cage its self is all finished! I need to get some zinc primer on it before it starts going orange now, as I don't fancy having to sand surface rust off all of it! |
| |
|
|
RobinJI
Posted a lot
"Driven by the irony that only being shackled to the road could ever I be free"
Posts: 2,995
|
|
Nov 26, 2017 23:11:16 GMT
|
No it's a Porsche..... Sorry couldn't resist. Excellent work! Really enjoy these updates, love the thought, care and attention to detail that's going into this build. Keep it up! You beat me to it! Also, thanks for the kind words. Well my week off has come to an end, so it's back to the day job tomorrow. This afternoon I managed to get a couple of the gussets in place, and a couple cut ready for next time I'm at the unit. Hopefully a couple of evenings work will see the cage completed. Although saying that, there's a few little finishing touches to potter away at while I finalise some suspension design stuff. Pictures! Gussets for the main hoop cross cut out and bent round a bit of tube then hole sawed: 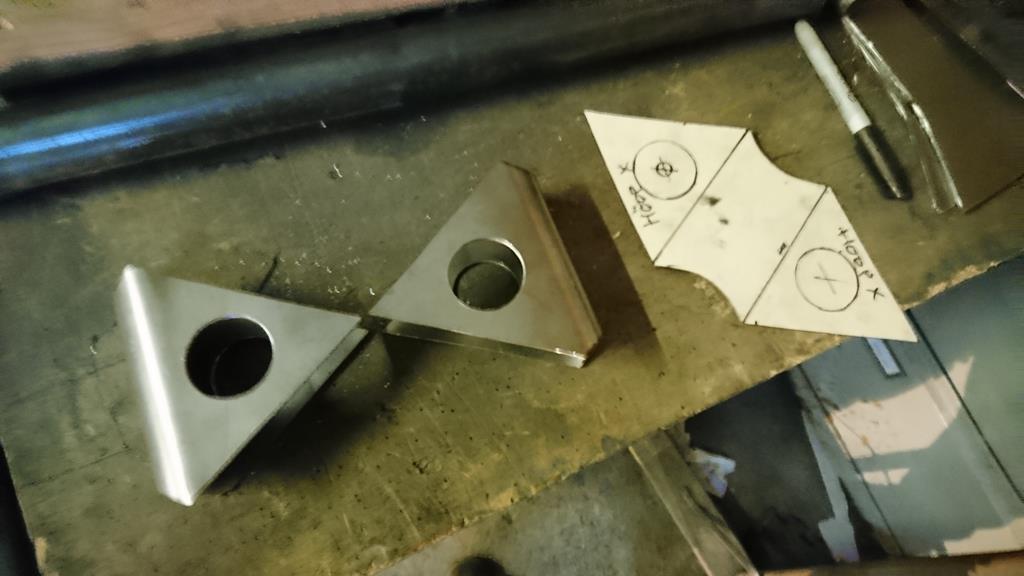 Then buzzed into place: 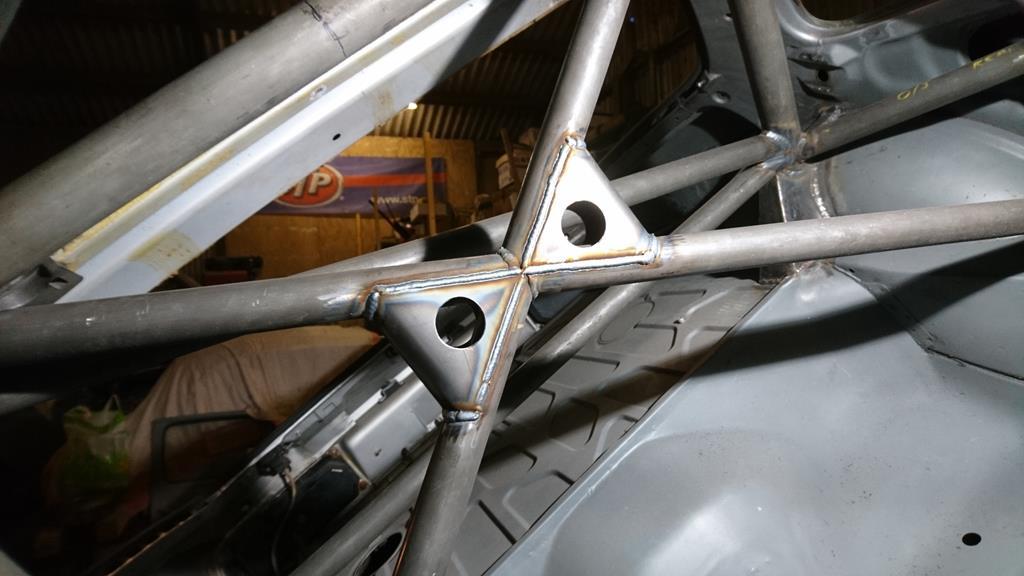 I contemplated turning up some dies to swage the holes, but the more I thought about it, the less it seemed necessary. The gussets reinforcing the joint acting as a stressed skin only, so there shouldn't really be any bending forces that'd require the added stiffness of a swage. It would have been a hell of a lot of work just for the look, and I'm more of a function over form kind of a guy, so plain holes will do. I don't think they look bad plain anyway! Anyway, in less holey gusset news: Drivers side door bar gussets: 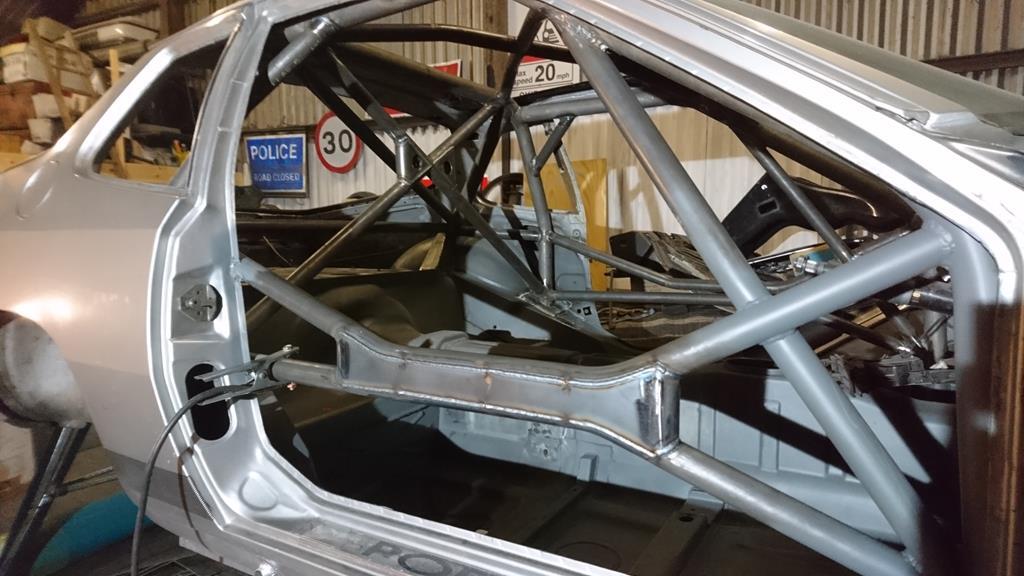 Without these the design I went for would have frankly sucked! And you can feel (and hear) the difference in stiffness when giving them a whack compared to the still gusset-less passenger-side. Back to work. I'll try and get out a few evenings this week. |
| |
|
|
RobinJI
Posted a lot
"Driven by the irony that only being shackled to the road could ever I be free"
Posts: 2,995
|
|
Nov 24, 2017 21:34:27 GMT
|
Thanks Darren. I'm massively happy with how it's turned out. There's one or two welds that aren't quite as neat as I'd like, but they're all good and solid, and on the whole it's come out way better than I expected my first attempt at a cage to! It's been a good week in general, as I've also landed a new job out of the blue after being approached by an ex-colleague about a position at his new place. Not hugely relevant to this thread, except that it'll give me access to a TIG welder.  My main job will still be CAD based, but I might be asked to help out with making the odd prototype or one off that doesn't fit in with normal production. I made it clear I was willing and eager to learn TIG! |
| |
Last Edit: Nov 25, 2017 9:33:07 GMT by RobinJI
|
|
RobinJI
Posted a lot
"Driven by the irony that only being shackled to the road could ever I be free"
Posts: 2,995
|
|
Nov 24, 2017 21:14:58 GMT
|
31 down, 0 left 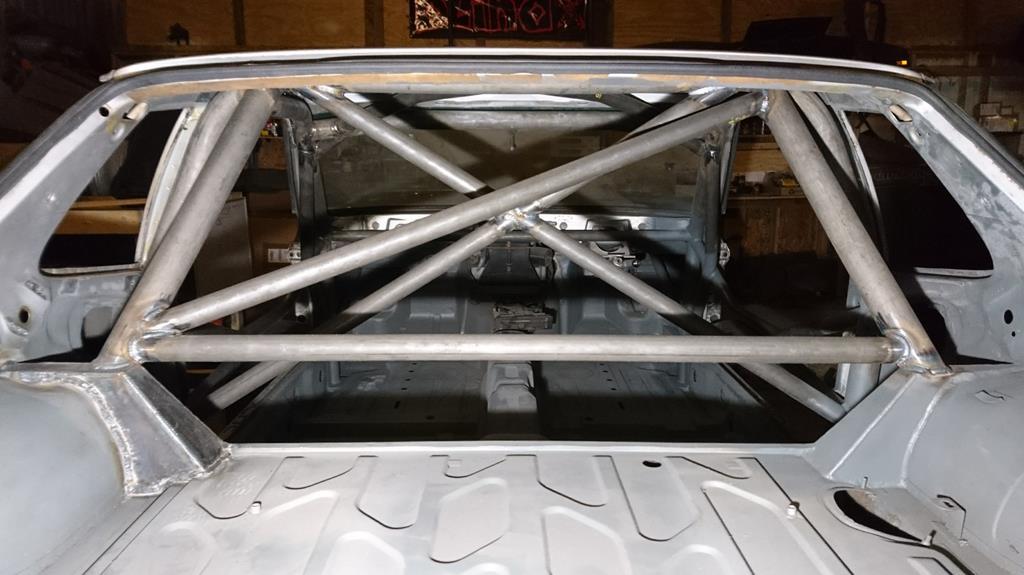 I've also plated up the bottom of the main hoops legs and welded all the bits where the cage is touching the shell around the door openings. Rear leg with the huge hole I'd cut to get the hoop into place welded back up, then a 3mm spreader plate added. The plate had to be put on in two halves so I could get it around the cage. One side had to be L shaped so it went up the side just enough to reach the bottom of a recess, to let me get the welding torch in behind it. Me being fussy about getting the cage to be a really tight fit (and through the sills in double shear) has definitely caused some headaches! 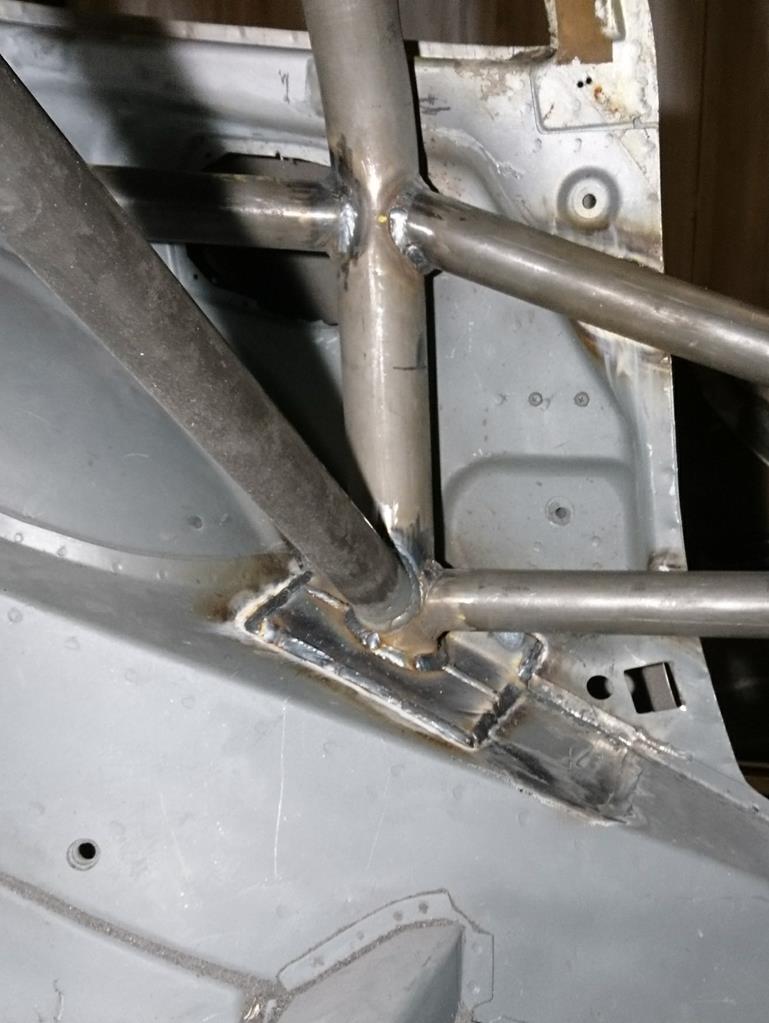 Then time for the underside. Again, the large hole I'd hacked out was filled back in then another 3mm spreader-plate added. I hole-sawed the plate to fit around the hoop, so it could be welded to it, then capped it off flush using the piece the hole saw had cut out: 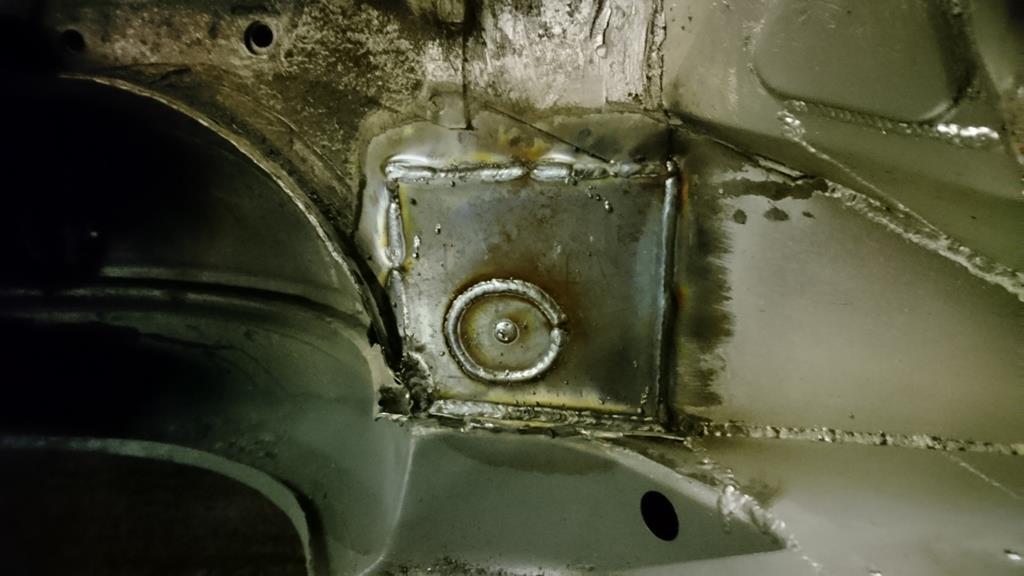 I'm going to leave that weld proud and visible, as it adds a clue to the method of construction, which could one day help a future owner or scrutineer out. The next job's to add the gussets to tie the two door bars together. (as well as some on the roof and hoop Xs) I've made templates already and I've got some 2mm plate waiting, so it should be a fairly quick job. This shot shows well how high the sills kick up at the back, which explains why the lower door bar doesn't bend down at the rear, and why I've wanted to pass the hoop right through the sills, and not end it on top of them: 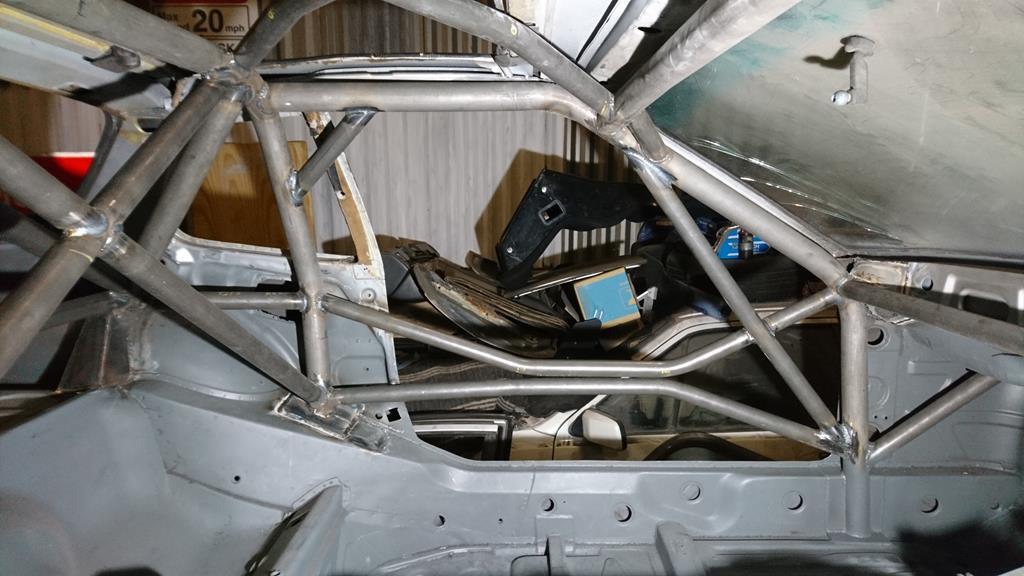 |
| |
Last Edit: Nov 24, 2017 21:19:19 GMT by RobinJI
|
|
RobinJI
Posted a lot
"Driven by the irony that only being shackled to the road could ever I be free"
Posts: 2,995
|
|
Nov 22, 2017 23:40:16 GMT
|
Bracing back from the door bars to the rear legs. Hopefully, should the worst happen, these will provide a nice force path front to rear around the cabin. 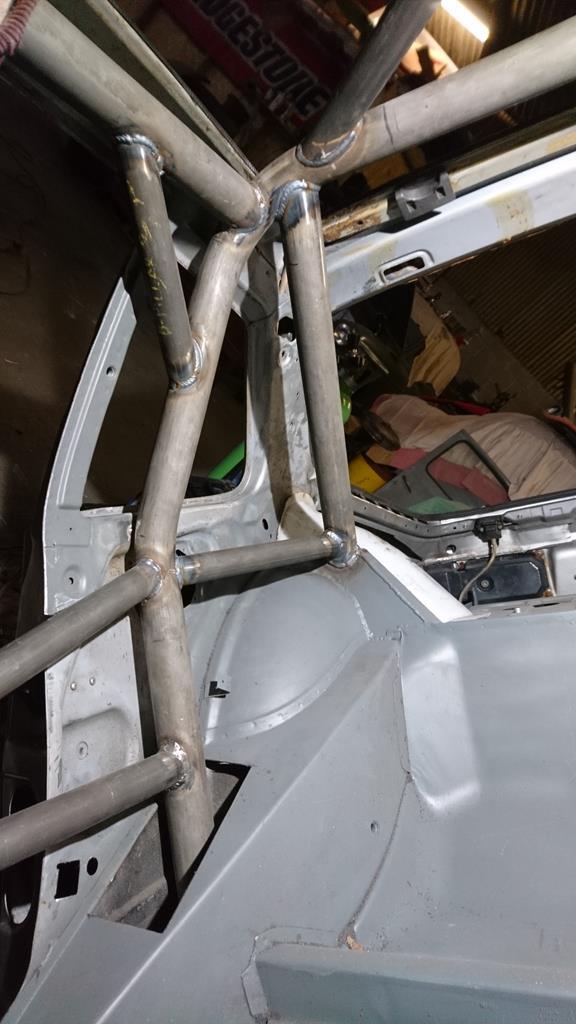 And the main hoop cross is in now too: 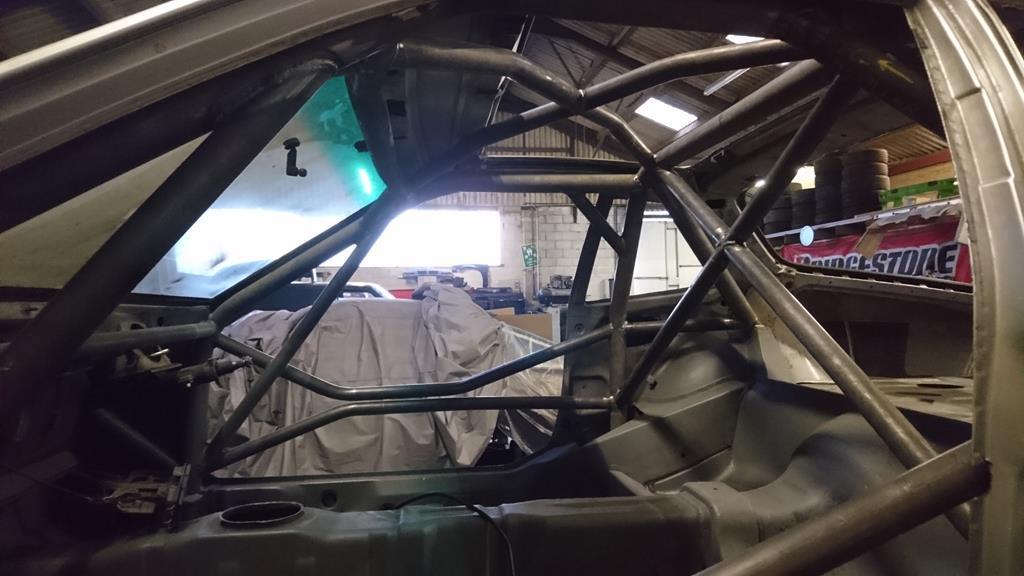 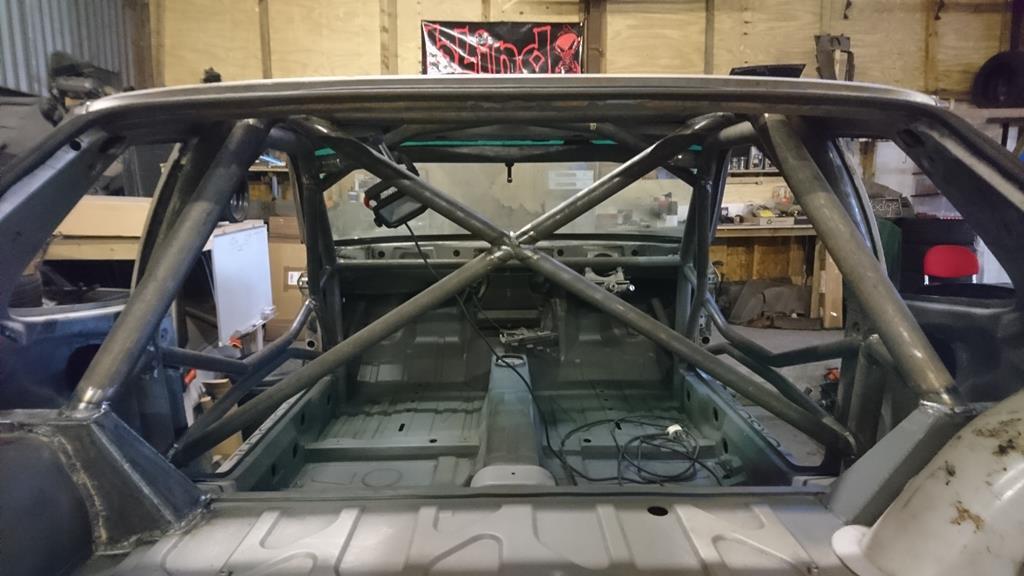 I did a quick count earlier, and that's 29 tubes in place, with 2 left to go. Getting there! |
| |
|
|
RobinJI
Posted a lot
"Driven by the irony that only being shackled to the road could ever I be free"
Posts: 2,995
|
|
Nov 21, 2017 21:33:20 GMT
|
Thanks guys! I've got this week off work in an attempt to use up my unused holiday before it resets over Christmas, so I've managed to get a bit further with the car, and hopefully I'll get further before the weeks out. With any luck I may even get the cage finished up! The front half of the cage is now done other than the gussets between the door bars. I've closed the holes through the bulkhead and tied both the front legs into the sills. I've also added some bracing at the b-pillars, as well as making up the passenger side 'turret' and adding the cages rear legs.  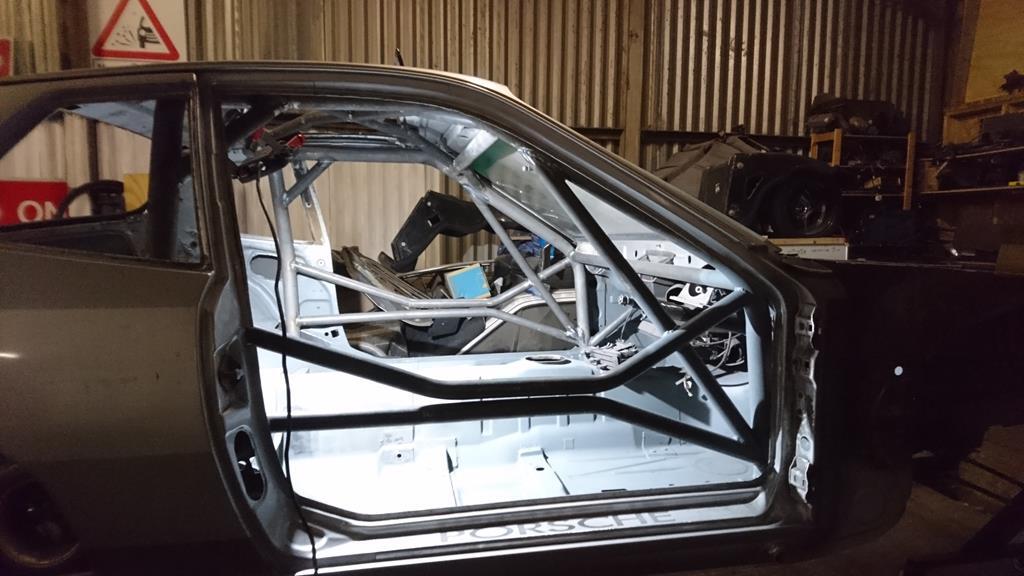 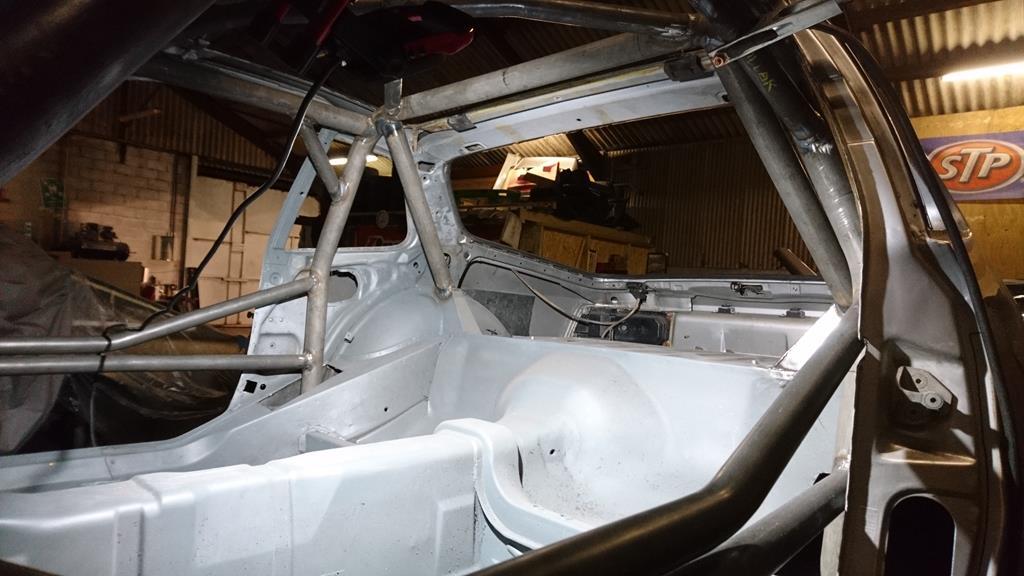 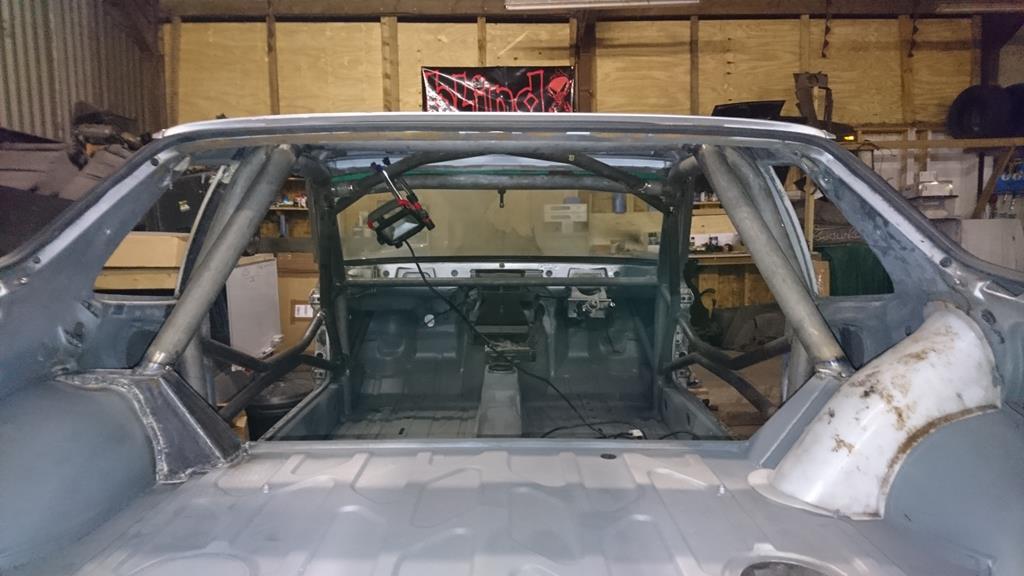 Still to do are the main hoops cross, a diagonal between the rear legs, a harness bar and braces from the back of the top door bar straight back to the rear legs. Then tie the main hoop into the shell at the bottom. (I want to do this last to try and reduce the internal stresses in the shell) Hopefully there will be more updates later in the week. |
| |
Last Edit: Nov 21, 2017 21:41:03 GMT by RobinJI
|
|
RobinJI
Posted a lot
"Driven by the irony that only being shackled to the road could ever I be free"
Posts: 2,995
|
|
Nov 19, 2017 22:22:54 GMT
|
^link isn't working on my phone? Odd. Its the "SIP Meteor 2300", which Toolstation sell for £36.27. (assuming it was my link not working) |
| |
|
|
RobinJI
Posted a lot
"Driven by the irony that only being shackled to the road could ever I be free"
Posts: 2,995
|
|
Nov 16, 2017 23:16:56 GMT
|
If you're in the market for a budget welding helmet, for an extra tenner over the cheap generic auto-dim ones, I can definitely recommend one of these: www.toolstation.com/shop/p32517?table=noThe viewing window is noticeably taller than the cheaper (and a lot of more expencive) ones, which can make quite a difference in tight spaces. |
| |
|
|
|
|
RobinJI
Posted a lot
"Driven by the irony that only being shackled to the road could ever I be free"
Posts: 2,995
|
|
|
|
|
Could the harnesses be run around the existing bar that the tank's sat on? Taking them further back will reduce the difference in angle between you and Tom driving it. It might be worth thinking about the height difference between the two of you, and how far back the mount will have to be so that a strap that's near horizontal for Tom isn't too steep for yourself.
If you want to give Tom some maths homework you could always get the calculator out to try a good practical demonstration of trig:
Seated height difference / Tan(Max angle) = distance to mounting point.
On the other hand, remembering school he probably doesn't need or want any more!
I've never been sure about harnesses running upwards from your shoulders. I think the issue is that they can promote 'submarining' out the bottom of the harness, which can cause the lap strap to ride up off your hips and onto squishy non-load-bearing bits of you. With inertia real belts the initial slack let's your body move more upright before stopping you, so you're less likely to slip down, but I think I'd still go with horizontal or a slight down-slope given the choice (especially as your seats look fairly reclined.) I believe the MSA yearbook recommends 0-20deg downwards, but allows up to 45.
|
| |
Last Edit: Nov 14, 2017 0:20:06 GMT by RobinJI
|
|
RobinJI
Posted a lot
"Driven by the irony that only being shackled to the road could ever I be free"
Posts: 2,995
|
|
Nov 13, 2017 11:26:08 GMT
|
|
Looking good!
As Fad says, it's more about the bias than moving enough fluid, but just as a point of interest, a single piston sliding calliper and a 2 piston fixed one should be considered as theoretically identical when doing any calculations.
Although there's only one piston, because the calliper will slide after the first pad hits, the piston will have to move twice as far, so the fluid movement's the same as a 2 piston. Then thanks to equal and opposite forces, the opposing pad will have the same force put on it that a second piston would have been providing, so the force is the same too. Hopefully I've explained that with a hint of sense!
|
| |
|
|
RobinJI
Posted a lot
"Driven by the irony that only being shackled to the road could ever I be free"
Posts: 2,995
|
|
Nov 11, 2017 12:44:41 GMT
|
|
The lane-change indicator thing makes some sense on paper, the issue I had with it on my e61, is simply that 3 flashes isn't actually enough to change lanes. I always wanted about 5.
Going completely against this thread, one detail I did like was the I-drive in that car. Really easy to use without distracting you from the road, and most importantly, it only dealt with optional stuff (like turning off the 'lane change' indicators), and they'd kept proper buttons for stuff like the climate control, and basic stereo functions. It meant I could adjust stuff exactly to my taste, but could still throw the keys to a friend without having to give them a half hour prep-talk on how everything worked. In fact, reading through this thread, that car had a fair few of the niggles from people have mentioned, but generally they could be switched off with the I-drive.
We've got a brand new Peugeot golf-sized-thing at work which does everything with the touch screen and its dangerously distracting to use. No tactile buttons means you have to stare at it to do anything with it (especially on a bumpy road), and sharing 1 screen to do everything means adjusting the heat isn't just pressing the 'increase heat' button, its exiting the stereo, to enter the heater controls, to increase the heat. Then a few seconds later a terrible song comes on and you can't just skip song, you have to exit the heater menu, to enter the stereo, to skip song. And that's if you haven't got to exit the sat-nav to do any basic function. It's genuinely dangerous.
Having praised the e61, the only thing I miss going from it to my e36 touring is the cruise control. None of the other auto-this, auto-that stuff took more than 30 seconds to realise I actually kind of prefer full control of everything, rather than it automatically doing stuff nearly as I'd want it to.
In terms of retro stuff, my 924 has the handbrake on your right by the sill. The thing I found most odd about it was that it was always getting out of the 924, and into the daily that felt 'wrong'. Having it by the sill, opposite to the gear lever somehow felt more natural, even though it was the car I used less (and not even for very long before it fell apart.)
The wind noise in my volvo 240 estate bugged me. It was such a comfortable cruiser that would have been such an amazing mile muncher, but as soon as you hit motorway speeds it sounded like you were clinging to a small crag on the side of Kilimanjaro in a storm.
|
| |
Last Edit: Nov 11, 2017 12:50:44 GMT by RobinJI
|
|
RobinJI
Posted a lot
"Driven by the irony that only being shackled to the road could ever I be free"
Posts: 2,995
|
|
Oct 31, 2017 20:21:56 GMT
|
Thanks JP. I'm not sure if an intruder would be more scared or confused by a rattle snake in rural Somerset! Well I accidentally solved the 'will the screen be usable' debate: 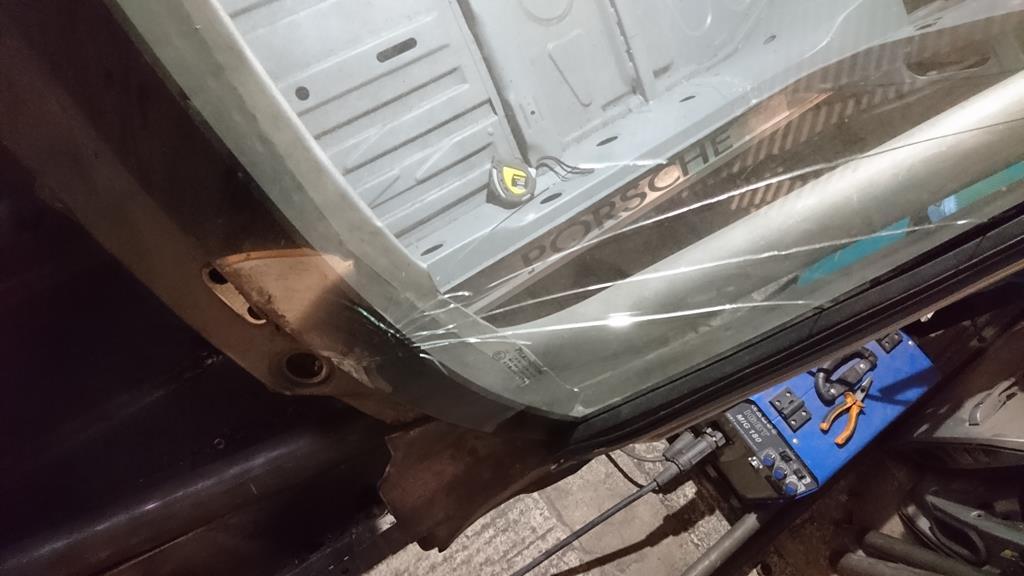 Woops! I was trying to knock the wiper spindle down through the scuttle and caught the edge of the screen. I can be a clumsy tit sometimes! Right, so cage progress: So with all the roof level tubes in place, it was time to cut the tack welds holding the cage up in place and let it drop down to hopefully give enough space to get the welder into the top of the tubes. Yep, that'll do! 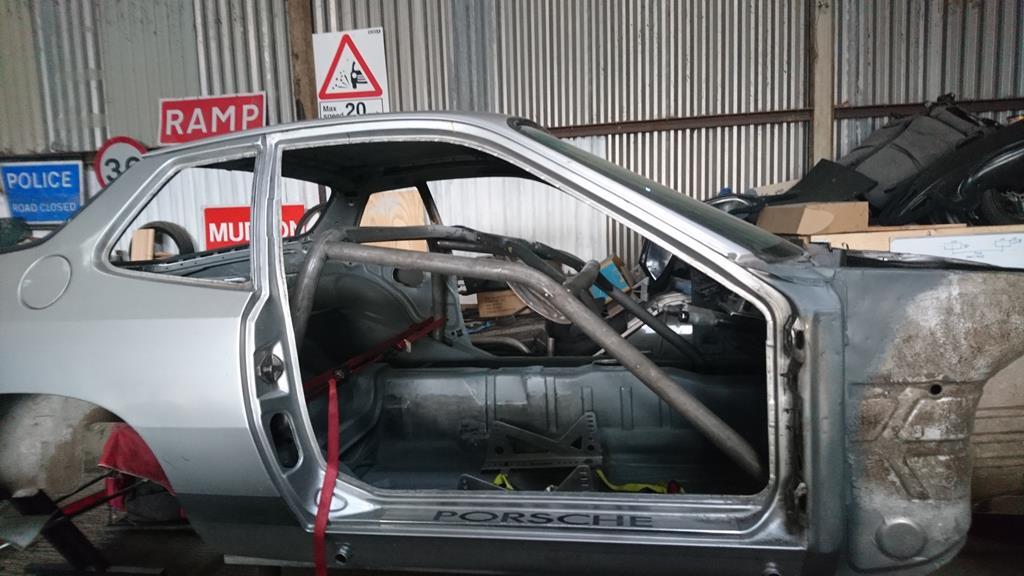 Welded up: 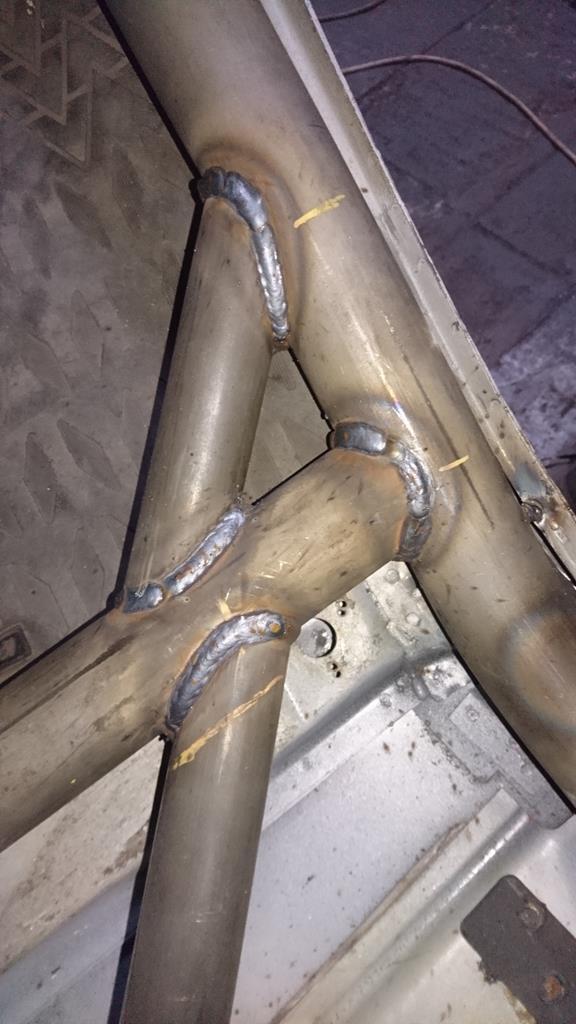 Next up, bracing forwards to the front turrets: 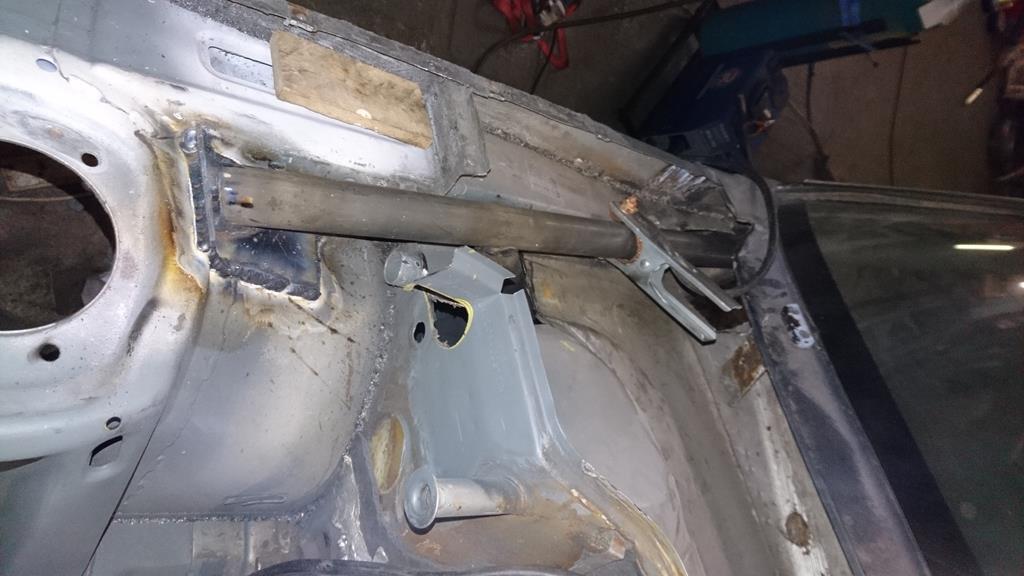 Then door bars and the dash bar: 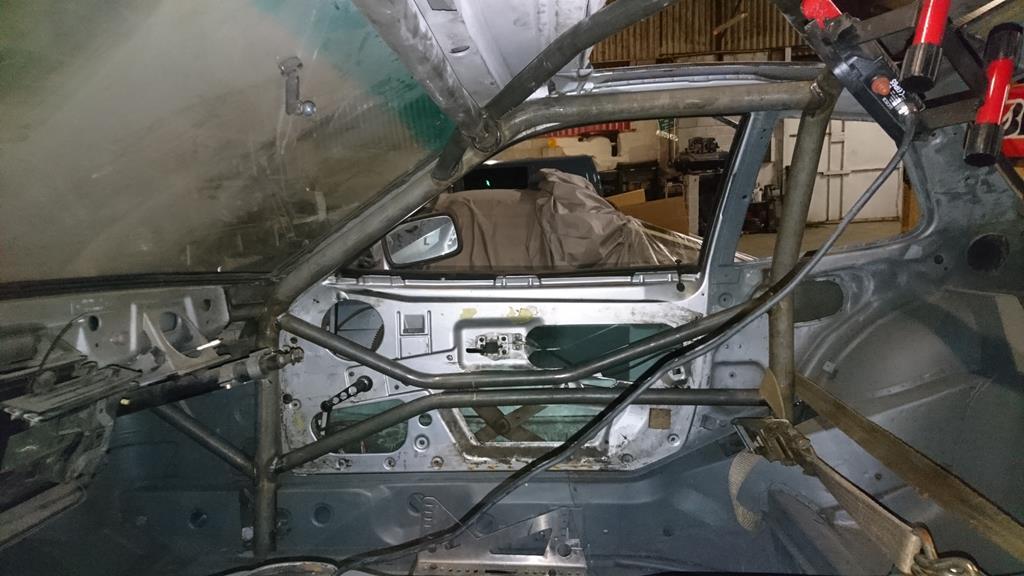 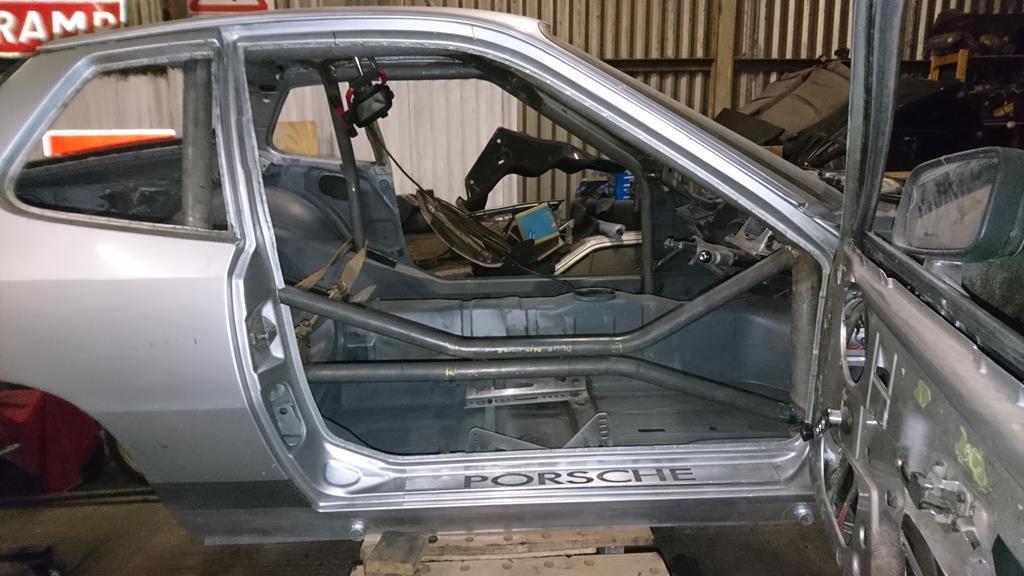 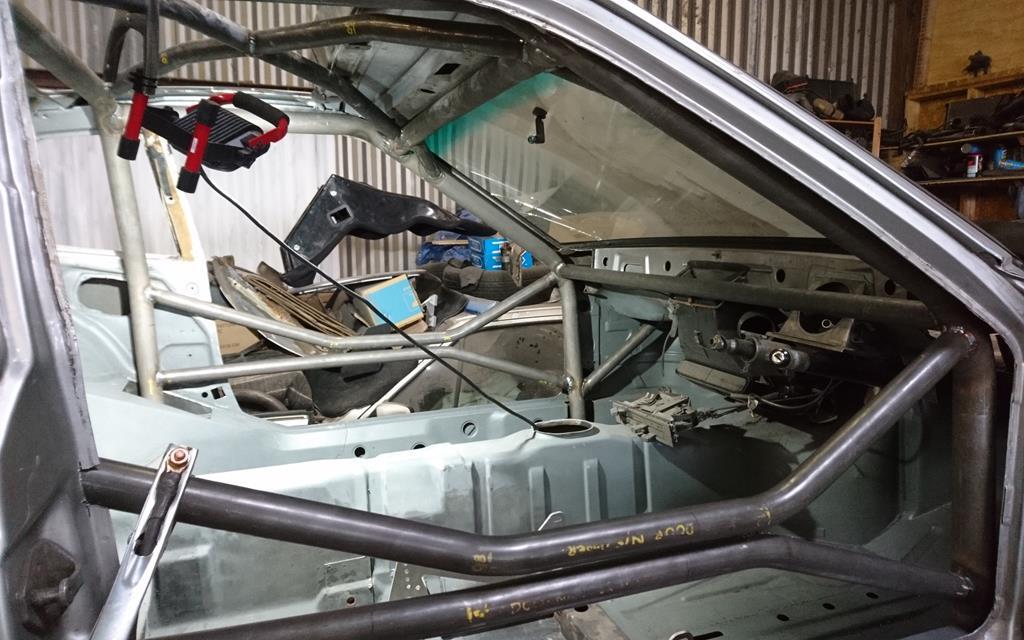 I didn't do the A-pillar bars yet as they'll make it a lot harder to get my head & arms into the foot-wells while I'm filling in all the holes I've had to cut in the shell, and their welds will be completely accessible even with everything in situ. Speaking of welds being accessible, some of them as expected have been a complete pain to get at, and as such haven't ended up with as neat weld as I'd like but I'm happy that everything's got a strong, full weld on it, even if it is a bit messy in places. I've also welded up the hole around the drivers side front leg of the cage, and made and welded in the spreader plates. I've left the cage leg poking right through the shell, end capped it and welded a spreader plate on the outside and inside. This way the leg's in double sheer and the spreader plates are sandwiching the box-section of the sill. Hopefully it should be pretty well tied into the cars structure! On the outside: 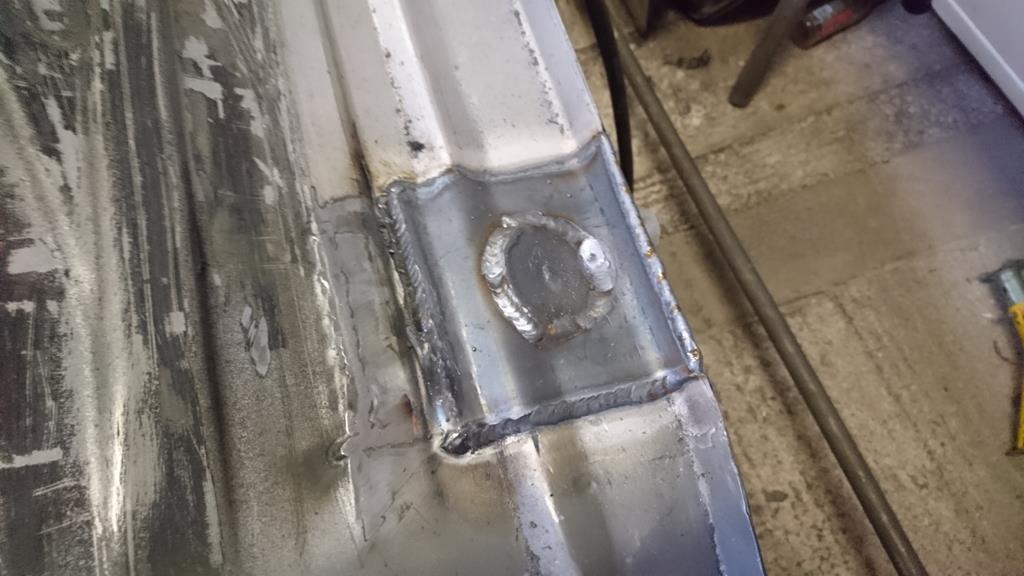 And the inside: 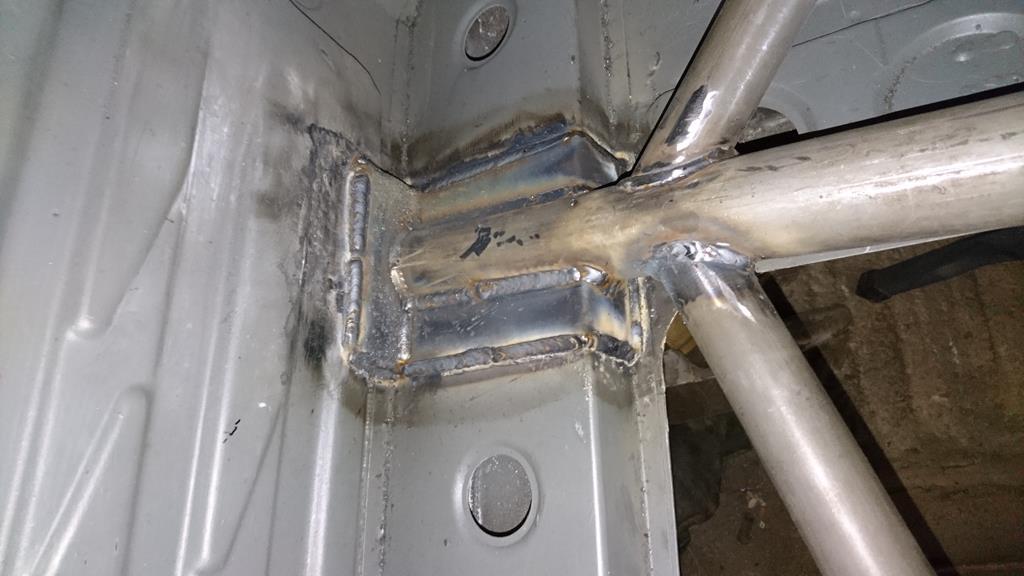 I won't be able to touch it for about a week not as I've got a few things going on, but when I'm back I'll continue with the passenger side foot, before filling back in the holes where the forward bracing passes through the bulkhead. Then I can get the A-pillar bars in and start putting the tubes in the back half. |
| |
Last Edit: Oct 31, 2017 20:29:43 GMT by RobinJI
|
|
RobinJI
Posted a lot
"Driven by the irony that only being shackled to the road could ever I be free"
Posts: 2,995
|
|
|
|
Yep, the screen's still in, and definitely knackered! It was far from great before I started, but after one too many times forgetting to protect it I've given up on it at this point. I guess it'll teach me to be more careful next time! As a small silver lining, when the time comes to replace it, I can fit a late 944 screen which will sit flush with the opening rather than inset like the 924one does, for a tiny little aero gain. I was hoping to keep going with it last night, but some bag of human excrement tried to break into the unit on Wednesday night. Thankfully they failed (quite miserably). So I spent a very long evening down there adding some serious reinforcement to the door along with a second lock and a shield over the main lock to hinder access to it. I'm happy it's a lot more secure now, but worried that if someone's got their eye on our stuff, they may come back better equipped next time. |
| |
Last Edit: Oct 27, 2017 8:46:19 GMT by RobinJI
|
|
RobinJI
Posted a lot
"Driven by the irony that only being shackled to the road could ever I be free"
Posts: 2,995
|
|
|
|
Tubes! 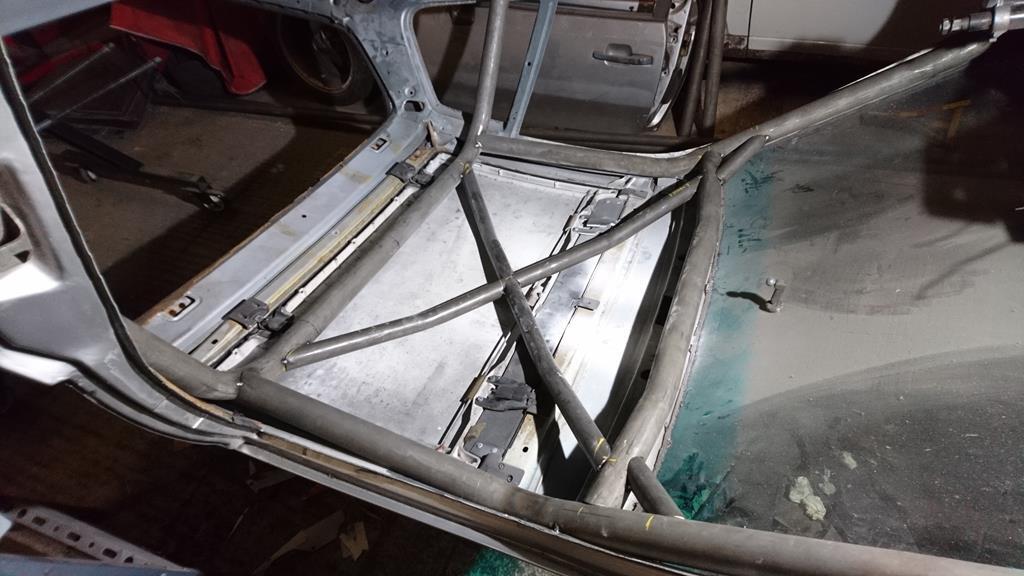 I'm almost ready to drop the cage down in the shell and seam weld up all these joints, I've just got the diagonal braces between the door-hoops and the B-pillar to cut and notch. After that the sequence will be: - Lift the cage back into position and tack it in place (at roof level only.) - Make the forward bracing to turrets (while a-pillar's are still loose so I can flex them inboard to get a weld all the way around) - Notch and fit the door bars (while the b-pillars are still loose, again to let me flex them in for more access, although this will still be a pig to weld) - Fully weld up the foot plates for the A and B pillars. - Then the main hoop X bracing, the rear legs including their diagonal, and the dash and harness bars can all go in last. (As I can access all sides of them with the cage in situ.) I'll also be gusseting the main hoop and roof X in the centre, but thanks to the sunroof the roof one's accessible in situ, so I'll leave putting the extra heat in things until the cage is in it's final position and as braced up as possible. - Stand back and hope I'm happy with it! |
| |
Last Edit: Oct 26, 2017 9:52:14 GMT by RobinJI
|
|
RobinJI
Posted a lot
"Driven by the irony that only being shackled to the road could ever I be free"
Posts: 2,995
|
|
Oct 25, 2017 10:13:02 GMT
|
Historically the back stays used to mount on the rear arches but if rules have changed it might be it's not possible to make the angle? It would be possible for the rules, the angle would be much the same that mine will end up at, I just thought it wouldn't hurt to add some more structure, as the 924 has no structural turret at the rear arch, so the arch is just a single skin of sheet metal. Really like that rotisserie. Is it shop bought or something you fabbed up? Thanks. The rotisserie is all home made. It's done me well so far but as the car's getting a little top heavy with the cage, I think I need to sort out a better way of locking its position than the current pinch-bolt arrangement. No progress to report, but I'm hoping to get an evening on it later today. |
| |
Last Edit: Oct 25, 2017 10:13:25 GMT by RobinJI
|
|
RobinJI
Posted a lot
"Driven by the irony that only being shackled to the road could ever I be free"
Posts: 2,995
|
|
Oct 23, 2017 16:20:28 GMT
|
I bookmarked this a while ago and I've been lurking enjoying the read. What a great project for you to get stuck into! With regards to rivnuts vs tapping the pedalbox rails, I'm assuming the rails are box section, and about 3mm wall? If that's the case I probably wouldn't do either. Rivnuts are great, but for something taking repetitive loading like a pedalbox will, I wouldn't be surprised if they worked loose over time. Personally I wouldn't drill and tap anything mild steel unless it's thickness is at least equal to the bolts diameter. A couple of options spring to mind. Either drilling an oversized hole and welding in a threaded insert like these (or something solid you can tap). Or you could drill right through the box and weld a pair of nuts to a piece of flat to act as a sandwich plate that doubles as captive nuts. If that makes sense? Keep up the good work! P.S. I'd agree that tabs would be the way to go with fixing panels to the tubework, for the reasons already mentioned. |
| |
Last Edit: Oct 23, 2017 16:21:44 GMT by RobinJI
|
|
RobinJI
Posted a lot
"Driven by the irony that only being shackled to the road could ever I be free"
Posts: 2,995
|
|
Oct 20, 2017 13:26:05 GMT
|
Thanks guys. If you’re future-proofing it, MSA regs don’t allow rear stays to be mounted further back than the rear suspension mounts - unless it’s needed to achieve the 30 deg minimum angle. Very good point. For some reason I got a bit confused over this. I had it in my head that it was the case, but when I looked quickly at the MSA yearbook while looking at the car and thinking what the best solution might be, I couldn't find it in there. Looking again now it's definitely there clear as day! It's lucky I did it this way! Just as a minor note, the regs say "ROPS must not extend beyond the front upper or rear suspension mounting points of the vehicle." I'm not sure exactly what on the 924 (or a lot of other cars for that matter) would be classed as the 'rear suspensions mounting point'. The rear beam has a series of 3 mounts down each side, with the rear-most one behind the axle line. On a leaf sprung car could you go as far back as the rear spring shackles!? It doesn't matter much to me, where I've put it is in front of the axle line, and in line with the rear shock (which passes in front of the drive-shaft), but it's an interesting ambiguity all the same. |
| |
Last Edit: Oct 20, 2017 13:27:35 GMT by RobinJI
|
|
RobinJI
Posted a lot
"Driven by the irony that only being shackled to the road could ever I be free"
Posts: 2,995
|
|
|
|
Following on from my last post, the tame local fabricator (Hayman of 'Hermfab') had a chance to bend my other bits up, so I now have all the tubes that should need bending sorted, meaning my time and effort's the only thing between me and a finished cage Hayman's done a great job of bending it all to my measurements, so providing I haven't cocked anything up, it should result in a nicely fitting cage. Top to bottom this lot consists of: Upper door bars, lower door bars, A-pillar supports & roof X bracing (one of which will need chopping in half) 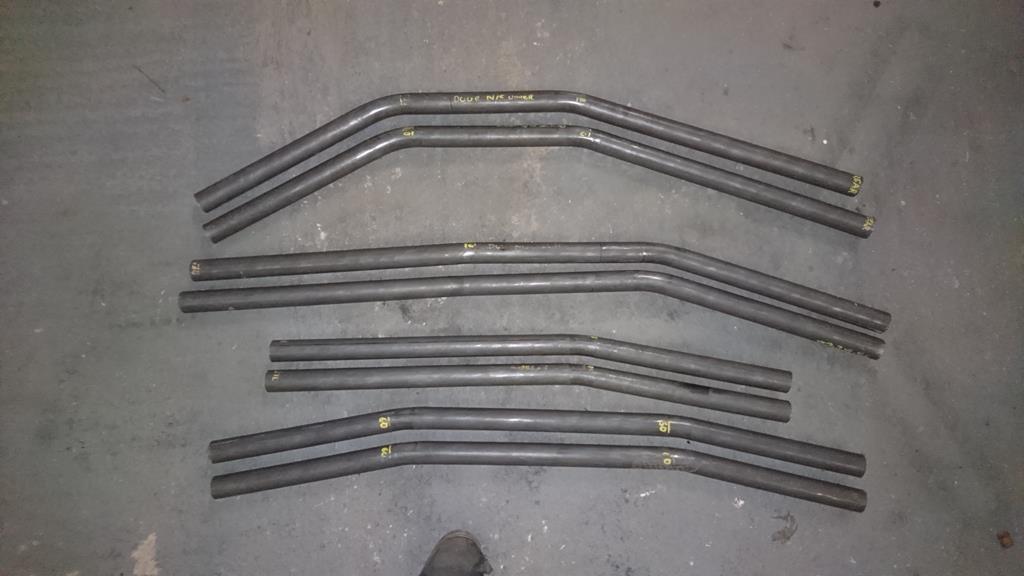 I quickly mocked up the door area: 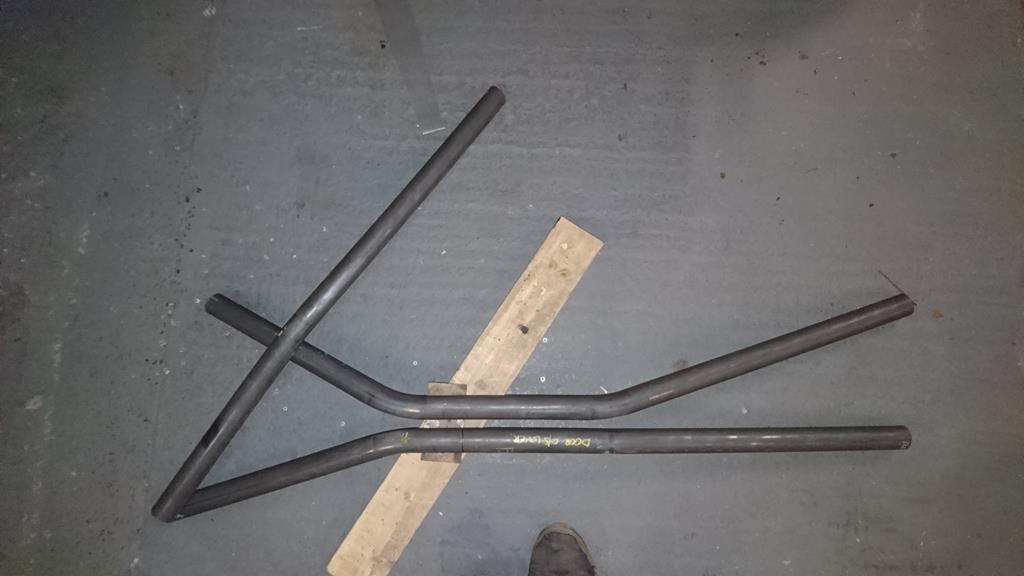 I noticed the doors don't even have any factory side impact bars in them, so I'll feel a lot safer in the car with this lot in there! While Hayman was doing his thing with the tubes I made a start on the mountings the rear legs will land onto. The fuel filler's in a really annoying place for a cage. I wasn't happy with how steep the rear legs would end up if I landed them in front of it, and running them right back behind it gets them too far behind the rear axle for my liking. (reducing rear crumple zone as well as taking up valuable wheel-carrying boot space.) To get around this a lot of cages for 924/44's seem to land the legs onto the inner wheel arch, but due to the torsion bar back end, this is only a single skin tub, without much structure as all the suspension loads are dealt with lower in the shell. So I've built a 'tower' out of 3mm plate that protrudes inboard from the arch tub and ties down to the boot floor directly above the shock mounts. (which as I plan to ditch the torsion bars in favor of a coil-over set-up, could do with some added strength.) 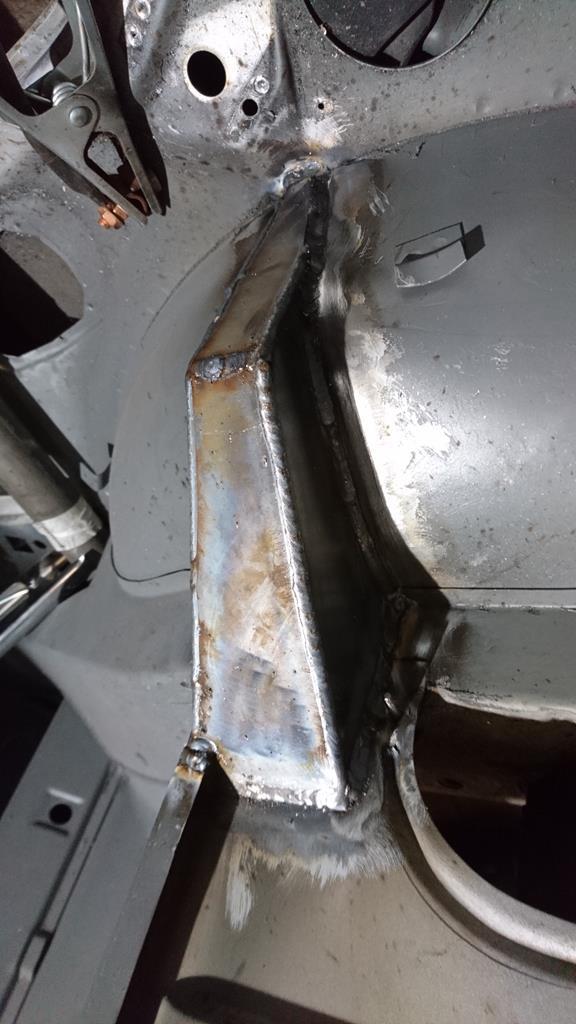 And with the cover for the filler neck in place: 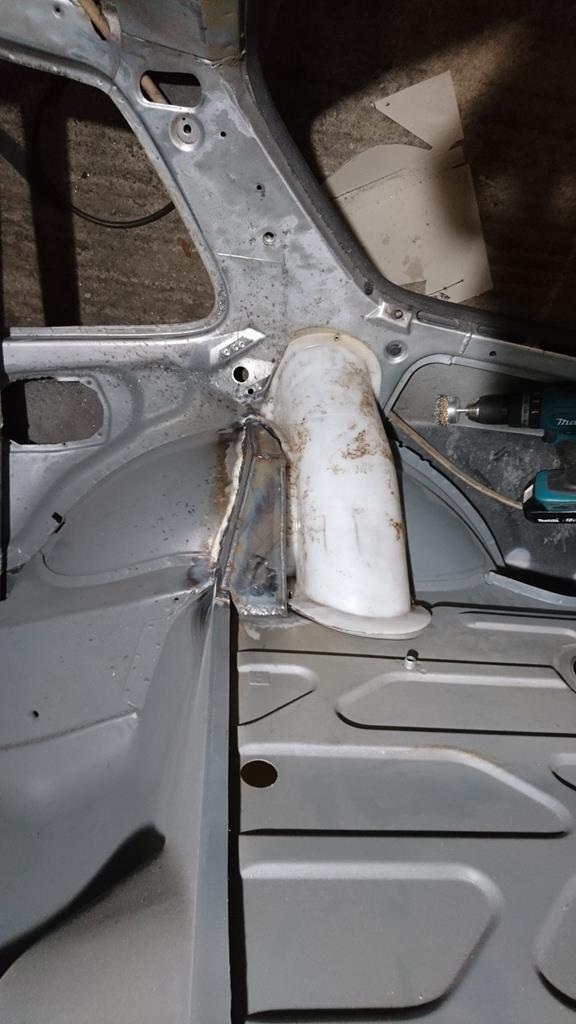 |
| |
Last Edit: Nov 24, 2017 22:22:38 GMT by RobinJI
|
|
|
|


 Admittedly, the cage is quite over the top for a road legal track day car, but hey, better safe than sorry, and easier to do a proper job of it now than re-visit later.


 My main job will still be CAD based, but I might be asked to help out with making the odd prototype or one off that doesn't fit in with normal production. I made it clear I was willing and eager to learn TIG!


