RobinJI
Posted a lot
 "Driven by the irony that only being shackled to the road could ever I be free"
Posts: 2,995
|
|
|
|
|
Thanks Fatlad.
To be honest that lathe's a bit crappy, but it is kind of usable. I bought it second hand, and I'm glad I did as I wouldn't have wanted to spend the new price on one and I'm not sure I'd bother again even second hand. I've seen companies that import them, heavily upgrade them and then sell them for a bit more, which might be worth considering as it does mostly seem to be upgradable parts that cause the issue, but by then you're looking at the kind of price that could buy something better second hand. I'm not sure what the ones Axminster Power Tools sell are like. Although they appear to be the same base machine, I wouldn't be at all surprised if they'd seen better quality control and a few choice upgrades to make them a fair bit better.
It does get alright results with a bit of patience but it comes out of adjustment much faster than I'd like, and you need a few of the accessories for it to be usable.
|
| |
|
|
|
|
RobinJI
Posted a lot
"Driven by the irony that only being shackled to the road could ever I be free"
Posts: 2,995
|
|
|
|
I got a nice little present in the post today. 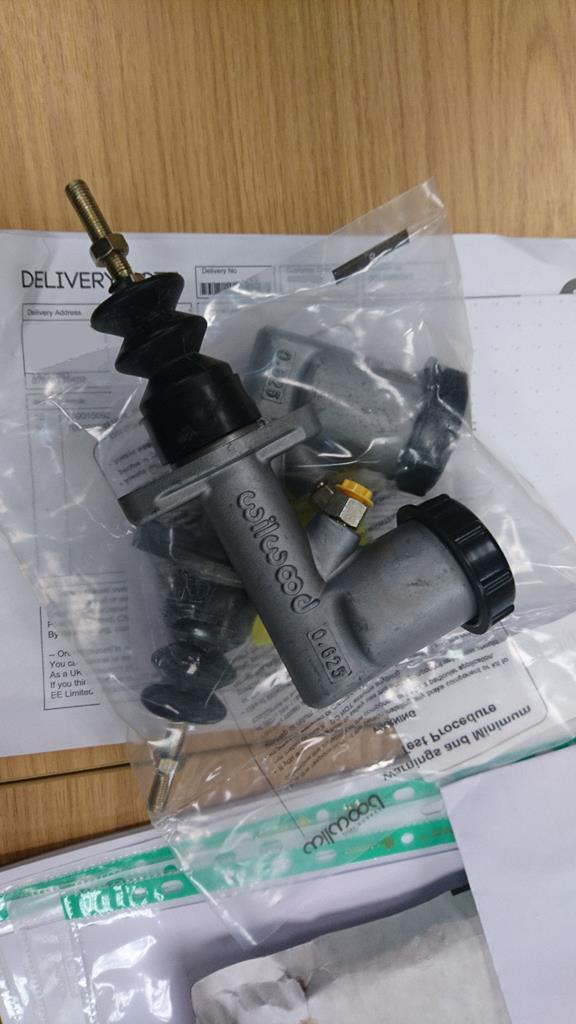 Although its a while until I'll need them functionally, having them now lets me make sure I've got the fit and clearances right as I build the pedal box up. I chose these Willwood ones as they were the cheapest cylinders I could find from a brand I'm confident in and I liked the inbuilt reservoir as space is tight, plus less joints means less complication and less places for leaks to spring. I was pleasantly surprised to see these have completely sealed reservoirs with a diaphragm to allow the fluid level to vary. Keeping the fluid sealed off away from pesky moisture filled air should keep it at its peak performance a little longer than usual. On the theme of brakes, that pedal I knocked up needs something to pivot on, so this evening was spent cleaning up my little lathe to try and knock up some bushes for the pedals. I started with a lump of phosphor bronze and a section of the tube that used to transfer the pedal movement to the passenger side. So that means they're basically standard brakes doesn't it?... 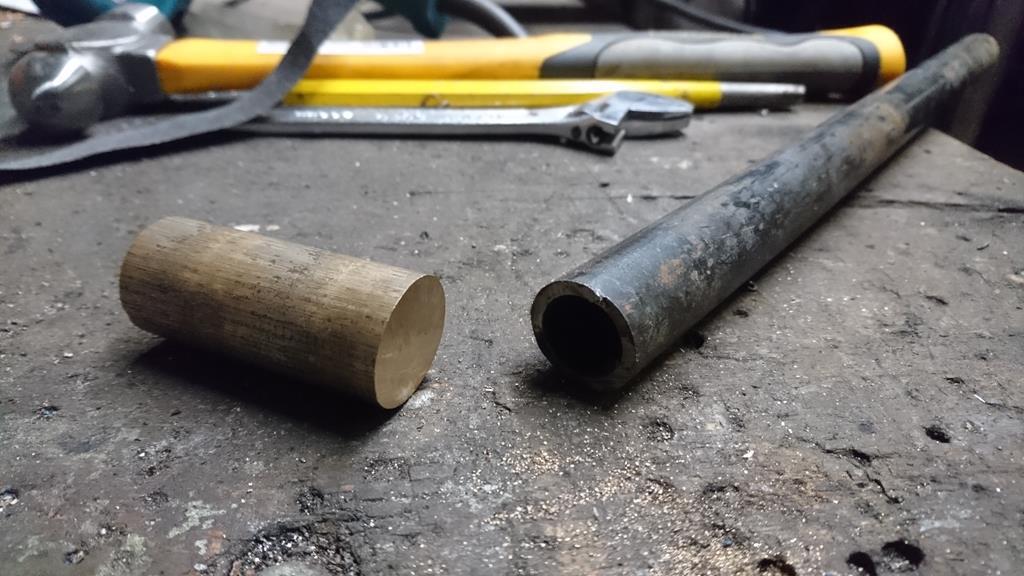 Then after a while cleaning up the abused little Chinese lathe I skimmed the bore of the tube (which is a nicely sized thick wall CDS), faced it's ends and cleaned up the outside with emery cloth, giving me a nice pivot-housing to weld onto the pedal. Next up I parted off a chunk of the phosphor bronze, faced it and turned the outer diameter of the first few mm to match the tubes O.D. Then flipped it around in the chuck, faced the other end, bored a 10mm hole through it and turned the outside down to a press fit into the tubes I.D. Then, I was hungry so I went home. Next time I'm out I'll repeat the bronze bush and weld the sleeve onto the pedal. 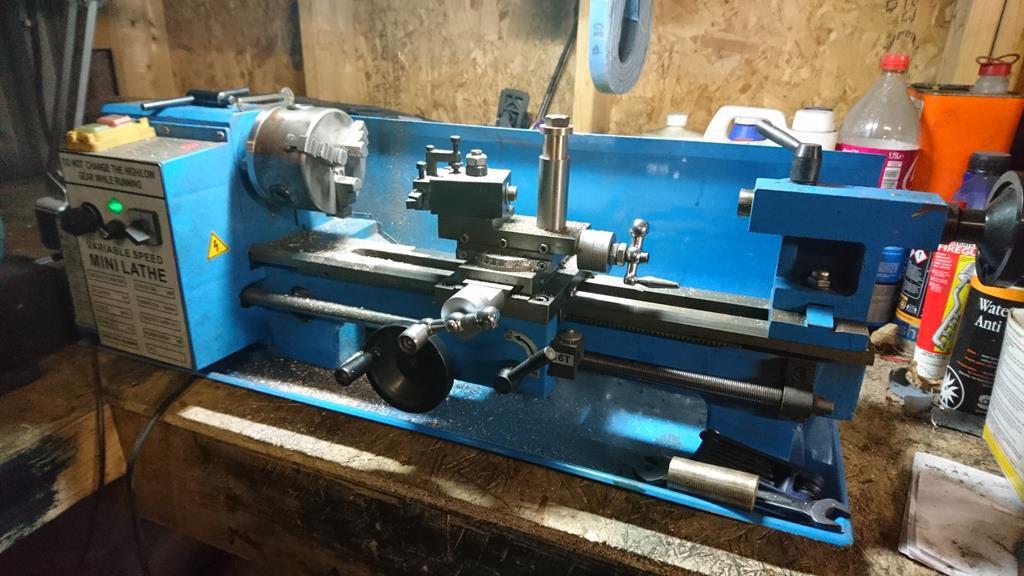 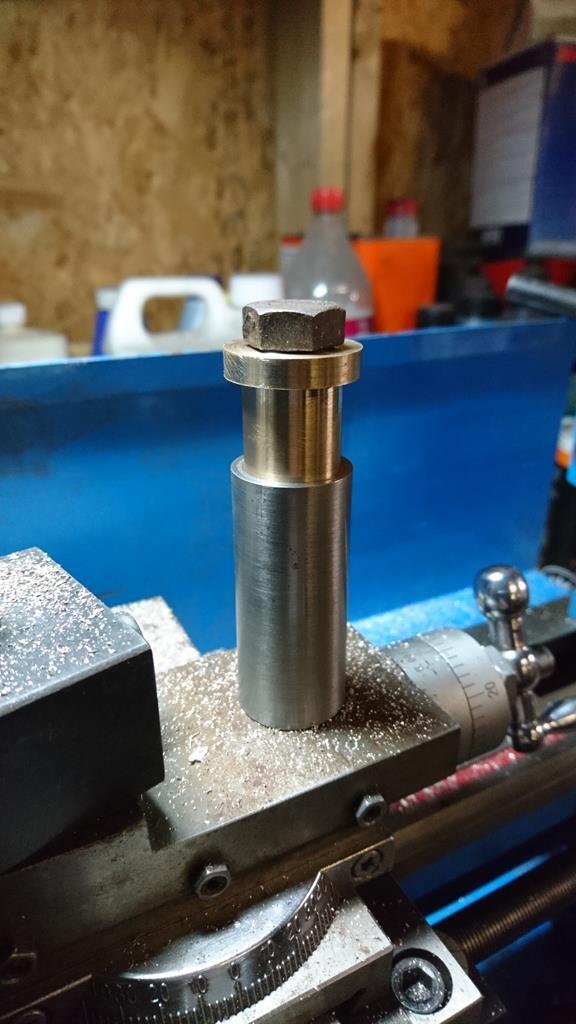 I'm hugely over-building the brake pedal, but hey, brakes are kind of important! Plus, any kind of flex in the braking system is bad for performance. |
| |
Last Edit: Apr 6, 2018 6:26:04 GMT by RobinJI
|
|
RobinJI
Posted a lot
"Driven by the irony that only being shackled to the road could ever I be free"
Posts: 2,995
|
|
|
|
In a distraction from the suspension stuff, which is a bit stalled until I finalise the designs and place an order for the laser cut bits, I made a brake pedal: 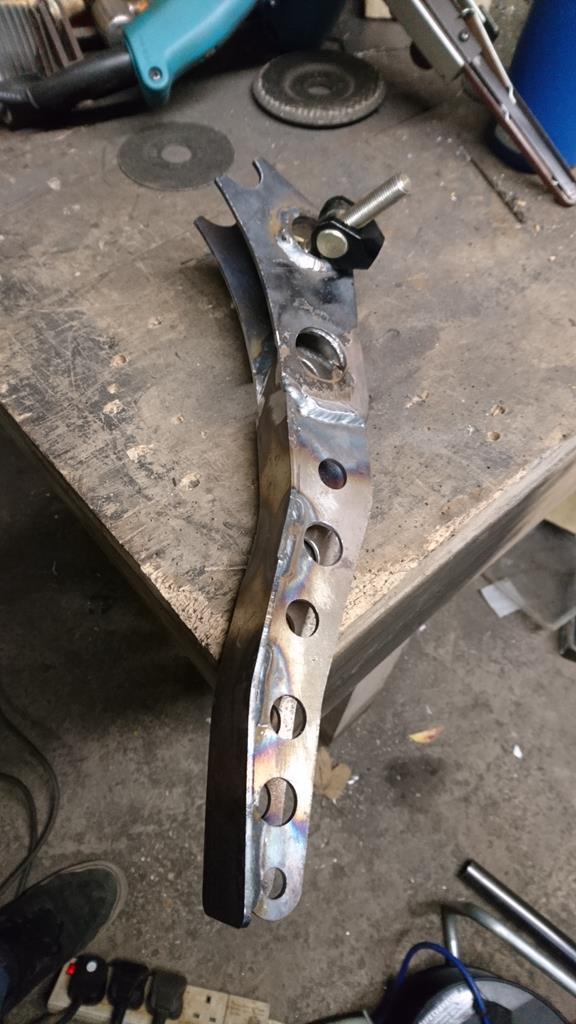 I've been trying to decide how to do the pedals for a while, as I want dual master cylinders and don't want the factory RHD system with the master cylinder on the passenger side. Normally the easy answer is a floor mounted pedal-box but due to the shape of the foot-well I'd need to move the seat back a bit, which I don't want to do. After a bit of measuring, scribbling and drawing round stuff I've come up with a plan: 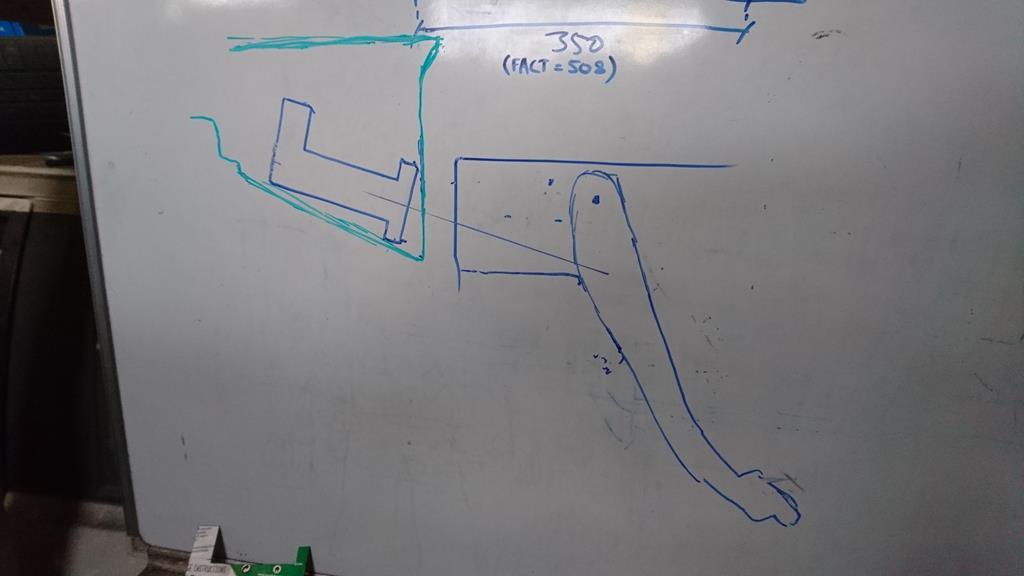 Essentially, I'll try and wedge a pair of cylinders on the bulkhead in the limited space above the wheel-tub. This does mean the cylinders will have to point up a bit so the push-rod aims low enough to keep the pedals pivot in the cabin. It also points the push-rods right through the mounting of the original pedal-box, so I'll be needing to make up a new one. I need to get some master cylinders on order but in the mean time I butchered a pedal from a partially finished pedal-box I made a while ago, extending it and moving the pivots. I still need to weld the pivot tube onto it. I'll use the matching clutch and accelerator pedals to make up a new box that'll sit where the factory one did. |
| |
Last Edit: Apr 1, 2018 16:51:56 GMT by RobinJI
|
|
RobinJI
Posted a lot
"Driven by the irony that only being shackled to the road could ever I be free"
Posts: 2,995
|
|
Mar 26, 2018 20:57:54 GMT
|
The coilovers are now on order from Gaz.  I've gone for a set of their gold spec with fronts as they'd usually supply for a 924, (shortened, oversized body) then a custom aluminium coilover on the rear. They should give about 150mm of wheel travel, which is a bit more than I'll need as I'll only be able to run ~75mm of bump travel before ground and wheel tub clearance becomes an issue. It'll give me a nice range of adjustment, though, as I could run it with an extra ~30mm of ground clearance before worrying about not having enough droop travel. I've designed everything around it sitting with 80mm of ground clearance, so I'll have the option of up to about 110 easily. Gaz were really helpful but it wasn't the quickest order to put through as they seemed to prefer phone calls to emails. Normally that would be fine by me, but works been crazy with getting a new building ready to move into so I've not had much time for calls during their opening hours. With the back and forth involved in a customised product it drew out the process a bit. I'm looking farward to getting my hands on them! |
| |
Last Edit: Mar 26, 2018 21:19:16 GMT by RobinJI
|
|
RobinJI
Posted a lot
"Driven by the irony that only being shackled to the road could ever I be free"
Posts: 2,995
|
|
Mar 22, 2018 21:17:17 GMT
|
I've been shown the odd intriguing glimpse of this car by my friend Nick (Prawn) and I'm really pleased to see you on here and have an excuse to catch up with things. Good work and I'm eagerly awaiting hearing the rest of the history! As a few others have said, it should certainly fit in well on here. |
| |
Last Edit: Mar 22, 2018 21:18:05 GMT by RobinJI
|
|
RobinJI
Posted a lot
"Driven by the irony that only being shackled to the road could ever I be free"
Posts: 2,995
|
|
|
|
|
Thanks James. There should be adjustment enough to take the car back up to around standard ride height should I want to, which with everything under the car tucked up nice and high like I intend, would give more than enough clearance for most rallys. I don't intend to rally it at the moment as my pockets aren't that deep! but I'm trying to keep the option open in case I want to go that direction in the future.
As for wheels, the 924's don't share the standard stud pattern with most VAG stuff. They're 4x10⁸ (copying the older audi's like the engine's from) which isn't a rare pattern, but is a weirdly limited one for the choice of style and size. I intend to convert to 4x100, like smaller VW's used up until the 2000s. This gives me a whole world of choice, especially as I'll be turning the spigots down small enough to also be able to fit japanese 4x100 wheels like toyota and mazda have used a lot. The hubs I'm using come as 5x100, which isn't as plentiful for smaller or more retro looking wheels. The fact I happen to have various wheels in 4x100 already thanks to the Scirocco definitely helps make the decission too!
|
| |
Last Edit: Mar 8, 2018 18:45:55 GMT by RobinJI
|
|
RobinJI
Posted a lot
"Driven by the irony that only being shackled to the road could ever I be free"
Posts: 2,995
|
|
|
|
I managed to get out the last two nights. Tuesday was just a short one with my laptop checking measurements and correcting the CAD model to the point I'm happy the laser cut parts for the back suspension will fit. Part of that was measuring where the actual wheel arch lip is, as I hadn't really worried before, I'd just aimed for a track width that seemed right and a ground clearance figure. Once I'd sketched it into the CAD model, I couldn't resist flipping the car over and offering a wheel up at the planned location. This should be where it'll sit at ride height:   Then last night I got most of the driver's side axle mount cut out, hammered to shape and stuck on. I positioned the hole based on the distance from the passenger side one, then checked it against my markings I made earlier in the build and they matched nicely, so I'm happy it's in the right place: 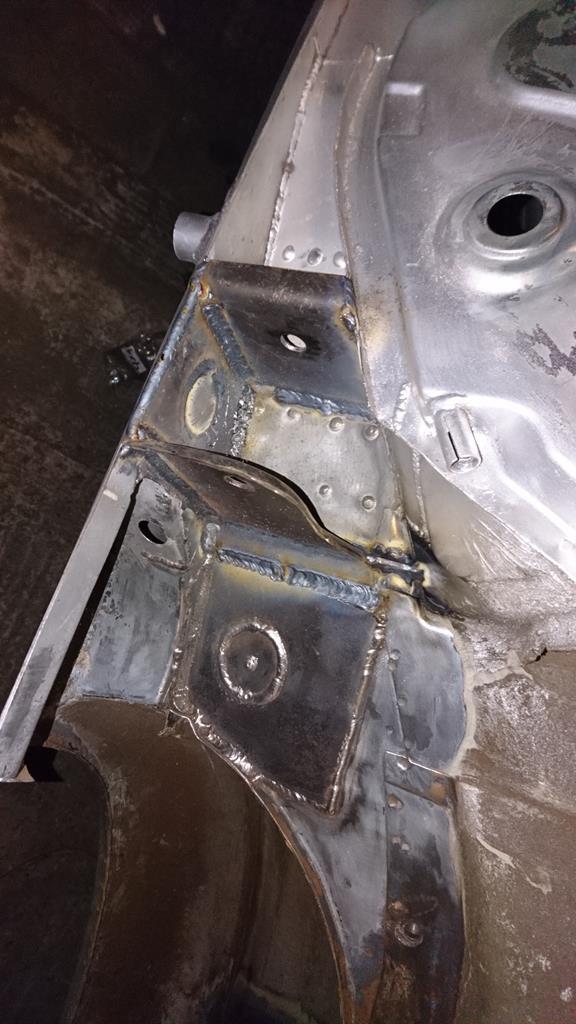 I still need to add a gusset down to the underside of the cage leg like I did on the other side. |
| |
Last Edit: Mar 8, 2018 7:11:20 GMT by RobinJI
|
|
RobinJI
Posted a lot
"Driven by the irony that only being shackled to the road could ever I be free"
Posts: 2,995
|
|
|
|
Well, There's been zero real world progress since my last post, mostly because I wasn't going to get a RWD car with summer tyres through 9 miles of country roads in this!  (The furthest I managed was some sideways fun in an empty industrial estate or two before it got too deep  ) Having had some more time stuck at home than usual, I did however manage some virtual-world progress: 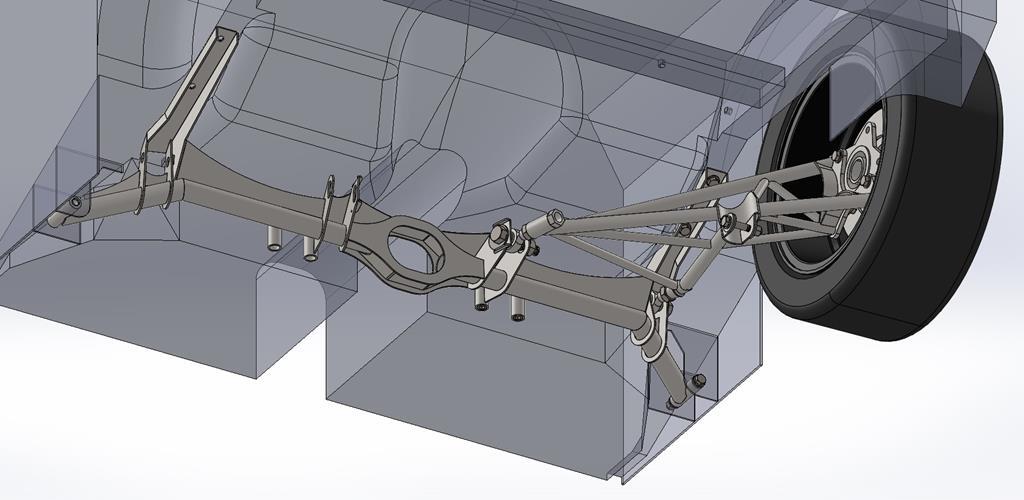 I need to double check some dimensions and order the Gaz Gold coilovers, but this has got me much closer to being able to order up the parts to make the new rear beam. Hopefully Gaz will be ok with giving me the external dimensions of the coilovers so I can get the parts ordered before they arrive. Geometry wise I've kept the original pivot angle when viewed in plan (~15 degrees), but replaced the torsion bars and rubber bushes with a pair of 3/4" rose joints, moved up and farward as much as possible to minimise the effect of lowering the car. I've also tweaked the inner pivot down slightly, to get the toe change inherent to semi-trailing arm designs back on my side. If you're not familiar with them, semi-trailing arms give toe in when moving the arm away from being horizontal (pivot points at the same height as the wheel centre). This is generally a good thing if the arm's horizontal at ride height, as a little toe-in will aid in stability and can help get the best out of the tyres slip angles. The trouble is, when you lower them you end up with suspension that toes in on compression, but toes out on extension, which can make for some undesirable lift-off oversteer. Luckily moving the pivot angle when viewed from the front/rear can play with the point where the change in toe reverses, so even though space constraints mean I can't run the arms horizontal at a height I'd be happy with, I can have my cake and eat it with a low ride height and toe change that's back in the situation Porsche intended; both compression and extension causing toe-in. Hopefully this will keep things nice and predictable and stable. I've designed in some adjustment of the inner pivot height, so I can tweak it to suit a range of ride heights. This adjustment is surprisingly sensitive, so although it looks like a good place to use for camber adjustment, I'll actually be making camber (and toe) adjustments by shimming where the bearing carrier bolts to the trailing arm. Otherwise it's just a bunch of tubes and laser-cut plate to stick the wheels on. I'm intending to use mk4 golf hubs, bearings and CV-joints. Mostly because I've got some new ones lying around. The hubs will be re-drilled to take studs at a 4x100 PCD, and have the spigots turned down to 54.1mm to suit the MX5 wheels I have. I'll have to make drive shafts out of the Mk4 ones I have (and maybe the porsche's inner sections, I haven't checked if the gearbox flange sizes match yet). They're tubular shafts, so I can cut them, sleeve them and weld them back up at the right length. The brakes will be Audi S3 calipers on mk2/3 front disks. The calipers are aluminium and made to work on 20mm thick vented disks, with a built in handbrake mechanism, so keep things light and simple. Hopefully this lot will come together to make a set-up that's lighter, more adjustable and easier to work on than the factory stuff, while letting me run the car low without ruining the handling. The switch from rubber bushes to rose joints should tighten things up somewhat too (at the expence of some road noise I'm sure, but comfort's not really what I'm building this car for.) |
| |
Last Edit: Mar 5, 2018 23:08:33 GMT by RobinJI
|
|
RobinJI
Posted a lot
"Driven by the irony that only being shackled to the road could ever I be free"
Posts: 2,995
|
|
Feb 25, 2018 22:45:06 GMT
|
So minor progress thanks to being generally quire busy with other stuff and a little trouble-shooting on the e36, but it's progress none the less. Yesterday I popped out and after fixing my e36's heater blower (which had decided it was deceased last week), I finished cleaning up the area around the 924's axle mount, drilled its final hole and threw some zinc primer over it. 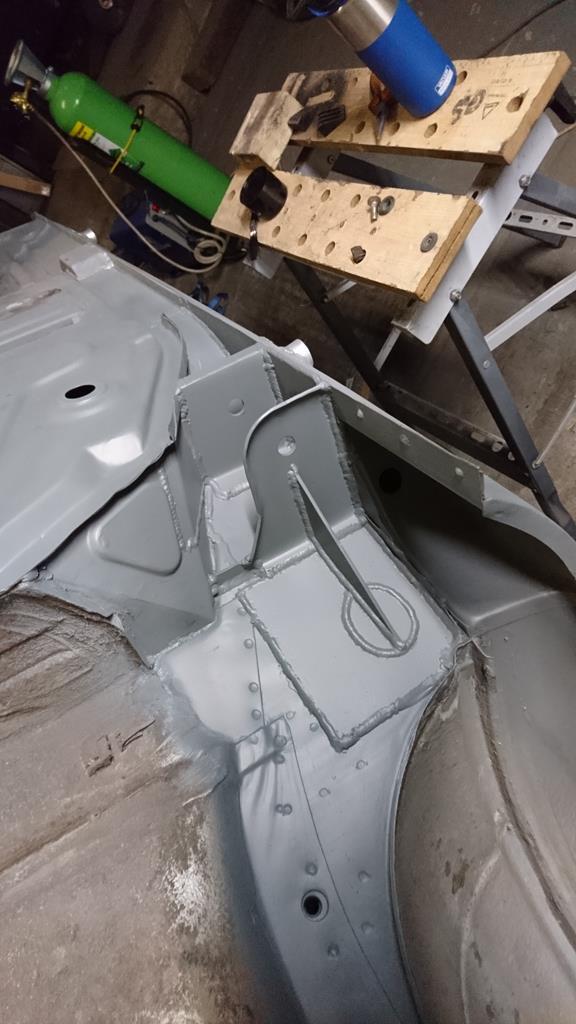 Then today I set off intending to get going with the remaining passenger side axle mount, but I had to pick up a new knot wheel on the way. While I was in toolstation a plan I'd been considering for a while sprung to mind and I thought now was as good time as ever to do it. The lighting in the unit is minimal at best, with about one strip light per ~20 square meters of floor space, half of which don't work (the landlord kindly insists he'll replace them for us, but that means it takes ages!) so I've been using a little LED floodlamp for most stuff for a while. The thing's great, but the issue I always have with floodlamps is how harsh the light they kick out is. You get very crisp, very dark shadows that are often hard not to be working in, and should you dare look in the vague direction of the light, you can give up on having working eyes for a while. Since seeing the ones my dad had just fitted in his garage, I'd been thinking for a while that an LED strip-light mounted on some sort of tall stand could be an ideal solution. Unlike fluorescent tubes of old, they're tough being just a row of surface mounted LEDs behind a poly-carbonate screen, and they come with all the advantages of a strip-light: They give off a nice soft defused light, and even when you're stood right in front of them, they're long enough that part of the light is to one side of you filling in your shadow nicely. So while I was in toolstation, along with the knot-wheel I'd gone in for I also picked up a 38W, 1.5m long LED strip-light, a 25m roll of decent rubber flex-cable and a 13A plug. When I got out to the unit I had a rummage through my steel-pile and decided what I wouldn't miss, then set about making up a frame from it. This ended up being a length of angle with a bend at the top and 4 legs sticking out of the bottom, then a few holes to cable-tie the cable to. I also cut an exhaust u-bolt in half and welded the halves to the side of the upright to wrap the cable around when not using it. With the frame made and the light mounted to it (with a little spreader plate inside it,) I cut about 10m of cable and wired the plug on one end and the light on the other. I'm really happy with the result, it's much nicer to work with than the floodlight! (It doesn't look like it in the photos, but the light's actually above head height so I can comfortably walk under it): 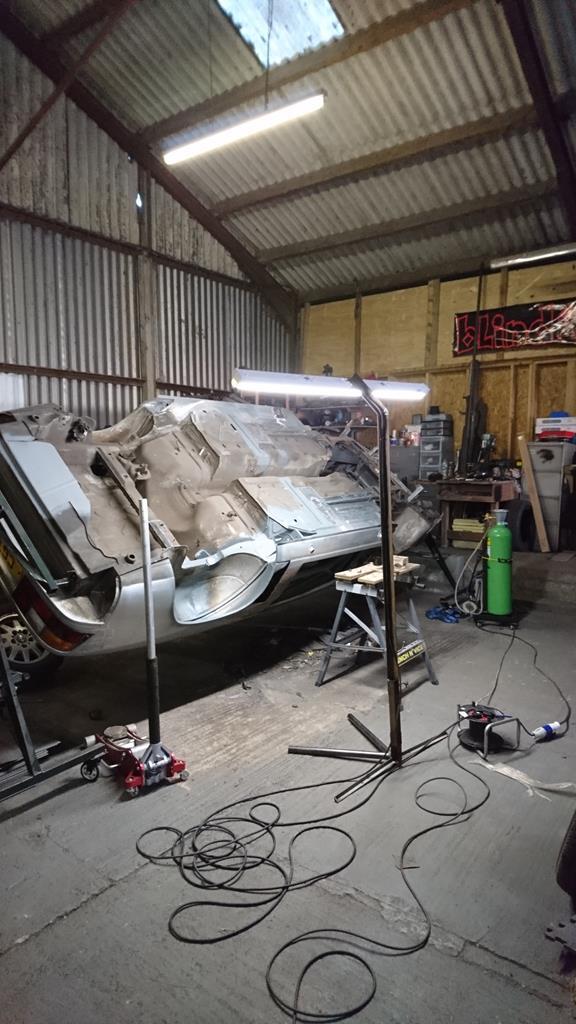 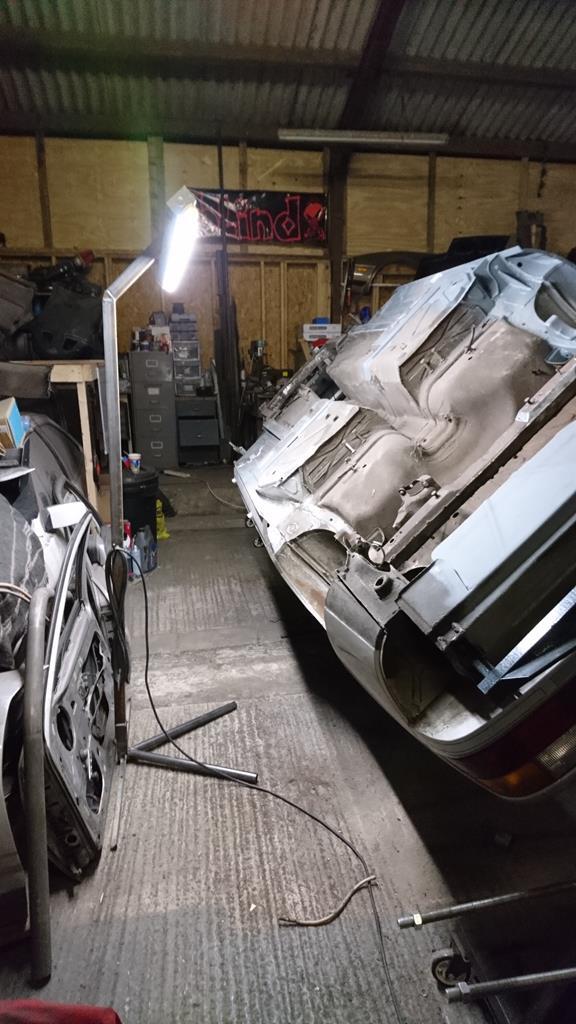 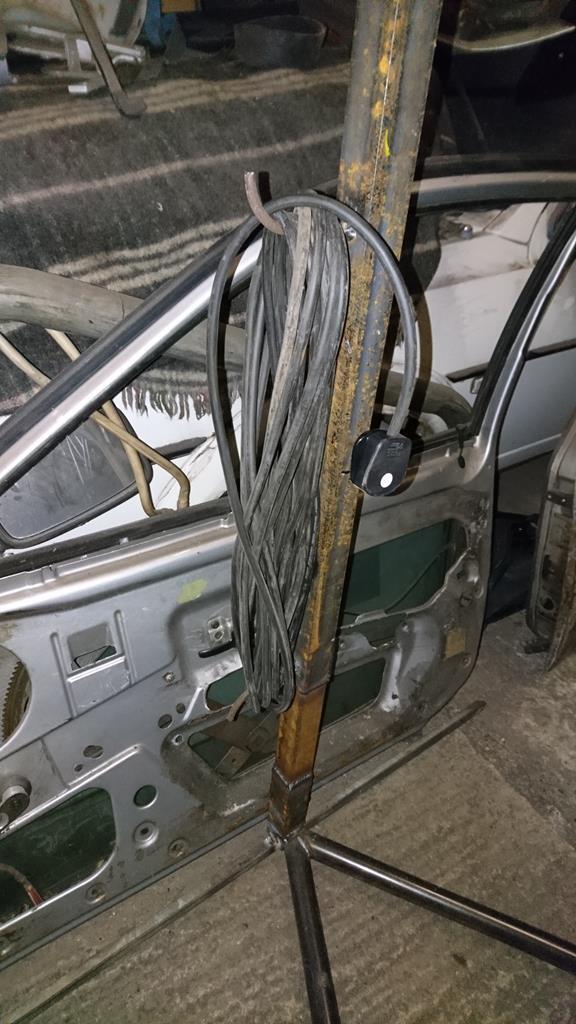 As I was finishing it off I came up with a plan that will have to wait until next time I'm heading out, as the shops had shut but this point. I want to pick up a 4 plug extension lead which I can fix to the bottom of the upright and wire the light directly into, effectively turning the light into a power-distribution point which should help keep things tidy as I'm working. I'll add some hooks to hang tools from and maybe a small tray for nuts and bolts if I find time too. With the light successfully sorted I made a start on cleaning up the area around the passenger side axle mount before heading home. |
| |
Last Edit: Feb 25, 2018 23:16:49 GMT by RobinJI
|
|
RobinJI
Posted a lot
"Driven by the irony that only being shackled to the road could ever I be free"
Posts: 2,995
|
|
Feb 11, 2018 22:18:09 GMT
|
I've managed to sneak out to the unit a bit over this weekend and stuck some metal back on the Porsche. First off, just to break up all the close ups here's an overview with the cage in place: 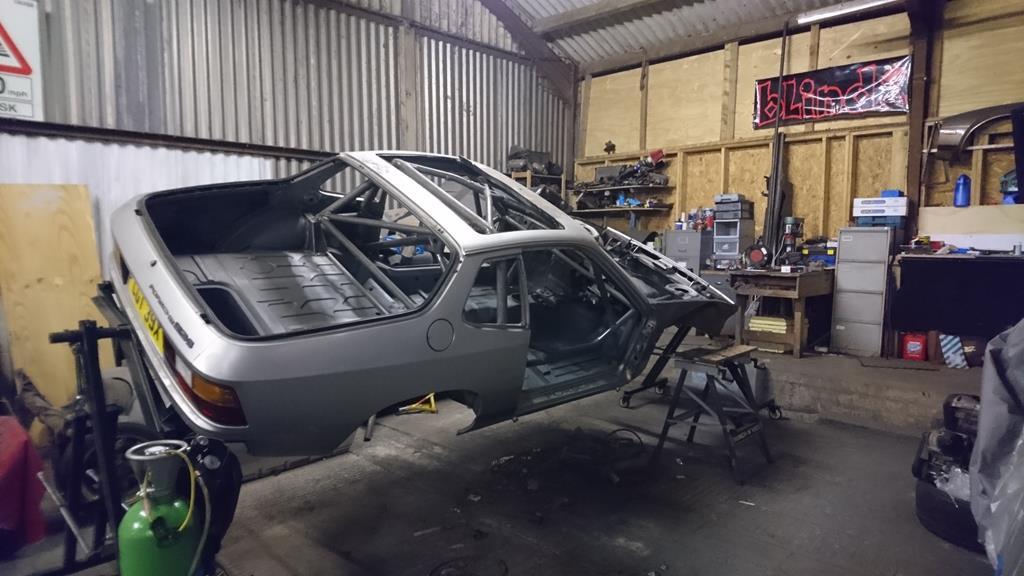 As mentioned in my last post, the bulkhead's now closed up around the cage:  And most of the cage inside has got primer on it: 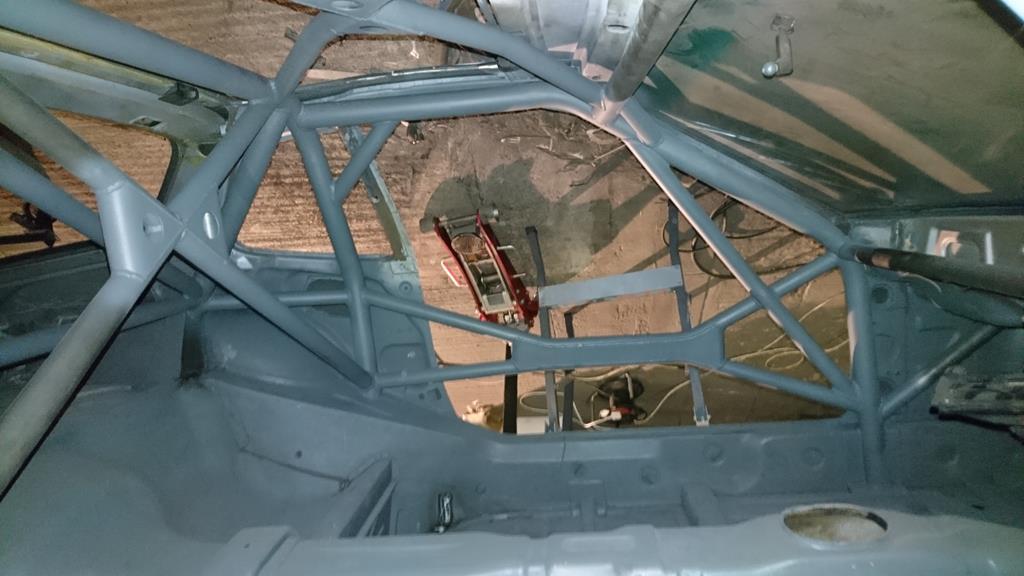 So onto this weekend's work. The rear axle mounts have been missing for a long while. I originally cut them off to repair the area around them, but the mounts themselves were far from healthy: 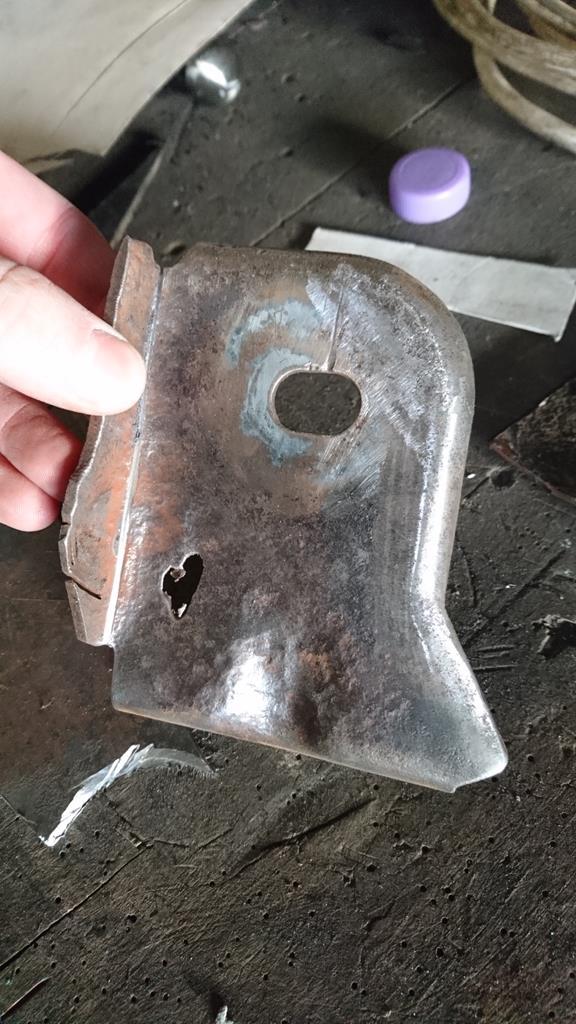 I hadn't bothered replacing them because I knew that the cage would be coming through the floor into the bottom of them, so now with the cage done, it was time to make up some new ones. As I mentioned earlier in the thread, I'd marked their position on the floor-pan for future reference, and the marks that located them side to side were very useful, but the ones that did the fore-aft position were on metal that I'd since replaced. Woops! A little wrestling and an engine crane got the axle rested back on the upside-down shell lined up with it's other mounting points so I could mark the correct position for the new mounts. I forgot to take any pictures though as I'd forgotten my bluetooth speaker, so my phone was in the corner plugged into the stereo. First up I cut a plate to the width of the axle bush, and the height/shape to fit to the inside of the sill, stuck a 2" hole saw through it then welded through the hole to the sill, creating a spreader plate that also acted to locate the axle mounts. Next up I cut out the new mounts them selves, which could be welded to the ends of the spreader plate. Although I won't be using the factory axle, I wanted to keep the mounts as per the factory to keep future options open, so I copied what was left of the original ones. Spreader plate and the forward plate of the mount welded in: 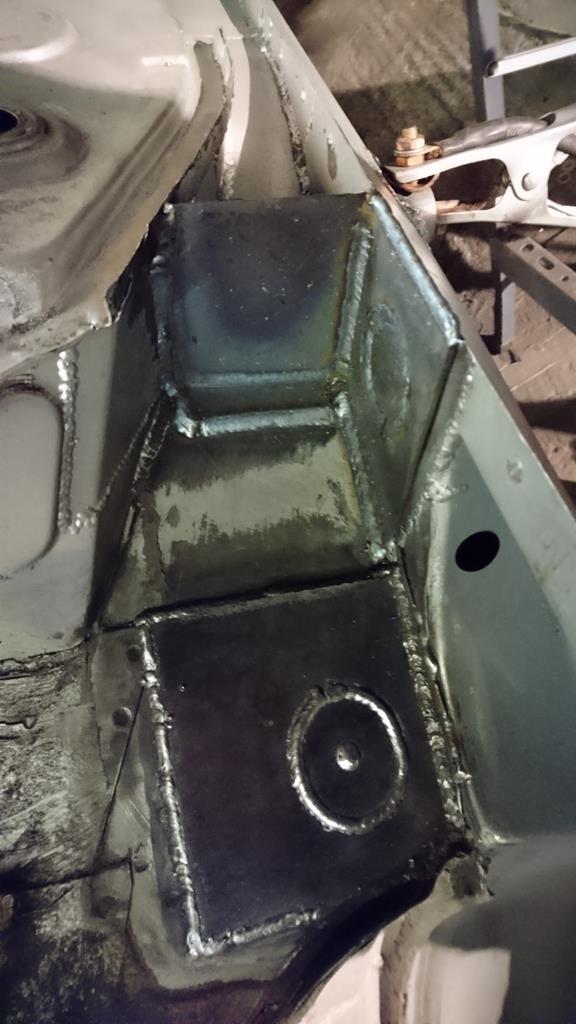 Then the rear plate made up and welded in, along with a gusset tying it into the cage spreader plate and a return lip for the forward plate:  All seam welded up. It's not going to hurt to have the mounts beefed up a bit as with firmer, solid mounted suspension they'll be taking more of a pounding than they did originally. 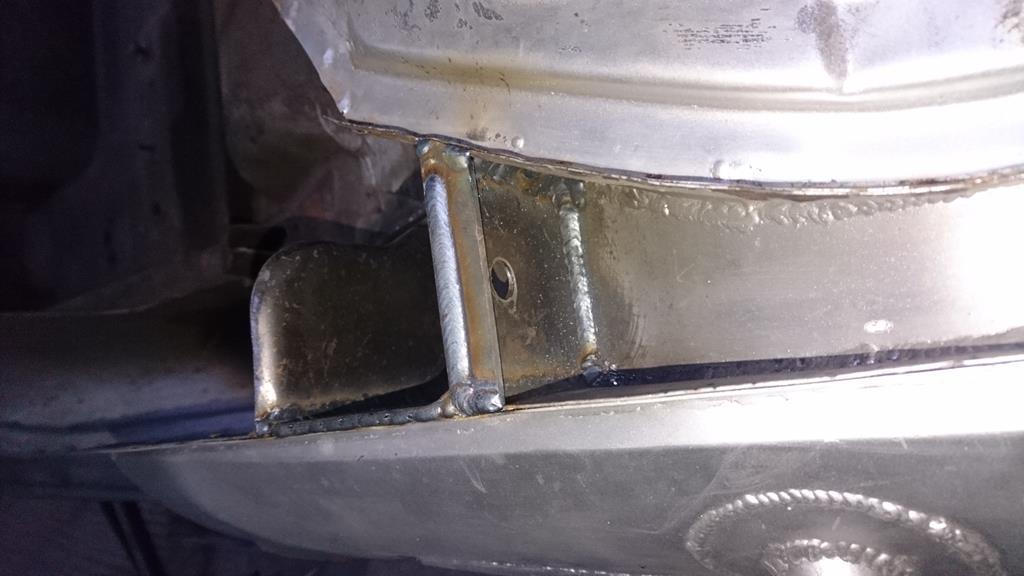 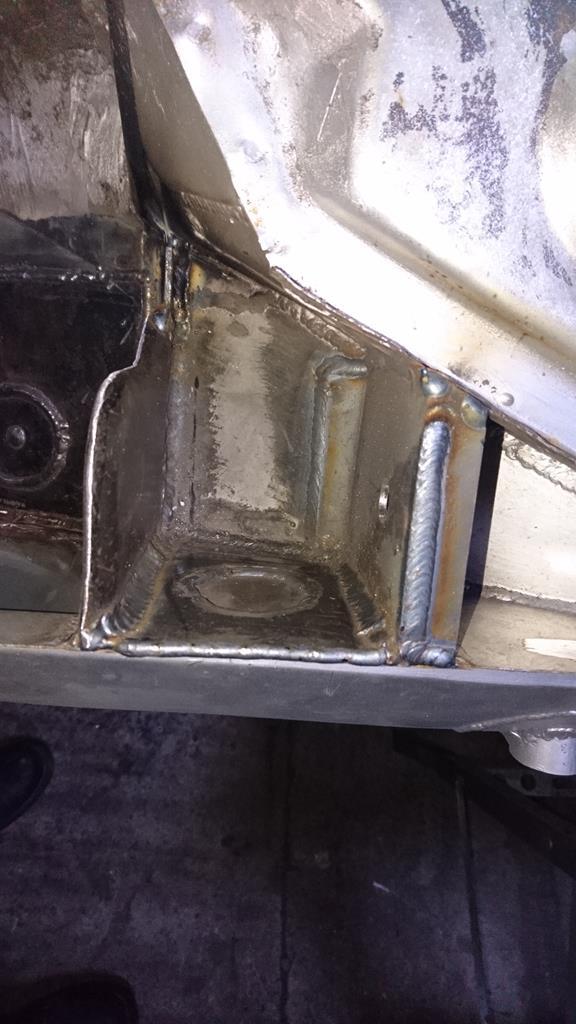 While I was in that area, I also cleaned back the other rear axle mounts and shock mount, which had some surface rust on them, then threw some kurust on it all for good measure: 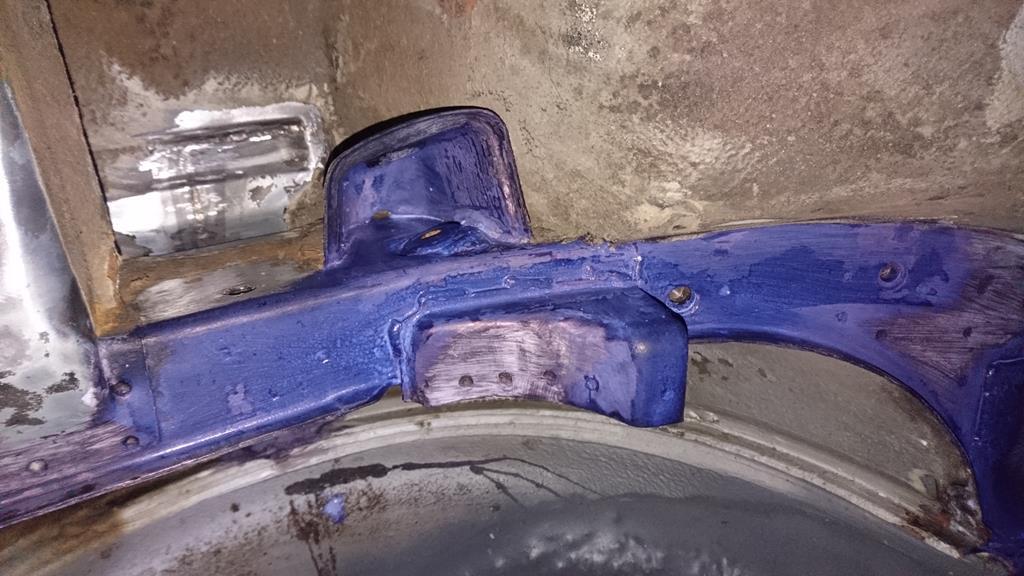 Quite excitingly, once I've copied this mount onto the other side the shells metalwork will kind of be 'finished', by which I mean if I was so inclined, I could just throw paint at it and bolt the car back together with all the original parts. That's not quite the plan though! |
| |
|
|
|
|
RobinJI
Posted a lot
"Driven by the irony that only being shackled to the road could ever I be free"
Posts: 2,995
|
|
|
|
|
Thanks Bshaw, I'm glad it's of some interest.
It's been a little while since I've updated this simply because the porsche has taken a bit of a back seat to life recently. Fear not though, as I'm settling into the new job a bit more and starting to find my way out to the unit a bit more.
Nothing particularly worth photographing has happened since my last update, but I've now got primer on just about all the cage and patched up the last two small holes in the bulkhead.
|
| |
|
|
RobinJI
Posted a lot
"Driven by the irony that only being shackled to the road could ever I be free"
Posts: 2,995
|
|
Jan 13, 2018 14:19:38 GMT
|
|
It's quite a complex topic, but to my understanding it essentially comes down to reduced grip and damping difficulties.
Large anti-roll bars can reduce ultimate grip by increasing weight transfer. They're working by trying to lift the inside wheel, not good when the maximum grip will be achieved with the most even loading on the tyres.
They also cause issues with damping, as they're asking the dampers to deal with 2 different spring rates, one in roll and single wheel bump, and a different softer one in full-axle bump and dive/squat. This can make it hard to match the damping rate to the spring rate. This is an issue even if you're not worried about performance, as miss-matched dampers suck for ride quality just as much as performance.
There's also dynamic effects to things like turn-in stability, but I'm a little rusty on those, so I'll let someone else explain them!
Essentially ARB's can be great in moderation as you can get a decent amount of roll-control before their rates get high enough to mess things up noticably, but rely on them too much and the compromises start becoming apparent. As with anything suspension related, it's all a balance between help and hindrance.
On the whole you'll find rally and off road vehicles running little to no anti-roll bars, and when they do it's often for tuning the under/oversteer balance easily rather than to provide any real roll. Fully fledged circuit-racing cars will run what look like stiff bars, but relative to their high spring rates they're actually reasonably soft, and again they're mostly there just as an easy tuning tool for quickly dealing with changes in tracks and conditions. Road cars kind of do exactly what you describe, and use them to kill some roll without having to use spine-jarring spring rates, but there comes a point where it's no longer helping either ride or performance.
|
| |
Last Edit: Jan 13, 2018 14:32:49 GMT by RobinJI
|
|
RobinJI
Posted a lot
"Driven by the irony that only being shackled to the road could ever I be free"
Posts: 2,995
|
|
|
|
|
What I'm trying to get at, is that with the introduction of the MOT exemption, I can't imagine them just assuming your car is eligible by default and leaving it up to you to tell them if it's not. It makes a lot of sense that you would still have to apply for a years 'MOT' in the same way the owner of a tax exempt car still has to apply for the tax, even though no money changes hands. Now if come 'MOT' time, you're filling in a form saying 'is the vehicle altered beyond 'whatever criteria they settle on', there's a damn good chance they're going to also ask if it's 'radically altered', and should it require an IVA test. I'm not saying they're going to, just that it seem plausible, if not likely, and I'd rather err on the side of caution until we've all seen how these rules will be applied. I'm aware it doesn't apply to my car for another 4 years or so, but I've got a feeling 2022 will come around worryingly quickly, and I see no harm in thinking ahead. (Plus there would be nothing stopping them asking the same questions on newer cars just for data collection, even if there's no MOT exemption to be had.)
Anyway, it was just a random thought, and like I say, it's not what this thread's about. If it was a real make or break factor I'd be looking into it in much more depth, but as it's just one of a few reasons to stick with the original engine for now, that's what I'll do. I can have some fun with this engine, and if it turns out to be curse word, and the new regs have all come to nothing, I may throw something more pokey in there a year or two down the line.
P.S. Thanks for the link, interesting to know.
|
| |
Last Edit: Dec 8, 2017 8:54:15 GMT by RobinJI
|
|
|
|
RobinJI
Posted a lot
"Driven by the irony that only being shackled to the road could ever I be free"
Posts: 2,995
|
|
|
|
Anyway, to reply to a few people and try and get things back on track to chatting about cool old cars, because legal stuff's boring: The work on that cage looks fantastic. Only thing now is painting it one of the worse jobs I've ever done is wasting so much paint trying to paint a cage. Thanks! I'm definitely not looking farward to painting the interior! Its going to be a challenge for sure. Nice work. If you go the whole hog, maybe the Audi S4 2.7 biturbo v6 may take your fancy. Powerwise it should handle any power demands you want. Haha! Awesome engines, I nearly brought an LPG converted S4 as a daily a while ago, but realised it would become another project (it was modified and needed mapping) and was more than I was planning to spend, so foolishly I listened to my brain not my heart. I dread to think of the packaging and heat management nightmare trying to shoehorn one into the 924's narrowish bay would create! Certainly more power than I or the gearbox could want or need anytime soon though! I didn't realise the Audi five pots were expensive. Times have changed... There is a lot to be said about S/C'ing your current engine and you're possibly right the M62 is a bit overkill as they were designed for bigger engines, I think Eaton quoted 2.5-4.0lt. But I'd still look into the M62 as Merc used them to very good effect on there M111 2.0 & 2.3. Also the 62 should create less heat than the 45 for the same pressure. Either way I'm sure your current engine would be a cracking motor with an S/C. Yeah, well, expensive by my standards anyway, they're certainly not a cheap option these days. The idea of a volvo T5 crossed my mind too. The trouble is, all this thought of engine swaps occurred before I realised how much work the car car was going to throw my way to just get it solid and roadworthy. All the suspension's junk, the brakes need rebuilding and the steering's sloppy. Given that I've got a hell of a lot of obstacles to overcome to get behind the wheel again any time soon, I don't want to bite off yet another big chunk before I've finished chewing. I've currently got 2 original 924 engines: The one that came in the car, and one I bought cheaply off eBay, because you know... eBay happened. The original engine ate it's camshaft in spectacular fashion, were talking about 80% of the cams lift missing on 2 lobes! Which has knackered cam followers and left some flakes of camshaft material stuck in the bearings, but otherwise it appears to have a good bottom end with healthy bores, pistons and rods, and an unmarked crank. The eBay engine's head looks in good condition, but while the bottom end looks functional, the bores appear pretty warn out with a detectable lip at the top of them. I'll need to strip the head and check the valve guides for excessive ware, as the bottom end would suggest it's seen some mileage, but the valve gear it's self looks in good condition. The plan will be to hone and reassemble the original block with new bearings and rings, then bolt up with eBay engines head after a little breathing work. Given that these engines owe me sod all, and I'm incapable of leaving stuff alone, I might have a go at lightening some of the ridiculously heavy internals while it's apart, I've got 2 sets after all, so I can afford to knacker some Outside the block I'm not 100% what I'll do, it'll involve an EFI conversion for sure, as K-jet won't let me play enough. Like you say Woofwoof, an M62 would be nice, but I'd be happy with a 45 for now if I can't find a sensibly priced 62. Looking epic chap  Cant wait to see this in the flesh at some point Thanks Mark, I'm sure you'll get plenty of chances to see it, I've been retro-less so long now I think I'll be attending just about every event I hear about for a good while after it hits the road! It'd be good to catch up with some of you past area52 guys too. I'll be at the Goodwood Weekender and the gathering this year all being well. That will be a flash rather? Sorry, I can't quite make sense of that one! |
| |
Last Edit: Dec 7, 2017 17:31:19 GMT by RobinJI
|
|
RobinJI
Posted a lot
"Driven by the irony that only being shackled to the road could ever I be free"
Posts: 2,995
|
|
|
|
|
I don't want to go down this rabbit hole too far in here, as this is a build diary rather than a legal discussion, but my understanding is that straying outside the 8 points system means the vehicle would, in the eyes of the law, no longer be formally recognised as a Porsche 924. It would require individual vehicle approval, with a new VIN number and Q plates to be used on the road. This is how it's been for years, but the reality has always been that if you've not gone chopping your chassis about, no one's really cared about picking up on a lack of the full 8 points. My worry now, with new regulations looming, is that if come MOT time, there's suddenly a form to fill in declaring if your car is modified or not, there's a good chance they'll include mention of whether it's modified beyond the rules. If this is the case, then 1: I'd rather not have to knowingly lie on said form. And 2: it'll make a LOT more people aware of the rules that have existed for years, making cars that don't meet the rules as desirable as malaria.
Also, as I've said, this is just one of several reasons for keeping the original lump. Another being time scale, and one a large one being that I fancy trying my hand at playing with the engine, and as no one's going to cry over me buggering up an old 2.0l 8v Audi lump when/if I get something horribly wrong, it seems like a good chance to have a play.
It also keeps some of the original cars character, and I think it'll be more fun and satisfying thrashing it around knowing I made the engine do it. I loved my scirocco as a reliable, economical, fast engine in a retro car that I was daily driving, but that's not what I'm going for with this car. I worry that just dropping in a complete engine doesn't quite have the fun factor I'm after, as sensible as it may be.
TLDR: I wish I'd never mentioned the legal stuff, so I'm just going to keep welding things together and hope one day I've got a fun car to drive around in.
|
| |
|
|
RobinJI
Posted a lot
"Driven by the irony that only being shackled to the road could ever I be free"
Posts: 2,995
|
|
|
|
|
If I had to guess, I'd probably get away with ignoring the 8 points system indefinitely, but my concern's that when the new regs for MOT exemption come in I'll be having to sign something (be it physically or electronically) to say what catagory the car falls into, and I don't want to knowingly lie on and official form like that. It may also make a lot more people aware of the 8 points system's potential to ruin your day if you do get flagged up for whatever reason, making cars that don't comply difficult to give away, let alone have any decent value to them.
Having said that, I'm probably not completely up to date with the whole MOT exception situation as I've not spent much time browsing the web since it all got stirred up. In the past I'd probably have just ignored it, as my car won't be outwardly heavily modified, and I won't be taking the curse word with chassis mods, but with all this coming up I'm wanting to stay within the rules for now. Plus it probably means the car hitting the road sooner, which is important to me at the moment, partly because I'm itching to get a fun car going again, and partly so I can get on with my scirocco, which will be the real crazy project, complete with Q plates. The Porsche was only ever meant to be some cheap and quick fun, it's just snowballed into a project thanks to me buying a terrible example that needed loads of work!
|
| |
|
|
RobinJI
Posted a lot
"Driven by the irony that only being shackled to the road could ever I be free"
Posts: 2,995
|
|
|
|
That's the one that I always fancied in a 924. Anyway, keep up the good work. I like the idea, but have you seen how much they go for!? Plus it doesn't get around the 8 points issue, which I'd like to stay within at least until all this MOT 'modified' catagory thing's a bit more known. call me extreme if you like, but what about a porsche 924 engine I think that might be a plan, I hear they bolt straight in. It's as if they're made for it! I like the idea of you supercharging the Original engine. M62 from a Merc? Maybe an M62, but it may be overkill, so I may go for an M45 which will likely still give enough power to test the standard internals while being a bit more budget friendly. |
| |
Last Edit: Dec 5, 2017 10:49:01 GMT by RobinJI
|
|
RobinJI
Posted a lot
"Driven by the irony that only being shackled to the road could ever I be free"
Posts: 2,995
|
|
|
|
|
Cool. I hadn't realised they put a 20v head on anything but the 1.8 bottom end! Looking at it they're 1984cc, the same as the 2.0 16v in earlier cars, so almost certainly shares their block architecture and bell housing pattern with them (and therefore the 1.8 20v) so it won't bolt up to the Porsche bell housing. Sadly the 20v heads don't work amazingly naturally aspirated (the 2.0 16v makes 150bhp!) I suspect the huge ports drop the inlet velocities to the point that they struggle to get the best out any cams, especially given the small bore/long stroke set-up. They breath very easily, but not very efficiently. Add boost to give a whole heap more airflow and they're awesome though!
The 2.0 that Porsche used is sourced from a very early Audi with a much larger bore spacing and completely different bell housing pattern to the later 4 cylinder engines, making swaps to them more of a task than just engine mounts and pipes. I believe it's a similar but not identical pattern to the 5 and 6 cylinder Audi units, so a swap to one of them could work, but on the whole they're either bloody expencive or boat anchors, so not the right thing for this build.
A Jag S-type sourced 3.0 v6 is tempting, as is the 1.8 20vt, but I think for now I'll be staying with the original lump and seeing how much belt driven boost it can take before things melt. If it's dissapointingly little then something else may find it's way into the bay, but I fancy giving it a go at least.
|
| |
Last Edit: Dec 4, 2017 19:52:38 GMT by RobinJI
|
|
RobinJI
Posted a lot
"Driven by the irony that only being shackled to the road could ever I be free"
Posts: 2,995
|
|
|
|
|
Thanks guys.
In terms of the engine, I've never seen a 2.0 20v (not a 4 cylinder anyway) but I've very seriously considered the 1.8 20v turbo, to the point of pulling my Sciroccos one out in preparation for using it. On the other hand, part of me thinks that if I'm going to the effort of an engine swap, I'd quite like more than 4 cylinders, especially as I've been down the 20vt route in my Scirocco.
Part of what's holding me back from a swap is the 8 points system. Obviously the shell needs to stay 'unmodified', and ok, there's a few holes where tubes poke through, but essentially it's unmodified, so I've got 5 points from that. I'm keeping the original gearbox for now, so that's another 2, giving me 7. So I've got to keep one more component: either the original axles, suspension, steering or engine. Suspension's definitely not staying, axles could be kept depending on their definition of an 'axle' on a car with independent suspension all around, but it would be quite a compromise. Steering could relatively easily be kept (well, not really the rod ends, but I could maybe get away with that.) however the rack's got a very low ratio and would spoil the drive a bit compared to a nice quick-rack. The engine seems like the part that'll compromise how it drives the least, plus as I'm much more of a chassis/suspension guy than I am an engine guy, and I quite like the idea of keeping some original 924 character. There's also the fact I don't want this project dragging out year after year, I'm itching to get driving something fun again. There's very few 'easy' swaps in these due to the transaxle, and the handful there is (924s, 944 and maybe audi 5 cylinder) are expensive engines. A more involved swap would keep it off the road a considerably longer time, which I don't really want right now. I may eat my words and swap in a v6 or turbo lump later down the line, but for now I'm fairly set on keeping the old 2.0 8v and seeing what I can do with it on a budget.
I think the 924 may take a back seat over the Christmas break, as my daily e36 is in need of a bit of tlc before I start relying on it for my new commute in January. It's not a long commute, but I cycle to work at the moment, so I'll be much more reliant on the car than I am at the moment.
|
| |
Last Edit: Dec 4, 2017 10:44:01 GMT by RobinJI
|
|
|
|


 )
)


 Cant wait to see this in the flesh at some point

