RobinJI
Posted a lot
 "Driven by the irony that only being shackled to the road could ever I be free"
Posts: 2,995
|
|
|
|
A tiny update. Last night I cut to length and labeled up all the tubes that need slight bends putting in them: These are the door bars and A-pillar bracing:  There's also slight bends to go in the roof bracing, which after sitting in the car again, I'm going to stick with a cross as the headroom will be pretty good once I get a more suitable seat. I did them first and dropped them off with hayman to be bent, so hopefully they'll get done today, but he had to head off before I'd done the rest. |
| |
Last Edit: Nov 24, 2017 22:39:17 GMT by RobinJI
|
|
|
|
RobinJI
Posted a lot
"Driven by the irony that only being shackled to the road could ever I be free"
Posts: 2,995
|
|
Oct 16, 2017 22:26:06 GMT
|
|
I use Creo 3, (it's what we use at work, and I modelled that in my lunch breaks) The tubes are indeed modelled as swept extrusions. It was only a quick and rough model to decide the layout and help me work out how much tube I'd need, as I knew in reality, no matter how much measuring I did it would all need building around the car to get it as close fitting as I wanted.
|
| |
|
|
RobinJI
Posted a lot
"Driven by the irony that only being shackled to the road could ever I be free"
Posts: 2,995
|
|
Oct 16, 2017 14:51:39 GMT
|
Thanks for that Gofasterpinch. Good to see some newer designs finding their way in there. That's interesting that they've removed the option of thin wall t45. Budget would have restricted me to CDS anyway though! For the MSA rules for the cage what sort of motorsport are you looking to compete in ? I am not aware of any requirement for tubes or bars to fill in the roof space and if only there to stop things bashing through the roof ontop of you - two semi circles appear to be a popular choice as do similar to your V but but J shaped- curved to join about 1/3 back from the screen tube and then running side by side the final 2/3 to the centre of the main hoop. Both providing a clear area above the drives head. Pulse MIG machines are very nice - and pricey. Just spotted your post. At this moment in time I don't intent to enter any competitive motorsport with the car, only track days (unless I suddenly find a fair bit more spare cash!) however that may change in years to come. I've mostly just been considering that the regs are there for good reason, and probably provide a good guide to follow, as well as future-proofing the build, and making it easier to sell should I have to. With the bracing in the roof, personally I want it there to provide a stronger safety cell more so than for protection from intrusion. I feel it'll help a lot both in terms of directly resisting parallelograming from a hard hit to a corner of the roof, as well as helping transfer an offset frontal impact more evenly through the cars shell. I'd rather keep the bars relatively straight to keep their strength in tension/compression. My biggest concern for head-room at the moment is the joint between any bracing in the roof and the windscreen tube, where I don't think the double 'C' or 'J' (which I'm sure I've seen in locaterfields often?) would provide me noticeably more room than a straight cross. I may mock it up in tape to see though, as with gusseting I'm sure it could still give a decent amount of structure. There's also the consideration that once the cage is raised into its final position after welding the upper joints, it'll be a nightmare to add anything extra later, so I'm best off going a bit over the top now, just in case. |
| |
Last Edit: Oct 16, 2017 14:53:39 GMT by RobinJI
|
|
RobinJI
Posted a lot
"Driven by the irony that only being shackled to the road could ever I be free"
Posts: 2,995
|
|
Oct 16, 2017 13:33:55 GMT
|
I did make a little progress over the weekend. I managed to get the front section of the cage tacked into it's final location, including trimming and notching the windscreen bar. Then I played with some tape to mock up what I want to do with the door-bars and roof cross. The door bars in the 924 end up a bit weird because of how high the chassis-rail is where the main hoop lands, meaning a normal cross would leave the car pretty much inaccessible. As I mentioned above, I've revised my design to use a cross in the roof rather than a 'v' as a result of this mocking up, which also has the bonus of not getting in the way of the sun-roof latches like the 'v' would have. (I intend to keep the sun-roof usable, as I've always quite liked them, and this one's such a simple design there's not that much weight to be saved removing it.)   |
| |
|
|
RobinJI
Posted a lot
"Driven by the irony that only being shackled to the road could ever I be free"
Posts: 2,995
|
|
Oct 16, 2017 12:49:54 GMT
|
Okay, I am just a hobby welder much as yourself but also mechanical engineer by qualification and although visually emulating the old "stack of dimes" TIG weld the on/off is far from the same process and I don't think you will find anyone doing a structural weld other than by a continuous welding process. A)- wear and tear on the machine - B) Time and more importantly C) for the structure of the weld as starting again on top will impart impurities and the heat and cool will contuually change the material structure and impart stresses within the weld. With any welding processes you establish the weld pool and then work with it keeping it moving and constantly shielded. I am sure you have seen how far two parts will move when you just put a small tack on them - all I can see in my mind when you do a stop/start is that movement of the two parts back and forth as you stop and start welding. The penetration may look fine but the it's the grain structure and any impurities introduced as the gas also stops and starts and allows oxgen in for that split second. With the continuous weld, the weld pool is always fully shielded and protected To me the first weld that you posted pictures of the slightly cleaned up stop/start weld looked poorer in relation to the "normal" weld. I have little doubt that in situ the on-off welds will be more than strong enough if they ever had to be tested in anger but for me a fully shielded continuous weld process would be the way to go. Thanks for the advice. I was at least partly aware of the issue with the structure of the weld, but I'd read about various destructive testing that had shown pulse welding to provide a very good joint. Having realised my confusion with the terminology, and read up on what real pulse welding (rather than a stop-start technique), as well as your very valid points, I'm pretty sure I'll use continuous runs throughout. do you think you will gusset to A and B pillars? i quite fancy it, even for the look, but also know the downsides of removing a 30 year old windscreen. plus i think theres loom running down the A on mine. I don't think I will be. The A-pillars in the Porsche are very skinny, with the cage as close as it is, the gussets would be tiny, and probably too small to get a decent swaged hole in. The B-pillars are a bit far away from the cage to put a sensible gusset in. The cage will be welded to the roofs inner skin at the top of the A and B pillar, as well as to the inner rear-quarters (near the original upper seat-belt mount) and behind the dash. In terms of the screen, I think this screen's toast but I'll see how it cleans up come the end. If not it's an excuse to fit a late 944 screen, which fit flush without the (very un-aero) step at the front of the roof that the 924 screen gives. Robin You mentioned you used 'rust proofing paint' on the floors, then zinc, the primer. What brand was the rust proofing paint? I'm just about to that stage with my 911 and I'm sure while I'll hit 99% of the rust, with the best will in the world I'm sure I will miss little pits of it. What were you prep stages before and inbetween coats? Thanks  Munky I'm probably not the best person to ask about paint, I'm kind of making it up as I go, but I gave it a coat of 'kurust' (sometimes 2 coats in the fiddlier areas) then a decent coat of zinc rich primer. I haven't put a top-coat on anywhere yet, but I'll probably throw some highbuild over the larger, flatter areas. The kurust seems to have given the primer some good adhesion too. Cage looks really good, i have just done the CAD for the new cage for my Polo, i have gone for a similar design in roof brace and rear stays to match new MSA regs. (picture) Bookmarked too Thanks. Annoyingly, after sitting in it again with the windscreen tube and a-pillar tubes in, then playing with some tape in place of the diagonals, although before I thought a 'V' would be ok, I've decided that an 'X' will actually give better headroom, so although I prefer the 'V' in principle, in a cockpit as tight as the Porsche, I'm a bit limited in choice by what I actually fit in! Any info on the new MSA regs? I've not been able to find anything in the 2017 blue book about the 'V' design, and I've mostly seen it in cars built to FIA regs, rather than MSA. P.S. Your Polo looks great, really cool build. I've got a soft spot for the 86c chassis as I had a mk2 Coupe S as my first car, and a few good friends are still into them. I also used to do a bit of co-driving, so yours ticks several boxes for me! Robin, I'll happily DP or MPI it. I'm a NDT pipeline inspector for gas/oil/etc with the relevant PCN certs. PM me if you're interested.. Love the 924 by the way, I had all bit bought one when my partner told me she was pregnant, family car it was then! James. Thanks James. I'll see what my work say and bear you in mind. |
| |
Last Edit: Oct 16, 2017 12:53:07 GMT by RobinJI
|
|
RobinJI
Posted a lot
"Driven by the irony that only being shackled to the road could ever I be free"
Posts: 2,995
|
|
Oct 13, 2017 12:35:08 GMT
|
After a little more reading up, I think I'm wrong to call what I'm doing 'pulse' welding, it's a stop-start technique rather than technically pulse-MIG welding. I keep also meaning to put up a picture of the cage's CAD design. I'm going quite extreme with it, as it's a perfect chance to build it to a spec to take anything I may want to throw at it in the future. (There will be gusset's I've not bothered modeling in too.)  |
| |
Last Edit: Oct 13, 2017 12:35:56 GMT by RobinJI
|
|
RobinJI
Posted a lot
"Driven by the irony that only being shackled to the road could ever I be free"
Posts: 2,995
|
|
|
|
Tom: Thanks for the vote of confidence, I'm hoping the car will come out well in the end, it should be structurally sound if nothing else! As for the engine, I haven't really mentioned it, because I haven't really made a final decision! I really do need to soon though. Whatever happens, I'll be keeping the factory gearbox and torque tube, and trying not to modify the shell to make anything fit. One option, which is currently edging it's way into being the most likely route is to rebuild and supercharge the standard 2.0 Audi engine. Darren: The hole saw chomps through nicely, but you do have to be careful not to put too much pressure on it or it can snag very easily where it's only doing partial cuts. I've been using the ones tool-station sell, and I've found their cheaper 'bi-metal' ones to be pretty good, but I was less impressed with their fancier 'cobalt' ones, which seem too brittle for what I'm using them for. Vagvaz: The tubing's 50.8mm x 2.03mm for the main sections, with 38.1mm x 2.64mm for the additional reinforcing. Both are EN10305-1 grade tube. This should meet MSA regulations should I ever want to do anything competitive with the car. Bastardchild: Thanks, I'm happy that both welds are solid welds, I'm just being fussy as it's something I want to get ideal, rather than just good enough. I'm sure some of my searches have pointed me at that forum, but I'll have a good look. Darkspeed: I'm pulsing it manually. I'm doing it with quite quick pulses, going back in just at the point the pool of the previous pulse is solidifying, so the new pulse flows into it without a cold joint. I had another play last night with higher amps on the pulses and was very happy with the result. I'll cut the joint open and have a proper look at it next time I'm out at the unit. I might see if work are doing any DPI testing soon, and see if they'd mind testing these practice welds while they're at it. (I'm not a fabricator by trade, but I do work for a large architectural fabrication company as a designer.) (It's fairly clear, but the top weld in this is the new pulsed one) 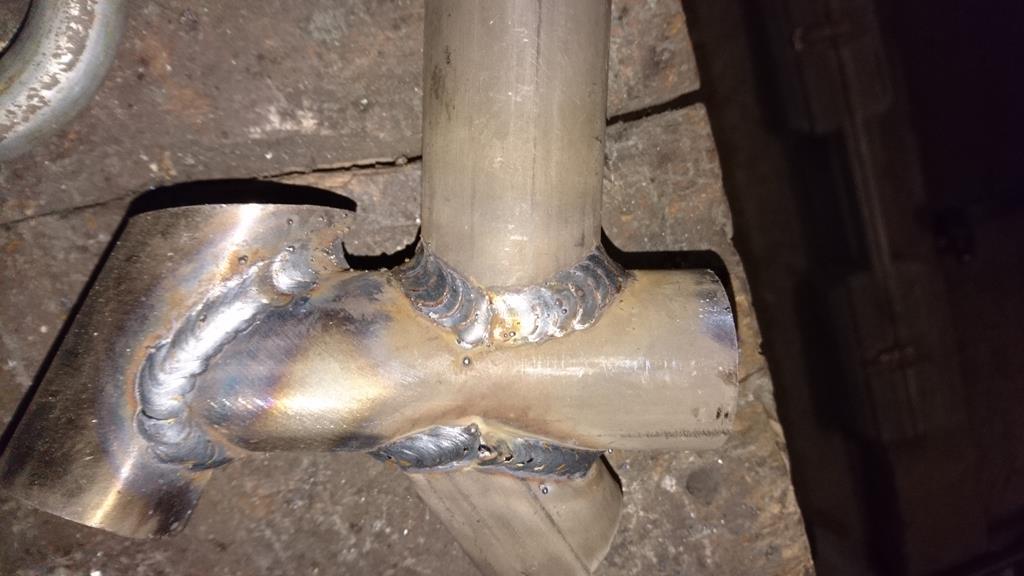 I got the second A-pillar bar notched and trimmed to fit last night too: 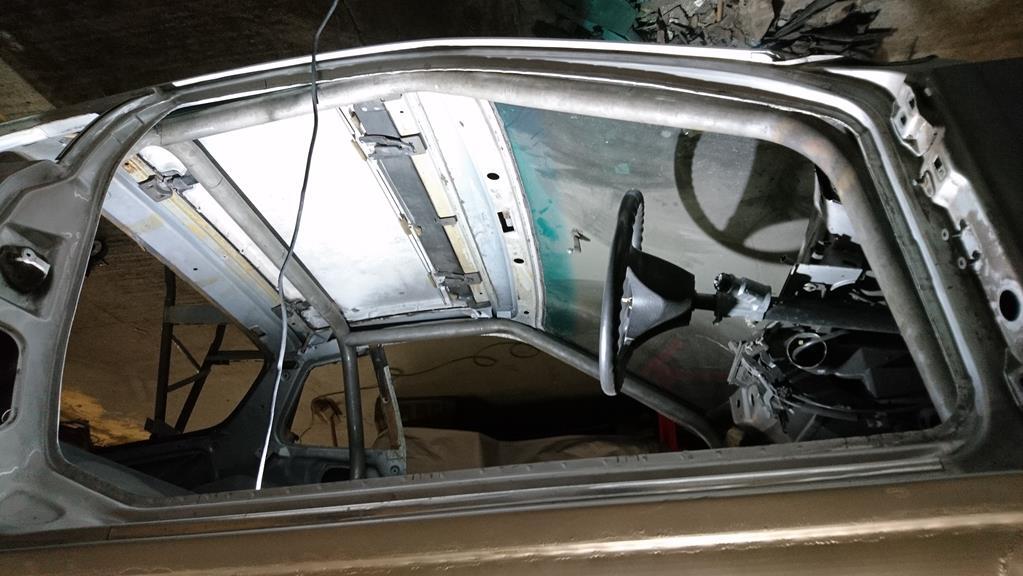  |
| |
Last Edit: Oct 13, 2017 10:00:16 GMT by RobinJI
|
|
RobinJI
Posted a lot
"Driven by the irony that only being shackled to the road could ever I be free"
Posts: 2,995
|
|
Oct 12, 2017 14:01:41 GMT
|
Thanks Wraith, I'm pleased with what I've done so far, but the small amount of skill's definitely enhanced by a very user friendly machine! The last bits to finish the tube notcher arrived yesterday, so I finished it up and gave it a go: 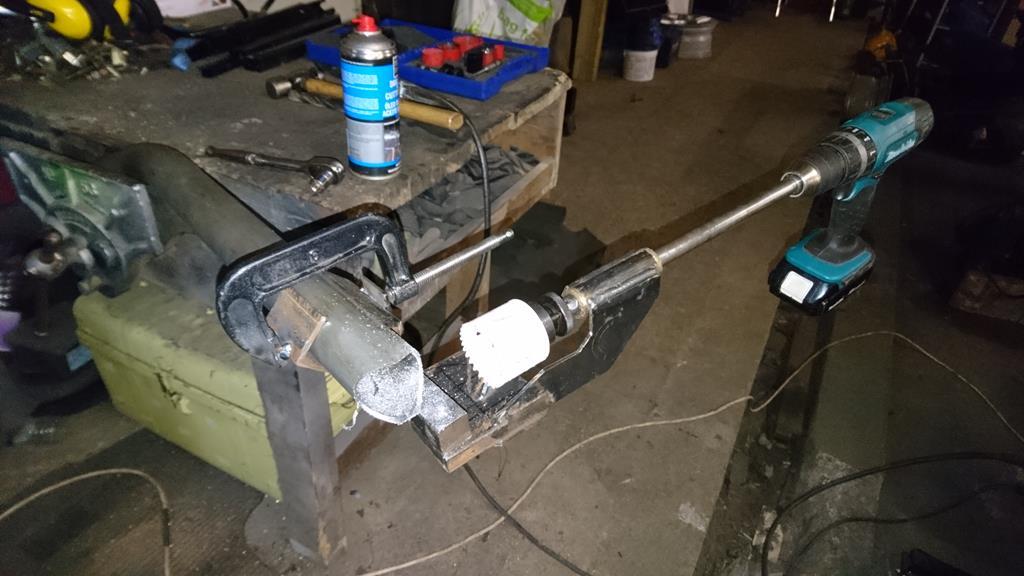 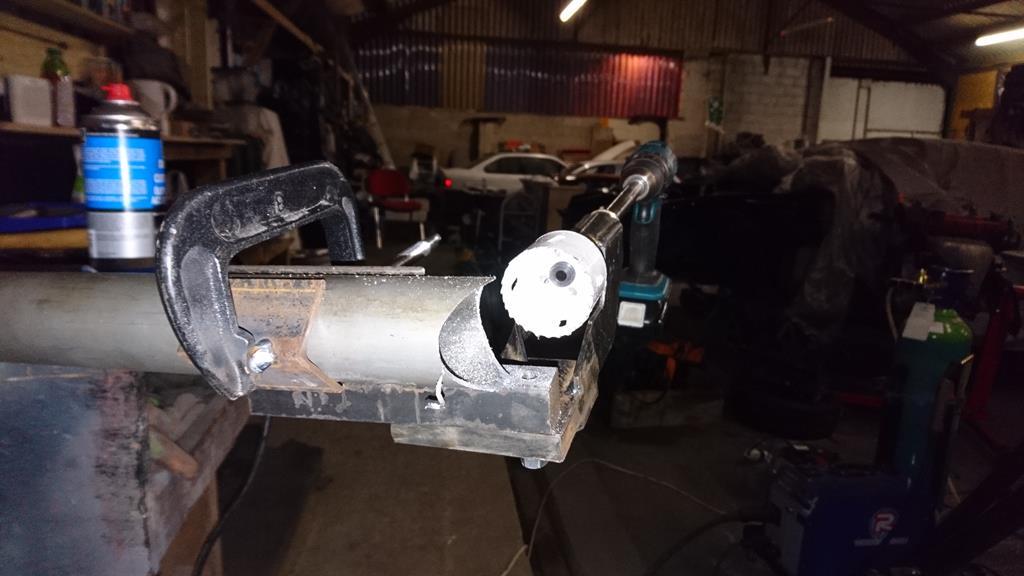 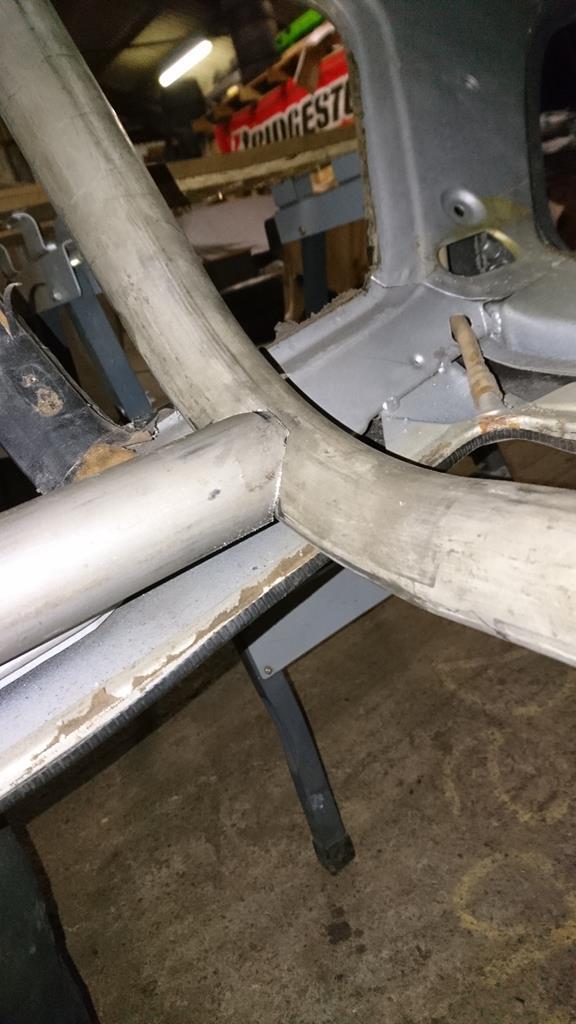 Success! Happy with that I cut off a small length of the 1.5" tube to do a couple of test welds to get my eye in and decide on a technique and settings. I've seen quite a few very high end, professionally built cars welded with a pulse-weld technique recently and Reading into it, I'm tempted to use that method on the cage. It certainly makes it easier to get a nice consistent weld around the awkward shapes, and the heat it puts into the tube seems a more gentle 'soak' rather than flash, which I guess can result in a less brittle HAZ. I did a test of 2 welds with identical settings on opposite sides of a tube, to see how them sunk in. I was expecting the pulsed weld to penetrate less but if anything it actually did a little better. I could have got away with a higher power setting pulsing, where as the seam weld was already boarder-line too high (causing me to rush a little, so it's not as neat as I'd like). 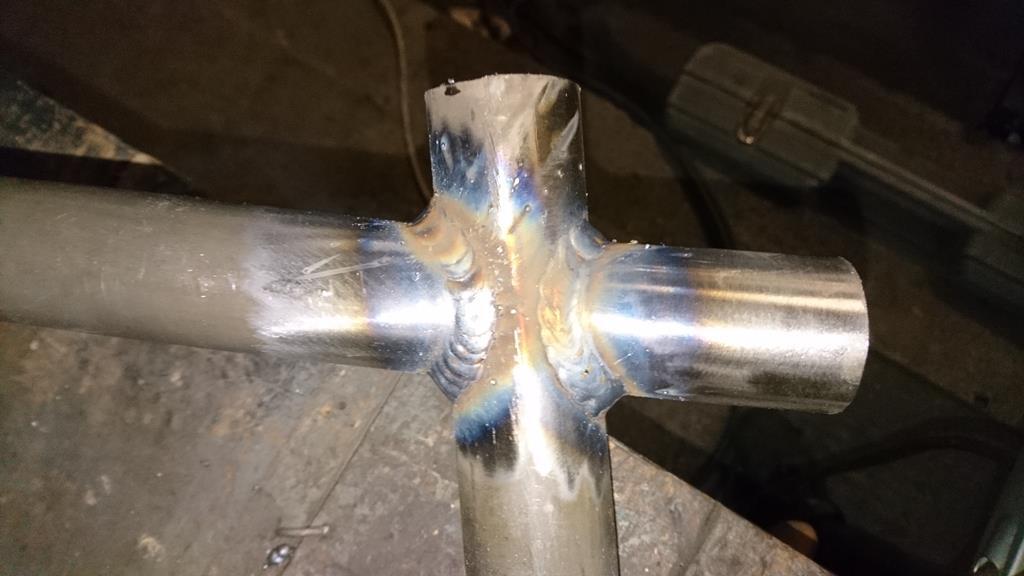 cleaned up: 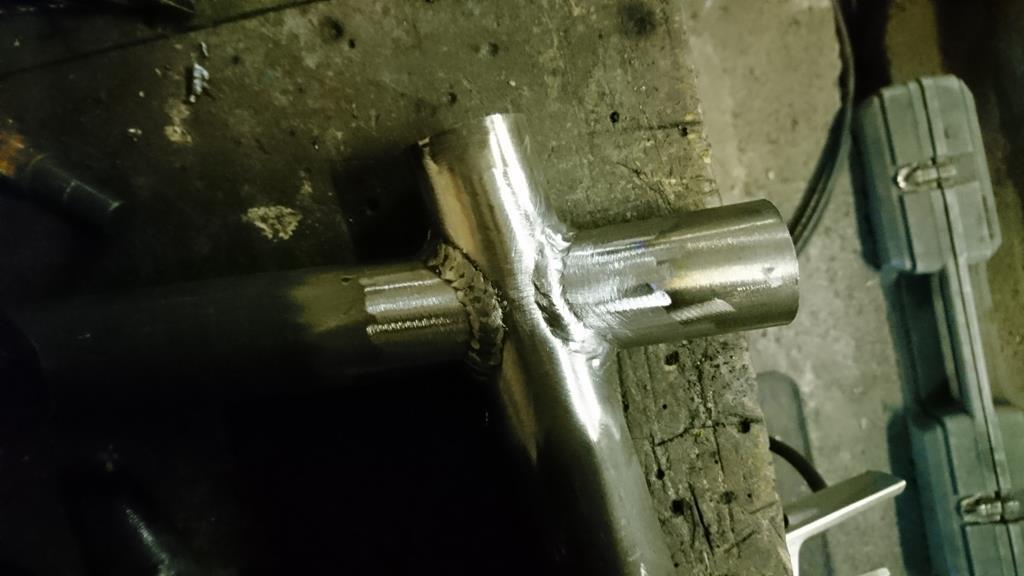 cut through (pulse on the left, seam on the right in both shots): 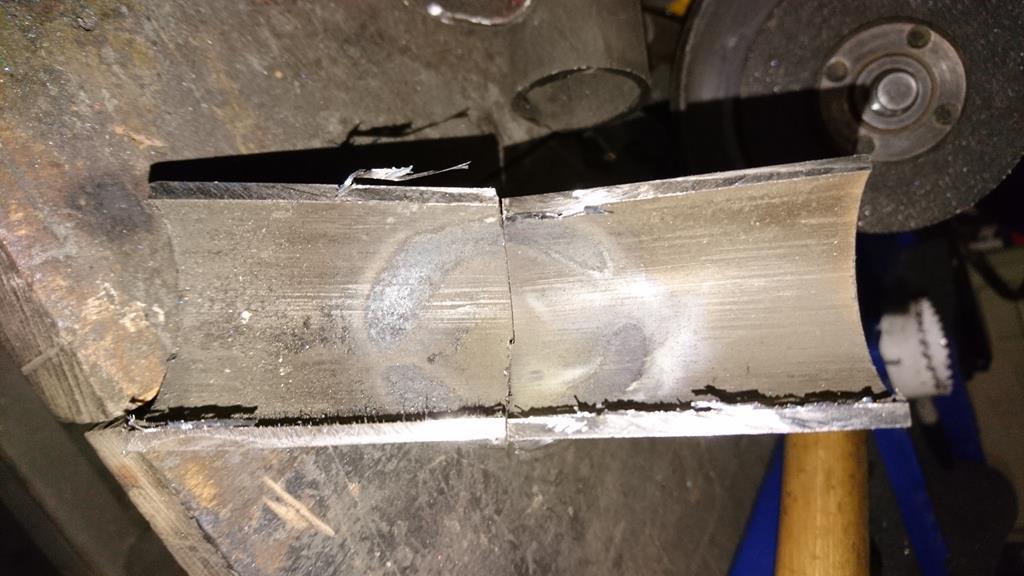 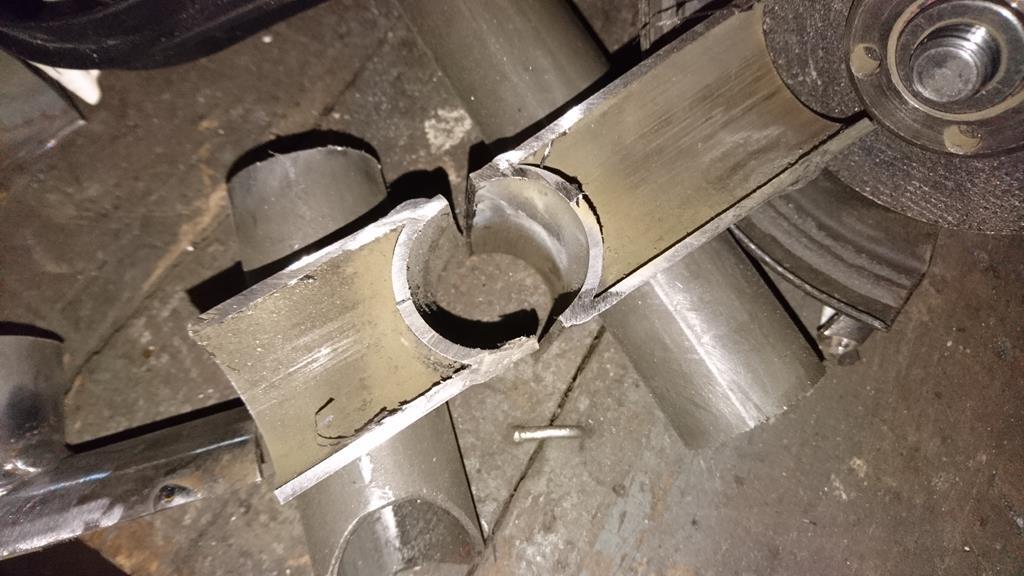 I don't think either's about to fall off, but I'm still undecided as to which would be the best technique. I'll probably have another play tonight with a lower heat seam weld run a bit slower vs. a higher heat pulse weld. I need to be careful not to use up too much tube on tests though! I know there's a few very skilled welders on this forum, so any hints, tips or advice would be more than welcome! |
| |
Last Edit: Oct 12, 2017 20:59:14 GMT by RobinJI
|
|
RobinJI
Posted a lot
"Driven by the irony that only being shackled to the road could ever I be free"
Posts: 2,995
|
|
|
|
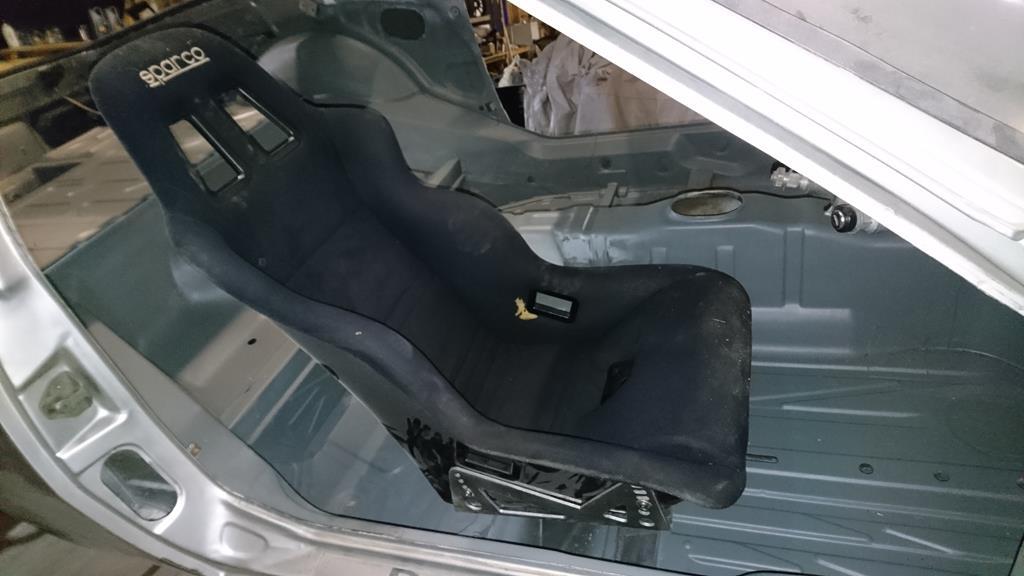
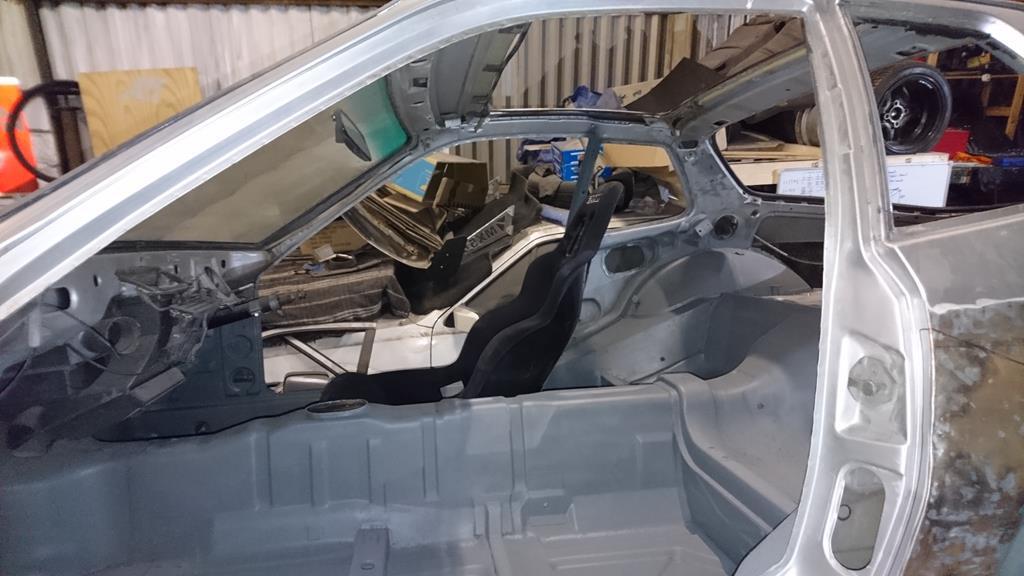
Progress! I have bent bits of tube! 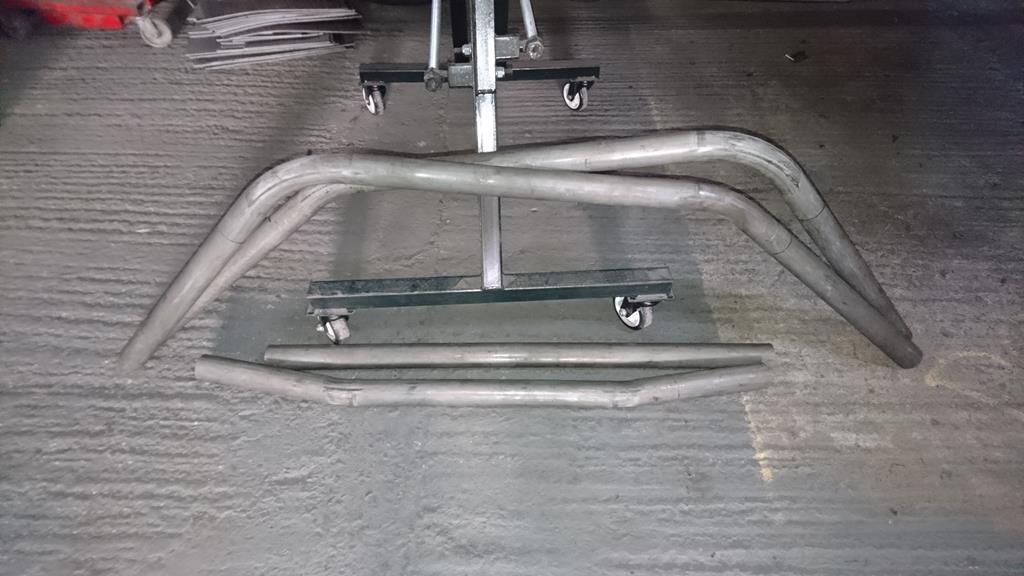 Main hoop: 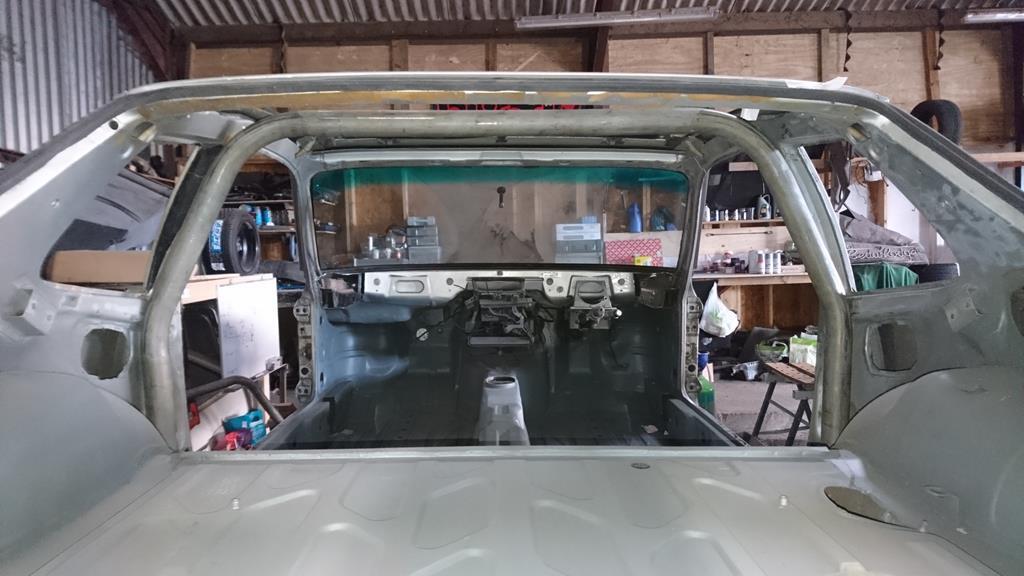 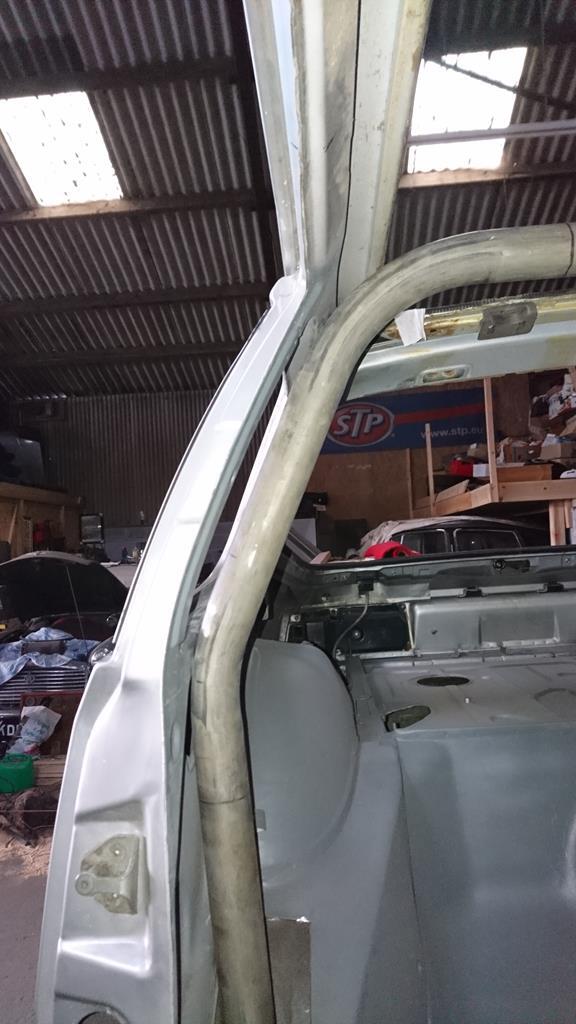 Lateral bars: 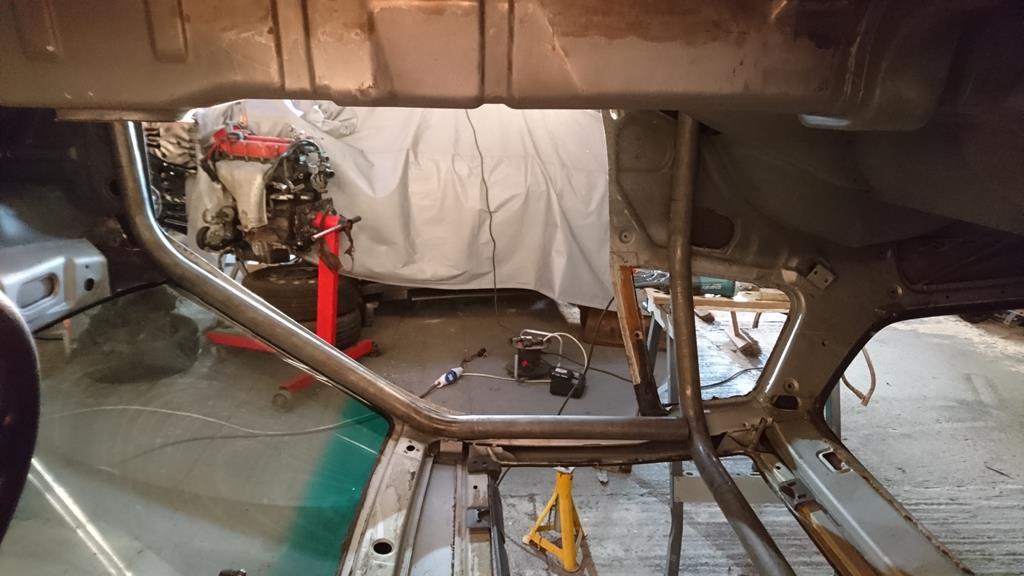 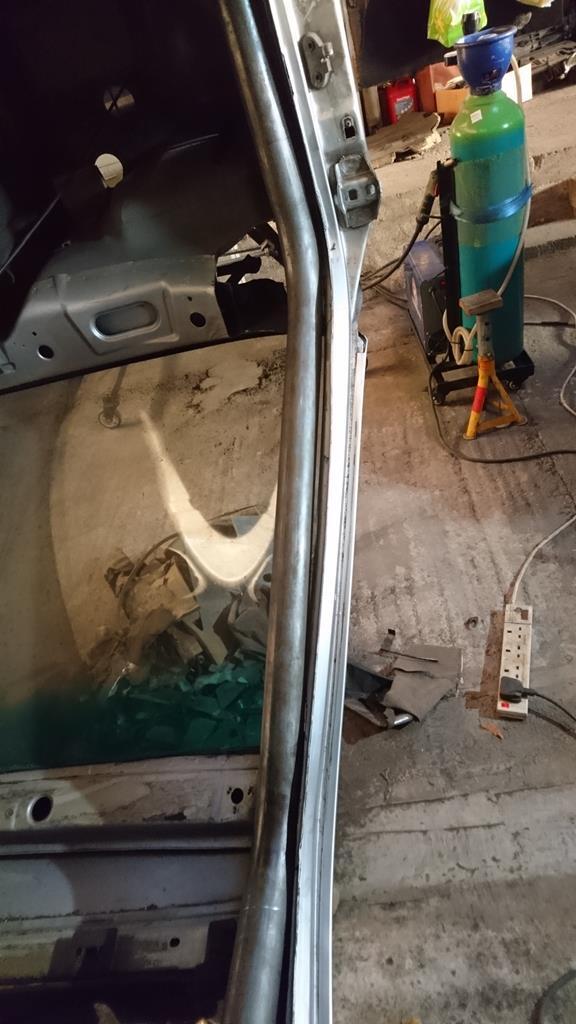 I'm really happy with the fit of these! It should give as much cabin space and visibility as I could possibly hope for, which is the main thing for me at this point. I also finished off the seat mounts and bolted one in to see how I'd end up sat in it so I could make a final decision on the arrangement of tubes above my head. The good news is I can run a 'V' in the roof with plenty of head room, the bad news is, I can't fit sliders under this seat with decent head-room, so It'll have to be a fixed seat for now. Luckily the narrow tunnel in the 924 means the side mount bolts are surprisingly accessible, which combined with captive nuts in the floor should make it a fairly quick job to move if necessary. 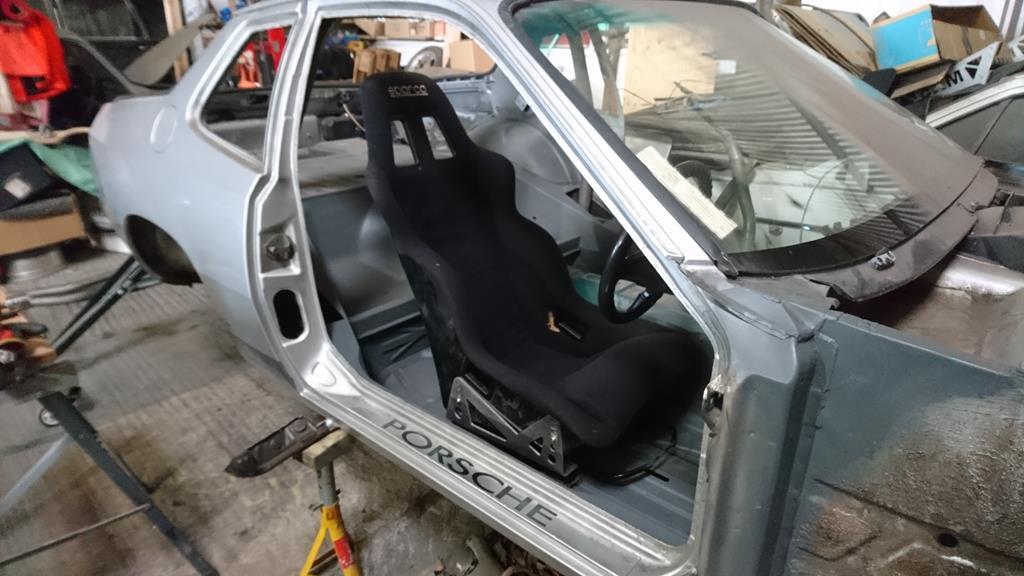 And a scruffy looking me sat in it (to give an idea of scale, I'm 5'9" and about 13 stone): 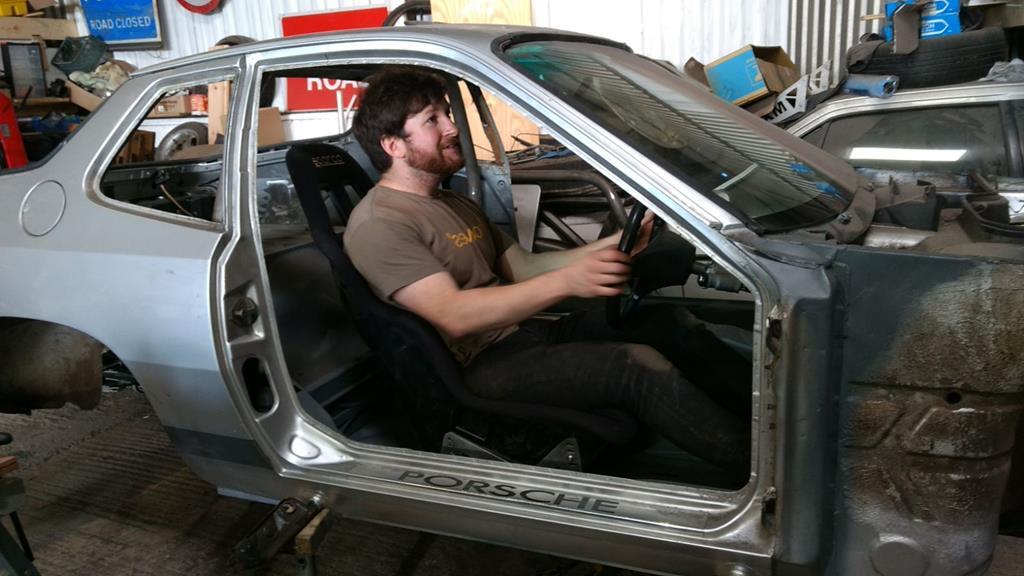 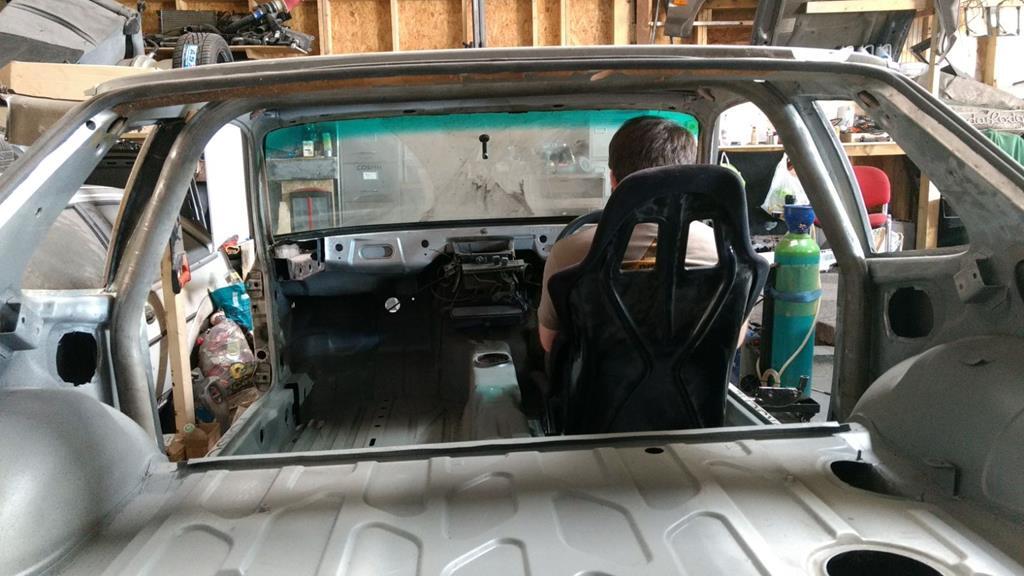 Hopefully the cage should come together fairly quickly. |
| |
|
|
RobinJI
Posted a lot
"Driven by the irony that only being shackled to the road could ever I be free"
Posts: 2,995
|
|
|
|
|
Haha! Removing the roof is the other option! And actually, I can remove about 2/3rds of mine with a couple of clips, but I still don't think it'd give me the room I'd want to get decent welds on there with the cage fitting as tight as I want it.
Besides anything else though, the sills on the 924 are deep, especially in the back. Ending the legs on top of them would leave my backside hanging well below the feet of the cage, so I wanted to pass them through and weld them to the bottom and top of the sills, with the added bonus that the legs end up in double shear.
Things got a bit delayed with bending the tubes up, but the main hoop is now bent and I'm super happy with how it fits. The lateral bars and screen bar should be getting bent tomorrow, which will let me roll the car back from next door and get on with lots of notching and welding.
Speaking of notching, I had a go at making a tube notcher while I waited for bending to happen. I've pretty much finished it other than waiting for a length of bar and a hole saw arbour which are in the post to me.
Pictures when I'm on a computer, as I'm not sure how/if you can upload photos to here off a phone.
|
| |
Last Edit: Oct 6, 2017 21:43:17 GMT by RobinJI
|
|
|
|
RobinJI
Posted a lot
"Driven by the irony that only being shackled to the road could ever I be free"
Posts: 2,995
|
|
|
|
Thanks JP If all goes to plan, the main sections of cage should be getting bent later by the guy in the unit next to me. So in preparation I spent last night cutting a load of holes into the shell I just finished welding holes up in: Where the front legs will land: 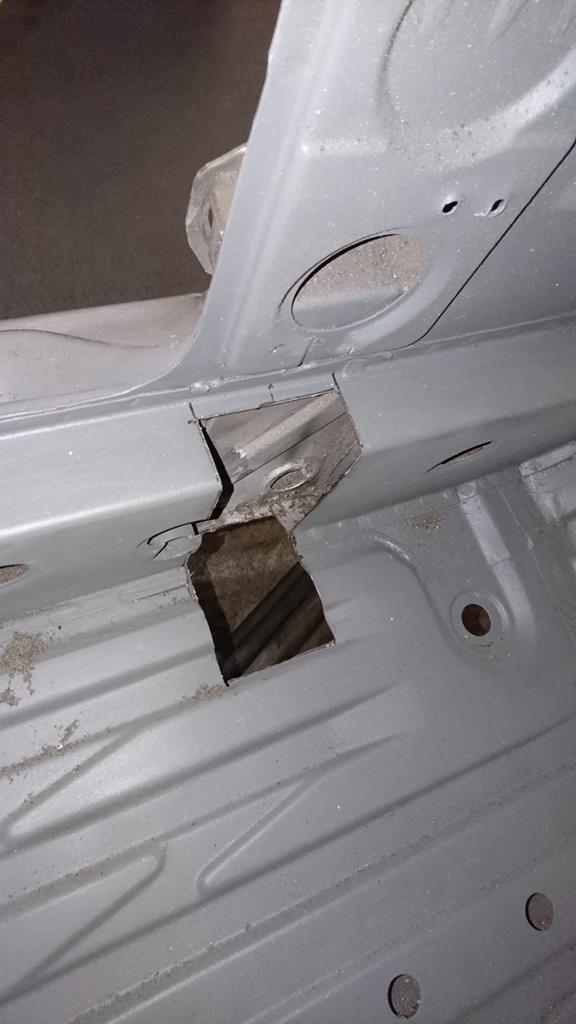 Where the rear legs will land: 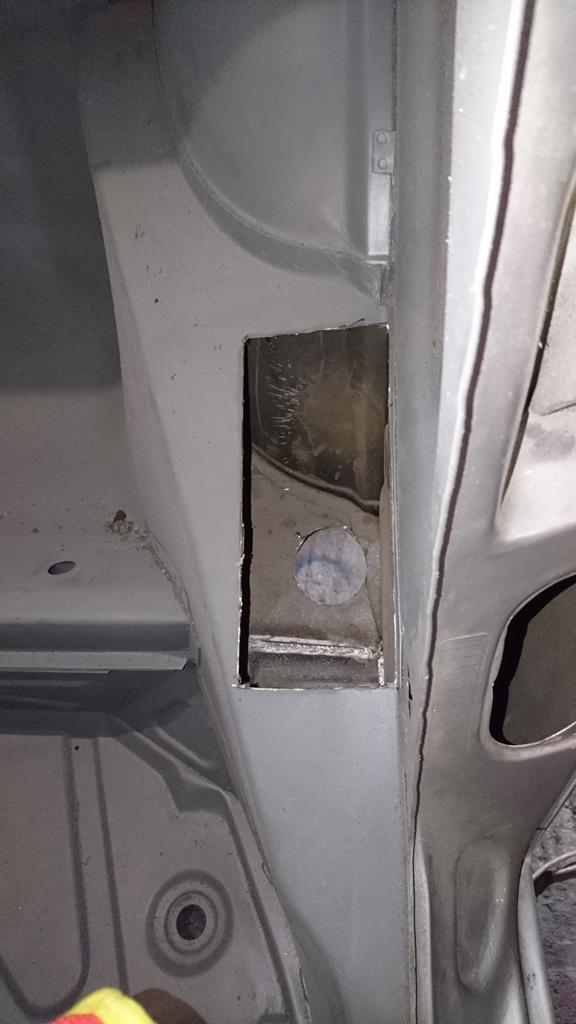 And some clearance at the dashboard to let the lateral bars run close to the pillar right down: 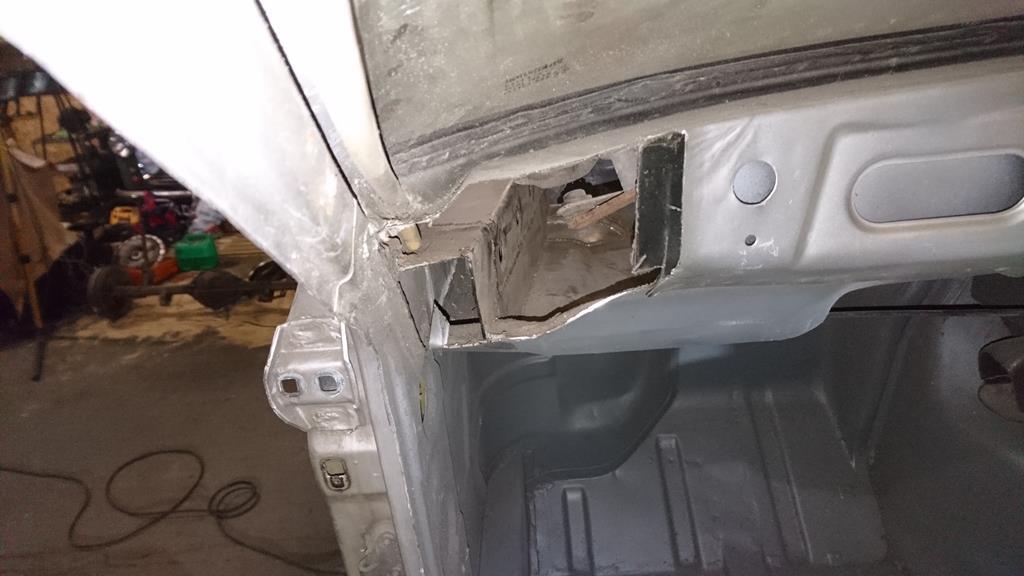 If you're not familar with how cages go in, this is done to allow me to drop the cage down in the car, to give access to weld the top of tubes where the roof would otherwise be in the way. Then once it's welded up it can be raised up into it's final position and the sections of floor can be welded back in under it, along with 3mm thick spreader plates. The holes at the rear are large because the hoop will need 'leaning' into position. I kept and labled all the bits that were cut out, so hopefully it'll be fairly easy to weld back up: 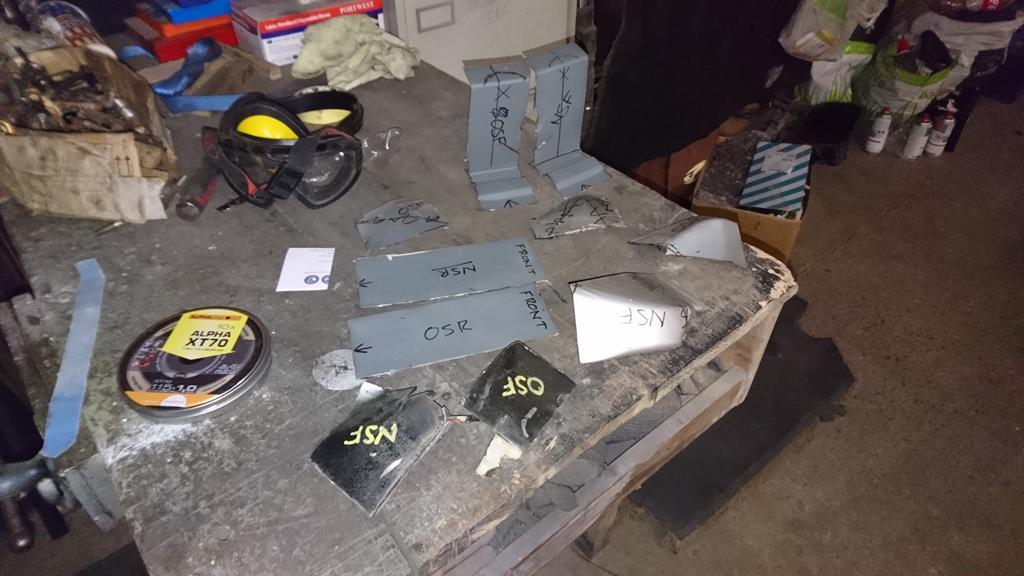 |
| |
Last Edit: Oct 4, 2017 9:47:17 GMT by RobinJI
|
|
RobinJI
Posted a lot
"Driven by the irony that only being shackled to the road could ever I be free"
Posts: 2,995
|
|
|
|
Thanks for the kind words guys. I managed to shift the roll cage tubing out to the unit over the weekend, but no other news: 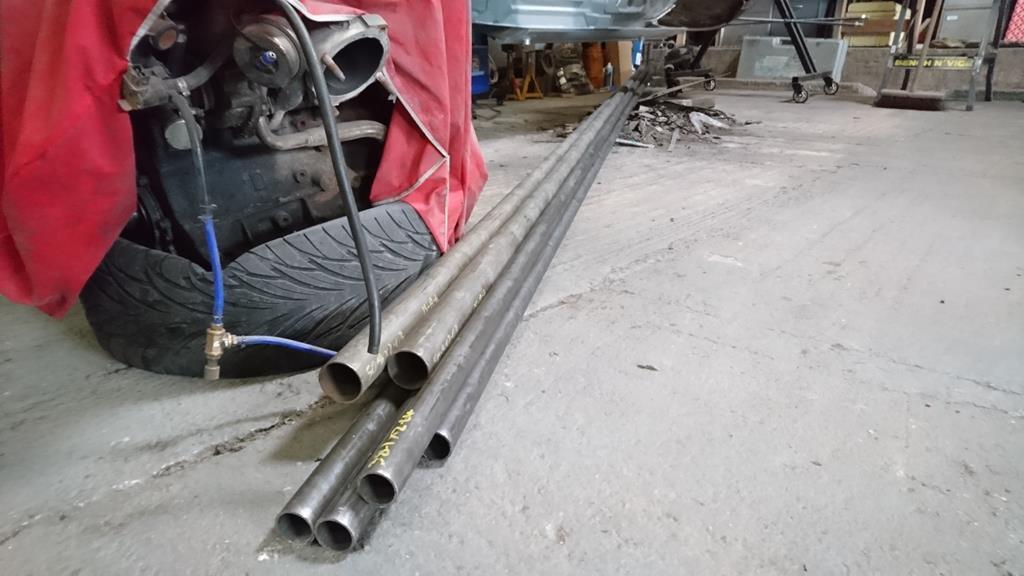 I just need to get someone to bend it now. |
| |
|
|
RobinJI
Posted a lot
"Driven by the irony that only being shackled to the road could ever I be free"
Posts: 2,995
|
|
Sept 29, 2017 9:39:05 GMT
|
Well this is it, as far as I'm aware this is the last bit of structural rust on the car sorted! This was a heavily pitted section of the drivers side chassis rail in the engine bay, where the exhaust had cooked the paint off and it had rusted over the years. New metal in: 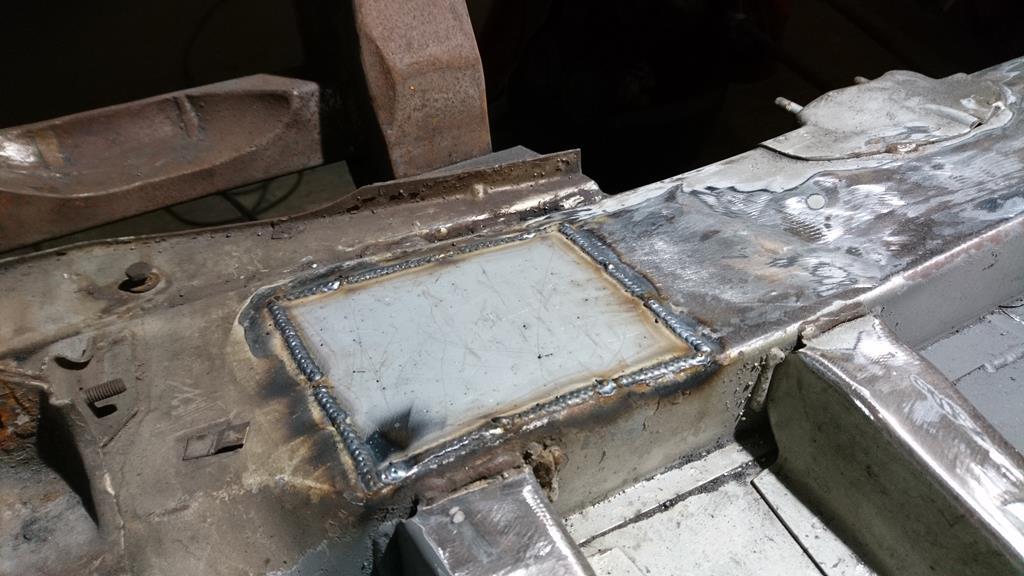 And ground back: 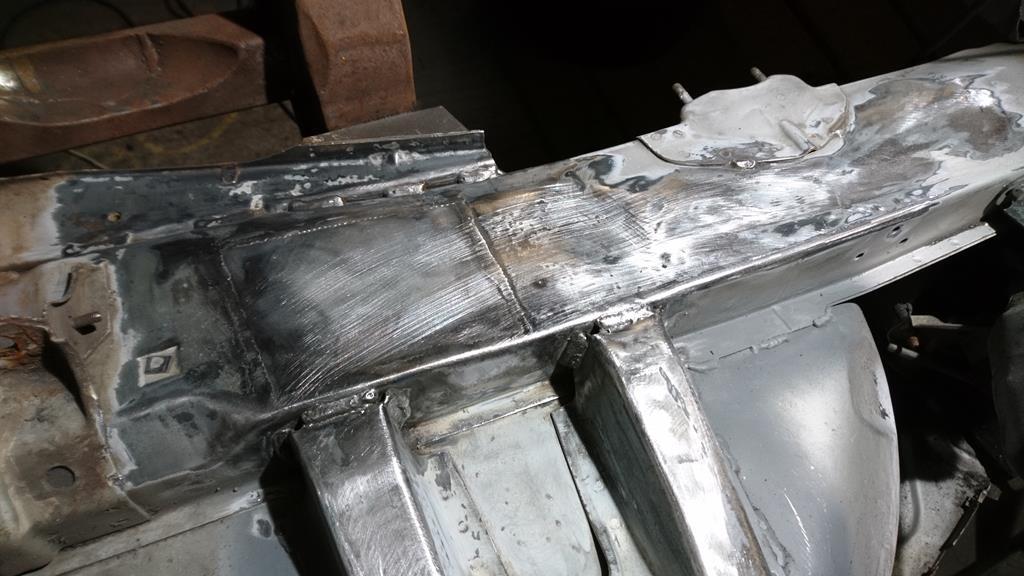 If you look closely you may spot that I ground out and re-did the factory welds where the turret hits the chassis rail too. I'm sure they were fine structurally, but their messiness was bugging me, so while I was there I thought I may as well tidy them up. Then I slapped a coat of Kurust over it all. I've been doing this with a lot of the car, just as an extra precaution against rust coming back. It's interesting the way it reacts with the steel to form a black layer, but where I haven't ground through the galvanizing, it stays silver: 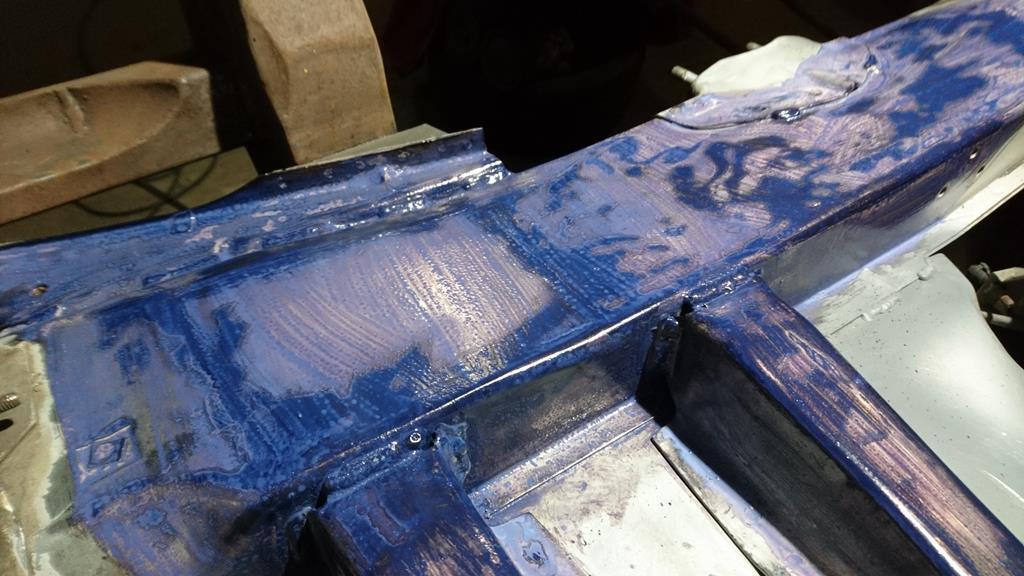 Oh yeah, I spent some money too, so now I've got 36m of CDS tube sat in the yard at work waiting for me to take it home.  |
| |
Last Edit: Sept 29, 2017 11:59:30 GMT by RobinJI
|
|
RobinJI
Posted a lot
"Driven by the irony that only being shackled to the road could ever I be free"
Posts: 2,995
|
|
Sept 20, 2017 14:37:55 GMT
|
FU Photobucket. Bookmarked anyway as I'm looking forward to updates. I've managed to find a few minutes at the end of my last few lunches to go through this thread and fix the photos. They're now hosted here on retrorides, so hopefully won't be going anywhere, and everyone should be able to see them on mobiles/tablets again. No real progress as what time I've spent out at the unit recently's mostly been spent helping my housemate with a 16v conversion in his Mk2 Polo Coupe. This isn't Porsche related, but here's a cut-n-shut pulley I made up for him, to let him use a mk2 8v alternator on the 16v engine to simplify the belt run, the centre's 16v, while the outer section's 8v: 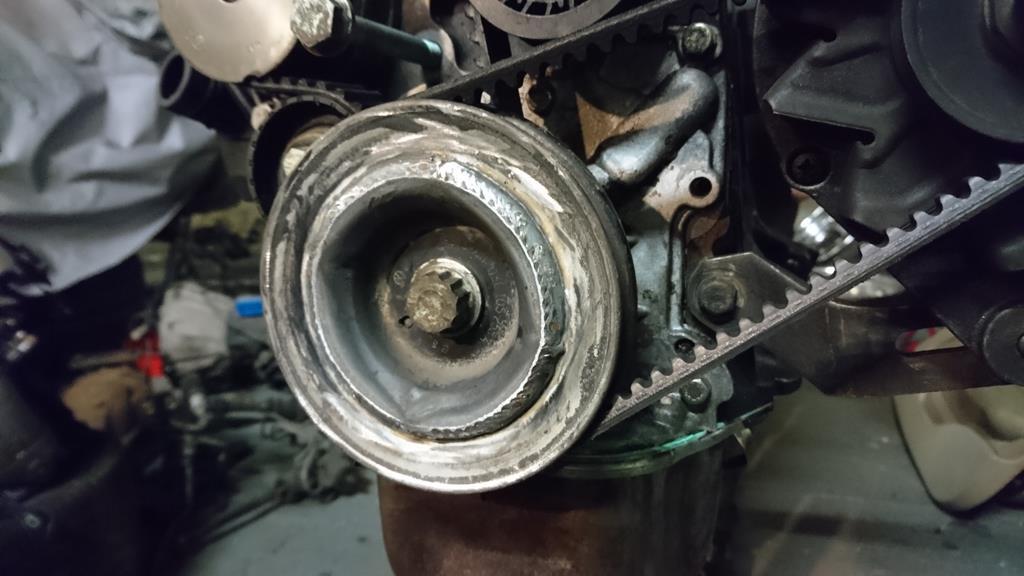 |
| |
Last Edit: Sept 20, 2017 15:00:29 GMT by RobinJI
|
|
RobinJI
Posted a lot
"Driven by the irony that only being shackled to the road could ever I be free"
Posts: 2,995
|
|
Sept 13, 2017 12:09:18 GMT
|
|
|
| |
|
|
RobinJI
Posted a lot
"Driven by the irony that only being shackled to the road could ever I be free"
Posts: 2,995
|
|
Sept 12, 2017 21:59:15 GMT
|
|
Thanks bstardchild. I was a bit worried about cracking, so I did check that the laser cutters used a grade of aluminium that suits forming. I gently warmed them with a blowtorch (still touchable, but hot) before bending and set the folder jaws with about a 10mm gap to allow it to keep a reasonable radius, which seems to have done the trick.
I tried to build in as much adjustment as possible, but I'm aware how fiddly side mounts are to move once all bolted down. I'll try mounting the factory porsche runners between the side mounts and the floor to keep the driver's seat sliding. Failing that, I'm pretty average heigh (5'9") so most people will physically fit without moving the seat, even if it's not quite ideal for them.
|
| |
|
|
RobinJI
Posted a lot
"Driven by the irony that only being shackled to the road could ever I be free"
Posts: 2,995
|
|
Sept 12, 2017 14:45:11 GMT
|
Yeah, I think a few refreshes will bring the pictures back if you're on a desk-top, I think mobiles won't work though. I will try and find time to get the photos updated, it's just a pain on a phone, and as I spend all day at work on a computer I rarely feel like using one when I get home. I fancied a break from the car its self, so I as a little distraction I decided to finish off the bucket seat side mounts I'd started a while ago. I'd had some cut to my designs from 6mm Aluminium a while ago, but they needed a 90deg fold putting in them. Earlier in the build I made a little sheet metal folder, and although it was beefy enough to fold the 6mm aluminium, the vice I was using to clamp it, and my strength pulling down on it (even with a big cheater bar) wasn't enough. A little chopping, turning, drilling and welding later and my porta-power was slotted into the folder and made short work of them.  The results aren't perfect, but there is now undeniably a 90deg fold in them with no cracks in them, so I'm happy with that. Take a couple of these: 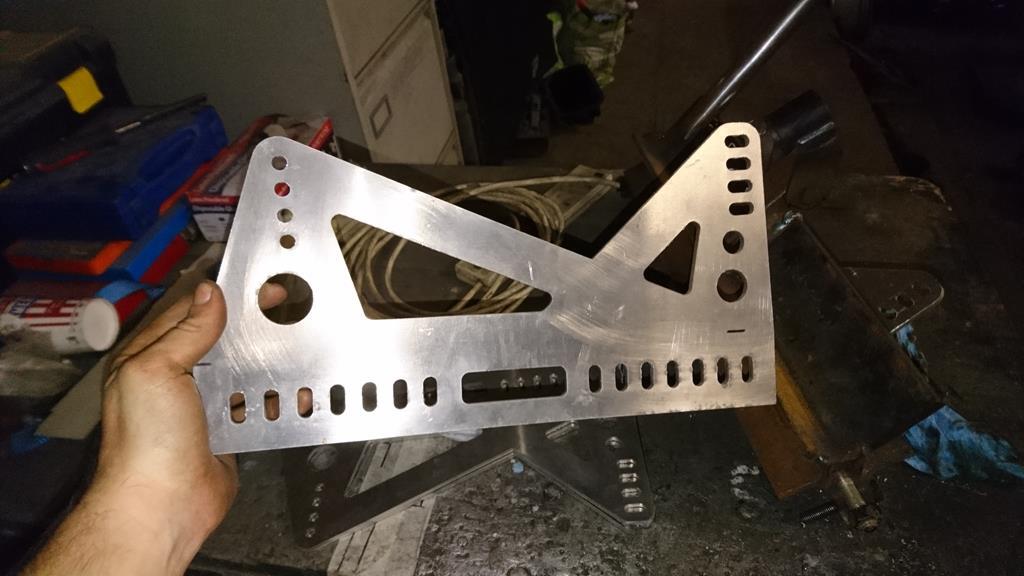 introduce them to one of these: 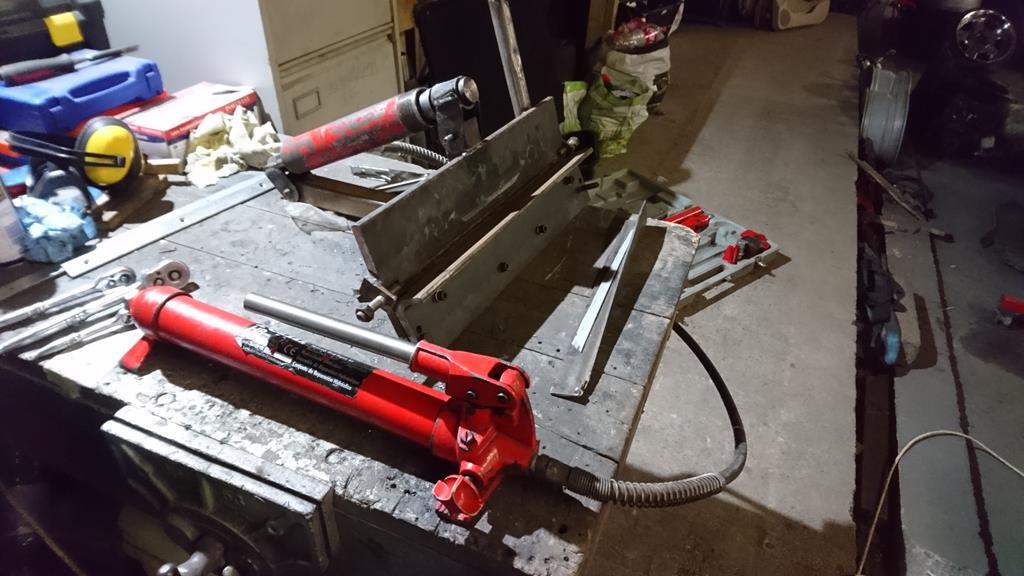 And you end up with these: 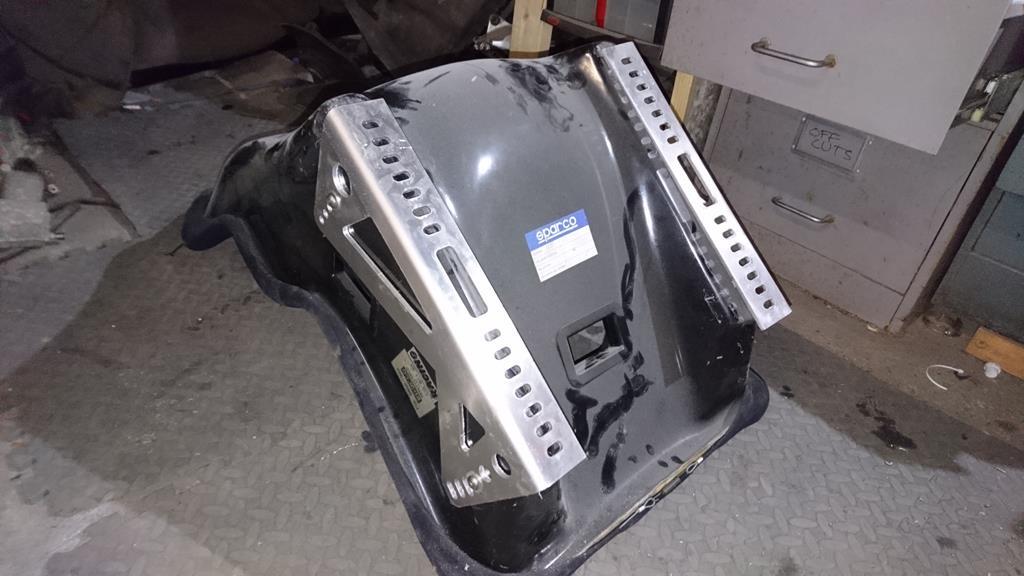 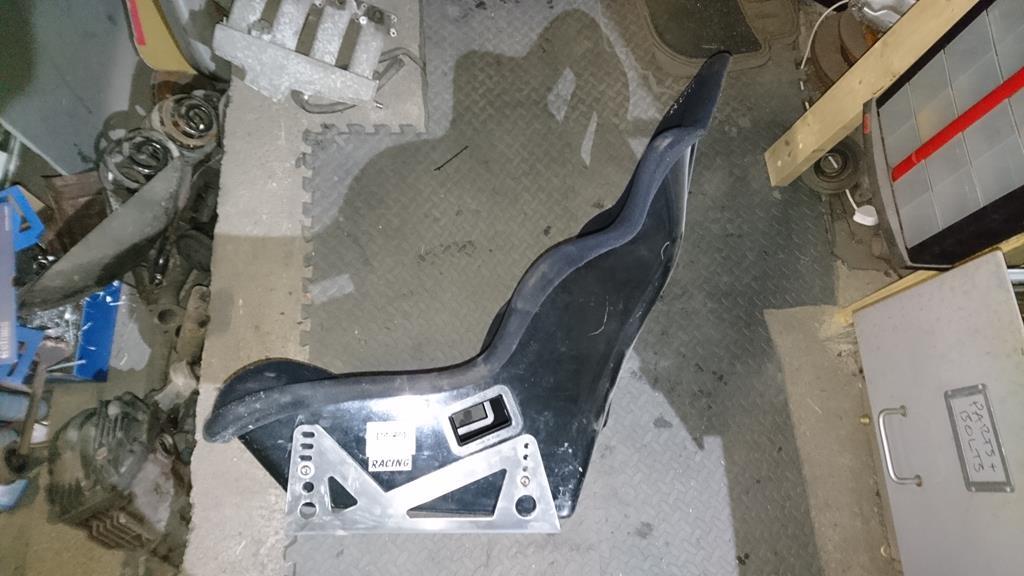 It probably would have made way more sense to just buy some, but ah well, I like making stuff. |
| |
Last Edit: Sept 12, 2017 15:30:08 GMT by RobinJI
|
|
RobinJI
Posted a lot
"Driven by the irony that only being shackled to the road could ever I be free"
Posts: 2,995
|
|
Sept 11, 2017 14:28:39 GMT
|
|
Thanks JP
I meant to say before I ran out of lunch break, that last plate in the bulkhead marks a nice milestone, as it means the cabin's now completely rust free, meaning it's time for me to move onto the engine bay.
The bay needs one plate in the drivers side chassis leg where the exhaust's killed the paint over the years, otherwise it's a case of tackling the slam panel and radiator mounts, which I'm more than likely going to be heavily modifying anyway, so may not take much in the way of repairing.
It does mean I need to pull my finger out and sort out a roll cage and maybe even buy an engine soon! One headache that's been playing on my mind will be what to do about an LSD.
|
| |
|
|
RobinJI
Posted a lot
"Driven by the irony that only being shackled to the road could ever I be free"
Posts: 2,995
|
|
Sept 11, 2017 12:32:54 GMT
|
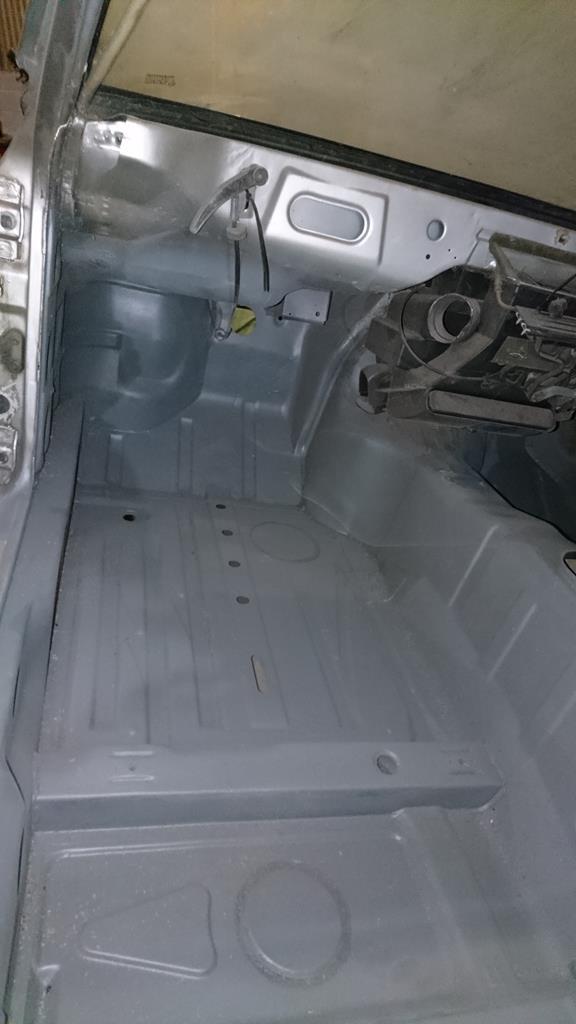
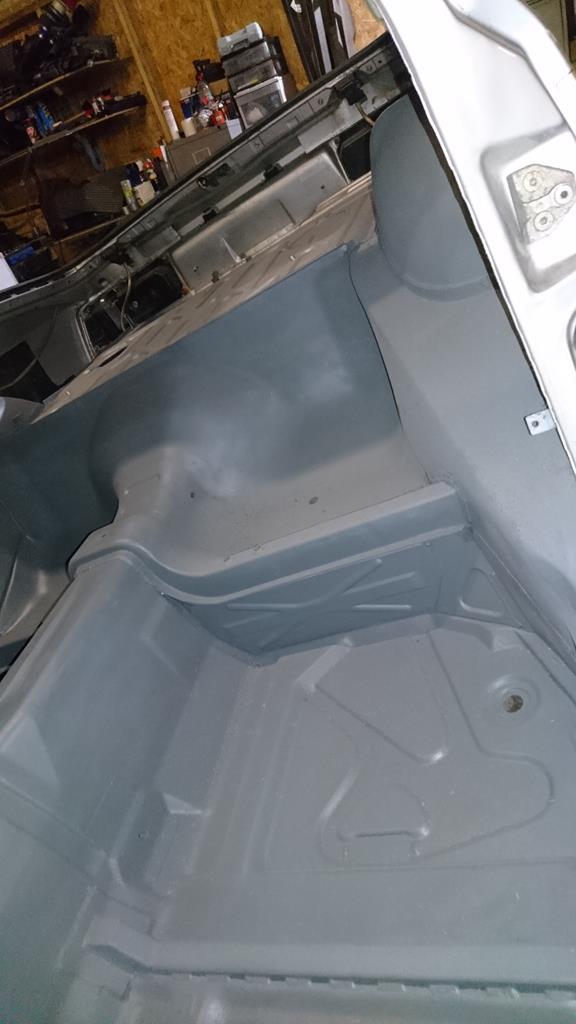
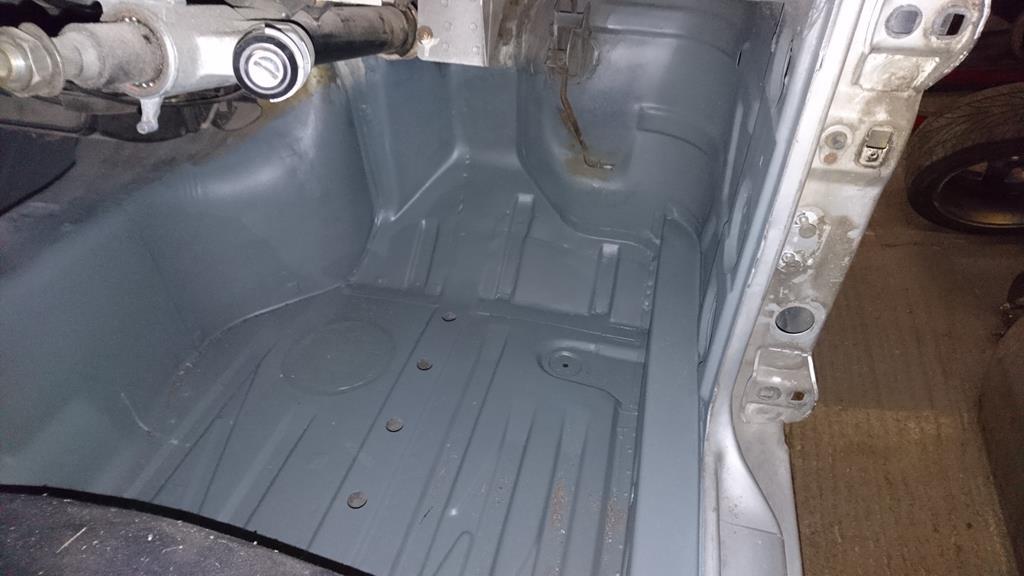
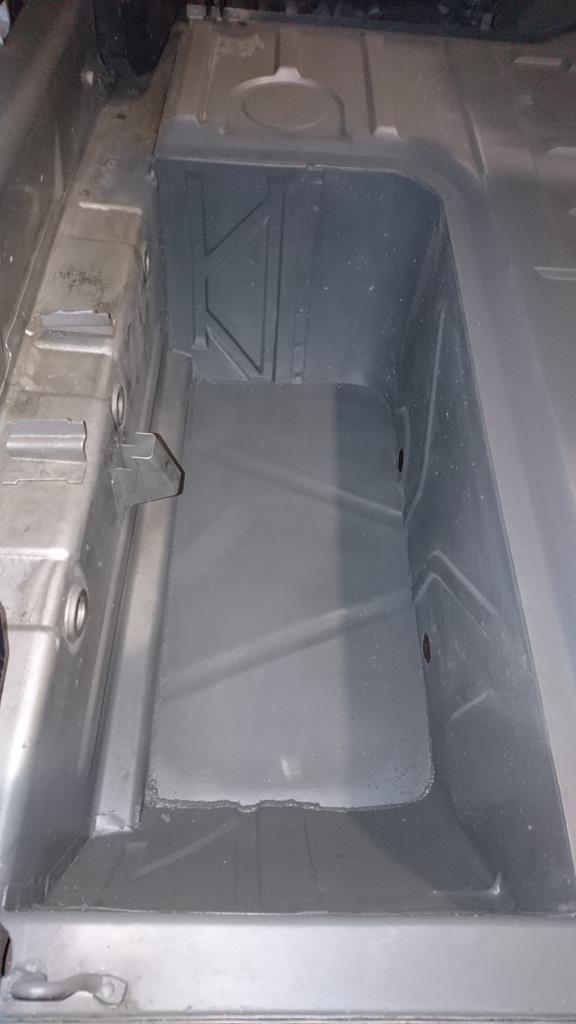
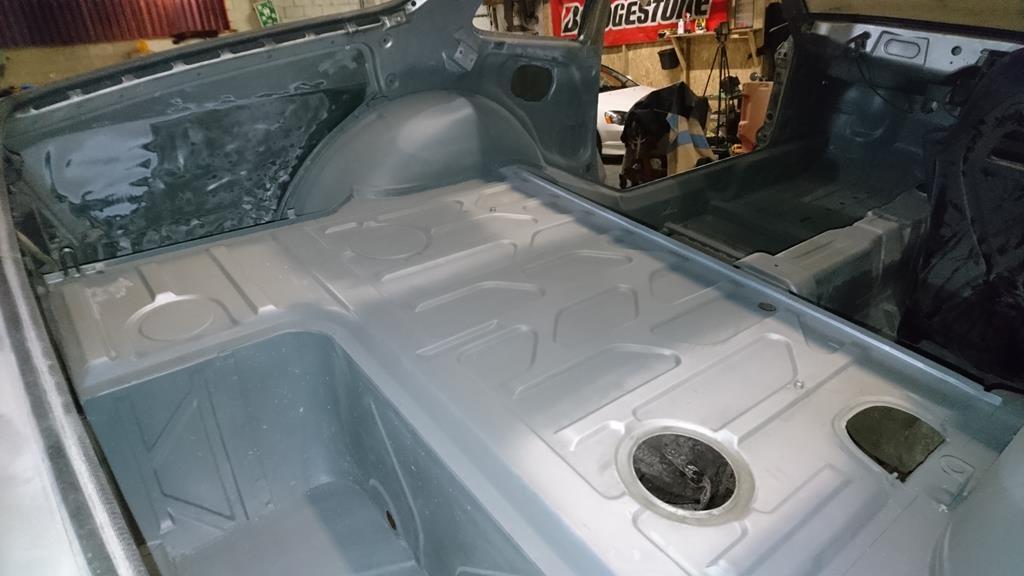
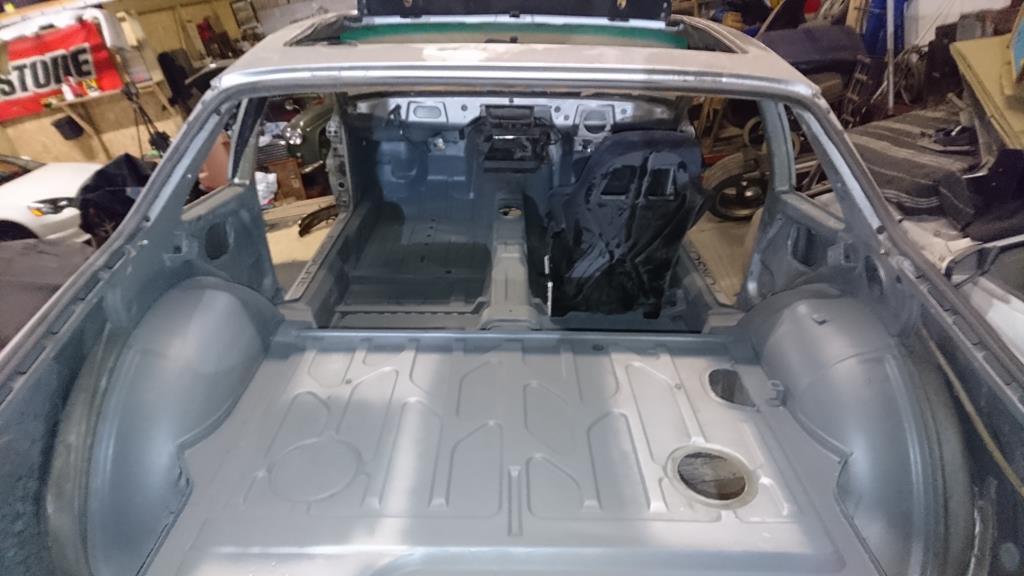
Well it's been a little while. Summer, combined with my mum moving house (for the first time since I lived with her, so loads old my old stuff to sort out!) has taken it's toll on the time I can spare out at the unit, but now things are winding down again socially I've been able to make a little more progress again. I've hammered straight(ish) and welded up a torn hole in one of the rear inner arches (where someone had punch through it to try and hammer out the rear quarter panel). I've also spent a lot of time with a knot wheel cleaning up the interior, grinding back and treating any surface rust and getting a coat of zinc primer on it. I'm pleased to say it's actually starting to look respectable in there now. In the process I found some deep pitting in the drivers side footwell, I guess you'd call it a kick panel, but it's the sloped panel behind the pedals. As this is the quite a structural part of the shell, I thought I'd better replace it even though it hadn't quite gone right through. One hole: 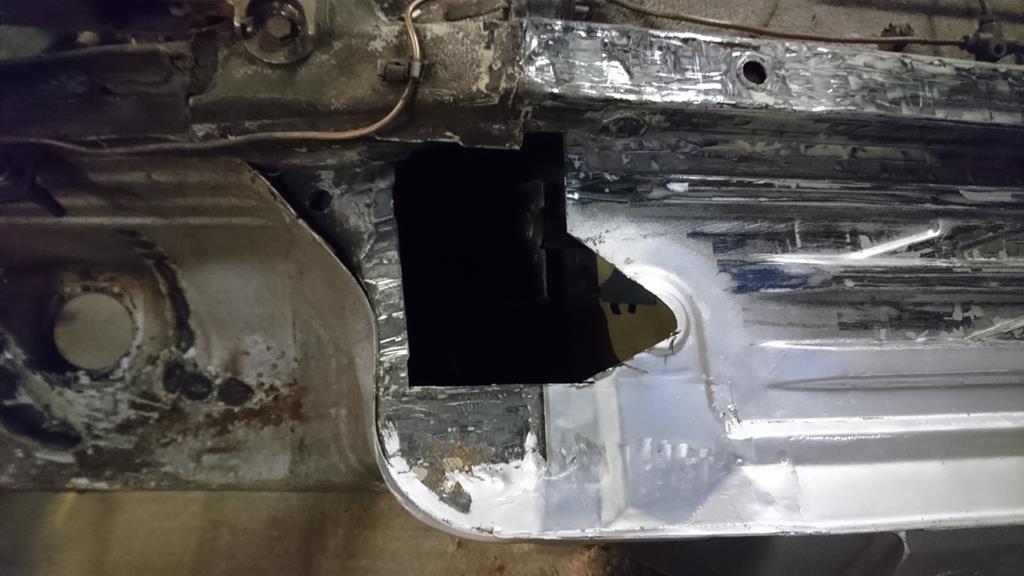 One panel: 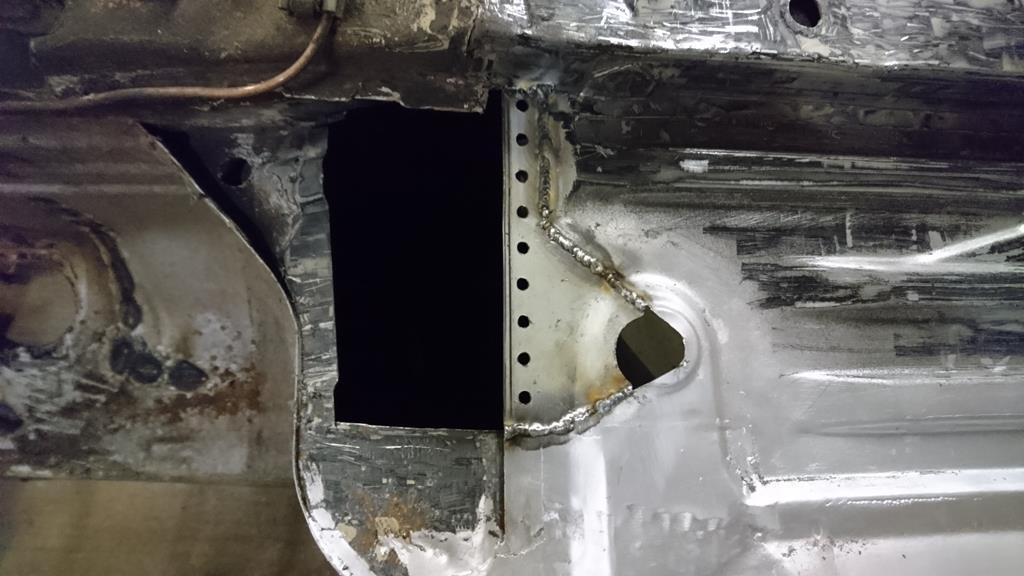 Two panels: 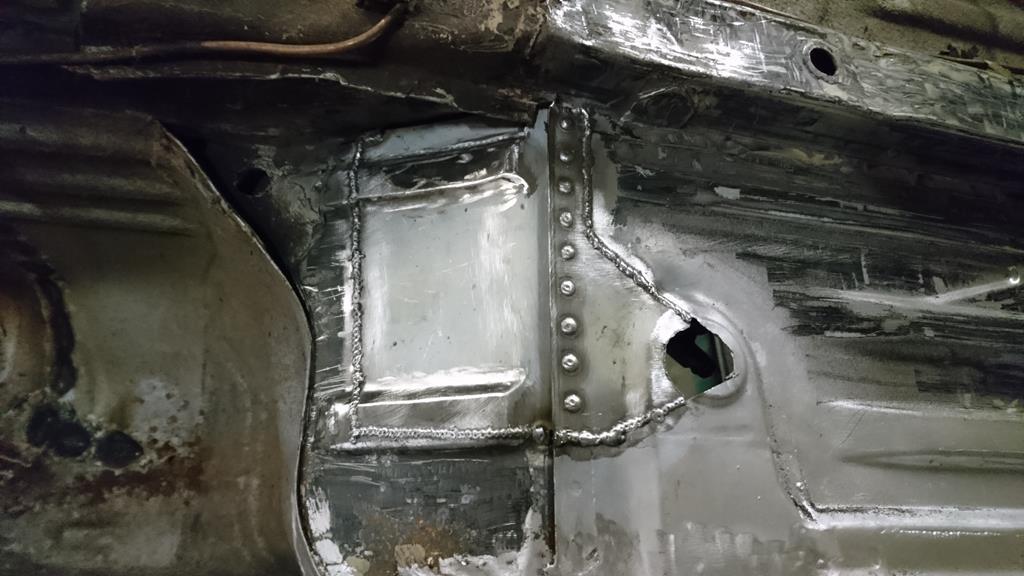 It's a little messy, but it's not a spot that anyone will be looking closely at. All finished off and cleaned back: 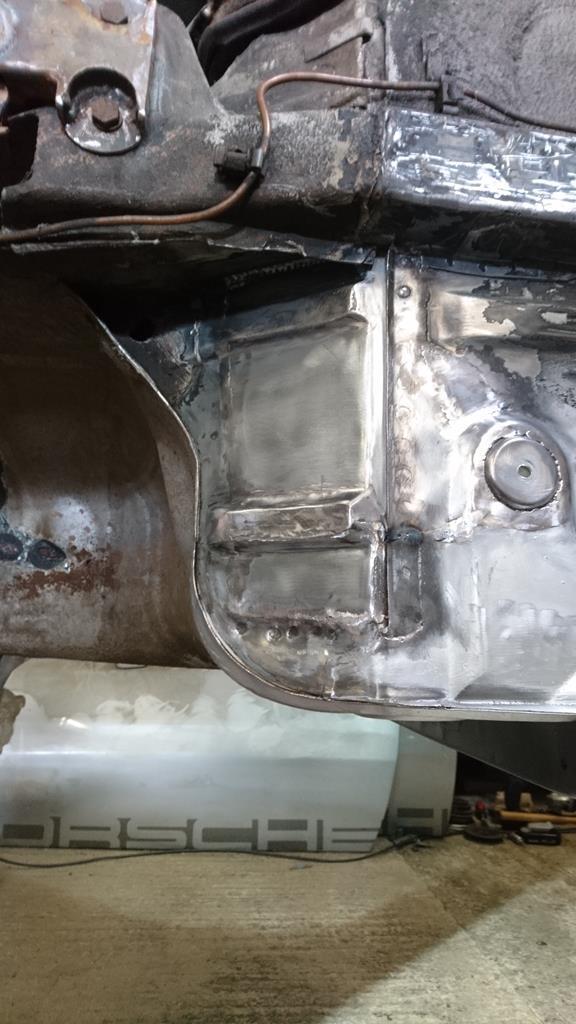 And from the inside with a little primer on it:  |
| |
|
|
RobinJI
Posted a lot
"Driven by the irony that only being shackled to the road could ever I be free"
Posts: 2,995
|
|
Aug 31, 2017 17:00:39 GMT
|
|
I've been lurking in this thread for a while drooling over the car and feeling inspired by your attitude and perseverance.
My dad donated a kidney to his brother around the turn of the millennium, and a decade and a half later both are unusually fit and active people with no restrictions to their lifestyles. It's an amazing gift for her to give you, and having seen the process from near by, (and over a long time span) I just wanted to reassure you that it really won't affect her once the healing from the operation's over, and it will make a world of difference to your life. Soon enough it'll just be a story for a healthy couple to look back at.
Good luck with everything!
|
| |
Last Edit: Aug 31, 2017 17:02:55 GMT by RobinJI
|
|