edwell
Part of things

Posts: 199
|
|
Sept 10, 2014 15:14:26 GMT
|
Yes, thank you.  I apologise for the jaunty parking angle but that's as far as it would reverse up the hill before it dug itself a big hole. A big thanks to all who helped push. |
| |
|
|
|
|
edwell
Part of things
Posts: 199
|
|
|
|
so thats the update done, also attended the gathering which was my first show where i actually had something to show! was cheeky enough to move it when i saw another base model 205, (which i have come across on the forum) sadly i didnt catch the owner :/ Absolutely cracking show though, can't wait till next year, should be a completely different machine by then! hope you don't mind the photo if you see this! 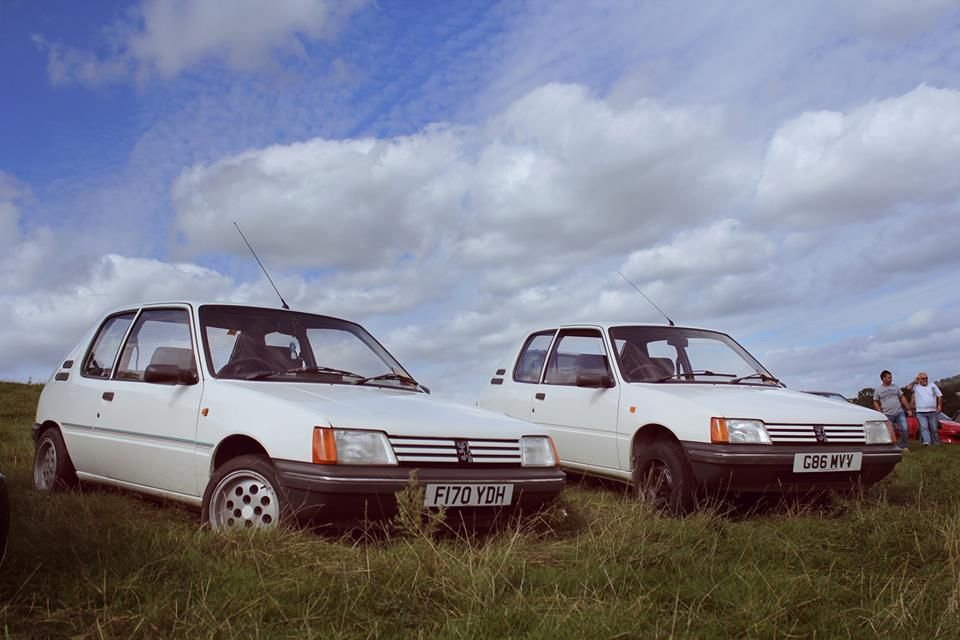 Not at all! here is the thread 205 Junior. Poverty spec FTW! |
| |
|
|
edwell
Part of things
Posts: 199
|
|
Jun 20, 2014 16:02:53 GMT
|
I'm currently in the process of accumulating parts to build a Prusa i3 so I'll keep my eye on this thread, any tips? Sent from my Nexus 5 using Tapatalk Might be a bit late but. You need to get hold of precision ground 8mm steel for the rods. I initially got turned which isn't good enough. Use hairspray and or pritt stick to help prints adhere to the bed. you do need a heated bed If you can build it with auto levelling from the start do so as it means a lot less faffing around. follow a calibration guide I think there is one on the reprap wiki. don't aim for high speeds you will soon learn that getting it to print well is a lot more useful than getting it to print fast. Feel free to ask and specific questions, I will try to keep an eye on this thread. |
| |
|
|
edwell
Part of things
Posts: 199
|
|
|
|
Mini Build Thread Step 1: The Frame There are basically two different types of frame: Single plate and box. as the names suggest single plate frames are made from a single plate of some strong and stiff material, usually aluminium. Box frames are usually wood. I chose to make a box frame as I thought it would be cheaper and easier. You can buy laser cut frames of both types, but a laser cut alloy single plate frame is about £60. I used 12mm MDF. the plans are here Box frame plansI always think woodwork is easy, IF you have the right tools. I didn't have the right tools. Even so it is an easy thing to build being just 4 pieces. just make sure that the front face is square to the base otherwise you will print at an angle on the z axis. This is the only pic I took of the process  Step 2: Rods You will need approx.: 1M M8 threaded rod. 1M M10 threaded rod. 1M M5 threaded rod. 3M 8mm plain rod (in some hard and stiff grade of steel). Cut to the lengths on the RepRap site (although I think the x-axis ones need to be longer than they say by 20mm). I used a 1mm cutting disk on the angle grinder, took about 5 mins. Step 3: Hobbed bolt The hobbed bolt is what feeds the filament into the hot end of the extruder. Its basically an M8 bolt with a knurled cut out section. Again you can buy one already hobbed but I wanted to do as much as possible myself. They are ideally made from one of those bolts where the part of the shank nearest the head is unthreaded. I couldn't wait to order some from screwfix (they din't have stock but could get some apparently) so I just bought a pack of two normal m8 bolts from Halfords. It needs to be about 50mm to 60mm long. If you had a lathe then the may well be an easy way to do this, but this is how I did it Put the bolt in the pillar drill and file a grove of about 4mm radius (after checking how far down the bolt it needs to be of course.)  Then take bolt out of the drill and put M4 tap in the drill. Slide two 608 bearings onto the bolt. set drill to lowest speed and hold the grove we filed earlier against the spinning tap. it should rotate the bolt and cut a thread into the groove. (remember to lubricate).  The finished article  The teeth need to be nice and sharp and there needs to be no trace of the original thread left in the hobbed section othervise it will just rip the filament out of line. More later |
| |
|
|
edwell
Part of things
Posts: 199
|
|
|
|
Using your printer, can you make me one please? "if you've got a RepRap - you can print lots of useful stuff, and you can print another RepRap for a friend..." Yes eventually, that is the idea after all that they are "Self replicating". all the black plastic parts on mine were printed by someone else. The reliability of mine isn't quite there yet though. |
| |
Last Edit: Feb 7, 2014 19:44:46 GMT by edwell
|
|
edwell
Part of things
Posts: 199
|
|
|
|
You build looks great and I'd love to see more details on how you built is as much as what you're making with it. As there seems to be a fair bit of interest in the machine I will do a mini build thread below. How much are the rolls of material these days? They were exortionate back in 2005 but I'd like to think they are a bit cheaper now? Booknarked. I'd love to buidl and run one of these. I'd also LOVE to have a laser cutter too....one day, hopefully? The material isn't that much a 110M 1Kg role of the green ABS was £19, the nylon (1lb in weight) was £28 and the other two (premium ABS and PLA 1kg I think) were £26 You can also put a laser on a reprap as they are basically the same thing mechanically. |
| |
|
|
edwell
Part of things
Posts: 199
|
|
|
|
Always wanted to get into 3d printing but the ones I've seen are big money. How much do you think your setup has cost you in total? About £350 excluding the filament (the material you print with). I'm sure with a bit of shopping around you could have one up and running for under £300 easily. |
| |
|
|
edwell
Part of things
Posts: 199
|
|
|
|
Thought this might be of interest in here, especially as I intend to use it for a few car related tasks.  This is my home built 3d printer, a RepRap Prusa i3 to be exact. Check out reprap.org for more info on repraps etc Bit of a closer view  It has been a lot of fun to build and set up, but has taken up ALL of my spare time for the last two weeks Here is a close up of some of the more successful and useful part I have printed so far.  As for car related Items, this weekend if it stops raining at some point, I'm going to measure up the centre caps off my alloys (2.8i pepperpotts) and design and print up a new set as I only have one genuine one and the 3 copies don't fit very well. Ultimately I'm going to try and print an inlet manifold for my throttle body conversion. I already have some nylon filament (which is petrol resistant and has a high melting point as well as being very tough) for this, but I need to get the machine calibrated well first. For an idea of what people are doing with their 3d printers check out thingiverse. there are already some Peugeot 205 related bits on there 205 searchI will post my progress on here if anyone seems interested, I really think these will start to get popular soon and certainly more usefull. And questions feel free to ask. |
| |
|
|
edwell
Part of things
Posts: 199
|
|
Jan 17, 2014 12:50:48 GMT
|
Those Pepperpots look amazing, they suit the 205 so damn well?! That Smiths Datamaster thingy really is off the hook...!!! I'd love to get myself one of those, it really is digi-tastic... Thanks. The guy I got mine off still has some left by the look of it. DataMaster - eBay |
| |
|
|
edwell
Part of things
Posts: 199
|
|
Jan 16, 2014 12:06:05 GMT
|
You should be able to fit 306td disks and calipers on yours easy enough, I had them on my Rallye & they were awesome. Car looks sweet on those rims! If you ever go for engine, the 106 gti lump is good for sub 15sec 1/4 mile. Do you know what diameter disks You used? I think there are 247mm and 266mm. I'm not sure if the larger ones will fit in the 13" wheels. |
| |
|
|
|
|
edwell
Part of things
Posts: 199
|
|
Jan 15, 2014 11:52:22 GMT
|
I like the capri wheels on this..very diffrent look to it. The door handles on your 205 are the same as roof grab handles on peugeots so very easy to come by. I may even have a couple laid in a box somwhere. I know i do have 2 of the bigger style handles i removed from my 309.. I also have a nice set of front and rear XS GTI Seats If you want to replace your denim blues at any time.keep up the good work Thanks for the kind comments. I did work out about the door handles as well and have a couple of good condition sets in different colours now. They are also used as the manoeuvring handles on Eriba caravans. The sub frame from a GTI is quite rare these days so you might struggle to get a good price. Have you thought about a maxi kit or a dimma kit? To get a bit of power you could get the 1.4 tu multipoint engine, that can run on bike throttle bodies without changing an aftermarket ECU. Also, if you think of doing a brake conversion, you can get lots of different brakes quite cheap. I already have the subframe, I'm just to lazy to fit it. Also I have heard that it might actually reduce the front track width, which would make my positive camber issues worse, so a little more research and tape measure work is needed. I do like the dimma 205s but I think it might be a bit much on a 954cc car. As for the brakes I'm going to go for 1.6 gti front callipers and disks, as they are basically the same but vented, and it needs new callipers anyway as they both stick a bit (or a lot sometimes, it's surprising how hot an alloy wheel can get!) Have a Dimma kitted Cti I like very much  |
| |
|
|
edwell
Part of things
Posts: 199
|
|
|
|
|
Understood. Let me know either way please, I will keep the funds available.
|
| |
|
|
edwell
Part of things
Posts: 199
|
|
Jan 14, 2014 22:13:19 GMT
|
Anyone know of something similar that might be available? Corbeau GT8?  Apparently available in all vinyl as well. Might be to wide though.  |
| |
|
|
edwell
Part of things
Posts: 199
|
|
Jan 14, 2014 21:35:47 GMT
|
Any updates on this. How you getting on with the Datamaster The clock in the Datamaster has been the best addition I have made to the car! Well at least the most useful. Unfortunately two sets of two "cells" in the rev counter seem to have blown, one pair at 2000 and another at 4000 revs. Although oddly today two of them started working again, so hopefully the other two might as well. If not I will take it apart and have a look. Even if it is knackered I will be able to rig something up with an arduino and LEDs in the Datamaster case. Here is a pic I took last month with the new tires.  I haven't done a lot else with it except drive it. I do however need to sort out some mounting paint issues and get a new windscreen from somewhere. |
| |
|
|
edwell
Part of things
Posts: 199
|
|
Jan 14, 2014 21:15:36 GMT
|
|
I've just got some delivery quotes back which are reasonable, so I will take it if it is still available. £500 with the prop-shaft and axle yes? will they fit in the back of the car for delivery purposes? PM me some contact details. Thanks
|
| |
|
|
edwell
Part of things
Posts: 199
|
|
Jan 13, 2014 12:57:35 GMT
|
|
Interested in the road car, can I have a postcode to work out collection costs please.
|
| |
|
|
edwell
Part of things
Posts: 199
|
|
Dec 18, 2013 12:08:25 GMT
|
|
There was also an injected TU9 205 called the 954i, which would probably be the easiest swap but finding one will be a problem
|
| |
|
|
edwell
Part of things
Posts: 199
|
|
Dec 18, 2013 11:44:02 GMT
|
|
The 954cc (TU9) and the 1.1 (TU1) blocks are shorter than the 1.4 (TU3) and 1.6 (TU5). I think the TU9 and the TU1 are the same, and the TU3 and TU5 are the same. So if fitting a 3 or 5 you need the top mount from a 1.4 205 I think. Also 205 TU engines tend to be wet liner whereas newer 106s etc. aren't, I don't think it makes much difference apart from weight though.
|
| |
Last Edit: Dec 18, 2013 11:46:38 GMT by edwell
|
|
edwell
Part of things
Posts: 199
|
|
Dec 16, 2013 15:57:25 GMT
|
These do look good in black. Reminds me of the Lister XJC.

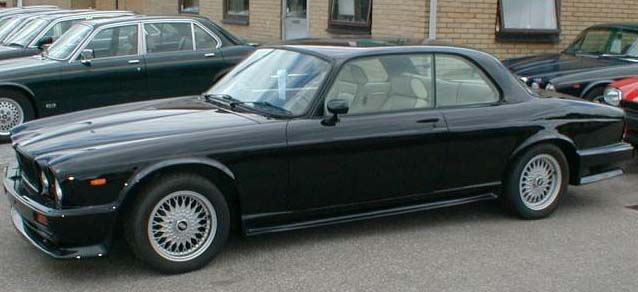
In relation to the above car I think, from piston heads forum.
|
| |
|
|
edwell
Part of things
Posts: 199
|
|
|
|
|
I think you might need the map and temp sensors though
|
| |
|
|