jonomisfit
Club Retro Rides Member
Posts: 1,764
Club RR Member Number: 49
|
|
Aug 26, 2019 19:51:13 GMT
|
|
|
| |
|
|
|
|
jonomisfit
Club Retro Rides Member
Posts: 1,764
Club RR Member Number: 49
|
|
Aug 26, 2019 19:30:29 GMT
|
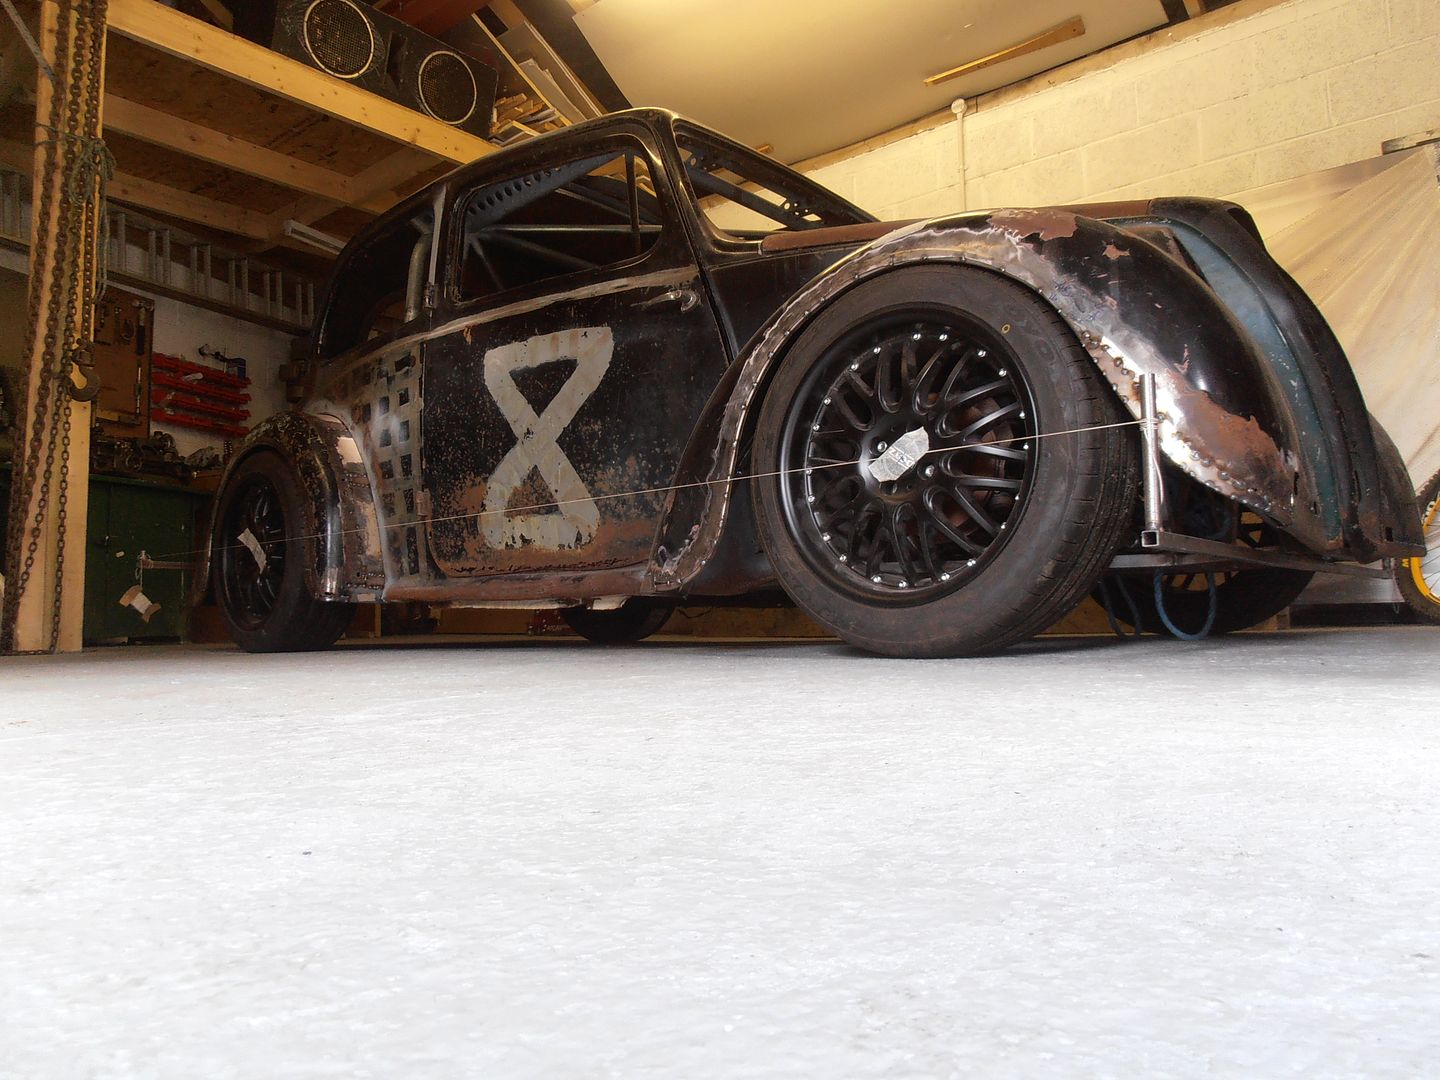
was particularly poor at taking pics whilst doing things today. roof piece ready for welding  P1020645 P1020645 by jono_misfit, on Flickr welded and cleaned up in a few areas  P1020646 P1020646 by jono_misfit, on Flickr  P1020647 P1020647 by jono_misfit, on Flickr mid making the patch piece for the other half of the repair.  P1020648 P1020648 by jono_misfit, on Flickr there's a fair curve to the bottom of it  P1020649 P1020649 by jono_misfit, on Flickr welded in  P1020650 P1020650 by jono_misfit, on Flickr and the lip repaired as well  P1020651 P1020651 by jono_misfit, on Flickr a bit of a clean up and a light dust of primer. There's more clean up to do, but I need to get the trim off first. Somehow... its very well stuck on.  P1020652 P1020652 by jono_misfit, on Flickr there were a load of pin holes appearing under the rubber, so i cleaned back, welded, the ground flush  P1020653 P1020653 by jono_misfit, on Flickr some pin holing on the roof to side panel join, so spot repairs and clean up. A few more to do.  P1020654 P1020654 by jono_misfit, on Flickr and some on the window surround  P1020655 P1020655 by jono_misfit, on Flickr a pillar under the hinge 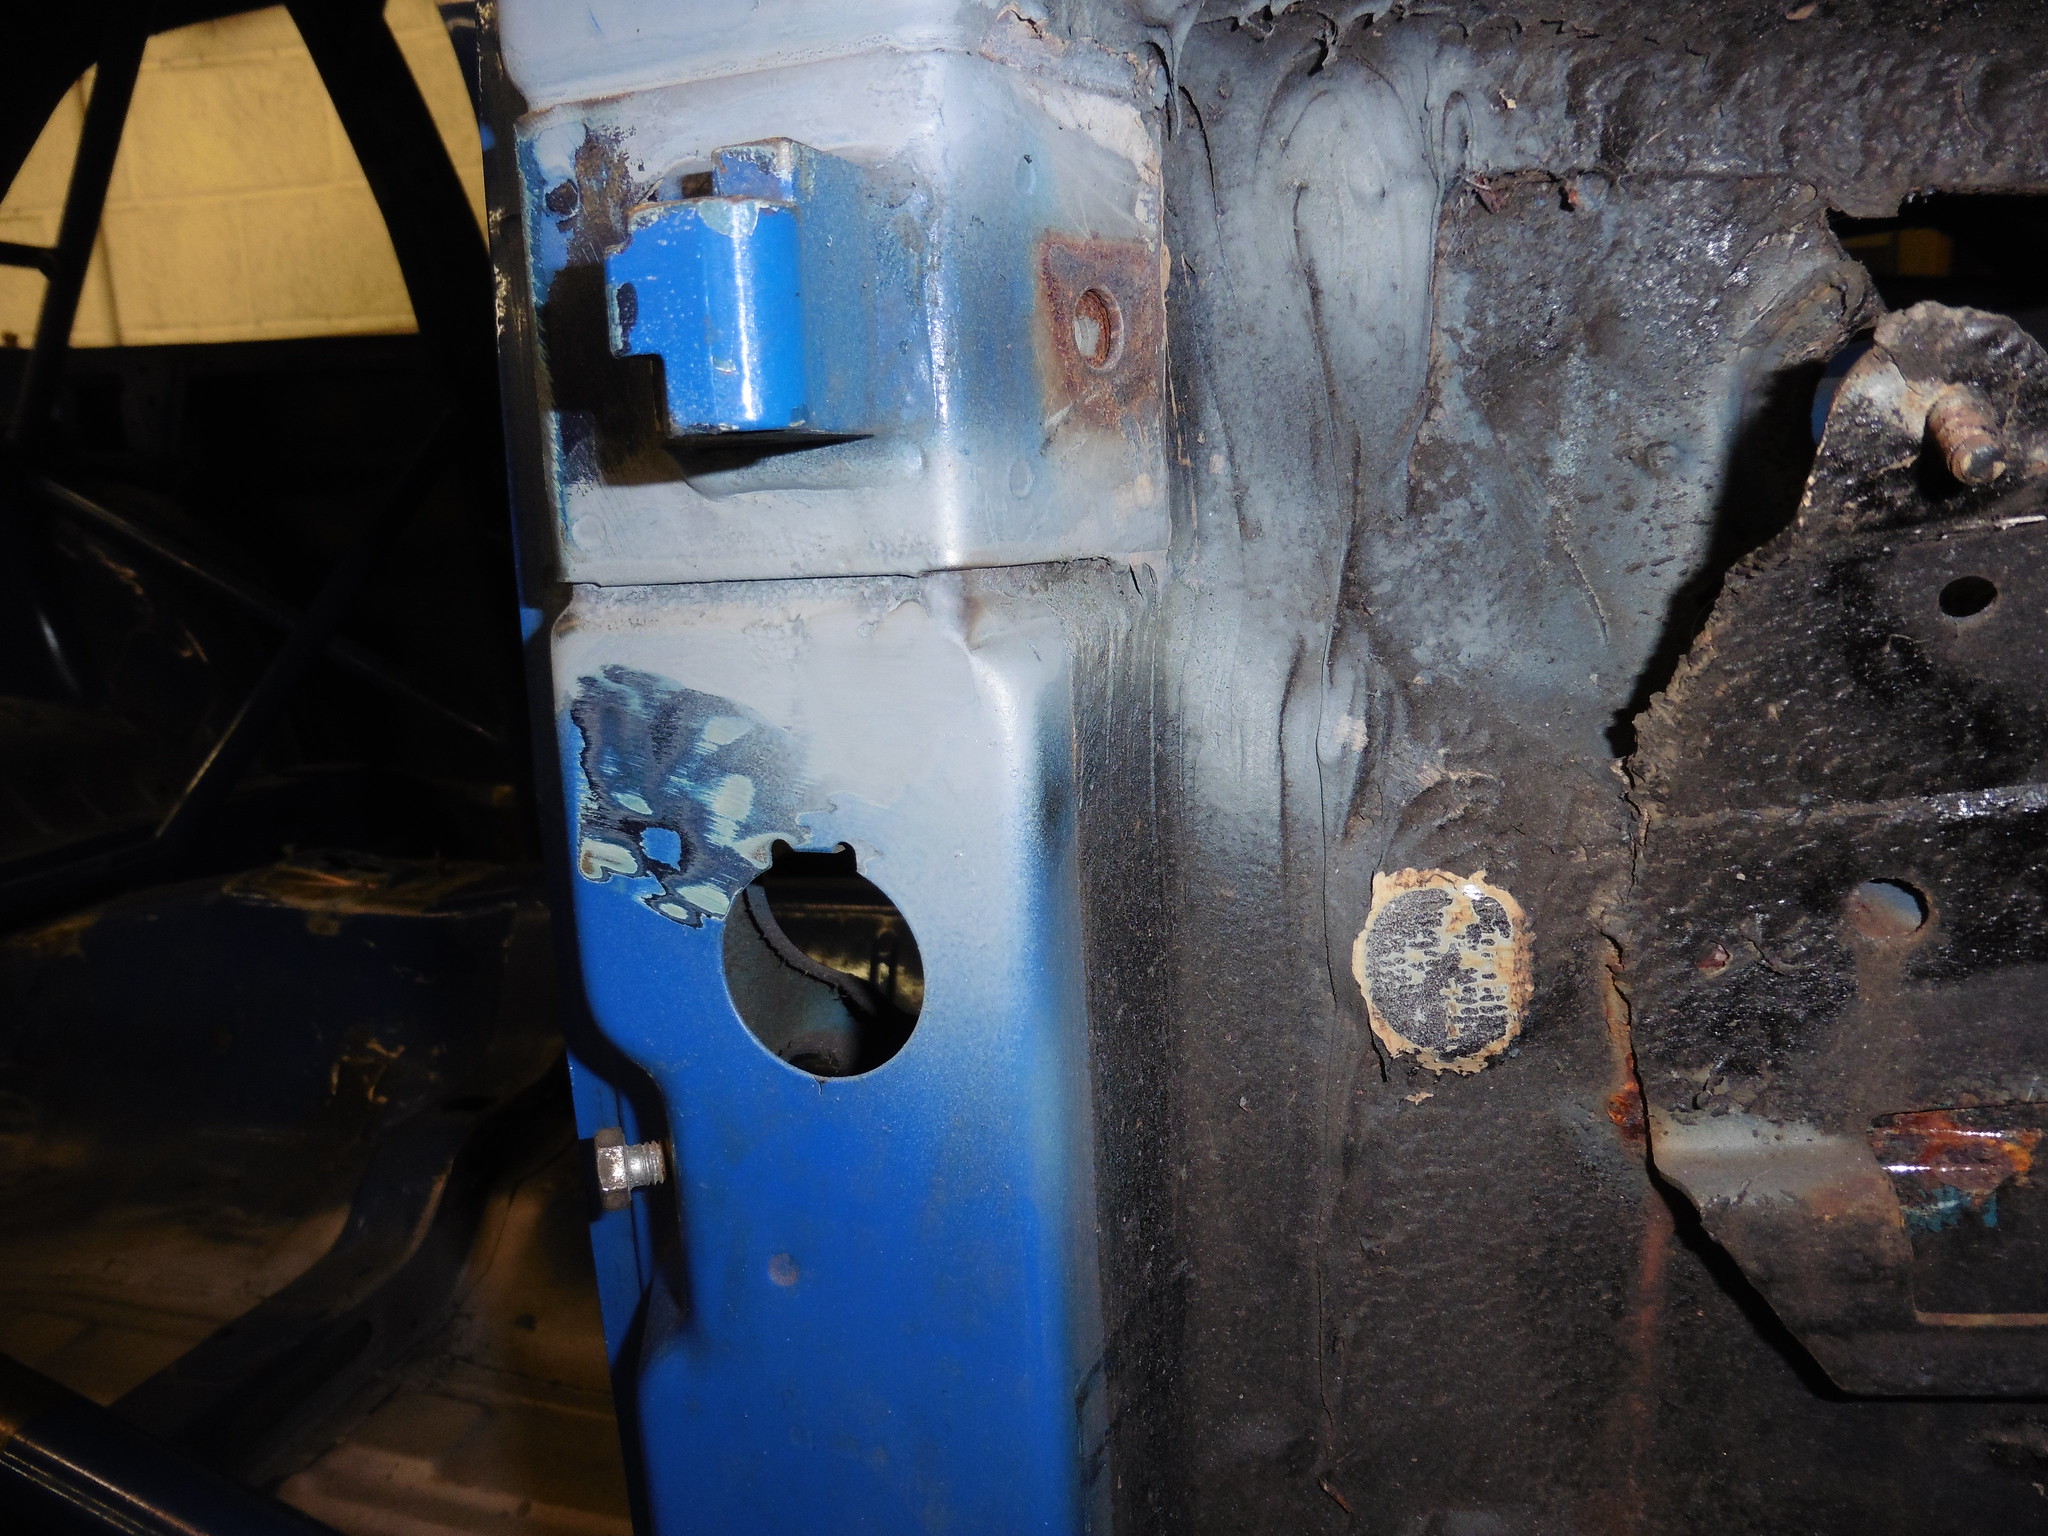 P1020656 P1020656 by jono_misfit, on Flickr and a couple of spots on the scuttle panel, under the window.  P1020658 P1020658 by jono_misfit, on Flickr then i had a shuffle round and started sorting some of the crash damage on the light surround / mount  P1020659 P1020659 by jono_misfit, on Flickr I'm no panel beater, but the previous attempt to straighten was very very poor. Its still not super straight, but is a lot better than it was. Previously the headlight bezel had a step in it...  P1020660 P1020660 by jono_misfit, on Flickr The last bit I did today was cut out this bit and patch in. Its where three panels meet for the bumper mount, and is a water trap. It had rotted through all three panels. It was difficult to get all the between panel sealant out, so the welding is not my best. needs cleaned up and painted still  P1020661 P1020661 by jono_misfit, on Flickr there are a few more holes and spots to tidy up, but in the general that "should" be the main rust repairs done. other than one rear bumper mount but I need the car off the spit to do that, so its getting left till the last job. Its onto some cage work, seat rails, and a few other odds and sods next. |
| |
|
|
jonomisfit
Club Retro Rides Member
Posts: 1,764
Club RR Member Number: 49
|
|
Aug 20, 2019 16:50:51 GMT
|
|
What I mainly find is they warp into interesting shapes, they pull a bit at the edges but not as much as doing a swaged hole near the edge.
There seems to be a lot more local stretching rather than pulling from elsewhere.
|
| |
|
|
jonomisfit
Club Retro Rides Member
Posts: 1,764
Club RR Member Number: 49
|
|
Aug 18, 2019 20:41:10 GMT
|
Piece of steel cut out to shape to replace the old one (which is handily a completely different size / shape to the driver side!)  P1020625 P1020625 by jono_misfit, on Flickr trimmed and marked up for beading  P1020626 P1020626 by jono_misfit, on Flickr although.... thats the wrong side marked for beading..... turn over and re-mark  P1020627 P1020627 by jono_misfit, on Flickr beads in  P1020628 P1020628 by jono_misfit, on Flickr primed the under side  P1020629 P1020629 by jono_misfit, on Flickr cleaned up and primed the footwell again  P1020630 P1020630 by jono_misfit, on Flickr welded in  P1020634 P1020634 by jono_misfit, on Flickr  P1020640 P1020640 by jono_misfit, on Flickr Its a bit redundant as i'll be fitting a passenger footrest so most of this will be covered. Still it strengthens the weakened part of the floor. then onto the A pillar hole  P1020635 P1020635 by jono_misfit, on Flickr cut, treated, and primed hole  P1020636 P1020636 by jono_misfit, on Flickr bit i need to re-make, it has a nice curve in two directions 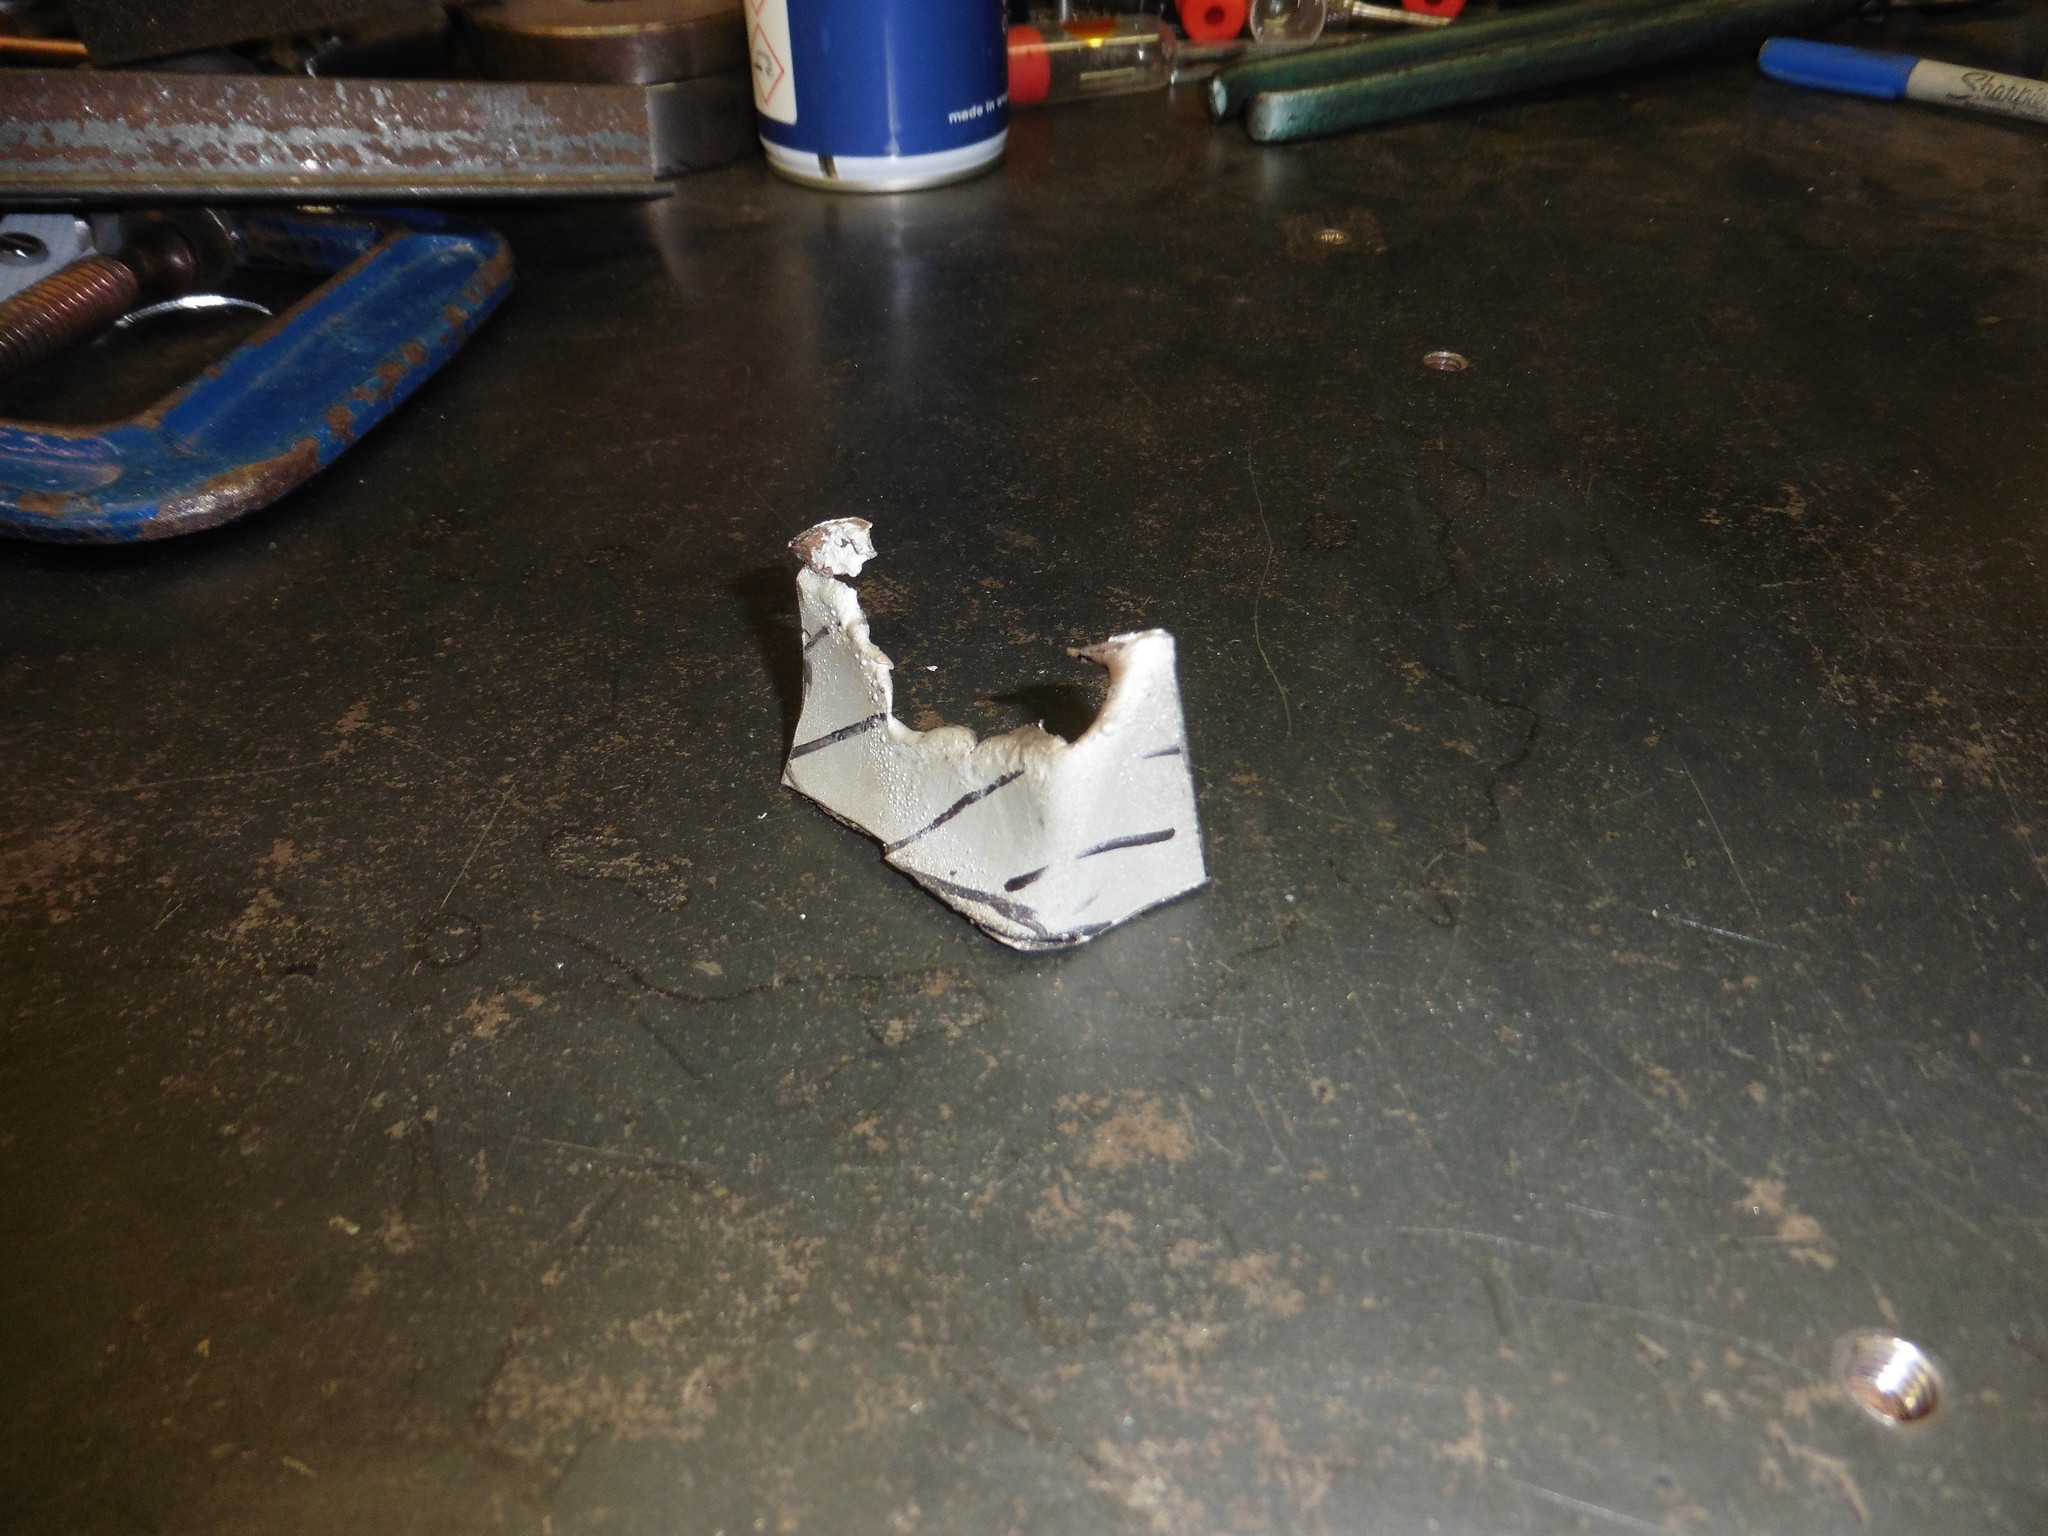 P1020637 P1020637 by jono_misfit, on Flickr stretcher the rescue  P1020638 P1020638 by jono_misfit, on Flickr fitted  P1020639 P1020639 by jono_misfit, on Flickr some other spot rust repairs where it had pin holed under the trim  P1020631 P1020631 by jono_misfit, on Flickr  P1020632 P1020632 by jono_misfit, on Flickr  P1020633 P1020633 by jono_misfit, on Flickr Then onto another fix of a rusted bodge from when the cage was fitted. The rear hatch to roof join  P1020641 P1020641 by jono_misfit, on Flickr cut, clean, de-rust, and prime  P1020642 P1020642 by jono_misfit, on Flickr the manky bit cut out  P1020643 P1020643 by jono_misfit, on Flickr  P1020644 P1020644 by jono_misfit, on Flickr start of the repair panels. P1020645 by jono_misfit, on Flickr I ran out of time. Its going to be tricky to get this sorted. There's a brazed seam just next to it that i need to fix to. I don't have brazing equipment, will need to see if I can tig braze it. |
| |
|
|
jonomisfit
Club Retro Rides Member
Posts: 1,764
Club RR Member Number: 49
|
|
|
|
I thought to myself... you deserve a day off. Then thought, well, no you don't really, but i'm having the day off anyway. I had a few things to do, but got a couple of hours on the car. used the angry grinder on this  P1020620 P1020620 by jono_misfit, on Flickr that looks familiar. Plate over sound deadening to give some additional impact protection... possibly  P1020621 P1020621 by jono_misfit, on Flickr chipped off the sound deadening and its looking nice and solid under it.  P1020622 P1020622 by jono_misfit, on Flickr gave it a quick clean with the twist knot on the angle grinder  P1020623 P1020623 by jono_misfit, on Flickr inspected it and its not bad at all. Gave it a proper buff over, then put on some inhibitor. then let that dry, then gave it a light dusting of primer.  P1020624 P1020624 by jono_misfit, on Flickr there's a few small pinholes I need to sort still (and an angle grinder cut...) but other than that its good. rust need to make up a plate and fit it. It'll be a couple of weeks though as i have things to do / drink this weekend. |
| |
|
|
jonomisfit
Club Retro Rides Member
Posts: 1,764
Club RR Member Number: 49
|
|
|
|
|
|
| |
|
|
jonomisfit
Club Retro Rides Member
Posts: 1,764
Club RR Member Number: 49
|
|
|
|
Trimmed the rough cut hole and welded in the strengthening section.  P1020602 P1020602 by jono_misfit, on Flickr needs dressing still. I added in an additional drain hole in case it gets water in it.  P1020603 P1020603 by jono_misfit, on Flickr i took care to try and minimise the distortion as far as I could.  P1020604 P1020604 by jono_misfit, on Flickr with that done it was back onto the last sill repair. Trimmed out the edge which was rusty and distorted around the drain hole.  P1020605 P1020605 by jono_misfit, on Flickr the piece I cut out  P1020606 P1020606 by jono_misfit, on Flickr inner sill patch piece made  P1020607 P1020607 by jono_misfit, on Flickr trimmed a hole  P1020608 P1020608 by jono_misfit, on Flickr new piece welded in place, cleaned back, rust treated, then primed  P1020609 P1020609 by jono_misfit, on Flickr then need a patch to the sill  P1020610 P1020610 by jono_misfit, on Flickr folded into shape  P1020611 P1020611 by jono_misfit, on Flickr  P1020612 P1020612 by jono_misfit, on Flickr welded in.  P1020613 P1020613 by jono_misfit, on Flickr I drilled the 4 holes so I could slot between them then file out after welding. If you look at where the join is in relation its very thin, so did this to give best chance of not blowing through and ending up with an oversized hole. This sill end was another example of where ford just filled big panel gaps with underseal. then started looking at the towing eye housing. The external skins had evidently trapped water between them and rusted badly. started trimming back and cleaning up. Its a pig to do through due to the space, and how ford bodged the panels together.  P1020614 P1020614 by jono_misfit, on Flickr rust.  P1020615 P1020615 by jono_misfit, on Flickr There were huge dollops of ford underseal neatening up the joint cut back cleaned and new plates in. still to be cleaned back.  P1020616 P1020616 by jono_misfit, on Flickr  P1020617 P1020617 by jono_misfit, on Flickr  P1020618 P1020618 by jono_misfit, on Flickr I gave this and a few other exposed bits of steel a coat with some primer as it'll be a few weeks till i'm on with the car again. I then took a walk round the shell exploring bits with a scraper and wire brush to see if there are other repairs needed, then marking them up with pen when I found them. Hopefully a few more sessions will have broken the back of the rear end welding. |
| |
|
|
jonomisfit
Club Retro Rides Member
Posts: 1,764
Club RR Member Number: 49
|
|
Jul 29, 2019 20:02:40 GMT
|
I felt like some workshop time, so headed out tonight for an hour. Need to replace this cut out bit  P1020592 P1020592 by jono_misfit, on Flickr some steel will be required.  P1020594 P1020594 by jono_misfit, on Flickr I'll need to tidy up the bits that have been bludgeoned out, plus need to get a matching radius  P1020595 P1020595 by jono_misfit, on Flickr trimmed some cardboard till it fit  P1020596 P1020596 by jono_misfit, on Flickr then found the closest match in my radius gauge set (read swage tools)  P1020597 P1020597 by jono_misfit, on Flickr about 40mm locate some suitable bar, clamps, metal, and brute force  P1020598 P1020598 by jono_misfit, on Flickr gives the bend  P1020599 P1020599 by jono_misfit, on Flickr fettle the return step and trial  P1020600 P1020600 by jono_misfit, on Flickr fettle a bit more and gives not a bad fit.  P1020601 P1020601 by jono_misfit, on Flickr A little bit of trimming required on the weekend to clean it up, along with a few other bits, then can be welded in. |
| |
|
|
jonomisfit
Club Retro Rides Member
Posts: 1,764
Club RR Member Number: 49
|
|
|
|
|
A valid point.
I shall have to consider this next session.
|
| |
|
|
jonomisfit
Club Retro Rides Member
Posts: 1,764
Club RR Member Number: 49
|
|
Jul 27, 2019 20:22:20 GMT
|
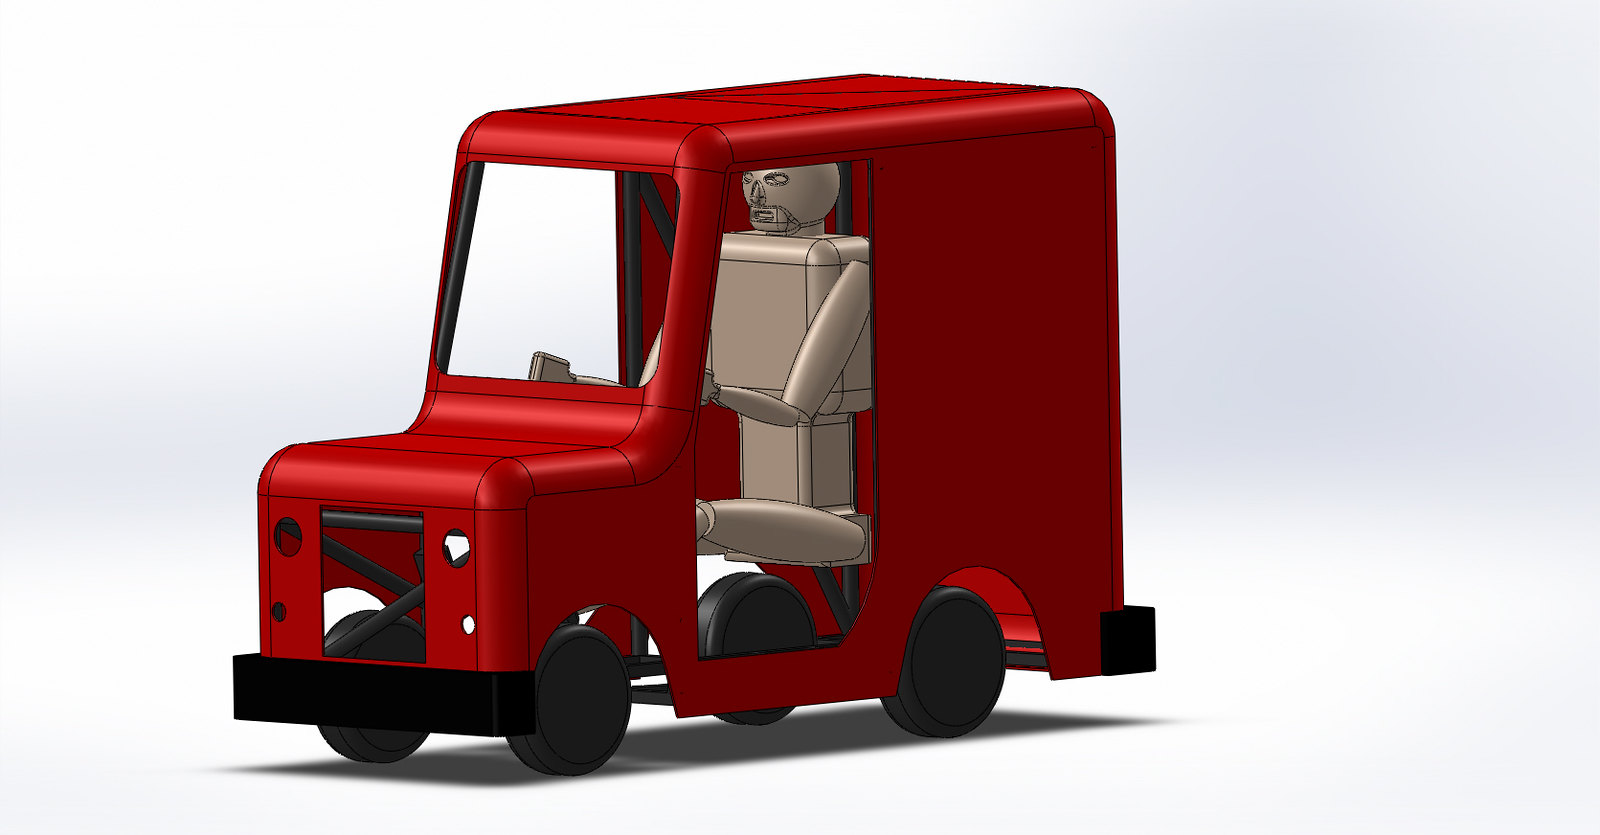
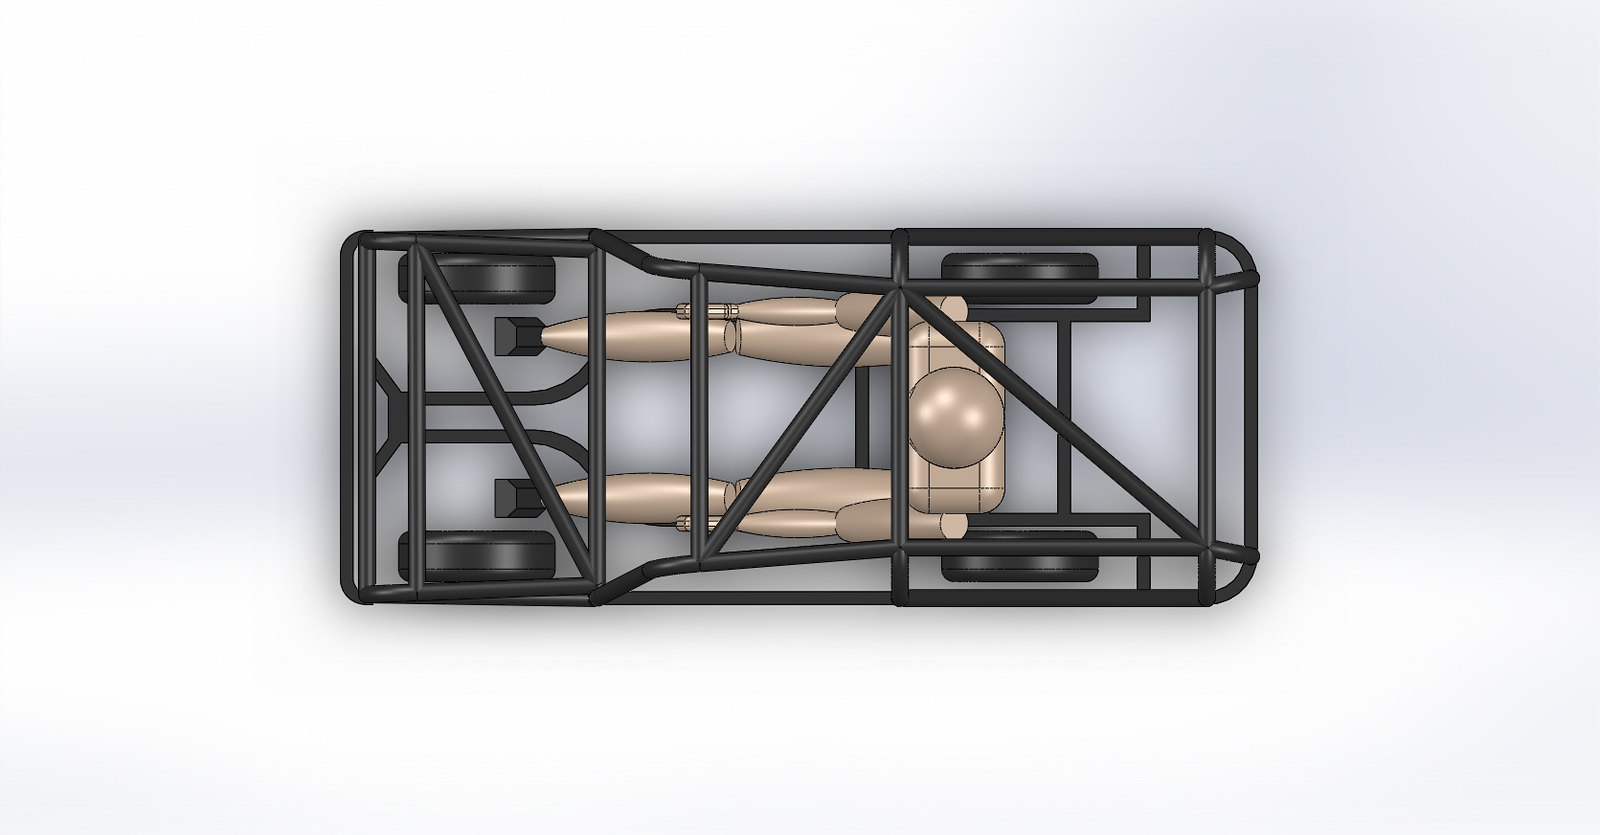
I started mocking some things up in CAD based on the dimensions I found, and some inspiration shots...  Postman pat front view Postman pat front view by jono_misfit, on Flickr  1988M10NISSANPRAIRIE..POSTMANPATVAN 1988M10NISSANPRAIRIE..POSTMANPATVAN by jono_misfit, on Flickr I took the side and front profile views, then traced them in cad, and scaled it all to match the wheel base of the mobility scooter  ToT_Rod_Assy_1 - side view ToT_Rod_Assy_1 - side view by jono_misfit, on Flickr  ToT_Rod_Assy_1-3-4_view ToT_Rod_Assy_1-3-4_view by jono_misfit, on Flickr 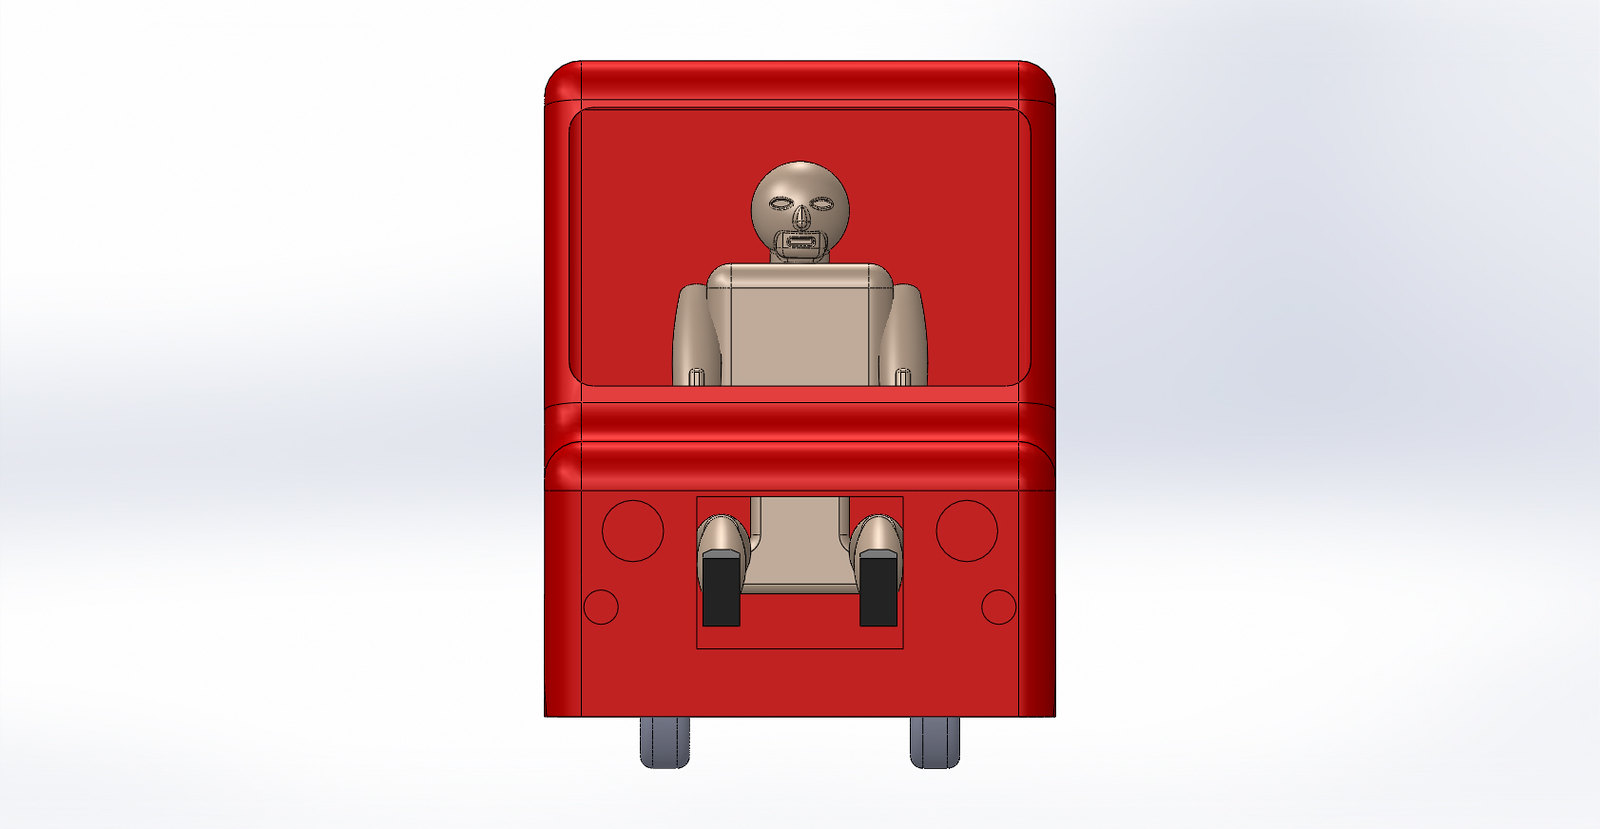 ToT_Rod_Assy_1 - front view ToT_Rod_Assy_1 - front view by jono_misfit, on Flickr hmmmm, that doesnt work as the track width on the mobility scooter is miiiiiilllllleeeees out. For scale the zombie thing sitting in it is a (bad) scale model on me. The things huge. A tweak is required I think. revised design  ToT_Rod_Assy_1 - side view 2 ToT_Rod_Assy_1 - side view 2 by jono_misfit, on Flickr  ToT_Rod_Assy_1-3-4_view - 2 ToT_Rod_Assy_1-3-4_view - 2 by jono_misfit, on Flickr  ToT_Rod_Assy_1 - front view 2 ToT_Rod_Assy_1 - front view 2 by jono_misfit, on Flickr Much more reasonable. I may tweak it round a little more so it doesnt have as much tuck on the wheels. An adult(ish) can still fit. It wont be hugely comfortable for one, but should be a good size for Toddler_Misfit, who was insisting she is going to "help", as such she started reading up on a few things.  20190727_130757 20190727_130757 by jono_misfit, on Flickr (not a staged shot either!) I'll tweak things a bit more, then it'll be onto chassis modelling / design. |
| |
|
|
|
|
jonomisfit
Club Retro Rides Member
Posts: 1,764
Club RR Member Number: 49
|
|
Jul 27, 2019 19:34:03 GMT
|
I was trying to be fairly quiet today in the workshop, so welded in the foot plate.  P1020576 P1020576 by jono_misfit, on Flickr  P1020577 P1020577 by jono_misfit, on Flickr The passenger side now looks fairly manky in comparison (and will have been done just as dogily), so I may well cut it off and re-make it as well. But as I was being quiet I looked for another job. This hole needs filled. It used to be the spare wheel holder (which sticks up into the boot),but if you go back to the first pics it was cut out (badly) and replaced with a sump for a fuel tank. mine is going amidship like the escort WRC cars, so this hole isnt needed.  P1020578 P1020578 by jono_misfit, on Flickr The flange was very distorted. It had been battered about and pulled lots by the rivets stretching the metal. I dressed it flat, but as it had stretched it was rising up. I did a number of point welds, which when cooled shrunk back and pulled out the stretch. I then ground them back flat. start a template  P1020579 P1020579 by jono_misfit, on Flickr goes here  P1020580 P1020580 by jono_misfit, on Flickr trim and mark up for beading  P1020581 P1020581 by jono_misfit, on Flickr I then realised i'd forgotten to leave space for the reinforcing bar, so marked this up again and re-set where the beads were cut some steel  P1020582 P1020582 by jono_misfit, on Flickr marked up for where the reinforcing edge will be reinstated (it was also cut out for the fuel tank mount)  P1020583 P1020583 by jono_misfit, on Flickr used the bead roller to step an edge where its possible to do an overlap.  P1020584 P1020584 by jono_misfit, on Flickr marked up for bead rolling  P1020585 P1020585 by jono_misfit, on Flickr and rolled  P1020586 P1020586 by jono_misfit, on Flickr as usual with bead rolling a large panel its warped quite a bit  P1020587 P1020587 by jono_misfit, on Flickr I find a lot of it comes from the ends of the swages not really being finished and pulling, so I have a bit of bar shaped like semi circle that I then use top punch the open ends into shape. It doesnt fix them perfectly, but it does take the worst out. Plus the beads look more finished. in place for a final trim  P1020588 P1020588 by jono_misfit, on Flickr trimmed  P1020589 P1020589 by jono_misfit, on Flickr welded in  P1020590 P1020590 by jono_misfit, on Flickr flipped over onto the reverse and did a couple of stitches on any overlaps.  P1020591 P1020591 by jono_misfit, on Flickr P1020592 by jono_misfit, on Flickr You can see the re-inforcing bar I need to re-instate  P1020593 P1020593 by jono_misfit, on Flickr needs cleaned up still, but I ran out of time. |
| |
Last Edit: Jul 27, 2019 20:24:53 GMT by jonomisfit
|
|
jonomisfit
Club Retro Rides Member
Posts: 1,764
Club RR Member Number: 49
|
|
Jul 27, 2019 19:19:36 GMT
|
A quick fill in job on this morris. My allen socket for the larger Q max cutter turned up yesterday, so cut the remaining holes.  P1020574 P1020574 by jono_misfit, on Flickr Much much quicker than using the hole saw, and much better quality holes, with less savage edges. quite a few holes punched.  P1020575 P1020575 by jono_misfit, on Flickr If its cooler this week I may nip out and do some work on the seat. |
| |
|
|
jonomisfit
Club Retro Rides Member
Posts: 1,764
Club RR Member Number: 49
|
Well I didnt know that.......jonomisfit
@jonomisfit
Club Retro Rides Member 49
|
Jul 27, 2019 18:14:38 GMT
|
The MG YB utilised the same bodyshell tub 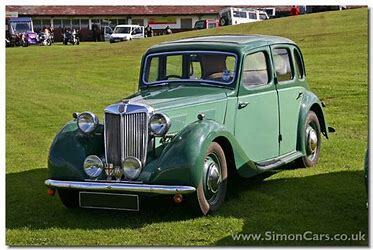 Has the Morris 8 saloon 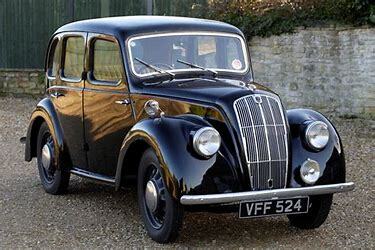 I shall remember this if I'm looking for bits |
| |
Last Edit: Jul 27, 2019 18:15:22 GMT by jonomisfit
|
|
jonomisfit
Club Retro Rides Member
Posts: 1,764
Club RR Member Number: 49
|
|
Jul 26, 2019 16:53:55 GMT
|
|
That they do which is why mine will be hand built if I do one.
The little tykes car?
|
| |
|
|
jonomisfit
Club Retro Rides Member
Posts: 1,764
Club RR Member Number: 49
|
|
Jul 26, 2019 15:43:30 GMT
|
|
I've started initial CAD mock ups. Will try and get some pics up later.
My current intent is for the body to be a bright red van that everybody knows, although it may be black and unicorn coloured, and if I don't like the van look it may become a different vehicle.
Base is a mobility scooter, steering it will have a wheel so I may need to change the steering ratio.
|
| |
|
|
jonomisfit
Club Retro Rides Member
Posts: 1,764
Club RR Member Number: 49
|
|
Jul 23, 2019 19:19:31 GMT
|
|
Thanks dude.
That they are. I was lucky to get the shell at a good price otherwise I'd never have one. It was a good price for a reason though.
I do keep forgetting to take some of the pics
|
| |
|
|
jonomisfit
Club Retro Rides Member
Posts: 1,764
Club RR Member Number: 49
|
|
Jul 22, 2019 19:36:12 GMT
|
Thanks, this is what is going in to start with  P1020571 P1020571 by jono_misfit, on Flickr its had the sump and diff from an XR4x4 fitted, although it needs to come back off again to stick the sump on with sealant, not a gasket as it presently has  P1020572 P1020572 by jono_misfit, on Flickr Its used the support cross member from the XR4X4 as well, along with the standard engine mounts.  P1020573 P1020573 by jono_misfit, on Flickr Good to know there are other driveline options out there if/when I need them. |
| |
|
|
jonomisfit
Club Retro Rides Member
Posts: 1,764
Club RR Member Number: 49
|
|
Jul 21, 2019 20:30:01 GMT
|
|
Trueism
|
| |
|
|
jonomisfit
Club Retro Rides Member
Posts: 1,764
Club RR Member Number: 49
|
|
Jul 21, 2019 19:43:04 GMT
|
trimmed back the rust from the mid sill join. Had a good look up inside the sill. Other than a lot of loose crud that has fallen into the sill its in very good condition in there. I cleaned back the remains of the mid sill seam as it has some light surface rust. I'm pretty certain its the braze that does for this joint. cleaned it up and painted the opening.  P1020556 P1020556 by jono_misfit, on Flickr I also cut out some of the other rust points  P1020557 P1020557 by jono_misfit, on Flickr then started making the infill panels  P1020558 P1020558 by jono_misfit, on Flickr forgot to take pics, but bent the panel to shape and put two steps on the panel to aid welding in and to replicate the piece I cut out Welded it in  P1020559 P1020559 by jono_misfit, on Flickr welded in some other patches  P1020560 P1020560 by jono_misfit, on Flickr and the rest of the sill joint. All needs cleaned back but I managed to pretty much minimise the distortion so far  P1020561 P1020561 by jono_misfit, on Flickr cleaned back and filled in a little pinhole  P1020562 P1020562 by jono_misfit, on Flickr peeled back and straightened a dent in the outer skin at this point, then welded it back in  P1020563 P1020563 by jono_misfit, on Flickr then onto the long front repair, which has the drain point to add back in  P1020564 P1020564 by jono_misfit, on Flickr folded up a piece of steel, slit it strategically and hammered it lots, with added clampage  P1020565 P1020565 by jono_misfit, on Flickr hammered and clamped it some more  P1020566 P1020566 by jono_misfit, on Flickr ready to prime and weld in, drain isnt as deep as the original, but the distortion was going to get too much.  P1020567 P1020567 by jono_misfit, on Flickr welded in  P1020568 P1020568 by jono_misfit, on Flickr cut out to rust patches, both around mounting points for the side skirt  P1020569 P1020569 by jono_misfit, on Flickr again some more strange damage of some holes cut / drilled into the sill, so welded them up  P1020570 P1020570 by jono_misfit, on Flickr A few more patches needed, but ran out of time for today. |
| |
|
|
jonomisfit
Club Retro Rides Member
Posts: 1,764
Club RR Member Number: 49
|
|
Jul 21, 2019 19:14:56 GMT
|
I was outside early today so looking for a quiet job I did some morris work. Bent up the wire for edging the lower part of the seat.  P1020551 P1020551 by jono_misfit, on Flickr couple of little tweaks on the fit  P1020552 P1020552 by jono_misfit, on Flickr then a few more, and onto the other side  P1020553 P1020553 by jono_misfit, on Flickr then started cutting out the holes to swiss cheese the seat  P1020554 P1020554 by jono_misfit, on Flickr  P1020555 P1020555 by jono_misfit, on Flickr then got stuck as I need a larger allen key for the new large hole cutter. |
| |
|
|
|
|

 ToT_Rod_Assy_1 - 26-08-19 01 by jono_misfit, on Flickr
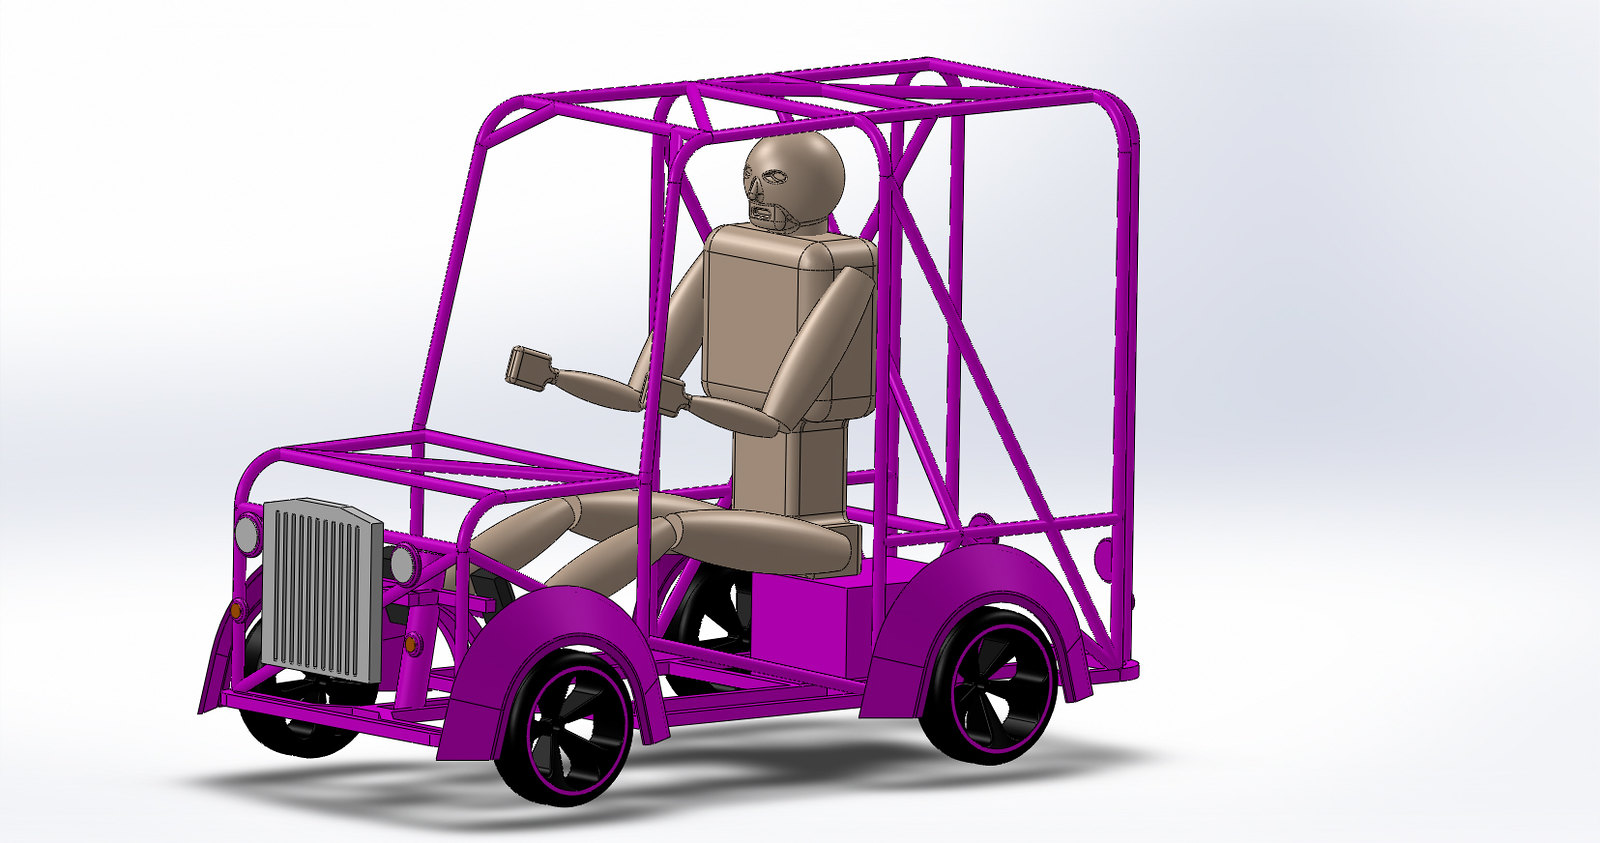 ToT_Rod_Assy_1 - 26-08-19 02 by jono_misfit, on Flickr
 ToT_Rod_Assy_1 - 26-08-19 03 by jono_misfit, on Flickr