teaboy
Posted a lot
   Make tea, not war.
Posts: 2,125
|
|
Oct 22, 2023 22:18:22 GMT
|
Here's some sunshine and warmth from our place for you... (well about 2km away as the crow flies)  I could have done with that sunshine this week, Alex. I have been deep undercover since Monday, sorry about that but it has been a funny old week. Tuesday I did some more sanding and spooging which is not at all photo-worthy. Wednesday was quiz night, not the result I would have hoped for as we were third. Thursday was full on monsoon, storm B-something, I forget the name, which could be one of the reasons why we don't win the quiz as often as I would like. Friday and the storm was still at it but this time we lost our electricity supply.  I don't want to complain though because a lot of people have had it far worse than us. Saturday was house stuff including servicing and lighting the Rayburn, at least we will have hot water if the power goes off again and, more importantly, I will be able to boil the kettle to have a cup of tea. Today the sun made an appearance, yay! I helped the Doc with her patio job in the morning by sorting the carb on the whacker plate and getting it running so she can squash down the hardcore. The more compacted hardcore she puts down on this patio area the more comfortable I begin to feel that she is less likely to bury my body under it. After brunch at the cafe I went back to sanding the underside. I did about five hours before I had had enough. There were a couple of drain slots in the rear seat base that I wanted rid of and I hadn't welded them up because of my broken welding mask. They are not visible once the axle panel is in and one of them had a bit of rust around it so they needed to go.  The one above was not the rusty one. I just hammered them flat.  Then welded them up from inside and tidied them up.  I didn't go mad tidying the underside because, as I said, they are enclosed by the axle panel and will not be seen.  I took advantage of the dry weather and mixed up some epoxy and daubed it all over the car and a fair bit on myself. 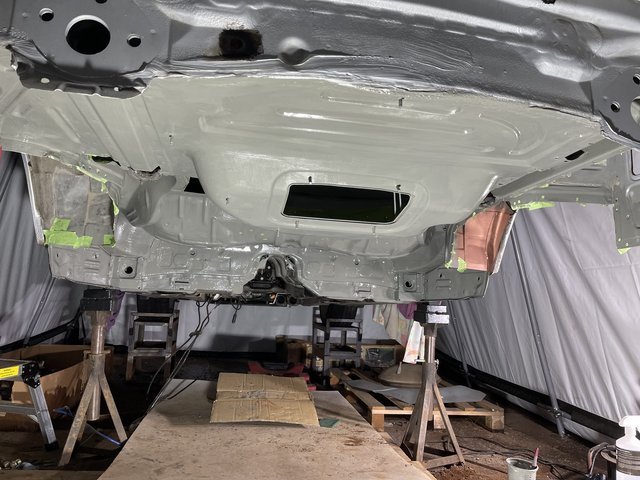 It's nice to get rid of that horrible blotchy spooged up area that I have been looking at for months now. 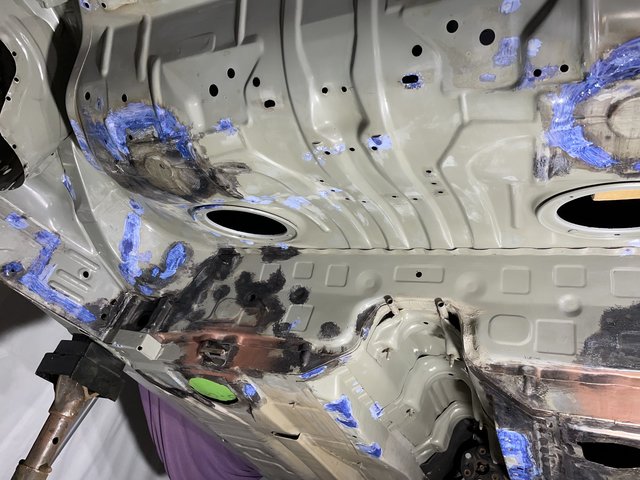 I will soon have run out of excuses as to why I haven't started fitting the axle panel. Cheers. |
| |
|
|
|
|
braaap
Posted a lot
  
Posts: 2,748
|
|
|
|
Thursday was full on monsoon, storm B-something, I forget the name, which could be one of the reasons why we don't win the quiz as often as I would like. Babet ? She met another weather gremlin up north and together they caused some chaos at the German baltic coast on saturday. |
| |
|
|
|
|
|
Oct 23, 2023 18:15:30 GMT
|
|
I reckon this axle panel could turn into another oil tank scenario…
|
| |
Ich habe kein Geld!
|
|
Darkspeed
Club Retro Rides Member
Posts: 4,880
Club RR Member Number: 39
|
|
Oct 23, 2023 19:15:16 GMT
|
Mr teaboy - how is that new power/band file doing? I am looking at getting one to assist me with grinding down some hard to get at welded up rivet holes, and although I am very tempted by a nice Milwaukee M12 cordless I am not sure I will be getting 4-5 times the use/value compared to £50 for one of those evolution jobs. |
| |
|
|
teaboy
Posted a lot
   Make tea, not war.
Posts: 2,125
|
|
Oct 23, 2023 20:59:34 GMT
|
Mr teaboy - how is that new power/band file doing? I am looking at getting one to assist me with grinding down some hard to get at welded up rivet holes, and although I am very tempted by a nice Milwaukee M12 cordless I am not sure I will be getting 4-5 times the use/value compared to £50 for one of those evolution jobs. So far so good, DS. |
| |
|
|
teaboy
Posted a lot
   Make tea, not war.
Posts: 2,125
|
|
Oct 25, 2023 22:26:52 GMT
|
I composed an extensive, highly educational and, dare I say it, entertaining post which took a considerable amount of time to do. It was almost completed when my computer decided to switch off and it all disappeared into the ether so this is the I cba to type it all out again version. I have decided that I am going to leave the original joint on the axle panel alone and just lop it off at a convenient place then weld it back together. This is, as is the way of things, not as straightforward as I'd hoped. I thought that the piece that I am going to make to back up the joint would just be a flat piece with a 90* fold in it but this turned out to be over optimistic on my part. The horizontal part of the extension has some uppy and downy folds and the vertical part has a swage along it and also a stepped spot welded joint. Once I had chosen my cut position it was time for cardboard.   I am going to make the backup out of two pieces. I made the bottom one first because it was the easiest and just has one very slight fold in it.  In the picture above you can see the end of the swage and the stepped joint on the vertical section. I hammered in a bendy bit to cope with the stepped joint.  It might need to go a bit more yet. You can see here that the hammery in bit isn't a straight line, because that would be too easy...  After lots of messing about I have made backup pieces for both sides.  I think the hammery in bits need some more work but my toes had frozen by that point so it will have to wait until another day. Cheers. |
| |
|
|
teaboy
Posted a lot
   Make tea, not war.
Posts: 2,125
|
|
Oct 26, 2023 20:08:21 GMT
|
That's her. Although she has gone she has left an enormous amount of rain which doesn't seem to want to stop. I reckon this axle panel could turn into another oil tank scenario… I hope not because this panel already exists so I don't have to make it myself. Cold and wet is the order of the day and I must admit that I was tempted to just cover myself in deep heat and cosy up against the Rayburn when I got home but, as my pal Chris keeps telling me that I am a lazy fat b-star-star-tard and saying that I don't want work, I decided to give it an hour, or so. I did some more hammering and fettling on my, I'm going to call them joiny pieces, until I was happy with how they were fitting. The Doc found a tin of copper weld through primer under the sink in the utility room the other day so I sprayed a bit of that on there.  It does look more coppery coloured in real life, especially when it is wet. I also put some on the extensiony bit.  That was all very lovely so I clamped them all together to check that they still fitted nicely.  They did, which was pleasing and I was going to leave it at that for tonight but I suddenly got the urge to weld the two bits together to make one complete joiny bit. 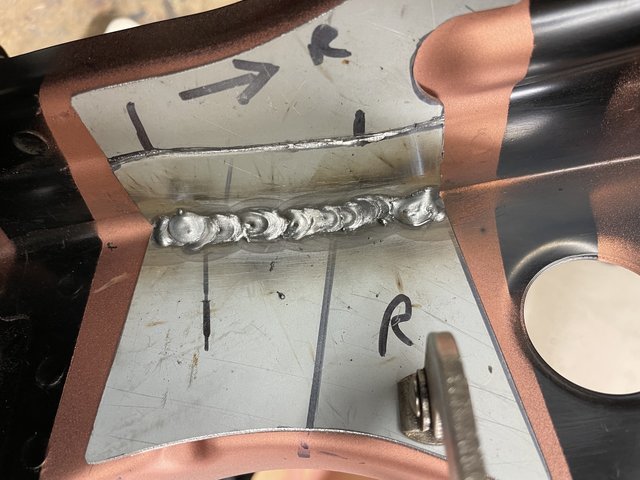 I welded them with all those clamps holding them in place because I wanted it to still fit afterwards but it did make torch access difficult so it wasn't that neat. It doesn't matter though because they are going to be totally enclosed when fitted and nobody will ever know. I had left the outer extremities slightly oversize when I was making them but now this one was welded together I trimmed it to suit.  I did leave it at that and I am now inside covered in embrocation. Cheers. |
| |
|
|
teaboy
Posted a lot
   Make tea, not war.
Posts: 2,125
|
|
Oct 28, 2023 20:52:37 GMT
|
It's the weekend, yay! Last night the Lovely Doctor and I were invited to some friends for food and brown booze so I didn't go in the shed. I checked the weather forecast for the morning and it said 0% chance of rain so that was promising. The no rain was actually miserable drizzle. We did our usual Saturday stuff and I even managed to get a large custard tart, despite being very late to the creamy bun shop. There was one left and I found myself at the back of quite a long queue hoping that none of the people in front of me wanted a large custard. Luckily for me, they didn't. Anyway, the sun came out in the late afternoon so I managed to get an hour or so in the shed. It was time to get the joiny piece in place so that is what I did. I stuck loads of clecos in there so that I knew it would stay in the same place if I were to remove it and then replace it.  The inside was like this.  That line with X marks the spot things on there is my intended cut line which was to make sure I didn't get the clecos too close to it. Now I had a repeatable fitment of the joiny piece it was time to mark out the cut line on the extensiony bit.  This is the crunch, am I doing the right thing cutting it off here? I had a cuppa and some custard creams whilst I psyched myself up for it.  Genuine McVitie's, not your supermarket own brand stuff. Oh well, better get on with it.  It's off. Now I need to weld it to the bit that I just cut off, but first, a bit more copper primer.  Then clekos back in so I could clean the paint back off around the edges. 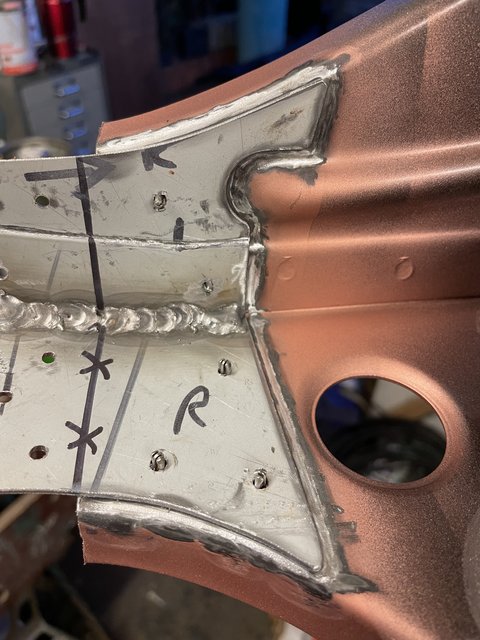 Just needs welding on now.  Once it was secured I removed the clecos and spot drilled the joiny piece to plug weld the holes up. I did file down one of the plug welds before I realised that it is going to be out of sight and would be a waste of time. The welding was a funny old job because it had gone dark by then an cooled right down so the 'cheater' magnifying lens in my welding mask started steaming up on the inside, where you can't get to it to wipe it off without removing it. I ended up having to warm it up with a heat gun which did the trick, if only for a few minutes before it steamed up again. It is welded on now so I gave it another going over with the copper paint.  In theory, I should be able to cleco it back on to the main piece leaving a small gap the width of the cutting disc which will be just right for when I come to weld it back together. Cheers. |
| |
Last Edit: Oct 28, 2023 22:58:10 GMT by teaboy
|
|
teaboy
Posted a lot
   Make tea, not war.
Posts: 2,125
|
|
Oct 29, 2023 17:58:26 GMT
|
The weather has been quite pleasant today so this afternoon I took advantage and got my thingmy out to see if the bit I had cut off would go back in the right place.  Amazingly it did, so I removed it to offer it into place under the car. These two tabby bits here,  would have originally gone underneath the V-brace box, where my fingers are.  As that is not possible now, I cut them off, I'll just stitch it together there.  It sort of fits. Next thing to offer in is the fuel filler pipe tube.  This is where it appears in the rear wheel well. 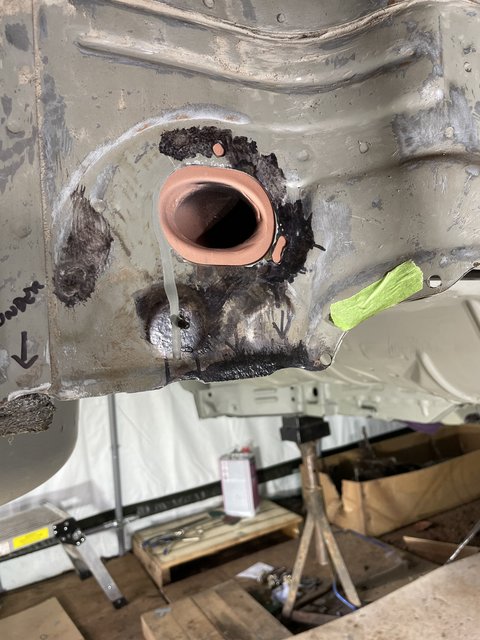 The next job was to cut off the other extensiony bit, I have already made a joiny piece for it. I had a cuppa first and had a thought, I wonder if I can juggle the axle panel in without cutting the other end off.  It is a heavy old thing to get up there, I was laid on my back shoving it up with my legs. I felt like Doug McClure wrestling with a sea monster. I rather optimistically expected it to just drop into place but, well, it didn't. I had it sort of fitting on one side but not the other. This gap around the 'spare wheel well', for instance. 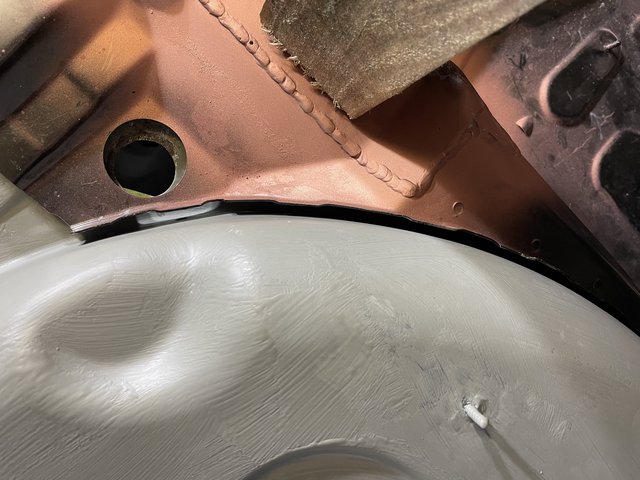 The whole thing was too far forward on the right hand side, it was overlapping at my lovely joiny piece.  As a result it was also a mile off at the sides.  The left front wasn't too bad. 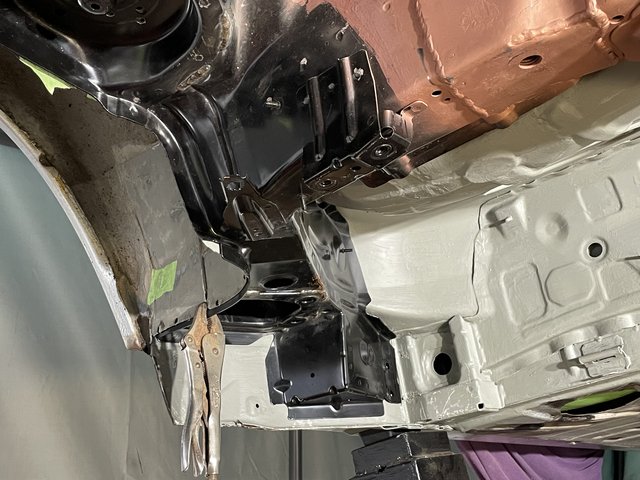 It was like the whole thing was at slightly the wrong angle, so I had to start working on tweaking all the mating flanges and trying to work it into position, all whilst hoping it didn't drop off onto my head. I worked at it and now the joiny bit is no longer overlapping.  It still needs a bit more movement because the joint is too tight but it is heading the right way. According to the BMW instructions, you are supposed to take this bit off and fit it separately but I don't know why you would need to. I drilled out the old one from the inside of the cab so I don't see why I can't weld it all from there as well, so I have left it in place. 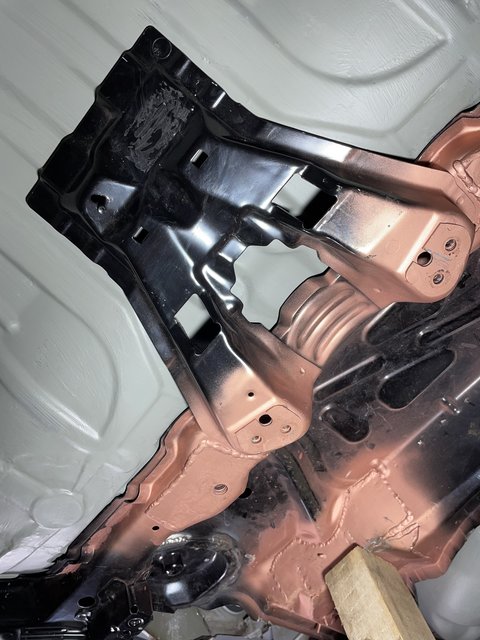 This is where it is at now.  It is nearly where I want it but not quite, a bit more tweaking to go yet. Once I get it somewhere near and pinned into place I will be able to bolt my jig on for final checks. Once it is nicely fitted it will need to come back off for prepping for welding and painting the inside bits. I still need to sort that wiring grommet hole too, before it can go in properly. 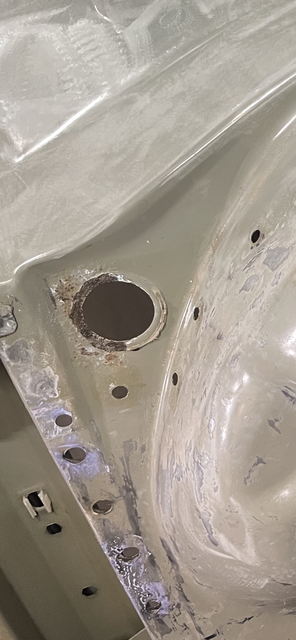 Cheers. |
| |
|
|
jamesd1972
Club Retro Rides Member
Posts: 2,921  Club RR Member Number: 40
|
|
Oct 29, 2023 18:04:55 GMT
|
|
Ooh progressively more car less pieces from now on. Nice.
James
|
| |
|
|
glenanderson
Club Retro Rides Member
Posts: 4,354
Club RR Member Number: 64
|
|
Oct 29, 2023 18:11:13 GMT
|
|
Excellent progress. 👍👍
|
| |
My worst worry about dying is my wife selling my stuff for what I told her it cost...
|
|
|
|
|
Oct 29, 2023 18:17:54 GMT
|
|
Well done!
|
| |
|
|
teaboy
Posted a lot
   Make tea, not war.
Posts: 2,125
|
|
Oct 30, 2023 22:40:36 GMT
|
Well thanks, dudes. I have to say I really don't like this time of year at all, when the clocks change and I find myself going out in the morning when it is dark and then it is dark again well before I head home. If you add in the seemingly incessant rain it totally kills my motivation. I have spent this evening eating creamy buns and drinking tea and now I am feeling guilty about it. I never feel guilty about the creamy buns, just the lack of working in the tent. Oh well, I've still got two 'custard rectangles' left.  Cheers. |
| |
|
|
teaboy
Posted a lot
   Make tea, not war.
Posts: 2,125
|
|
|
|
What an appalling week it has been weather wise, very English. I've been late-ish from work every night and with it being dark and hammering down with rain I just didn't have the enthusiasm to do anything once I got home. To be fair Friday was quite a nice day, considering, but I thought I would save myself for the weekend. Of course that guaranteed a monsoon all day Saturday. What I did do was to fix the lovely Doctor's car. If you remember, besides the dogging car she has an Audi A4 and she had broken the handle on the glove box. She was keen for me to fix this because she still had half a bag of wine gums in there. This little prongy bit that does the opening business had broken off.  I had a look on eBay and there were loads available, made somewhere on the orient where lots of cheap knock-off stuff originates and they were about eight quid. Luckily, I didn't just order one before I looked at the old one because of this...  If you look in the right hand slot at the bottom you can see where the prongy bit has snapped off from. All the ones from the far east had the prongy bit in the left hand slot because they were for left hand drive cars so they would be fitted the other way round. Most of the adverts didn't bother to mention this. Anyway, I was forced to order one from Audi. This is it, in all its glory.  They took just shy of sixty quid from me for that which is an absolute liberty and I have only just stopped hyperventilating. In retrospect I should have just bought the Doc a family bag of wine gums. Today was quite a bright and dry day but I didn't have masses of time because the Doc said that we were having her mum for dinner. I told her that I would prefer chicken... I did a bit more jiggling of the axle panel into position and I think I now have a plan for how to get it where it needs to be. I didn't have time to implement the plan and I also didn't take any pictures because there is nothing to photograph, yet. That left me with about an hour to kill, so I decided to clean up the fuel tank straps. Firstly, I pulled out the old bushes.  There is that metal 'top hat' bush that goes into the rubber bush thing. As you can see, 20 years under a car in England hadn't been kind to the metal bush.  Some time ago I had got some new ones which I had zinc plated.  The tank straps themselves are some kind of stainless steel but they had a little bit of rust staining at the edges. I gave them a tickle with the wire wheel on the bench grinder then went over them with some fine scotchbrite. Can you tell which one is done and which isn't?  Anyway, they are now both done and ready to refit, once there is a floor to refit them too. 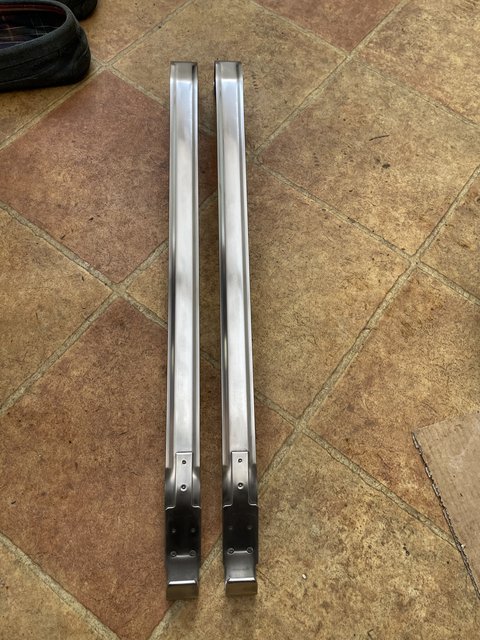 All in all, a thoroughly unproductive week. Let's hope that next week the weather is a bit more conducive. Cheers. |
| |
Last Edit: Nov 5, 2023 21:43:59 GMT by teaboy
|
|
braaap
Posted a lot
  
Posts: 2,748
|
|
|
|
the Doc said that we were having her mum for dinner. I told her that I would prefer chicken...  Brilliant! That's my kind of humour! |
| |
|
|
teaboy
Posted a lot
   Make tea, not war.
Posts: 2,125
|
|
|
|
It has been quite a pleasant day today, despite spending most of it in Grimsby.  What I meant was the weather has been mostly bright and even sunny at times. Obviously that changed when I got home because I live under a cloud so it is raining. I really didn't feel like doing anything but that was how I felt last week and last week nothing got done so I put an extra coat on and went out to the tent. Now that the panel thing is vaguely in position I really need to get it fitted up exactly where it needs to be.  That means that it is time to dig out my thingymajig. It took a bit of pulling and shoving to get it bolted on. This wasn't a shock. I built the jig to fit the car, which it did. When I tried it on the panel whilst it was on the bench I did have to tug at the front extensiony bits to get it on. This could be for any number of reasons. There is quite a bit of flex in them and they may even have had a knock in transport. I'm not suggesting that they were miles out, just a mm or so here and there. Anyway, I got the thingmy bolted in and I remembered to put the 2mm spacers under the trailing arm mounts to account for the strengthening plates.  Then it was just a case of getting it jacked into position.  The left front bit wanted to sag down a little bit so I put the first jack under there. It seemed like a good idea to put the other jack diagonally opposite to hold that side up. This time I put the block up against the jig.  It is relatively easy to see when the panel is high enough because you can see through the holes in the spring mount when it is touching the reinforcer above it. Once it was up at the right height I needed to move the driver's side back a bit to get it up nicely against the 'spare wheel well'. I did this by tapping the jig with a large dead blow hammer.  Now that it looks like it is in the right place I broke out the high tech tape measure and started measuring everything. Front to back, side to side, diagonals, the lot and... It looks to be spot on. The next job will be to get it screwed into place with self tappers so it stays in the right position. Then I can remove it to finish the prep on the panel and get a bit of paint on it before it goes in permanently and it should go back in the same place with the self tapping screws. I did stop short of drilling for the self tappers though because I think that I want to get someone to come and cast a second pair of eyes on it and to help me re-check the measurements, just in case. I also want to get that under diff push rod thingmy bolted on and fit the V-brace, just to make sure that everything fits properly before I start welding. This bit HAS to be right. Cheers. |
| |
|
|
jamesd1972
Club Retro Rides Member
Posts: 2,921  Club RR Member Number: 40
|
|
|
|
|
Self drilling self tappers (tek screws) not a thing in the TB household?
Close !
James
|
| |
|
|
teaboy
Posted a lot
   Make tea, not war.
Posts: 2,125
|
|
|
|
Self drilling self tappers (tek screws) not a thing in the TB household? Close ! James Well, there are some at the yard at work that I forgot to get this morning, depends whether I get to the screwing it on stage before I go back there, as I don't go in every day because I end up spending half the morning drinking tea which then makes me late home.  |
| |
|
|
teaboy
Posted a lot
   Make tea, not war.
Posts: 2,125
|
|
|
|
Ages ago when I first started poking around under my old banger I discovered that the battery box needed some work. It was the first thing I was going to repair, until I uncovered the extent of the corrosion in there when it then became the first bit I removed and it was also the first replacement panel that I bought. This was the start of its removal.  When I got the new one I removed the unneeded and rust prone brackets from the side and I also welded up two grommet holes in the bottom of it. It has been sitting in the shed for months and it only saw the light of day when I welded the repaired exhaust silencer bracket to it. Tonight I decided that it was high time I offered it up to the car to see if it fits. Luckily, it does.  Unluckily, I had to lower the axle panel because the front end of it goes above the axle panel. It is a bit of a jiggle to get it in because the inner edge goes under this chassis rail. 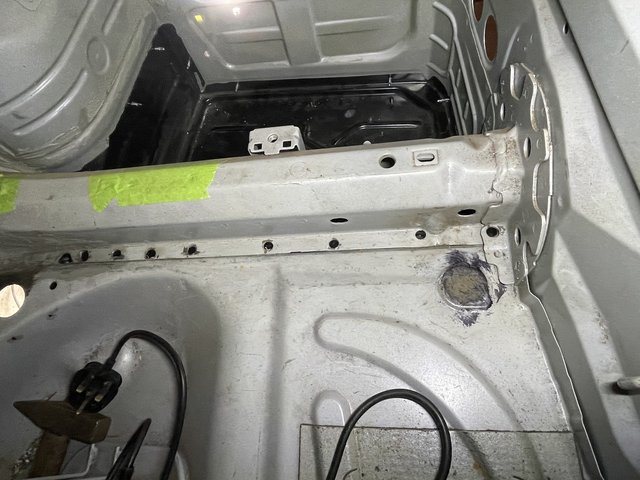 But it is also sandwiched between that rail and the boot floor.  It is now screwed in place.  I used self drilling tek-screws which are very handy.  I then jacked the axle panel back up and fitted the under diff push rod thing which then allowed me to fit the V-brace to make sure everything fits as it should.  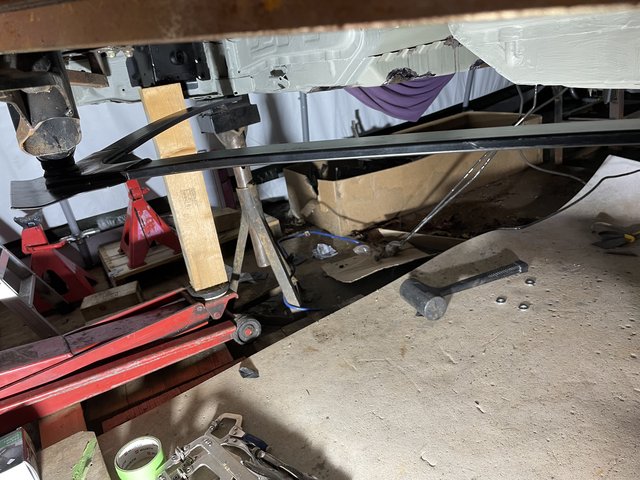 I haven't started screwing the axle panel into place yet because I want to do some more measuring and checking before I do that. Cheers. |
| |
|
|
teaboy
Posted a lot
   Make tea, not war.
Posts: 2,125
|
|
Nov 14, 2023 21:14:24 GMT
|
Well I left this last Wednesday with me wanting to do some more measuring and adjusting. I could have possibly done some of that on Thursday but I can't for the life of me remember why I didn't but I suspect that it was weather related. This weekend just gone the weather was really lovely for the time of year, bright and sunny if a little bit chilly. Perfect for going in to a tent with a tape measure and a hammer, but I didn't do any of that because on Friday evening my eldest daughter, granddaughter and son-in-law turned up from 'darn sarf'. My youngest daughter also arrived from up t'norf and none of them wanted to help me in the tent. Saturday was double good because we all went to Ten Acres for breakfast. This is Tasmin and James at TAs.  I know that he isn't very good looking but he does have a good pension plan. After TA's we went to the ice cream place which was the second part of the double good thing. Can you spot the toddler hiding behind the plastic cow?  The lovely Doctor had been clearing out the fridge and we had loads of out of date food and rather than throwing it away she invited all of her side of the family over for Sunday dinner which doubled the number of cars in the village (I didn't get them all in the picture).  These people came from all over for some free grub, Exeter was the farthest which is five hours away. 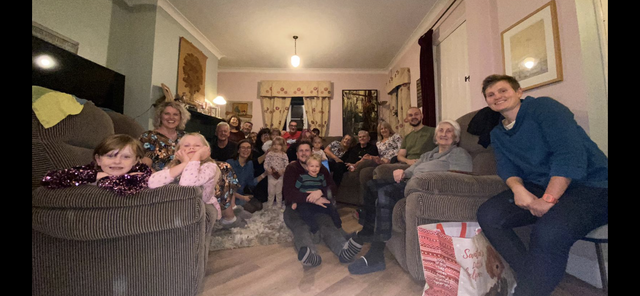 I'm not sure if I would drive for five hours for a mouldy sausage... Anyway, I fully intended to get back to the business at hand last night but storm Deborah or whatever she was called was really going for it so I had to put it off until tonight. I had a couple of hours measuring, adjusting and re-measuring and then doing it all over again. There isn't much about this which is photogenic as I was laid under the car looking at this. 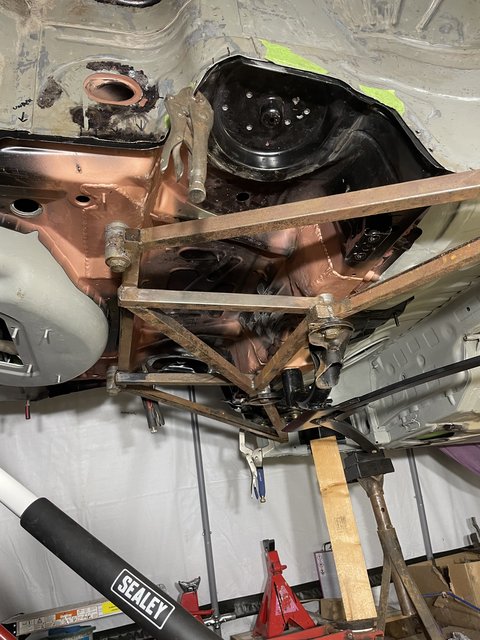 It is really close to where I want it to be but when I unclamp it to move it a bit it drops down a few mm which is quite annoying. It is annoying because when I have the front of it jacked up into place and the rear has dropped I was then unable to jack the rear back up. I need to dig out another couple of jacks so that I can support all four corners whilst I make my adjustments. All this means that I haven't been confident enough to put any screws in to hold the axle panel in place, yet. Cheers. |
| |
|
|


