teaboy
Posted a lot
   Make tea, not war.
Posts: 2,126
Member is Online
|
|
|
|
Right then, I need to decide how much of the heel panel I need to cut out. As the corrosion has been happening on the outside, that was the place I looked. I think that I can get away with leaving that original vertical flute in there, that will be a bit less work.  I decided just to double check on the inside before I cut it out.  There looks to be a tiny bit of rust right next to the flute on the inside. I cleaned it off to have a look.  I think I'll probably get away with that bit, so I marked it up.  Then cut it out.  There is a little bit of surface rust on the panel behind which will need treating but it is nothing major. On to making the replacement. I bent a flange on a piece of tin then stuck the old bit on with a magnet to mark up the steppy bit that needs knocking in.  I then spent ages bishing and bashing to make the steppy bit. When the steppy bit gets knocked in it pulls the panel into a curve. when you flatten out the panel it throws the flange and steppy bit out. I had to resort to some serious boshing to sort this problem out and ended up chasing my tail for some time. Eventually, I had a steppy flange, yay!  I offered it in place.  It looks like it fits, yay! I checked it from the other side.  It's a country mile off, boo! I could either try a bit more boshing, to tweak it into place or I could go with plan B. It is already seriously boshed and is a little bit wrinkly. The original piece that I removed was also a bit wrinkly in the steppy area despite being made on a megaton enormous press. This tells me that the metal is not really that keen to assume that shape. Plan B, which is always a last resort for me, is to just put a couple of slits in the flange, fold it to suit and weld up the slits. I normally try to avoid doing it that way if I can because it is the sort of thing that an amateur repairer, probably working in a tent on their drive, would do. Plan C is to make it using plan B and then clean and sand it all up so nobody knows it has been welded then tell everyone I did it using plan A. I'll have to think about it in the meantime possibly think up a plan D, who knows... Cheers. |
| |
|
|
|
|
|
|
|
|
|
Plan C is to make it using plan B and then clean and sand it all up so nobody knows it has been welded then tell everyone I did it using plan A. Just tell everyone that you forgot to take pictures until the job is done. My memory is often a bit flaky when I'm welding. Every single time my welds don't look as neat as I hoped, my memory fails me - right until the moment I get the flap wheel out, then I remember to take photos again. Funny that! |
| |
Sometimes, others may not understand why you like a car so much. Sometimes, you may not even understand why you like a car so much. But none of that matters; all that matters is that you like the car, and having it makes you happy.
|
|
|
|
|
|
|
|
I go with the amateur plan B every time (even though I’m working in a garage and not a tent).
|
| |
|
|
Darkspeed
Club Retro Rides Member
Posts: 4,882
Club RR Member Number: 39
|
|
|
|
|
It would be out of character for you to fold - pardon the pun - at the first QC rejection and resort to welding and grinding.
Bit of adjustment to the form tool required me thinks
|
| |
|
|
teaboy
Posted a lot
   Make tea, not war.
Posts: 2,126
Member is Online
|
|
|
|
Just tell everyone that you forgot to take pictures until the job is done. My memory is often a bit flaky when I'm welding. Every single time my welds don't look as neat as I hoped, my memory fails me - right until the moment I get the flap wheel out, then I remember to take photos again. Funny that! Sounds like you know what you are doing.  I go with the amateur plan B every time (even though I’m working in a garage and not a tent). It is very tempting sometimes and probably sensible too. It would be out of character for you to fold - pardon the pun - at the first QC rejection and resort to welding and grinding. Bit of adjustment to the form tool required me thinks Thanks for sending me on the path to righteousness once more DS, I would get myself in a total flap if it wasn't for your sage counsel. There was no form tool though, it was freehand. As I said last time I was fully prepared to go for plan B on this piece and I was sure that was going to happen right up until I got into the shed. Once there I thought that I would just give it one more go, as a very wise man had suggested to me. More bishing got me to this stage.  That might work. Next I needed to put the vertical flute in.  I roughed this in by hitting my smaller T dolly against it whilst the piece was rested on the vice with the jaws opened up to the required gap.  I'm not going to mention that, like a complete tit, I started knocking the flute through in the wrong direction to start with. I had to quickly reverse out of that before anyone noticed. Once I got it somewhere like.  I needed to trim down the width.  So that I could get it in place and slide it up behind the existing panel.  This gave me the opportunity to see how I needed to tweak the flute to match up with the original bit. Once I was reasonably happy with it I could trim the top edge to size.  It is not far off now. I sanded the surface rust off behind it and treated it with some phosphoric acid stuff.  That was three hours so I had had enough by then. Time for tea and crumpets. Cheers. |
| |
|
|
teaboy
Posted a lot
   Make tea, not war.
Posts: 2,126
Member is Online
|
|
|
|
I got that repair piece made on Tuesday, Wednesday was quiz night which we lost dismally, I'm blaming that on our football expert because he went to watch Manchester United instead of coming to help us. Thursday was a total monsoon so I gave it a miss. Friday my eldest daughter, son in law and granddaughter came to stay with us for Easter and the Doctor told me that it would be bad form if I went into the tent whilst they were here. My youngest Daughter is also here for the week and the mother-in-law is still here so it is a full house. The mother-in-law put some chocolate in the fridge and my daughter asked her why she had done that. She said, 'I like it when it goes hard so I can suck it longer'. At this point I was forced to telephone the police, she had gone too far! We never did find out why she puts chocolate in the fridge... Anyway, after breakfast at Ten Acres on Saturday instead of going in the tent we went for a walk on the beach. Notice the handsome chap in the background.  I did order a lovely cake from Lil's cakes so we had something nice for after the walk.  They have gone back darn sarf today but we went for Easter dinner at Ten acres this afternoon so most of the day had gone by then. Once they had gone I thought I would just have a quick look in the tent to see what needed doing. I wanted to get some epoxy in that section where the new patch will go before it gets welded in. I have bought some epoxy in RAL 7023  That was the closest match I could find to the factory E-coat in the standard RAL chart. It is pretty close but it doesn't have the slight green tint that the original has. Anyway, it's close enough as it isn't for parts that are going to be on show. I did a bit of cleaning up and masking.  I mixed up 100ml of paint, which was more than enough for that bit so I also prepped the inside of the seat crossmember. 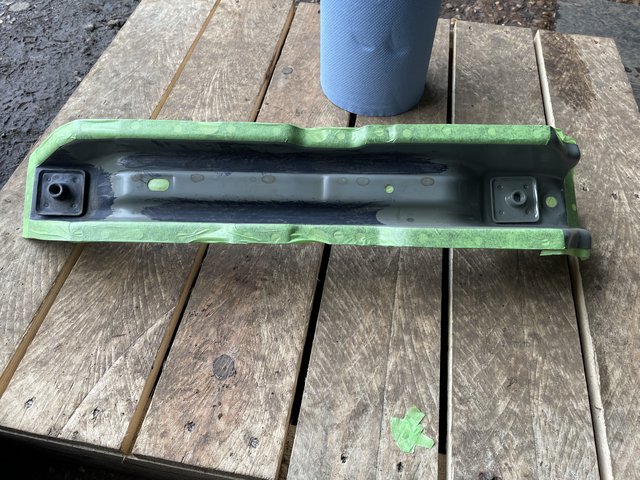 I daubed it on as best I could. I am really not over keen on painting.   There was plenty of paint left which I had expected and prepared for because I had the driver's side ready as well.  It looks ok, considering it will never be seen once everything is back together.   When we were stocking up for the visitors the other day I noticed that lemon fancies were on special offer.  I might have a couple of those with a cup of tea. Cheers. |
| |
|
|
Darkspeed
Club Retro Rides Member
Posts: 4,882
Club RR Member Number: 39
|
|
|
|
|
As that looks like 121 I find adding 10% thinners works for flowing it out and losing the worst of brush marks - being warm also assists but I prefer to apply it with a small roller. The slightly texture finish being better than brush marks.
|
| |
|
|
teaboy
Posted a lot
   Make tea, not war.
Posts: 2,126
Member is Online
|
|
Apr 10, 2023 19:13:06 GMT
|
After a nice few days, weather wise, the monsoon season has returned. I woke up full of enthusiasm but one look out of the window soon quelled that. It did stop raining in the afternoon and the sun came out, which was excellent. I took advantage of this to get the tent opened up and to get the welding gear down from the shed. I wanted to get the epoxy I painted yesterday masked up so I could get a bit of weld through paint on there. The epoxy was not fully cured and was still slightly tacky. This was odd because it is the same brand, Rustbuster, as the black stuff I have been using previously and I mixed it the same way using a graduated mixing cup. I stuck the seat crossmember on top of the rayburn to help it dry and I used my heat gun in the cab to help that. Once I had sorted that surprise extra job I was looking at painting the weld through primer. I didn't do that next though, because I manufactured myself another extra job first. The back edge of the floor where I had drilled out the spot welds was a bit thin where I had gotten giddy with the drill. As the new plug welds were not going to be in exactly the same place as the original spots, I decided to weld them up and dress them back. You can see how carried away I was with the drill here.  That thing clamped around where I am going to weld is one of these plug weld clamps.  It is excellent and has a copper jaw to back up the weld, which is especially helpful if you happen to have drilled through both pieces to screw or cleko them together, for example. Anyway, I welded all three of the original spot welds up.  I didn't take a picture of the weld through primer but I did do that with the copper stuff, honest... I had spent quite a while fettling the repair to make it fit nicely before I painted it. Once it was reasonable I screwed it to the floor then started tacking the other three sides.  There was a bit of pushing and pulling to get it all lined up, the top edge was particularly awkward because there is no access from behind. Anyway, I eventually got it welded in.  I also got it cleaned up, on the inside edge at least. There is a bit of a concave sinking around the right hand side of the top edge and, as I said, there is no rear access to bump it back up. It's not that bad though, really.  At this point, the Doc messaged me to say she was preparing food. The reason she messaged me and didn't just step out of the back door to tell me was because there was a biblical thunderstorm in progress. I got totally soaked when packing up. Spiffing as this new bit looks, it isn't quite finished. I need to tidy up the outside edge underneath the car. 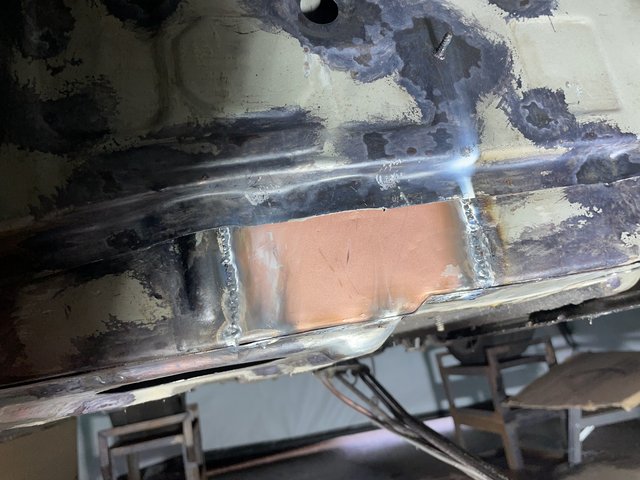 There are also two plug welds to do where that wiggly flange touches the new bit.  Maybe that will happen tomorrow, assuming I survive the culture shock of having to go back to work.. Cheers. |
| |
|
|
nze12
Part of things
 
Posts: 193
|
|
Apr 10, 2023 19:36:57 GMT
|
When we were stocking up for the visitors the other day I noticed that lemon fancies were on special offer.  I might have a couple of those with a cup of tea. Cheers. Boxes or cakes?  |
| |
1986 BMW E30 refreshed to original spec
1973 BMW E12 520 converting to Motorsport 530
1982 XJS V12 converting to 5 speed manual
Many landscaping projects overriding above!
Cogito cogito ergo cogito sum!
|
|
teaboy
Posted a lot
   Make tea, not war.
Posts: 2,126
Member is Online
|
|
Apr 10, 2023 19:47:46 GMT
|
When we were stocking up for the visitors the other day I noticed that lemon fancies were on special offer.  I might have a couple of those with a cup of tea. Cheers. Boxes or cakes?  Boxes, obvs.  |
| |
|
|
|
|
|
Apr 10, 2023 20:05:34 GMT
|
|
Very neat. You have more patience than me to get a seamless repair. And I’d really struggle with motivation if I had to do it on the drive
|
| |
|
|
teaboy
Posted a lot
   Make tea, not war.
Posts: 2,126
Member is Online
|
|
Apr 11, 2023 18:57:39 GMT
|
Very neat. You have more patience than me to get a seamless repair. And I’d really struggle with motivation if I had to do it on the drive I always chase perfection and invariably fall short, hence the oil tank saga. I am starting to come to terms with my limitations now.  Back to the grindstone today and it has been a very lovely day indeed. Mid teens temperature, bright and sunny, the exact opposite of the bank holiday in fact... Perfect weather to go into the tent. When I got home my daughter's car was on the drive, with a flat tyre, so the first thing I did was to put the spare on and put the flat one in my van to hopefully sort out tomorrow. Whilst I was doing that it went a lot darker and I could feel rain in the air. I wasn't to be deterred so I carted the welder out before the rain started properly. I put those two remaining plug welds in the back of that patch and tidied up the outside of the welds underneath the car. I didn't go mad with it because I don't want to over thin it and it isn't going to be seen.  I also cleaned up where the two plug welds penetrated the patch. You can barely see where they were on this picture which, I suppose, is the whole point of cleaning them up...  Anyway, whilst I was doing this the rain got faster but I didn't care because I was undercover. Then the wind really started to pick up and the tent started swaying and inflating. I thought it was about to take off so I quickly daubed some spooge on the new bit.  I also spooged up the other side and the underside.  As soon as that was on I packed up and closed down the tent. I can see it through the window and it is flapping a bit. Hopefully now it is closed it isn't going to inflate and go into orbit. Cheers. |
| |
|
|
teaboy
Posted a lot
   Make tea, not war.
Posts: 2,126
Member is Online
|
|
Apr 12, 2023 21:52:13 GMT
|
I was 'lucky' enough to pick up two bonus extra 'emergency' have to be done by yesterday jobs today so that made me late home from work. When I did get home it was, you guessed it, tipping down with rain. Luckily, despite the ridiculously wild gale force winds of last night, my tent has not blown away and, as the Lovely Doctor and both daughters have gone to see some totally anodyne pop star performing a load of songs that all sound alike, there was no reason for me not to brave the deluge and go into the tent. As I was carrying the welding set down from the shed the rain decided it was going to double in intensity and change into hailstones. With weather like this it's no wonder my car went rusty. I really should go back out there and do some more repairs just to try to keep up with the new rust that is probably forming as we speak... Anyway, I was in there and the rain was outside so what was the next bit? There was the slotty type thing in the floor which on the other side looked like this.  Which I hammered flat and welded up.  I was tempted to just do the same on this side bit there was a bit of rust to clean off first. I hammered it flat.  That little thing in front of it isn't a stray corn flake, it is one of the chunks of rust which flew off when I was hammering it flat. That meant that it wasn't just a bit of surface rust to clean off it had started to properly corrode and we can't have that so I double checked underneath to see if it had spread beyond what was visible on top. It hadn't so I marked it up to cut out.  I made a piece to replace it with.  It looks like a real easy piece to make and to be honest, it was, but it isn't as straightforward as it looks because the edges where it curls up are not quite straight so it wasn't just a quick fold and Bob's your uncle. I tipped the curved flanges with the rotary swaging thing that I got a while ago, that made it easier. Once they were tipped I had to work on them a bit to give the folds a bit more radius than the sharp fold the swager created. Of course, all this tipping and tapping takes place in the shed... Perhaps I should get an umbrella. It did fit and it did get welded in and tidied up. 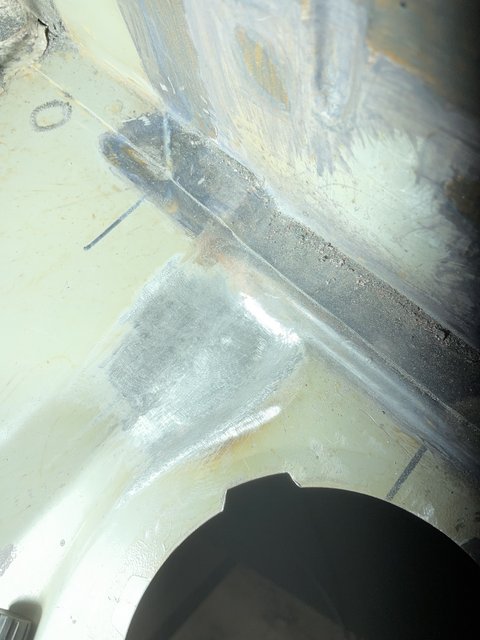 I didn't go mad on the other side again, just a bit of a tickle up.  I maybe need to think about doing something with those big round holes soon. Cheers. |
| |
|
|
teaboy
Posted a lot
   Make tea, not war.
Posts: 2,126
Member is Online
|
|
Apr 13, 2023 20:37:25 GMT
|
It didn't rain today, yay! The previous piece that I repaired. This bit.  The reason it had rotted was because of the fuel tank strap bracket on the back of it. These things.  Now that the panel was in I can replace the bracket.  Once I had it positioned I removed it to get some weld through primer on there, and it. I had a nice cuppa whilst the paint dried. 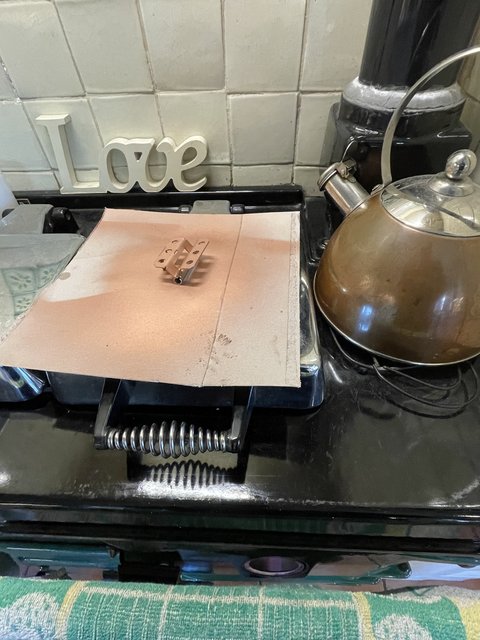 When I started welding it on I got a massive spark of hot metal on my hand which made me mess up one of the plug welds. Can you guess which one it was?  If I had showed you this picture instead, you would never have known. 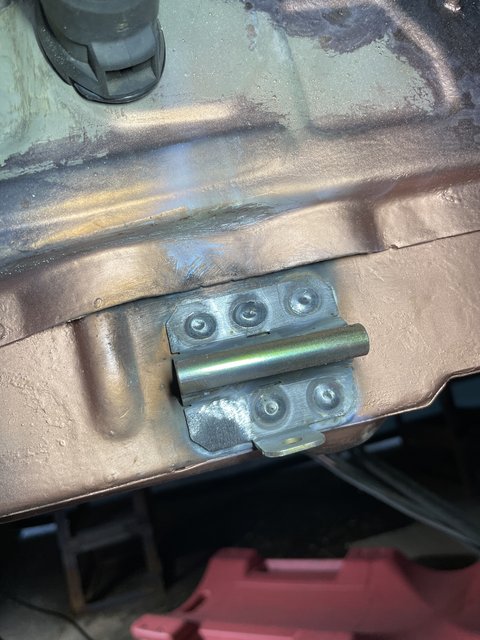 That messed up one didn't look to have as good penetration as the others and as I don't want the fuel tank to fall off, I used the spot weld drill on the inside.  Then I welded that one from the inside as well. I cleaned them all off.  I cleaned off the outside on the bracket too. 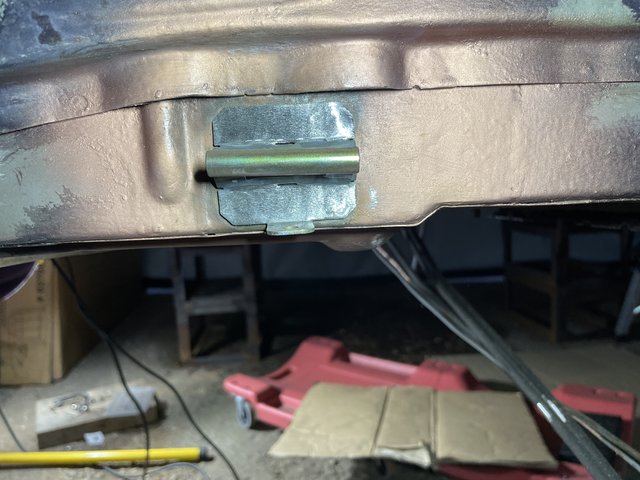 That was enough for tonight so I just daubed it in some spooge.  The inside got some as well, including the bit I repaired yesterday. 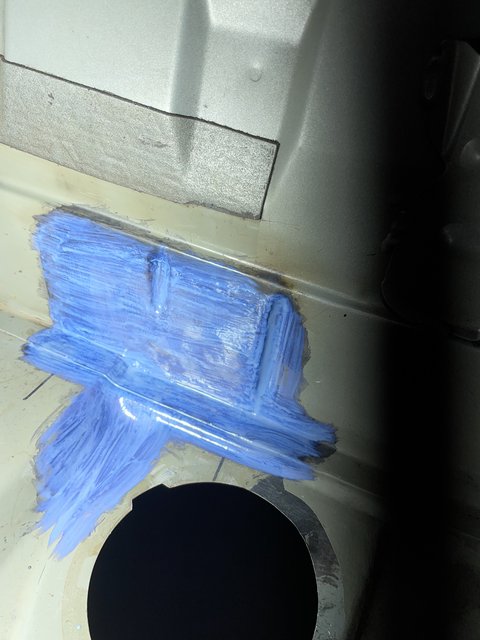 I haven't decided which bit I'm going to do next. Cheers. |
| |
|
|
|
|
|
Apr 13, 2023 20:51:05 GMT
|
|
I think the old bier und wurst (as opposed to tea and cake) crew in Munchen must be preparing an invitation for you to join their restoration team at Mobile Tradition. That would have some advantages, such as Prinzregententorte and ready access to their part bins. That said, I’m nervously looking forward to the Great Rear Subframe Replacement.
John
|
| |
|
|
teaboy
Posted a lot
   Make tea, not war.
Posts: 2,126
Member is Online
|
|
Apr 20, 2023 20:48:44 GMT
|
I think the old bier und wurst (as opposed to tea and cake) crew in Munchen must be preparing an invitation for you to join their restoration team at Mobile Tradition. That would have some advantages, such as Prinzregententorte and ready access to their part bins. That said, I’m nervously looking forward to the Great Rear Subframe Replacement. John Cheers, John. My daughter's in-laws are German, maybe they can sort me out with some fancy cake? WRT the subframe/boot floor/RACP job, I have been contemplating how I'm going to do it. I have a plan and hopefully it will be pretty straightforward, but it is a fair bit of work. Ok, my previous tent report was last Thursday and now it is this Thursday. That means that I have had enough time to think up my excuses for not doing anything on the car. Here goes; Friday, late home and wazzing down. Weekend, MOT the Doc's dogging car then helping her in the garden (I hate gardening). Monday, my man wanted to borrow my sheet metal rollers, I did my back in getting them out of the shed and loading them into the van. Tuesday, late home and still aching from Monday. Wednesday, quiz night (we won, yay!). Which brings us to today. I couldn't think of any more excuses so I thought I had better look at the next bit that needs repairing, the two grommets underneath where the rear seat goes. This is the passenger side.  With the grommet out of the way.  First off, remove the tar board around the area.  Then clean off the remains.  Those spot welds just above the hole are where the rear axle carrier panel is attached at the front end.  They are very close to the hole, better look underneath to see what it looks like.  Hmmm, that doesn't look fantastic, let's take a closer look.  Oh heck, I'd better clean it up and have a better look.  Is that another hole, what does it look like from the inside now?  Oh it is a hole, I'd better clean that up.  There was also a crusty looking bit in the corner of the rear seat area.  I'd better clean it up.  It did put a bit of a dent in it when I was cleaning that, it must be quite thin. Inside it is like this.  Another hole to sort out, it is getting tedious now. All this put a serious dent in my enthusiasm for tonight, so I stuck some phosphoric acid on the rusty bits and packed up. I did manage to get a drop of the acid on my arm, it does sting a bit... I need to have a think about how I'm going to attack it. I'm thinking that I might have to get the back axle off and out of the way. It will stop me banging my head on the diff, at least. Cheers. |
| |
|
|
|
|
|
Apr 20, 2023 21:52:14 GMT
|
|
Indeed that does look like it’s become soul-sapping work.
John
|
| |
|
|
|
|
|
|
|
|
I thought you were just going to snob an MOT patch over the lot. Then you mentioned taking the axle off and I remembered whose thread I was reading 😁. I’m sure it will be invisible when done
|
| |
|
|
braaap
Posted a lot
  
Posts: 2,750
|
|
|
|
My daughter's in-laws are German, maybe they can sort me out with some fancy cake? Then ask them for Schwarzwälder Kirschtorte Frankfurter Kranz Bienenstich Mokkatorte Or google these first.  |
| |
|
|
teaboy
Posted a lot
   Make tea, not war.
Posts: 2,126
Member is Online
|
|
|
|
Hello and welcome to another thrilling episode of look at my rusty hole where I will be exposing everything, warts and... err, err, hold on, that doesn't sound quite right. Ok, I've given myself a good talking to and there is no point moping around. I am fully aware that rust is the gift that keeps on giving and that the 'prize' is always bigger than you were expecting and I should be prepared for that. I'm not saying that I won't be hacked off if there happen to be any more surprises, just that I need to accept it and press on regardless. I didn't feel in the mood to start removing the axle tonight because it is a fair old job and really I think I want someone to help me with that because it is a big old lump. What I decided to do was have a go at that bit of the seat base where my bonus extra hole was. Here.  I want to try to make a brand new, un-farted on, piece of seat base to replace the horrible old bit. First I had a look through my shed to find this.  It is a large sand filled leather bag. Large enough, you would think that you couldn't lose it but it has been missing in action for quite a while. Thankfully, it was in the first place I looked. That's not to say that I haven't looked in lots of other places on previous occasions and not found it, but I do have it now. Next I cleaned up my recently rediscovered rugby ball stake, another thing which you would think impossible to lose, but I seem to be a specialist in achieving the impossible in this regard.  I cut out a piece of tin and hammered it on the sand bag. Actually, I used a dome headed rubber mallet. Then I chased in some groovey bits with a chisel and hammered it up on the rugby ball stake.  It is starting to look a bit like this.  Which isn't very exciting. It is starting to take shape, here it is offered in position.  It still needs a fair bit more work, or I may end up chucking it out and starting again. I'll have to see how it develops next time I work on it. I have to keep reminding myself that it fits under the back seat and above the fuel tank... Cheers. |
| |
Last Edit: Apr 22, 2023 10:09:50 GMT by teaboy
|
|


