|
|
|
|
|
|
Just read the whole thread for the first time! Cool motor, and you've done really well with it! Its great to see someone learning and improving for jumping in and getting their hands dirty!
I'm pleased you've moved over to POR15, its much better than Hammerite. Just beware, if you paint it anywhere that will see the sun then you will need to buy the POR topcoat. When POR15 is exposed to UV rays (so sunlight) it dulls massively.
Keep on it, I'm really looking forward to seeing this one progress!
|
| |
|
|
|
|
|
|
|
Mar 13, 2011 18:28:40 GMT
|
|
Inspirational stuff! Just had a flick through of the last two pages but need to make time to read the rest, top work! Need to get some of that black stuff too.
|
| |
Project Diary1975 Viva / 1988 T25 Camper / 1989 Mini / 1991 MX5 / 1992 Mini / 1994 Saab 9000 / 1997 Saab 9000 / 2008 Saab 9-5
|
|
stealthstylz
Club Retro Rides Member
Posts: 14,960
Club RR Member Number: 174
|
|
Mar 13, 2011 19:43:52 GMT
|
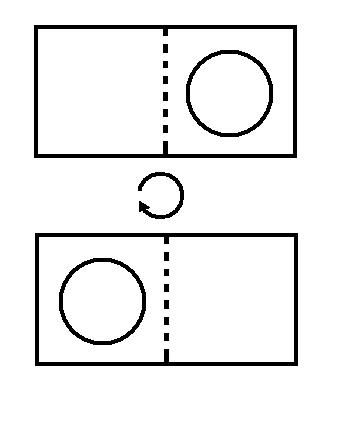
What's the gearbox tunnel like where the gearshift comes through? If it's flat ish (when viewed from size it'll probably be curved)you can cut a rectangle out, spin it and weld it back in.  If it needs to go back 2" you'd need to make the centre line (dotted) an inch from the existing hole, then when you spin it it will be 2" further back. Matt |
| |
|
|
|
|
|
Mar 13, 2011 23:39:32 GMT
|
Inspirational stuff! Just had a flick through of the last two pages but need to make time to read the rest, top work! Need to get some of that black stuff too. Thank you very much! If I can inspire some to get stuck in to something I am very passionate about I must be doing something right. Thanks, hope you enjoy the rest of the thread. What's the gearbox tunnel like where the gearshift comes through? If it's flat ish (when viewed from size it'll probably be curved)you can cut a rectangle out, spin it and weld it back in.  That's certainly what I'll be looking to do  Quick flip round and weld back in. The tunnel is curved but doesn't narrow at all. Thanks Matt  |
| |
|
|
|
|
|
Mar 17, 2011 21:23:08 GMT
|
Tough tough day, but got home and got cracking after some promises and touching comments about this car at the funeral. Thank you guys!  Here's the secondary air filter pipe that was fouling the bulkhead when I popped the engine in, and subsequently have found out I don't need it. As Guy mentioned to me after I told him, "Anything that's marked Secondary, just rip out" Fair point haha. I'll need to either find a turbo to exhaust manifold from a non aircon car, or weld up this one where that big fat nuts comes out of the back. Not decided which yet. After re-arranging the garage and putting the engine stand in the back of the car (thanks again Bruce, I'll run that back down to Area52 very soon!) I gave the gearbox a good scrub with some wire wool and wire brush to prep it for some etch primer and paint tomorrow morning. Cleaned up really well.  Then found out that the speedo connection to the gearbox is cable NOT electrical as I first feared! RESULT! I can keep the sexy retro speedo and rev counter dials! (I did feel rather stupid tho lol)   Anyway, cleaned up ,had a look at the clutch linkage which I'm going to have to fabricate an arm and some kinda gizmo to take the cable clutch so that will pull the clutch fork. I'll keep the hydraulic cylinder for future conversion, as I'd imagine I'll pop a hydraulic setup on in the future.    Currently thinking a bracket extending backwards from the current mountings with a cup to take the cable end and a clamp fitting over the fork. Something to address over the coming days. Gearbox mount got a rub down and some POR15 treatment...  As did the starter motor (no POR for that tho)  I'm now spent, shattered, exhausted and really hoping I can switch off and get some sleep tonight. Fortunately not coaching until later tomorrow so some more time to tick some things off the to-do list in the morning! Chris |
| |
|
|
|
|
|
|
|
Had a tough morning today. Stripped the covers off the car and was stood looking at it thinking I was scared about plumbing in the engine. Took a deep breath and decided that the biggest thing that's holding progress back at the moment is the gearbox and sorting out the clutch cable. So feeling a little better about things, I dragged the gearbox out and cleaned up a little more and gave it a quick etch ready for a top coat later. Also etched the starter motor too after some fiddly masking.    While I had the etch out I dusted the inner wing which I had a problem with. The stone chip was basically falling off as I hadn't keyed the surface I'd sprayed it on. Needed a quick clean and keying. I'll throw a top coat on and stonechip it again.  This done, I turned my attention to this cable clutch I'm dreading the conversion process for.   The clutch fork looks fairly easy to knock up a bracket to hold the clutch cable in such a way that it can pull the clutch open. Unfortunately the cable didn't look quite long enough to reach all the way round to address the fork from the rear.  Luckily I think there's enough adjustment in the cable to hopefully allow enough length!  Anyway, until I get the gearbox mounted, and the car up on some ramps it's hard to see, so I soldiered on. Looking at the box I formulated a very simple plan which needed some angle iron... which I couldn't find in the garage. Trip to the local metal supplier...  I think that gave me enough choice anyway haha!  Knocked up a quick test bracket to see how it might work?     Planning to drill this out to the diameter of the largest OD on the clutch cable and slotting the clutch fork to accept the end of the cable. The bracket will be bolted to the gearbox. Need to get hold of an M10 x1.25mm tap set (hopefully its Dez to the rescue here, thanks bud) so I can mount this and see how it operates. Need to crack on anyway. Have a few mornings next week which I need to cram with jobs so I can start addressing the fuel system, intercooler and rad (need to order this intercooler too :/ ) Then brakes! I am loving it, I'm just feeling like it's always "Ah, I'm going to do this today... damn, I need to order/buy these" I wish I were able to see what was needed beforehand so I could have everything there ready. For instance, fitting the swirl pot, and fuel pumps to the fuel system I'm sure will take me five times longer than it should as I'll be plumbing it all in and realise I need so-and-so etc Still... it's going to look amazing... and I'm going to take it up Prescott!  Thanks all! Help or feedback more than welcome! Keep your eyes out as I may be doing a "Car Prep BBQ Weekend" when it's ready for a coat of paint  |
| |
Last Edit: Mar 19, 2011 1:48:26 GMT by Diabolu
|
|
bstardchild
Club Retro Rides Member
Posts: 14,971
Club RR Member Number: 71
|
|
Mar 19, 2011 10:01:04 GMT
|
|
Is that a pull clutch arrangement or a push clutch arrangement?
I'd better explain
Did the little slave cylinder push the clutch arm to operate the clutch or pull it towards itself
It looks to me like you are trying to make a cable push
|
| |
|
|
|
|
|
Mar 19, 2011 15:08:27 GMT
|
|
The slave cylinder pushed the arm, but from the other side. This is a cable pull from the rear.
|
| |
|
|
The Doctor
Club Retro Rides Member
Posts: 3,449
Club RR Member Number: 48
|
|
Mar 19, 2011 15:58:47 GMT
|
i don't know how much space you have on the other side, but on a car i worked on before which had a cable clutch and a hydraulic box, they made a little pivot device thing on the bolts the slave cillinder was bolted to and fitted the cable at the top, which in it's turn pushed the clutch arm. i hope that does make any sence at all...  On my car i chose to go hydraulic right a way, even though it's not easy to do, converting the cable to operate the box isn't easy either. |
| |
|
|
|
|
|
Mar 19, 2011 17:02:48 GMT
|
That may be the way I'm going to have to go Thomas as I'm still not convinced I'm going to have enough length to get around the back. We'll see, but could u perchance dig some pics out of that pivotted system u talked about?  Chris |
| |
|
|
|
|
The Doctor
Club Retro Rides Member
Posts: 3,449
Club RR Member Number: 48
|
|
Mar 19, 2011 17:42:21 GMT
|
|
no, sadly not! I did an engine swap on that car, and didn't take a picture of it.
According to the owner it worked perfect.
|
| |
|
|
|
|
|
Mar 19, 2011 17:47:05 GMT
|
Would u mind whipping up a sketch?  Really interested in how you did the pivot. |
| |
|
|
The Doctor
Club Retro Rides Member
Posts: 3,449
Club RR Member Number: 48
|
|
Mar 19, 2011 19:02:40 GMT
|
i've tried, but my drawing skills are laughable!   together with the adjustable rod and the holes in the pivot arm, a decent setup could be made, so it all worked like it should  But for my own car i still went for the hydraulic route, and if you've got clearance for a clutch master, i'd do it like that. I must say that drilling a big hole in my firewall was scary! And my space was very, VERY tight! |
| |
Last Edit: Mar 19, 2011 19:04:07 GMT by The Doctor
|
|
|
|
|
Mar 19, 2011 19:16:18 GMT
|
Got it! Thank you! much more simple than I had in my head  |
| |
|
|
|
|
|
Mar 19, 2011 22:25:00 GMT
|
just convert to hydraulic you big girls blouse  |
| |
|
|
|
|
|
Mar 19, 2011 22:52:36 GMT
|
|
Break it down for me bro, what would I need? And would any hydraulic pedal box work?
|
| |
|
|
|
|
|
Mar 19, 2011 23:10:31 GMT
|
|
a master cylinder the same bore size as the starion, a length of braided hose to connect the 2, you could probably use your original clutch pedal and cable, remote mount the clutch cylinder with some jiggery pokery and have the master cylinder cable operated
|
| |
|
|
The Doctor
Club Retro Rides Member
Posts: 3,449
Club RR Member Number: 48
|
|
Mar 19, 2011 23:12:54 GMT
|
or just convert your own pedal! Only thing you have to know/measure is the distance the piston in the clutch master needs to travel and then decide where on your pedal it's giving that travel. Then drill a hole in the firewall where the cillinder needs to go and adapt pedal to the clutch master (in my case, weld a little bracket on and drill a hole in it for a bolt to go through).  Then lay the hardline to the side the clutch slave sits and do the last bit in a proper flexi hose. |
| |
|
|
|
|
|
Mar 19, 2011 23:23:08 GMT
|
|
What master cylinder did you use Thomas? Are they fairly generic?
|
| |
|
|
The Doctor
Club Retro Rides Member
Posts: 3,449
Club RR Member Number: 48
|
|
|
|
|
i bought a new one for an old Celica, which goes with the slave cylinder which i needed for my gearbox. So in your case, i'd go for a Starion (or similar) master. Or just look up what size bore they use and find one which is similar.
You need to make it fit to the car anyway, so it doesn't really matter what cylinder you get, if the bore size is correct.
|
| |
|
|
|
|


 Quick flip round and weld back in. The tunnel is curved but doesn't narrow at all.


