Seth
South East
MorrisOxford TriumphMirald HillmanMinx BorgwardIsabellaCombi
Posts: 15,543
|
|
Sept 3, 2007 22:41:12 GMT
|
Can you send me some of your enthusiasm through the post? I need to get back out into the workshop before the escort starts rusting again ;D I just want to be driving this damn car again! Get to it dude! Or come over here and feed off my enthusiasm on my car  I couldn't do anything noisy today but got on with removing various bits and pieces that need to be out of the way for the engine and box to come out. I also won an MGB Prop and gearbox crossmember on Ebay that should come in useful for getting the O/D box in. Total cost, £4.19 ;D I need to take the old O/D box I got from Mr RevD apart to use a couple of bits in the new one. I ought to get that done soon so I can basically pull the old engine and box out and have the new one ready to bolt in almost straight away, after a bit of engine bay tidying and gearbox mount mods. Still lots to do.... |
| |

Follow your dreams or you might as well be a vegetable. |
|
|
|
|
|
|
Sept 4, 2007 19:48:11 GMT
|
|
Looking good! How long until it's on the road & cruising around again? ;D
|
| |
|
|
Seth
South East
MorrisOxford TriumphMirald HillmanMinx BorgwardIsabellaCombi
Posts: 15,543
|
|
|
|
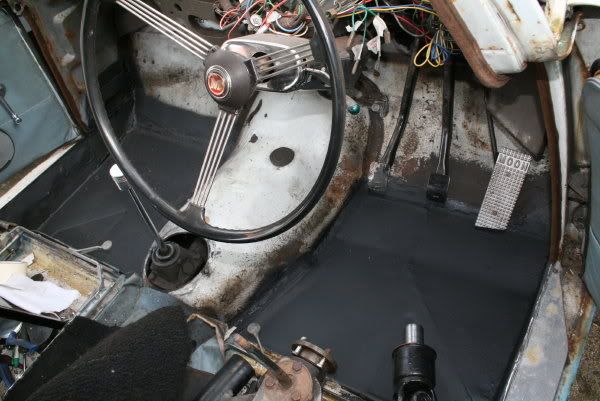
Yay, more progress! I'm still plugging away. Strangley I'm quite enjoying doing it in the full knowledge that it will get done and the car will drive once more. Here's the floor panel at the trimming and bending stage, fixed down with a few self tappers into the chassis rails/outrigger. These holes would be filled when welding.  Here's a shot of me forming the depression in the panel as I tried to describe on the previous page. This is kind of unnecessary but I am able to spend time doing this kind of thing in the shed more often than I can get time on the car itself so I figure I may as well do a good looking job. Thanks to Brian D for sending me a couple of photos of his floorpan so I could confirm the shapes involved!  Yesterday I finally got it in! No in progresss shots but you can see the lines of plug welds and it was butt welded to the remains of the original panel near the trans tunnel.  While waiting for paint to dry etc I did a bit more cutting on the other side too. I also took the dash right out a couple of weeks ago.  That's because I have this lot to look forward to yet at the back corner of the engine bay....  Its pretty much all simple rectangles so I don't feel fazed as it'll be easier than the floor just a bit more fiddly. Access is going to be tricky too.... |
| |

Follow your dreams or you might as well be a vegetable. |
|
Ruki
Part of things
 
Posts: 480
|
|
|
|
|
Looking good
|
| |
|
|
tofufi
South West
Posts: 1,462
|
|
|
|
Looking good, bet you can't wait to get it on the road again  I'm still undecided on the flames, thought it looked good without em but I definitely love everything else  |
| |
|
|
|
|
|
|
|
|
Yeah maybe you're right, the race is on!!!
|
| |
|
|
Seth
South East
MorrisOxford TriumphMirald HillmanMinx BorgwardIsabellaCombi
Posts: 15,543
|
|
Oct 11, 2007 19:59:47 GMT
|
|
|
| |

Follow your dreams or you might as well be a vegetable. |
|
tigran
Club Retro Rides Member
In rust we trust. Amen.
Posts: 6,444
Club RR Member Number: 142
|
1970 Morris Oxford - 20/9/24 - tigran
@tigran
Club Retro Rides Member 142
|
Oct 11, 2007 20:44:32 GMT
|
|
wo0t indeed dude. Can't wait to see this thing blatting about, and down the ace STAT.
|
| |
1964 Rover P5 i6
1987 BMW 525e - The Rusty Streak
1992 Micra K10
2001 BMW E46 316i
2002 BMW E46 330Ci
2013 BMW F31 320d
2018 BMW G31 530d
|
|
|
|
|
Oct 11, 2007 20:52:07 GMT
|
|
Very nice!!!
|
| |
|
|
|
|
|
Oct 11, 2007 21:43:34 GMT
|
YEE and indeed HAW!!!Respect is due...it won't be long now!!! 
|
| |
|
|
|
|
Seth
South East
MorrisOxford TriumphMirald HillmanMinx BorgwardIsabellaCombi
Posts: 15,543
|
|
Oct 11, 2007 21:53:34 GMT
|
...it won't be long now!!! Err, it probably will, lots more to do but this is a nice hurdle to have jumped  |
| |

Follow your dreams or you might as well be a vegetable. |
|
sav
Part of things
 
Posts: 842
|
|
Oct 11, 2007 22:27:07 GMT
|
Nice work there Seth, looking very tidy in the old footwells now.  Good luck with the next lot of jobs. |
| |
|
|
|
|
|
Oct 12, 2007 11:36:48 GMT
|
Some great work going on there Seth - again, I can't wait to this car on the road again - not having ever seen it in the flesh (as it were) And constantly been teased by your banner picture  It funny how this forum constantly throws up ideas which often co-inside with a tempting opportunity to fullfill them... last week it was Pog's 318 this week its a lovely white (old english?) Oxford thats for sale in a local garage  Thing is to try & stay focused on what I am lucky enough to own & to actually carry out the plans I have for my car rather than just 'flit' between one incomplete project to another  For me Seth's car is worth so much more than the sum of its parts & is what true Retro motoring is about - this Oxford could tell so many stories of its life before Seth's ownership, but its what you've been through & what you've done with it over the years that makes it individual & special... its like the Beach Boy's 'Bessie' - but hopefully it will end up being Seth's 'Cherry' Coupe ;D PS; loving the little Kustom 'Quirks' that you have done over the years - like the front valance, headlamps, lowered bumper etc etc - they really do change the whole attitude of the car without being obvious  |
| |
|
|
Seth
South East
MorrisOxford TriumphMirald HillmanMinx BorgwardIsabellaCombi
Posts: 15,543
|
|
Dec 21, 2007 12:28:03 GMT
|
Ho Hum. I've made some more progress on the rear passenger side floor/chassis section but the weather and other circumstances meant that's ground to a halt a few weeks ago  I said to myself earlier in the year that once it got cold & wet I ought to get on with the disc brake conversion which can be done in the relative shelter of the shed. So this week I got on with it! Here's the complete MGB crossmember I bought a couple of years ago. 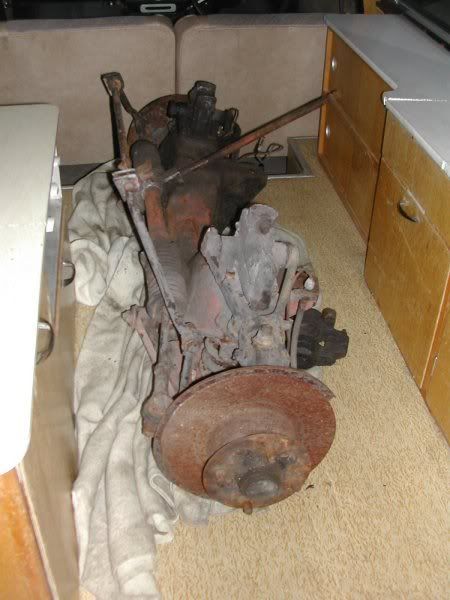 I dismantled the whole thing to make it easier to store, sold off a few bits and established which parts I was going to use and what I needed to replace (discs & calipers obviously!) My plan is to use the MGB upright adapted to suit the Oxford's wishbone. Here are the two uprights (king pin & stub axle) together, MGB one at the top. 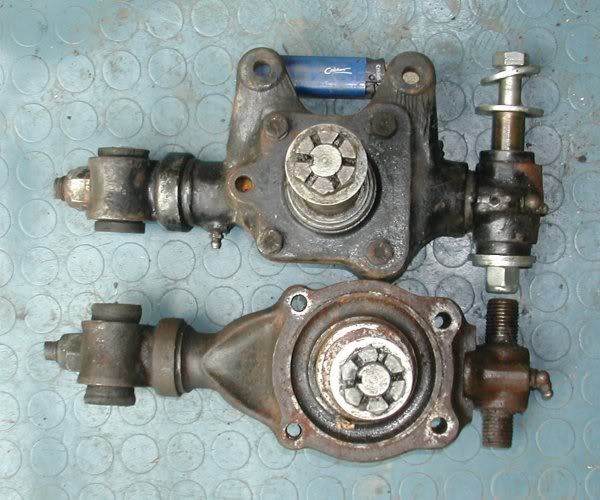 Result! The MGB one will actually act as a "dropped spindle" and lower the car some more!  I have also looked at the king pin/stub axle angles as I had been warned the geometry gets all messed up when doing what I plan. It appears as though the MGB assembly will result in the camber going 3 o positive but in my case (as the car is so low and there's quite a bit of neg camber) this could actually straighten things up. I have other plans to deal with it if becomes a problem. Heres a bare Oxford king pin and wishbone (parts gratefully supplied by pid363 for playing about with purposes  ) 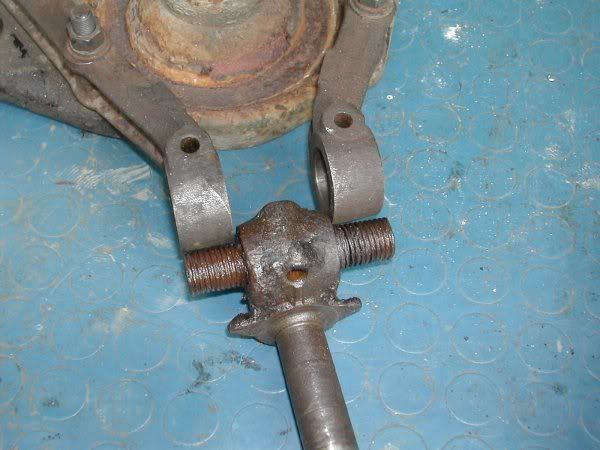 The MGB wishbones are thin pressed metal as opposed to forgings and as a result the kingpin boss is much thicker as below. 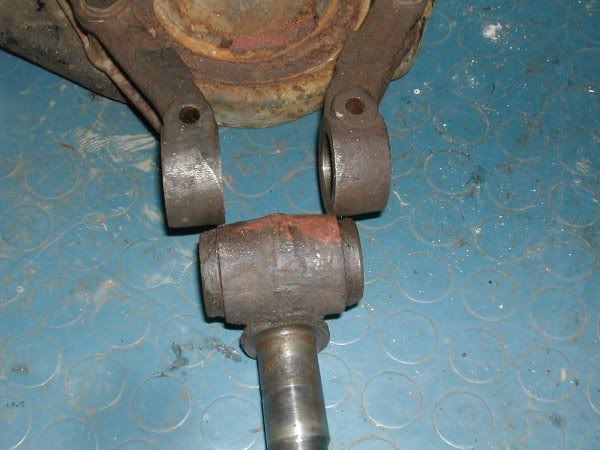 Also the MGB one uses a simple 1/2" bolt to fix KP to wishbone so I spacers are needed to fit a bolt to the Oxford wishbone. SO this lead me to play with the lathe this week. The old one on the left is the original Oxford fulcrum bush. 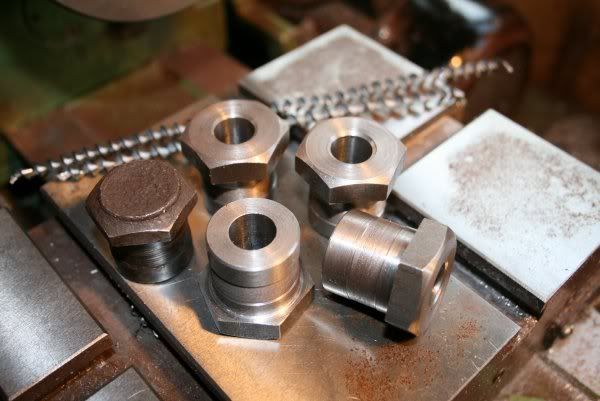 I was going to bore the centre of these eccentric by a couple of mm but calculated that would only give me +/- 1/2 o of camber so not really worth the hassle. The bushes are a close fit to the wishbone and are reamed .501" to fit the bolts nicely. I've also milled one of my MGB kingpins down to the same thickness as the Oxford one. Its actuallly a worn KP nut I thought I'd better check this out wiht old bits before taking the cutting tools to new parts  Order from top is std Oxford, Std MGB, machined MGB. 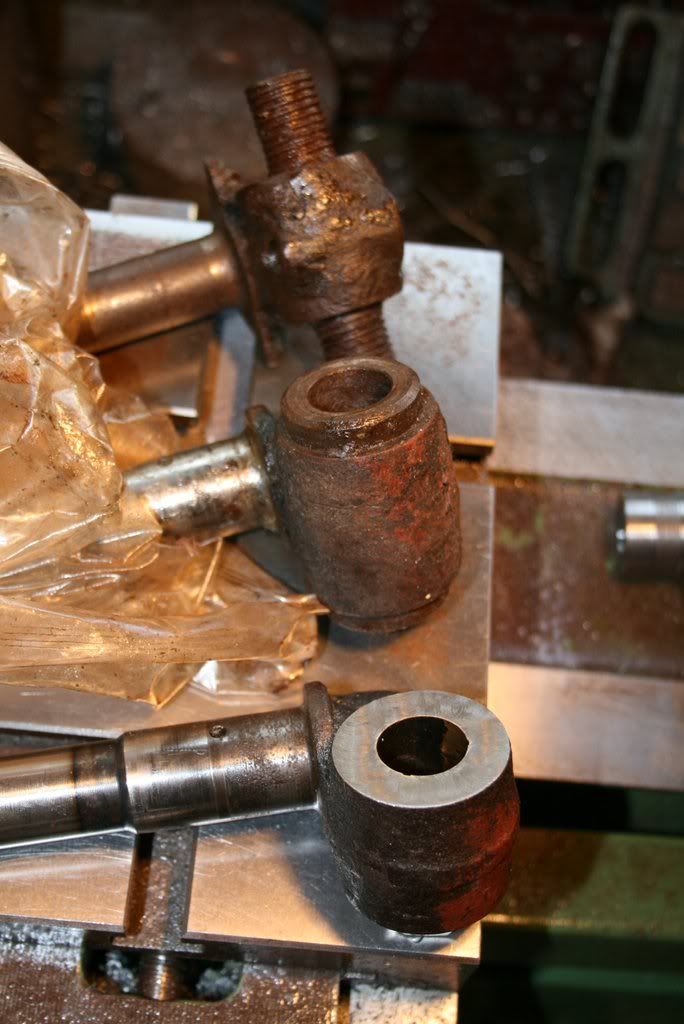 So that's where I've got to. I need to make a pair of thrust washers per side (probably from bronze which I'll pick up at the Ally Pally Model Eng show in Jan. Then I can start putting bits together  |
| |

Follow your dreams or you might as well be a vegetable. |
|
sav
Part of things
 
Posts: 842
|
|
|
|
Ah ha, I was wondering when you were going to make a start on this Seth.  Will be following this with great interest, although the chances of replicating it myself will be very slim. I've been looking into other possibilities but not sure what way to go at the moment. |
| |
|
|
|
|
|
|
|
|
Owe you an apology Seth,
Missed this one completely!!!
Just read it all the way through and am now up to date.
Nice one mate it´s looking good.
May see it next week? ;D
Dave
|
| |
|
|
|
|
|
|
Seth
South East
MorrisOxford TriumphMirald HillmanMinx BorgwardIsabellaCombi
Posts: 15,543
|
|
Dec 22, 2007 17:39:53 GMT
|
Ah ha, I was wondering when you were going to make a start on this Seth.  Will be following this with great interest, although the chances of replicating it myself will be very slim. I've been looking into other possibilities but not sure what way to go at the moment. Sav, and since StealthyMatt asked, assuming it all works out then I will be happy to make and modify the bits for others but probably won't "market" it as such. Pid363 is first on the list as he's helped me out by lending me the various bits to play with so I haven't needed to strip my car apart.  This is one of those conversions that has been carried out numerous times on farinas in the past but the details have never really been published in the club mag or anywhere else. Hopefully I will change that.  Oldbus, no worries, I don't update it often  |
| |

Follow your dreams or you might as well be a vegetable. |
|
sav
Part of things
 
Posts: 842
|
|
Dec 22, 2007 17:53:10 GMT
|
Understand what you mean Seth, look forward to see how this goes.  Details on previous modifications and conversions have indeed been poorly documented so it is a good opportunity to set that right. Using the MGB parts has got to be the best solution for the future. Farina front brake parts are pretty expensive, and not the easiest to source now it seems. |
| |
|
|
|
|




 Thing is to try & stay focused on what I am lucky enough to own & to actually carry out the plans I have for my car rather than just 'flit' between one incomplete project to another


 Order from top is std Oxford, Std MGB, machined MGB.

