|
|
|
|
|
Back to the regularly scheduled program... We already talked about the corner pieces.  They obviously had to be replaced, but as far as I can tell, nobody makes repair panels for that. So I made my own.   Trimming to fit.  Welded in. 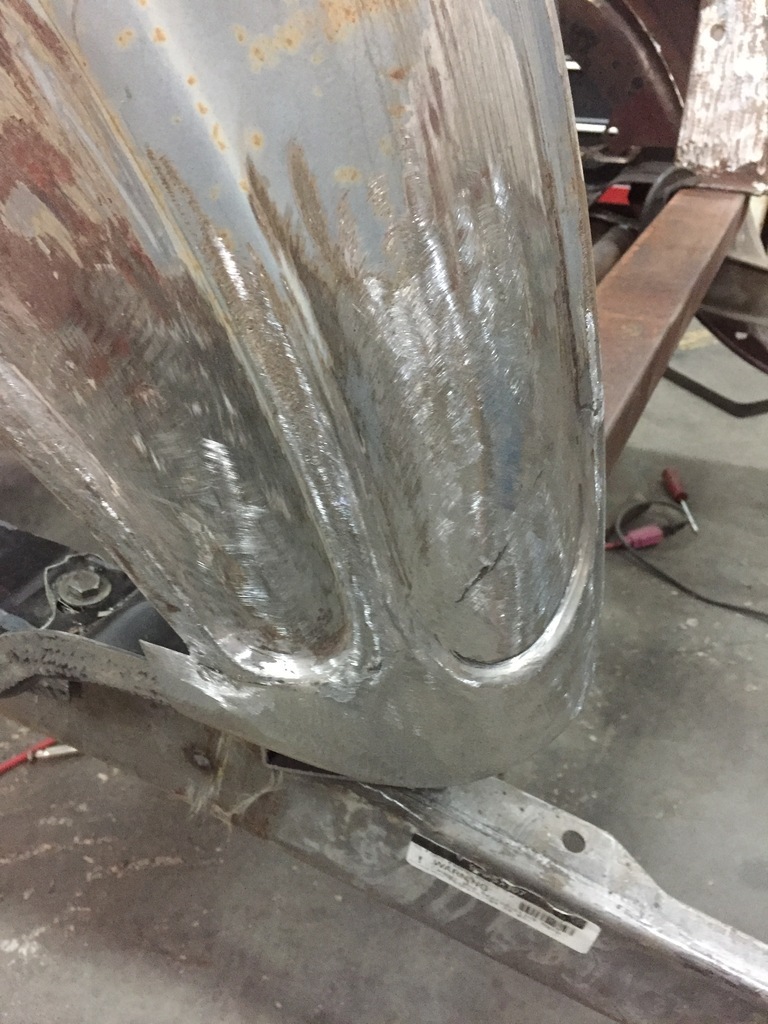 |
| |
|
|
|
|
|
|
|
|
|
Inner rear wheel well.   Tacked in place.  And another patch panel.  The inside.  |
| |
|
|
|
|
|
|
|
The other side is next.   Its in much worse shape than the other side.  My guess it that the car got hit at some point, on the right rear fender. There doesn't seem to be any direct impact damage to the rear or the 1/4 panel, but it is all out of alignment. The fender then got removed, but the damage it transferred into the main body stayed.  More later... |
| |
|
|
braaap
Posted a lot

Posts: 2,597
|
|
|
|
Very interesting tutorial, thanks a lot for the effort! I was wondering, wouldn't an extra cut where the warp is be helpful to get control back over the warped area? Like this:  I'm not really good at welding thin sheet metal, I often ended up burning holes in old sills and then chasing and trying to catch them over the sill trying to shutweld them again resulting in very ugly welding. So when ever the rear surface is accessable (so unfortunately hardly with sills) I use a flat piece of copper. E.g. when welding up a small hole like for wipers or aerials (so a lot smaller then Your shown hole) I do not use extra sheetmetal, only the extra welding wire material to close the hole. This may effect the penetration as there is not really much material below because the copper was stopping it (in german we call it the Schweiss-Wurzel (= translated into english: the weld-root, I don't know the correct term). But it's usually enough since You do not connect two sheets of metal, just one and the same with a wide weld spot.  I'm also sometimes worried when I don't have access to the background of the welding area, that I hardly can do any rust protect methods. But then I'm not a restorer so far or keep my cars long enough, so I hardly ever notice when a rust hole comes back one day because of that.  |
| |
Last Edit: Dec 4, 2022 8:40:39 GMT by braaap
|
|
|
|
|
|
|
|
Very useful demonstration. Thanks for taking the time.
Seems like there are nearly as many ways to do this kind of thing as there are welders.
I'm off to weld some ugly patches directly over rust holes on my car now!
|
| |
Last Edit: Dec 4, 2022 9:09:05 GMT by horrido
|
|
|
|
|
|
|
Thanks guys. braaap, the area you put the green line on wasn't that bad. I was able to make it a lot better by hammering ( with a regular, very slightly domed body hammer ) into a rawhide hammer used as a dolly. The worst area was straight down from the middle of the hole. And there was a lot of trauma in the metal from previous efforts by people in the past. Forcing it would have more than likely damaged the bead that runs around the fender. So I left it alone until the area had more rigidity. But yeah, sometimes a relief cut is the only answer. Kind of a last resort, though.... |
| |
|
|
|
|
|
|
|
|
Thanks very much for showing how you carry out a flush panel repair, very interesting,
It's shown me that a mistake I've made previously is that I (used to) make my patches too tight with no gap thus affecting the weld penetration, something I'll work on in the future,
Nigel
|
| |
BMW E39 525i Sport
BMW E46 320d Sport Touring (now sold on.)
BMW E30 325 Touring (now sold on.)
BMW E30 320 Cabriolet (Project car - currently for sale.)
|
|
teaboy
Posted a lot
Make tea, not war.
Posts: 1,941
|
|
|
|
|
This kind of thing is never boring to me, I like to see how people do these repairs.
It is either an opportunity to learn something or maybe get confirmation that one is doing the same sort of thing.
Thanks for the insight on how to do a very good job.
|
| |
|
|
|
|
|
|
|
|
|
Thanks for the tutorial. Massively appreciated. And lesson learned is that a gap is vital when welding. I usually just blunder along, fixing or fuxing it as I go along. This patch though……. Enough to make me emotional on a bad day. Your work really is of a level I can aspire to. |
| |
Last Edit: Dec 4, 2022 10:42:27 GMT by grizz
|
|
|
|
|
|
|
|
|
|
|
|
Amazing work ...again! ... very useful tutorial thank you for posting ...👍
|
| |
|
|
|
|
|
|
|
|
I really appreciate the detail! It's obviously timely for me, but seeing it step by step is really helpful.
|
| |
|
|
|
|
|
|
|
|
Great skills on the patch. Do you ever use a joggle tool for this kind of thing? It tends to be my get-out-of-jail card for thin stuff, as you get another material thickness behind the weld.
|
| |
|
|
|
|
|
|
|
Thanks guys. dieselmax, I never overlap outside sheetmetal. The step in the patch and the overlapping seam make the area too stiff to bodywork ( hammer and dolly work). And unless you only tack it and leave it like that, the warp isn't any less ( possibly even more). I do use it a lot for area's that are not going to be bodyworked, like trunkfloors, etc. |
| |
|
|
|
|
|
|
|
|
Brilliant. Thanks for the detailed tutorial.... Really helpful 👍
|
| |
|
|
|
|
|
|
|
|
|
The quarter panel needed more work too. But the patch ( patches...), are all tacked in.   And I got the inner wheel well in ( tacked ), with a nice transition into the lip on the 1/4 panel.   |
| |
|
|
|
|
|
|
|
I'm getting close to redoing the roofchop. But to do that, I want the rear bulkhead in to strengthen the body. Before I do that I should build the rear suspension. And to set the pinion angle on that, the engine & gearbox have to be in. So I got the engine out of the shed, and started to mock up the parts on it.  The supercharger was on this engine before, but it was mounted off a Ramhorn exhaust manifold. And now the engine has headers, so that is different. Also, the car will get airconditioning, so I need different pulleys ( 1 more groove )to make it all work. So the blower will have to move forward by that amount. And I'm replacing the Blow Through Holley with 2 Blow Through Dellortos, so all the plumbing and linkage will be different.  |
| |
|
|
|
|
|
|
|
This is about the rideheight it will get in the back.   My original plan was to use '35/'36 Ford rear wishbones. But to use those, for ease of mind, I'd wanted to re-enforce them with extra tubing and triangulation. Thinking about that ( and about the work involved ), it dawned on me to take a good look at '60/'72 Chevy truck rear trailing arms. They are strong ( they came on 1/2 ton and 3/4 ton trucks). They were used on Nascar racers for years, so they can be made to handle ( I believe they still use something similar, but now fabricated ) And they are available, repro, for reasonable money. I got a set of those. Over the years I've done a lot with leafsprings. But they are kind of a pain... It would be so much nicer to use coilovers on this car. But for the era I've chosen for this car ( mid to late '70s), they are not really right. To get the best of both worlds I will use just the coilover spring, without the coilover shock, mounted off the original place for the spring on the Chevy trailing arms. The upper platform will be adjustable where it mounts on the chassis ( with threaded sleeves Burton Power sells to convert McPherson struts ) That will give me all the adjustability of a coilover, without the too modern coilover look.... A set of regular shocks will mount behind the axle ( I went through my stash and found a Unused NOS set of Koni's that should work really nice ) The RHS lower shock mount will double as a Panhard bar mount. I spent some time mocking things up, and doing a lot of measuring. I think it will work nice...      |
| |
|
|
|
|


