adam73bgt
Club Retro Rides Member
Posts: 4,939
Club RR Member Number: 58
|
|
|
|
Cheers for the mention Adam, you know I love leccy things  I'm actually really chuffed we managed to sort that, such a simple fix that clearly the previous owner had given up on! No worries, its probably the thing I'm most chuffed about on the car so far  I really wish guys like you & curtis lived nearer to me! The methodical way you go about your repairs/modifications is wonderful to see. I probably speak for many down South, but I would rather pay you to fix some niggles than the inflated prices we havbe to pay down here for garages. ( I am about to put Wifes car in the garage to fix the OSR door. The opening linkage has come loose and fallen to the bottom of door!) Local guy is quoting up to £200 because I need it back same day. 
Your threads are so interesting to me because you clearly explain the thought process of each repair.
Keep it up! Aha thank you very much, it would be a dream to be able to do odd jobs on cool cars as a living but unfortunately with the speed I work at, I doubt I'd be particularly competitive on labour costs  Well since I'm here writing a reply, I can confirm the microswitch did do the job and the roof now retracts and raises on the switch for the princely sum of a couple of quid Heres a shot of the new switch just before I soldered it in  After I soldered it in, I took it to the car and tested it but it would only work when the arm of the motor was actually depressing the switch.. A quick swap of the wire to the other terminal saw the roof going up and down as it should When I have someone to hold a camera I will get a roof opening/ closing video up  So other jobs.. Exhaust MOT this Sunday (expecting welding) Tracking needs doing Head unit wiring needs sorting Need to get the aerial motor working Remove the alarm wiring (big job, in two minds about whether to tackle this now or not) Gauges need wiring in Wheels.. Have spotted some wheels on a popular auction site which would likely suit the 7 very well, I'm in two minds though, they're Work Equip 05's which are a classic look but I'm worried that they're a bit basic in design.  Plus walking away from the car the other day really made me appreciate the BBS, maybe if they were just a bigger diameter.. But then maybe I just need to be patient for the 'right' set of wheels to come along, I've got the other jobs on the list to sort in the meantime Much to ponder |
| |
|
|
|
|
Paul Y
Posted a lot

Posts: 1,948
|
|
|
|
Top work Sir! With regards to wheels I think your current choice is spot on. However.... The wheels on the white one do look rather superb. Please continue. P. |
| |
|
|
thebaron
Europe
Over the river, heading out of town
Posts: 1,657 
|
|
|
|
Plus walking away from the car the other day really made me appreciate the BBS, maybe if they were just a bigger diameter.. But then maybe I just need to be patient for the 'right' set of wheels to come along, I've got the other jobs on the list to sort in the meantime Much to ponder I think that's the move. OEM+ look on this will be a winner a la ....  |
| |
|
|
|
|
|
|
|
Plus walking away from the car the other day really made me appreciate the BBS, maybe if they were just a bigger diameter.. But then maybe I just need to be patient for the 'right' set of wheels to come along, I've got the other jobs on the list to sort in the meantime Much to ponder I think that's the move. OEM+ look on this will be a winner a la .... That's doing naughty things to my downstairs - looks awesome! |
| |
1995 BMW E34 525i Sport - Avus Blue on the outside, brown and crusty on the inside! 1998 BMW E36 328i Sport - Daily Commuter
|
|
adam73bgt
Club Retro Rides Member
Posts: 4,939
Club RR Member Number: 58
|
|
|
|
thebaron After seeing that photo... I think I'm sold!
|
| |
|
|
adam73bgt
Club Retro Rides Member
Posts: 4,939
Club RR Member Number: 58
|
|
|
|
That photo also reminds me I need to reinstate the TURBO II graphics on my front wings, I need to make a decision on what colour to go for those as well.. Antoher job for the list |
| |
|
|
vanpeebles
Part of things
I am eastbound in pursuit of a white Lamborghini, this is not a recording.
Posts: 978
|
|
|
|
Silver or gold on a red car |
| |
|
|
stealthstylz
Club Retro Rides Member
Posts: 14,926
Club RR Member Number: 174
Member is Online
|
|
|
|
|
Polished lips and red centres on a red car is the shizz.
|
| |
|
|
goldnrust
West Midlands
Minimalist
Posts: 1,880
|
|
|
|
The larger BBS do look awesome, but I'll just leave this here for you to remind you how awesome 5 spokes can also look... 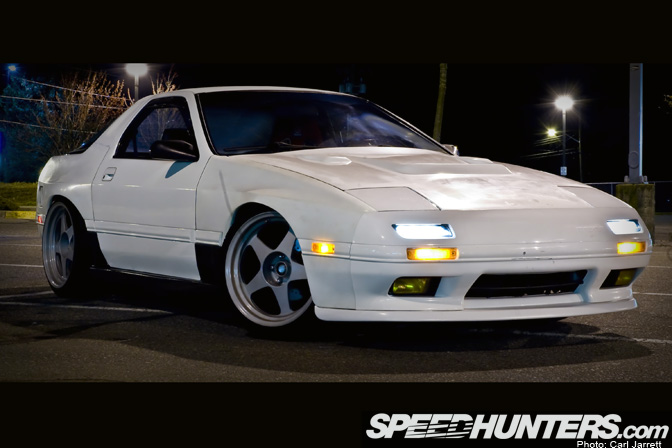 |
| |
|
|
adam73bgt
Club Retro Rides Member
Posts: 4,939
Club RR Member Number: 58
|
|
Jun 13, 2016 21:16:01 GMT
|
Well the big day came and went, I sat watching the 7 with baited breath  But in the end I got the all important bit of paper  So thats another 12 months MOT sorted! Got a few advisories to sort to add to the general list of jobs but pretty happy overall There was a couple of bits of corrosion which I largely knew about, advisory for pitted/scored discs (going to replace all 4 and the pads) and a front wheel bearing has a bit of play (worth doing both I'd guess?) Another 2 of the advisories were regarding the knackered exhaust which I of course knew all about On that note, I have finally got round to sorting out the main Y-pipe of the exhaust. Little before after shot as I was going over the exhaust with the wire brush  The Y pipe is stainless but as there was a lot of rust pitting on it, I've wire brushed it all back and given it a coat of VHT paint. I also gave the pre-silencer a quick coat (in a different colour VHT paint but its under the car so I don't care )  The Turbo/downpipe gasket has been delayed again so I'm hoping to get that this week. I think now that the MOT is sorted, I'll start work on removing the old exhaust and seeing where new hangers will be needed. I'll also be able to work out roughly where the wideband sensor will need to go. Something else that has become apparent is that the rear suspension seems to be hitting the bump stops fairly easily on small bumps, the suspension came from a coupe so the weight balance may be a bit different for the vert. They are stiffness adjustable so hopefully a little tweak should sort them out |
| |
|
|
|
|
|
|
|
Jun 13, 2016 21:18:44 GMT
|
I thought I recognised the garage and then spotted the clock. |
| |
|
|
adam73bgt
Club Retro Rides Member
Posts: 4,939
Club RR Member Number: 58
|
|
|
|
Update time, and this time its mostly wiring based. There's a few bits of bodgy wiring on the 7 which I'm not happy with so this will be the first of no doubt many attempts to sort it out First off was looking for this odd 'yellow wire' which appeared when I had the interior out to sort the roof motors. A quick look behind the panelling in the boot revealed this  Tapping into the power for the boot light, after a quick brainstorm sesh with Curtis we think it might be a power source for the old alarm. Anyway, I took it away and taped up the oem wire. I've pulled the yellow wire to the cabin for now, a bit more tracing work is needed to see where it comes out But anyway, the main job for me was to wire in the gauges.. Except I'd gone to my parents house and left the wiring for the gauges in Cov ¬¬ So the next job on the hitlist was to sort the wiring for the headunit This is what I started with  A mess, a mix of cut off wires with some still left on the original plugs as seen here  Now I could have just cut all the wires off and wired the relevant wires directly into an ISO plug but since the original plugs were there, I wanted to try and use them. So I started the time consuming job of teasing the pins out of the plugs, matching them up with the correct wires and soldering them together before putting them back in the plugs    Wasn't too difficult once I got the knack to it, then it was a simple case of plugging them into the 3 quid adaptor harness to plug the head unit in. Radio had power, and sound was coming out, also more surprisingly to me, the aerial works!!  Much like the roof, its possible to live without it but its a good feeling to have it working properly The only slight issue I have is that the rear door speakers don't seem to be playing sound. There was some non orignal grey speaker wire behind the dash, so next job will be tracing that back and seeing what other games someone has been playing with the wiring in the past! Tidier wiring pic  Also need to sort gauge wiring now I have the loom with me...  Aaaaand may have done a purchase..  |
| |
|
|
adam73bgt
Club Retro Rides Member
Posts: 4,939
Club RR Member Number: 58
|
|
|
|
Quick update on the wiring situation, now I'm back in Cov with all the wiring for the gauges to hand, I set about taking apart the dash to get them wired in  It all comes apart quite easily which is nice. First on my list of jobs was to get rid of the random second lighter socket that a previous owner had fitted. Still no idea why it was there but it had to go  Eugh Scotchlocks   One colour of wiring used  Why do such a bodgy job?.. Anyway, good riddance to it Next I turned my attention to the gauges themselves, armed with the wiring diagrams in front of me, I had a pretty good idea of which wires to tap into. On reflection I probably could shorten the wires to the gauges as its a bit excessive at the moment! but the key thing was making sure the gauges all worked Which it looks like they do! Obviously I still need to run the lines for the pressure sensor and wideband sensor to make those gauges work properly but all seems to power up as it should I've also managed to track down a wiring diagram for the alarm system, its in Dutch and a couple of the wires seem to be slightly different colour to what I've seen in the car, but it should be a good guide to help me remove the lot. I'm going to start with the alarm side of things first as it should leave the car operable, then I'll tackle the immobiliser side of things |
| |
|
|
The Doctor
Club Retro Rides Member
Posts: 3,441
Club RR Member Number: 48
|
|
|
|
if you need a translation from dutch to gibberish, just give a shout |
| |
|
|
adam73bgt
Club Retro Rides Member
Posts: 4,939
Club RR Member Number: 58
|
|
|
|
The length of this update will likely not do justice to the amount of time spent working in the car today. I am sick of the sight of wires, of the sticky fingers from aged insulation tape and of the foot well gymnastics required to reach difficult wires. But the upshot is that the old non-functioning aftermarket alarm and immobiliser are no more! And the best bit is, I almost did it by accident My plan for today was to take the door cards off to inspect the speaker wiring and see how I could make them work  But in doing so I got distracted and started by pulling through the wire which had been tapping into the boot light. After that, and armed with my wiring diagram (and google translate), I started to look more closely at the alarm wiring and how I might go about tracing it back and removing it The siren under the bonnet was one of the first things to go (pre removal pic)  A bonnet contact which I'd never noticed before was also removed  These things had to go too  I may pick up a non drilled cowl when one turns up The hardest bit was in the drivers footwell where the immobiliser tapped into the OEM wiring, here you can see the fuse box for the alarm system which was tucked up behind the dash  A lot of time was spent rectifying loads of these little splices (Mercifully not a single scotchlock in sight!)  Rubbish pic, but while looking at the wiring in the drivers door I noticed how there was an actuator on the door lock mech, which makes sense as the alarm came with a fob.  I've left it in place for now as remote central locking would be quite a nice feature to have. I'll have to see if I can make it work with a small remote locking module The end result of my endeavours  Not too bad for my first alarm removal I thought. I did test the car to make sure it would still run and it did so everything seems fine in that respect So a good chunk of useless wiring removed, a bit of weight saving and great piece of mind that the car has one less bodge in it Still didn't sort that stereo wiring though |
| |
|
|
|
|
|
|
|
|
You sir, are a saint! Well you must be with having been blessed with so much patience!
|
| |
96 E320 W210 Wafter - on 18" split Mono's - Sold :-(
10 Kia Ceed Sportwagon - Our new daily
03 Import Forester STi - Sold
98 W140 CL500 AMG - Brutal weekend bruiser! Sold :-(
99 E240 S210 Barge - Now sold
02 Accord 2.0SE - wife's old daily - gone in PX
88 P100 2.9efi Custom - Sold
|
|
adam73bgt
Club Retro Rides Member
Posts: 4,939
Club RR Member Number: 58
|
|
Jul 10, 2016 10:17:06 GMT
|
You sir, are a saint! Well you must be with having been blessed with so much patience! Haha it got to the point where I realised I'd cut so much wiring out that if I stopped, there was a chance the car might not start so I just kept on going. There was a point when I was upside down in the foot well trying to reach two wires spliced into the back of the fuse box where I did question my sanity mind haha Oh and I've still got to put it all back together still |
| |
|
|
adam73bgt
Club Retro Rides Member
Posts: 4,939
Club RR Member Number: 58
|
|
Jul 11, 2016 19:35:28 GMT
|
Just to finish off this drawn out update, the interior is all back together and after a bit of inspection of some wires behind the dash, I now have all the stereo speakers working Today I also did a little hose work to finish off plumbing the boost gauge in, no pictures of that but heres a pic of it at idle  (Yes I need to do a bit of filing to be able to get enough clearance to fit the fascia for the radio) Seems to move around as it should and reads the kind of boost levels I was expecting, I'll double check the hose connections after a while as the t-piece was a little on the small side but I've got a load of hose connectors somewhere so its easily fettled While I was under the bonnet I also had a go at a mod that was suggested on a forum where a restriction piece is removed from the lid of the airbox. Not sure how much difference it will really make but every little helps   Whats next? The big one is the exhaust. I've read more forum threads than I care to think about but I think I've finally got the full picture in my head of what I need to change to support the exhaust swap so I'm almost ready to tackle it The rear shocks need adjusting still but seem ok with just me in the car and an empty boot Wheels. Not really said much about the BBS RG-ii's I've bought but I think I'm gonna be getting into another home refurb job But at least they are in much better nick than previous wheels I've done so should be more straightforward. Currently thinking of colour combos for those before I get cracking Would be nice to get all those done before the end of July.. Or at least that can be the challenge I set myself |
| |
Last Edit: Jul 11, 2016 19:36:30 GMT by adam73bgt
|
|
vanpeebles
Part of things
I am eastbound in pursuit of a white Lamborghini, this is not a recording.
Posts: 978
|
|
Jul 13, 2016 12:11:15 GMT
|
Do you need a wireless with that rotary turbo up front? |
| |
|
|
adam73bgt
Club Retro Rides Member
Posts: 4,939
Club RR Member Number: 58
|
|
Jul 13, 2016 12:21:39 GMT
|
Do you need a wireless with that rotary turbo up front? The radio may get less use once the new exhaust goes on.... |
| |
|
|
|
|


 I'm actually really chuffed we managed to sort that, such a simple fix that clearly the previous owner had given up on!


 Why do such a bodgy job?.. Anyway, good riddance to it
