|
|
|
Sept 5, 2020 18:49:50 GMT
|
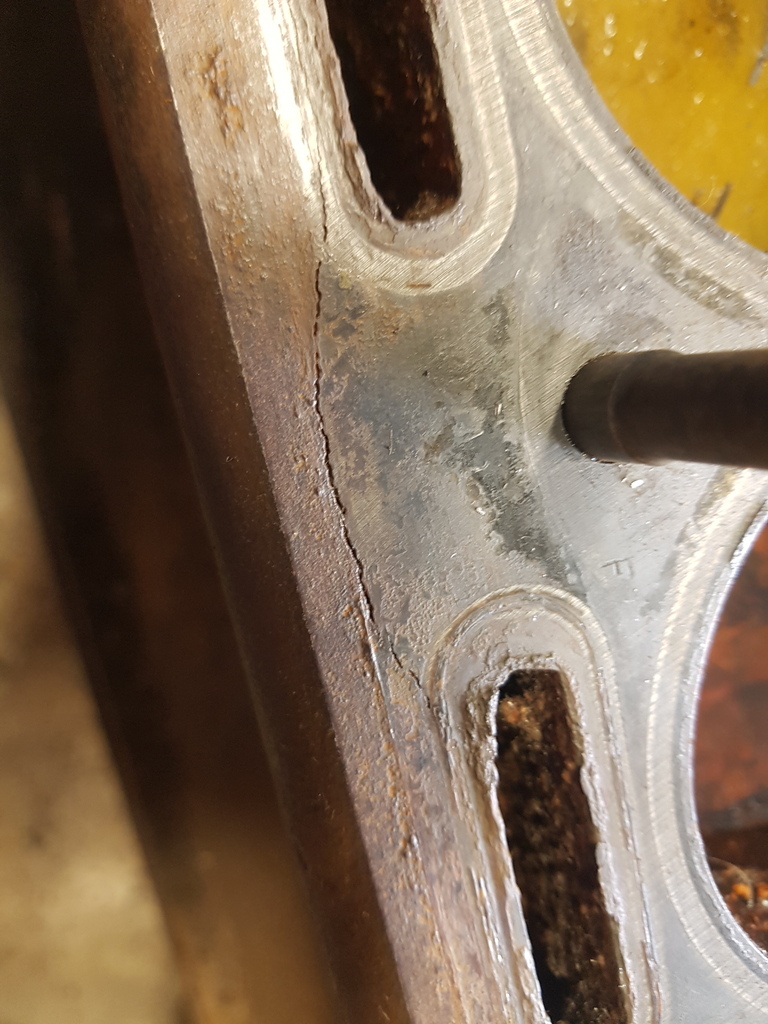
This morning I decided to start stripping the engine down to see what kind of condition it was in. It was seized, but I didn't know what was causing it. Oddly enough everything came apart easily. You hear horror stories of heads refusing to move on XK engines but this came off really well. What it revealed not as good though. Water in 3 of the bores, inch thick goo on the other pistons, and 2 stuck valves. Not to worry I thought, it's all fixable. So I cleaned it up and then found this -  Balls. Anyone know if a cracked block like this is repairable? I really want to keep the original block if I can. I heard the horror storied of people struggling to get heads off XK engines too but i've had four off so far and all of them have been fine (a 4.2, two 3.8's and a 2.4). There was a lot of discussion about repairing blocks on the Temptress thread on here which might be worth looking at, if its definatley the original engine its probably worth looking at getting it repaired but if it can't be done or its too expensive a second hand block/engine would be easy enough to source (although quite pricey!).
I'll have a look on the Temptress thread and see what's what. It's definitely the cars original engine, and the engine and head numbers match too so I'm keen to keep it together and get it fixed if I can. |
| |
|
|
|
|
eternaloptimist
Posted a lot
   Too many projects, not enough time or space...
Posts: 2,578
|
|
Sept 5, 2020 19:05:30 GMT
|
|
That should be repairable.
|
| |
XC70, VW split screen crew cab, Standard Ten
|
|
|
|
|
Sept 5, 2020 19:54:36 GMT
|
That should be repairable. Do you think it'll weld? I really want to keep this engine. |
| |
|
|
eternaloptimist
Posted a lot
   Too many projects, not enough time or space...
Posts: 2,578
|
|
Sept 5, 2020 21:04:33 GMT
|
That should be repairable. Do you think it'll weld? I really want to keep this engine. Might be worth getting in touch with these guys, based in Measham.  |
| |
XC70, VW split screen crew cab, Standard Ten
|
|
|
|
|
Sept 7, 2020 11:18:49 GMT
|
|
JSWL also do metal stitching. I saw far worse damage repaired successfully when I worked there. That is a 'nice' failure because it is on a machined surface for the stitching is easier to carry out compared to on a cast face.
James
|
| |
|
|
|
|
|
|
|
JSWL also do metal stitching. I saw far worse damage repaired successfully when I worked there. That is a 'nice' failure because it is on a machined surface for the stitching is easier to carry out compared to on a cast face. James Would that be Jim Stokes Workshops? Just want to make sure before I email the wrong people. Cheapest quote so far is £1170 for stitching or £2020 for welding, however the welding would apparently need a lot of machining work on all of the faces/bores/bearing surfaces afterwards due to the pre heat fusion welding. |
| |
|
|
|
|
|
|
|
|
Jim Stokes, yes. Stitching would only need the fire face skimming and would certainly be my preference over welding.
|
| |
|
|
|
|
|
Oct 28, 2020 12:56:25 GMT
|
I'd like to say there has been progress on the Mk1 lately, but a combination of work, dark nights, bad weather, Coronavirus and the fact the car is 6 miles from where I live in a garage without power means not that much has been done. I am still collecting rare Mk1 parts as and when I find them though, and this is the latest -  A lovely condition grill, with all the mounting studs in place. I do have a plan to make some progress over winter, but space is very limited at home too, with the 3 bikes in the already small garage, but I'll see what I can do. |
| |
Last Edit: Oct 28, 2020 14:12:18 GMT by Phil2600s
|
|
|
|
|
Oct 28, 2020 14:14:41 GMT
|
|
keep plugging away when you can, we all want our cars done and sorted but this year in particular has been tough just leaving the house.
Speaking from experience my cortina was 90 miles away from me for 6 years so with limited time and a tiny amount to spend I did as much as I could over weekends and as frugally as I could and just have enough to eat!
|
| |
1966 Ford Cortina GT
2018 Ford Fiesta ST
Full time engineer, part time waffler on Youtube - see Jim_Builds
|
|
|
|
|
|
|
With the announcement of the second lockdown I realised I need to make sure I can still work on the car in some way. Currently it's in a garage 6 miles from my house, and although it's within electrical extension reach from my parents house, it's not exactly essential travel or a good idea to see my already ill parents. So, what to do....  Remove the subframe! So that was today's task. It wasn't too difficult with only around 8 bolts, 2 flexi hoses and the lower steering column. I can now strip this in the garage at home, clean and replate all the bolts, and send the big bits for powdercoating. With a little work over winter I should have a nice chunk done! |
| |
|
|
|
|
|
|
|
Nov 10, 2020 12:52:12 GMT
|
So shortly after the last update the wheels were removed from the subframe, and the whole lot was manhandled into the back of my car and taken home. I think this was Wednesday evening? Since then I've spent an hour or two here and there and managed to get the complete subframe stripped down. There are still a few bushes and bearings to press out, and the steering assembly to strip but the suspension is now ready to go for blasting and powdercoating.   Everything came apart really well, only one snapped bolt on the whole assembly. I better start buying parts! |
| |
Last Edit: Nov 10, 2020 12:54:32 GMT by Phil2600s
|
|
|
|
|
|
|
I've not worked on the Jaguar for a month or so now, to be honest I felt (and still feel) a little overwhelmed by the amount of work needed, frustrated by a lack of progress and expense of pretty much every part, especially the Mk1 specific ones. I have to admit, I considered selling the car. Luckily, I managed to snap out of it a little and some small progress has made me feel a lot better. I guess the trick from now on will be to make whatever progress I can, however small as its all part of the restoration and will add up to a finished car. So, first up was to buy an engine stand capable of holding the XK lump, assemble it and after buying some long high tensile 3/8 unf bolts, get it mounted.  Then it was time to drain the sump, something I've wanted to do for a while now as I knew from the top end strip that a lot of water had made it's way in there. I have a video of this but essentially it was 3 or 4 litres of water then some horrible grey gunge. I left it tilted on the stand overnight to drain as much as possible. Tonight's job was to get the sump off and start to remove all the con rod bearing caps. This was easier said than done as the crank won't rotate, and each bolt has a 1/2 castellated nut and a split pin. After removing the oil pump and pickup to ease access I got there in the end. Lastly I knocked down all the lock tabs and removed the main bearing caps.  The sump looks pretty grim and will want a really good clean and out before re-using it.  So that's it for now, hopefully by this weekend I'll have the timing cover off and the crank out, then I can attack those pistons. |
| |
Last Edit: Feb 4, 2021 22:49:15 GMT by Phil2600s
|
|
stealthstylz
Club Retro Rides Member
Posts: 14,960
Club RR Member Number: 174
|
|
|
|
|
Hopefully the damage isn't too bad, try looking for mobile stitching for the crack, it's not a unreasonable quote you've had but you might get it a bit Cheaper. Oversize pistons are surprisingly cheap for these, Mahle do some nice ones for less than 400 quid. You could also find some 3.4 XJ con rods as they're a bit stronger, iirc they're the same pin sizes. Before you buy pistons etc take the block to a machine shop and get them to bore 15 thou out of the worst looking cylinders to check if they clear. If they don't it might need re-sleeving in which case you might get away with reusing the old pistons if they're in useable condition.
|
| |
|
|
|
|
|
Feb 10, 2021 19:15:50 GMT
|
Great news, a few hours of hard work, swearing and hitting things with hammers and all 6 pistons are out! The block is now completely stripped and ready to go for dipping, cold stitching the crack, a light skim on the head surface and a +60 overbore. The bores actually don't look bad at all, way better than I thought they would. A couple of the rods are scrap though, so a new set will be ordered and balanced with the whole rotating assembly. I'm not sure if one place can do all that, or if I'll need to get it dipped first then sent off for the repair and machine work. Still, it's good progress!  |
| |
Last Edit: Feb 10, 2021 19:17:07 GMT by Phil2600s
|
|
stealthstylz
Club Retro Rides Member
Posts: 14,960
Club RR Member Number: 174
|
|
Feb 10, 2021 20:39:51 GMT
|
|
What's up with the rods?
|
| |
|
|
|
|
|
Feb 10, 2021 20:54:20 GMT
|
The pistons come out through the top on an XK engine, and unfortunately in the process of taking a couple of them out I've marked a couple of the bearing surfaces on the rods. |
| |
Last Edit: Feb 10, 2021 20:54:49 GMT by Phil2600s
|
|
stealthstylz
Club Retro Rides Member
Posts: 14,960
Club RR Member Number: 174
|
|
Feb 10, 2021 21:13:50 GMT
|
|
How badly marked? You can get away with it to a degree if the housing is honed to remove high spots.
|
| |
|
|
|
|
|
Sept 22, 2022 18:22:39 GMT
|
|
|
| |
|
|
|
|
|
Sept 23, 2022 8:03:41 GMT
|
|
It certainly looks a lot better now doesn't it. The engine alone looks like it's had a lot of money spent on it. I wonder how they sorted the crack in the block.
I'm happy that the car has had a good amount spent on it and is now easily out of the dangerous banger territory it was once in. It was pretty clear from early on I couldn't do the car the justice it deserved, I'm just glad someone else has and hopefully will continue too.
|
| |
|
|


