sowen
Club Retro Rides Member
Posts: 2,245
Club RR Member Number: 24
|
|
|
|
|
The favoured option at the moment subject to measuring the space available is to dig out a little bit of my front garden, roll it in, and remove the wheels (or axles entirely) and let it down so the bed would be level with my drive. The hitch could come off too. Then just build up the garden 'stuff' around it and use it as a regular car parking spot.
It's been parked across the bottom of my garden since the summer. I was hoping it could live in the carport I built but the logistics of that are presently impractical and with the continuous rainfall we're getting I've churned up half the garden dragging it out!
I did briefly think of splitting the bed from the chassis so it became manageable lumps to tilt onto it's side for storage, but lack of firm level ground means that's a non starter
I don't really want to sell it as it's been really useful the couple of times I've used it and it's one of the few things left that I bought and fixed up with my passed dad.
|
| |
|
|
|
|
sowen
Club Retro Rides Member
Posts: 2,245
Club RR Member Number: 24
|
|
|
|
|
I have an old Brian James tiltbed trailer, for many years it's been sat unused (apart from having a car sat on it) at the end of my parents driveway completely inaccessible. I moved house earlier this year and now I've started using the trailer to move my project cars and offroader about.
Due to having to significantly downsize the space I use for storage and projects and being in a position to use the trailer periodically it will need to be kept accessible, and probably visible to the road. I believe trailers can be desirable to some of the lesser honest of folks out there so want to protect my investment.
Any advice and suggestions? The top idea is to disable it for storage, wheels removed, and maybe use it for parking on out the front of the house (we have a short driveway in the front with parking 'bays' being landscaped into the old front garden) and semi disguise with pot plants etc. I briefly looked into trailer insurance and it all seemed to be aimed at commercial operators. I'll likely only need it half a dozen times in the year?
|
| |
|
|
sowen
Club Retro Rides Member
Posts: 2,245
Club RR Member Number: 24
|
Trailer overrun brake issuesowen
@sowen
Club Retro Rides Member 24
|
Aug 20, 2023 19:03:44 GMT
|
|
I thought it should more or less slide out once the ancilliary parts were out of the way. No grease nipple on this one, it is a bit old now!
The hitch assembly is now off and sat in the garage soaking in penetrating fluid, awaiting a bigger hammer to help get it moving....
|
| |
|
|
sowen
Club Retro Rides Member
Posts: 2,245
Club RR Member Number: 24
|
Trailer overrun brake issuesowen
@sowen
Club Retro Rides Member 24
|
Aug 20, 2023 14:16:58 GMT
|
|
I have an old tiltbed car trailer, had it for maybe a decade now but never towed it on the road. When I got it my dad fitted new wheels, brakes, lights, wooden bed and bits, but we never touched the Knott hitch. Due to many reasons it never got beyond moving out of the corner of the drive and has had a dead car sat on it for at least 6-7 years now!
So I need to move all my projects now I've bought a house with the space wanted. The trailer was unburied, given a little checkover and all seemed good enough. Loaded it up and set off to immediately have it banging away on my tow hitch. So I understand this to be the damper which I've now removed and ordered a replacement.
My big issue was having the brakes locked on for the last mile of my journey, making for very slow progress. Basically the piston the the hitch bolts onto going into the main casing had gone in so far and jammed up solid, holding the brakes on. I've freed it off for the first 2 inches travel from fully extended, and with the damper removed if I push it the piston jams up again needing to be knocked back out.
Should the piston be jamming up as it goes in further, or should it be free to push all the way into the casing until it hits the brake actuating arm or falls out the back if the brake arm was to be removed?
|
| |
|
|
sowen
Club Retro Rides Member
Posts: 2,245
Club RR Member Number: 24
|
|
Jun 20, 2023 20:21:19 GMT
|
|
The electrician has laid the wiring from the breaker box at the front of the house through to the back, but not connected it in the box. When the time comes they'll come back to connect it all up and make it live. They did suggest we contact our electricity supplier to have the house supply breaker upgraded from 60amp to 100amp to reflect the potential new loads.
I've done some work in the back parking area and found the tarmac to be of exceptionally poor quality so digging a trench through that won't pose much of a problem. From there there's a concrete path that goes beside the garage to the bottom of the property where I plan to build the new workshop/garage. Running a trench alongside that would work well for my requirements. All subject to the electricians accepting my plans.
Budget has been hit really hard recently so I may just dismantle the existing prefab garage and reconstruct it at the bottom with some alterations to suit my needs....
|
| |
|
|
sowen
Club Retro Rides Member
Posts: 2,245
Club RR Member Number: 24
|
|
|
|
|
Excellent stuff thankyou all.
We use the area between the house and garage for car parking, and the previous occupants appear to have had the entire area behind the house two car lengths deep covered in awful tarmac over mud! Exploratory holes have gone through it easily enough with a hammer, chisel and crowbar. I should be able to dig a deep enough trench through that to the garage. The novelty of a tarmaced area behind the house wore off quick with the quantity of small stone being walked into the house.
There's a concrete path running to the bottom of the garden so I can easily follow that to the bottom when I begin the new workshop build.
That leaves how to get a cable from in the bottom of a trench outside to being joined to the cable ready in my kitchen. Run the conduit up the wall and put a junction box inside?
|
| |
|
|
sowen
Club Retro Rides Member
Posts: 2,245
Club RR Member Number: 24
|
|
|
|
|
I moved into my new home a few months back with ample room for all my toys and projects. There's a garage and a substantial shed down my garden away from the house. We're told the previous owners had electricity running to them which was rightly condemned and mostly removed.
The house is a bit of a project so I've had the electricians in doing some re-wiring inside, and whilst they were at it I had them install a 50amp supply to the back of the house to power the garage.
My question is what is the best recommeded way to get the electricity from the house to the garage? I'm assuming I'll be digging a trench and dropping armoured cable into it. How deep should I be going and should I have the cable inside some sort of sealed conduit? I also want running water, washing hands and filling the kettle. Should any water pipes go in a seperate conduit? Should I put something down to protect the water and electricity under the ground?
Years ago when my parents had their house extended and built the garage they had a 6" plastic tube joining the house to garage buried under a small walkway with both electricity cables and water pipe inside, though the water was never turned on from the house.
|
| |
|
|
sowen
Club Retro Rides Member
Posts: 2,245
Club RR Member Number: 24
|
Landrover Box to RWD??sowen
@sowen
Club Retro Rides Member 24
|
|
|
|
If I remember rightly only the old 2.25/2.5 to 200tdi Defender's had the short bellhousing LT77. From the 300tdi the Defender shared the same long bellhousings as the Discovery/Range Rover's with the introduction of the R380.
There is however a conversion kit to rebuild a certain range of later R380's to have shorter than the short bellhousings to be a retrofit into earlier Defender's....
Still doesn't change the fact that it's a major undertaking to attempt converting a 4x4 'box to rwd spec!
|
| |
|
|
sowen
Club Retro Rides Member
Posts: 2,245
Club RR Member Number: 24
|
Landrover Box to RWD??sowen
@sowen
Club Retro Rides Member 24
|
|
|
|
Check the suffix letters at the end of the serial numbers. If they match you should be able to mix and match without any issues. They constantly developed the gearboxes throughout production so different suffixes are unlikey to match up. Changes include bearing sizes, gear widths, reverse mechanisms, synchros etc. If you can find the relevant parts catalogues that may give you an insight into which parts carried over and which changed
|
| |
|
|
sowen
Club Retro Rides Member
Posts: 2,245
Club RR Member Number: 24
|
Landrover Box to RWD??sowen
@sowen
Club Retro Rides Member 24
|
|
|
|
The mainshaft of the LT77/R380 boxes is entirely different for the 2wd and 4wd variants. Not just a case of unbolting the tailhousing and swapping them over.
|
| |
|
|
|
|
sowen
Club Retro Rides Member
Posts: 2,245
Club RR Member Number: 24
|
Radiator Shroud Advicesowen
@sowen
Club Retro Rides Member 24
|
Jan 17, 2023 20:18:00 GMT
|
|
I've made a couple from 1-1.2mm ally on my projects. I have a selection of folders in my workshop making it easier, but clamping blocks of wood or steel angle/box either side and gently pushing or hammering will usually do a good enough job folding the edges over. Riveting on extra bits of angled aluminium as strengthening braces helps too
|
| |
|
|
sowen
Club Retro Rides Member
Posts: 2,245
Club RR Member Number: 24
|
moving a wheel centre out. sowen
@sowen
Club Retro Rides Member 24
|
Jan 13, 2023 18:05:08 GMT
|
|
There was a guide somewhere on here years ago on how to split this style of welded steel wheel to change the offset. I've done a few sets of steels with a line of weld rather than a puddle of weld holding them together. To re-align I've made basic jigs to hold a spare hub assembly in a vice and used a dti to true them myself
|
| |
|
|
sowen
Club Retro Rides Member
Posts: 2,245
Club RR Member Number: 24
|
Toylander 4x4 projectsowen
@sowen
Club Retro Rides Member 24
|
Oct 23, 2022 20:15:50 GMT
|
Managed a few more hours tinkering on the project today. With it still turned over I decided to have a look at the axle with the idea of how seeing much work is needed to get it rolling, and what space I have to play with for suspension and running gear An idea I'd had was to scavenge and old Land Rover Salisbury diff as they're huge, in the hope that the centre planet gears were large enough to work with the scooter differential gears. With luck, the drive gear is just large enough to work, and the smaller planet gear should give a handy 1.6:1 gear reduction 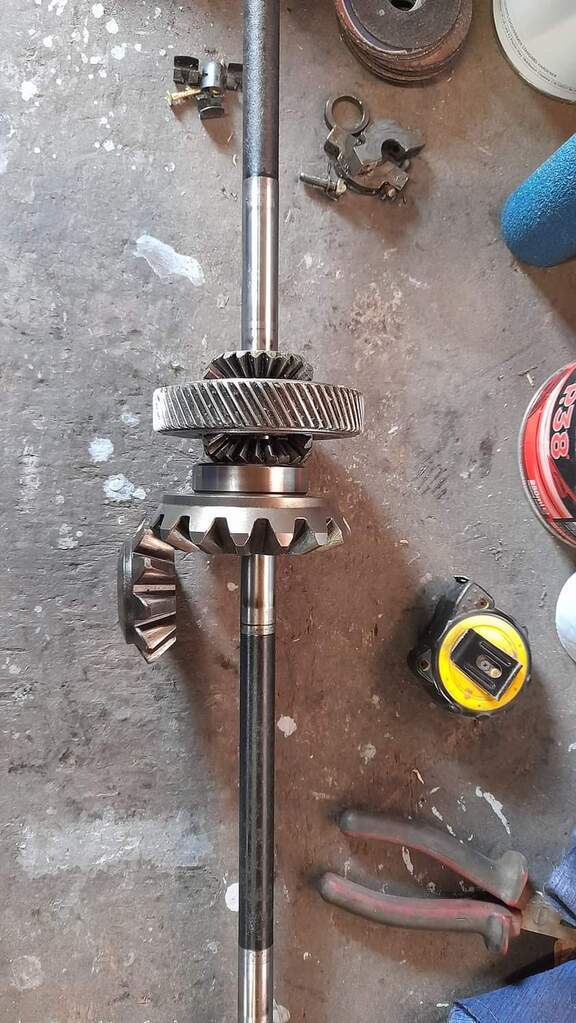 Next up I cut four squares of 10mm steel plate, marked out the centre and four holes at 4" pcd and drilled out all of the hub faces. So far two have gone in the lathe and had the centres turned out to take a short length of thickwall pipe which has been pressed in to make the hubs 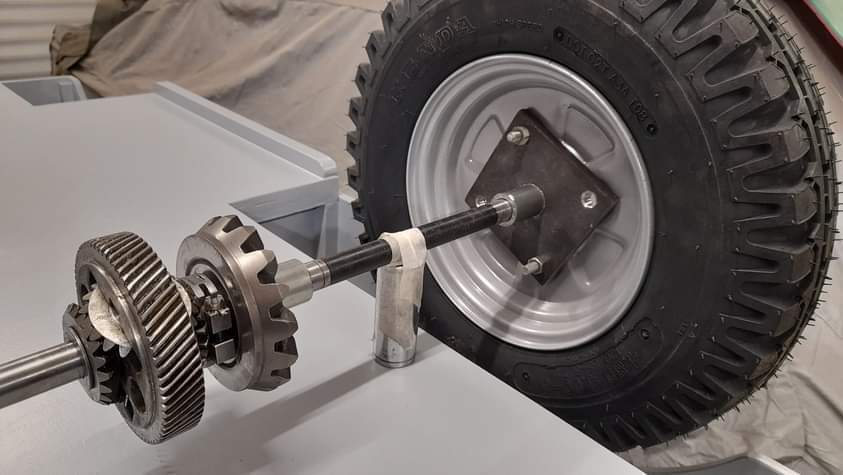 And with some more measurements I roughly positioned both hubs on the axle driveshafts and sat it on the body 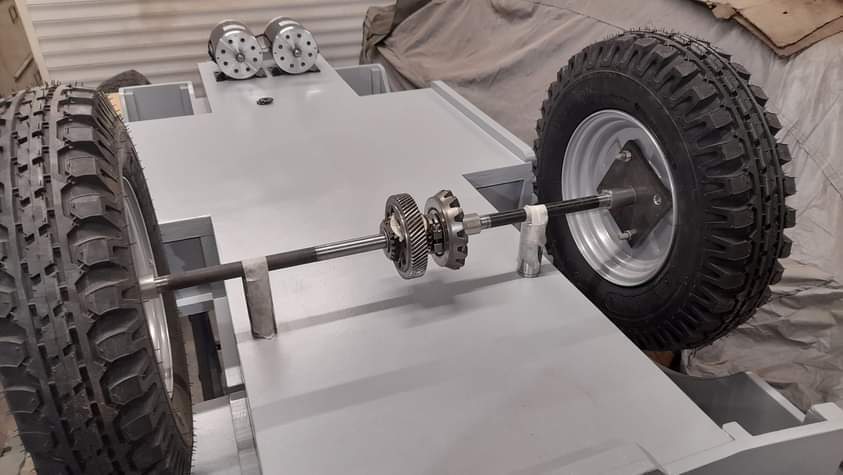 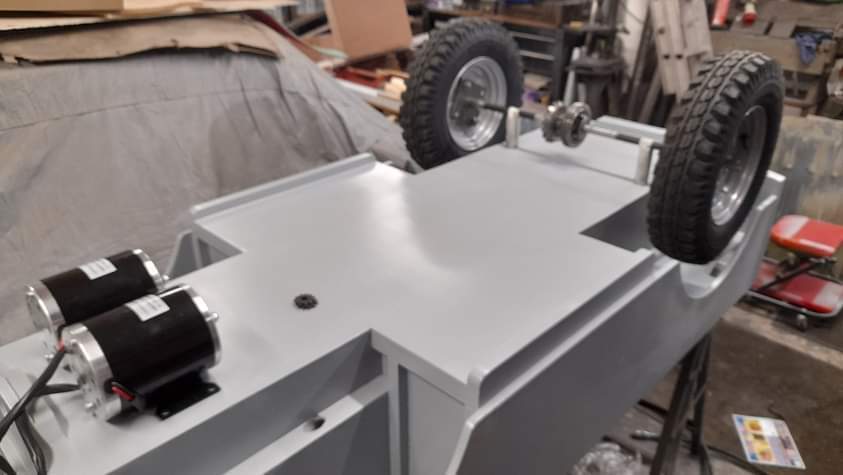 After lots of thinking, I believe the best option for the axle is to weld a custom made planet gear carrier assembly directly to the Land Rover drive gear instead of trying to attach the new gears to the existing scooter drive gear. Then I can fabricate an axle casing to suit. The input drive should be quite simple, turning down something to press and weld to the new pinion gear that can run on a needle roller bearing with a short stub to take drive of some form. And finally my two motors have arrived, and roughly sat on the front where I intend to fit the inside. There's plenty of room for them to be mounted side by side in the front, and room to possibly build a mechanism to disconnect one for single motor driving 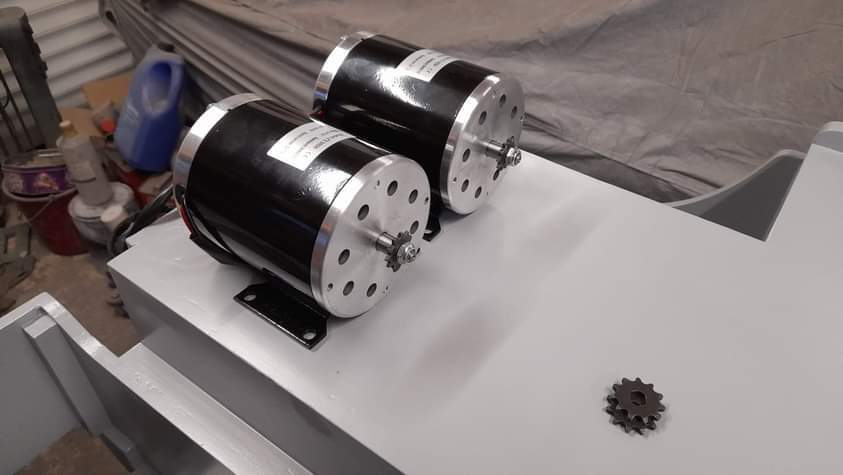 |
| |
|
|
sowen
Club Retro Rides Member
Posts: 2,245
Club RR Member Number: 24
|
Toylander 4x4 projectsowen
@sowen
Club Retro Rides Member 24
|
Oct 17, 2022 19:42:57 GMT
|
Doing a little research on motors, most mobility scooters and wheelchairs seem to be powered by 250w motors, with some upto 400-500w for the higher end ones. The motors supplied by Toylander themselves are listed as 180w on their website. With that in mind, I've ordered a pair of cheap ebay 24v 500w motors for my project  Browsing ebay there seem to be loads of cheap 24v controllers that should power the motors. I know nothing about this area of electrics so will be researching controllers a bit more.... One idea I've come up with is building in a mechanism to run either one or both motors depending on who's driving (kids or me). A simple dog clutch and isolator switch to the second motor should be sufficient? The motors come with a chain sprocket so I'll be learning about different chain sizes and specs once I figure out how to do the axle drives and what ratio I have to work with.... |
| |
|
|
sowen
Club Retro Rides Member
Posts: 2,245
Club RR Member Number: 24
|
Toylander 4x4 projectsowen
@sowen
Club Retro Rides Member 24
|
|
|
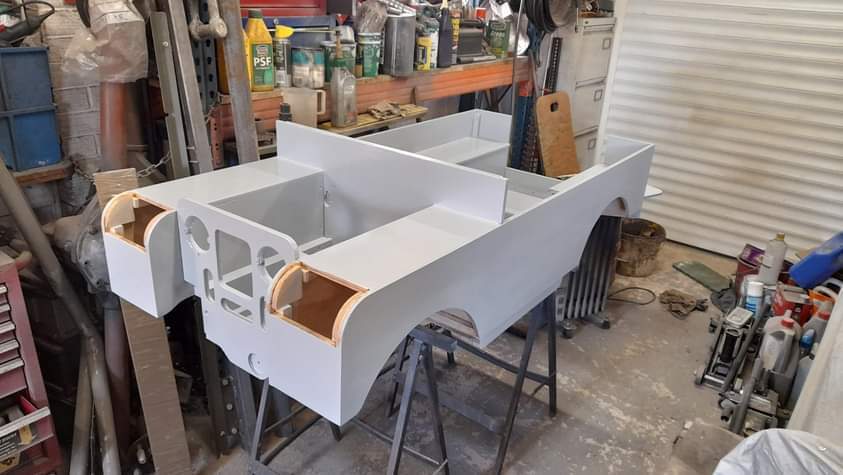
Liking very much...great carpentry!! waiting to see the comparable mechanical engineering!!...  Thanks, I've never done woodworking on this scale before! I'm putting ideas together in my head about how to support a pair of live axles underneath, and how to change the transverse drive layout of the mobility scooter axles to inline to allow for a centrally mounted centre differential and drive from a motor source. The top ideas are basic 1" box steel frame under the body for suspension and driveline mounting, and cannibalising a small car differential for the planet gears and use those on the mobility scooter axles to create a simple 90 0 drive. I'm also thinking maybe mounting a pair of 24v motors in the cavity under the bonnet with a chain drive to the centre differential unit. I should still be able to fit two batteries under the bonnet, and then hide all of the motor controls under the back seat. Watching lots of Grind Hard Plumbing Co and similar builds have got me thinking of either a basic rear swing axle mounting so no rear articulation, or if there is space some sort of anti roll bar setup so it articulates but doesn't lean if slightly unevenly loaded. No I can see the standard wooden Toylander body will be highly restrictive for all of my plans, but if things go according to plan, there'll likely be a more advanced second build so the kids can't argue as much lol |
| |
|
|
|
|
sowen
Club Retro Rides Member
Posts: 2,245
Club RR Member Number: 24
|
|
Jul 26, 2022 17:06:36 GMT
|
|
All good stuff thankyou
I'm now planning on getting an informal visit from the local planning office once we've moved in to discuss our options after watching a youtube video on someone else's garage build, I didn't know they offered that service? Ideally I'd be wanting a 9m wide by 6m long workshop (30'x20') which will go against both side boundaries and the end. Then I'd be wanting a small hard surface outside so that's going to be just over 60sqm of concrete! Overall that'd be a quarter of the garden so I'm assuming well into plannig permission territory regardless, and then requiring associated extra drainage work.
I've had a quick read of the planning portal, only things I guess that I'd want to clarify is the roof design if I build to the boundary on 3 sides, 2.5m for the eaves either side, but what about across the back which doesn't back onto private land? And would I have to incorporate some sort of tight walkway all around it so it's not hard against the boundary line?
I did watch a video of a small group of builders who put up 3 walls of a double garage in less than a day. Watching those videos makes me think I could learn to lay blocks myself and over the coarse of a few weeks build up the walls myself saving money? If going the block route I'm guessing the design and foundations would be my greatest expense before the roof?
Lookng at neighbours gardens there is a similar sized outbuilding visible a few houses along so the precedence is there to build something biggish at the bottom of the garden.
I'm also beginning to think sectional garages can't support moderately substantial insulated roofs as they all look like lightweight frames and paneling. An I beam or two for chain hoists might be out of the question!
|
| |
|
|
sowen
Club Retro Rides Member
Posts: 2,245
Club RR Member Number: 24
|
|
Jul 25, 2022 17:46:55 GMT
|
|
My partner and I have been looking around for a property to buy together and have come across a partial renovation project that should suit all of our needs. The big bonus for me is there's a 100ft long garden and vehicle access into it! Presently it has a 10'x16' concrete prefab garage and a 10'x6' workshop/shed up near the house. These will work for me in the short term with an additional large storage shed already agreed on.
My dream plan would be to build a combined garage and workshop across the end of the garden away from the house. The current owner had ideas of a 3 car garage at the end, whereas I'd want a 2 car garage with extra width for my workshop equipment to the side. The plan would basically be to build on a concrete base approx 30ft wide and about 18-20ft deep across the end of the garden.
The first great idea and possibly cheapest would be to deconstruct the existing garage and relocate it to the bottom, whilst scouring the local ads for a similar compatable type sectional garage and frankenstein a new garage out of 2 or 3 prefabs together. This I would believe to possibly be the quickest and cheapest to have constructed, and potentially still fall well within the realms of permitted development? The first obvious downside is moving a few tons of concrete and manhandling it into position.
The first idea was then expanded to for ultimate ease of building, ordering a new concrete sectional garage to my specifications. Downside would be the costs involved and trying to take some money from the house renovation budget with associated ear bending!
Alternatively, I've started thinking of a simple concrete block built garage workshop. This would be more of a permanent structure and due to it's size I'm assuming full planning permission would be required. There would also be the costs of builder labour, unless I can learn to lay blocks myself, how hard could it be? I get the impression that materials costs wouldn't be to much, a few thousand ££££'s?
I haven't even got to brainstorming a roof beyond it not being flat, possibly a shallow apex roof so there is a little extra space for storage above.
My final built garage would be insulated, electrified, heated and this time have running water (maybe with a small heater unit), something we never did manage in my parents double garage.
Has anyone got any advice on my ideas, or even ideas on what I could likely be paying to have such a large structure built? I consider myself quite practical and intend to do as much of the works myself. There are ideas to build a large conservatory on the back of the house so coming up with some sort of garage plan early on might help save some costs in having two sets of foundations built at the same time?
|
| |
|
|
sowen
Club Retro Rides Member
Posts: 2,245
Club RR Member Number: 24
|
Is Scalextrics dead?sowen
@sowen
Club Retro Rides Member 24
|
|
|
Whilst re-organising all my stuff over the last year all the Scalextric I'd acquired has been brought inside and scrubbed up, cars serviced and repairs carried out. My partners boy has been introduced to it and taken to it well! Some more cars have found their way from ebay into my collection too... I've come up with a twisty living room layout that will fit on an 8ft x 4ft semi-permanent board I'm hoping to begin construction on sometime soon  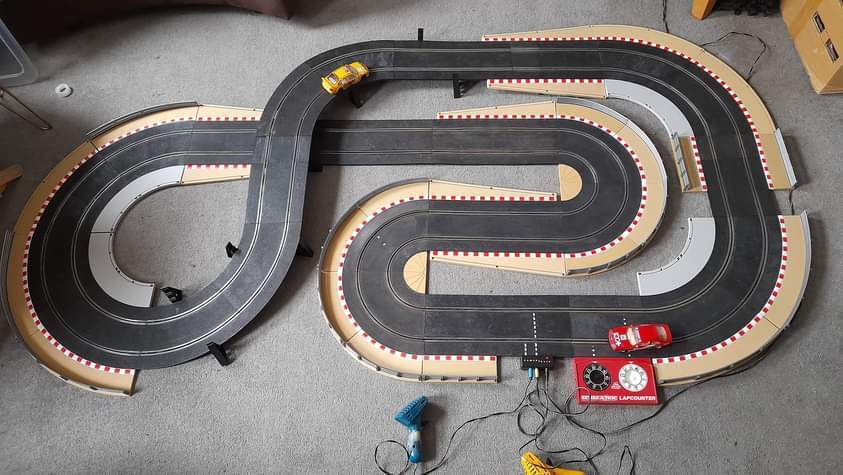 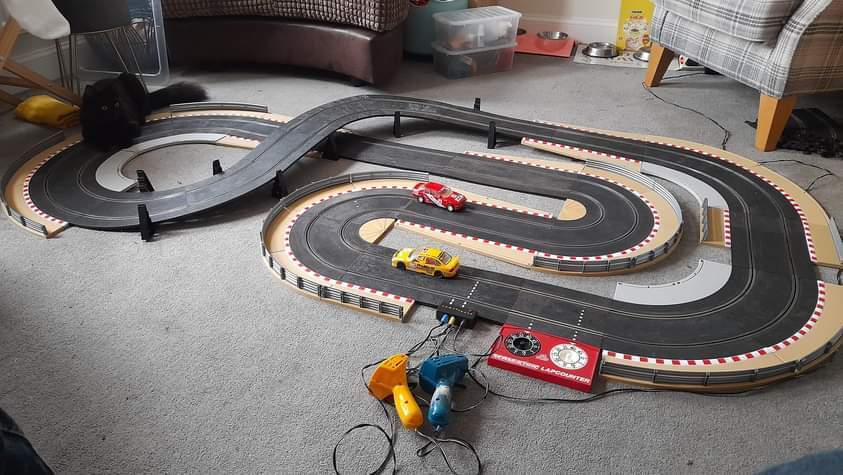 |
| |
|
|
sowen
Club Retro Rides Member
Posts: 2,245
Club RR Member Number: 24
|
Toylander 4x4 projectsowen
@sowen
Club Retro Rides Member 24
|
|
|
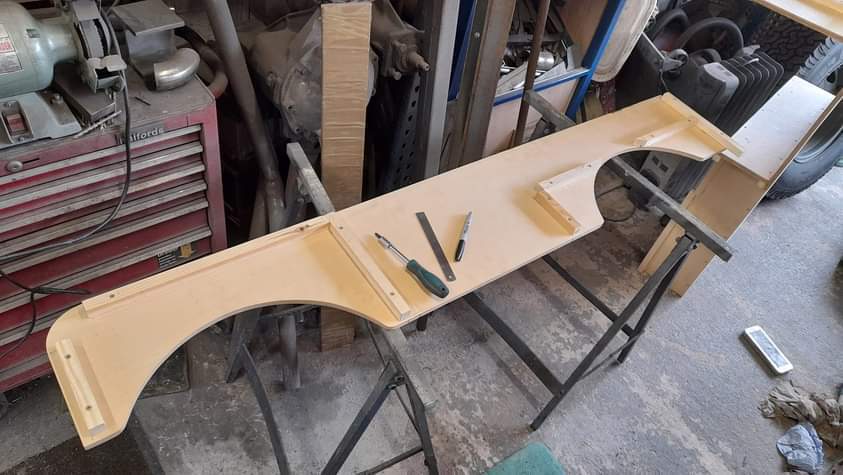
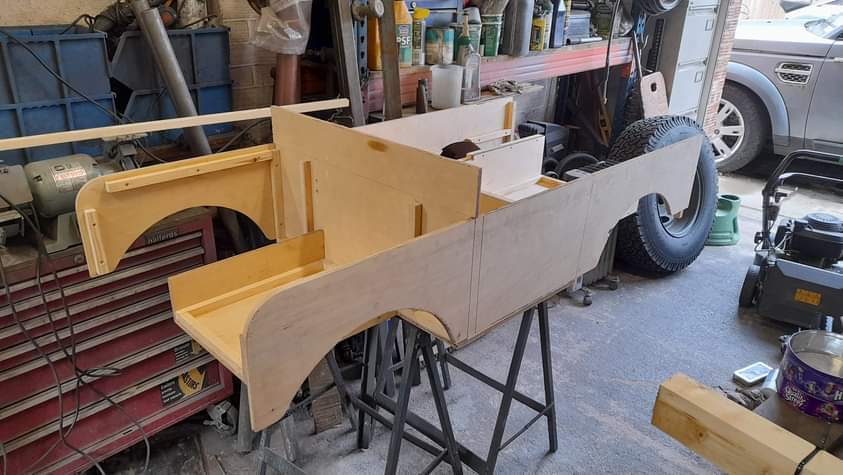
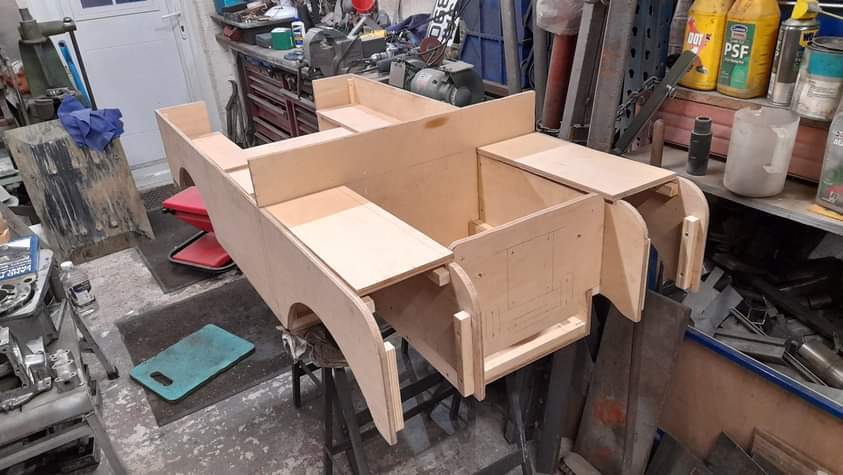
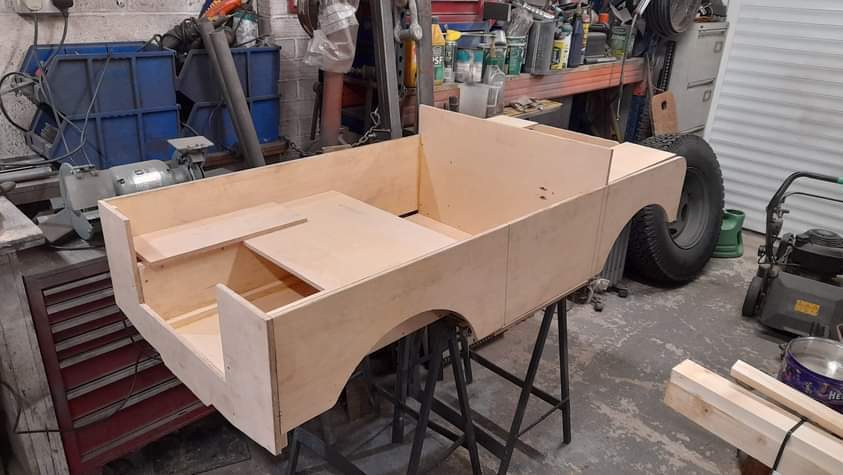
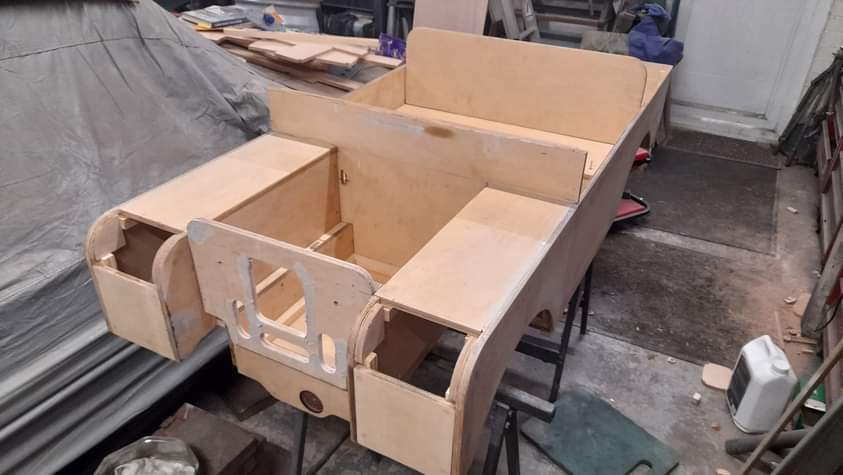
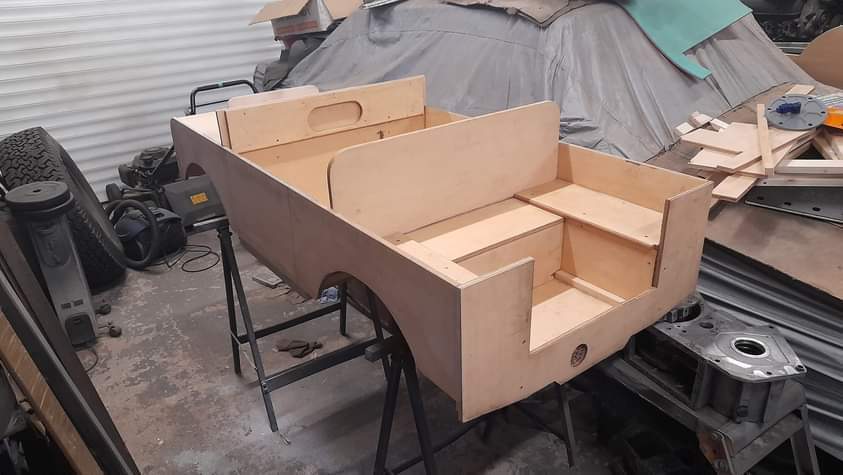
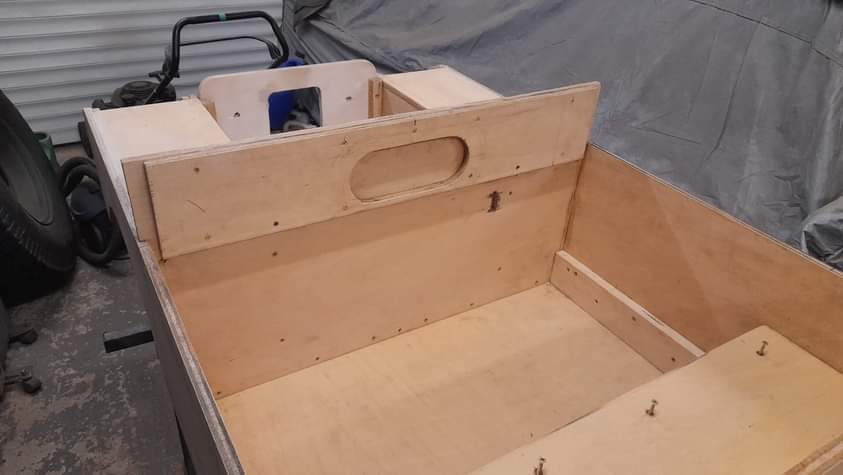
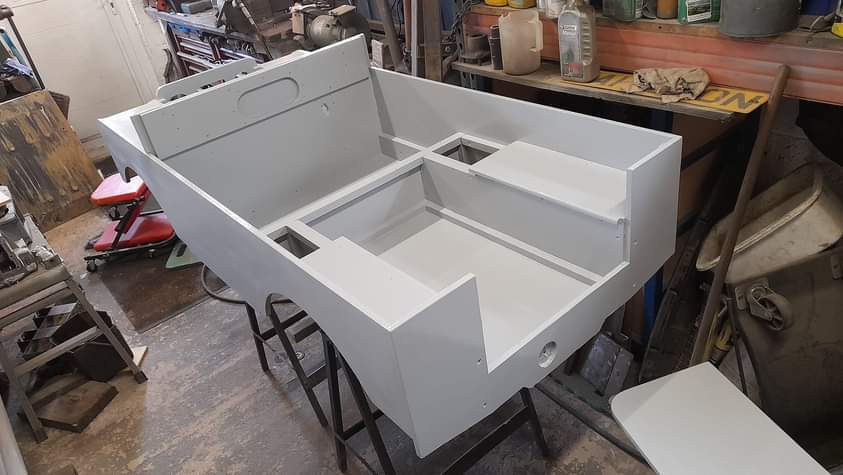
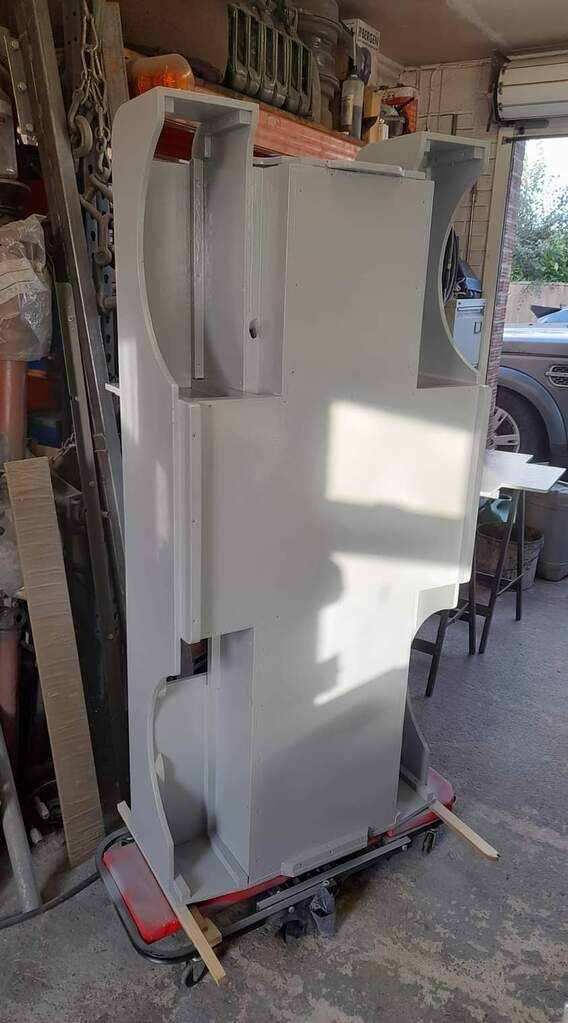
A few weeks back I got round to the local builders merchant and bought two sheets of 12mm marine ply. Yesterday I found the time to draw out all the pieces from the plans and jigsaw them out  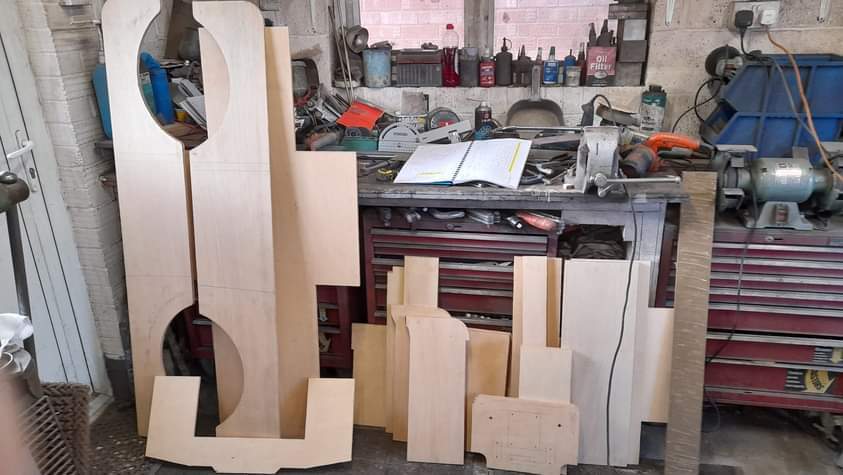 And of course a quick mock up just because! 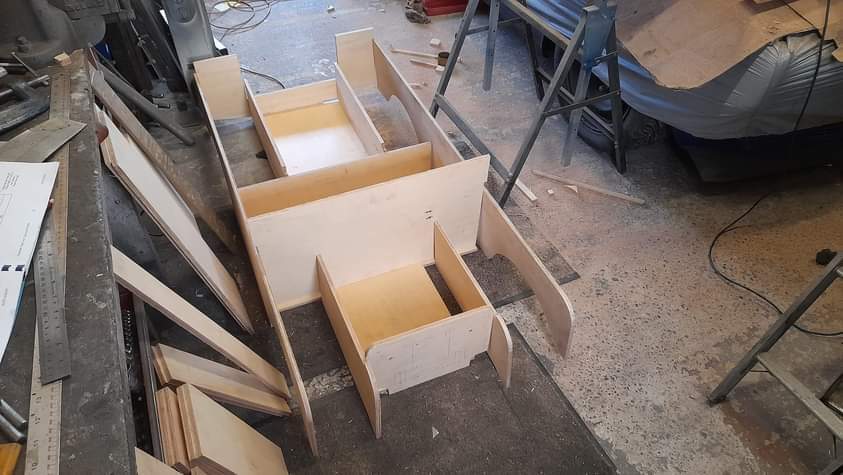  All the edges are to be tidied and straightened then I can begin the job of constructing the body.... |
| |
|
|