|
|
|
|
|
Just to clarify, are you planning to increase the size of the actual aperture (e.g. to get more light into the heads), or just alter the visual appearance of the coachroof glazing? Also, with the single piece with no frame setup you are planning, are you just bonding them on, or will they be screwed / bolted into place? I ask since the previous owners of the catamaran in my sig ditched the teak outer frames & just fitted flush fit glazing, but it wasn't hugely successful. However, that may have been partly since they were trying to get perspex to conform to shapes that it didn't like, as they also turned several pairs of individual windows into one piece ones... As originally built, my understanding is that the frame helped to keep the perspex properly bedded down & spreads the clamping force of any fixings, rather than allowing it to lift inbetween fixings. However looking back at earlier pics of your yacht, what you are doing looks like it is purely single curvature though. Some yachts have successfully managed to trick the eye by using a colour band that matches the glazing, which can be very effective - the Prout Snowgoose 37 did this very well, provided the colour band was the correct shade (i.e. dark brown to match the tinted one way perspex - many were different colours for the band, or had no colour band at all and just don't look right). In addition to your new glazing, is changing the coachroof banding colour something you are considering? I used to work in yacht design (doing the pretty bits though, rather than the maths) so happy to assist with the aesthetics if you want, such as more detailed drawings / artist impressions etc  |
| |
|
|
|
|
|
|
|
|
|
|
I think the standard one looks best as well.
|
| |
|
|
|
|
|
|
|
Still offshore, back Friday morning, but to pass the time I've been playing around in Sketchup to try and test some ideas for the saloon cupboards.
Its not the best looking model, but bear with me this is my first time using Cad / Modelling software.
First off I tried 2 cupboards with a big shelf in between, it just doesn't really look 'right' in my opinion.
Then I tried doing a double cupboard to cover up the reinforcing webb for the bulkhead, but again, still doesn't look 'right'.
Finally I tried the 2 cupboards & shelf, but making them all the same size, so the shelf is the same length as the cupboards on each side, this looks better, but I'm still not happy. I'm trawling through boat classifieds for inspiration haha.  |
| |
|
|
|
|
|
|
|
Just to clarify, are you planning to increase the size of the actual aperture (e.g. to get more light into the heads), or just alter the visual appearance of the coachroof glazing? Also, with the single piece with no frame setup you are planning, are you just bonding them on, or will they be screwed / bolted into place? I ask since the previous owners of the catamaran in my sig ditched the teak outer frames & just fitted flush fit glazing, but it wasn't hugely successful. However, that may have been partly since they were trying to get perspex to conform to shapes that it didn't like, as they also turned several pairs of individual windows into one piece ones... As originally built, my understanding is that the frame helped to keep the perspex properly bedded down & spreads the clamping force of any fixings, rather than allowing it to lift inbetween fixings. However looking back at earlier pics of your yacht, what you are doing looks like it is purely single curvature though. Some yachts have successfully managed to trick the eye by using a colour band that matches the glazing, which can be very effective - the Prout Snowgoose 37 did this very well, provided the colour band was the correct shade (i.e. dark brown to match the tinted one way perspex - many were different colours for the band, or had no colour band at all and just don't look right). In addition to your new glazing, is changing the coachroof banding colour something you are considering? I used to work in yacht design (doing the pretty bits though, rather than the maths) so happy to assist with the aesthetics if you want, such as more detailed drawings / artist impressions etc Hi thanks for taking the time to type out that response. And if you're good with aesthetics, please have a look at my cupboards!
Regarding the windows, they would bonded to the outside of the cabin without fasteners, so they would actually be proud of the side by the thickness of the acrylic, this is a very common way to do it now. The leaks nearly always occur between the aluminum frames & the acrylic or at the fastener holes.
The camber on my cabin side isn't too extreme so I should have no issues bonding it, although I could slightly curve the acrylic using heat if required.
With the modern bonding adhesives like Dow 795 the window actually becomes a structural part of the cabin side and if done correctly it should actually be stronger than the previous method using aluminum framing, if the windows are very large then its important to not make the out of one piece as the larger the area, the harder for the silicone to accommodate the different expansion rates due to heat.
I've been doing a fair amount of research, this write up of the bonding method seems to be widely accepted.
I don't plan to increase the cut out size right now, in my opinion its already too large & should have a divide down the middle (as you see in the link I put), but that's a major undertaking, for another time. (if at all)
|
| |
|
|
|
|
|
|
|
Well you guys aren't much inspiration! Anyway, I struck inspiration in a for sale advert of a Maxi 1050.
This is how I will be proceeding:
I've still got details to iron out, like how to make the doors & their design, but overall I think this one works.
|
| |
|
|
bstardchild
Club Retro Rides Member
Posts: 14,893
Club RR Member Number: 71
|
|
Jun 12, 2020 12:55:18 GMT
|
Well you guys aren't much inspiration! That bulkhead is a pain to work round Anyway, I struck inspiration in a for sale advert of a Maxi 1050.
This is how I will be proceeding:
I've still got details to iron out, like how to make the doors & their design, but overall I think this one works.
The old chap always took the view that he wanted to always be able to get to every part of the boat above and below the water line So boxing in the bulkhead area would have been a no in his book What he would have done is leave the angled bulk head but hide it with a front I am curse word with drawings but I'll see what I can do |
| |
|
|
bstardchild
Club Retro Rides Member
Posts: 14,893
Club RR Member Number: 71
|
|
Jun 12, 2020 13:01:54 GMT
|
Like this (MS Paint at it's worst - well or my MS paint skills at their worst)  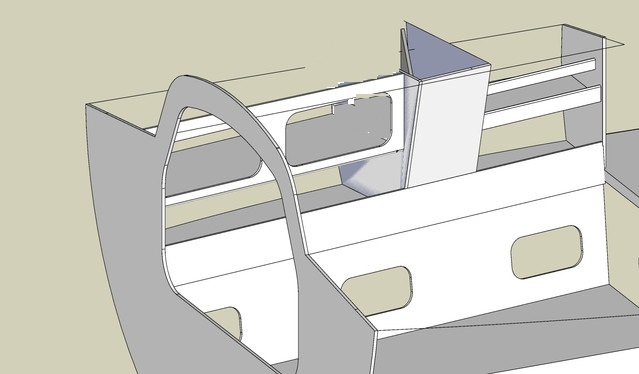 |
| |
|
|
|
|
|
Jun 12, 2020 14:16:56 GMT
|
|
Not clear from my drawings because its just a mockup is that the box will be completely removable, its not planned for it to be glassed into place, simply screwed onto wooden blocks epoxied onto the hull.
The shelf on the right will only be held in by 4 screws as its just for books & small bits & pieces.
So while its not instantly removable, it can be removed very easily for inspection. However the bulkhead itself shouldn't need inspection more than any other part of the inside of the hull, the bolts for the chainplate will be visible at the back of the shelf.
I do like your idea for the left hand side, the part in the cupboard doesn't need to be boxed off.
I'll update my sketch.
|
| |
|
|
|
|
|
Jun 12, 2020 14:33:48 GMT
|
Okay, so the cupboard does need to be boxed off, otherwise anything could fall out inside the boxed off area. With hindsight, I shouldn't have made the semi-circle cutout in the bulkhead / web, if it was left on show then it looks better, but for what I'm trying to do, a straight line would be preferable. This is what I had in mind.  |
| |
|
|
bstardchild
Club Retro Rides Member
Posts: 14,893
Club RR Member Number: 71
|
|
Jun 12, 2020 16:03:51 GMT
|
Not clear from my drawings because its just a mockup is that the box will be completely removable, its not planned for it to be glassed into place, simply screwed onto wooden blocks epoxied onto the hull. The shelf on the right will only be held in by 4 screws as its just for books & small bits & pieces. So while its not instantly removable, it can be removed very easily for inspection. However the bulkhead itself shouldn't need inspection more than any other part of the inside of the hull, the bolts for the chainplate will be visible at the back of the shelf. I do like your idea for the left hand side, the part in the cupboard doesn't need to be boxed off. I'll update my sketch. I guess all I was saying is neither side needs to be boxed off - it's just going to be odd angle for storage at the corners of both cupboards |
| |
|
|
|
|
|
|
|
Jun 12, 2020 17:25:37 GMT
|
|
The photos looks smart.
|
| |
|
|
|
|
|
Jun 12, 2020 17:47:37 GMT
|
Not clear from my drawings because its just a mockup is that the box will be completely removable, its not planned for it to be glassed into place, simply screwed onto wooden blocks epoxied onto the hull. The shelf on the right will only be held in by 4 screws as its just for books & small bits & pieces. So while its not instantly removable, it can be removed very easily for inspection. However the bulkhead itself shouldn't need inspection more than any other part of the inside of the hull, the bolts for the chainplate will be visible at the back of the shelf. I do like your idea for the left hand side, the part in the cupboard doesn't need to be boxed off. I'll update my sketch. I guess all I was saying is neither side needs to be boxed off - it's just going to be odd angle for storage at the corners of both cupboards I'll think on it, and probably knock it up roughly with some old plywood or MDF to get a feel for it. The advantage of the box as I see it: - Nice clean ending to the shelf on the right and the cupboard on the left. - My book shelf can be used for books without adding some extra unsightly divider to square off the edge. - Covers up the raw fibreglass of the web. - Handy place to put a 12v socket & usb charger
Disadvantages
- Need more expensive veneered plywood - Slightly harder access to hull & bulkhead. - Loss of stowage space as there's wasted space inside it.
I do appreciate all suggestions though, even if I don't always go with them.
|
| |
|
|
|
|
|
Jun 12, 2020 21:36:58 GMT
|
|
Sorry - only just seen your reply. Based on what you say about the glazing, I'd be tempted to have a play with some large sheets of black cardboard, to confirm any thoughts in order to see what shapes look good in reality. The card will also help check that it is staying in single curvature.
Work is manic at the moment so may not have the chance to put together any sketches of that or the interior until next weekend (the school I teach in is still fully operational, although using Zoom & I have all my reports due for next Thursday).
In the meantine, in terms of storage, do you have anything in particular that you want to keep there? E.g. if just books, that structural section may not be that noticable once they are all in place. Is that web in place yet, or is it still to be installed? If the latter, could you change the shape at all, e.g. adding material to it, so it becomes more part of the associated cabinetry? If you have them, could you post up a plan view and also a section, in order to give me a better idea of what the shape of any cladding needs to be. For instance, it could be hidden behind a padded pelmet running along the length of the coach roof edge. If required, an LED lighting strip could be run behind it too, which would also help illuminate the shelving. What is your plan for curtains? Any such pelmet could also house a lower curtain track, so that they are held flush to the glazing, rather than hanging vertically.
Also, have you considered sliding doors for those overhead lockers? Won't spring open when heeling, & also require no clearance to open (e.g. if saloon seating is occupied). Doors could be clear or tinted perspex, the former works well should this be the ship's bar!
|
| |
Last Edit: Jun 12, 2020 21:37:56 GMT by Paul H
|
|
|
|
|
Jun 12, 2020 22:45:51 GMT
|
Sorry - only just seen your reply. Based on what you say about the glazing, I'd be tempted to have a play with some large sheets of black cardboard, to confirm any thoughts in order to see what shapes look good in reality. The card will also help check that it is staying in single curvature. Work is manic at the moment so may not have the chance to put together any sketches of that or the interior until next weekend (the school I teach in is still fully operational, although using Zoom & I have all my reports due for next Thursday). In the meantine, in terms of storage, do you have anything in particular that you want to keep there? E.g. if just books, that structural section may not be that noticable once they are all in place. Is that web in place yet, or is it still to be installed? If the latter, could you change the shape at all, e.g. adding material to it, so it becomes more part of the associated cabinetry? If you have them, could you post up a plan view and also a section, in order to give me a better idea of what the shape of any cladding needs to be. For instance, it could be hidden behind a padded pelmet running along the length of the coach roof edge. If required, an LED lighting strip could be run behind it too, which would also help illuminate the shelving. What is your plan for curtains? Any such pelmet could also house a lower curtain track, so that they are held flush to the glazing, rather than hanging vertically. Also, have you considered sliding doors for those overhead lockers? Won't spring open when heeling, & also require no clearance to open (e.g. if saloon seating is occupied). Doors could be clear or tinted perspex, the former works well should this be the ship's bar! Thanks for the reply Paul.
Don't feel like you have to do sketches or anything, especially if you're busy. I'm just throwing ideas out there at the moment.
The web is already installed, I suppose I could add material too it, but I'd rather avoid it, to do it correctly would mean grinding a taper to glass on some additional core material and after finally getting the cabin something near clean, I'm loath to do it again this year!
For storage I envisioned a book shelf on each side, for pilot books, almanacs and just general reading material. I do tend to use the kindle more these days, but I still like paper books. The shelves could also be used for storage of small items, mobile phones, keys etc.
I'd also thought maybe running a 12v socket & usb charging port to each one as well so that I could charge phones, camera gear etc.
For the lockers I would use them to store food / snacks etc, probably one for glasses / wine glasses that kind of thing, maybe some lightweight bits that I keep onboard.
When we did the dutch trip we had to put all the food in bags / boxes on the open shelves, which worked but it was all on show, it nice to have somewhere to stash it all.
Mainly lightweight bits though.
I would quite like some LED strip lighting, not just down the shelves, but also in the galley as well for some extra light when cooking, however I'm still looking for a decent 12v controller, I don't want it on a remote, I want some kind of fixed control which I'm hoping would be more reliable for my needs. I hadn't thought of a pelmet, its something I should think about.
I actually have sliding perspex doors in the galley, though for these lockers I'd thought of going with push button latches and doors, simply because I like the look, however perspex doors are easier to make & don't require expensive teak moldings. (or as expensive) Here's a few photos & a snippet of a plan.
It doesn't show the web however as this was part of the work I did over winter:
Saloon as it looks right now.  My proposed shelf / bottom of locker height when I was mocking up a while back.
Layout and a section, note that the back rest and shelf I built is not as high as the original.
|
| |
|
|
|
|
|
Jun 18, 2020 16:28:44 GMT
|
Time for a none theoretical update. Had a few other things to do, & as ever it all takes longer than expected.
But here's a little of what I've been getting up to.
Last year just before coming out I noticed that the waterpump was leaking (again), this year when I did my test before launching it was pouring out of it.
The seal on the back had worn out again, I didn't take any photos of the actual rebuild (see the start of this thread) but I replaced the wear plate in the back of it & the front cover, + both oil & water seal. 20 minute job once you've done it once.
Hopefully it lasts until I can afford / justify a new engine)
While I was at work the fam were nice enough to launch her for me, great to be afloat again.
Permanently installed the new mast base, just waiting on that dang mast now.  Had another experiment with textured gelcoat to make a non skid, not happy with these either, try again.
These forward cabin storage lockers will need replacing eventually, starting to see some de lamination of the plywood & water staining.
For the moment I just rubbed them back & gave them 3 coats of varnish. (satin) to keep me going. Next up a job I've been putting off, the stanchions for the lifelines.
I had to move it as the chain plates go where the old one was located, I decided to switch to a through deck setup rather than bolted to toe rail, over time with people grabbing them, they'd caused some local deformation of the alloy toe rail.
First off, carefully mark out.
Then drill a 16mm hole in the deck. No biggie.
Test fit the base.
Trial of the stanchion, very happy with that.
Since the bases sit slightly off the toe rail, its not sat down all around the flange.
So I made a base with thickened polyester resin.
Mask off. Using packing tape on the base so that it will release easily, kind of like a mould.
Smush some resin underneath & let it cure.
I skipped a few steps with the photos here, but basically you pull it off & level out any gaps with more filler.
Here its awaiting some final fairing & then gelcoat.
Also cracked on with bolting on the new hand rails for the coach roof.
Trial fit.
And the finished article, a real improvement over the rotting wooden ones with the added advantage of they won't break if you need to hang on to them. I also think they look better.
Hopefully more to follow over the next days.
|
| |
|
|
|
|
|
|
|
|
Great work. Youre slowly getting there. You have used packing paper for making the resin shaped items. I sometimes use clay for making castings. Not the old fashioned clay but the modern yellow clay. This works very well and you can make "castings" rather quick and smooth surfaces.
Peter
|
| |
Last Edit: Jun 19, 2020 9:29:20 GMT by petervdv
|
|
|
|
|
Jun 19, 2020 11:39:49 GMT
|
Great work. Youre slowly getting there. You have used packing paper for making the resin shaped items. I sometimes use clay for making castings. Not the old fashioned clay but the modern yellow clay. This works very well and you can make "castings" rather quick and smooth surfaces. Peter How would you use it in this situation? Use the clay to create a 'dam' around the area in question & then fill it with resin?
|
| |
|
|
|
|
|
Jun 19, 2020 13:11:48 GMT
|
Great work. Youre slowly getting there. You have used packing paper for making the resin shaped items. I sometimes use clay for making castings. Not the old fashioned clay but the modern yellow clay. This works very well and you can make "castings" rather quick and smooth surfaces. Peter How would you use it in this situation? Use the clay to create a 'dam' around the area in question & then fill it with resin?
Yes, create a dam around the area. It is stickey enough to keep into position and very easy to shape and then fill it with resin. It can also used to close holes or splits to avoid resin to drip out. Afterwards it can be removed very easy. I have used different brands and Pelikan worked the best for me. I buy it with the same supplier who supplies my epoxy or polyester resin. They sell it as modeling clay for castings
Peter
|
| |
|
|
|
|
|
Jun 19, 2020 21:21:57 GMT
|
|
Cheers Peter, I'll give that a go.
|
| |
|
|
|
|
|
|
|
So I've been hard at work for the week and a bit even if it maybe doesn't look like it in terms of work output! Some recovered teak arrived so I can finally make some proper hand holds & washboard runners for the companionway, but I'll come back to this later.
With the stanchion bases done & gelcoated it was time to fix them properly.
I picked up some 10mm G10 plate to make the backing pads, I went though a full pack of jigsaw blades cutting them out.
With the plates cut out, I bonded them into place using thicknened epoxy, this ensures they don't bridge any high spots & really increases the strength.
When the epoxy set I then drilled the pads & fitted the stanchions.
The finished article, now I need to do the rest as they don't match!
The quarter berth had been a thorn in my side for a while, there was a leak from the deck hull join & from the mooring cleat.
The water would run down the carpet liner and onto the cushions & then down inside the liner of the boat. Leaving smelly carpet & sodden cushions, not pleasant in the sleeping area.
You can see here where the water was coming in. I took of the cleat, cut away a section of the liner & bonded in a G10 pad. After cleaning it up and degreasing, I then put a fillet of epoxy along the deck hull joint & tightened all the fasteners, some of which had worked a little loose.
Its not the neatest job, but its a really awkward area to work in & it will eventually be covered. If it really bothers me I can go back and tidy it up.
I'd tried to make some solid resin support pads of the mainsheet traveller in the past, but it ended up looking like a mess. So I cut them off and redid them, not perfect but good enough to get sailing this year. And at least they won't turn green & rot.
And then bolted the traveller back down again.
With the leaks (hopefully) fixed down the quarter berth, it was time to make it clean & nice again.
I spent a full day almost sanding down there, the whole area would resonate with the sander like a drum & the temperature was about 35 in the enclosed space, not fun at all.
Two coats of epoxy primer: And 4 coats of gloss 2 pack poly paint. The paint & primer took place over the heatwave we just had, and the boat is in a sun trap with the tide out, trying to avoid sweat landing in the paint was a real concern!
The plus side was it dried rapidly & I was able to do 2 coats per day.
With the paint dry & then reinstalled my woodwork & gas pipe.
Gave the forward cabin toe rail the same epoxy fillet treatment.
Painted the other side of the bulkhead.
And finally refitted the varnished lockers I did in the other post. Of course now the bunk boards need varnishing, it never ends!
And that's basically it, back to work next week so probably won't get much more done, mast is booked for fitting on the 20th of July.
|
| |
|
|
|
|