|
|
|
Oct 20, 2019 18:00:05 GMT
|
I'm after some opinions on a wheelarch repair I'm doing on my Audi coupe please. This is the cross-section of the shape, with the black line being the outer rear quarter panel, and the blue line being the inner arch. 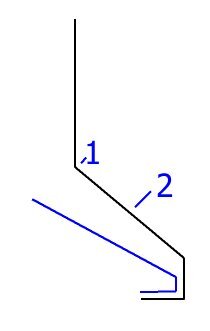 I've repaired the inner arch now, so the next job is to put the replacement outer arch on. But the question is, where to join it? At the moment, I've cut the old one off roughly at position 2 on the diagram, just less than 20mm in from the edge. I've cut it just about at the edge of where it had rusted. I could trim the new arch to a little more than that, slit it every couple of inches, put a step on the new arch to go inside the old arch (hence the slit, to deal with the diameter decreasing), and then weld it in place. Or, I could trim the old quarter panel back to where it is flat - around position 1 - and do the same. I suspect doing the latter method it might be easier to lose the join, and it would save me from having to try to put a step onto a curved panel. Any thoughts or opinions? The new arch has plenty of steel on it, easily enough to go back to the flat. |
| |
|
|
|
|
|
|
|
Oct 20, 2019 19:09:25 GMT
|
|
Personally and although it looks like more work - Option 2 has you will be in a better position to control panel distortion created by the heat of welding the panel joint over a area of a smaller width - Option 1 - Carries all the risk of distorting the larger flatter profiles carried through the rear wing and you could end with a far greater amount of work on you hands in correcting it - Going back to option 2 - ideally you need the rebate / step / swage edge to be set into the original panel / wheelarch and not the new panel hence the new panel overlaps the top of the old rather that then the reverse of this - reason being is that should you get water ingress / condensation run down the inside of the panel it will not fill what would be a open edge with water and start to rust from the inside out - post up any further questions that you may have and I shall do my best to get a answer back to you - Chris
|
| |
|
|
|
|
|
|
|
|
Thanks for that - it certainly makes sense to try to avoid distorting the main quarter panel, and that's important because I don't really know where I'd even start to try to correct it. The panel step is interesting too - I'd thought that, once done, I'd apply seam sealer over the seam and stop water that way, but I'm not totally sure I can get to all of it.
I'll have to have a look at how (or if) I can put a step on there - the inner arch is quite close in some areas, and the smallest tool I have to add a step is a hand-held one that has flat jaws.
|
| |
|
|
|
|
|
|
|
Thanks for that - it certainly makes sense to try to avoid distorting the main quarter panel, and that's important because I don't really know where I'd even start to try to correct it. The panel step is interesting too - I'd thought that, once done, I'd apply seam sealer over the seam and stop water that way, but I'm not totally sure I can get to all of it. I'll have to have a look at how (or if) I can put a step on there - the inner arch is quite close in some areas, and the smallest tool I have to add a step is a hand-held one that has flat jaws. What you may have to do is just dress the edge of the original panel down - which will be awkward - your only other option is to butt weld the panels but I appreciate that this is easier said than done |
| |
|
|
|
|
|
Oct 21, 2019 12:46:52 GMT
|
|
I've been trying to butt-weld as much as I can - I don't like overlaps, even with "weld-through" primer in them and seam sealer over them - but maybe this will be a step too far. I guess if I leave plenty of time between tacks, it shouldn't be so bad.
|
| |
|
|
|
|
|
Oct 21, 2019 17:51:09 GMT
|
|
If you have access to an airline a blast of compressed air cools them really quickly, to avoid distortion you need to only do 2 or 3 tacks at a time and get it back to ambient temperature before the next ones.
|
| |
|
|
|
|
|
Oct 22, 2019 17:42:51 GMT
|
|
I do have a compressor, though I'm not sure that the mains will fancy running that *and* the welder at the same time.
I always thought that leaving these things to cool naturally was a better idea, or is that just a strength thing? Or something that isn't true?
|
| |
|
|
|
|
|
Oct 22, 2019 18:02:17 GMT
|
I do have a compressor, though I'm not sure that the mains will fancy running that *and* the welder at the same time. I always thought that leaving these things to cool naturally was a better idea, or is that just a strength thing? Or something that isn't true? Easy way around this is to let the compressor fill the tank then switch it off whilst you use the MIG for welding - you can then use a short burst of air from the compressor tank to cool your welds and then top the tank up has required in between welding - its much better if you can cool the weld quickly rather than leaving it to cool naturally has this runs the risk of heat distortion especially on larger flatter surface areas of panels |
| |
Last Edit: Oct 22, 2019 18:03:27 GMT by Deleted
|
|
|
|
|
Oct 22, 2019 19:22:59 GMT
|
|
Quenching red hot steel can affect its properties and is a science in its own rights but for these purposes this is not an issue, the weld is usually stronger than the surroundimg metal anyway, as above you want to get rid of all the heat as quickly as possible
Even a panel which only feels warm to the hand will have expanded and therefore will distort if this distortion is locked in by subsequent welding.
|
| |
|
|
gryphon
Club Retro Rides Member
Posts: 330  Club RR Member Number: 157
|
Body & Paint Threadgryphon
@gryphon
Club Retro Rides Member 157
|
|
|
|
Bit of a non-diy question here, but my 944 is having a new rear wing welded in soon and I've just realised that the body shop I was planning to use isn't going to use cellulose - despite the rest of the car being cellulose. He says it won't be a problem... I thought that the paints would have a different appearance? Should I be worried?
Thanks!
|
| |
|
|
|
|
|
|
|
|
|
Bit of a non-diy question here, but my 944 is having a new rear wing welded in soon and I've just realised that the body shop I was planning to use isn't going to use cellulose - despite the rest of the car being cellulose. He says it won't be a problem... I thought that the paints would have a different appearance? Should I be worried? Thanks! Providing the preparation & quality of the work is to a good standard there will not be a problem - is your car a solid colour or a metallic ? - either way if its a body shop that produces good quality work the colour match should be perfect |
| |
|
|
gryphon
Club Retro Rides Member
Posts: 330
Club RR Member Number: 157
|
Body & Paint Threadgryphon
@gryphon
Club Retro Rides Member 157
|
Oct 25, 2019 11:43:33 GMT
|
|
That's good to hear, thank you. Colour is solid black. We've used the bodyshop before, the colour match has been perfect.
|
| |
|
|
|
|
|
Oct 25, 2019 12:28:23 GMT
|
Paint reaction question. I'm pretty sure i know the reason behind these reactions is the colour not fully dried on the previous coat. But thought I'd get a professional opinion.    Some bits have come out great and some have come out like you can see. I'm using 2k paint and the reaction is always happening between colour coats. Usually after the 3rd coat The environment is less than ideal as it's currently cold and damp I'm using a gas heater to warm up the shed so moisture won't be helping. |
| |
|
|
|
|
|
Oct 25, 2019 14:04:16 GMT
|
|
Are you using a base coat colour (if so is the base coat solvent based) then a 2K clear coat or you using a 2K direct to gloss system
|
| |
Last Edit: Oct 25, 2019 14:08:39 GMT by Deleted
|
|
|
|
|
Oct 25, 2019 14:15:47 GMT
|
|
Yes it's a solvent based base-coat colour and 2k lacquer to go on top.
|
| |
|
|
|
|
|
Oct 25, 2019 15:59:35 GMT
|
Yes it's a solvent based base-coat colour and 2k lacquer to go on top. In that case its the solvent in the solvent based colour that reacting with the original paint finish - a few things that you can try : Flat the reacted area back - prime has required and try applying the base coat in several drier coats rather than wet coats - this will not always work Flat the reacted areas back then apply a isolating primer - your solvent based colour coat can go back on over the top of this Ditch the solvent base and go to a water based colour coat has this will not react with the original paint I'm currently a little short on time and have to be somewhere shortly - please post up any questions or if you require further details on the above and I shall respond to them when I get back this evening |
| |
Last Edit: Oct 25, 2019 16:00:22 GMT by Deleted
|
|
|
|
|
Oct 25, 2019 17:32:34 GMT
|
|
That's for the ideas I appreciate the help.
I redid some of the parts a few days ago and they are now fine wenever I have had this same issue before sanding down, reprinting and then respraying has worked.
Some of the parts that reacted were taken back to bare metal so it isn't the original paint.
However based on what you said my braincell jumped into gear and suggested maybe the etch primer I have been using is the issue.
For quite a while I have been using rattle can etch primer.
I'm now wondering if that's what is reacting with the solvent colour and I have always put it down to the previous coat not fully dry.
|
| |
|
|
|
|
|
Oct 25, 2019 17:37:05 GMT
|
For quite a while I have been using rattle can etch primer. I'm now wondering if that's what is reacting with the solvent colour and I have always put it down to the previous coat not fully dry. I've been using a rattle-can etch primer as well, and a lot of the time if I paint over it with aerosol satin black it blows up as if it's reacting with something, even though it's gone onto clean bare metal. So maybe some of them are iffy. |
| |
|
|
|
|
|
Oct 25, 2019 17:40:48 GMT
|
|
Sounds very much like it.
If you are spraying basecoat/topcoat why not spray the primer as well? This way it's a known quantity and probably far better quality/thickness.
|
| |
|
|
|
|
|
Oct 25, 2019 20:04:46 GMT
|
Sounds very much like it. If you are spraying basecoat/topcoat why not spray the primer as well? This way it's a known quantity and probably far better quality/thickness. The main reason I guess is convenience. I'm not always ready to get out the spray guns and mixing stuff but want to protect the bit I have just cleaned back and stop any flash rusting. Maybe I'll have to look into other methods. |
| |
|
|
|
|


