vulgalour
Club Retro Rides Member
Posts: 7,088
Club RR Member Number: 146
|
Matchbox / Hotwheels Retrosvulgalour
@vulgalour
Club Retro Rides Member 146
|
|
|
Too much chrome for an Ambassador... it really does look like it's based on a Princess though. Are these actual characters from the Cars films universe (what a weird sentence) or are they just having fun making ones up for toys to sell now?
EDIT: There's a wiki? Okay, so they reckon it's probably based on an Aston Martin Lagona and yeah, I can kinda see that a bit too. |
| |
Last Edit: May 7, 2024 15:49:38 GMT by vulgalour
|
|
|
|
vulgalour
Club Retro Rides Member
Posts: 7,088
Club RR Member Number: 146
|
|
|
|
Hey I did some photos for once so let's do an update on today's adventure. Recently I found a little hole in the floor under the pedals, I'm pretty sure this is down to my leaking windscreen seal and a big chunk of underseal that had fallen off on the outside of the car... and my general neglect while I was working on other cars before pressing the Princess back into daily duties. Got it up on an axle stand so I could pop the wheel off and clean up the area. 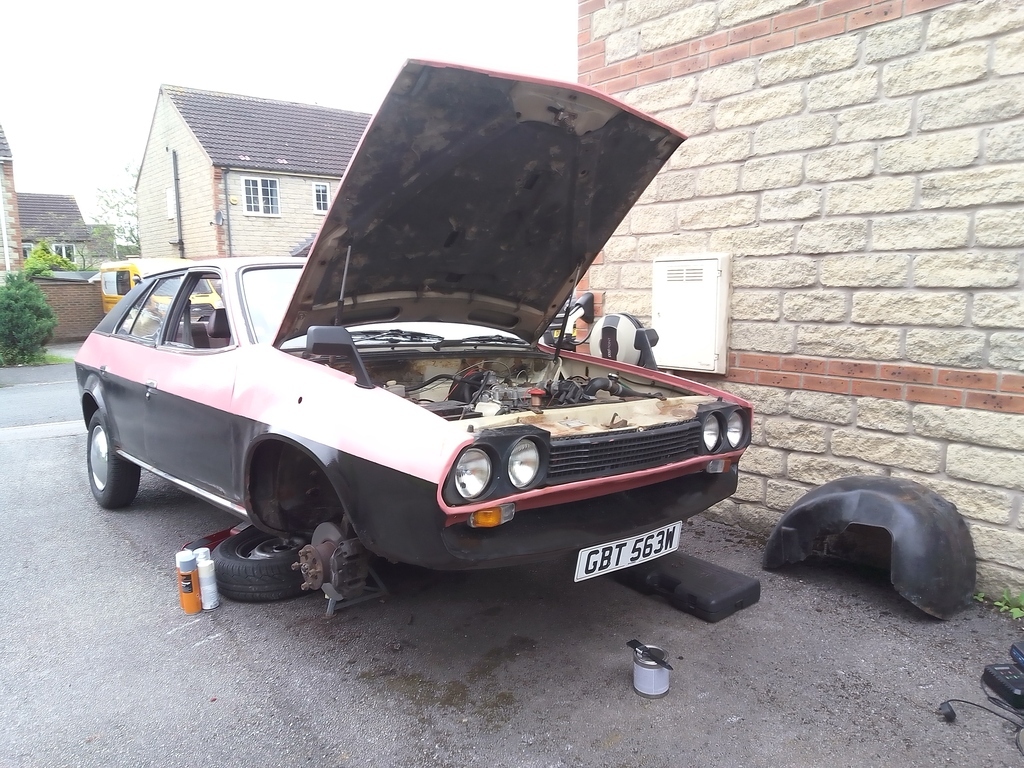 I completely failed to get any before photos, I just wanted to get this job done. Working in footwells is not my idea of fun, nor is welding upside down on the drive. There had been a larger repair done to this area well before I got the car so that was done at least 12 years ago, probably nearer to 30 which is when the car was restored in the '90s. For the most part, that repair is holding up just fine so I left it alone, the issue is where water has been sitting inside the car from the leaking windscreen seal, and the missing underseal on the outside I didn't know about. Some chopping and grinding and rust treater later and it was no longer a hole nor was it rusty. 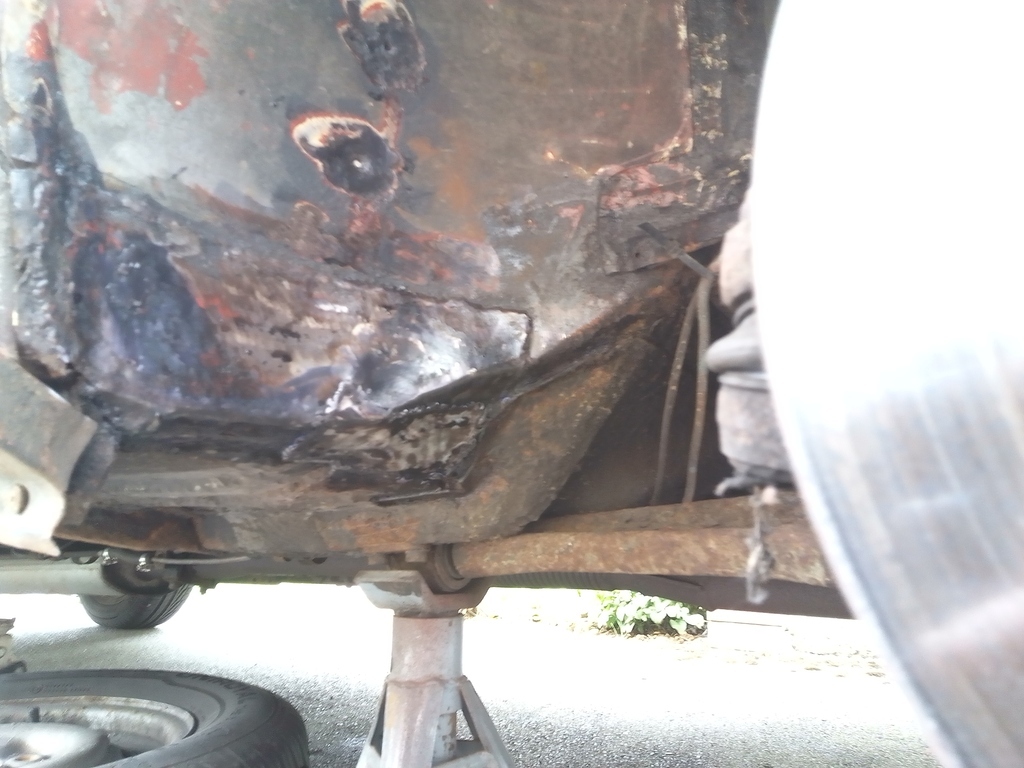 Had a bit of an explore of the rest of the inner arch and found some flaking paint and surface rust, a couple of localised bits of rot that need welding up, and not much more than that. Picking battles again with this one, I only really had an afternoon available so decided to leave the welding that requires partial dismantling of the suspension alone for the time being. 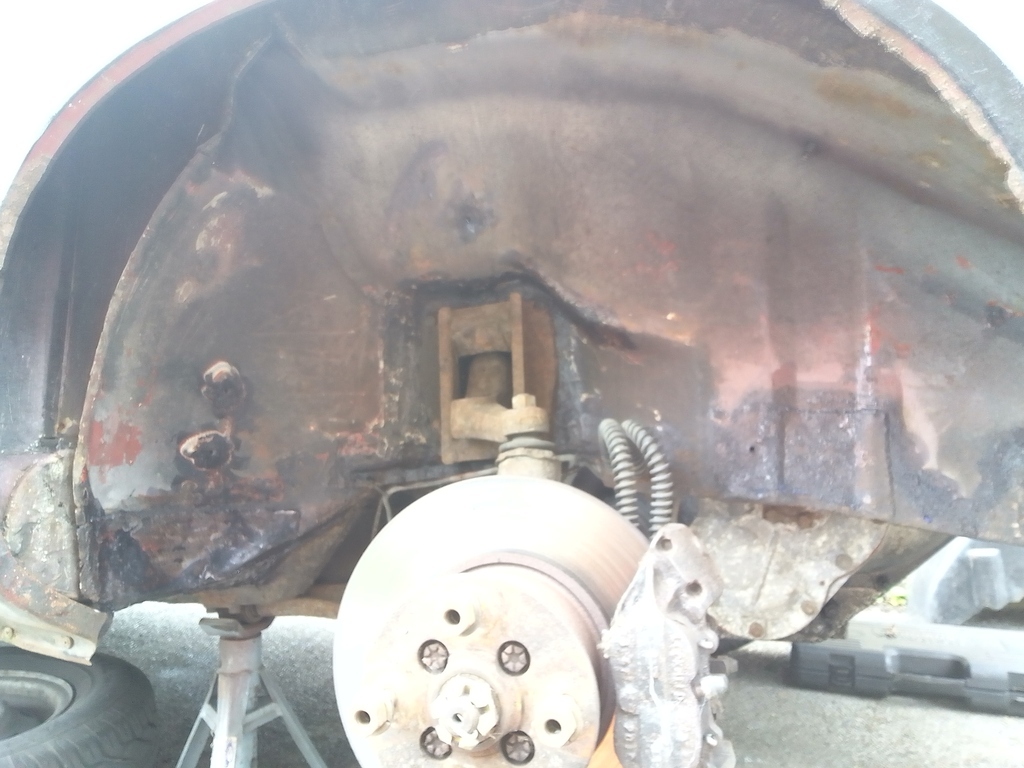 While I had the car in the air I went over the sill repair, caught any pinholes that appeared after grinding off the welds, and just gave things a general tidy. I've got a full outer sill to go on this side when I have time so I didn't go nuts. 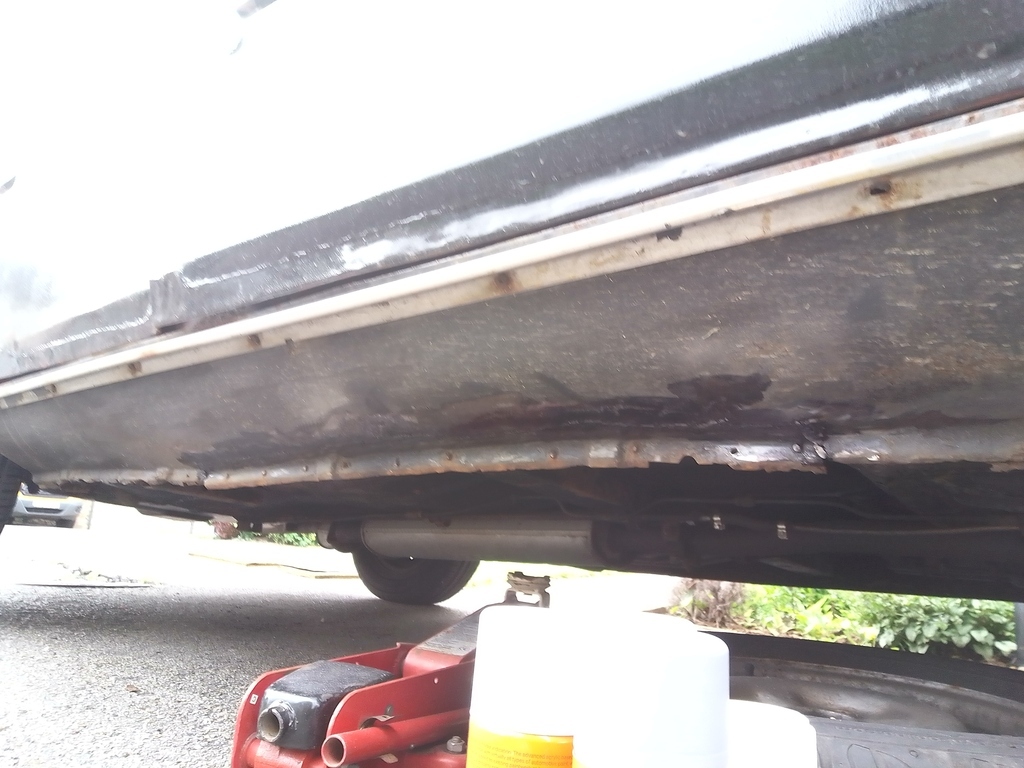 Inside wasn't too bad, bit blurry for the photo because it had got to that point in the job. This did end up being a much larger repair than I was expecting, there was a lot of overlapping panels and sealant going on here which I think had exacerbated things. 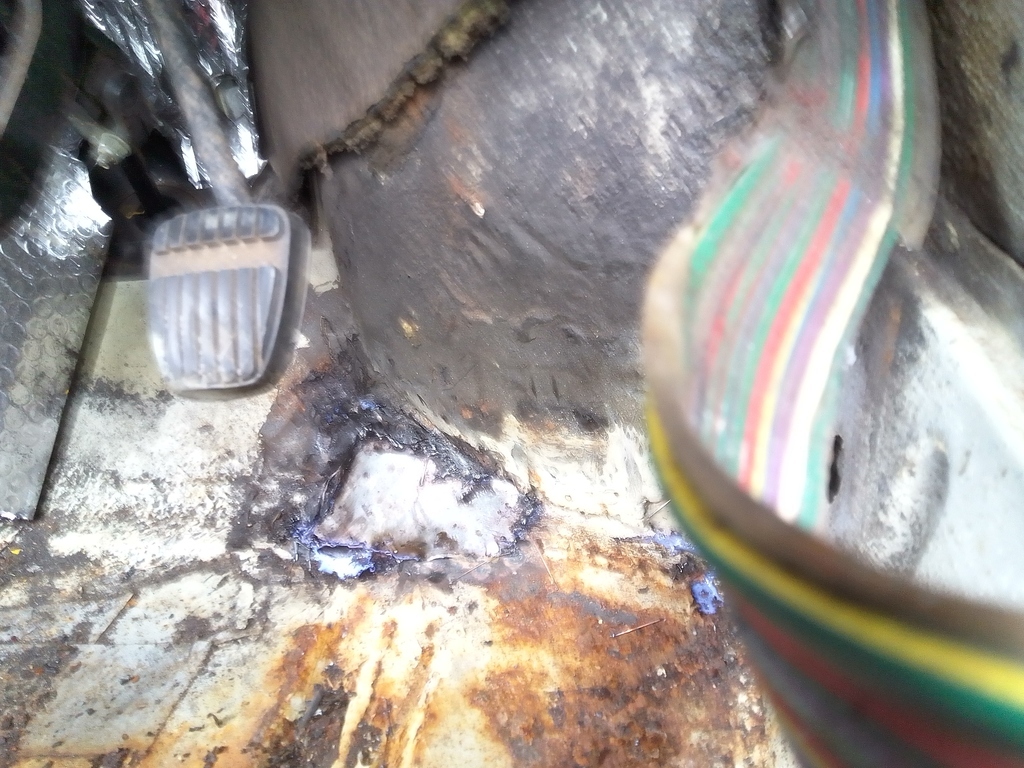 Passenger side didn't have the same problem, although it was a bit damp from the recent downpours. I took out the foam sound proofing panels from the front of the car since they are definitely holding on to water, the red carpet barely holds on to any water at all so that can stay for now since I hate driving around with no carpets in the car. Annoyingly, it wasn't until after I had put all my tools away and was refitting the carpet that the light caught what turned out to be a tiny hole in the middle of the passenger floor pan so I'll have to come back and sort that out, it's so small you could probably drill it and fit a bung to repair it. 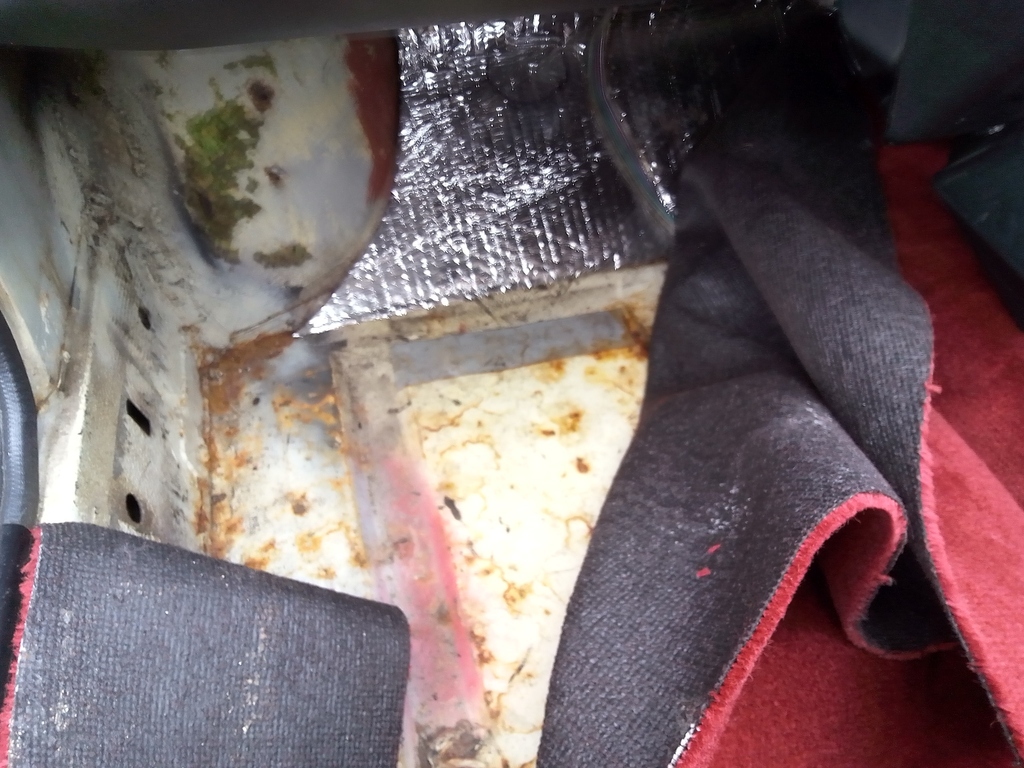 A break to let things cool down and whatnot, flatting off of the repairs, and then a nice dose of primer and seam sealer on both sides to keep the weather out and the rust at bay. Actually ended up looking a lot better than I was expecting. 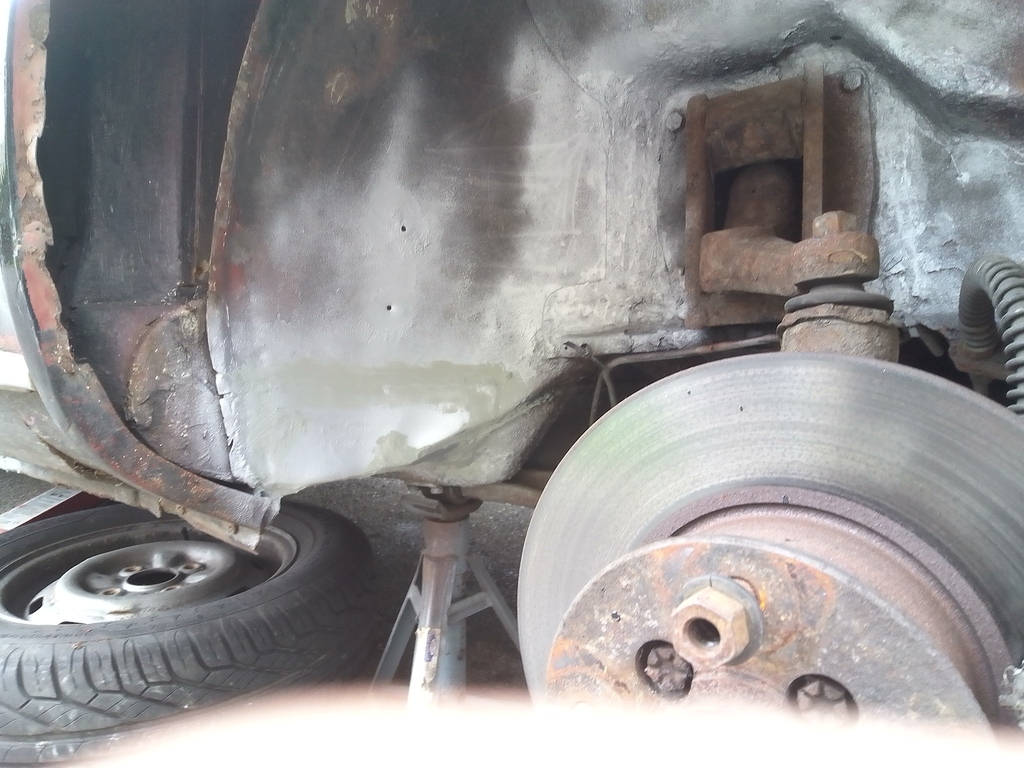 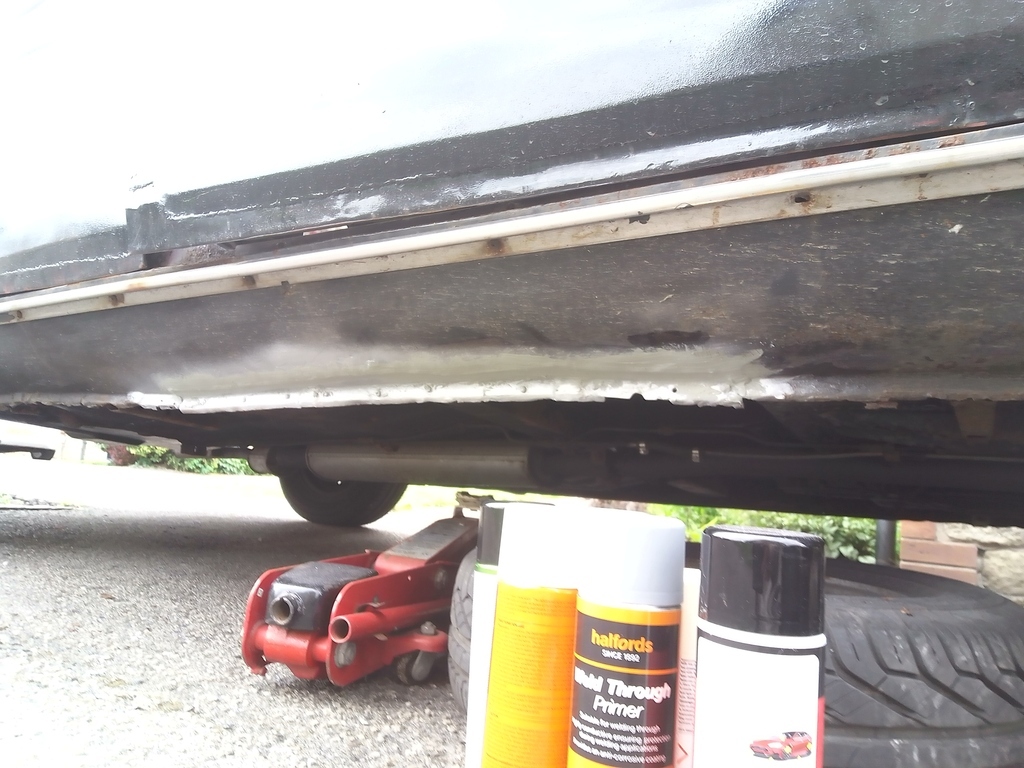 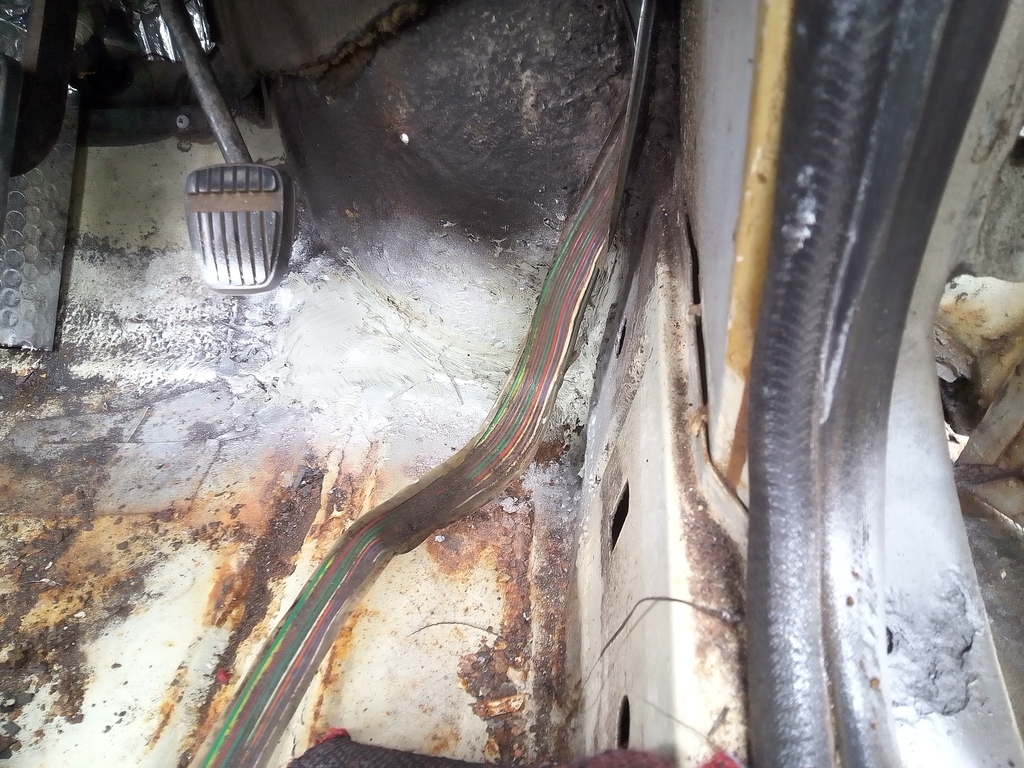 Finished it all off with some top coat and a spritz of underseal, forgot to photograph that, and let the underseal cure a bit before letting it down off the jack. That's when the jacking point - which has always looked pretty mangled on this corner but never offered a problem - decided to make some awful crunching noises, try and push up through the floor and generally give me The Fear. Found another point to jack from and all was well so I could investigate. It looks like the seam between the jacking point and the inner sill has partially failed, hidden by a very thick layer of factory underseal. There's also been a repair to the floor over the jacking point which might have been me, I'm not sure, and that still looks perfectly sound. I'll have to pull the carpet back again and have a bit of an explore, it'll either just need a quick line of stitch weld or for the jacking point to be removed and straightened, the floor likewise, and the whole lot put back together again. There's no obvious holes or rust so it's a bit of an odd one. I'm tempted to take a few days off work since May is always super quiet and just do as much welding as I can to deal with all these niggly little bits in one go before work gets busy again. We shall see. For now I'm just happy the big hole in the floor is now a big steel patch. |
| |
|
|
vulgalour
Club Retro Rides Member
Posts: 7,088
Club RR Member Number: 146
|
|
|
|
|
I'm not doing much in the way of pics and vids lately, cba I'm afraid.
Anyway, had a look at the fuel pump oil leak this afternoon. The phenolic spacer is well bonded to the cambox, that side isn't leaking which is great so I left that alone. The pump side, on the other hand, was leaking because the paper gasket had failed. Cut and fit a new cork gasket then went for a test run and it seems to be leak free now. I don't think it will last very long, it never normally does. I'm hoping the cork is just that bit more flexible than the paper, and obviously a little thicker, so should take up any variances. A go over with a sanding block didn't highlight any particularly egregrious surface deviations so I just have to keep trying. Next attempt at sealing will be cork gasket and goop if this one fails.
Happily, the oil filler tube gasket has proven successful and I'm getting no oil from there and while there is oil residue on the belts side, I'm not seeing any new appearing from any particular spot. I think I'm getting close to the point where I can just degrease everything and keep an eye on things now. There's also less spots of oil appearing on the drive when I park up, so that's good too.
|
| |
|
|
vulgalour
Club Retro Rides Member
Posts: 7,088
Club RR Member Number: 146
|
|
|
|
Hi is the tank still available? I forgot to update this thread. I've actually moved and am now in Lincolnshire. The car (and parts) are still in Kent with my ex. Arranging anything is going to be awkward for the forseeable. |
| |
|
|
vulgalour
Club Retro Rides Member
Posts: 7,088
Club RR Member Number: 146
|
|
|
|
|
The bulbs were more work (EDIT: by which I mean I'd have to find somewhere to put the sides and indicators after fitting the bulbs for the look I want on the front), hence the decision I made. I want the sides and indicators in the headlight bowls and this seemed the best way to do it in one shot with the least hassle.
|
| |
Last Edit: May 3, 2024 14:42:29 GMT by vulgalour
|
|
vulgalour
Club Retro Rides Member
Posts: 7,088
Club RR Member Number: 146
|
|
|
|
Happy days, had a little payment come in so I could order those LED headlights. 10% discount knocked them down to £230 for two pairs, and there was free postage. Brightness - should be much improved helping me see where I'm going much better Aesthetics - indicators and sidelights are incorporated into the headlights, this is a lot tidier than the current set up. Wipers - When I've got all systems running in the rain, my wipers can slow down when I'm stood on the brakes at a junction (heated rear screen, headlights, sidelights, indicators, all five brake lights, heater, blower fan, and the wipers themselves) so hopefully LED units will help out a bit there. They do look to be plug and play so even an idiot like me should be able to fit them and since I already have a digital flasher instead of an old bimetallic one I shouldn't need to worry about flash rates on the indicators. These are the ones I got in the end: www.originalcaferacer.com/product/5-75-monaco-gp-led-headlight-pair-50w-drl-dot-e-marked/I think they'll look okay because while they are black which I didn't exactly want, that should blend in to the black plastic trim on the front of the car. I just hope it doesn't end up looking a bit 'modernised hot rod'. |
| |
|
|
vulgalour
Club Retro Rides Member
Posts: 7,088
Club RR Member Number: 146
|
1981 Eriba Tritonvulgalour
@vulgalour
Club Retro Rides Member 146
|
Apr 28, 2024 15:28:20 GMT
|
That's looking really smart. I suppose if you wanted the new lamps to look a bit more like the old ones you could paint the external bits of the black base in white. If you still have the Jeep as tow vehicle, you could also fit it with some of those trims like you used to see on Rialtos and Robins for a bit of pseudo matchy-matchy.  |
| |
|
|
vulgalour
Club Retro Rides Member
Posts: 7,088
Club RR Member Number: 146
|
|
Apr 27, 2024 22:05:32 GMT
|
|
As expected, the fuel pump is leaking oil again now. Not much, it's only just started, but I'll have to pop it off and re-gasket that to see if i can seal it again.
Happily, the other oil leaks seem to have remained fix, so it's not all bad.
|
| |
|
|
vulgalour
Club Retro Rides Member
Posts: 7,088
Club RR Member Number: 146
|
|
Apr 26, 2024 15:53:38 GMT
|
|
I have a significant price rise coming soon. If you want to get a commission or original at the current prices do it now, they won't be this price for long.
Having spoken to curators and artists today I've learned my prices are far below industry standard and have been advised to raise them accordingly. This is people who have been in the industry longer than me, have experience promoting their own work and the work of others, and have assessed my original work in person today.
This will hopefully give me the time to create better work, to take on technical training, to promote my work better and, eventually, have a much better standard of living due to a healthier wage.
If you want things at the current price, book/buy NOW. I'm not keeping the current prices for long.
|
| |
|
|
vulgalour
Club Retro Rides Member
Posts: 7,088
Club RR Member Number: 146
|
Bilbo's mk1 Cavaliervulgalour
@vulgalour
Club Retro Rides Member 146
|
Apr 24, 2024 11:50:22 GMT
|
|
That's turned out really nice, happy bonus that the door carpet doesn't need recolouring now since it looks deliberate along with the new seats and dash recolour. I'd leave the centre console black so it flows into the bottom half of the dash nicely, especially if you're keeping black carpets with red mats. Nice thing with the dye is if you don't like any colour choice you can just go over it again with a different colour.
You might be able to get a rubber gaitor from a tractor supplies place, I was looking for similar a while ago and they had all sort of different shapes and angled bellows gaitors for all sorts of tractor applications.
|
| |
|
|
|
|
vulgalour
Club Retro Rides Member
Posts: 7,088
Club RR Member Number: 146
|
|
Apr 23, 2024 19:30:13 GMT
|
|
Done a few more miles so it's time for an oil leak update.
Fuel pump - seems to have stop leaking. If it is leaking it's such a tiny amount I can't see it.
Oil filler tube - no more leaking. More to the point, the oil that was on the front of the block as pretty rapidly self-cleaned off
Belt side - No reappearance of oil. However, there is an appearance of muddy water all over everything which does look and feel slighytly oily. There might be a minor gasket weep for the oil filter/pump housing, but that might also be dirty road water.
Clutch hydraulics are remaining trouble free too, if I had a leak there I'd definitely expect to see it by now and I'm not losing a drop of fluid or having and gear selection woes. I've also apparently cured the dead spot issue and I have a theory on why that might be. Since the deadspot would only happen after changing gear, often when setting off, and nothing else - carb settings, ignition timing, etc - made any lasting difference I suspect I've had a bit of air stuck in the clutch hydraulics. If my theory is correct that means that most of the time the air is in just the right spot that everything works as it should, but every now and then the air is in a place where I can't get proper travel on the clutch arm in relation to the pedal, and that was causing the dead spot issue. It was a lot like the clutch wasn't engaging properly, but not a slipping clutch, and because of the intermittent nature of the problem it had proven impossible to pin down. Now, it could also be that the problem has just gone away for a bit like it has in the past so I'm not counting any chickens and that's why my theory is just that.
I am actually enjoying just having the Princess to worry about lately, it's all the car I need and it's nice not to be distracted by other project cars for the moment. I'm also looking forward to heading back down to Kent later this year to see Pat and the Lanchester and for that I think I'd like the Princess to be trustworthy enough to take me since she is cheaper than the train and takes no longer to get there and back. Might have to install some sort of tunes first, it's a 4-5 hour drive and I don't fancy that in just my own company.
|
| |
|
|
vulgalour
Club Retro Rides Member
Posts: 7,088
Club RR Member Number: 146
|
|
Apr 22, 2024 18:34:25 GMT
|
Good luck with your time management endeavours. Could be a good excuse to acquire a DeLorean. I've been doing battle with a nasty cold this weekend, so it's just as well the weather hasn't been so great. That said, bullied myself to get out and do something on the car and might have found and fixed a couple of minor oil leaks. Time will tell on that. Put the shiny wheel trims on too, fancied a change.  Work was finished on the white Rover a little while ago, that's just awaiting collection. |
| |
|
|
vulgalour
Club Retro Rides Member
Posts: 7,088
Club RR Member Number: 146
|
|
Apr 21, 2024 15:38:04 GMT
|
Fluid leak situation update for you all. Clutch fluid is remaining exactly where I left it with no signs of any leaks anywhere, I also still haven't been able to get the dead spot to reappear which again may be coincidental or it may be I've accidentally found the cause of it. Perhaps that dead spot has been low clutch fluid all this time and I simply hadn't brimmed the reservoir to the correct level. The fuel pump leak was a lot less serious than usual and I did find the bolts were not quite as tight as one might expect. Nipped them up just a smidge did a test run and the oil leak has thus far not reappeared. What has happened is one of the paper gaskets has taken on an odd shape though so I think I'll likely have to remove and regasket the pump anyway. 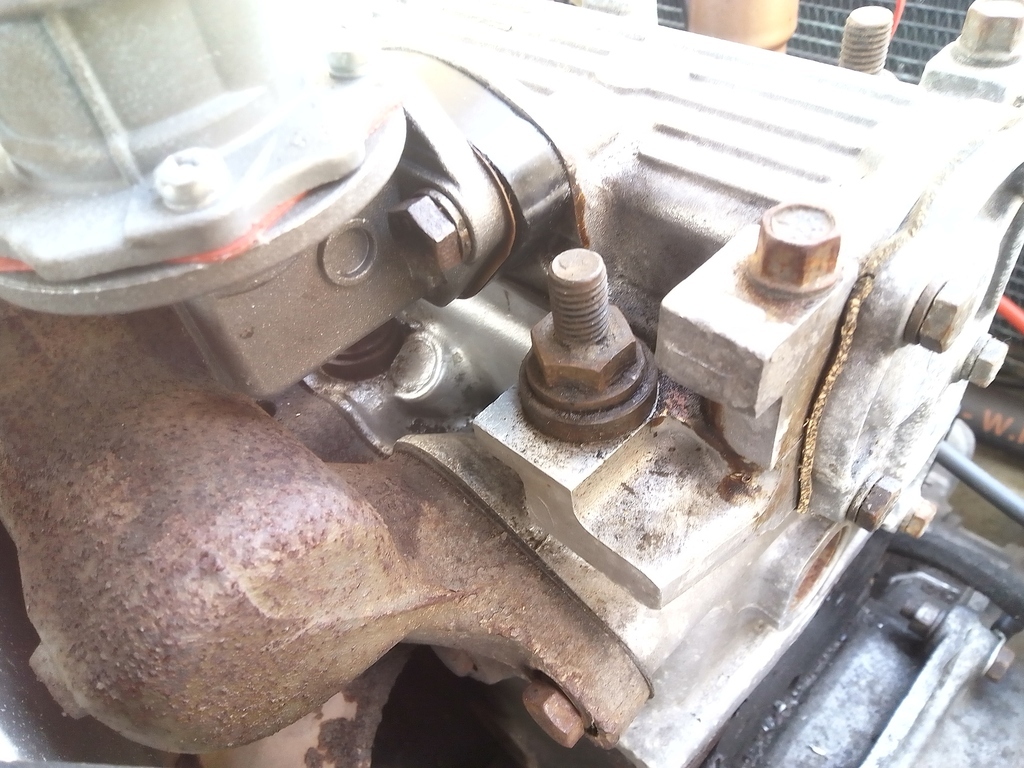 The other suspect oil leak was proven to be so when I remove the oil filler tube. I've had this off several times over the last twelve years and it's only ever been put back on with sealant because when I got the car it never had a gasket fitted. It was clearly leaking when removed so I cleaned everything up and fitted a cork gasket here. As with the fuel pump, I've not noticed any fresh oil appearing here after a run so hopefully that's that one resolved. 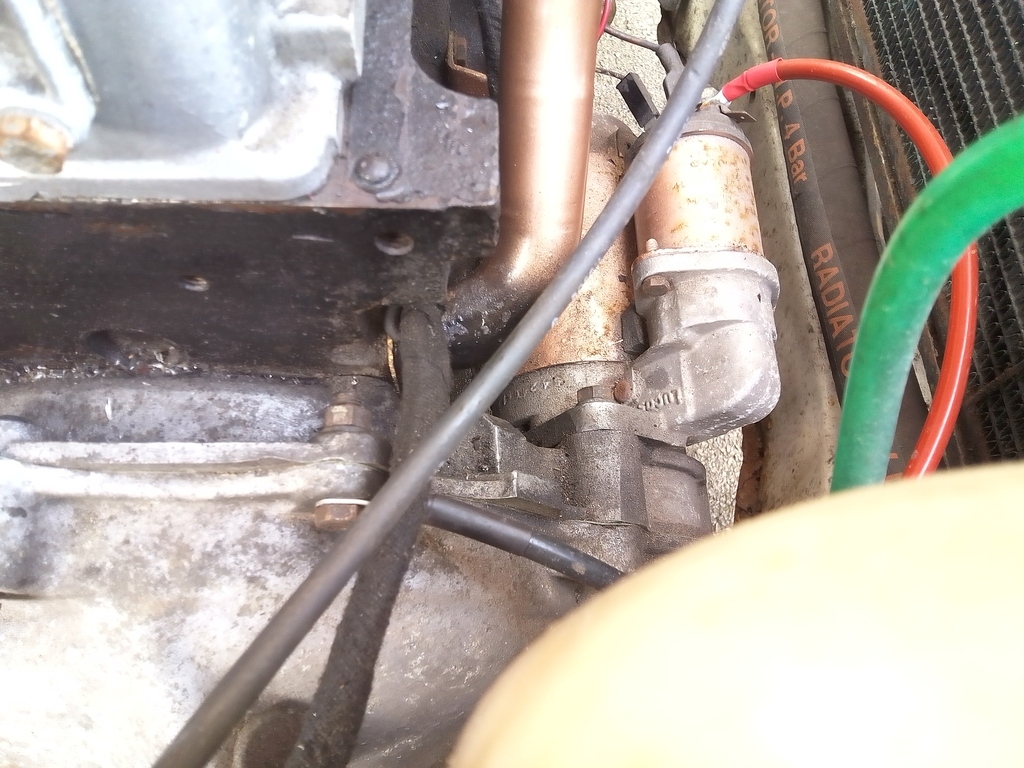 The other oil leak I cannot pin down at all. At the belt side of the engine there's a few tiny spots of oil as if it's been thrown up from somewhere else but none of it looks particularly gunky or old. I begin to wonder if maybe I've driven through something that looks like oil but isn't because the belts do pick up stuff and throw it all over the place due to the lack of undertrays and only a minimal cover on top of the belt as standard. I cleaned it all off and I'll see if it reappears. Other than that I'm not really seeing any issues aside from a lot of storage grime I need to hose down and some hastily applied paint that has finally failed and needs redoing. Would have liked to do more this weekend but I've been absolutely hammered with a cold since Thursday so there's a bit of a gap between what I think I can do and what I can actually do when I try and do anything. |
| |
|
|
vulgalour
Club Retro Rides Member
Posts: 7,088
Club RR Member Number: 146
|
|
Apr 19, 2024 10:40:51 GMT
|
Ah, it turns out I did rebuilt the clutch master cylinder in July 2020. Odd that I don't remember doing it, and good that I had reference of doing the work. I did the slave cylinder at the same time, so the system was basically overhauled three and a half years ago. 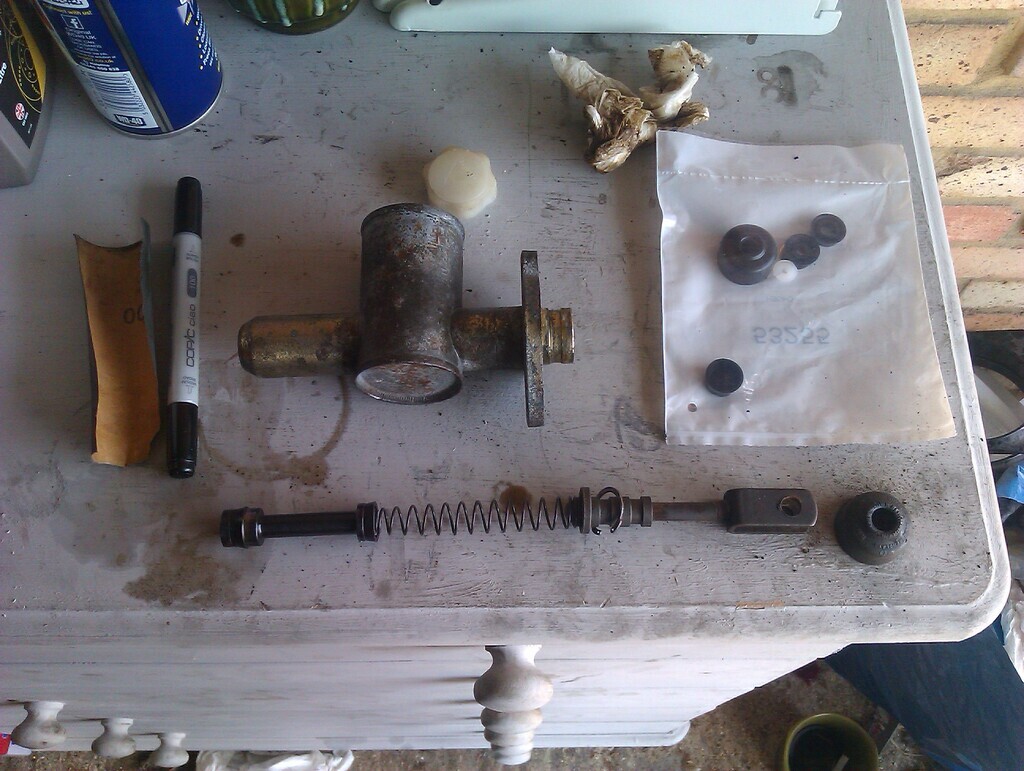 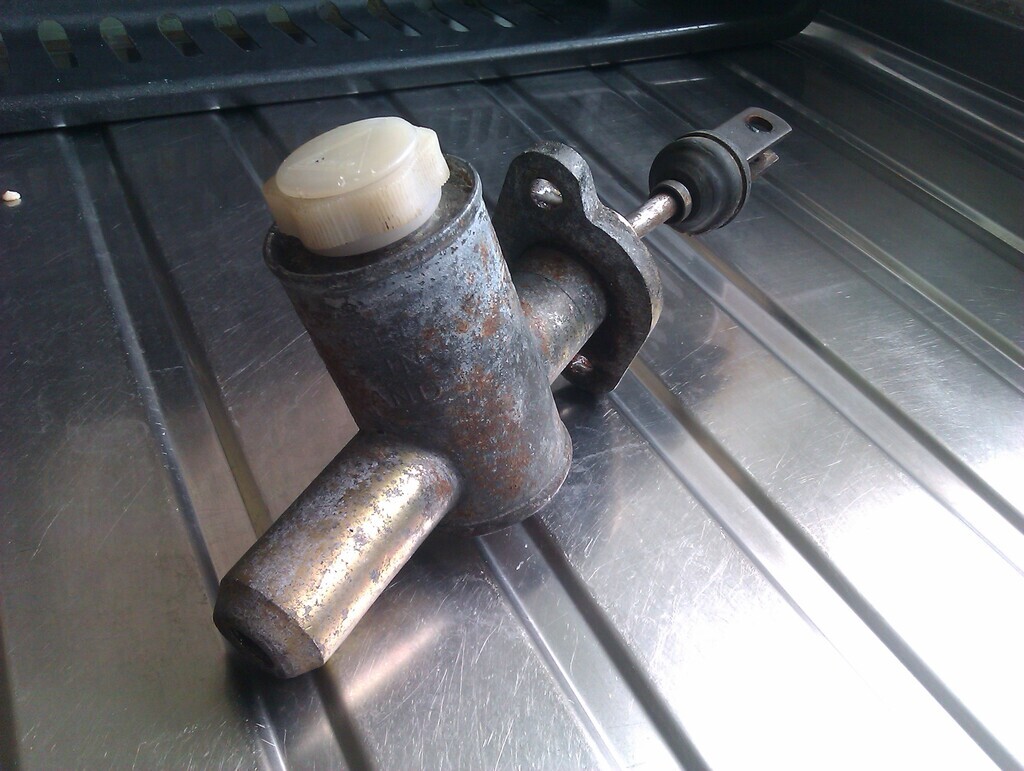 |
| |
|
|
vulgalour
Club Retro Rides Member
Posts: 7,088
Club RR Member Number: 146
|
|
Apr 19, 2024 10:00:32 GMT
|
|
Don't give it ideas!
|
| |
|
|
vulgalour
Club Retro Rides Member
Posts: 7,088
Club RR Member Number: 146
|
|
|
|
|
Today had to drop off a CV at a local bakery. Not expecting to be successful, while at the same time being very aware you miss 100% of the shots you never take. That meant using the Princess, since it's about 5 miles drive. Fluid level in the clutch master cylinder is still where it was so it hadn't leaked out overnight and the gear change still felt okay.
Off we trundled and immediately one thing became apparent which is the weird dead spot when setting off, especially when the car is cold, had gone. This could be coincidental of course, this is a problem that has come and gone for years now, but even when I tried to replicate the conditions that would make it happen I couldn't. Clutch control at lower speeds felt a lot better too than it has in a very long time.
I'm going to keep an eye on this one, make sure I check the clutch fluid every week alongside the other fluids (which I arguably should be doing anyway) and just monitor the situation. There's still no sign of fluid leaking out anywhere either inside the car or inside the engine bay so if it is leaking it must be a very tiny leak.
|
| |
|
|
vulgalour
Club Retro Rides Member
Posts: 7,088
Club RR Member Number: 146
|
Bilbo's mk1 Cavaliervulgalour
@vulgalour
Club Retro Rides Member 146
|
Apr 18, 2024 17:37:49 GMT
|
|
You chose the right red, goes well with the seats. Hope it wears as well in your cabin as it has in mine. Vauxhall colour interiors from this era were excellent, and a little later when they did the colour matched interiors with crushed velour seats.
|
| |
|
|
vulgalour
Club Retro Rides Member
Posts: 7,088
Club RR Member Number: 146
|
|
Apr 17, 2024 20:31:12 GMT
|
|
It's possible. I've not seen any sign of leaking inside the car and obviously the fluid must be going somewhere so for now I'll just keep an eye on things and see if I can discover where it's escaping. It has had a replacement hose and slave cylinder when they both failed a while ago, the master cylinder I've never touched so might need a rebuild.
|
| |
|
|
vulgalour
Club Retro Rides Member
Posts: 7,088
Club RR Member Number: 146
|
|
Apr 17, 2024 16:56:51 GMT
|
|
Slight fright today, although I was half expecting it since things have been going so well. Yesterday the clutch pedal felt 'off', but I couldn't figure out if it was just me being tired, or the car being cold or what, so just had to wait and see. Today on trying to reverse out of a parking bay I couldn't actually get reverse. Now, the Princess has done this to me before a couple of times, I know the drill. If the gear change is notchy, that usually means the oil is getting low so I check that and it wasn't as low as it would have been to affect the gear change. Dropped a tiny bit of oil in anyway to bring it to almost the full line and it made no difference. That means it's clutch cylinder related. It's not the clutch, it's not slipping, I'm just not getting full travel of the arm in relation to the pedal. That is usually failed seals in the clutch cylinder or a collapsed clutch hose. Checked those out and both are dry and don't show signs of damage. Checked the fluid level in the clutch reservoir and it was actually very low. It's been a while since I've checked this and the car had been sat around doing nothing for a while, it made sense that it might have disappeared a bit like brake fluid does sometimes. Topped it up, still no change, opened the bleed nipple to check the hose wasn't restricted and found that there was air in the system, probably because the fluid had dropped a bit too low. Once bled, all gears back to normal and reverse considerably better than it's been for a couple of weeks.
We'll see if normal service continues, it might, or I might need another clutch hose (there's at least three different lengths, which I found out last time I tried to get one) or to rebuild the clutch cylinder again. Time will tell. It's a bit of a relief something went wrong to be honest, it's been a bit overdue.
|
| |
|
|
vulgalour
Club Retro Rides Member
Posts: 7,088
Club RR Member Number: 146
|
|
Apr 17, 2024 10:33:55 GMT
|
|
I did discover some rubber sheet/webbing last night that's leftover from another project, could that work? I'm just thinking since it's flexible and the rubberised backing on the original blanking plate actually works, maybe it would be more effective since it has a bit more squish to it than cork or paper or card.
Or is it something I should totally avoid. I've no idea if the rubber I've got is heat/oil safe since it wasn't bought as gasket material, so I might just make it worse.
|
| |
Last Edit: Apr 17, 2024 10:34:19 GMT by vulgalour
|
|


