|
|
|
Jan 28, 2013 21:42:16 GMT
|
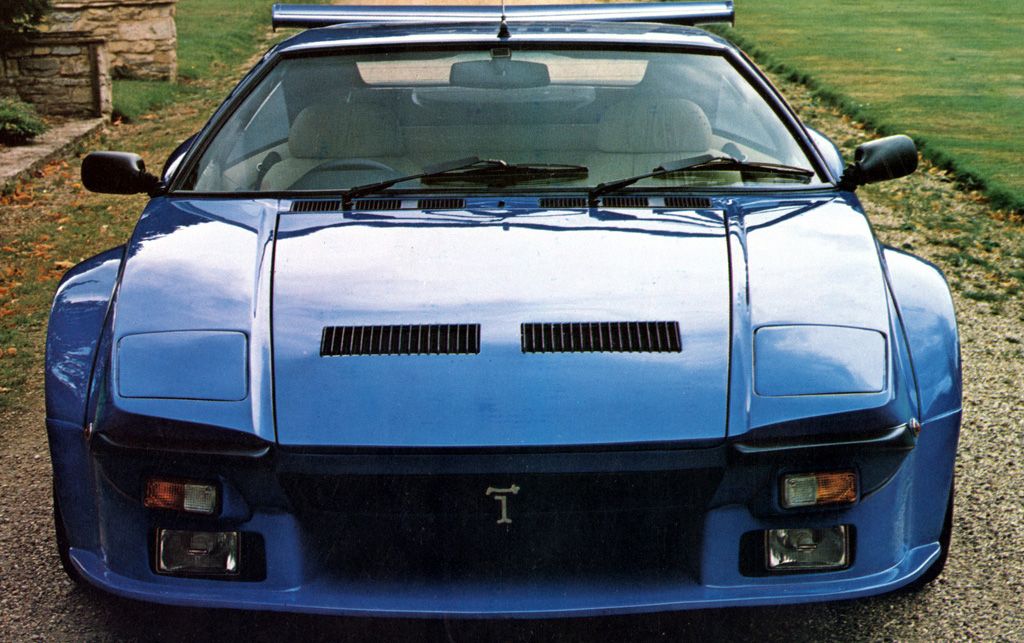
Surely the Monza and XJS-C are too new to compete? Saw the Toyota on the A77/M77 on Saturday afternoon. Looked great. Didn't see anything else though. Not all the cars were taking part in the full Monte Carlo, most were on a heritage run through local car clubs. |
| |
|
|
|
|
|
|
|
Jan 26, 2013 22:58:15 GMT
|
I don't know when they will be in each of these locations but this is their planned route; maps.google.co.uk/maps?saddr=People%27s+Palace+(Museum),+People%27s+Palace+(Museum),+Glasgow,+Glasgow+City,+United+Kingdom&daddr=55.7925655,-4.3053939+to:55.7510051,-4.363124+to:kilmarnock+to:dumfries+to:carlisle+to:penrith+to:scotch+corner+to:High+St%2FA634+to:Barnby+Moor+to:Cambridge+to:dartford+to:Unknown+road&hl=en&sll=55.756583,-4.338226&sspn=0.078146,0.154324&geocode=FWc5VAMdPFm__ylFYN7JukaISDGLw1pYSeLLaA%3BFbVTUwMdD06-_ykLw3hs6keISDH41-kyA0982A%3BFV2xUgMdjGy9_ymPt7HvxjeISDExVAhNEas9lg%3BFf-cUAMdmFq7_ykx2CL9Ci2ISDF5nDYCoM936A%3BFYtQSAMdgP3I_ynTkeGimLBiSDGp4rIyyXLt9g%3BFbmXRQMdPT_T_ykPa-4-3-F8SDEtaBW6tkMKXA%3BFaEbQgMdPP_V_ylJOAtnkFV8SDFO-2tKJsrbRQ%3BFWy2PgMd9pTm_yljbrIm6p9-SDEgExkZQOi_Tw%3BFRx4LgMdvsvv_w%3BFQ4gLgMdTaPw_ylhj_ObcKh5SDGaGrQpu0kw7A%3BFRmXHAMd2dsBACktASrziV3YRzEhPV6j4SCjYw%3BFcIBEQMdKE8DACnRtjWyYa3YRzEvl1KappIXjw%3BFWcaDAMdblAUAA&mra=dpe&mrsp=2&sz=13&via=1,2&t=m&z=6 |
| |
|
|
|
|
|
Jan 26, 2013 22:25:17 GMT
|
Nice pics, thanks for posting. Shame, its the first year I've missed this since they started from Glasgow again.Had to work. I was supposed to be at work  Nowhere near as exciting as that first year. Combination of Health and safety and city council publicity department has diluted the fun. |
| |
|
|
|
|
|
Jan 26, 2013 22:18:43 GMT
|
Incase you didnt know, Glasgow is again one of the starting locations for the Monte Carlo classic rally. I popped down today straight after work as the cars set off at 2pm. I have just finished uploading my pics to Flickr;  Monte Carlo 2013 35 Monte Carlo 2013 35 by route9autos.co.uk, on Flickr 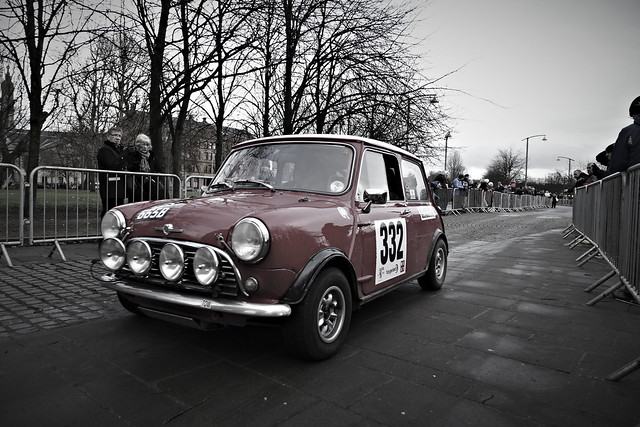 Monte Carlo 2013 28 Monte Carlo 2013 28 by route9autos.co.uk, on Flickr 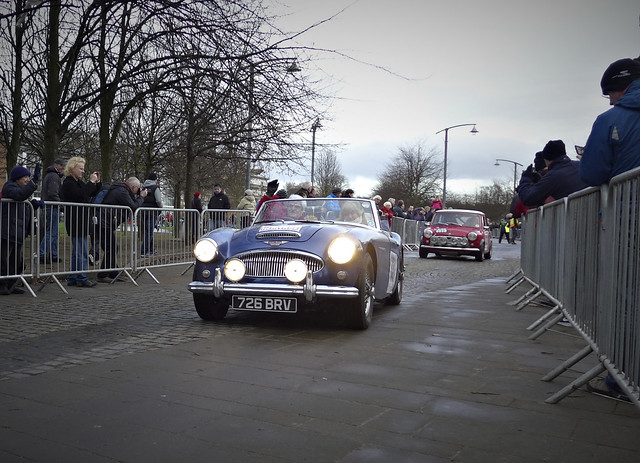 Monte Carlo 2013 27 Monte Carlo 2013 27 by route9autos.co.uk, on Flickr  Monte Carlo 2013 19 Monte Carlo 2013 19 by route9autos.co.uk, on Flickr  Monte Carlo 2013 14 Monte Carlo 2013 14 by route9autos.co.uk, on Flickr  Monte Carlo 2013 58 Monte Carlo 2013 58 by route9autos.co.uk, on Flickr  Monte Carlo 2013 5 Monte Carlo 2013 5 by route9autos.co.uk, on Flickr  Monte Carlo 2013 45 Monte Carlo 2013 45 by route9autos.co.uk, on Flickr  Monte Carlo 2013 13 Monte Carlo 2013 13 by route9autos.co.uk, on Flickr I will refrain from posting all of them but if you want to see some more of the same you will find them in the usual place; www.flickr.com/photos/route9autos/sets/72157632615100703/with/8417202861/Dave |
| |
|
|
|
|
|
Jan 22, 2013 17:35:09 GMT
|
Todays update and the first bit of welding complete. Its only a small bit but its a start. Todays job, replace the rear crossmember. I chose to start here so that I could use the bolt holes on the body to line up this part and once this is in place I can line up the body with the crossmember bolt holes. 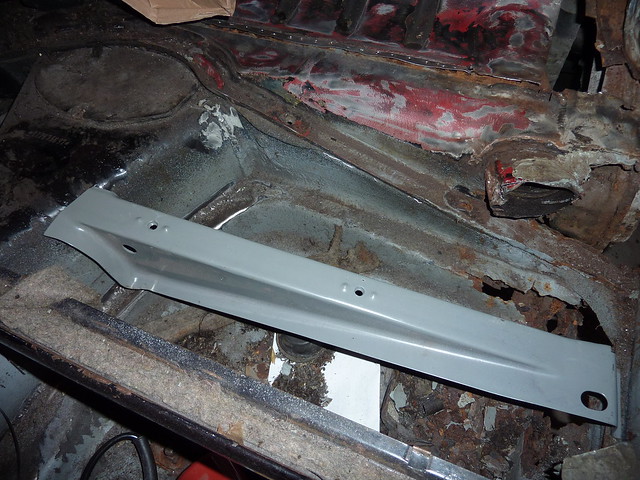 cross member on cross member on by route9autos.co.uk, on Flickr This part will be welded to the floor pan and bolted to the body. Started by cleaning the paint from the areas that will be welded.  cross member on cross member on by route9autos.co.uk, on Flickr I cut a small section from the body to allow me access to the weld seam.  cross member on cross member on by route9autos.co.uk, on Flickr The body part I cut will be replaced anyway. I could have cut the complete section here but I would have lost the bolt holes for reference. With the section removed I could get to the weld line to clean it up.  cross member on cross member on by route9autos.co.uk, on Flickr Annoyingly when the floorpans were replaced in the past they were seam welded instead of plug welded so there will be a lot of cleaning up needed when I get to that point. With the old panel cut out I could thoruoghly clean up the chassis where the cross member will be welded to it.  cross member on cross member on by route9autos.co.uk, on Flickr The new crossmember is in place, seam welded and quickly covered with primer.  cross member on cross member on by route9autos.co.uk, on Flickr I will do a bit of cleaning up in this area then seam seal it when its not -2 in the garage. I'm now waiting for heater pipe to run up the A pillars and maybe a warmer day to start on the sill/heater channel replacement......The big job. Dave. |
| |
|
|
|
|
|
Jan 20, 2013 22:09:16 GMT
|
|
Looks like the Delorean in Back to the future after it has travelled in time :-)
|
| |
|
|
|
|
|
Jan 15, 2013 21:02:12 GMT
|
|
Hi Don, I'm glad you are enjoying the pictures, I have really enjoyed cycling about taking them.
I havent been on the Apollo site as I hate to tell you, it was before my time (should have said I picked up the Sham69 album at a jumble sale) and I only ever remember seeing the apollo derelict.
|
| |
|
|
|
|
|
Jan 15, 2013 13:53:43 GMT
|
|
My work is on Muirend ave, one street over from Gavinton.
I have a Sham 69 LP with 2 tickets for the Apollo taped to the front but the apollo is long gone and now the site of Europes tallest cinema. All shiny and modern like a big sore thumb.
At the moment in Glasgow I'm having an issue with so many 60's and 70's concrete buildings that are getting torn down and replaced by glass and aluminium blocks. Might not be to everybodys taste but it seems wrong to completely erase an era of buildings.
|
| |
|
|
|
|
|
Jan 14, 2013 22:18:21 GMT
|
|
|
| |
|
|
|
|
|
Jan 14, 2013 19:50:29 GMT
|
Got back to the garage today and it was bloody cold but took another big step towards that BIG cut.; 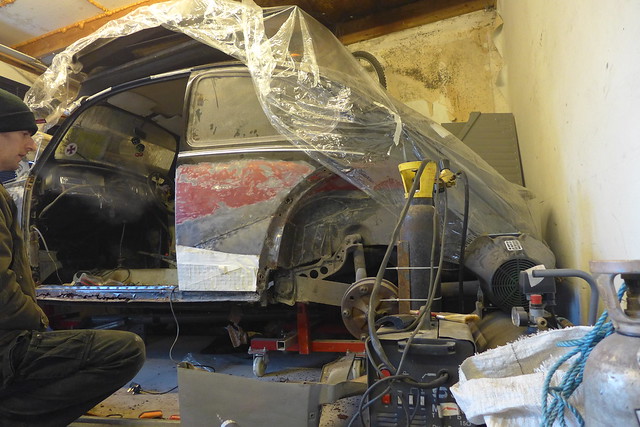 Cold day in the garage. Cold day in the garage. by route9autos.co.uk, on Flickr I don't smoke so what you are seeing coming from my mouth is an example of how cold it was today in the garage. My first task was to remove these spot welds. I want to keep as much of the boot floor panel as possible to try and keep the join looking like it did when it left the factory.  P1000307 P1000307 by route9autos.co.uk, on Flickr So with a 5mm drill I ran along all the spot welds. I wasnt worried about going through to the lower panel as this will be on the scrap pile by the end. 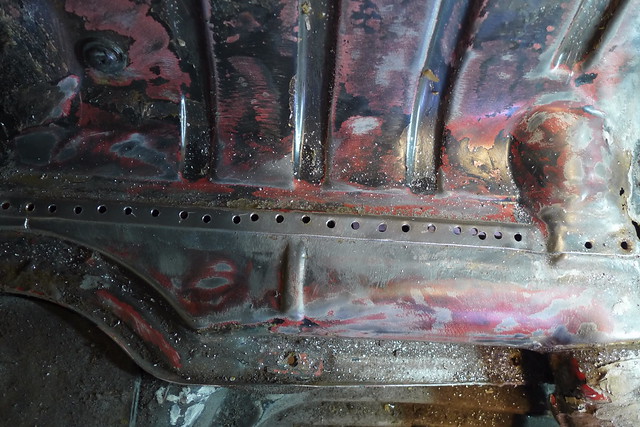 P1000308 P1000308 by route9autos.co.uk, on Flickr With the welds driled through I separated the panels with the best chisel in the world....A big screwdriver. 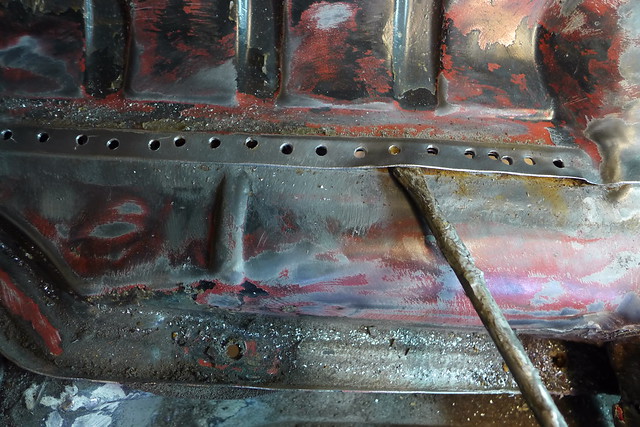 P1000310 P1000310 by route9autos.co.uk, on Flickr After sleeping on the problem of what to do with the loom I decided that soldering the wires back together here was easier than trying top feed the loom back through to the engine bay.  P1000316 P1000316 by route9autos.co.uk, on Flickr I cleaned out the rot and the previous repair plate in the rear corner. It will help getting the new panel in place and I wanted it to be fresh so that I don't have to worry about it again.  P1000340 P1000340 by route9autos.co.uk, on Flickr To get ready for welding this part on I needed to clean off the paint along the edge so that I could get a clean weld. 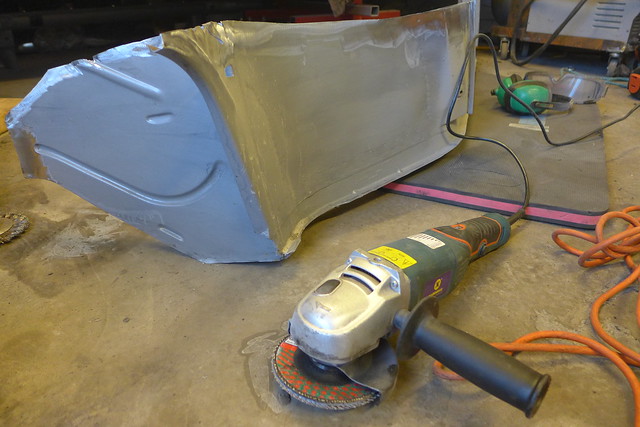 P1000337 P1000337 by route9autos.co.uk, on Flickr Before I left today I was worried about the cold and the moisture causing rust on the 1/4 panels so a quick coat of primer for protection then home for a heat. 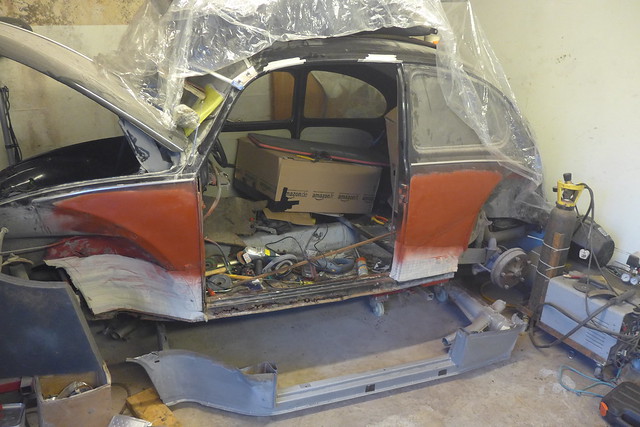 P1000341 P1000341 by route9autos.co.uk, on Flickr Hopefully get back to it soon and get on with the big cut. Dave. |
| |
|
|
|
|
|
|
|
Jan 13, 2013 22:54:54 GMT
|
|
|
| |
|
|
|
|
|
Jan 12, 2013 17:17:35 GMT
|
So three months have passed and finally I have made some progress on this project. A combination of Christmas, work and waiting for my knee to heal has kept me away from the garage but today I got back to it. Job one today was pulling out the back seat, carpet and parcel shelf. As usual the glue holding the carpet to the sound deadening was no where near as strong as the glue holding the messy stuff to the car. 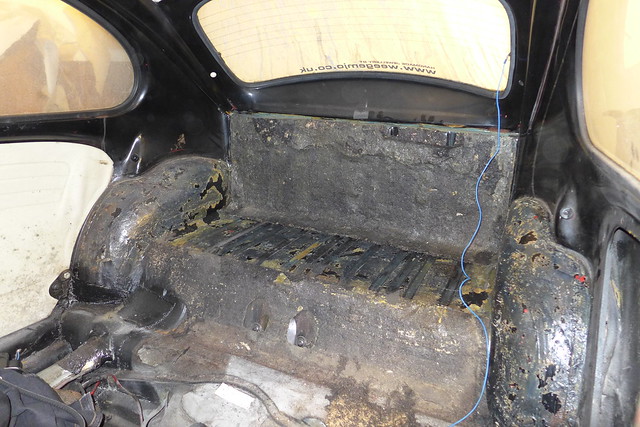 Project progress 12/01/13 1 Project progress 12/01/13 1 by route9autos.co.uk, on Flickr So a bit of time was needed to scrape off the tar hairy stuff sound deadening and see what the steel underneath is like. 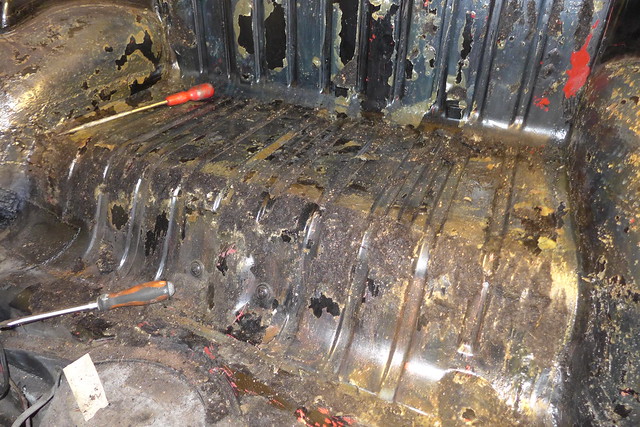 Project progress 12/01/13 2 Project progress 12/01/13 2 by route9autos.co.uk, on Flickr In all the steel was very good. The only crusty stuff is in this corner and I think I would have been more surprised if this hadnt been rusty. On the bottom right you can see where the wiring loom passes through the heater channel into the quarter where it runs into the engine bay. 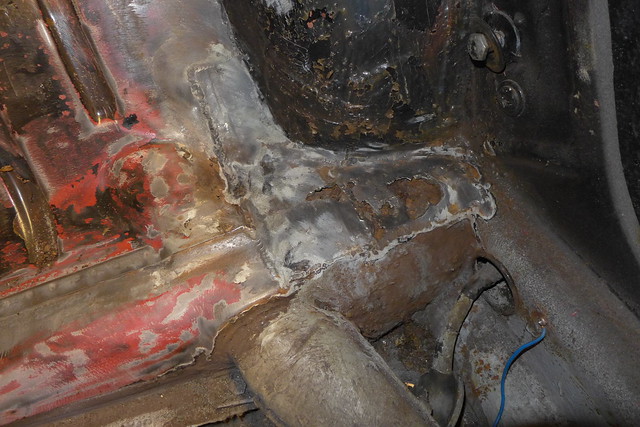 Project progress 12/01/13 3 Project progress 12/01/13 3 by route9autos.co.uk, on Flickr This is a problem as I either need to cut and re-connect the loom here or dissconnect the full loom in the engine bay and feed it through the hole. Think I may cut it but need to sleep on the idea first. So while thinking about the loom I thought I would remove the last of the floor pan bolts. These bolts wouldnt come out with a socket as the captive nuts have stopped being captive. 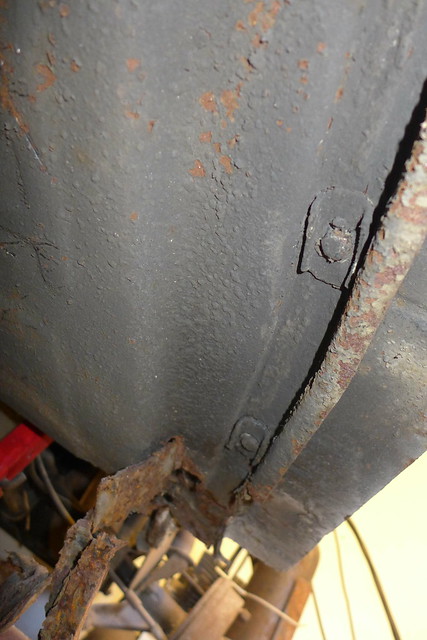 Project progress 12/01/13 4 Project progress 12/01/13 4 by route9autos.co.uk, on Flickr Best method I could think of to remove these bolts was to cut through them with my reciprocating saw. 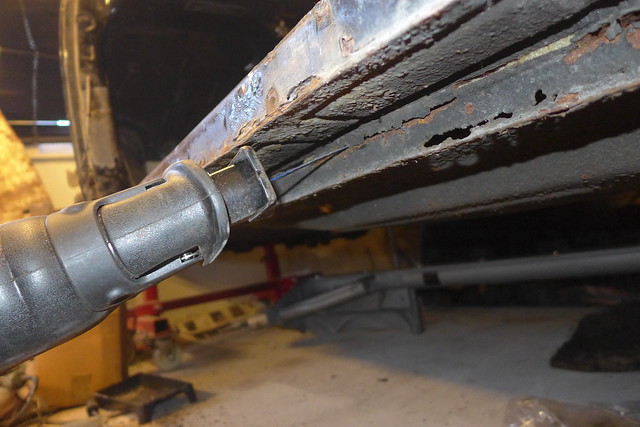 Project progress 12/01/13 5 Project progress 12/01/13 5 by route9autos.co.uk, on Flickr That was easy peasy so now there are no bolts holding the body down on this side of the car. Last job today was to mark out a template where the new panel will be let in at the back. 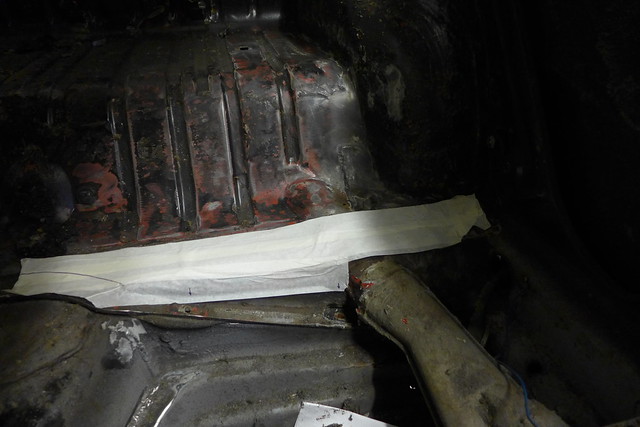 Project progress 12/01/13 6 Project progress 12/01/13 6 by route9autos.co.uk, on Flickr So thats where I left it today and it better not be another 3 months before I get to it again. Dave. |
| |
|
|
|
|
|
Jan 10, 2013 17:42:16 GMT
|
I doubt anyone will remember this one, but in 1986 there was a film called "The Gladiator" that went straight to TV. I remember that. Didnt the guys brother get killed by a drunk driver so he sets out to act revenge on the drunk? |
| |
|
|
|
|
|
|
|
|
I had a shot of one a few years ago for the telly;
|
| |
|
|
|
|
|
|
|
|
They look quite low so be careful when reversing into a kerbside parking space.
If the flap gets pushed onto the wheel when you are still moving backwards your wheel will pull it off.
I know from experience with my Beetle.
Dave.
|
| |
|
|
|
|
|
|
|
|
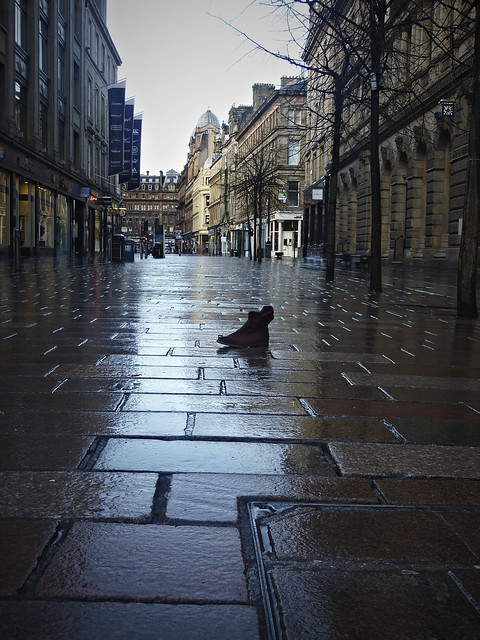
The shoe was out of its normal habitat. Usually they stay on top of bus shelters. ;D
|
| |
|
|
|
|
|
|
|
|
|
|
More likely to need an anti-zombie pack on a normal day in Glasgow ;D
Worse thing I saw was a few people doing the walk of shame with the scars of the night before.
|
| |
|
|
|
|
|
|
|
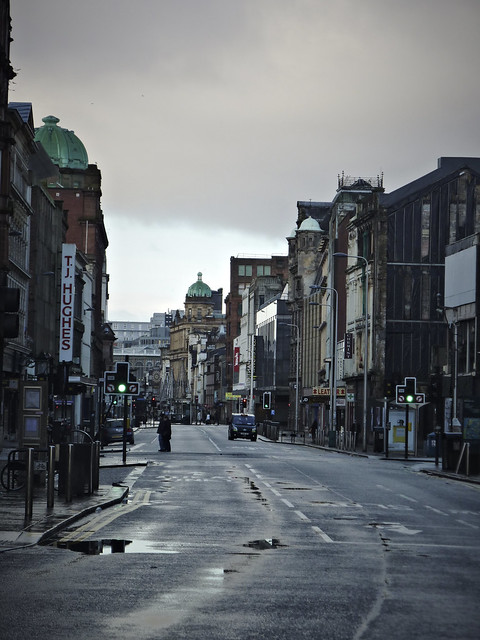
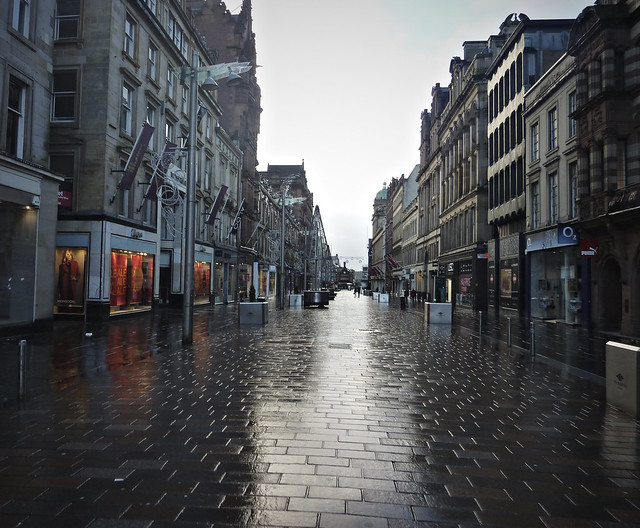
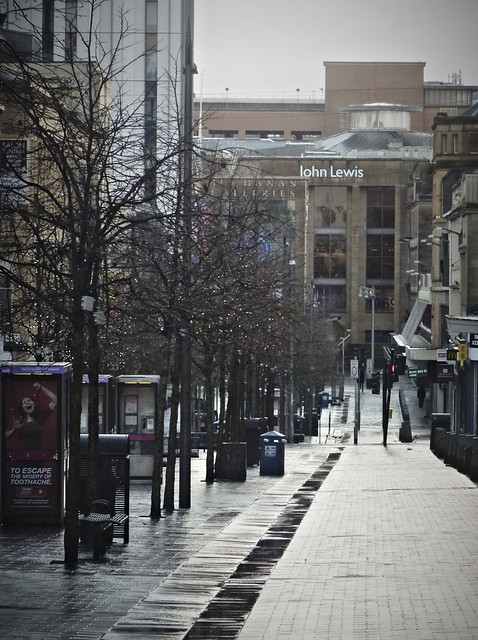
As I don't drink I didnt have a hangover on New years day so I got up early and headed out on my bike to see what Glasgow city centre looks like without people. I couldnt believe I was able to stand in the middle of some of Scotlands busiest streets at 9am on a Tuesday and not worry about getting run over. Here are a few of the results and there are more on my flickr page with more to follow if interested;  The day after the apocalypse The day after the apocalypse by route9autos.co.uk, on Flickr 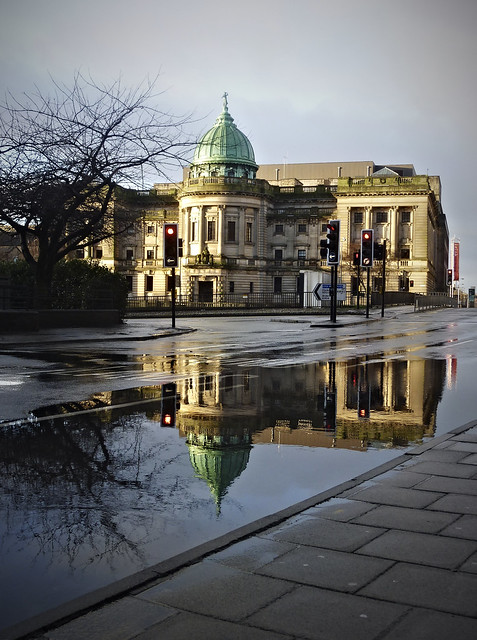 The day after the apocalypse The day after the apocalypse by route9autos.co.uk, on Flickr 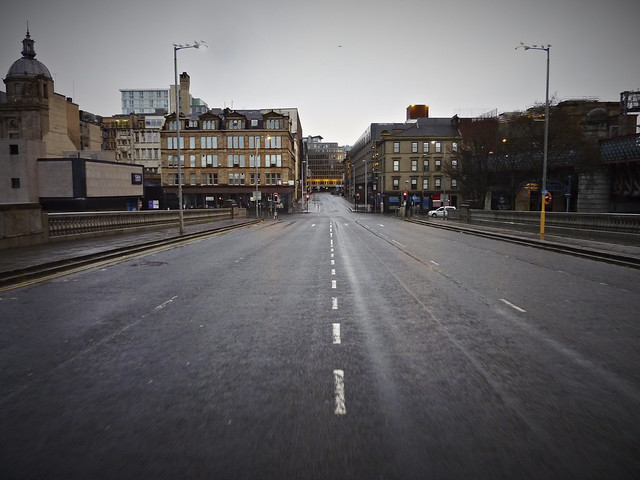 The day after the apocalypse The day after the apocalypse by route9autos.co.uk, on Flickr 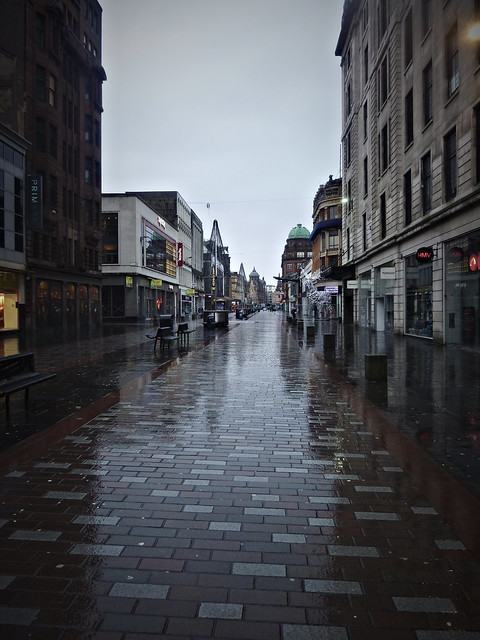 The day after the apocalypse The day after the apocalypse by route9autos.co.uk, on Flickr 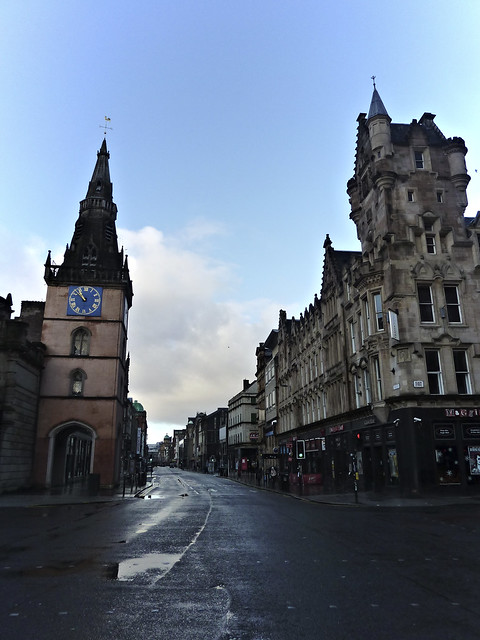 The day after the apocalypse The day after the apocalypse by route9autos.co.uk, on Flickr 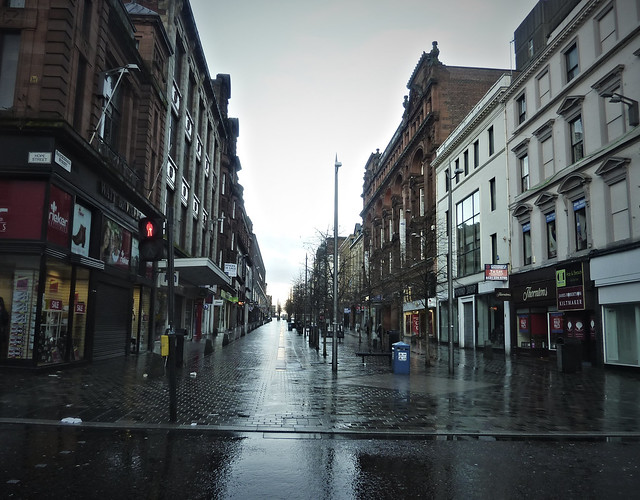 The day after the apocalypse The day after the apocalypse by route9autos.co.uk, on Flickr 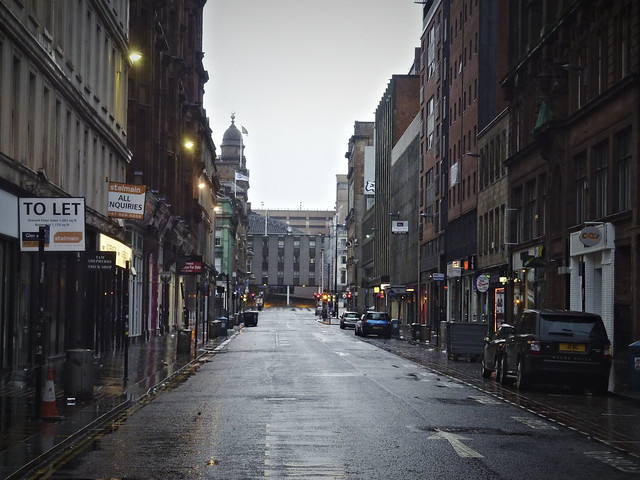 The day after the apocalypse The day after the apocalypse by route9autos.co.uk, on Flickr 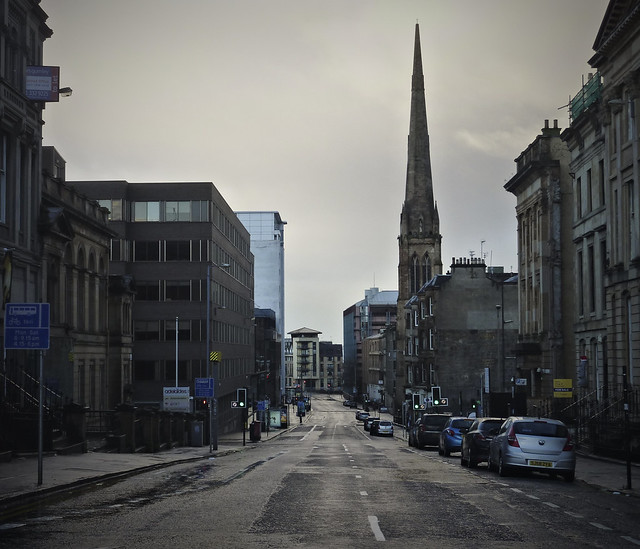 The day after the apocalypse The day after the apocalypse by route9autos.co.uk, on Flickr 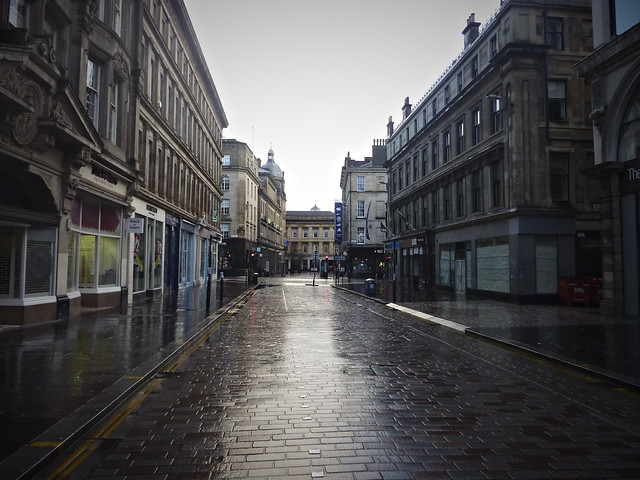 The day after the apocalypse The day after the apocalypse by route9autos.co.uk, on Flickr 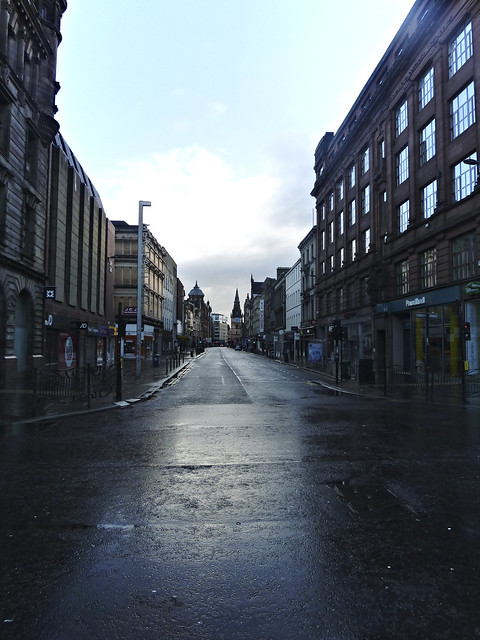 The day after the apocalypse The day after the apocalypse by route9autos.co.uk, on Flickr Dave |
| |
|
|
|
|
|
Dec 22, 2012 23:07:54 GMT
|
My pals back garden - its rammed with old stuff!!  isnt that on the far right one of those really rare VW's? VW Brazilia. Rare here but pretty common in south america. |
| |
|
|