|
|
|
|
|
Yeah, been adjusting that too. It's the top thread that's the main problem. 1/10th of a turn between too loose and too tight. Then it will do a few stitches then self tighten etc. I think it's just not that great. I'll keep playing with it. It used to sew fine. Oh... I had that problem with an old 1970s Alfa sewing machine. Really great old lump until one day it didn't matter what I did it just wouldn't sew. The paper trick worked for a bit but before long it was just reverting to wandering tension. Gave it to a neighbour and she unthreaded it, cleaned it, rethreaded it and it never gave her a jot of bother. Never did find out why because there was nothing obviously wrong with the thing. There did used to be a sewing machine specialist on, I think, Cavendish Street in Chesterfield town centre, did all the supplies, parts, and servicing for just about any machine out there. Hopefully they still survive, they might if the fabric market is still going well. Fred's over on West Bars near the market was also good for supplies and general knowledge, I hope they're still going.
They are still there  I might see what they say. It's an old frosted and rossmann. Basic, but built like a tank. |
| |
|
|
|
|
|
|
|
|
|
Ordered the spare part for my girlfriend's sewing machine. Spent a few hours adjusting mine but I just can't get it to work properly. Will have to wait till hers is fixed. Turned my attention to the battery charging situation. I have quite a decent charger for my RC cars which will do lead acid batteries too. It wouldn't detect the gains battery as it was too low. As suggested, I put another battery (low, but still reading 12.something v) in parallel and left it running. The dead battery was only showing 7v, but after a few hours it's showing 11v and is now drawing 5 amp from the charger rather than the 0.3a it was originally drawing! Looks like there is hope for getting it charged, time will tell if it will hold that charge though. It was a new battery, but stupidly I've let it flatten.  That's interesting - is it because the charger gives up if it doesn't see any return from a completely flat battery but the secondary battery fools it by showing a voltage? I'm in same boat - let a new battery decharge due to lack of use but have a leisure battery that has maintained it's level. Yes. The charger is smart so it just detects under voltage. It doesn't take long before you can disconnect the other battery. I left them connected for a good few hours though as they both needed charge. My charger tells me the amps being drawn so I could disconnect one of the battery and see how the amp draw drops, this way I could see which battery was taking what percentage of charge. The higher voltage battery is now full so I've left the previously dead flat battery charging. It's now reading 12v and drawing 6a from the charger so it's all working well at the moment. Wether it will hold it's charge and still output enough cranking amps I don't know. I guess I'll find out when it's back in the van. Edit to say these are connected in parallel (+ to +), so still 12v, just double the capacity. |
| |
Last Edit: Jul 7, 2020 14:05:33 GMT by VW
|
|
|
|
|
|
|
If the tensioners on the outside of the machine aren't helping it could be the tensioner on the bobbin, it should have a flathead screw on it to allow you to adjust it. You don't tend to have to do that one very often but it can wander off tension over time. Yeah, been adjusting that too. It's the top thread that's the main problem. 1/10th of a turn between too loose and too tight. Then it will do a few stitches then self tighten etc. I think it's just not that great. I'll keep playing with it. It used to sew fine. |
| |
|
|
|
|
|
|
|
On the sewing machine, have you cleaned out the bobbin holder bit? Sometimes on mine if there's a loose thread or fluff build up in there it can do all sorts of weirdness to the stitching, sometimes jamming the needle. It doesn't take much to end up being a proper headscratcher. It can sometimes help to run some paper through without the machine threaded too. I have no idea why it works, but sometimes it does, picked that advice up from a home economics teacher years ago. I've no clue what it's doing. I've been adjusting the needle bar a bit closer to the hook and have been checking timing. It's better, but still dropping stitches and giving uneven stitch length. No matter how I adjust the thread tensions I can't get a tight stitch. I think the main thread tensioner is rubbish. Thread tension seems to be unstable. I will keep trying, but my girlfriend's machine works well normally so once it's repaired, I should be good to go. It broke the top bevel gear, a new one has been ordered. |
| |
Last Edit: Jul 7, 2020 7:10:32 GMT by VW
|
|
|
|
|
|
|
Ordered the spare part for my girlfriend's sewing machine. Spent a few hours adjusting mine but I just can't get it to work properly. Will have to wait till hers is fixed. Turned my attention to the battery charging situation. I have quite a decent charger for my RC cars which will do lead acid batteries too. It wouldn't detect the gains battery as it was too low. As suggested, I put another battery (low, but still reading 12.something v) in parallel and left it running. The dead battery was only showing 7v, but after a few hours it's showing 11v and is now drawing 5 amp from the charger rather than the 0.3a it was originally drawing! Looks like there is hope for getting it charged, time will tell if it will hold that charge though. It was a new battery, but stupidly I've let it flatten. |
| |
|
|
|
|
|
|
|
is it a modern battery charger? If so I have found on very flat batteries mine thinks its a 6v and switches to that, connect it up in series with jump leads to a good battery or another car then when it's charging at 12V take the jump leads off and it stays at 12V. No, it's probably 80's at least. It's very basic bit has always been reliable. It seems to be waking up a little bit though, I'll leave it over night and see. |
| |
|
|
|
|
|
|
|
|
This isn't going as smoothly as hoped. Got the drivers seat cut open, first piece of cloth and scrim foam cut and then my girlfriend's sewing machine broke.
My machine has decided it no longer wants to sew too.
Need to order a new gear for her machine before I can carry on.
Also seems my battery charger has given up! Only outputting 6v, so looks like I need a new one. Not a very succesfull day!
|
| |
|
|
|
|
|
|
|
|
That's an interesting thought I hadn't considered.
I went to an auto electrics specialist to get the fuses and ask what they thought.
They thought 35 amp was excessive too. We came to the conclusion the best bet was to put 20a in and see. So I bought enough 20 amp, and enough 35 amp, to do the lot.
They said if I wanted they could measure the current draw across each fuse if I have any problems.
Fuses cost me a bit more than buying them from eBay but they are Lucas fuses rather than Chinese fuses, and I got to talk it through with some pros so all good.
I'll see what happens.
|
| |
|
|
|
|
|
|
|
Not touched this since last autumn, feel a bit guilty. Battery is flat, needs new fuses, paint is very dull a d damaged in places. Now I'm allowed to go places again I am going to get it sorted. Needs a polish, bonnet needs repainting, few other little paint repairs to do too. Top of the list though is the interior! Going to fix the seats, probably replace all the headlining and the carpets too. Seats first though. The starting point it rough!  I have some fabric, scrim foam, glue and thread now. Foams will need some work too. The foam has worn away where the cover has gone and where it's been exposed to the sun it's gone a bit crunchy. I guess I'll cut out the bad section, glue in a new block, and then sand it back to shape with a flap when on a grinder. They were this bad when I got it. I just put some covers on them and ignored it. I've been falling out of love a little with the van though and I realised it's because it's not as nice as I wanted it to be. With the interior sorted I'll enjoy being in it much more. |
| |
|
|
|
|
|
|
|
|
Used scaffold planks?
Edit, depending on how cheap you can get them locally.
|
| |
Last Edit: Jul 4, 2020 14:17:00 GMT by VW
|
|
|
|
|
|
|
|
|
|
Has anyone got a scrap 215/70/14?
I know it's an uncommon size. Want to try one for size before I think about buying new ones.
I may consider a pair of decent part works too.
Thanks.
|
| |
|
|
|
|
|
|
|
Great, I'll just stick a tack on them then Thanks |
| |
|
|
|
|
|
|
|
|
Ok, loose is a bit strong, but...
I redrilled the hubs on my cf but i screwed up one of the half shafts.
On all the other 3 corners I drilled the hubs so the studs are a really tight press in (beat in with club hammer) fit and drilled the brake drums so the fit nice and snug over the smooth, non spline section of the stud.
On one corner, I drilled the half shaft to the drum size. The studs knock in but they aren't as tight as id like. They may be fine, but if a wheel nut seizes or is over torqued and the stud spins then I'll be in all sorts of trouble.
Redrilling them was alot of work as I had to flat spot the rear face of the half shaft which took forever so I'm wondering if there is another option other than replacing it and trying again. For the same reason, and space reasons, I can't redrill further round.
My only options I can think of are to reduce the size of the hole (I dot punched around the edge which showed a little promise), find some 7/16 studs with a slightly fatter splined section, get new stock studs and hope the splined are more pronounced, or put a flat on the back lip of the stud and a tack weld on the back of the half shaft to stop the stud spinning.
They really aren't that loose, they still have to be knocked in with a hammer, but one smack will do it rather than the repeated smacks the other hubs take. They would be fine to run, I'm just concerned about the slight possibility of them ever spinning if something out the ordinary happens (savage overtightening by tyre shop numpty etc).
Or, have I ruined it 😂
|
| |
|
|
|
|
|
|
|
Hi, Is there a difference between early and late fuses, by which I mean glass and ceramic fuses. Because ISTR that they blew at different rates ie. slow and fast blow fuses so need to be rated accordingly. Something to investigate, sorry I can't be more definite. Colin That is something I hadn't considered. I don't believe I have to worry too much about if mine are fast or slow blow etc, they are just normal 30mm glass fuses. But, the cf2, which has proper fuse ratings, uses blade fuses instead of glass. Maybe they could be more accurate with ratings when they were using blades, but still seems a bit difference. My current favourite plan is to put 10 amp in all of them but carry a variety of higher rated fuses to replace any that pop. Even if 35 amp was ok when it was new, the wiring is now 40 years old and the look has some notoriously temperamental main connectors, so I'd rather the fuses blew before the van burns down. There is an auto electrics place in town, rather than ordering fuses I'll buy them from there and run the situation by them too. I'm leaning towards being uncomfortable with 35 amp fuses on circuits that 2 years later they decided can run happily with a 5 amp fuse. |
| |
|
|
|
|
|
|
|
List out what's on each fuse add up the watts and divide by 12 to give you the max current, fuse should be around a 20% above this. Anything inductive(motors) will have a higher starting current so you might need to go a bit higher still. Can't I just follow what fuses Bedford used on the later models? The electric systems are pretty much the same, they just used a few more fuses and rated them all properly. I'm just at a bit of a loss as to why Bedford didn't do this on my model and just used 35a fuses. It seems an odd thing for them to do. |
| |
|
|
|
|
|
|
|
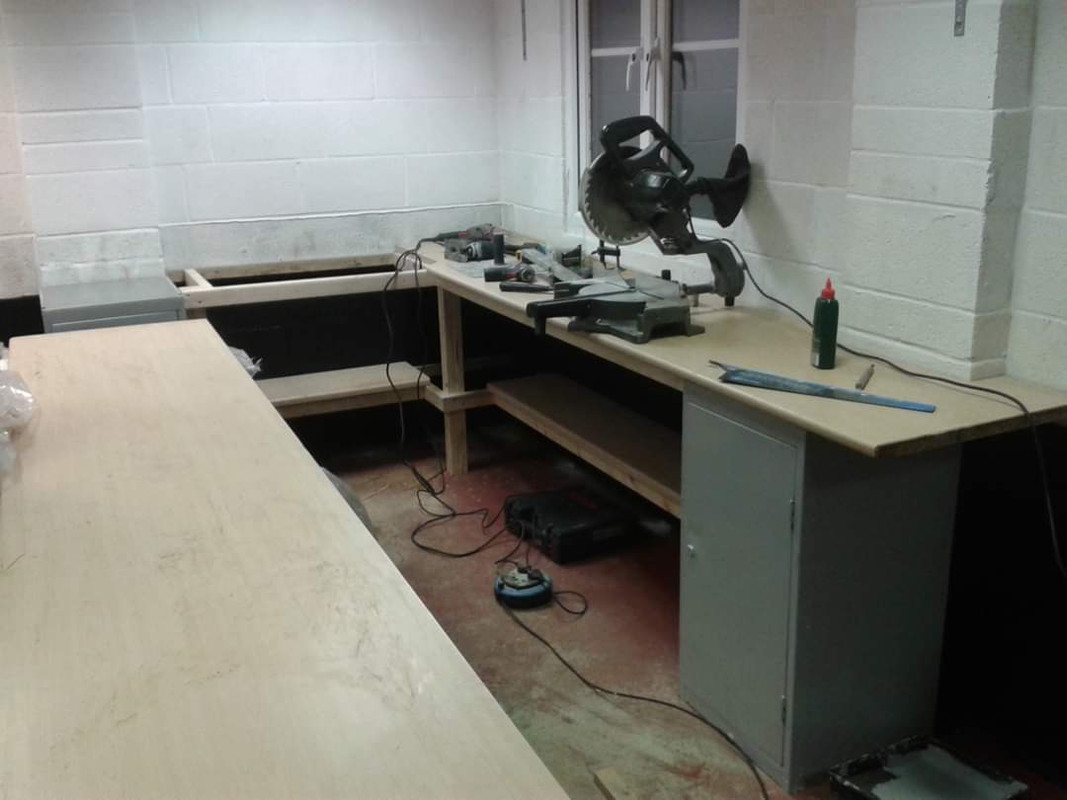 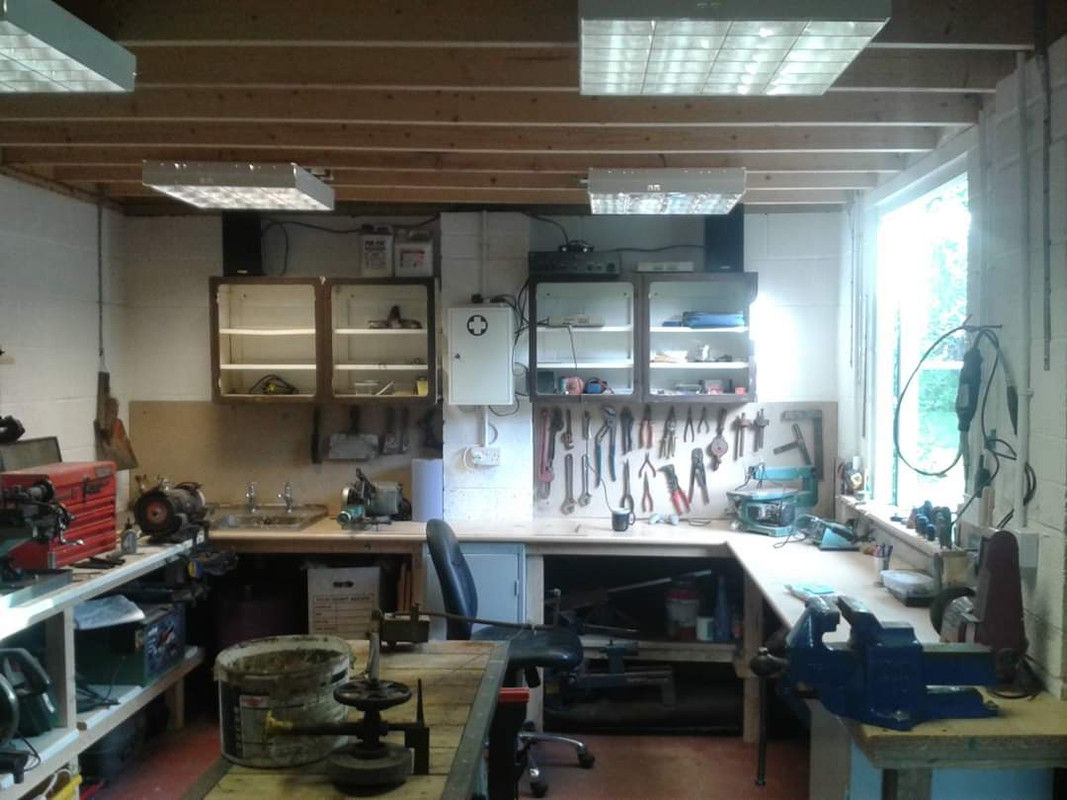 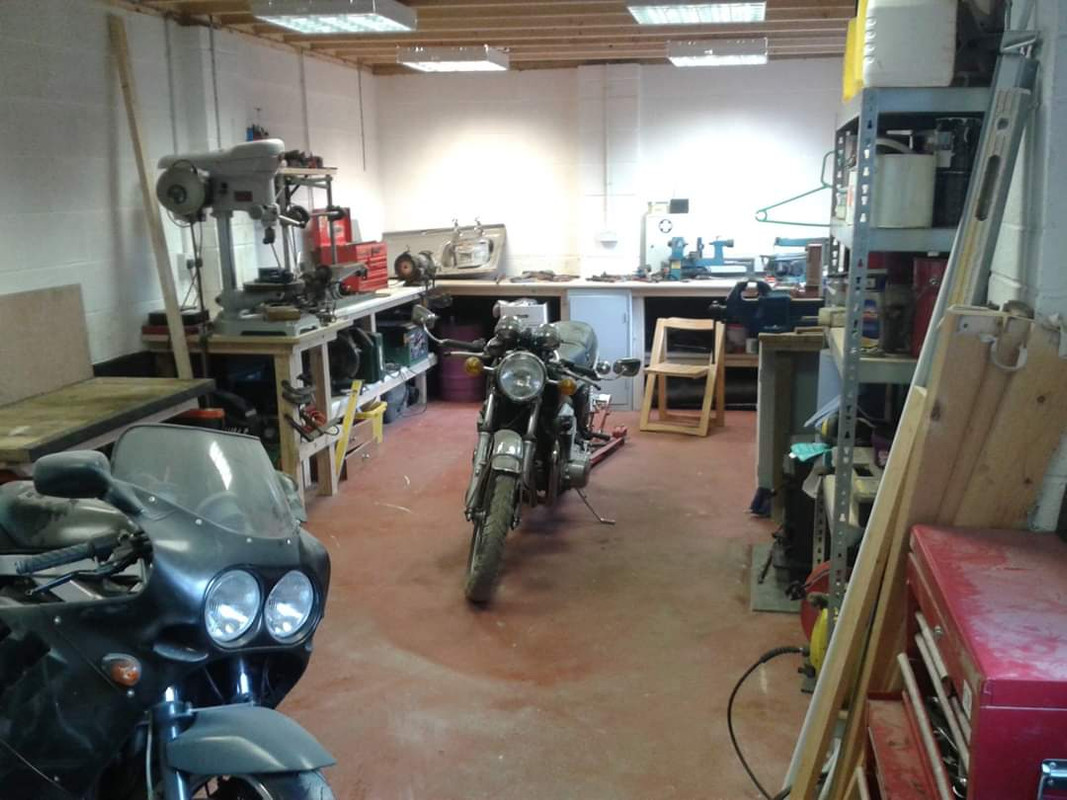 I built a U of benches around the bottom 3rd of my workshop. On the left there is a slight return to take the pillar drill which can be swung of the end, then the lathe and a few other bench tools. There is a sink in the corner but it's not plumbed in. Vice is on the right opposite the drill. I also made a stand alone bench top from offcuts of roof joist and heavy steel angle. I just put this on saw horses when needed. It's handy for rebuilding oily things or beating things on. The metal edges come in handy. It's all just made out of stud work timber and some damaged worktops I got cheap. I put a shelf underneath too to stack toolboxes. Its narrower so i can still get my legs under the worktop. Just a shame I can't get a car down to my workshop  |
| |
|
|
|
|
|
|
|
Previously I was hanging stuff like clamps (and welding clamps) on the wall, but they take up lots of surface. What's the most efficient way of storing this sort of thing - in a properly labelled box on a shelf? I think I need to get some sturdy boxes for this stuff... I clamp my clamps to my bench legs. |
| |
|
|
|
|
|
|
|
|
I spent a good few years as a player, all kinds from zinc and chrome etc to silver and gold.
The main thing is cleanliness of connections. Most of the job was cleaning connections and getting a feel for likely current setting for stuff that didn't already have a recipe.
We all used to plate anything we could when we were bored, tobacco tins, keys, BMX parts, ALL the workshop tools etc 😂
Bosses didn't seem to mind as it all helped us learn how to be better at our jobs, but things like gold plated lump hammers used to catch the bosses attention 😂
|
| |
|
|
|
|
|
|
|
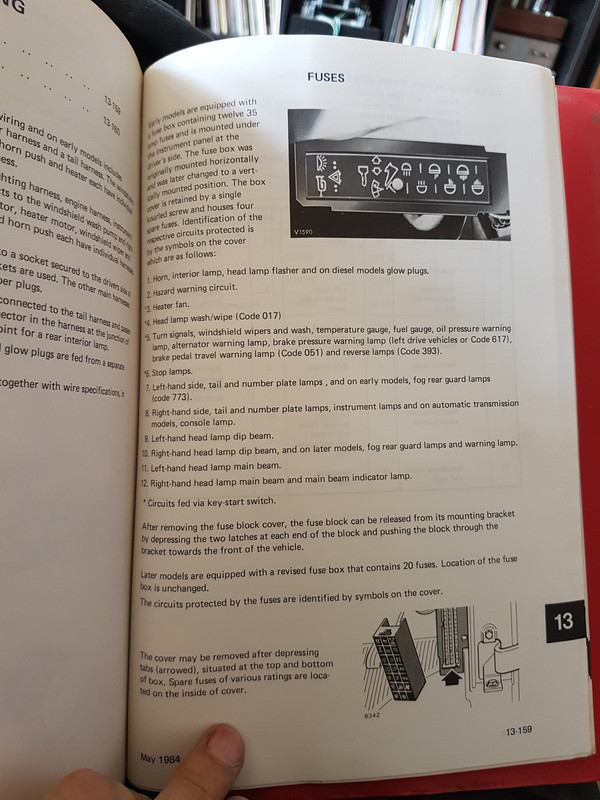 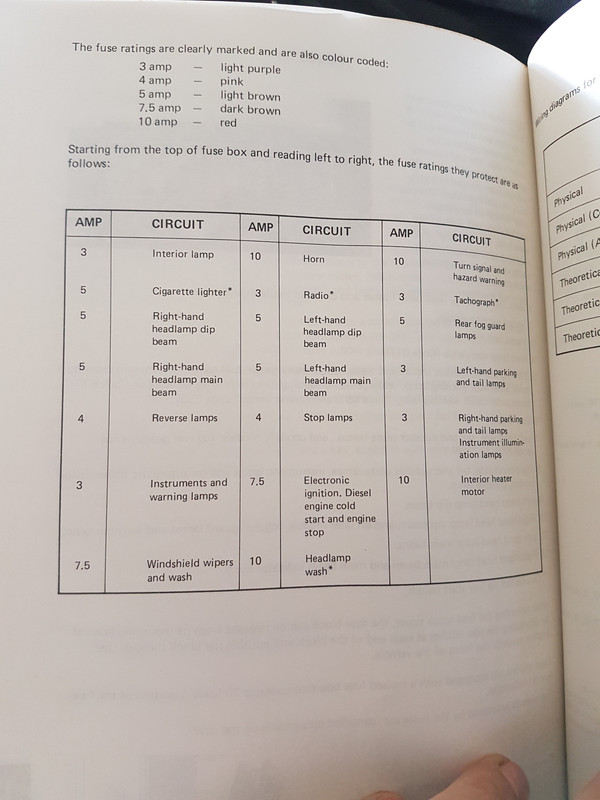 This is what the factory manual says |
| |
|
|
|
|
|
|
|
Keeping in mind that the fuse is there to protect the wires, if any of those circuits have wires which can't handle 35a, then those wires are now the fuse. I suspect the book is incorrect! Could you carefully wire in an ammeter gauge and test each circuit at full chat? Most multimeters won't go past 10a without going kaput. It's that or do the calcs yourself, which you can't do unless you can find the data for everything in that circuit. The 10a fuse test isn't reliable and I 100% definitely not (but really have) played that game. But what if it's in the middle of winter, cold and the circuit draws a tiny bit more current than it did in your summer testing? I was basing 10a on later cf's having a maximum fuse rating of 10a, and that's probably on the headlights. I can check what circuits had what on the later models in the factory manual. It says 35a for my model in numerous places, I don't think it's a mistake. |
| |
|
|


