|
|
|
|
|
|
Well this is a cool little thing. Have you contacted Daihatsu themselves to ask about parts? On something so rare they might be interested in helping.
There are a few companies that make bespoke head gaskets, you can also buy sheets of the correct gasket material and make your own, I've never done a head gasket but it's the same material used for exhaust manifolds and is fine for small engines like yours.
|
| |
1989 Mini MG 1275 ~ 1987 VW Polo ~ 1989 Citroen 2CV ~ 1998 VW T4 ~ 2006 Volvo XC70
|
|
|
|
|
|
|
Apr 21, 2024 22:30:25 GMT
|
I have a comfy chair and gin, so lets do another update. I continued restoring and fitting bits. Firstly, the glass. I won't bore you with too many details but it wasn't easy finding a good set of front glass with matching etching and frames that weren't rotten, but I got there in the end, also fitted the rear door glass. I didn't fit the old rear quarter glass for obvious reasons.   With that done, it was time to move onto the door mirrors. I got a rebuild kit and restored the rest of the parts. I made the cork gaskets because I couldn't find those for sale anywhere.    Next up, the dashboard needed repaired as it was cracked at some of the fixing holes and in the centre. They always crack in the centre because the wiper motor sits right behind the dash and gets very hot, which makes the dash go brittle and sometimes even melt. I repaired all the cracks with epoxy and spent ages refinishing to get the right textured black finish.  I fitted it, and my repair bloody cracked! Right in the middle where the wiper motor sits. Time for a redesign.  I cut a hole in the bit that broke, and decided to make a metal section with a grille in it to vent the heat from the wiper motor.     I welded a mesh behind and painted it textured black to match the dash finish.  And fitted it up.   I can't find pictures of it fitted to the car, but that was the next step! We're nearly up to date now, so I'll take proper pictures soon. Next on the list was door cards. Because I messed about with the front doors I had to make non standard ones, which I did, along with rears from foamex board. I like it for door cards as it's light and trims well, doesn't warp and take on moisture either. 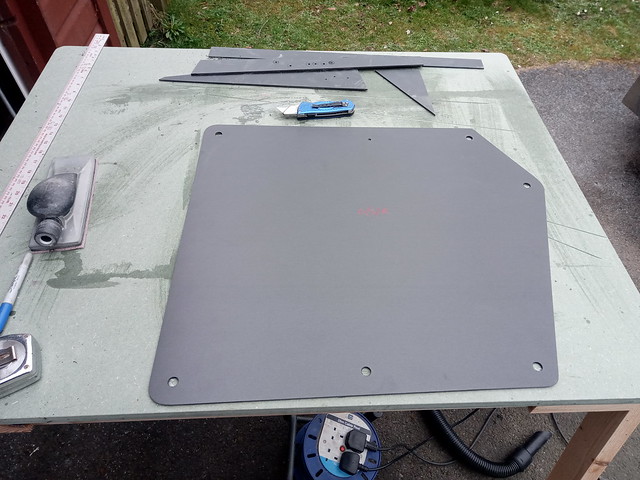 I then covered the boards with wadding and then trimmed with black vinyl. They looked terrible. Really terrible.   I only did one, so it all came off and I started again. The mistake I made was using wadding instead of foam and gluing the vinyl to the wadding. Undoing about a hundred staples was pretty life affirming.  I'm very lucky to be friends with Chris from Retro Retrims, he laughed at me and then pointed out where I'd gone wrong and sent me the right stuff, 3mm foam with a scrim and a piece of vinyl to replace the one I c*cked up. I fitted the foam in place of the wadding and didn't glue the vinyl to the foam. Annoyingly I have no pictures of the finished article, so you'll have to take my word for it, they turned out quite well. The aformentioned Chris also retrimmed the seats some time back, I brought him the frames with the old foam etc, and he made new covers using black basket weave vinyl which was a material used in old Citroens and gives that utilitarian vibe that I'm going for with the interior in this car.    Because I hadn't yet replaced the foams or refurbed the seat frames, I stripped the new covers off and set about restoring the seats. 2CV seats are basically foam over canvas, suspended within the frame by lots of rubber bands.      I painted the frames...    Refitted new canvas and rubber bands  And cut new foam using the old stuff as templates  Glued the new foam on  Same for the rear bench    I then refitted the new covers 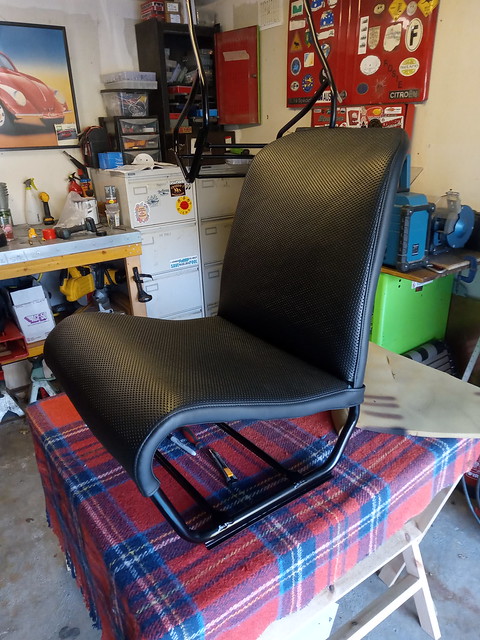 Annoyingly this is the only picture I have of the finished rear seat...  I then trimmed a few bits inside with black carpet, up the inside of the rear quarter and the inside of the inner rear wings  At this point lockdown happened, and for some baffling reason I decided to halt the 2CV build and do a rebuild and repaint on my Fabia. I then sold it and I have no idea why I did either of these things, it was a car that had been in the family for a while, but not really worthy of a rebuild. That said, it was a lovely car when I was finished and I got good money for it. Lockdown madness.  I did a few more small and unphotographed things to the Citroen, but to date it sits in my garage under blankets waiting for the next stage. I have to finish the metal work on the drivers side of my Polo, get that in epoxy primer and then put that on the back burner while I finish the 2CV, get it MOT'd and take it to some shows. I'm writing this here for accountability more than anything. Must not get distracted. |
| |
1989 Mini MG 1275 ~ 1987 VW Polo ~ 1989 Citroen 2CV ~ 1998 VW T4 ~ 2006 Volvo XC70
|
|
|
|
|
Apr 21, 2024 20:08:20 GMT
|
|
Looking good mate. These little repairs take ages don't they.
Regarding filler, I haven't read back very far so don't know if you've found one that you like but I really reccommend Upol Fantastic. When it came out it was a game changer. You usually get a couple of grades of filler, a "slap it in and hope for the best" sort of filler like Upol Easy 1, and a finer grade stopper like Upol TopStop. Upol Fantastic is kind of a combination of both, but lighter and easier to sand than pretty much anything else. You don't get many pinholes if you mix carefully. You can mix a little fibreglass resin into it to make it thinner to do a final skim if you have pinholes too big to be dealt with by high build primer. I'm not sponsored by Upol (but probably should be).
|
| |
1989 Mini MG 1275 ~ 1987 VW Polo ~ 1989 Citroen 2CV ~ 1998 VW T4 ~ 2006 Volvo XC70
|
|
|
|
|
Apr 21, 2024 18:50:08 GMT
|
|
This is great, kind of a shame to see the project fizzle out though. Do you have a for sale ad for it anywhere?
|
| |
1989 Mini MG 1275 ~ 1987 VW Polo ~ 1989 Citroen 2CV ~ 1998 VW T4 ~ 2006 Volvo XC70
|
|
|
|
|
Apr 21, 2024 18:03:19 GMT
|
|
I can't see your pictures, which is making me sad because I f*cking LOVE CX Safaris. Am I doing something wrong are are your pics down?
|
| |
1989 Mini MG 1275 ~ 1987 VW Polo ~ 1989 Citroen 2CV ~ 1998 VW T4 ~ 2006 Volvo XC70
|
|
|
|
|
Apr 21, 2024 17:53:14 GMT
|
Small update. Made this annoying little panel. 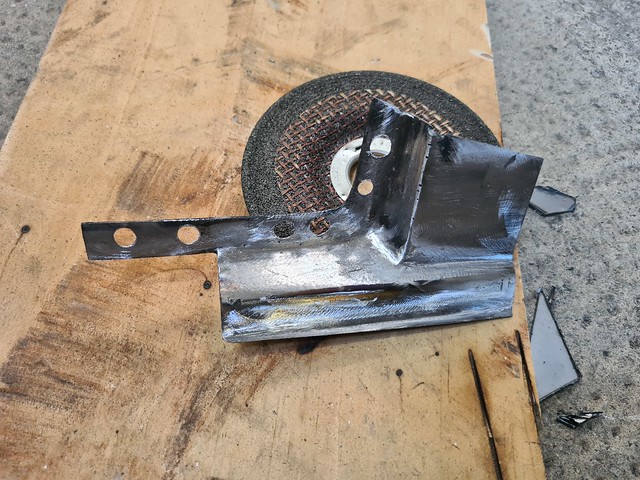 To go in this hole.  Made a bit of a c*ck of it, cut it a bit short.  But it welded up alright.  Also got all the welds dressed from last session. It dressed quite nicely with hardly any warping, which is the aim of the game.  I then had planned to fit the sill to finish off welding on this side, but I found this bit of rust at the front of the sill. I'm not sure if I noticed it before and I've just got more fussy with the project or I might have just missed it originally. Either way, it had to get sorted.  Looks like it had been patched previously, this is the floor behind the rusted inner sill.  I had to chop out this jacking point strengthening fella   And then hacked merrily at it until I had this hole.   Welded up...    Then a coat of rust converter on the bare metal to protect it until next time. I have until now been a fan of Vactan rust converter, but it separates in the bottle and you need to shake the hell out of it before using, and sometimes it goes on chalky and doesn't seem to work properly. After following commycouper 's LT build, thought I'd try the Bilt Hamber Hydrate 80 stuff. Same principle as Vactan but it doesn't separate in the bottle and so far, I prefer it.  That lot somehow took 6 hours. I'll get the sill on next time. Honest. |
| |
1989 Mini MG 1275 ~ 1987 VW Polo ~ 1989 Citroen 2CV ~ 1998 VW T4 ~ 2006 Volvo XC70
|
|
|
|
|
Apr 21, 2024 17:12:21 GMT
|
Fantastic work PM! But I do blame you for my recently acquired obsession with welding stuff... 👍🏼 Sup bro! Happy to be a bad influence  |
| |
1989 Mini MG 1275 ~ 1987 VW Polo ~ 1989 Citroen 2CV ~ 1998 VW T4 ~ 2006 Volvo XC70
|
|
|
|
|
|
|
That's pretty good for an afternoon. It would probably take me a fortnight to do that much.  Spare time is really hard to come by when you've got little kids and run a business, got to make the most of it. I'd rather do it at a more leisurely pace but also I want to get to drive it this century! |
| |
1989 Mini MG 1275 ~ 1987 VW Polo ~ 1989 Citroen 2CV ~ 1998 VW T4 ~ 2006 Volvo XC70
|
|
|
|
|
|
|
Right, well I got a bit done yesterday afternoon when the kids were out on a jolly. Got the hole for the fuel neck cut out, using the template I took from the old one.   I offered up the rear quarter and marked off the rusty area to be cut out at the bottom of the window aperture. I needed to fix the inner skin before welding the quarter back on.  Then repaired the inner skin. Repair plate is oversize, to be trimmed back later.   Then I sorted out a few bits of surface rust on the back of the rear quarter, removed as much as practical and brushed on some Vactan rust converter to deal with the rest.  Then I refitted the quarter, and started the long process of slowly welding around the edges of the panel.   In between welds I cut out the section I wanted from the new arch panel. Bad quality panel but easier than making my own, and it can be fettled to fit just fine. 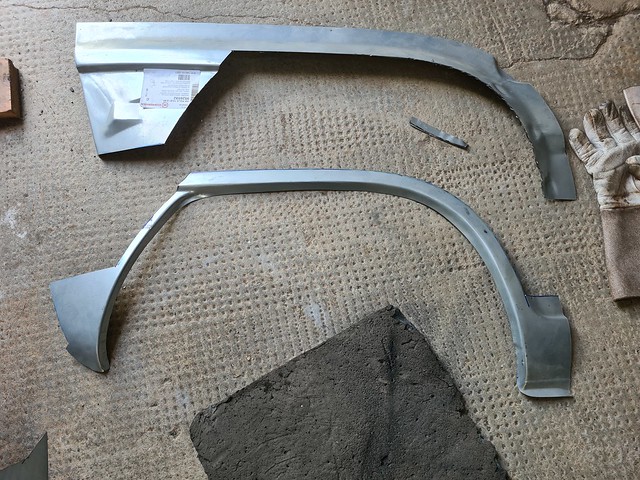 Offered up the arch panel, it was a bit too long so a cut near the back to shorten it by 5mm and it sits nicely.  Original rusted arch section removed and the new arch tacked into place  Fuel neck hole fully cut out and the flange welded, welds complete around the quarter and arch repair. It was getting late by the time I finished this so I decided to dress the welds another day, my neighbours probably prefer not to be serenaded by an angle grinder on a Sunday night. 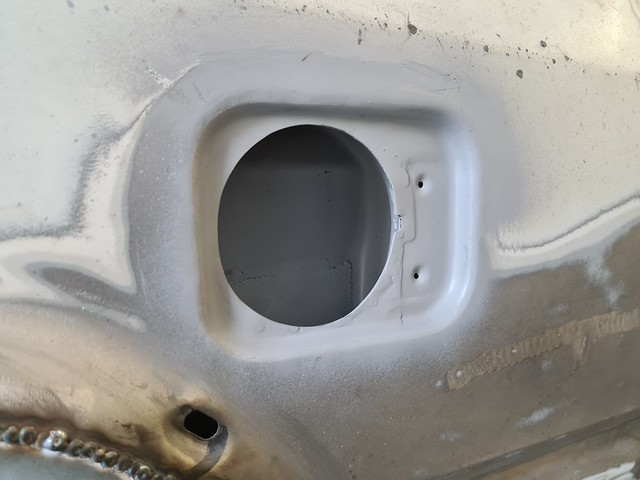  Ignore the pile of filler on the bottom of the quarter, the new sill comes quite far up the quarter so I'll be cutting that out, soon. I also have this hole to sort, need to pop out the window on the other side to make a template.  More next weekend. Probably. Thanks for reading! Pete |
| |
1989 Mini MG 1275 ~ 1987 VW Polo ~ 1989 Citroen 2CV ~ 1998 VW T4 ~ 2006 Volvo XC70
|
|
|
|
|
Mar 30, 2024 13:24:26 GMT
|
Thanks jmotor. Good to get another positive review on the greenstuff pads. |
| |
1989 Mini MG 1275 ~ 1987 VW Polo ~ 1989 Citroen 2CV ~ 1998 VW T4 ~ 2006 Volvo XC70
|
|
|
|
|
|
|
Mar 29, 2024 19:28:22 GMT
|
Almost forgot, this was my first car when I arrived to get the true North American experience. It was great! But 9mpg was killing me and it was too big even for Canada, so I sold it after a few months. But glad I had the experience. 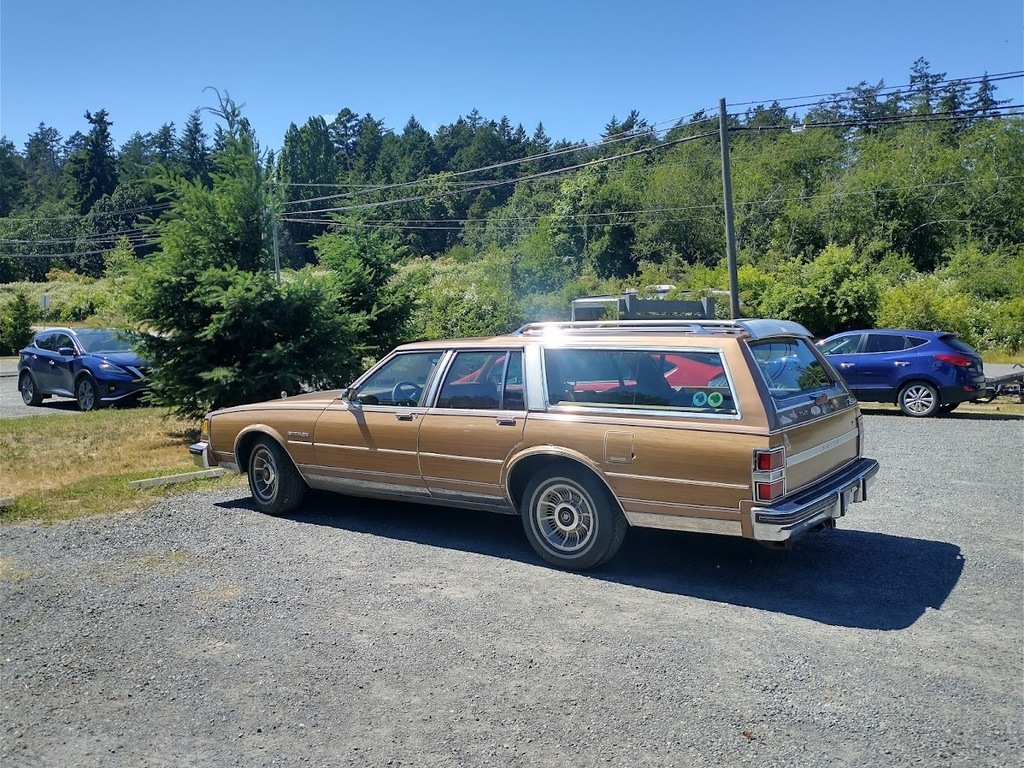 Is this a Buick Electra? My dad had one, very rare car in the UK. We managed an impressive 12mpg if I remember right. |
| |
1989 Mini MG 1275 ~ 1987 VW Polo ~ 1989 Citroen 2CV ~ 1998 VW T4 ~ 2006 Volvo XC70
|
|
|
|
|
Mar 29, 2024 18:42:55 GMT
|
For the brakes I found on my elan most modern mainstream pads are hopeless for a non servo car, greenstuff ones transformed it. That said I used to be involved with testing a lot of cars in the mid to late 90's VW's were the only ones we always had to order spare brakes for. Interesting, I thought greenstuff were meant to be curse word unless you got your brakes very hot. I'll try them. I've tried blackstuff which were meant to be the regular road pads, wasn't overly impressed. |
| |
1989 Mini MG 1275 ~ 1987 VW Polo ~ 1989 Citroen 2CV ~ 1998 VW T4 ~ 2006 Volvo XC70
|
|
|
|
|
|
|
Thanks motardman. Mine is only a 1 litre but it goes perfectly well, and yes the brakes are really terrible on mine too! I'll be trying to do something about that, try a good brake service with new fluid and braided lines and take it from there. Thanks for your interest! The lack of servo makes the brakes quite alarming against even anything else of the era. You can use a bulkhead cut from a 2F polo to add a servo. I can't remember if I did that or not when I did a 1.3GT 2F drivetrain and harness swap into a 2. Can't find any pics of doing it sadly. That's good to know, I'll certainly look into that option. Thanks |
| |
1989 Mini MG 1275 ~ 1987 VW Polo ~ 1989 Citroen 2CV ~ 1998 VW T4 ~ 2006 Volvo XC70
|
|
|
|
|
Mar 28, 2024 21:22:35 GMT
|
Apologies for the potato quality video, but SHE'S ALIIIIIVE!!! This was the first start in over 7 years. Runs nicely, I've got to go steady for a bit while the new pistons bed in, but thrilled to get it running and be able to move it under it's own steam. After initial start up I got a mate who is better with the mechanical side of things to double check my timing settings etc, all was tickety boo.  Around this time it was time to move house (yes again). Managed to get some pictures of it on the transporter.   Tucked up in the new and current garage.  The first job in the new garage was to fine tune my home brewed door latch set up.  This is my solution to lock and unlock the door, made to match the aesthetic of the door opening handle. Unlocked  ...and locked  I drilled markers into the lock cover to indicate position, it made sense to me at the time that red meant locked, I'd appreciate opinions on that, I don't think it makes sense, looking back on it. Maybe a locked and unlocked decal would be better.   Next up I had to fix a bugbear of mine, the front number plate. They're usually just screwed to the font of the bonnet which I think looks cr@p. I bent my new pressed plate so it fitted snugly to the profile of the bonnet plate plinth, then trimmed it to the same shape and stuck it on with 3M tape.    Yes I'm wearing Crocs. I'm not even sorry. Next challenge was to make a solution for the front door check strap. On normal non suicide door type 2CVs, the door hinges double as a stop, they're shaped so they hit the A pillar when the door is fully open, restricting further travel. Considering I had hinged the front doors on the B pillar using flipped over rear door hinges, it made sense to use the same type of rubber check strap used on the rear doors. The only problem being that the rear doors were already using the ideal check strap location. When I rejigged the front doors I predicted the check strap issue and so welded on some spare rear door check strap brackets in the same position as the rear doors, without really thinking any more forward than that. This meant I had to figure out a way of attaching both check straps to the same mount point. I know it sounds simple enough but without any extra hardware it compromised one or both of the straps so I made these brackets.  These allowed both straps and the seatbelt holder loop THINGY to all be mounted in the same location without restricting anything. It works great, I think.   That's all for now, thanks for reading! Pete |
| |
1989 Mini MG 1275 ~ 1987 VW Polo ~ 1989 Citroen 2CV ~ 1998 VW T4 ~ 2006 Volvo XC70
|
|
|
|
|
Mar 28, 2024 20:30:45 GMT
|
Thanks motardman. Mine is only a 1 litre but it goes perfectly well, and yes the brakes are really terrible on mine too! I'll be trying to do something about that, try a good brake service with new fluid and braided lines and take it from there. Thanks for your interest! |
| |
1989 Mini MG 1275 ~ 1987 VW Polo ~ 1989 Citroen 2CV ~ 1998 VW T4 ~ 2006 Volvo XC70
|
|
|
|
|
Mar 28, 2024 13:37:07 GMT
|
great job, do you have any engine plans? Thank you! I like the simplicity of these little engines so it'll be left standard, albeit with new belts and waterpump etc. It feels plenty fast enough for what it is, it's a light little car. |
| |
1989 Mini MG 1275 ~ 1987 VW Polo ~ 1989 Citroen 2CV ~ 1998 VW T4 ~ 2006 Volvo XC70
|
|
|
|
|
Mar 27, 2024 21:06:30 GMT
|
Thanks for the replies chaps, I have found half an hr to get another update in. The next step was the rear valance and back of the rear arch area. This is what I was faced with   I started cutting the rear corner out   It's an awkward little area with a few panels intersecting and no access from above as the boot floor covers it. It's probably hard to make out what's going on in the photos but there are three little repair sections made and welded in here.    Next up, the rear valance that goes around the tow eye. You can't get original looking panels for this bit, a rear valance panel is available but it's a one piece rather than the original two piece with a seam, which is pointless and looks rubbish so I made my own. Started with a nice bit of pitch pine to use as a buck to form the new panel over.  Smacked it about a bit and it started looking something like something.  I then made up the other part too. Old and new.  Cut out all the rust and cleaned up the inner. The inner was rusty, it was mechanically cleaned up then given a few goings over with Jenolite rust remover (phosphoric acid) then sealed.     It's not perfect but a skim of filler and it'll be grand. I also replaced a bit of the lower valance but this is the only picture that exists.  I then made a new lip for the arch. I don't know why I havent removed the seatbelt reel yet.  I was then excited to get the rear quarter welded back on but it's never that simple. I dug it out and was reminded that it needs work too before I can think about welding it back in. Mainly around the fuel flap area which was rusted out.  I decided to try and make a panel to replace the whole recess and though I only ended up using a part of it, it was a fun exersise. Made a panel former to go in the bench press  ...and mashed a bit of steel into it  It sort of worked, with a lot of distortion around the edges. I used about half of it, the hinge mount area was fine on the original panel so I kept that bit. I still need to cut the hole.   That's me up to date with this now, it'll be a couple of weeks til I get much more done due to the upcoming chocolate egg eating festival and agreeing to do some work for a client this Saturday. Thank you for reading  |
| |
1989 Mini MG 1275 ~ 1987 VW Polo ~ 1989 Citroen 2CV ~ 1998 VW T4 ~ 2006 Volvo XC70
|
|
|
|
|
Mar 27, 2024 20:02:55 GMT
|
|
Well I can't really add any more than what has already been said but this thread is flipping great! I've read the whole thing over the past couple of days. Great metalwork skills and interesting to see how you have got better and more fussy as the project has progressed. It reminds me of my polo project, same colour and era of VW, though I think yours is more rusty than mine. I mean it was more rusty!
|
| |
1989 Mini MG 1275 ~ 1987 VW Polo ~ 1989 Citroen 2CV ~ 1998 VW T4 ~ 2006 Volvo XC70
|
|
|
|
|
Mar 25, 2024 22:01:55 GMT
|
Cheers for the encouragement chaps, very kind and... encouraging! I started with the broken check strap bracket, just because it was offending me.  It had torn away from the inner A pillar, quite surprising really, but an easy fix.  I cut out the torn metal  Welded in a new bit  Straightened up and removed the pigeon sh*t welds from the bracket  ...and welded it in position.  I then repaired the outer skin section that I had removed and welded that back in.    Then I moved onto the sill, which had a small hole on the inner section and floor pan.    Next up, the bad bit at the back of the sill. This area seems needlessly complicated and a lot of it was simply rusted away. It wasn't too clear how it should be, so a bit of this is made up as I go along.  Started by cutting out this mid sill section to reveal a strengthening gusset thing inside the cavity. I assume this is to strengthen the jacking point part of the sill.  I cut that out to reveal more rust and filler stuffed through a hole from the inner side. This is the outer and the view from below showing some elegant previous repairs.   Cutting all the rust away left me with this. Thankfully the structural mounting point was still very solid, which saved having to remove the rear beam.  New section made and welded in   The next part that had to be repaired was the seat base corner. To access that properly, meant removing the inner arch closing panel.    Made up a little section to repair the seat base    With that area solid, I could then make up and fit a new gusset/closing panel.   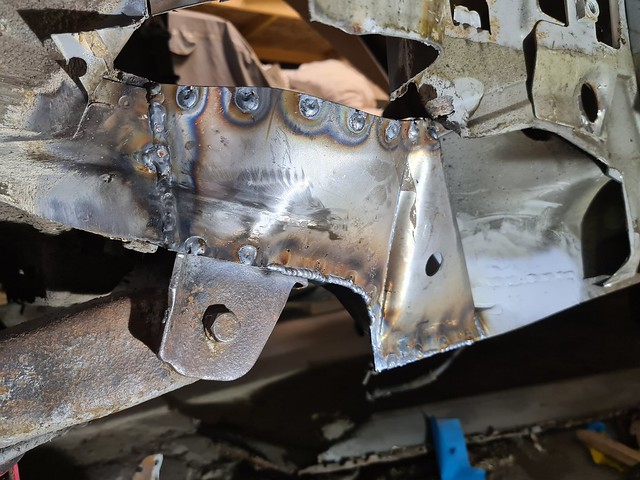  Next up, this mid sill section.    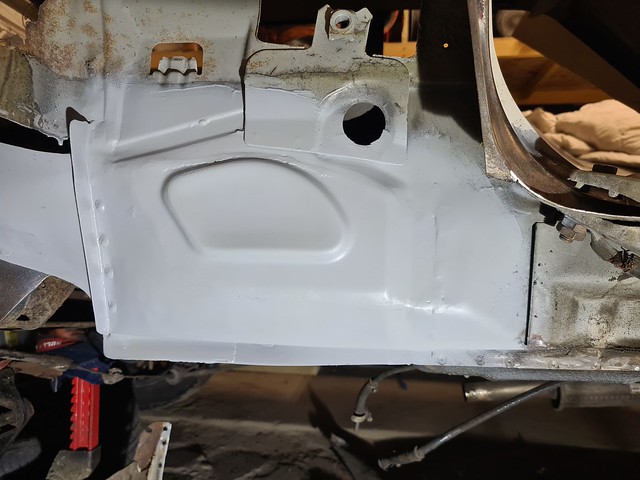 Next was the inner arch section. Now I made a total  of this, I ran out of 0.8 steel and so used some 1mm which was far too thick to make a panel like this, I struggled getting the shape I wanted and I ended up having to make a few cuts and letting some fillets in. Cuts and fillets are terms used in butchery with is quite apt. It works fine though, and to continue on a butchery theme is quite beefy, but isn't pretty! 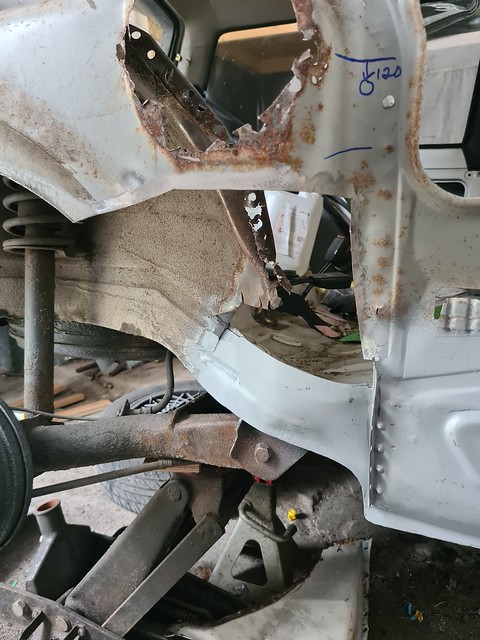     Next up was the seatbelt mount area      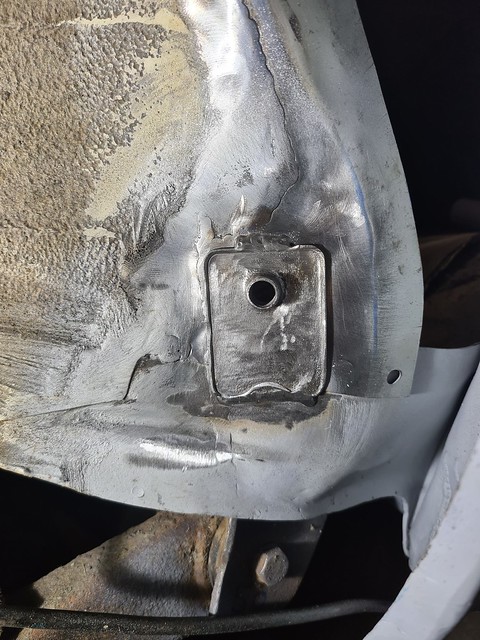 And then to close it all off again, the inner closing panel needed repair and refitting.  Repair templates made  Transferred to steel  Tacked together  Seam welded and dressed  I then realised I should repair the fuel filler hole and the fuel tank breather tube whilst the closing panel was off, as access would be much better. For some mad reason, VW decided to route the plastic breather tube that goes from the tank to the fuel tank filler neck through a steel tube fixed to the inside of the rear quarter which has no drain point and is pretty much always rotten. I considered re-routing it inside the car or something but I like a challenge so I redesigned it keeping it in the original location. First step was to make a flange to sit on the inside of the inner arch to accept the new tube, and leaving space for a grommet to seal the plastic pipe where it enters the tube. The flange also has a drain hole at the bottom so any water that enters won't get as far as the tube.     I then made a new tube from corrugated stainless exhaust pipe left over from fitting a diesel heater in my T4.  This is where the grommet seals the hole from the inner arch side.  Nobody will ever see this as it's inside the rear quarter so it's all a bit silly, but hey ho... Next repair was the fuel filler hole. I'll cut out the actual hole when I refit the quarter, to guarantee they line up properly.     With that done, it was time to return to the closing panel and get that welded up. 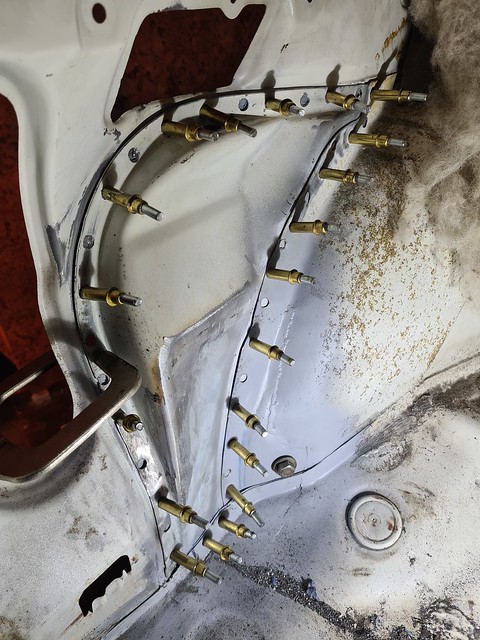    This area is now looking solid again.  The next area to get my attention will be the rear of the rear arch, and rear valance corner. Til next time! Cheers |
| |
1989 Mini MG 1275 ~ 1987 VW Polo ~ 1989 Citroen 2CV ~ 1998 VW T4 ~ 2006 Volvo XC70
|
|
|
|
|
Mar 25, 2024 20:20:37 GMT
|
|
Lovely work, John. It's very interesting seeing how you make these panels, especially with it being aluminium, which is an alien material to me. Keep it up!
|
| |
1989 Mini MG 1275 ~ 1987 VW Polo ~ 1989 Citroen 2CV ~ 1998 VW T4 ~ 2006 Volvo XC70
|
|


