gazzam
Part of things
 
Posts: 740 
|
|
|
|
|
The Gapcraft thing is a joke that a fabricator friend of mine used to get a chuckle with.
CIG had a range of welding rods called things like Satincraft, Staincraft, and a few others. He joked that when the bits didn’t fit together nicely, you needed to use the Gapcrafts.
Might not travel well that joke. I’ll get me coat, as they say.
|
| |
|
|
|
|
jamesd1972
Club Retro Rides Member
Posts: 2,921  Club RR Member Number: 40
|
|
|
|
The Gapcraft thing is a joke that a fabricator friend of mine used to get a chuckle with. CIG had a range of welding rods called things like Satincraft, Staincraft, and a few others. He joked that when the bits didn’t fit together nicely, you needed to use the Gapcrafts. Might not travel well that joke. I’ll get me coat, as they say. Once you know you know 😜 I think it worked really well as you got Mr T to go looking for them 😂 james |
| |
|
|
glenanderson
Club Retro Rides Member
Posts: 4,353
Club RR Member Number: 64
Member is Online
|
|
|
|
|
Like a can of tartan paint and a long weight from the stores… 🤣
|
| |
My worst worry about dying is my wife selling my stuff for what I told her it cost...
|
|
|
|
|
|
|
Just say NO ! Anyboby seen my coat ... |
| |
|
|
teaboy
Posted a lot
   Make tea, not war.
Posts: 2,125
|
|
Mar 14, 2024 20:58:14 GMT
|
I was late home tonight and it was dark and uninviting outside but I was keen to finish off the crack pipe. It just needed stitching to the floor along the far edge as we look at it.  There was a bit of a gap to bridge where the tube curves away from the vertical part of the panel. I don't think it is going to fall out.  The reason for the short stitches in the middle is because the bit I was fixing it to is one of those castellated joints that BMW seem to be keen on. This is that joiny bit that I re-fitted earlier to explain what I mean.  I just welded the bits that were touching and left the sticky out bits rather than trying to bridge over those as well. Cheers |
| |
|
|
|
|
|
|
|
|
The castelated joints are for corrosion protection, the idea being e-coat can penetrate the seam.
|
| |
|
|
teaboy
Posted a lot
   Make tea, not war.
Posts: 2,125
|
|
Mar 15, 2024 20:53:55 GMT
|
The castelated joints are for corrosion protection, the idea being e-coat can penetrate the seam. Sadly, British weather can also penetrate those seams...  Despite meticulous planning in order to prevent it, I ended up being late home from work again. This is not ideal at the best of times but on a Friday even less so. I have got important things that I need to be getting on with! Now that this tubey thing is installed.  The next job is to cover it up because it is a secret tubey thing. This piece needs to go back in to hide it.  I painted a lot of the underside with epoxy before the axle panel went in and this covery thing didn't escape it. That means that I now need to sand off the epoxy in the places where it is going to be welded. All around the edges need sanding.   I did all of that upper edge rather than just around the holes because I am going to drill some more holes to get more plug welds into it. I also sanded the edges on the outside of the piece.  This was much easier because the epoxy was reassuringly difficult to sand off. I am also planning on drilling through the top of the covery thing and plug welding directly to the tubey things. That meant that I had to sand off some more paint in the middle of the panel.  Those child like scribblings are my cack-handed attempt at working out where the tubey things are going to be. I will have to be a little bit more accurate when the time comes to drill the holes... Would you believe that I spent almost two hours doing that little bit? Cheers. |
| |
|
|
teaboy
Posted a lot
   Make tea, not war.
Posts: 2,125
|
|
Mar 16, 2024 21:06:49 GMT
|
Hopefully the weather is getting better because it was a lovely morning. After my usual Saturday morning routine, I went out in the afternoon and opened up the tent and got all my gear set up. I was just vacuuming the dust out of the boot and contemplating my plan of attack when my pal Dave appeared. He had taken advantage of the lovely day and been out for a spin in his convertible sportscar and was now in need of a cup of tea. This was all very lovely and, of course, I like tea as well. This meant that it was late afternoon before I started work. I was going to get some paint around the tubey things and under where the covery thing is going but I decided that I was going to do a bit of stitch welding underneath first, where the axle panel joins the spare wheel well. 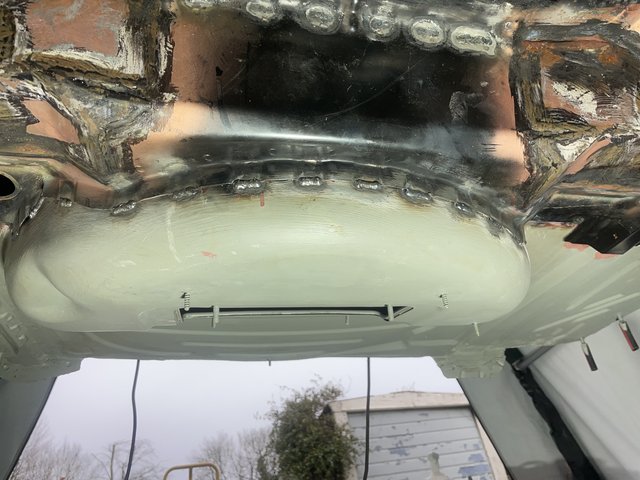 I stitched between the castellations because, well, it seemed like a good idea. 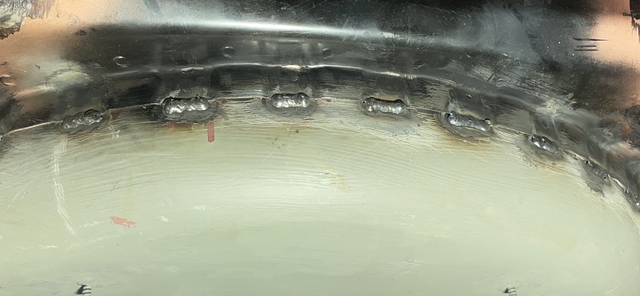 This would have burned off the paint under where the covery thing fits which is why I didn't paint it first.  Then there is this hole where the wiring passes through.  It is a bit crusty, so I decided to sort that out next. First I needed to drill a 35mm hole in some tin.  This took ages because my 35mm holesaw is blunt because I ruined it drilling some stainless last time I used it. Eventually I made it through in slightly less time than it took them to dig the tunnel for the great escape.  I got it trimmed to size, positioned and marked up.   I carefully cut the top off with the dremel because I didn't want to cut through the layer below.  Using the markings I put on before, I got it into position.  It looked good so I stuck some weld through primer on it and stuck it on the Rayburn to dry whilst I had a cup of tea.  All that was left then was to weld it in.  Then tickle it off.  This is the crusty old hole, which is now in the box with all the other bits that I have cut off the car.  That lovely day from this morning had turned into a rainy evening when I was packing up and dragging the welder back up to the shed. I never did get round to painting the tubey things... Cheers. |
| |
Last Edit: Mar 17, 2024 0:23:37 GMT by teaboy
|
|
teaboy
Posted a lot
   Make tea, not war.
Posts: 2,125
|
|
Mar 17, 2024 20:50:41 GMT
|
I might have been a little optimistic in thinking that the weather was getting better because this morning, as my friend Scott from Dundee might say, it was 'peshen doon'. I completely failed to summon up any enthusiasm to go out in it so I had a lazy morning. In the afternoon it stopped raining and later on it even brightened up so I didn't have any more excuses. The first thing I did was to get some weld through primer on the covery piece which I had spent ages sanding and I didn't want it to go rusty and need sanding again.  At the start of the weekend my aim was to get some paint in around the tubey things so I was going to do that next until I remembered that there are two little flanges that the covery piece is welded to. These were at the sides but you have to cut them off to fit the platey things.  In the instructions with the kit, these bits get welded back on and reused. I didn't fancy that because, well, they are horrible. I decided to make some new ones.   The bend has quite a wide radius so I found something to use.   There was a little kinky bit at the other end to do. This is the old one and the new one compared.  Obviously I made two.  It seemed like a good idea to check them against the covery thing.  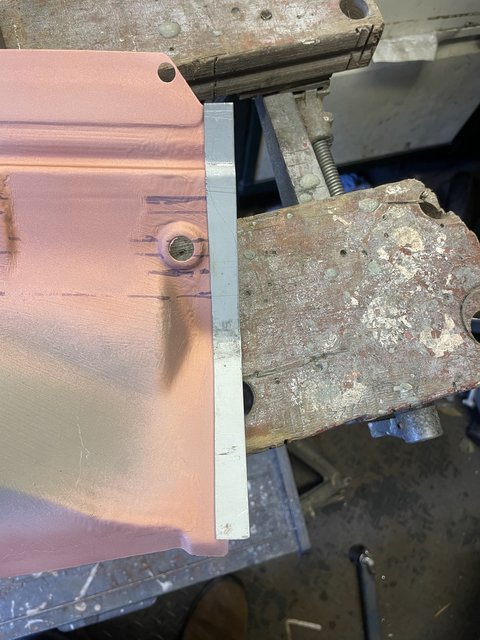 When it came to welding them in I ended up cutting them into three pieces to make them the same height as the tubey things, rather than sitting on top of them.   Once they were done I could try the covery thing in place.  Good, it still fits. I still can't get any paint in there yet because I need to make a strip to back up the long curved side of the joint with the 'spare wheel well'.  This is tacked on flush with the covery thing but the bit where it fits into the car is vertical so it needs stretching and folding down.  It now slots in place but it does need a little bit more fettling to be perfect. 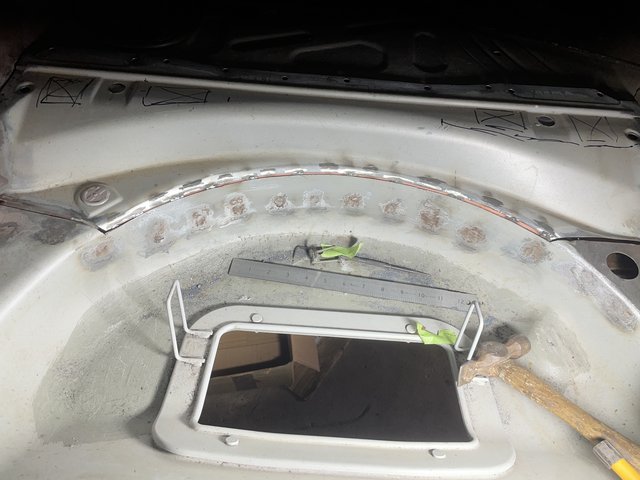 No, I still haven't got any paint in there... Cheers. |
| |
Last Edit: Mar 17, 2024 20:57:59 GMT by teaboy
|
|
teaboy
Posted a lot
   Make tea, not war.
Posts: 2,125
|
|
Mar 18, 2024 19:43:27 GMT
|
My plan for this evening was to finish tweaking the covery bit so it fits nicely then to get some paint on the tubey things. Whilst the paint was drying I could get on with some more of the stitch welding underneath. I dragged the welder down ready then set to on the first task. The covery thing was sort of close to fitting so I went at it with the hammer and dolly again.  I spent an inordinate amount of time on that and ended up chasing my tail. I would work on one part and it would fit nice there but it would spoil the fit elsewhere. Also, the curve of the part on the car where it fits isn't quite right because when I did this stitch welding, it made it a bit wiggly.  So I worked that back into shape with the hammer and dolly. It nearly fits now.  But by this time I couldn't be bothered to do any more so I did a bit of sanding, which was even less exciting then I cleaned it all up and daubed paint all over the place. 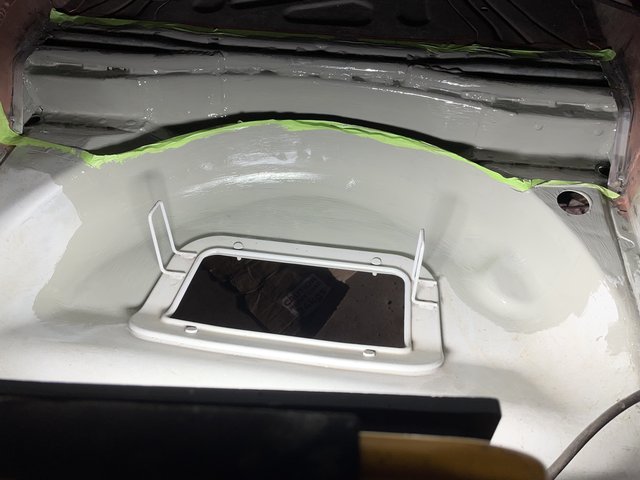 I was totally sick of it by this point so I dragged the welder back up to the shed without it having even been switched on. Cheers. |
| |
|
|
teaboy
Posted a lot
   Make tea, not war.
Posts: 2,125
|
|
Mar 19, 2024 20:45:18 GMT
|
Yesterday I put my welder away without using it so today is the day to make amends. I'm not doing the covery thing yet because firstly, I want the paint to harden off a bit more as I need to sand off the top of the tubey things and get some weld through primer on there and secondly, my back needs a rest from leaning inside the boot. I decided that I would weld along the bottom edge inside the wheel well, where the wheel well and the axle panel meet. This bit, which I cleaned up with the wire wheel. 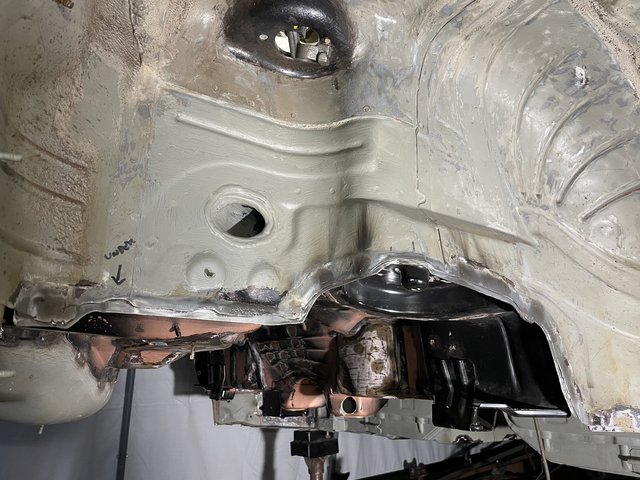 When I pull the trigger on the welder there is a dull thud noise as the wire feed motor starts running. I heard that familiar thud and then, nothing. The welder had packed up. The cooling fan was still running but nothing else was working and the LED power indicator on the control panel had gone out. This was really disappointing to say the least and, to be honest, I am thoroughly hacked off with the job right now. I dragged all my gear back up into the shed, slung it in and locked the door. Everything is just a total pain in the backside at the moment. It is quiz night tomorrow, hopefully that will cheer me up a bit. Cheers. |
| |
|
|
|
|
|
|
|
|
Sorry to hear, sir. We might say, “Goody, now you can get a new MIG” but none of us is looking for unexpected cash outlays.
Kind wishes, John
|
| |
|
|
|
|
|
Mar 20, 2024 18:30:30 GMT
|
|
A pain, I've thought my 40 year old Clarke has died a few times but it's just been loose wires, might be something similar.
Always anoying when you have spend the time you should be getting on with the job fixing the tools though.
|
| |
|
|
|
|
|
Mar 20, 2024 21:25:42 GMT
|
|
Bad news about the welder old chap. Bad news about the mojo too. There are times when you just need to walk away for a bit and have a break. If that's how things pan out I'm sure we'll all understand.
Go do something different for a while. Have you ever thought about playing with a Porsche for example?
James
|
| |
|
|
jamesd1972
Club Retro Rides Member
Posts: 2,921  Club RR Member Number: 40
|
|
|
|
|
Cake, 🎂
Cake is the answer I’m sure.
Onwards.
James
|
| |
|
|
|
|
|
Mar 21, 2024 11:12:34 GMT
|
|
Shut the door, walk away for a few days. Have a creamy bun (maybe a custard slice?) and procrastinate.
Come back to it in a few days.
|
| |
|
|
Norman
Part of things
 
Posts: 449 
|
|
Mar 21, 2024 12:13:07 GMT
|
|
Hi Tom, I hate it when some of my gear breaks down, it really irritates me. My wife thinks I’m an idiot, she says it’s like I take it personally when something breaks. I am sure we will see you back on it soon. You are giving me the push to do something myself, I feel really guilty every time you post. I am sure the good doctor will bring cakes to revive your mojo. All the best, Norman
|
| |
|
|
|
|
|
Mar 21, 2024 20:06:14 GMT
|
Cake, 🎂 Cake is the answer I’m sure. Onwards. James James is right you know. Cake helps everything. Because there's been a lacking of recent cake in this thread I will post up a photo of the lovely home made sponge cake, real fresh cream, strawberries and blueberries, that a lovely young lady customer brought to me as a thanks for fixing her van. Hopefully this might fix your welder woes. 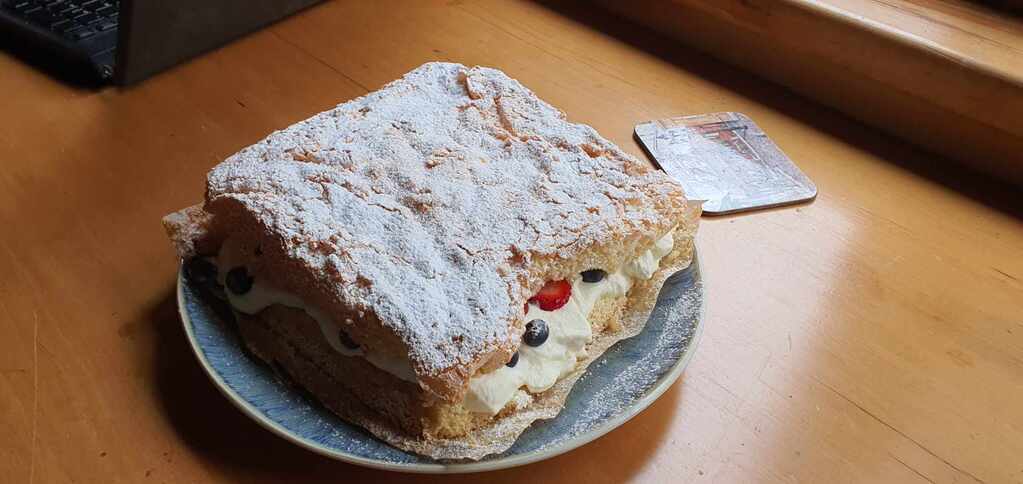 |
| |
|
|
teaboy
Posted a lot
   Make tea, not war.
Posts: 2,125
|
|
Mar 21, 2024 21:41:13 GMT
|
Firstly, I would like to thank everyone for the support, I really do appreciate it very much. If I was hoping that the quiz would cheer me up then finishing second to last wouldn't have been what I would have wished for... Actually it was lovely to see my pals from the team, despite them being a bunch of cabbages.  I had a pretty tough day at work today and was late home. On the way I was thinking that maybe I would have a night off but when I eventually got home, I remembered that the Doc was working late so once I had fed Fat Al, I went out to the tent. Sitting about feeling sorry for myself won't get the job done, will it. First off, I sanded the top of the tubey things then got some weld through primer on them.  I also painted the edge of the covery thing too but didn't take a picture of that. The other night, when the welder packed up, I had wanted to do the welding in the wheel well so that is what I did next.  I used the emergency backup (borrowed) welder to do it.  By the time I had finished faffing about with my head under the wheel arch, the paint in the boot was dry so I made a start in getting the covery thing in place.  It is just secured with tek-screws at the moment and I didn't want to start welding it yet because I need to make sure that everything is aligned properly and I was feeling too tired to give it my full attention. I did remember to stick some protective spooge in the wheel well before I packed up.  Maybe I'll have my night off tomorrow instead, or maybe not. Cheers. |
| |
|
|
|
|
|
Mar 21, 2024 22:07:08 GMT
|
|
With your MIG, not just the old “scrape the gun’s trigger contacts” which needs doing, perchance?
John
|
| |
|
|


