ChasR
RR Helper
motivation
Posts: 10,194
Club RR Member Number: 170
|
|
Feb 19, 2009 10:18:06 GMT
|
Man, you seem to be having a run of bad luck. Car is looking sweet though. Can't believe the brake hose, that is a shame, but good job you spotted it. Will the braided hoses sought that problem out? Welding looks better than mine!! Welding has since improved  , but since my welder decided to go all funny, that's also been ground to a halt  . On the plus side, here are some goodies for it. Castle rail I won't need now but may need later (the original painter I took the car to (dad took it there, as a mate said it was cheap and good  ) patched over the rot, so I may cut that out in the future and change that section only to save me doing an entire Castle section. I also have a floorpan repair section too. So thankfully, not all of the bits in the first pic are going to be used: 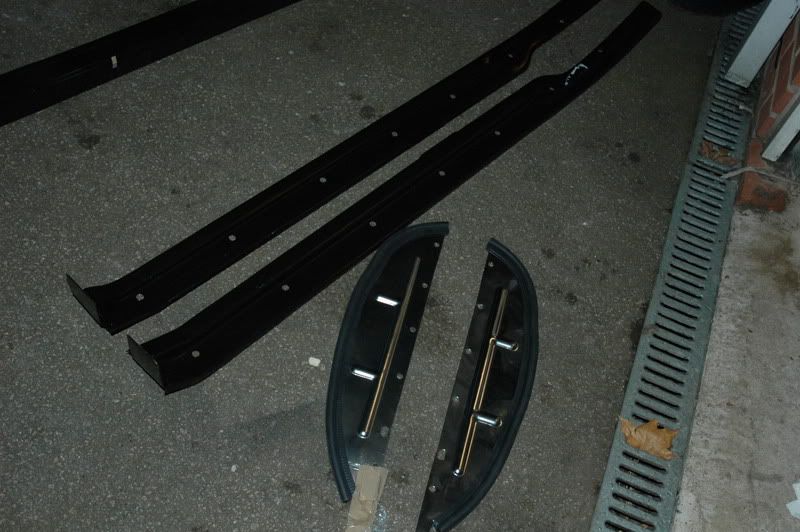 And yes, thankfully the brake hoses do have 90 degree connections, quite thankful there! However it does appear that the hoses which are supplied with the kit are better than the rear Goodridge hose that I have (I think the fronts have stainless fittings, compared to the zinc coated Goodridge, plus I'm not too keen on the Goodridge screw on fitting, but it's better than what's there . I think that the front hoses are made by Mocal. 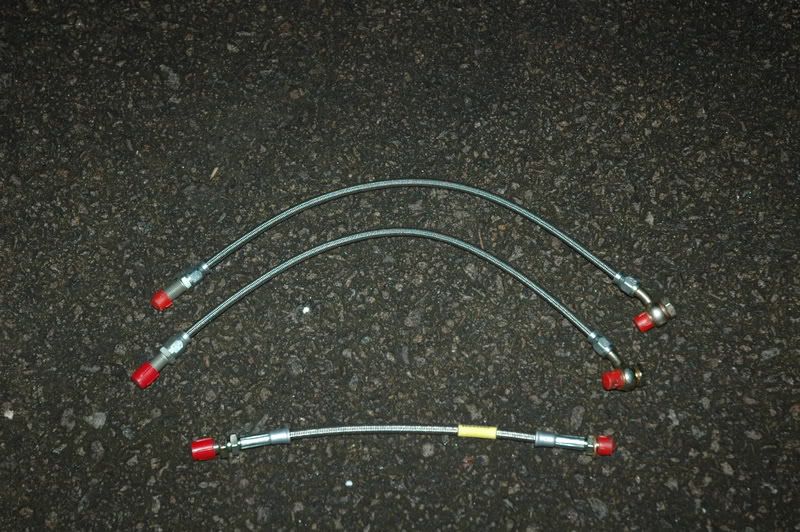 I have got it one gift though, as I wanted one for ages and this came up at the right price and at the right time with the boss too  . 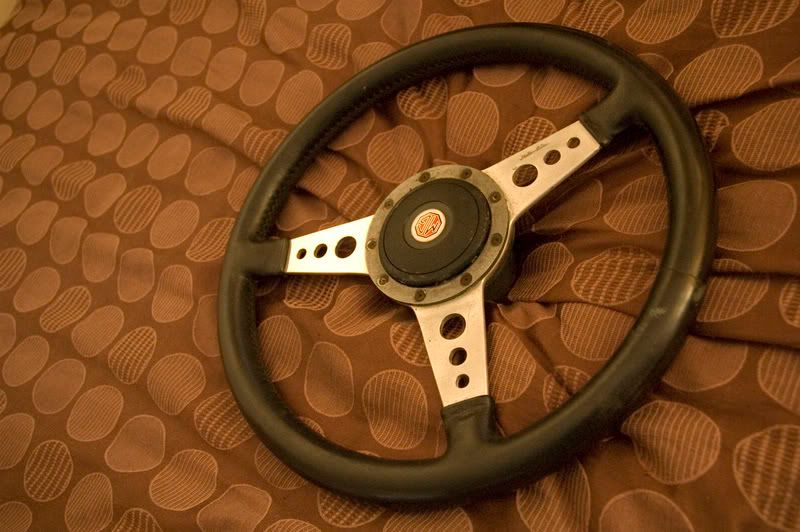 It needed polishing. As you can tell, I did one spoke in the picture, but since then I've done the whole lot and it's come up looking great . |
| |
Last Edit: Feb 19, 2009 11:27:48 GMT by ChasR
|
|
|
|
Nathan
Club Retro Rides Member
Posts: 5,626
Club RR Member Number: 1
|
|
Feb 19, 2009 10:46:11 GMT
|
Well, I've been a little busier with the Sebring over the past couple of weeks. I was prodding some very poor repairs done to the floorpan near the castle section and found that the mindless patching done caused more damage than harm. The previous people patched the floorpan from inside, leaving the rotten stuff beneath. As a result the floor (and patch) became crusty within years, and it took the flange of the castle section too (thankfully, not the castle rail itself!). So here's my latest efforts. Not the best, but I guess the metal going in will be better than before. 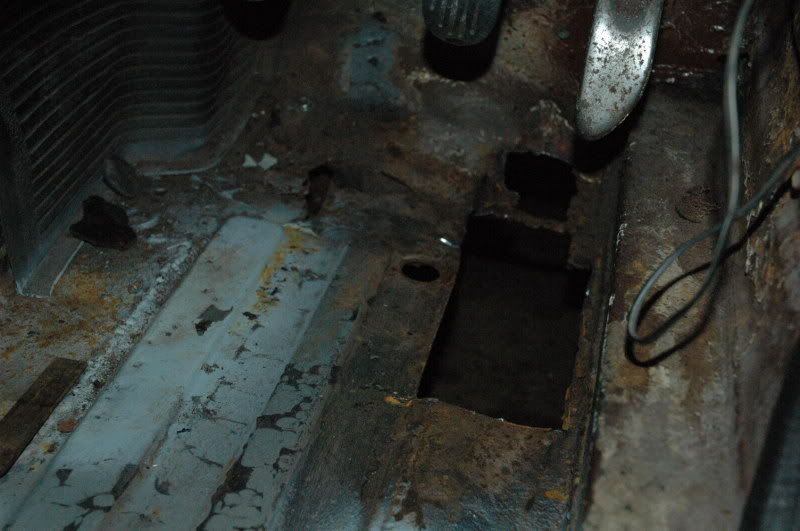 As you can see, I have cut the rot out and the patch (damn moisture trap), and I have now gone back to good metal. It still needs a small amount of tidying before I can let the new panel in, but I'll be getting another floor to repair it off, considering that the rest of the floor is perfect, and the fact that by following the ridges and carefully butt welding I should get the strength back too: Besides that bit of welding, I also need to weld part of the battery frame from where I guess acid off the old battery got the better of it, but that is easy compared to the floor (it's literally strips of metal :lol:) I thought after the welding the car would be ready for an MOT once the interior was in. Oh if life could be so simple! Not so fast. I turned the steering wheel onto full lock so as to make access to the floor a little easier, but this highlighted a potentially lethal problem, as well as potentially saving me buying another set of braided brake hoses. To (try and) cut a long story short, with the Spax conversion, longer brake hoses are provided so that the brake pipes do not rub the damper. But I found today that due to the design of the damper kit, that this is inevitable. So here, besides a crusty brake disc cover, it all looks ok with poly trunion bushes, new lower arms and springs with V8 bushes...: 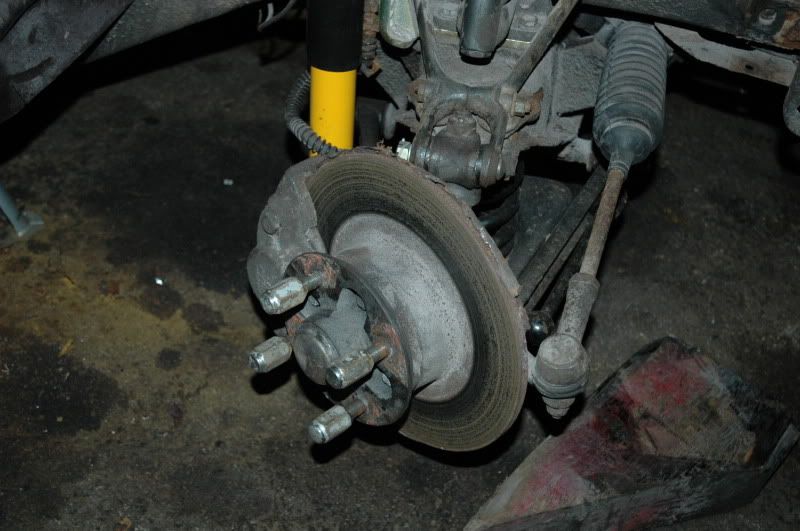 Until you see this design cock up:  Yes, the hose is being clamped by the damper due to a lack of room with the damper in place. balderdash! I've even lost the sill springs for the lever arm dampers, so using them may not be an option! Still, I guess I haven't wasted the braided hoses that came with this kit. But that is not the end of my hurdle. My original door was very badly rotten at the bottom, but the alignment of it was spot on with the door. Not quite this time though... The door has been re-skinned, but I don't remember it throwing it out this much. I've also noticed that my local places don't have doors either, and I'm not willing to travel to the other side of the country to get a door if it turns out to be worse than this one: 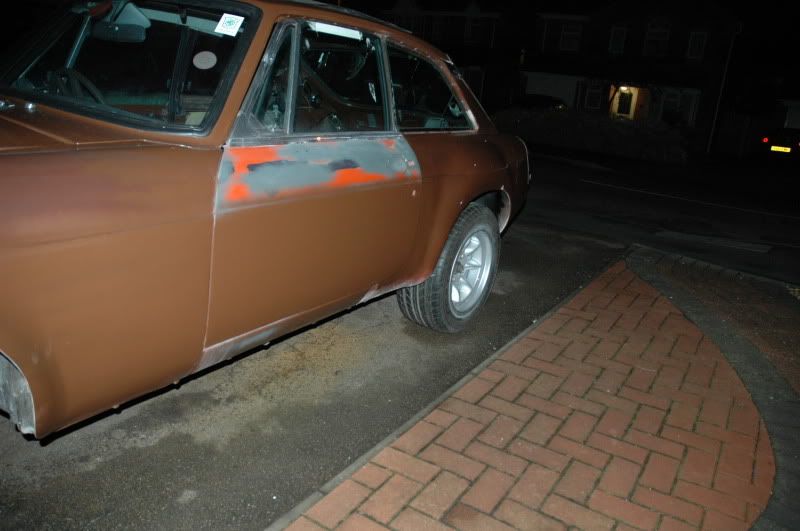 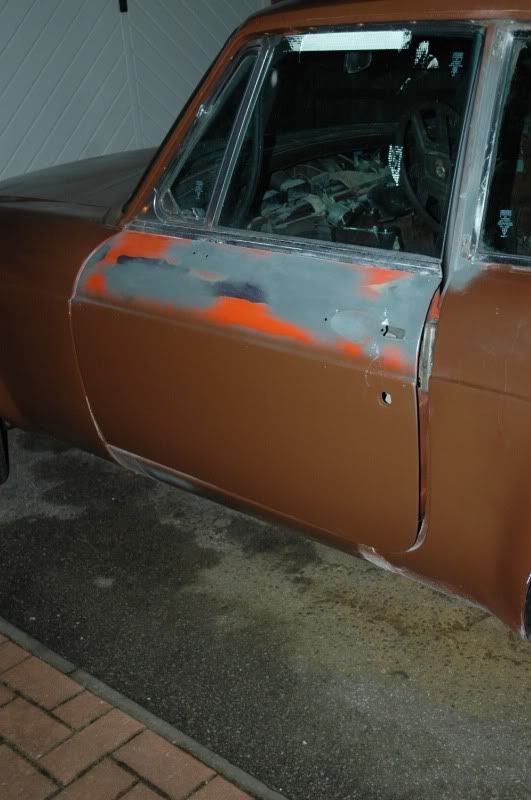  From the pictures, you can see the biggest problem I have is that the back of it does not want to line up with the rear at all. I'm sure it did at one point, so I am hoping that by adjusting the hinges that I can adjust out the closing problem. It shuts, just not very well! Damn, and there was me getting ready to throw a small portion of the interior in and get that all important green ticket. No rest for the wicked. LOL the dreaded doors. The reason you are having issues is because your doing it the wrong way round mate. You need to fit the door first then fit the wing. The hindges should not need adjusting, the adjustment is on the arms where it connects to the door (Forward/Backward movement). So with the wing off you can get the door lines perfect, then fit the wing. If its an original door (Not a reskin etc) then it will be really quick as these are far better than the BH ones. If its a BH then a small bit of shaving may be required to the leading edge of the door, if its a reskined door then expect a bit more felting. I went through this with my crossflow MGB, it was not until I spoke to the MG Breakers that they told me how to sort it, it only took me about an hour after that. |
| |
|
|
DutyFreeSaviour
Europe
Back For More heartbreak and disappointment.....
Posts: 2,944
|
|
Feb 19, 2009 13:27:51 GMT
|
As ^he said - you need to mess with the hinge arms into the door mate and it'll all come good. I got lucky with mine as the wing was mullered by a stolen car so was off while I sorted the rest anyway..... Crack on with the magic metal wielding stick - I'm currently 'progressing' as the cost of having mine done would've bankrupted another of the high street banks!  I love these Sebring kitted little beasts - well worth the effort fella. (On the welding - do the stuff that'll never be seen first, practice makes perfect n all that - so at least it's outta sight  ). Good luck...... John |
| |
Back from the dead..... kind of
|
|
ChasR
RR Helper
motivation
Posts: 10,194
Club RR Member Number: 170
|
|
Feb 19, 2009 18:47:20 GMT
|
Door's a reskinned one . It has a little bit of filler around the back where I guess it wasn't quite skinned so well. I think when I get a little more money I'll try and see if that's a better fit or not. Front doesn't line up too badly, but the gaps are way uneven. Touching (almost) in the middle of the front shut line, then widening at both ends. Considering it's been skinned once, it's probably not worth bothering with again, but then again it is a rust free door. Fired her up today, and it's still running great . As for the welding, that's the plan . |
| |
|
|
Nathan
Club Retro Rides Member
Posts: 5,626
Club RR Member Number: 1
|
|
Feb 20, 2009 10:36:52 GMT
|
|
If its skinned take the door off and make sure the crimped edge all the way around is nice and flat (most people don't take time whilst doing it). Also if its skinned you are safe to take some metal off around the edge of the door as the skins are made too thick anyhow. Defo if you have not welded them on, whip the front wings off or at least loosen the bolts this will give you the play needed.
TBH Whole new doors are more of a pain than skinned ones, at least with a skinned one your fitting to a factory door not one made a numpty at BH who cant count/measure/speak his/her own name etc LOL.
I started mine up last weekend (Been off the road since October becuase of winter coming) and gave it a blast around the back garden and OMG compared to the Capri everything feels so tight and new, not knocks/bangs/play in anything suppose the capri aint been rebuilt by me YET lol.
|
| |
|
|
|
|
|
Feb 20, 2009 17:45:05 GMT
|
|
looks like youve put a lot of time and effort in to this keep up the good work
I'm fitting a zetec in a mates mg at the minuite
|
| |
|
|
|
|
|
Feb 20, 2009 23:37:05 GMT
|
Still looking good there Chas. She'll get sorted soon, I'm sure - I need a partner to tandem drift with ;D And if you were on about me earlier, you should know better I reckon you should CA18DET it of course - they just sound so good. (Just make sure to oil change at least every 4000 miles) You could SR20, but I reckon they need some serious tuning before they sound anywhere near as good as the S13 engine... say about 400bhp Go on... you know you wanna... ;D Jimbo |
| |
|
|
ChasR
RR Helper
motivation
Posts: 10,194
Club RR Member Number: 170
|
|
Feb 28, 2009 21:06:08 GMT
|
CA18 is very tempting in the 'B for many reasons, but we'll see James . I've been doing the final few jobs before it's all put back together. O/S and rear Door handle are back on, all ready to go but the wing needs adjustment, and the passenger door shuts but the rear is still way on the curse word. The garage is going to lend me a good door from a '79 GT which is rotten, so I may have more luck there, but we'll see: 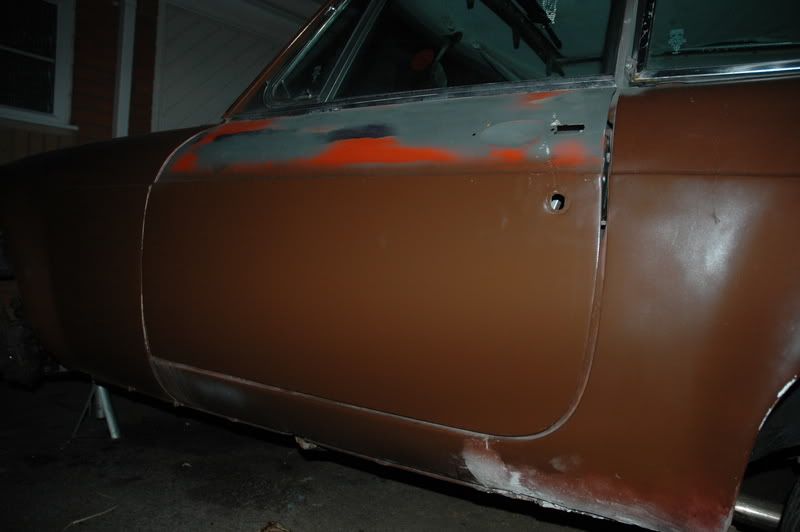 That's with the door fully on the catch and it's a bit of a struggle to shut it.  But that's a 'small' issue for now. The bigger issue is the N/S/F suspension. The other side wasn't too bad to change the trunnion bushes on, but this side is being an absolute pain. I tried heat, a BFG (read sledgehammer) on the bolt, but it refuses to budge a mm! I chopped the pin out and even with heat (admittedly only a blowtorch) all around it, the Fecker still refuses to come out. May be new damper time, although it's a mint damper and I can't see a recon damper lasting as long. Poo Noodles! 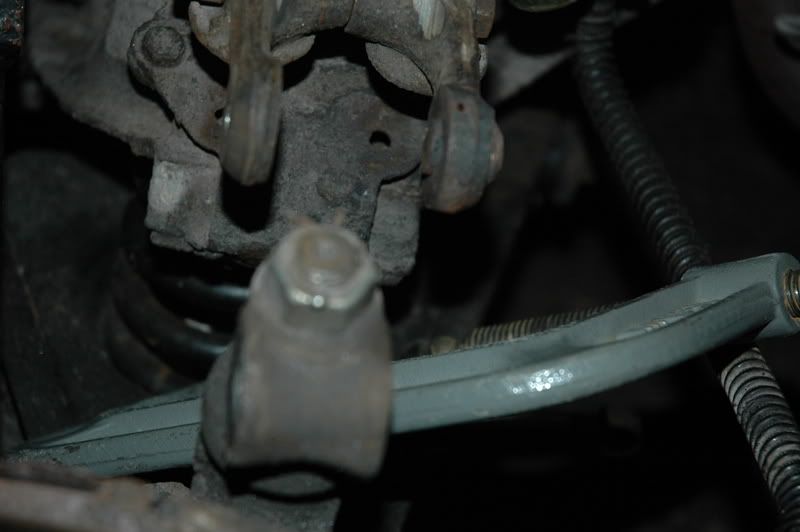 The remainder of the bolt which is being the source of all my troubles: 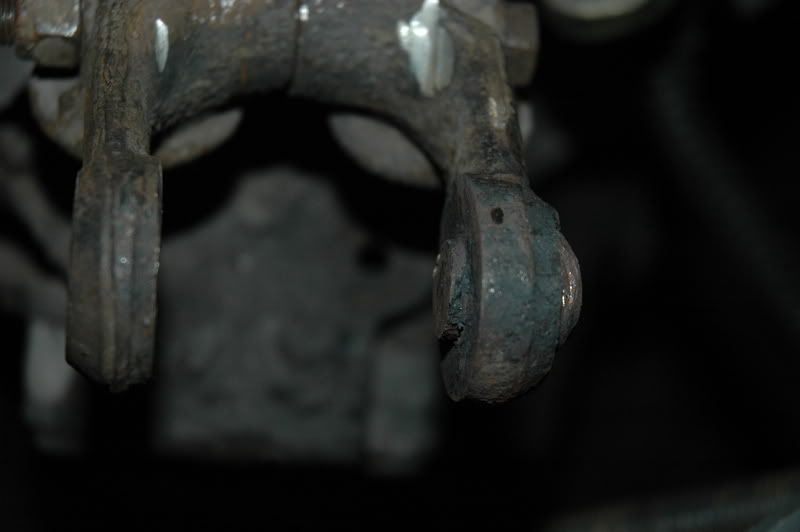 It's like the car doesn't want to move :lol:. |
| |
|
|
ChasR
RR Helper
motivation
Posts: 10,194
Club RR Member Number: 170
|
|
|
|
Well after that bolt gave me so much trouble, I decided to grind of as much as I could of it. The drill seemed futile even with new bits, so I grinded off as much of the old bolt as I could. It appears that on the remains of the bolt, it was the remains of the metal from the wishbone that was holding it on. Grinding this off helped, but it still needed a good whack (including a bent punch) to get the pin out. When the pin came out it didn't seem corroded so I am wondering if someone forced this pin into being there. Anyhow, once that was off, I took the opportunity to do a few things. First was to change the bumpstops (or rather the lack of them). The old plate (ally) had the bolts welded into it, so again the angle grinder cut those off (electrolytic corrosion eh?) New ones of mine do away with the spacer plate (for lowered cars) and so putting the new ones on was a relatively straightforward affair. I also gave the caliper a lick of paint and put the braided line on. One side down, another half (just the brake on the other side) to go. I was worried that the caliper would be seized with the pistons pitted but they had a surprise in store for me. The pistons appear to stainless with zero pitting . So after all that, both sides now look quite similar now. 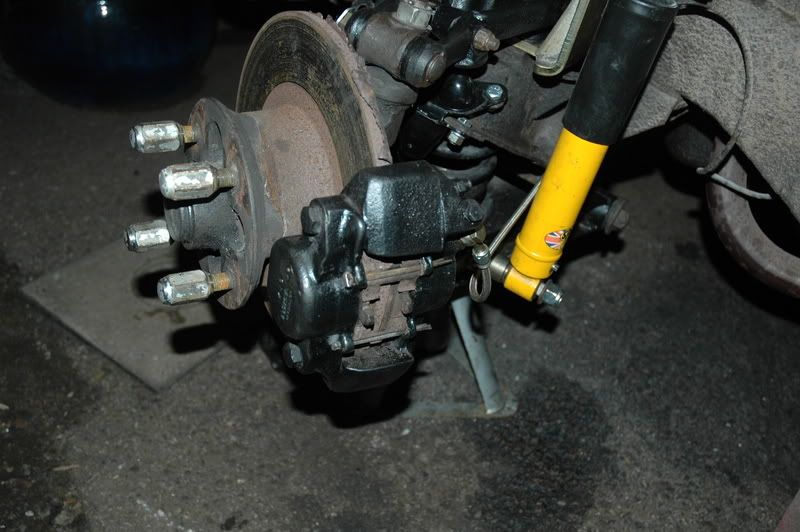 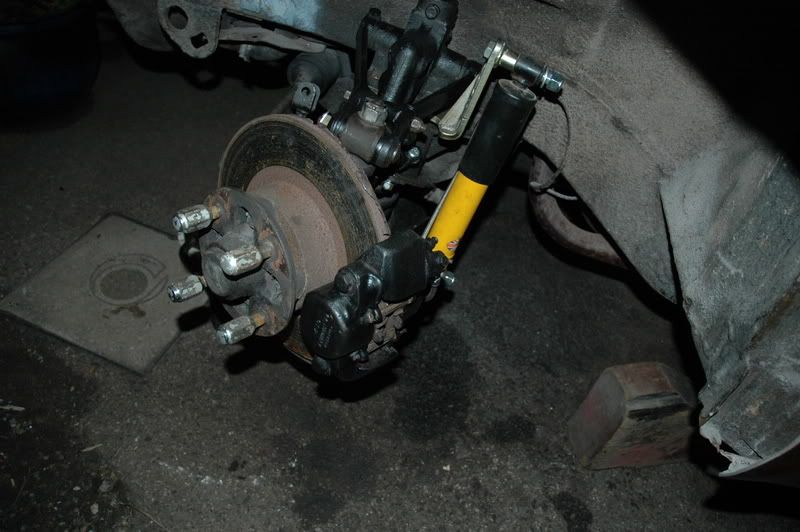 Discs I may change, but not sure what to. MGB Vented discs are a fortune, and whilst I have heard positive things from MGB owners about EBC brake discs and pads but I am not too keen on them at all. At the same time I'll probably get some stainless rear dust shields. |
| |
|
|
|
|
|
|
|
|
Nice work
The brakes on my old B GT were PANTS
they would overheat in a second and would just pack up all together if you gave it stick!
It did have an oselli fast road spec engine though so did haul ass!
Anyway... good work!
|
| |
|
|
|
|
sonus
Europe
Posts: 1,386
|
|
|
|
|
Chas - If you pay postage you can have my chrome dust shields. One's slightly bent, but should be easy to sort, both unused. Got them with my hoyle system i collected in the UK. Shoot me an e-mail at n . c . n i e l s e n @ g m a i l . c o m (delete spaces) if interested
|
| |
Current
1968 TVR VIXEN S1 V8 Prototype
2004 TVR T350C
2017 BMW 340i
Previous
BMW 325d E91LCI - sold
Alfa Romeo GTV - sold
Citroen AX GT - at the breakers
Ford Puma 1.7 - sold
Volvo V50 2.0d - sold
MGB GT - wrecked by fire
MG ZT 1.8T - sold
VW E-golf Electric - sold
Mini Countryman 1.6D -sold
Land Rover Discovery TD5 - sold
|
|
Nathan
Club Retro Rides Member
Posts: 5,626
Club RR Member Number: 1
|
|
|
|
Well after that bolt gave me so much trouble, I decided to grind of as much as I could of it. The drill seemed futile even with new bits, so I grinded off as much of the old bolt as I could. It appears that on the remains of the bolt, it was the remains of the metal from the wishbone that was holding it on. Grinding this off helped, but it still needed a good whack (including a bent punch) to get the pin out. When the pin came out it didn't seem corroded so I am wondering if someone forced this pin into being there. Anyhow, once that was off, I took the opportunity to do a few things. First was to change the bumpstops (or rather the lack of them). The old plate (ally) had the bolts welded into it, so again the angle grinder cut those off (electrolytic corrosion eh?) New ones of mine do away with the spacer plate (for lowered cars) and so putting the new ones on was a relatively straightforward affair. I also gave the caliper a lick of paint and put the braided line on. One side down, another half (just the brake on the other side) to go. I was worried that the caliper would be seized with the pistons pitted but they had a surprise in store for me. The pistons appear to stainless with zero pitting . So after all that, both sides now look quite similar now. Discs I may change, but not sure what to. MGB Vented discs are a fortune, and whilst I have heard positive things from MGB owners about EBC brake discs and pads but I am not too keen on them at all. At the same time I'll probably get some stainless rear dust shields. Standard discs are good for mild tune, just dump some EBC green pads in there and you will be fine. Give the calipers a overhaul the only time I have had issues was at a track day (and I was riding the brakes). My brakes stop the car dead and are running standard calipers. Unless your really going for super power (In which case ditch the B series) then I would keep them as is. I thought with the Spax kit you drain the original damper fluid, as its only there as a connector for the stub axle? |
| |
Last Edit: Mar 7, 2009 9:06:49 GMT by Nathan
|
|
luckygti
Posted a lot
 I need to try harder!
Posts: 4,912
|
|
|
|
Coming on. Remember spending way too much time under my old B sorting the suspension! Ended up burning the bushes out with a a small gas cooker, cos I didn't have a blowtorch! That was a right barrel of laughs! |
| |
|
|
seb
Part of things
Posts: 16
|
|
|
|
ive built a mgb gt sebring, it just needs paint now! yeah i agree just get some drilled and groved disks and get the green stuff pads. once their bedded in they not half bad. the other thing could be to fit princess brakes on standard v8 disks. looks cool makes me want to get mine on the road!  |
| |
|
|
ChasR
RR Helper
motivation
Posts: 10,194
Club RR Member Number: 170
|
|
Mar 16, 2009 12:53:10 GMT
|
I thought with the Spax kit you drain the original damper fluid, as its only there as a connector for the stub axle? Cheers for the suggestion there Nathan and Seb. I see they are quite well proven on the 'B. The other option I was considering was standard discs (good discs) with Ferodo DS Performance pads which also have a solid reputation for not gassing and not fading. You are right there, the Spax kit does away with the valve and fluid, making the top arm solely a wishbone. But the lever arms still need to be in good condition so as to lack play in them as well as the fact that if the seals are dead there is now no protection to stop the insides from rusting up. |
| |
|
|
Nathan
Club Retro Rides Member
Posts: 5,626
Club RR Member Number: 1
|
|
Mar 16, 2009 14:08:42 GMT
|
ive built a mgb gt sebring, it just needs paint now! yeah I agree just get some drilled and groved disks and get the green stuff pads. once their bedded in they not half bad. the other thing could be to fit princess brakes on standard v8 disks. looks cool makes me want to get mine on the road! That is F**kin mental!!!! LOVEIT!!! |
| |
|
|
ChasR
RR Helper
motivation
Posts: 10,194
Club RR Member Number: 170
|
|
Apr 26, 2009 20:47:05 GMT
|
|
I finally took off all of the patch today hoping that the inner sill etc. would all be fine (the Side member).
Depending on how things go tomorrow all will be revealed in the next few days, or within the week.
|
| |
|
|
ChasR
RR Helper
motivation
Posts: 10,194
Club RR Member Number: 170
|
|
Apr 28, 2009 21:06:39 GMT
|
Rain has played havoc, so no welding today . However I can happily say that the brakes are pretty much all done. Braided lines are all fitted and system has been bled. Brakes feel nice under the pedal, not something the purists would say about the dual circuit servo assisted brakes on a 'B so the decent calipers and lines coupled with fresh fluid (old fluid was disgusting (but then it would be)) seem to have made a nice difference. About the welding, it appears that the inner side member is fine, down the flange thankfully, so I'm going to plug weld the edge of the floor to that, and butt weld in the rest of the floor repair panel. More to come next week if the weather plays nice. |
| |
|
|
ChasR
RR Helper
motivation
Posts: 10,194
Club RR Member Number: 170
|
|
|
|
Well, I said I would post up progress and I will. I basically cut more out of the floor and after a fair bit of measurement I finally started to splice in the new repair section. Welding ain't too great but it will be a slow process for sure. It needs the metal cleaning up both sides, but I do now know that it will go in fine. Once the metal is clean it will be seam welded/butt welded into place :  And some comparison shots. White MG's rear valance has been semi prepped for paint: 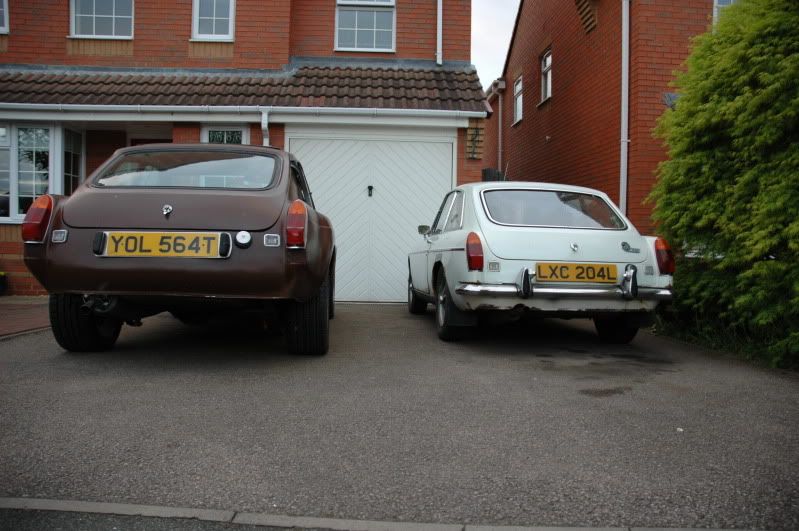 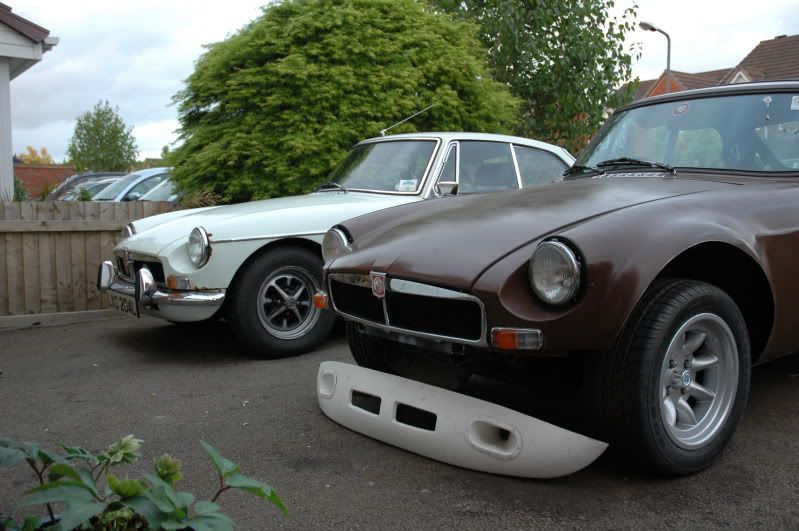 Once my Flap wheel arrives I'll be cleaning up the surfaces nicely. But for now, I need a few more things doing for it to pass an MOT: -Get another door (I thought as Nathan said the wing could be out of shape, but it turns out the door handle won't reach the catch at all despite fiddling with both the catch and the handle. As you probably know, it's an MOT fail as it can't be opened from outside -Weld corner of battery tray. This actually looks like a simple repair, and one I think I could circumvent if I get a battery bin -Rebuild/aquire new seatbelt reel. It goes in fine, but it won't come out! Damn, I should have broken my daily to bits when I had the chance LOL. After MOT I'll be looking into fitting the valance on correctly, giving it proper paintjob and lowering it more (It has the 'lowered' lowered springs up front that apparently give it the biggest drop but they don't seem to have dropped the car all that much at all. Rears need to go to a spring specialist where I'll probably get them to lower the car by 2-2.5" at the rear. In additon I am looking to sort out some seats (I was thinking Cobra Classic seats but I can't get the idea of Mazda MX5 seats out of my head). Capri Recaros maybe or are they too wide? |
| |
Last Edit: May 9, 2009 15:08:18 GMT by ChasR
|
|
ChasR
RR Helper
motivation
Posts: 10,194
Club RR Member Number: 170
|
|
Oct 12, 2009 22:47:42 GMT
|
Update time! Thanks to a certain someone on this forum my car is no longer a sieve . Before with all the holes:  That Battery tray was worse than this pic made out (the front was also gone) 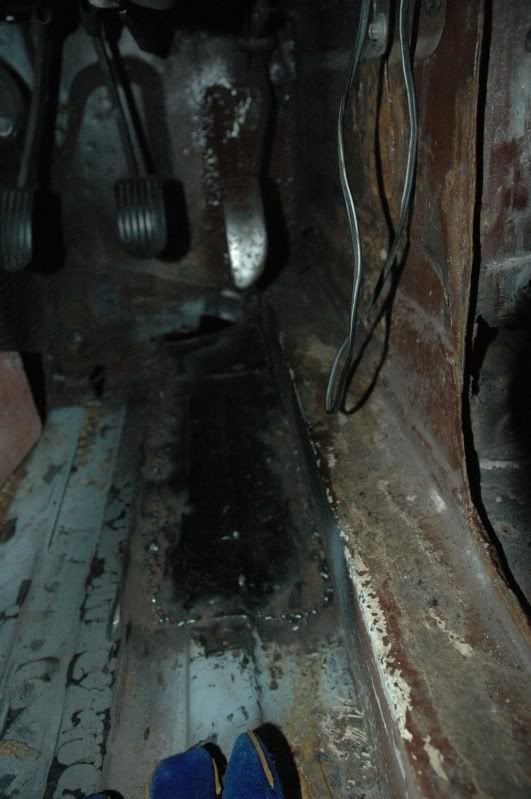 Repair panel didn't go as well as I hoped and there were still holes in the floor as it was worse than I thought (damn people patching floors out, and not cutting out the rust....) 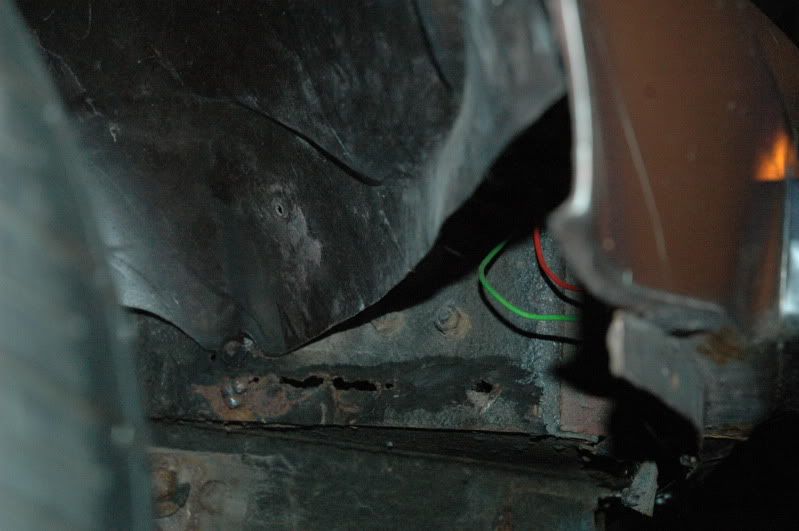 Rad vent was also slightly crusty. Thanks to the RR spirit, Rust Begone : 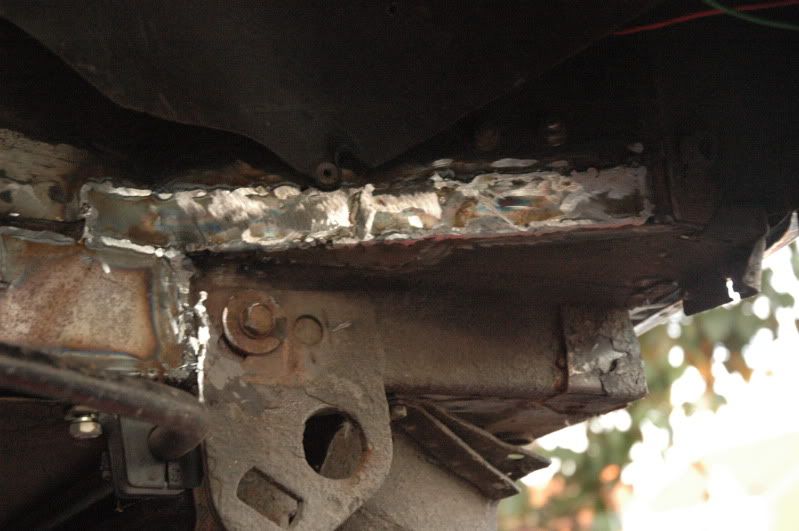 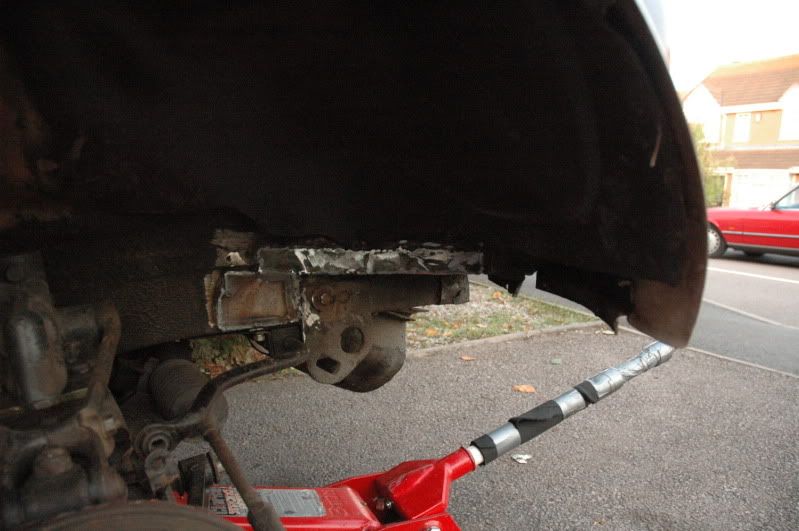 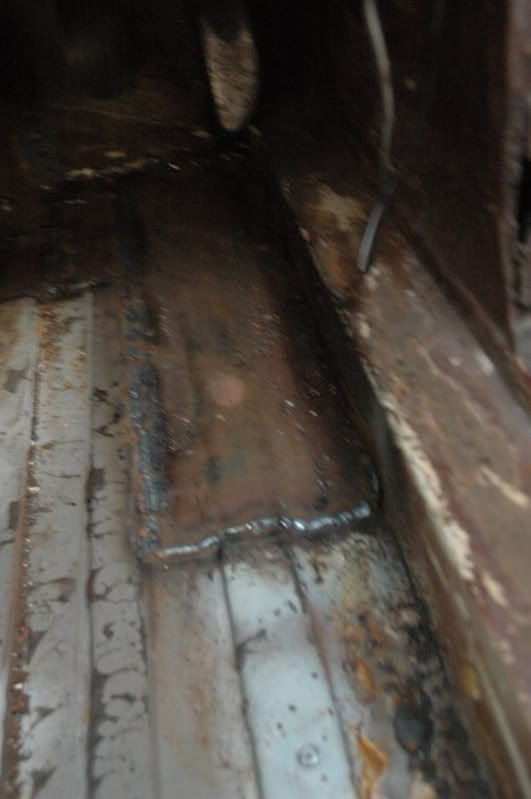 Welding it wasn't as easy as hoped. It turned out that my old 'Uni-Mig' Bottle for a recommended source didn't actually have much gas in it from the start which is why we were surprised when there was no gas in it at all (especially when I always ensured I turned that tap off (normally checking more than twice)). Another Argon bottle from BOC later and all was well again (apparently the welds were much better too!). It's been sanded and primered up read for some brown paint and then underseal on top. It's great not to have a sieve for a car again (Porsche fine, but I cannot remember when the 'B was this solid:D). Now on the to do list: Reconnect ARB (was supplied the wrong bolts...) Bleed brakes (line was reflared) Change oil (too thin (15W40 Semi: I'll be going to 20W50 Unipart and a decent filter)) and change spark plugs. Tune carbs and check timing (was stuck on 20 degrees but the weights seemed free...). Find another door (my reskin on the passenger side barely fits and just about closes on the catch even with the door adjusted all the way back). Paint sills (They've been worked on before). Underseal where necessary Refit O/S/R glass Reinstall interior. Source new seatbelts (old ones don't pull out, only go in. Italian Tuneup Hopefully an MOT! |
| |
Last Edit: Oct 12, 2009 22:55:59 GMT by ChasR
|
|
|
|


 , but since my welder decided to go all funny, that's also been ground to a halt
  .
. ) patched over the rot, so I may cut that out in the future and change that section only to save me doing an entire Castle section. I also have a floorpan repair section too. So thankfully, not all of the bits in the first pic are going to be used:
 .
.


 ).
).


