|
|
|
|
|
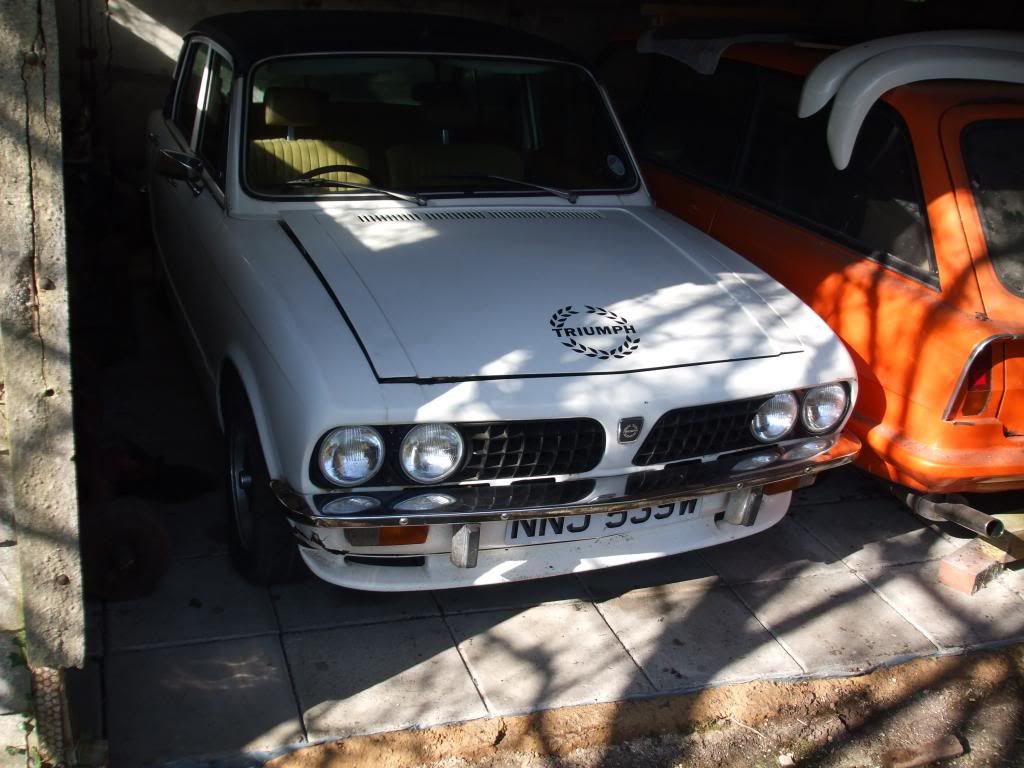
Have been enjoying the Readers Rides section of the forum for a while now so I thought I'd add some details of my own restoration. Hopefully it'll be of some interest to someone out there  I moved out to Adelaide in South Australia from Brighton about 8 years ago now, chasing sunnier climes (plus I'd met my now wife who is an Adelaidian). I had a Triumph Spitfire back in the UK but couldn't afford to ship it over so after we'd finally got ourselves settled in a place with some garage space I started the hunt for a new project. The prices of Spitfires are astronomical out here so I kept a lookout for something else British and of a similar vintage - a very sad-looking Triumph 2500TC turned up on Gumtree which later found its way into my garage. She wasn't exactly pretty by any stretch of the imagination: 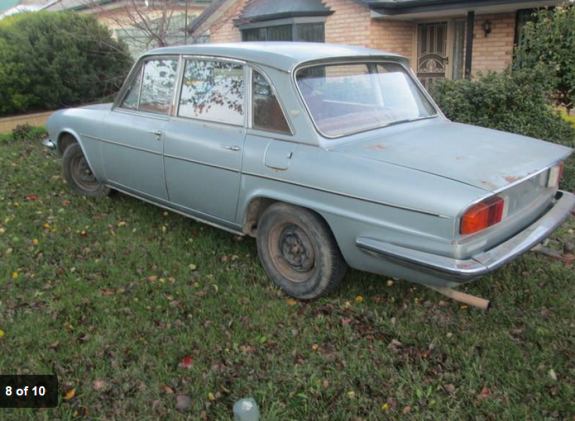 Back in the day, many British cars were assembled locally in Oz by Australian Motor Industries (AMI) - AMI also assembled Toyotas in Australia. These Aussie models didn’t get the cool (and arguably more normal) 70s colours that the UK cars did but instead were finished in rather funky Toyota colours of the day. Hence the dull metallic blue (which in this case was in shocking condition - far worse than the pictures suggest). The car hadn't seen the road for a good decade or two and needed a lot of work which I started working my way through - new brakes all round, fixing dodgy electrics, new tyres, rebuilding carbs, getting the distributor rebuilt due to huge endplay. It slowly became roadworthy and started to look a bit more presentable: 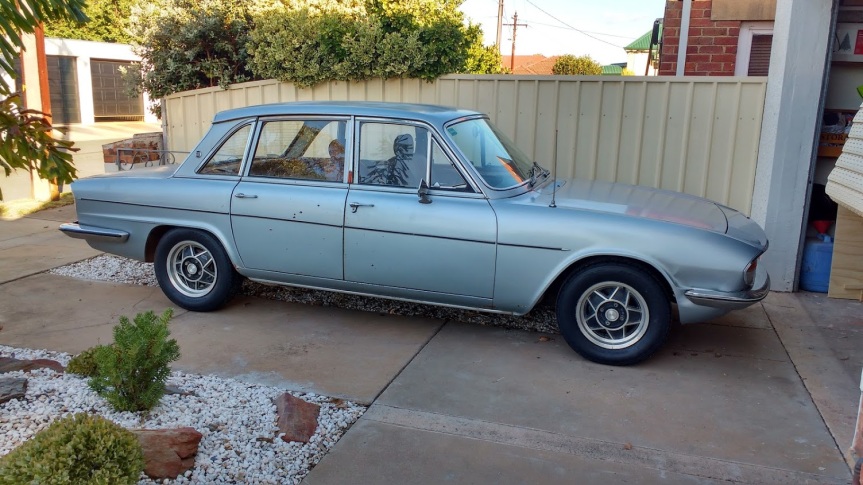 However, to cut a long story short, I was mid-clutch replacement and whilst I was waiting for a new release bearing to be shipped over from the UK my fingers began to wander and before long I was casually checking out classic car offerings on Gumtree. As my wife knows only too well, this has rarely ended without another ‘bargain’ littering/adorning our property. Enter Project 27.1b: ![]()   Project 27.1b, or ‘the white car’ as it shall be known for the foreseeable future, was advertised for sale by a local breakers yard. The scrappage rules are different over here – yards are free to either break or sell cars that they buy, there is no compulsory destruction as there is in the UK which has led to many a savable classic being needlessly introduced to the jaws of the crusher. Apparently an old boy drove the thing into the yard early one morning, despite it having no brakes whatsoever, and just wanted shot of it from his garage. The yard owner thought it was too good to crush and advertised it on Gumtree for $1500. Unfortunately for my wife, and for the blue car (more on this later), that’s exactly when I decided to partake in some casual and innocent window shopping. The advert looked tempting but it was difficult to tell from the couple of grainy photos accompanying it what the overall condition of the car was. I ignored it for a couple of days. In my defence I even posted the ad to the pages of a couple of Australian Triumph-related Facebook groups I follow. By the end of the week the ad was still showing and I could resist no more. I spoke to the breakers yard by phone and they confirmed the car was ultimately solid. I was there at 8am sharp the next morning – just to take a harmless look obviously… 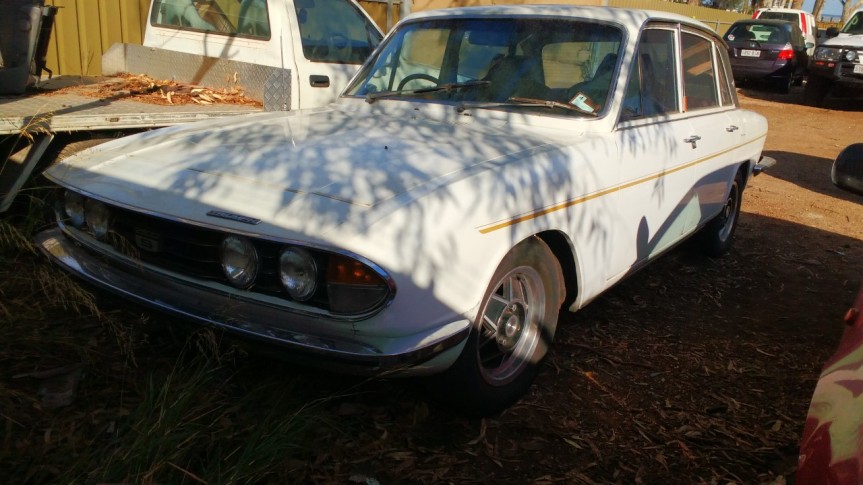 I gave the car a fairly good once over at the yard, with the help of my trusty fridge magnet, torch and Mr Pokey Screwdriver. It was scruffy but solid. Best still, it was not metallic blue. I started doing the sums in my head, weighing up the additional purchase cost of this car plus the jobs it needed doing, against the cost of ultimately having to undertake a full-body bare metal respray on the blue car. The white car won and a couple of hours later the breakers yard had very kindly delivered it free of charge. 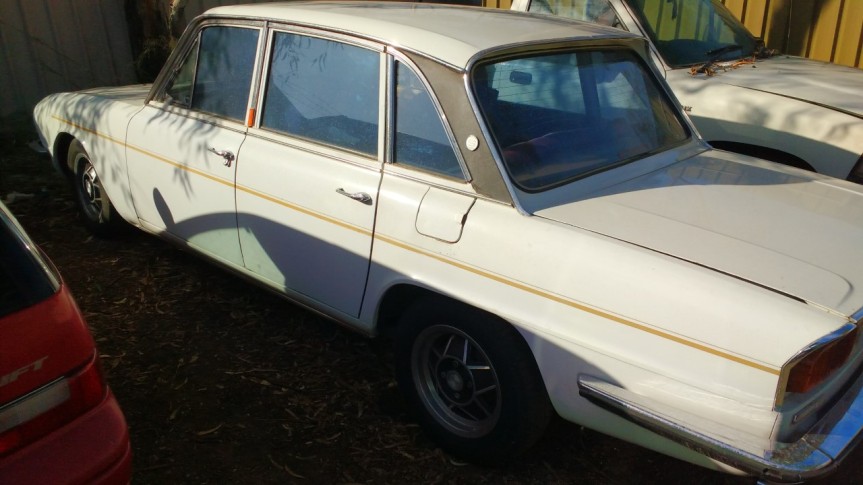 The car was a genuine 2500S, which gave it more of a pedigree than the blue car which was a TC (albeit with a replacement engine originally from an S). It also had a very nice set of genuine S alloys (including an unused spare), power steering and even an original 1970s AC system. The headlining was virtually unmarked, and the dashboard in great shape other than one small crack – both big jobs that needed doing on the blue car. The registration label in the windscreen shows 2011 – it has presumably been sitting since at least then, I suspect it may have been longer. 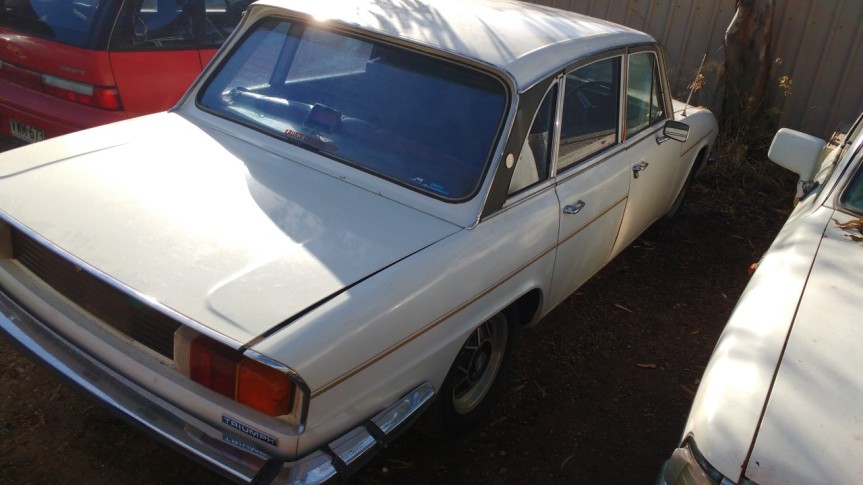 The downsides over the blue car were the mismatched interior – judging by the vinyl on the parcel shelf and pillars, it looks like the car originally sported bone-coloured velour with the seats and door cards having been replaced at some point with a red vinyl set (the driver’s seat of which was in very bad shape). The wood cappings of the doors were also in a bit of a state with peeling lacquer and, in some places, veneer. 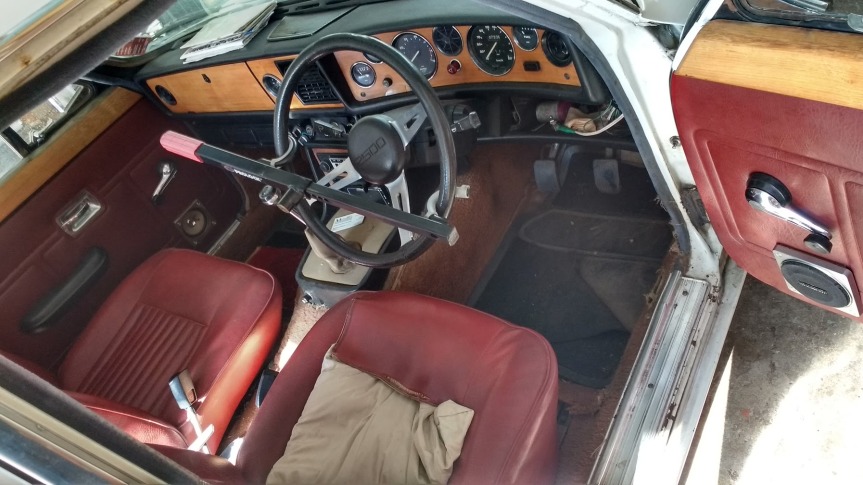 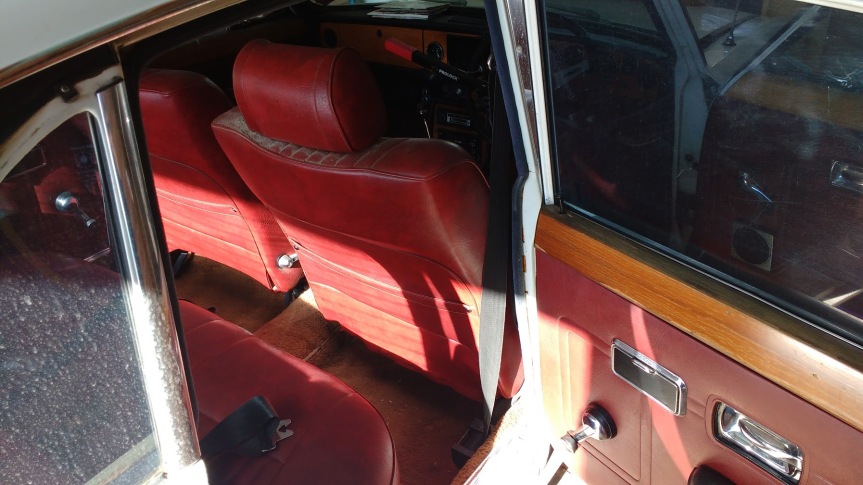 Whereas the panel fit on the blue car was actually very good, the driver’s door on the white car has at some point been swapped – the replacement a very subtly different shade of white, lacking the sexy gold pin strip and very badly aligned, with the latch end having dropped by several millimeters meaning the door had to be lifted when closing to avoid it merely bouncing off the striker plate. 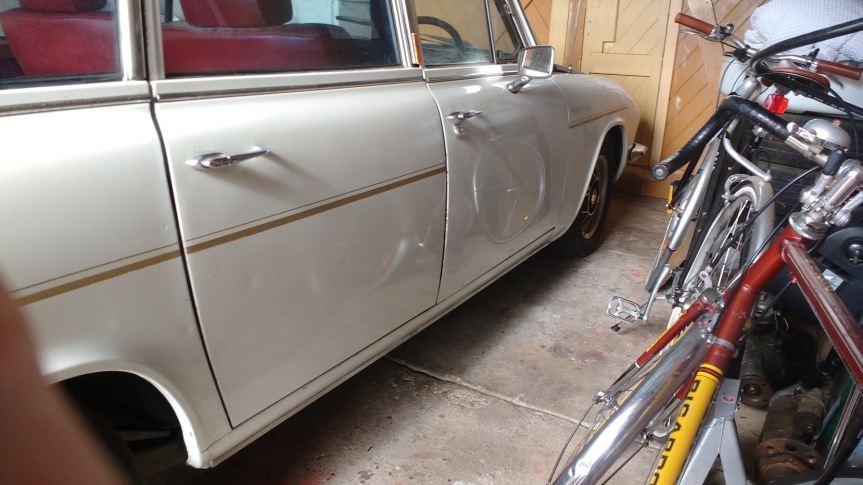 Potentially the biggest job needing doing on the white car which I would not have had to have worried about on the blue car is the crusty front end of the driver’s sill – the jacking point of which promptly chose to relocate itself about 5-10 mm skywards when I first tried to put the car on axle stands. The inner skin looks solid but I presume the outer skin at least need replacing, as well as some work to the jacking point and possible the inner skin. At some point a previous owner or one of their agents has lovingly given the sill a dose of filler and a bit of paint to hide the problem – but I know it’s there and waiting for me. 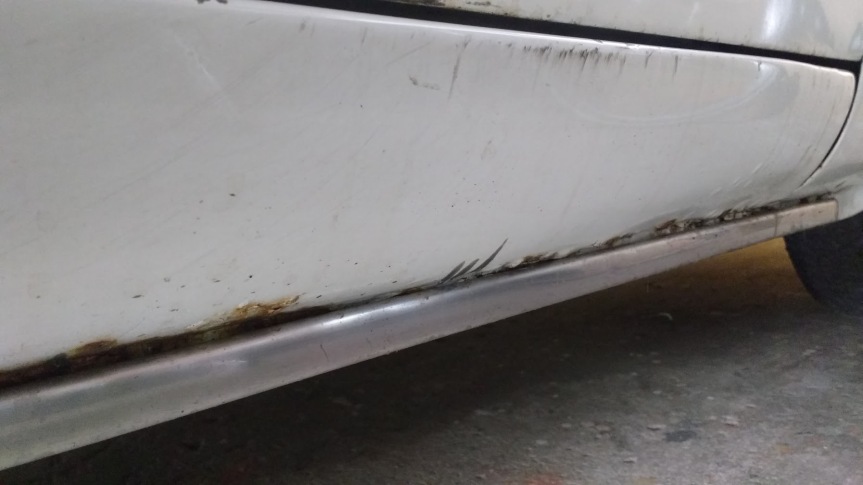 The only other rust I can find on the car is at the bottom corner of the rear valance panel – it’s going a bit crusty in one spot but it’s not particularly widespread. 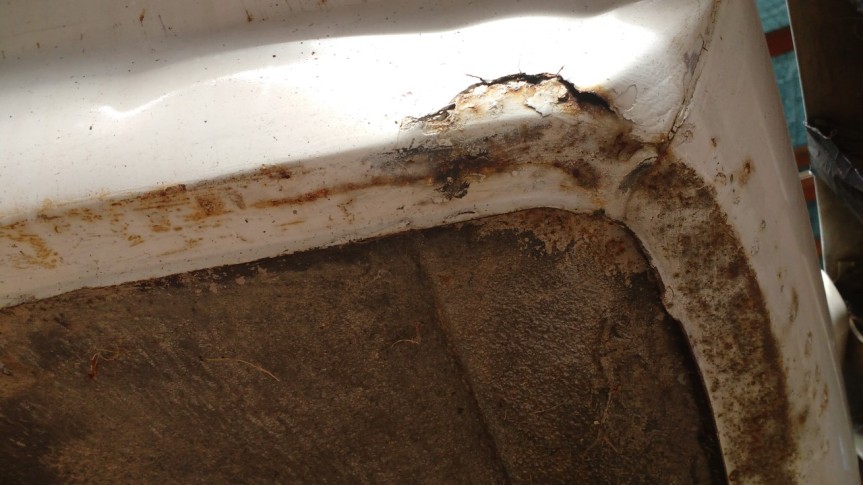 The underside of the car looks in great shape and all of the factory warning labels are present under the bonnet, which is a nice touch of originality.  So, what of the blue car you ask? Well, as much as I wanted to sell it on as a going project it was a very tempting source of spare parts for the white car – the brown tan interior (seats, carpet, door cards, door cappings), for example, could be transplanted over to the white car, thus ticking off a big item on the ‘what makes this car look a bit rubbish’ list. Likewise, all of the coolant system hoses were brand new, the ones on the white car being very perished, soft and swollen. The white car was driven into the breakers yard (and subsequently from the tow truck into my garage) with no brakes – the pedal just sinks to the floor with little or no stopping power. The brakes on the blue car were completely overhauled from master cylinder to hoses to slave cylinders to friction material. The tyres on the white car were worn and old, the ones on the blue car were brand new. There were also multiple niggly little items – the boot lid catch, the evaporative control system (missing on the white car with hoses capped and left dangling), the centre console, boot lining etc – all good on the blue car and not so good on the white car. 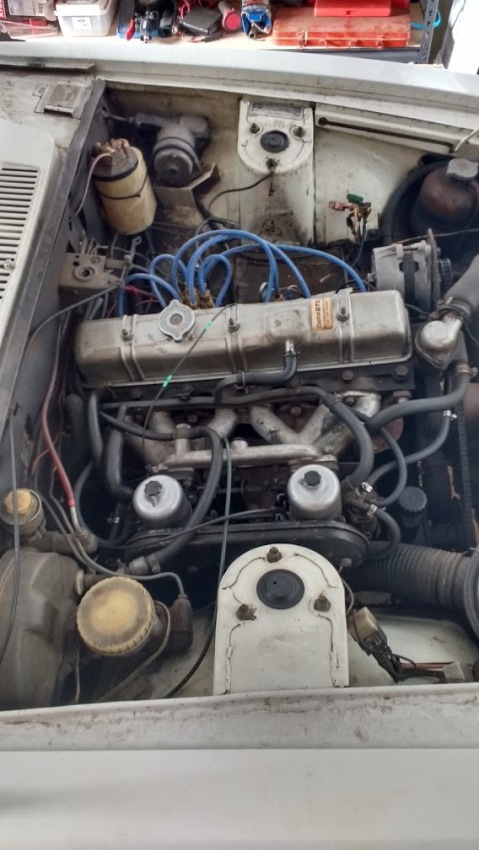 The reality therefore was that the blue car was stripped as far as possible to breathe new life into the white car . It was annoying to have to undo and the redo the work that had already been done – the brakes for example, no-one likes doing brakes, let alone thrice – but my stockpile will hopefully save me a small fortune over buying and shipping new parts again. |
| |
Last Edit: Dec 9, 2019 22:49:39 GMT by llessur
|
|
|
|
|
|
|
|
|
|
All Hail The Triumphant Antipodean..cool
|
| |
75 Daimler XJ6-S2-SWB
71 Jaguar XJ6-S1-SWB
Fiat 500D Custom
Cars in NZ.I'm in flippin Germany!
|
|
|
|
1977 Triumph 2500SMercdan68
@forddan68
Club Retro Rides Member 68
|
|
|
|
Lovely cars, nice rules in oz it seems!
Keeps old stuff from being scrapped
Good work on a worthwhile car , I’d love one of these rare cars nowadays
|
| |
Last Edit: Dec 9, 2019 16:17:31 GMT by Mercdan68
Fraud owners club member
2003 W211 Mercedes E class
1989 Sierra sapphire
1998 ex bt fiesta van
|
|
|
|
|
|
|
So in terms of getting the beast roadworthy, the to-do list stood as follows: - Rebuild the carbs – the HS6s had noticeable wear on the throttle spindles, the rubber jet hoses were perished and by eye the jet orifices looked a bit oval and worn
- Drain the 7+ year old fuel from the tank, clean sediment from fuel pump, install new in-line filter and replace all fuel hoses
- Replace the ballasted wire on the ignition circuit due to common problem of melted insulation. The options here are to replace like-for-like with a suitable length of ballasted wire, replace the ballasted wire with normal wire and a ballast resistor or swap the coil out for a 12v and do away with a ballasted circuit completely
- Rebuild the brakes – master cylinder is likely shot given the pedal sinking to the floor, flexi hoses look old and front brake pads are worn.
- Change the oil and filter, fit spin-on conversion from the blue car
- Fit reconditioned distributor from blue car, set valve clearances
- Replace perished fan belt
- Tune carbs and set ignition timing
- Flush cooling system and replace all hoses – the existing ones are very perished
- Check wheel bearings, replace if required
- Check and change/top up gearbox and diff oil. Carry out scheduled lubrication elsewhere
- Swap new tyres from blue car onto the better alloys from the white car
- Re-align driver’s door and sort out dodgy interior
- Sort out registration and insurance
The first item to tick off the list was a rebuild of the twin SU HS6 carbs. I did toy with the idea of swapping over the units from the blue car which I'd already rebuilt but I never went as far as having the throttle spindle bushes replaced and there was still some slight wear noticeable after the new spindles had been fitted meaning probable air leaks. In addition, the blue car’s carbs had the arguably less-desirable waxstat jets. 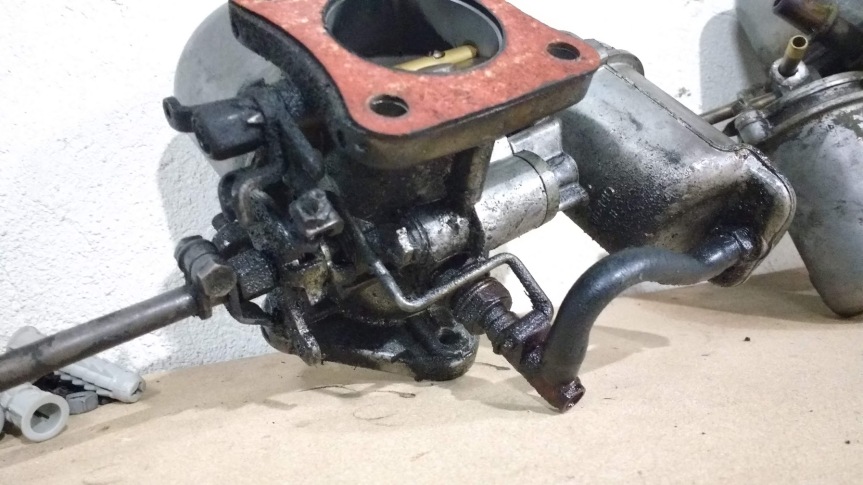 I stripped down and cleaned the carb bodies and sent them off to SU Midel in New South Wales who did an excellent job of drilling out and replacing the throttle bushes for a very reasonable $90 (around £45). To save costs I built up the units with the new spindles, butterflies, needles, float valves and gaskets salvaged from the blue car’s set, only needing to buy new non-waxstat jets and butterfly screws to complete them. I think the finished articles look great – I’m not a fan of the polished dashpot look, clean and tidy is more my thing: 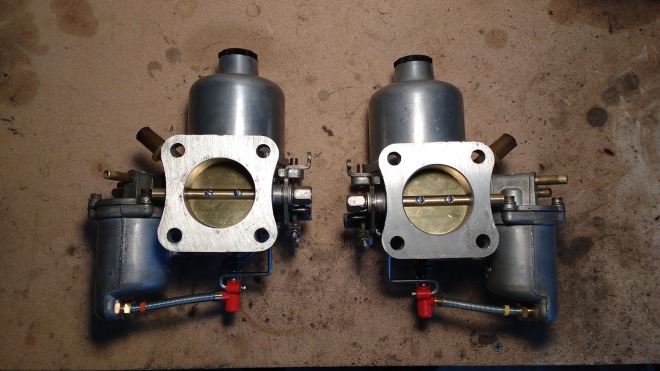 One change I did make to the carbs was to swap over the pistons and dashpots from the blue car’s carbs as they have the more advanced HIF-style twin track ball roller bearing arrangement which reduces friction in the piston/damper rod assembly and eliminates the possibility of the piston sticking. I know that swapping of moving parts between carbs is usually considered a bad idea but the general consensus among the online Triumph community was that as long as the pistons and dashpots were transferred in matching pairs then it should be OK. I’ve also started on the rest of the fuel system, finding time to drain the tank of the whopping 5 litres of stale fuel that it contained. This was pretty easy, although had the potentially to get dangerously messy – luckily I was well prepared with containers and a length of hose so my house and eyebrows remain unsinged. The outlet to the tank is very accessible from beneath the car, just to the side of the diff – the rubber fuel hose is simply attached to this with a jubilee clip. Removing the clip and hose, and very quickly sliding on a longer length allowed me to drain the fuel into a suitable container for storage and potential use in my long-suffering mower. 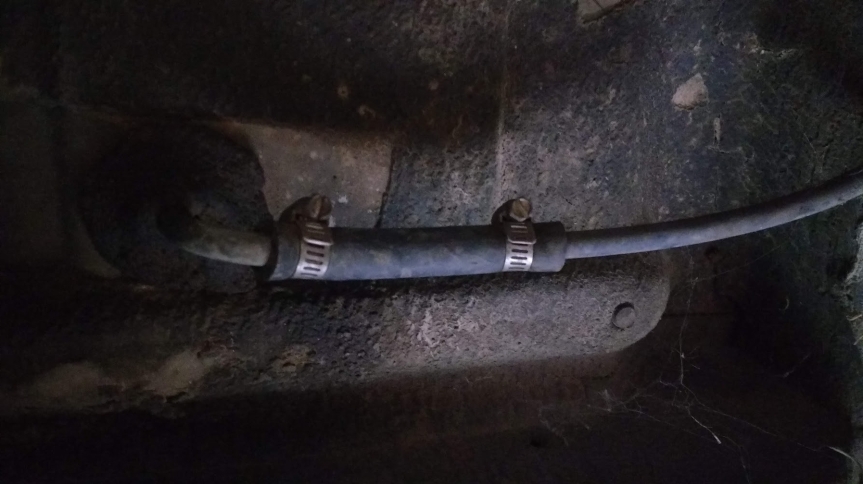 Tank drained, I moved forward in the fuel system to the mechanical pump – located on the side of the engine block. It is a typical classic British car arrangement incorporating a glass bowl which can be removed to access a filter gauze and sediment trap. Mine is very dirty as per the photo below: 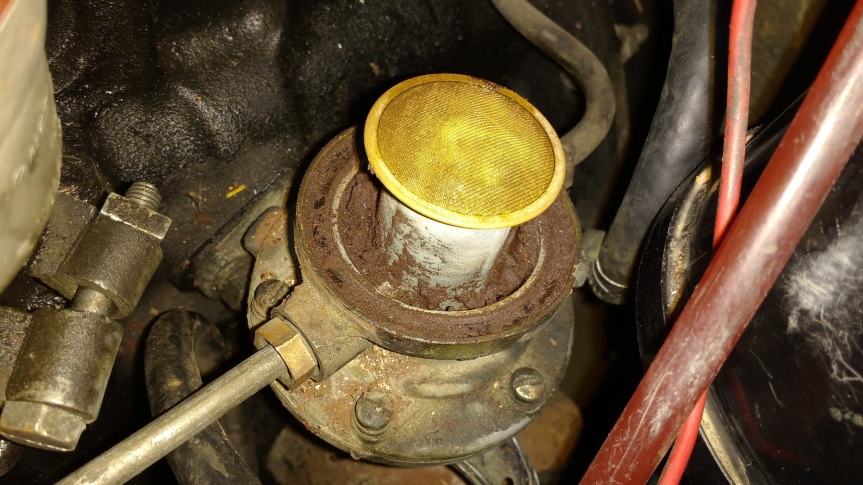 The filthy nature of the pump means it will need to be removed and possibly dismantled for cleaning – a job which I’ll get on to next time I get half an hour or so in the garage. It also raises questions of the internal state of the fuel tank which ideally should be at the very least removed and cleaned. Nuclear options involve rust-treating and sealing the inside of the tank with one of various different products marketed for such a task, but I’ll take a look first and see how bad it looks. Hopefully a good swilling out should do the trick... |
| |
Last Edit: Dec 10, 2019 22:48:15 GMT by llessur
|
|
|
|
|
Dec 10, 2019 18:02:19 GMT
|
Yup, this is getting bookmarked. Would love one of these as I learnt to drive in Dad's Mk2 2000 estate on our local roads & airfield. Even remember the reg - STK7L. Was Mink brown, so nowhere as funky as the electric blue of your donor car!  |
| |
|
|
|
|
|
|
|
The last post ended with one of those ‘what the hell will I find in my crusty old fuel tank’ cliffhangers. Teased almost to breaking point by the suspense I set about removing it so that I could have a good peer inside. The tank is surprisingly simple to access and subsequently remove – the boot trim needs to be removed (mine was held in place by an interesting assortment of self-tapping screws) after which the tank appears in all its glory nestled just behind the rear seat. 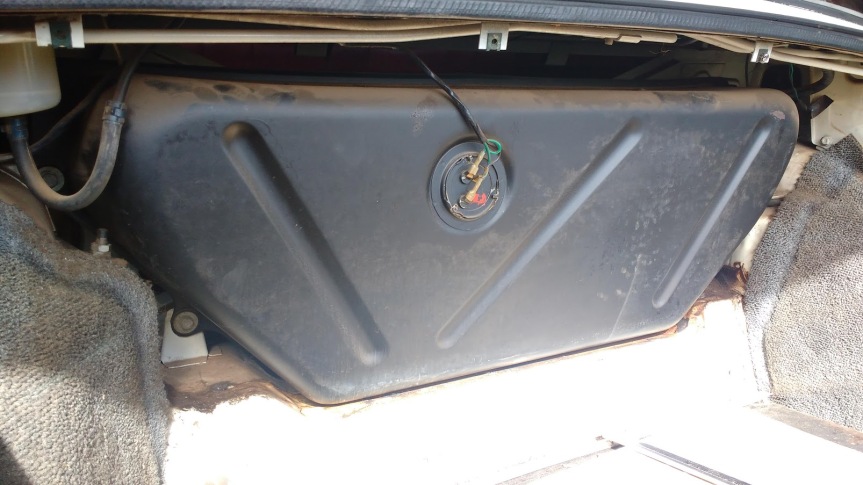 Before removing the tank, the gubbins connecting it to the car need to be detached. In no particular order there is the filler hose, the breather hose, the outlet pipe and the fuel gauge sender unit. None of these gave too much trouble – although it’s worth noting that removing the rear seat provides much better access to the clamps holding the filler hose onto the tank inlet. The sender unit is held in place by a circular retaining ring – it is released by simply driving it anti-clockwise via a rubber mallet and a flat-headed screwdriver located carefully on its lugs until it can be pulled free (taking care to feed the float mechanism out through the hole without damaging it). The tank itself is held in place by four bolts – two at either end. Once the bolts are removed, the tank can be carefully extracted from the car. 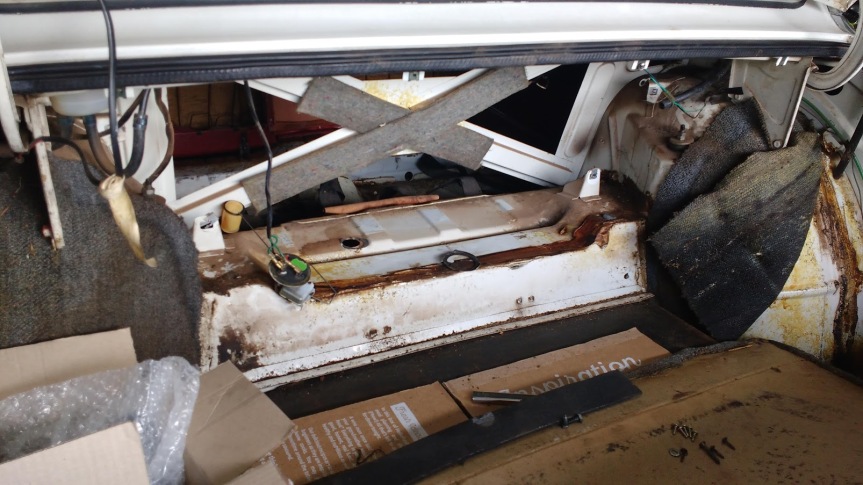 Surprisingly, given the build up of sediment in my fuel filter, the tank appeared to be in pretty good condition. There was hardly any sediment in the bottom and very little in the way of surface rust, either inside or out. The tank did yield one surprise – a yellow plastic nozzle from a fuel can which must have fallen into its petrolly grave many moons ago. Given its potential to block the fuel outlet it was removed and added to my rapidly expanding ‘strange things I have found hidden in the white car’ collection including coins, jewellery, keys, golf tees and two decades-old and upopened packets of sweets. 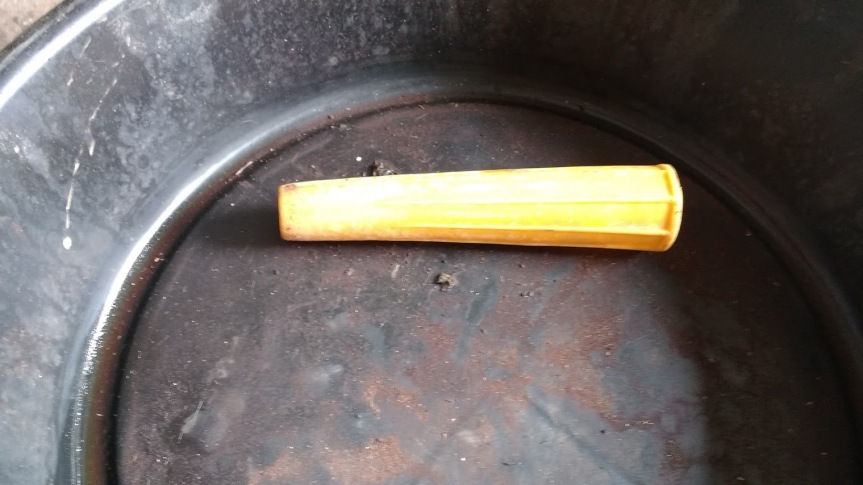 Whilst the tank gained a fairly clean bill of health, the fuel gauge sender did not get away quite so squeaky clean – the float was half full of fuel so obviously had a hole in it somewhere. I checked the float in the parts car to see if it could be swapped over but unfortunately it was in the same sad condition so I ordered a new one online. Luckily floats for these Smiths sender units are fairly common between British cars of the era so I could buy one from my local Mini spares retailer instead of having to wait for international delivery. 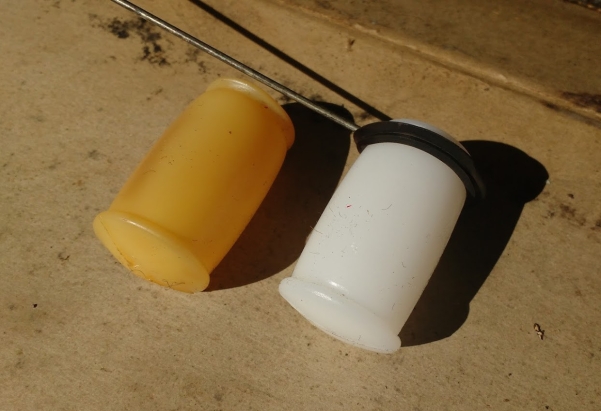 Once the float was replaced, I refitted the tank and its associated bits and bobs – having used the sender unit locking ring from the parts car to replace the rather mangled one on the white car. In hindsight I could have got away with not removing the tank at all but as least now I have the peace of mind of knowing that it’s not full of gunk or rust or plastic yellow nozzles. With the tank replaced, I turned my attention to the rest of the fuel system – the first job being to clean up the mess that was my fuel pump. I carefully removed the worst of the sediment with a screwdriver before blasting away the remnants from the pump body with a tin of carb cleaner. The filter was gently cleaned in petrol to avoid damaging the gauze. I replaced all of the rubber fuel hoses with high-quality Gates Barricade R14 fuel hose (not forgetting the short length attached to the tank outlet). Australian unleaded does not presently contain ethanol like UK fuel does so problems associated with prematurely degrading fuel hoses don’t seem to be as rife here, but it pays to future-proof. To complete my rebuild of the fuel system the newly-rebuilt carbs were fitted, which look great – even if I do say so myself. 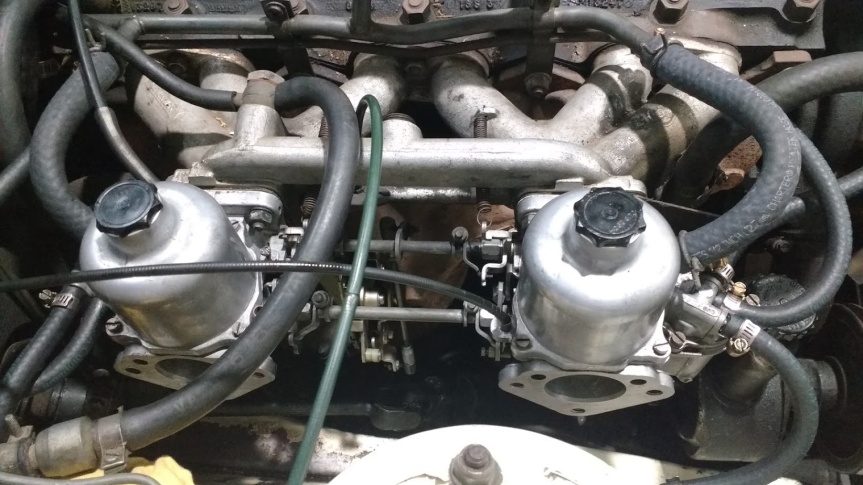 Next in line for a good groping by my wandering hands was the ignition system, which had some issues involving melted wire. Being a later 2500, the car is fitted with a ballast ignition system which means it runs a 6v coil instead of a 12v coil. During normal running a ballasted circuit feeds the coil with 6v, whilst a second un-ballasted circuit runs from the starter motor which feeds the coil with a full-fat 12v when cranking. The idea is to temporarily provide a bigger spark when starting the car, thus helping to overcome cold start issues. A good idea really. Instead of an old-school ballast resistor, by the late 70s Triumph were using a length of ballasted wire to feed the coil – this made for a neater installation and, let’s face it, it was probably cheaper too. Sadly, 40 years of resisting the passage of electrons had rendered it a twisted mess of melted insulation and wire, most likely earthing out sporadically at various points along its length. The car can’t have been running well when it arrived at the breakers yard. 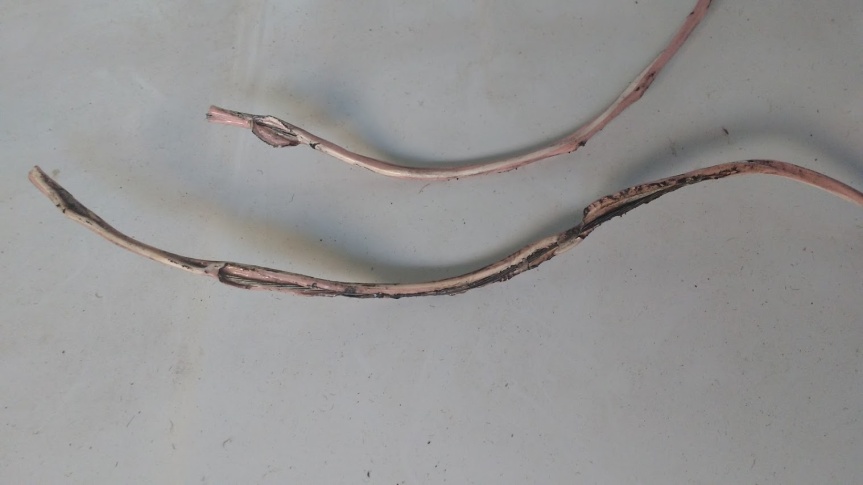 Luckily the rest of the engine bay loom had been spared from damage by the self-destructing ballast wire, so I had no further work to do other than deciding how best to reinstate this circuit. The options were to a) fit a new length of ballasted wire b) try to re-sleeve the existing ballasted wire c) fit a length of normal wire, do away with the ballast resistor and fit a 12v coil instead or d) fit a length of normal wire and a separate ballast resistor. Option A would involve sourcing a new length of wire of the right length and resistance, plus knowing that it might go all melty again and take out half the loom with it, Option B would require me to unwrap the loom both in the engine bay and behind the dashboard and Option C would potentially cause cold starting issues. I therefore chose sensible Option D and put in a ballast resistor, which I mounted neatly next to the coil. 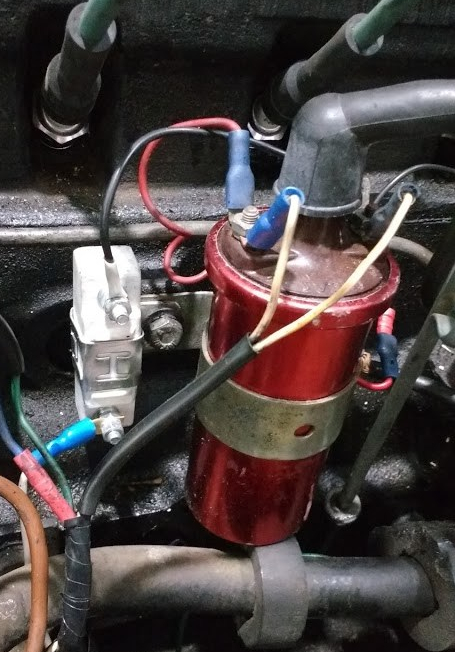 The melted remnants of the ballasted wire were carefully chopped out of the loom and a new length of 15A white wire (in keeping with the BL wiring colour scheme of the day) was run from the ballast resistor back through the grommet in the nearside end of the bulkhead and down to the car’s fuse box. From there I piggybacked onto the fused white circuit, which is live whenever the ignition is switched on. 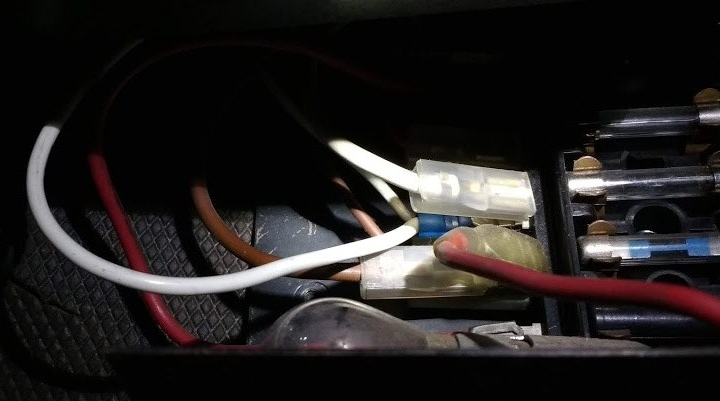 All in all it looks pretty neat and cost less than $30 (£15) to fix. All that remains is to tidy up the engine bay wiring by re-wrapping with some loom tape but I’ll spare you the write-up of that one… |
| |
|
|
|
|
|
|
|
Dec 12, 2019 11:45:31 GMT
|
|
Cheers for that - Rimmers are actually pretty good for overseas orders but I reckon I'll have a much bigger shopping list soon so I'm going to wait and put it all in together to save paying for two lots of international shipping.
There are a couple of places out here to get Triumph parts but stuff tends to be expensive in Oz so it's often cheaper to ship it in from the UK - even with 40 quid's worth of shipping charges added. Madness...
|
| |
Last Edit: Dec 12, 2019 11:45:51 GMT by llessur
|
|
|
|
|
Dec 12, 2019 13:32:00 GMT
|
|
That float and locking ring look the same as Landrover ones! As you say, parts shared a lot across the BL range at the time.
Lovely car, keep the updates coming.
|
| |
|
|
bazzateer
Posted a lot
   Imping along sans Vogue
Posts: 3,653
|
|
Dec 12, 2019 14:58:49 GMT
|
|
Back in the 80s a mate had a 2500S, white with a vinyl roof I think - SUD 97P, where are you now?
Edit: untaxed since 1986. Sadly probably gone.
|
| |
Last Edit: Dec 13, 2019 13:22:33 GMT by bazzateer
1968 Singer Chamois Sport
1972 Sunbeam Imp Sport
1976 Datsun 260Z 2+2
1998 Peugeot Boxer Pilote motorhome
2003 Rover 75 1.8 Club SE (daily)
2006 MG ZT 190+ (another daily)
2007 BMW 530d Touring M Sport (tow car)
|
|
|
|
|
|
|
Dec 12, 2019 18:09:17 GMT
|
|
Great car and excellent thread. I remember as a kid these were always rated as capable and stylish cars. John
|
| |
|
|
|
|
|
Dec 12, 2019 18:26:36 GMT
|
|
I think I'd have been very happy to have paid <£800 for that in the UK ($1,500.00AU). Presumably the Oz survivors are much less likely to have suffered from terminal corrosion as, I'm guessing, you won't need to grit the roads over there often / if at all?
|
| |
|
|
|
|
|
Dec 12, 2019 23:26:59 GMT
|
|
I’ve been surprised how reasonably priced old British tin is over here compared to old Aussie tin which is a fortune.
|
| |
|
|
|
|
|
|
|
I’m not sure if there is something in the water at the moment or perhaps at the ripe old age of 38 I have finally attained peak physical and mental efficiency but unusually I have been on a bit of a roll in terms of ticking Triumph-related jobs off of the to-do list. Speaking of the to-do list by the way, I have actually committed the must-finish jobs to a whiteboard now, so they absolutely have to be done and then neatly crossed-off. That’s the rule with whiteboard lists…  Some of the jobs are quick and easy fixes, others will take a little while longer and involve me getting dirty and sweaty. Obviously I’m the type of person to pick off the easy stuff first in order to to give myself an over-inflated sense of achievement and worth (hence the optimistic opening sentence to this post). One of the easiest yet also most satisfying jobs on the list is to swap the interior over from the parts car – as a reminder, here is the current state of the white car’s passenger decks as it came to me: 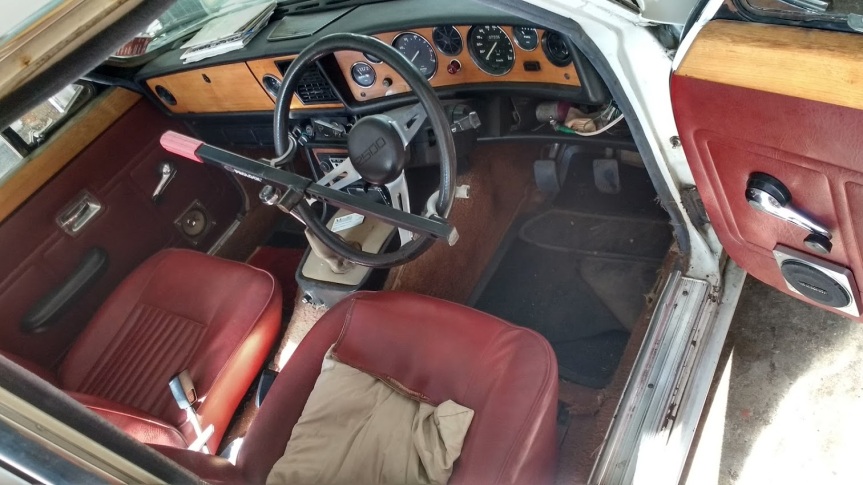 Whilst it has good elements it’s not exactly in tip-top condition. I love the red seats and door cards, and they seem to be quite rare on the 2500S – but the driver’s seat is in poor condition, with the squab ripped and collapsed, and a split seam on the backrest. I believe the original interior was bone velour – so it sports light brown vinyl trim around the gear stick and on the B and C pillars as well as on the parcel shelf, whilst the carpet is also brown. Not really a classic combo with the red seats. Speaking of carpets, the one in the white car has seen much better days and is ripped, worn and stained throughout. The wood door cappings in the white car are all deteriorated to various degrees – all have peeling lacquer, a couple have peeling or missing veneer and are not really salvageable I had toyed with the idea of keeping the red interior – but this would have involved either sourcing a replacement driver’s seat, or getting the existing one re trimmed and also replacing the carpet with either red or black to complement the red seats. This would take time and $$$ that I don’t have, so in the end I decided to opt for the quick and free decision of swapping the very good brown interior from the parts car into the white car and to put the red seats and door cards up for sale. The first job was to remove the interior from the white car and store it away for safe keeping until it is sold (crusty old carpets excepted – they will be dropped at arms length into the nearest bin). Four bolts hold each of the two front seats in place and, once removed, they can be lifted straight out of the car – taking care not to scrape the vinyl against any sharp objects (I learned a hard lesson about this through a previous car). The rear seats come out in two parts – the base is held in place by two screws at the bottom of its front panel, whilst the rear section has two screws along its bottom edge, which can be accessed only when the base section has been pulled out. 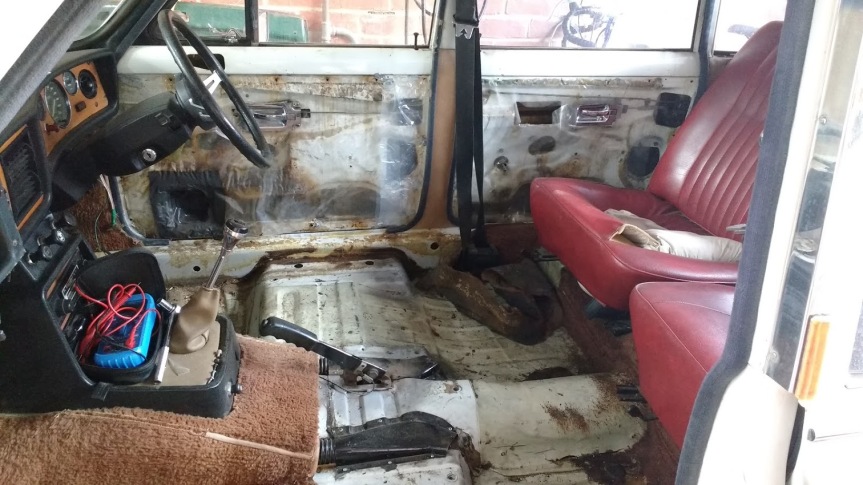 The carpets come out in several pieces – the floor mats in the driver’s and passenger’s footwells are individual sections, each with its own rubber and foam insulating pad – which I retained as they were in good condition. The main section of carpet covers the rear footwells and the floorpan beneath the front seats – with the seats and rear floor-level air vent trim pieces removed this can just be pulled out, although it needs to be fed over the handbrake lever mid-journey. The sections covering the sills and the base of the rear seats is stuck on with contact adhesive, although in my case this was old and crusty and did not put up much of a fight. Your experience may vary. 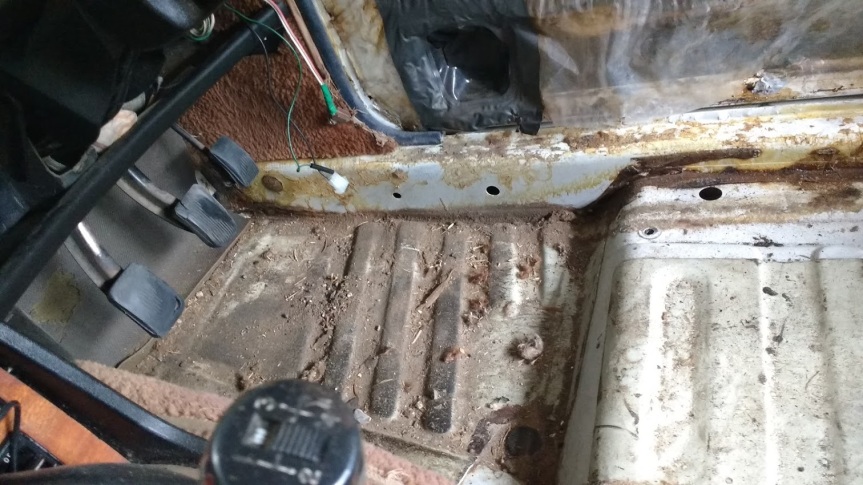 I decided to leave the centre section of carpet (the bit which covers the gearbox tunnel) in place, as to replace it would require the removal of the centre console and possibly some under-dash gubbins relating to the heater controls etc. As it is the same colour as the carpet which will be transplanted into the car, and in a similar (if not slightly better) condition, it was not worth the hassle removing it. I just gave it a quick once over with upholstery cleaner and it came up a treat. Who says I’m an inefficient time waster? In your face multiple bosses! Whilst the carpet was out I noticed that the wire to the handbrake warning light switch had broken off at the plug – it looked like it had possibly been repaired before and was subsequently now slightly too short so I cut a length salvaged from the parts car and soldered it into the white car, using a bit of heat-shrink to insulate the finished join. A quick test showed the previously non-working handbrake warning light was now functional once again, so that’s another item ticked off of the to-do list. 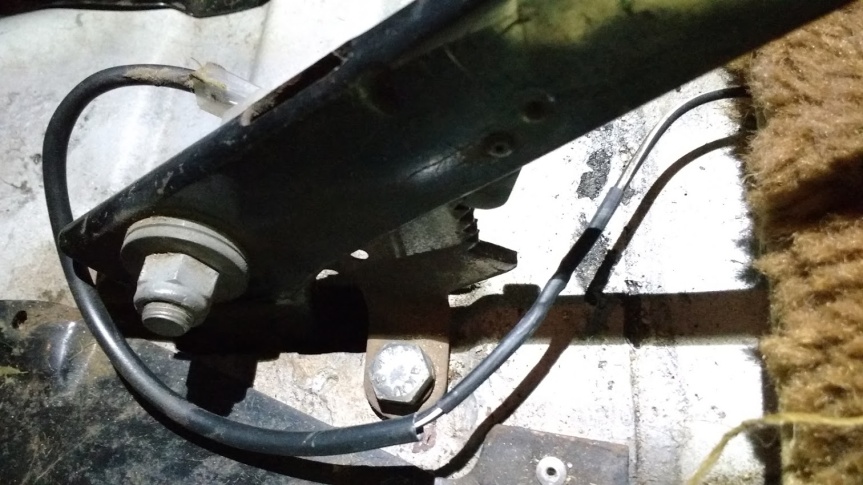 Refitting the interior was, as usual, the reverse of removal – the carpet sections salvaged from the parts car were carefully glued down with spray-on contact adhesive, whilst the wood door cappings and door cards were swapped over and clipped/screwed into place. The last and heaviest pieces of the jigsaw puzzle were the front and rear seats – each taking up its respective place within the car. And what a transformation… 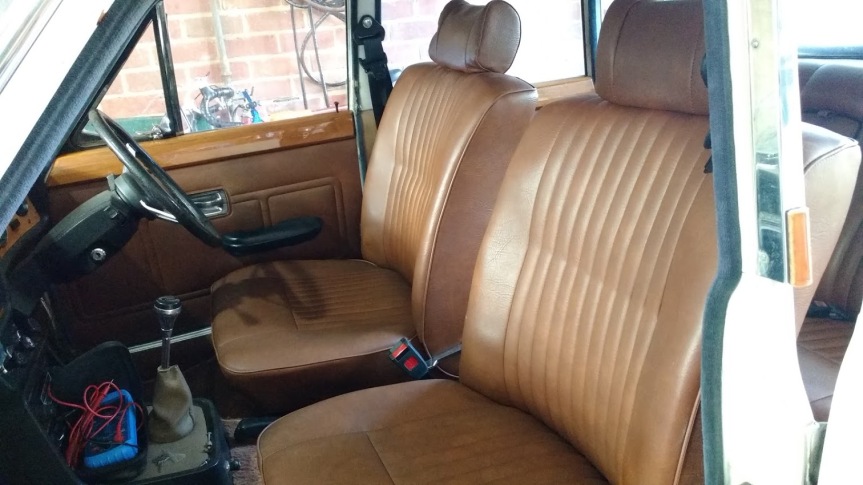 The new interior completely changes the feel of the car from a down-at-heel wreck to a comfy and usable classic. I had recently spent some time cleaning the brown interior when it was in the parts car so it still felt and smelled as fresh as a daisy. The new diaphragms which I had fitted to the seats made them comfortable and supportive, quite a change from the saggy, cushion-filled driver’s seat the car had been sporting since I brought it home. 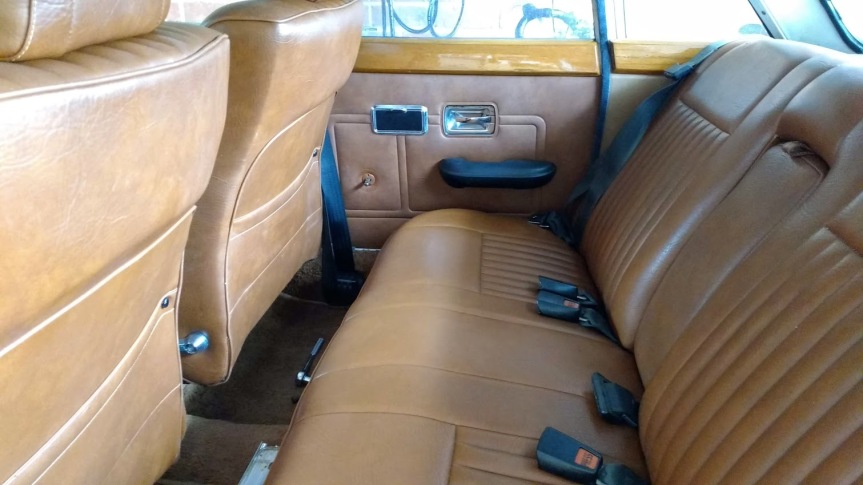 The more eagle-eyed of you will have noticed that I have kept the bone-coloured vinyl on the B and C pillars, as well as on the rear parcel shelf. I had planned to re-trim this with new brown vinyl but it is so much less obvious with a brown interior fitted than it was with the red one that I don’t really think it looks that out of place any more. If this turns out to really bug me then I can revisit it down the line – but at the moment there are higher priorities than this. Whilst the interior was out I did take the opportunity to replace the front seat belts with new Securon items, purchased a while ago from Rimmers. The belts in my car were showing signs of fraying and did no longer feel as supple as seatbelts usually do. Plus with 40 years of exposure to the high UV levels here in Oz, and the unknown history of the car in terms of accidents etc, I can see no argument for not changing them. The 500/15 model of belt costs about $60 (£35) per side and is a direct replacement for the existing belts in the 2500 – well worth it for peace of mind. 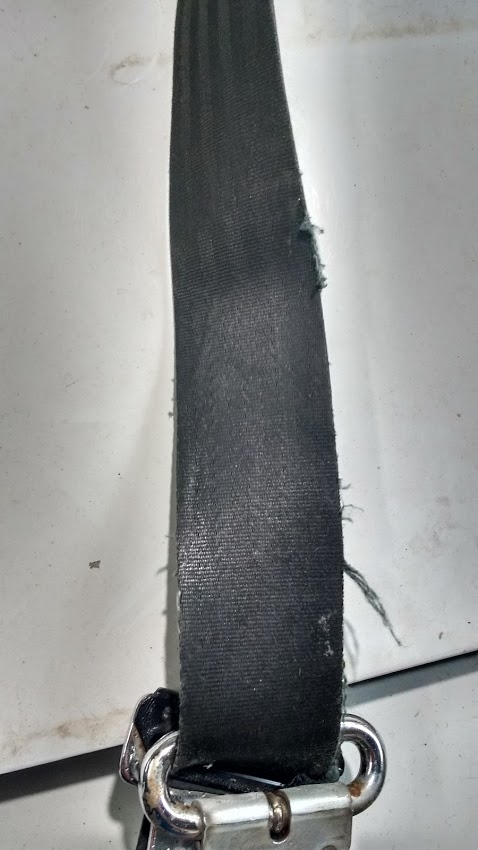 Fitting was really easy – the inertia unit and belt swivel brackets are attached to the inner sill an B pillar respectively by single bolts. The new unit can be attached into exactly the same fittings – I reused the same bolts to ensure they were fully compatible with the captive threads in the car. The new clasps also use the same fitting as the original ones, although I had to use a couple of (supplied) brackets to get the spacing and orientation right. All in all I’ve very happy with the fit and operation of the new belts – and I know they are strong and safe, unlike the unknown quantity that was the old ones. In a car with next to no crash protection in comparison to a modern vehicle, this is literally the least I can do to improve safety in the event of a collision. 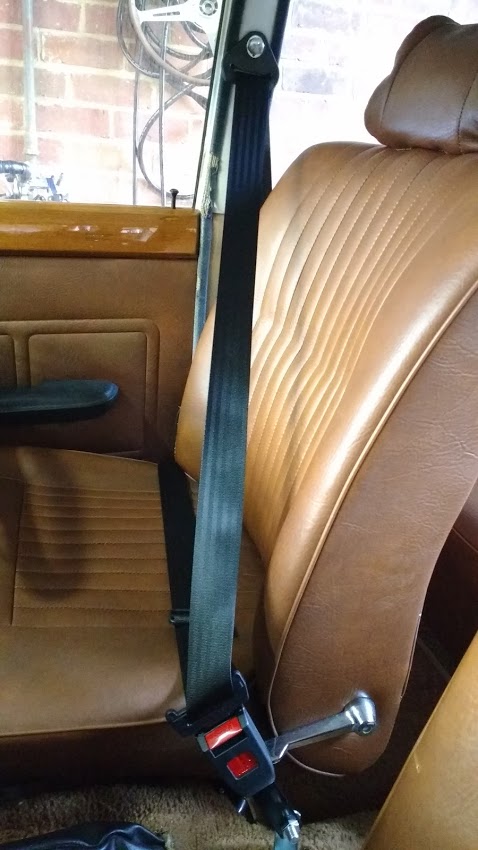 I haven’t yet tackled the rear belts – mainly due to budget. I don’t plan on carrying any rear seat passengers in the near future so this doesn’t concern me too much at this stage. A couple of other jobs ticked off the to-do list involved tackling the inoperative brakes – I have swapped over the new master cylinder I installed in the parts car to replace the non-functioning unit in the white car and also swapped over the front calipers from the parts car which I had treated to new hoses and pads (it was easier just to swap the entire units than to faff around with rebuilding the ones in the white car and having to contend with possible stuck pistons, degraded seals etc). The horrible green brake fluid was replaced with new DOT 3 and bled through the system. At this stage I have not swapped the new slave cylinders and shoes over from the parts car as a) I need to keep the parts car’s handbrake operational, b) the white car’s rear brakes seem to be functioning well so c) I can’t be arsed with so much else to do. I will keep a good eye out for leaking cylinders etc and the rear brakes will be addressed in the near future. 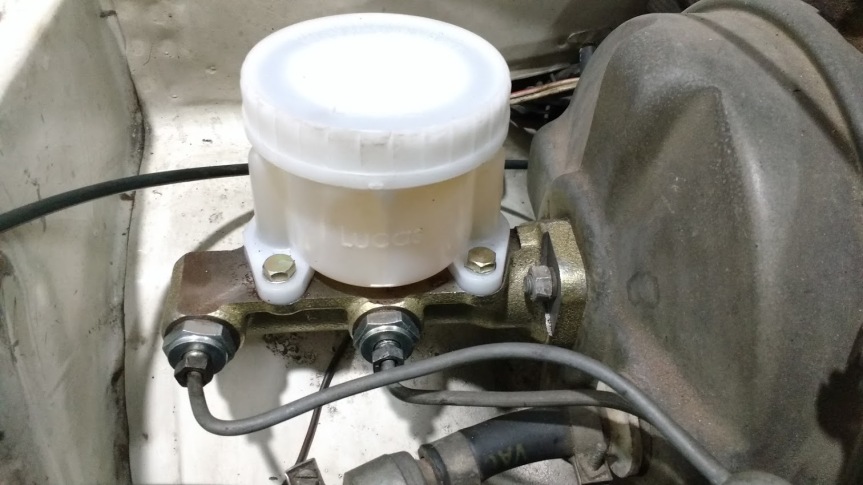 Another quick job was to replace the cracked radiator expansion bottle with the one from the parts car – they were of slightly different styles with different brackets, so this involved some drilling and re-riveting on my part. The new one is not the prettiest but fits nicely and is at least watertight. I even treated it to a new length of hose to replace the hard brown stuff that the car came with. 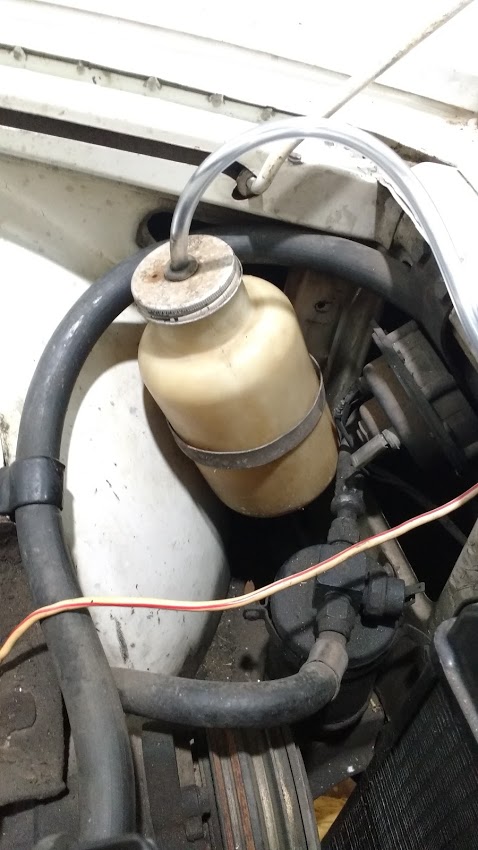 Next on the list is to get the engine up and running – if it does run that is. If not, I’ll need to swap over the known good unit from the parts car. Keeping my fingers crossed for the easy option here… |
| |
Last Edit: Dec 18, 2019 1:36:48 GMT by llessur
|
|
|
|
|
|
|
It has been quite a climatic year end as the Beast has finally emerged from the shadows and has once again been able to enjoy the slightly prickly feeling of the South Australian sun on its back, dulling its paintwork and crisping up its vinyl components. This means that I’m finally able to share some photos which haven’t been taken in the 3 foot gap between the car and my garage wall. So, without further ado – behold the white car: 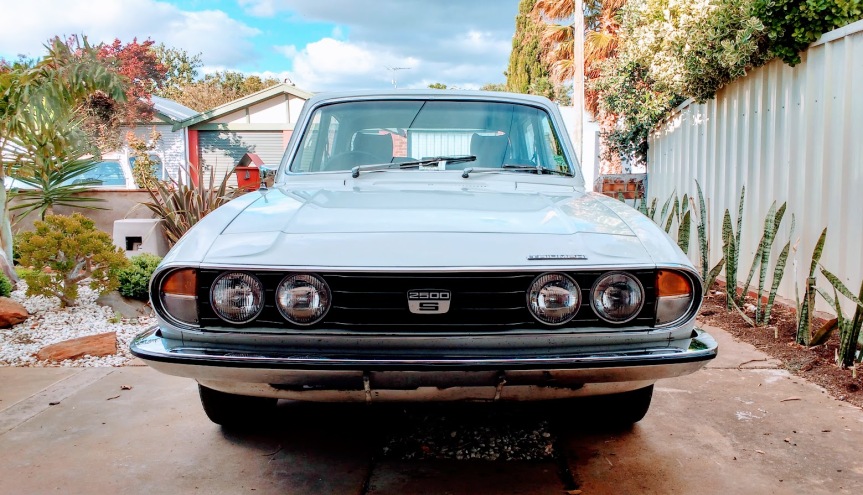 The car was surprisingly dusty considering it had been tucked up in a sealed garage so it was treated to a wash and hose down – the water from which remaining largely on the outside of the car (a nice little bonus). I think it looks pretty good for a 40 year old car which was picked up from a scrap dealer. 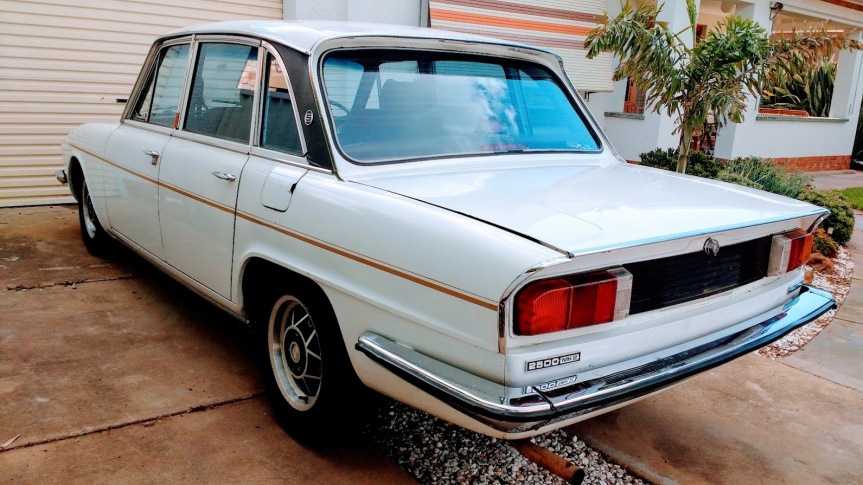 Yes, there are a few little bodywork issues which will eventually need to be addressed – there’s a small amount of bubbling around the right hand end of the rear panel seam, a small hole in the rear valance and a suspect bottom lip at the front end of the driver’s side sill – but ultimately it scrubbed up very well and has proven to be more presentable than I remember from when I bought it and quickly ensconced it safely in the garage/hid it from the wife. 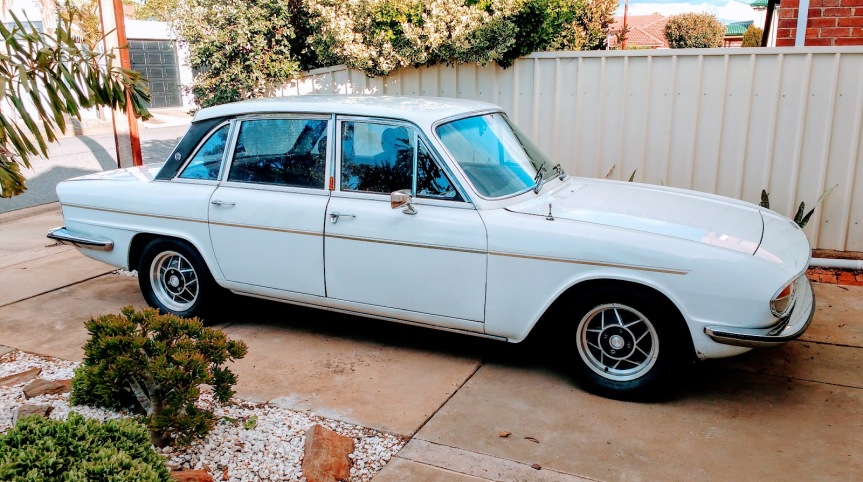 The slightly mismatched driver’s door (presumably replaced at some point in the past) looks ten times better now that I have added pin stripes – sourced from eBay and a very good match to the stripes on the rest of the car in terms of width, although they are a subtly different shade of gold so I will most likely re-do the whole of the driver’s side when I get a spare hour or two. The door also sits a little too far forward (i.e. the gap between the door and the front wing is smaller than the gap at the B pillar) – but I have some laser-cut hinge spacers which should sort this out. I replaced both the upper and lower hinge pins a while ago and this has levelled the door up quite nicely so it no longer drops at the latch end. The old pins were quite worn, especially the top one, so replacement was long overdue. 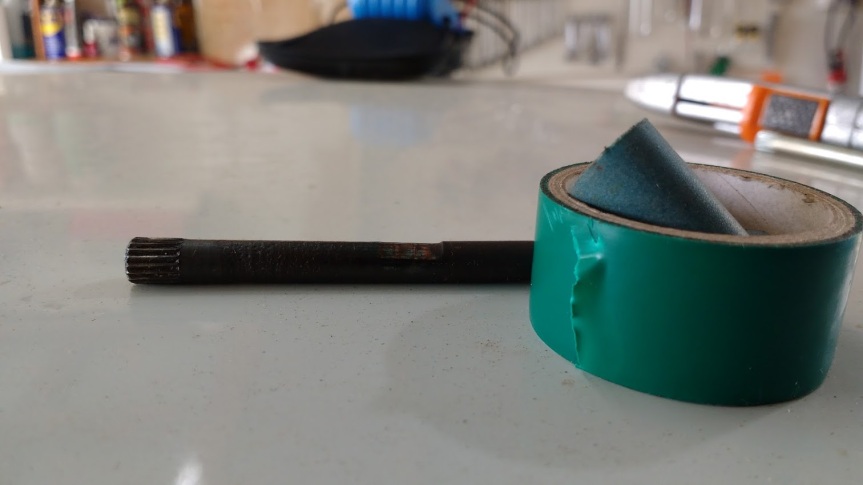 Replacing the hinge pins is relatively easy – with the door removed they can be driven out of the hinges with a punch, although they have one knurled end of a slightly bigger diameter which cannot be driven through the hinge so it has to be determined which end of the pin is knurled before it can be driven out successfully in that direction. If it’s not coming out fairly easily then you’re probably going the wrong way. In my case both pins were fitted with the knurled end upwards, although on my parts car one needed to be driven out downwards so your experience may vary. It is also worth replacing the two washers which sit either side of the door portion of the hinge – these wear with age and will cause further door drop if not replaced. I used some relatively unworn washers taken from a rear door of the parts car but obtained some new hardened hinge pins via Chris Witor (the Triumph big saloon specialist). 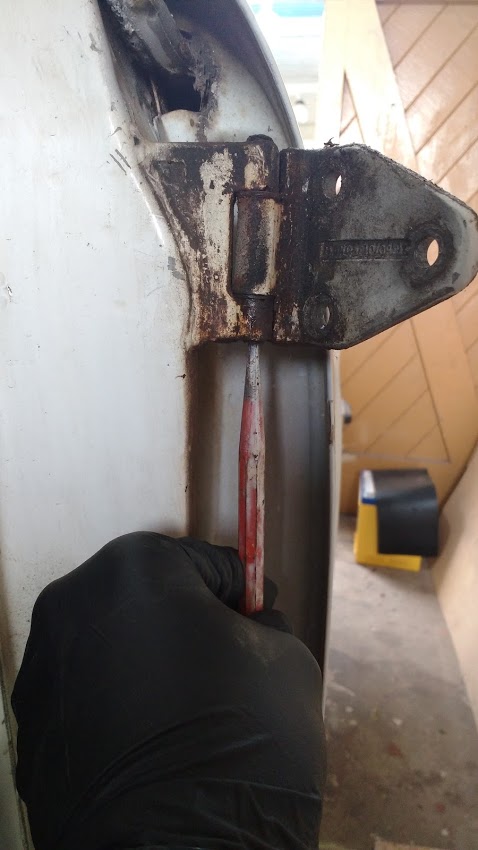 Buoyed by the overall internal and external presentability of the car, the next logical step was to make it actually work. With some fresh 98 RON petrol in the tank and new 20W50 oil in the sump (along with the spin-on filter and adapter from the blue car), the rebuilt carbs at their base setting (jets wound down 12 flats from being level with the bridge), the static timing set at 10 degrees and the valve clearances, points gap and spark plug gaps all set as per the manual, the engine fired up quickly and ran fairly smoothly, with the oil light extinguishing almost immediately – a promising start and at least confirms that I wired the coil correctly. There is a little bit of tappetty noise from the top end but at this stage I am putting this down to the engine having not been run for several years and am hoping it will quieten down once the oil gets flowing through some regular use. However, before I could proceed with setting up the carbs and timing properly, it was obvious that there was a significant exhaust leak which would need to be addressed. Looking at the sooty deposits on the existing exhaust, it was easy to see where it was leaking from – the front silencer on the middle section was in the process of parting ways with the adjoining pipe, with a big split between the two. 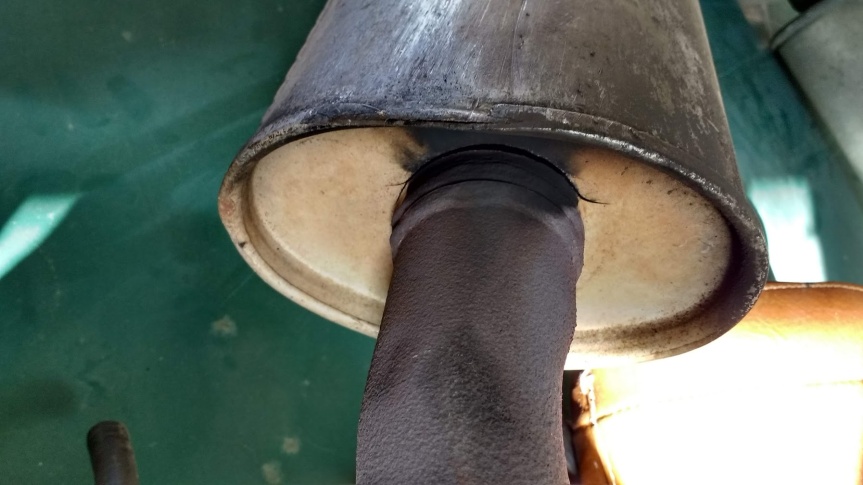 Furthermore, the rear section’s silencer had a small rust hole in one of its ends, and the horizontal part of the front section was more oval than round – presumably due to contact with something hard at some point in its life. The system was essentially scrap. This is where having a stock of stripped parts becomes an absolutely godsend, saving time and money in procuring new parts. Whilst the exhaust from the parts car was not shiny and new, it was very solid and dent-free. It seemed like a sensible choice to swap them over. 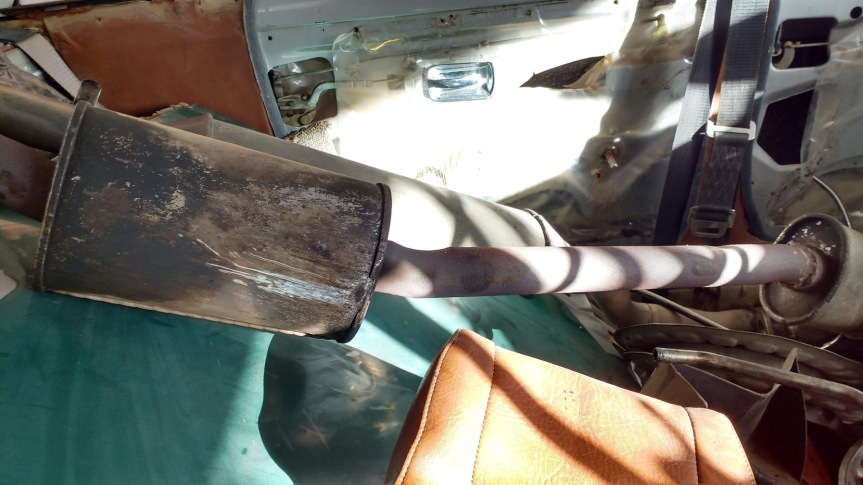 As a rule I don’t like removing or fitting exhausts. It’s dirty, fiddly and rather boring. However, I didn’t really want the hassle of finding a garage or fast fit place that would touch a used exhaust, plus I’m a tightwad. I therefore spent a not particularly enjoyable couple of hours on my back doing it myself. 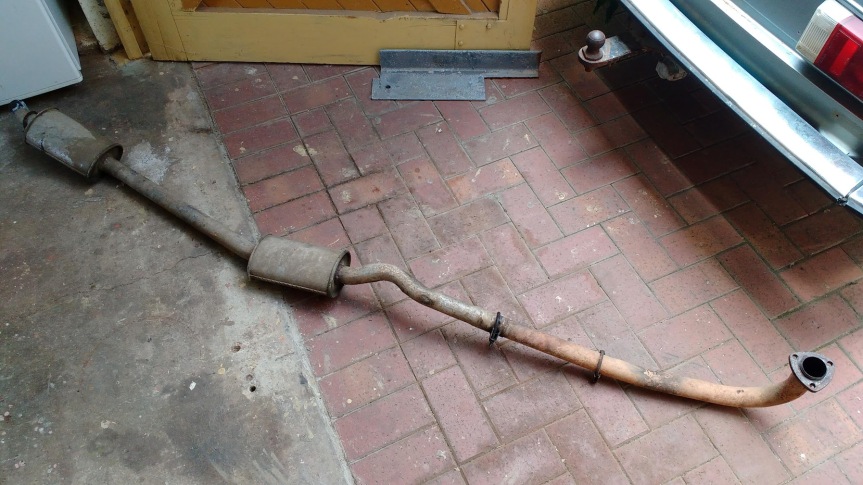 Removing the old exhaust from the car wasn’t too difficult – the rear section is removed first, and is supported by two rubber mounts, one near each end of the section. A bit of wiggling, pulling and persuading with a mallet saw this separated from the middle section without too much drama. Removing the middle section from the front section was less successful, partially due to the limited room to apply a decent amount of leverage. I instead opted to unbolt the front section from the manifold and, with the gearbox supported on a trolley jack and axle stand, remove the front and middle sections together by dropping the gearbox mount and cross-member. Seeing as I had gone to the trouble of removing them from the car, I thought it was a good idea to replace the gear box mount and the cross-member bushes with the new items I had previously bought for the blue car – a genuine Australian-made Mackay rubber mount (the only ones worth buying by all accounts) and a set of SuperFlex polybushes for the cross-member fittings. To be honest, despite being covered in oil, the old ones on the car didn’t actually seem to be in too bad a condition – the rubber and metal portions of the gearbox mount had not separated and the cross-member already sported polybushes, albeit squashed and tired ones. I replaced them anyway as a precaution. 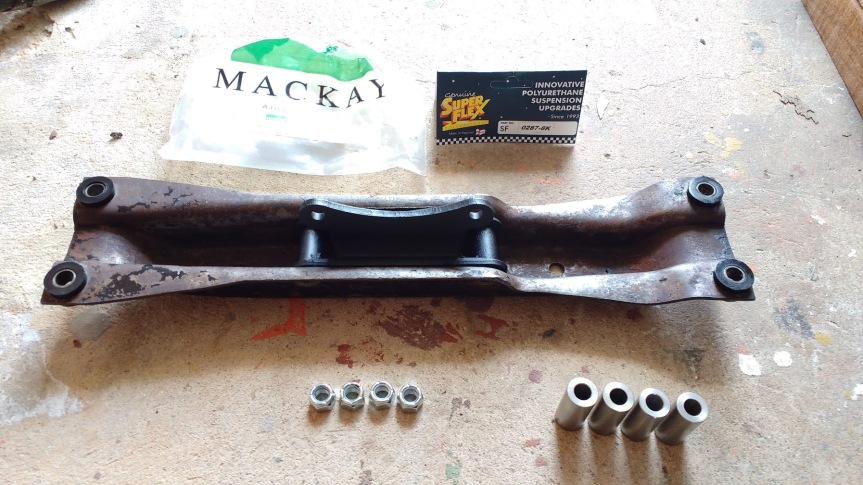 Fitting the replacement exhaust was undertaken in the the reverse order of the removal process – although the front and middle sections could be fitted individually as they had already been separated. As well as a new downpipe to manifold gasket, I used some exhaust gum on the joints to ensure they were gas-tight. Annoyingly I did manage to shear off one manifold to downpipe stud upon reassembly, but luckily enough remained protruding for me to remove the remains with a pair of mole grips and I had a spare on hand from the parts car. A 30 minute diversion from the task in hand, but it could have been a lot worse. To finish the job, the perished rubber mounts for the rear section of the exhaust were replaced with some new ones which I had in my stockpile and the rebuilt gearbox mounting hardware was returned whence it came. 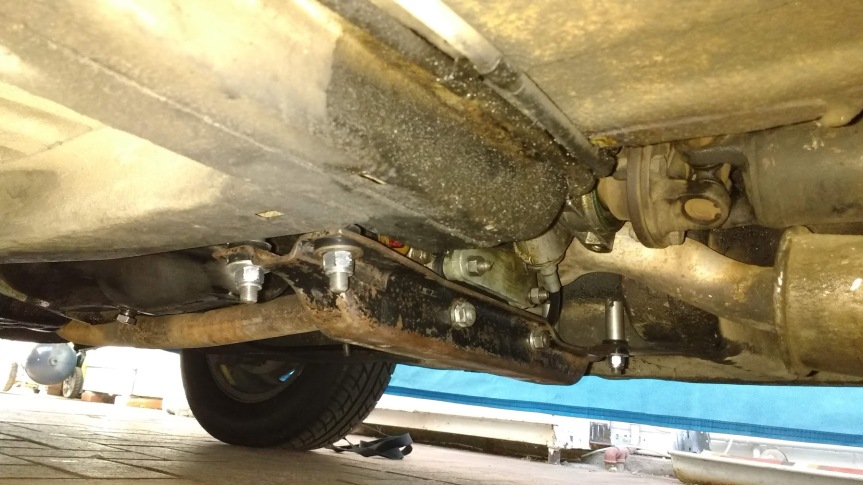 Firing up the car again produced an exhaust note much nicer than the chuffing previously emitted, confirming that the replacement had been a success and that I could finally get round to tuning and hopefully even driving the car. But, as excited as I was to get out on the open road, whilst the car was up on ramps it made sense to address the gearbox and diff oil levels in order to cross another couple of items off from the whiteboard list. The gearbox has both a drain plug and a filling plug – the latter of the two on mine proving particularly difficult to remove. It is located on the side of the ‘box and access is fairly limited due to its proximity to both the side of the gearbox tunnel and a lip in the cast gearbox casing. It was also one of the square head variety of plugs, meaning that I was limited in terms of tools I could use to remove it. Naturally, after draining the gearbox of its oil, I found the filler plug was stuck tight and my repeated attempts at removal with an open-ended spanner were fast rounding off the corners. Luckily, my trusty mole grips came to the rescue and I was able to remove the plug, albeit at this stage in a rather mangled condition. 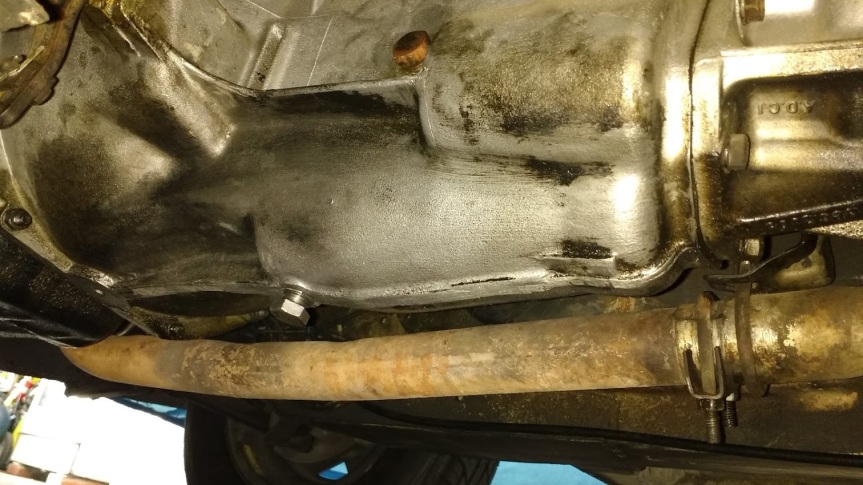 Whilst I do have a couple of new square headed plugs lying around my garage, I wasn’t hugely keen to fit a part which would likely be equally as difficult to remove in future. Luckily, the broken gearbox which I had previously removed from the parts car had a brass plug with a more sensible hex head. I fished it out of the pile of bits and pieces strewn around the interior of the parts car and fitted it to the white car’s ‘box. Filling the gearbox with EP80 oil was a fairly slow affair – it needs to be filled via the aforementioned hard-to-reach filler hole until the oil reaches the level of the hole (i.e. it spills back out down your arm). I used a large plastic syringe with a length of rubber tubing to do this as it made the job a bit cleaner – but also slower given that I could only add 100ml of the viscous, slow flowing fluid at a time. 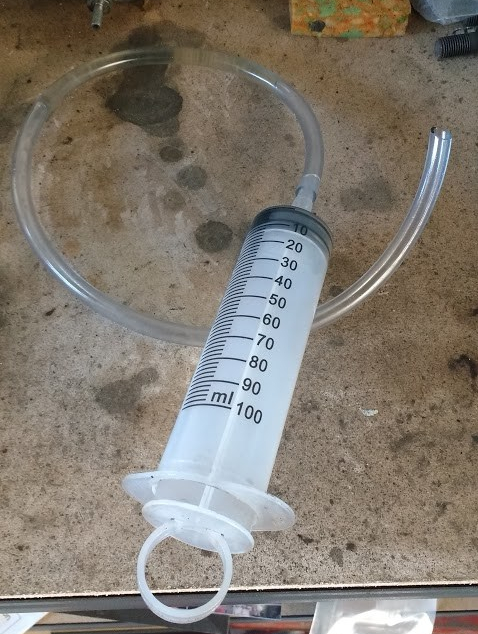 Technically, I could have drained the litre or so of old oil from the overdri ve unit by dropping its sump – but seeing as the drained oil was fairly clean and as I did not have a replacement sump gasket to hand I decided to forego this step. I can always come back to it later if required.
Filling the diff was less eventful – the drain plug, although square headed, was easy to remove and the unit only required the smallest of top ups of EP80 to bring the level back to where it should have been. The diff on the white car has certainly not been anywhere near as leaky as the one on the parts car – hopefully it will stay that way as my garage floor can barely absorb any more oily fluids… |
| |
Last Edit: Dec 20, 2019 4:15:21 GMT by llessur
|
|
bricol
Part of things
 
Posts: 290 
|
|
|
|
|
Next time warm the oil - stand the bottle int he sun, a pan of just boiled water or even microwave it as a Lancia specialist once told me - you have to fill an integrale gearbox down the long dip stick tube and warming it makes it flow so much better. I'm not too sure about what microwaves will do to the oil molecules and an oil guy never came back to me when I asked.
And I do like your car - it looks rather good.
|
| |
Last Edit: Dec 20, 2019 7:48:07 GMT by bricol
|
|
vader
Part of things
 
Posts: 425  Club RR Member Number: 93
|
1977 Triumph 2500Svader
@vader
Club Retro Rides Member 93
|
|
|
|
There is a flat filter inside the sump of the OD, I dropped my sump and cleaned the filter when I did the gearbox oil. Just a thought.
Cool car by the way
|
| |
Triumph Stag
Ducati Supersport
Shanks’s Pony
|
|
|
|
|
Dec 22, 2019 18:36:01 GMT
|
|
Nice. Got to love a big saloon. Interesting dor cards. Obviously "aussie" spec.
|
| |
2003 Holden SS Ute
1973 Triumph Stag
1970 Triumph 2000 Estate with RV8
1980 Triumph Dolomite Sprint
1969 Dodge Charger R/T SE
1960 Standard Atlas
Importer of Pedders Suspension products
|
|
|
|
|
|
|
Nice. Got to love a big saloon. Interesting dor cards. Obviously "aussie" spec. Yeah I think the locally sold cars had to have a certain percentage of locally made parts. The Girlock calipers for one - a joint venture of Girling and Lockheed as far as I know. I've also seen weird almost pyramid-shaped centre vents on the dash which don't look anywhere near as good as the UK ones in my opinion. |
| |
|
|
|
|
|
|
|
There is a flat filter inside the sump of the OD, I dropped my sump and cleaned the filter when I did the gearbox oil. Just a thought. Cool car by the way Cheers for the tip - I did think about doing that but I didn't have the gasket for it so thought I'd let sleeping dogs lie for now. I actually have a completely rebuilt OD gearbox sitting in the corner of the garage so I suspect that'll be swapped in at some point when time allows as the clutch needs doing. |
| |
|
|
|
|


![]()


