|
|
|
|
|
is it possible to have less than 100% VE with a turbo ? youd have to run a couple psi to achieve that I'm sure bolting a T2 onto a Supra would do that  I think they use some sort of boost-corrected VE for the calculations (or perhaps unboosted VE). Fingers crossed  I've done a little more research today, and apparently there are things called surge ports or MWEs (Map Width Extenders) that are machined into housings to help with low-flow/high-boost surge. They're the little ports in the housing on this: 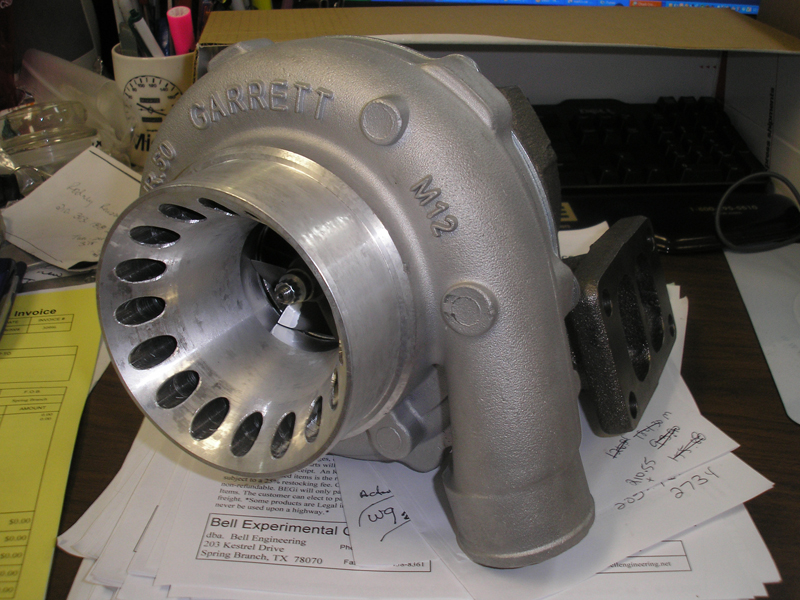 What they do is allow boost to bleed from the back end of the compressor into the front again, recirculating the flow and reducing the amount a turbo has to compress the air (as some of it is already a bit compressed). Housings with these are readily available for sodding great turbos like Holsets or GT35s, but I haven't seen any for something suited to a 1.3l engine yet... I've also been doing some very rough mapping and come up with these: 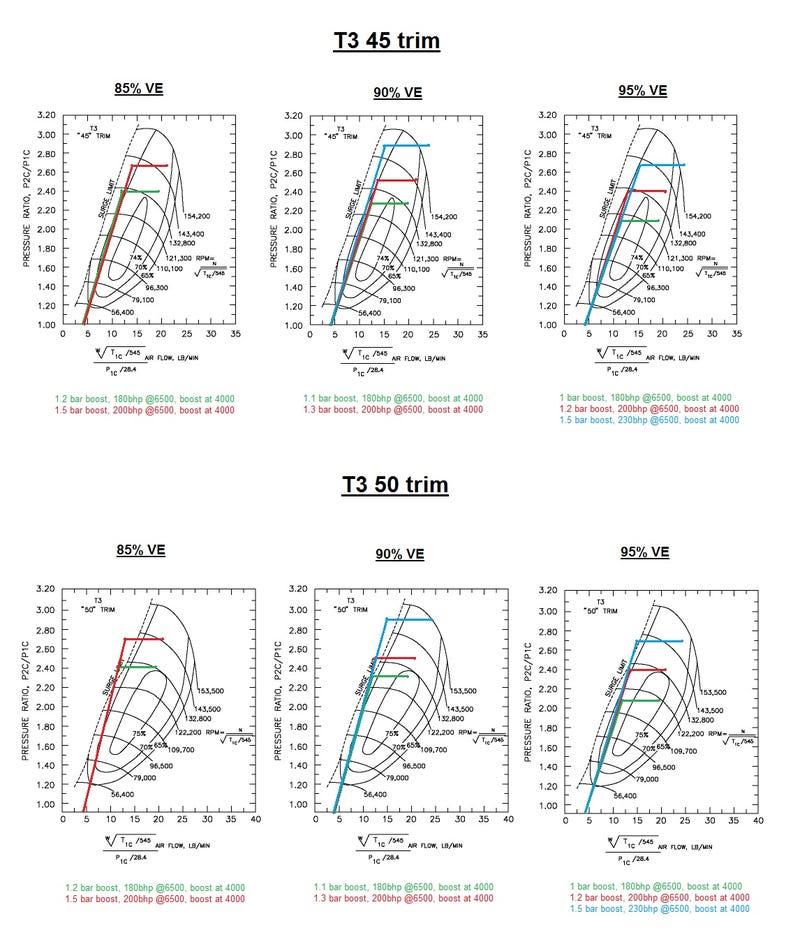 These maps are for a few T3s which is one of the only turbos that seems to fit most of the requirements relatively comfortably. I've done maps for 85%, 90% and 95% VE. The green line is for the minimum power I want to make (180bhp), the red line is for a hopeful figure (200bhp), and the blue line is where I'd really like to be (230bhp). The calculations are pretty crude, and are based on making peak boost by 4000rpm. Not sure how laggy a typical T3's going to be on a 1.3l Uno Turbo engine, but for low-rpm surge that might actually be a good thing. Not sure... If we compare the green and red lines, doing a bit of porting and intake/exhaust work would help make it more efficient (requires less intercooling which is a good idea for an X1/9), but none of them will really support the 230bhp goal. The 95% VE map comes pretty close, but the turbo just runs out of puff at 6500rpm (with another 500 left to go to redline). Another option seems to be a GT2259 52 trim 0.42A/R: 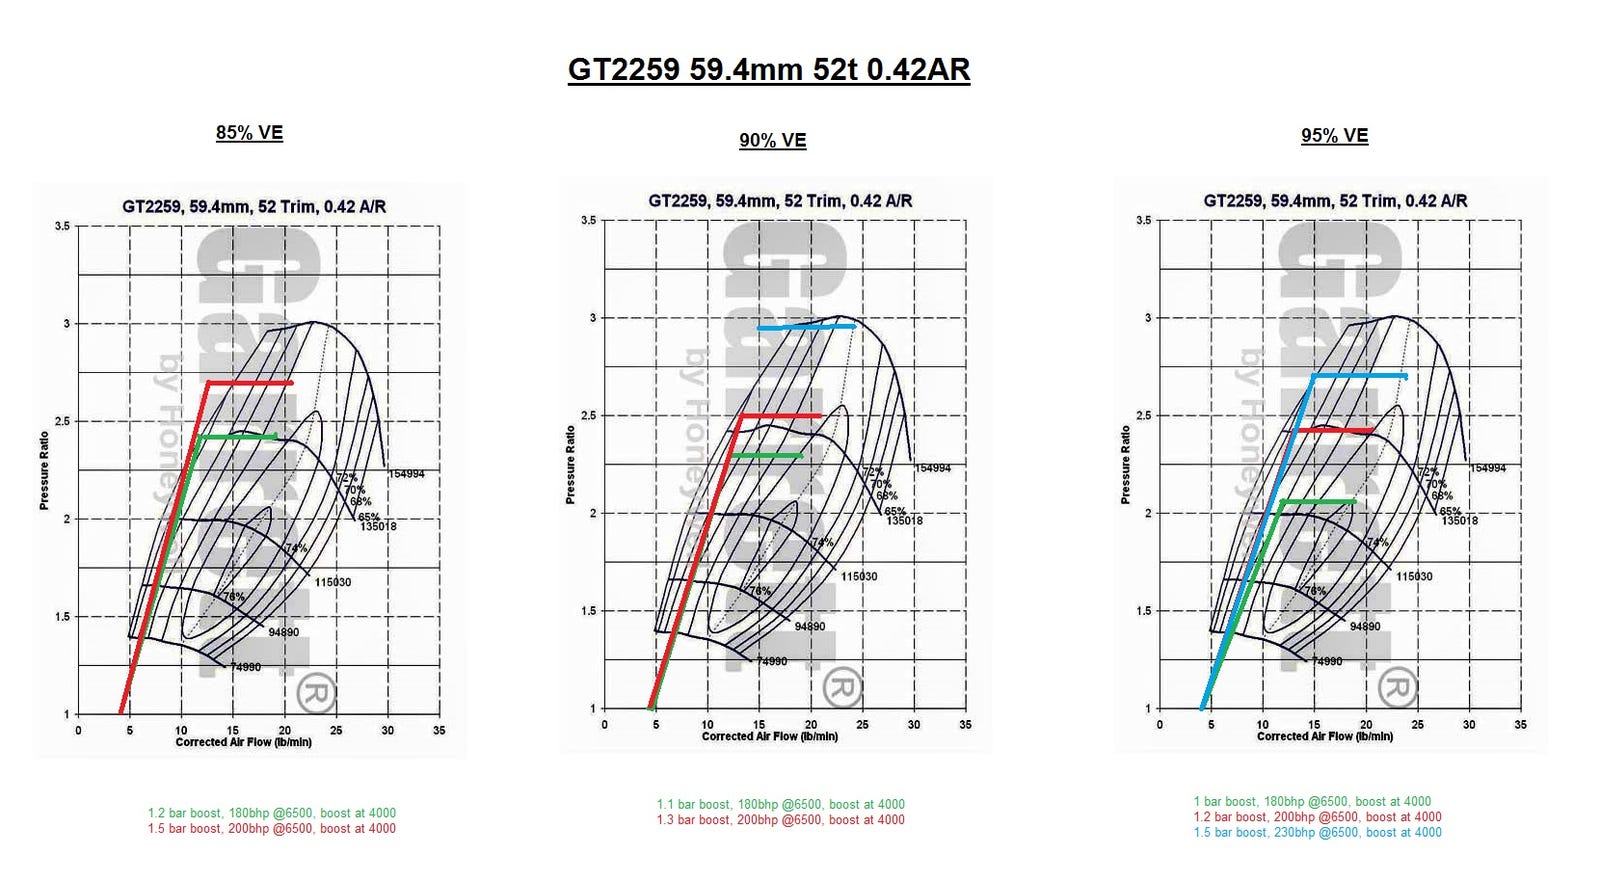 It'll sort the 180bhp figure as-is, but dips into surge at full boost in low-rpm. I don't actually know what this will do, any ideas? Does it just make less boost at that point, or will surging cause damage to the turbo (I'm expecting the latter). If I have a blow-off valve, will that area of surge just cause the blow-off valve to open around 4000rpm at full boost to vent extra flow (if it's set up right)? Either way, it's pretty much the only turbo I've come across that seems to be able to achieve the 230bhp goal. All other turbos I've looked at either surge at low rpm, or are too small and choke at high rpm. 4000rpm peak torque looks like it just dips into surge, but perhaps that's fixable with one of these MWE ported housings... I haven't actually seen any before/after compressor maps for a turbo with and without a ported housing though, so I don't know how they shift the map around. So, I suppose the exam questions are: - If a turbo dips just to the left of the surge line, is that controllable with things like an external dump valve?
- If a turbo dips just to the left of the surge line, does it just lag a bit and not build boost or will it merrily wreck itself by surging?
- Does anyone know what a surge-ported MWE does to a compressor map? I know it extends the surge line. I also know it affects efficiency. IS there some sort of tradeoff between surge width and choke at the top end?
- Anyone have any ideas for other turbos that might be able to produce high boost at low flow without surging? I was thinking about small-displacement diesel turbos, but not sure where to start googling for them.
Should have just stayed with NA tuning. I know what I'm doing there  |
| |
|
|
|
|
Darkspeed
Club Retro Rides Member
Posts: 4,878
Club RR Member Number: 39
|
|
|
|
|
Nope not me - Turbo's are not something I have ever really got involved with - I should as they are a rather superb device but do love screaming N/A's
|
| |
|
|
|
|
|
|
|
Well, it turns out they're more complicated than you'd think! Especially for small displacement, relatively big power. Would be worth it for a turbo G15 though... I've done some more searching and found this chart for an OEM and uprated turbo from an early '00s Ford Ranger 3.2l I5: 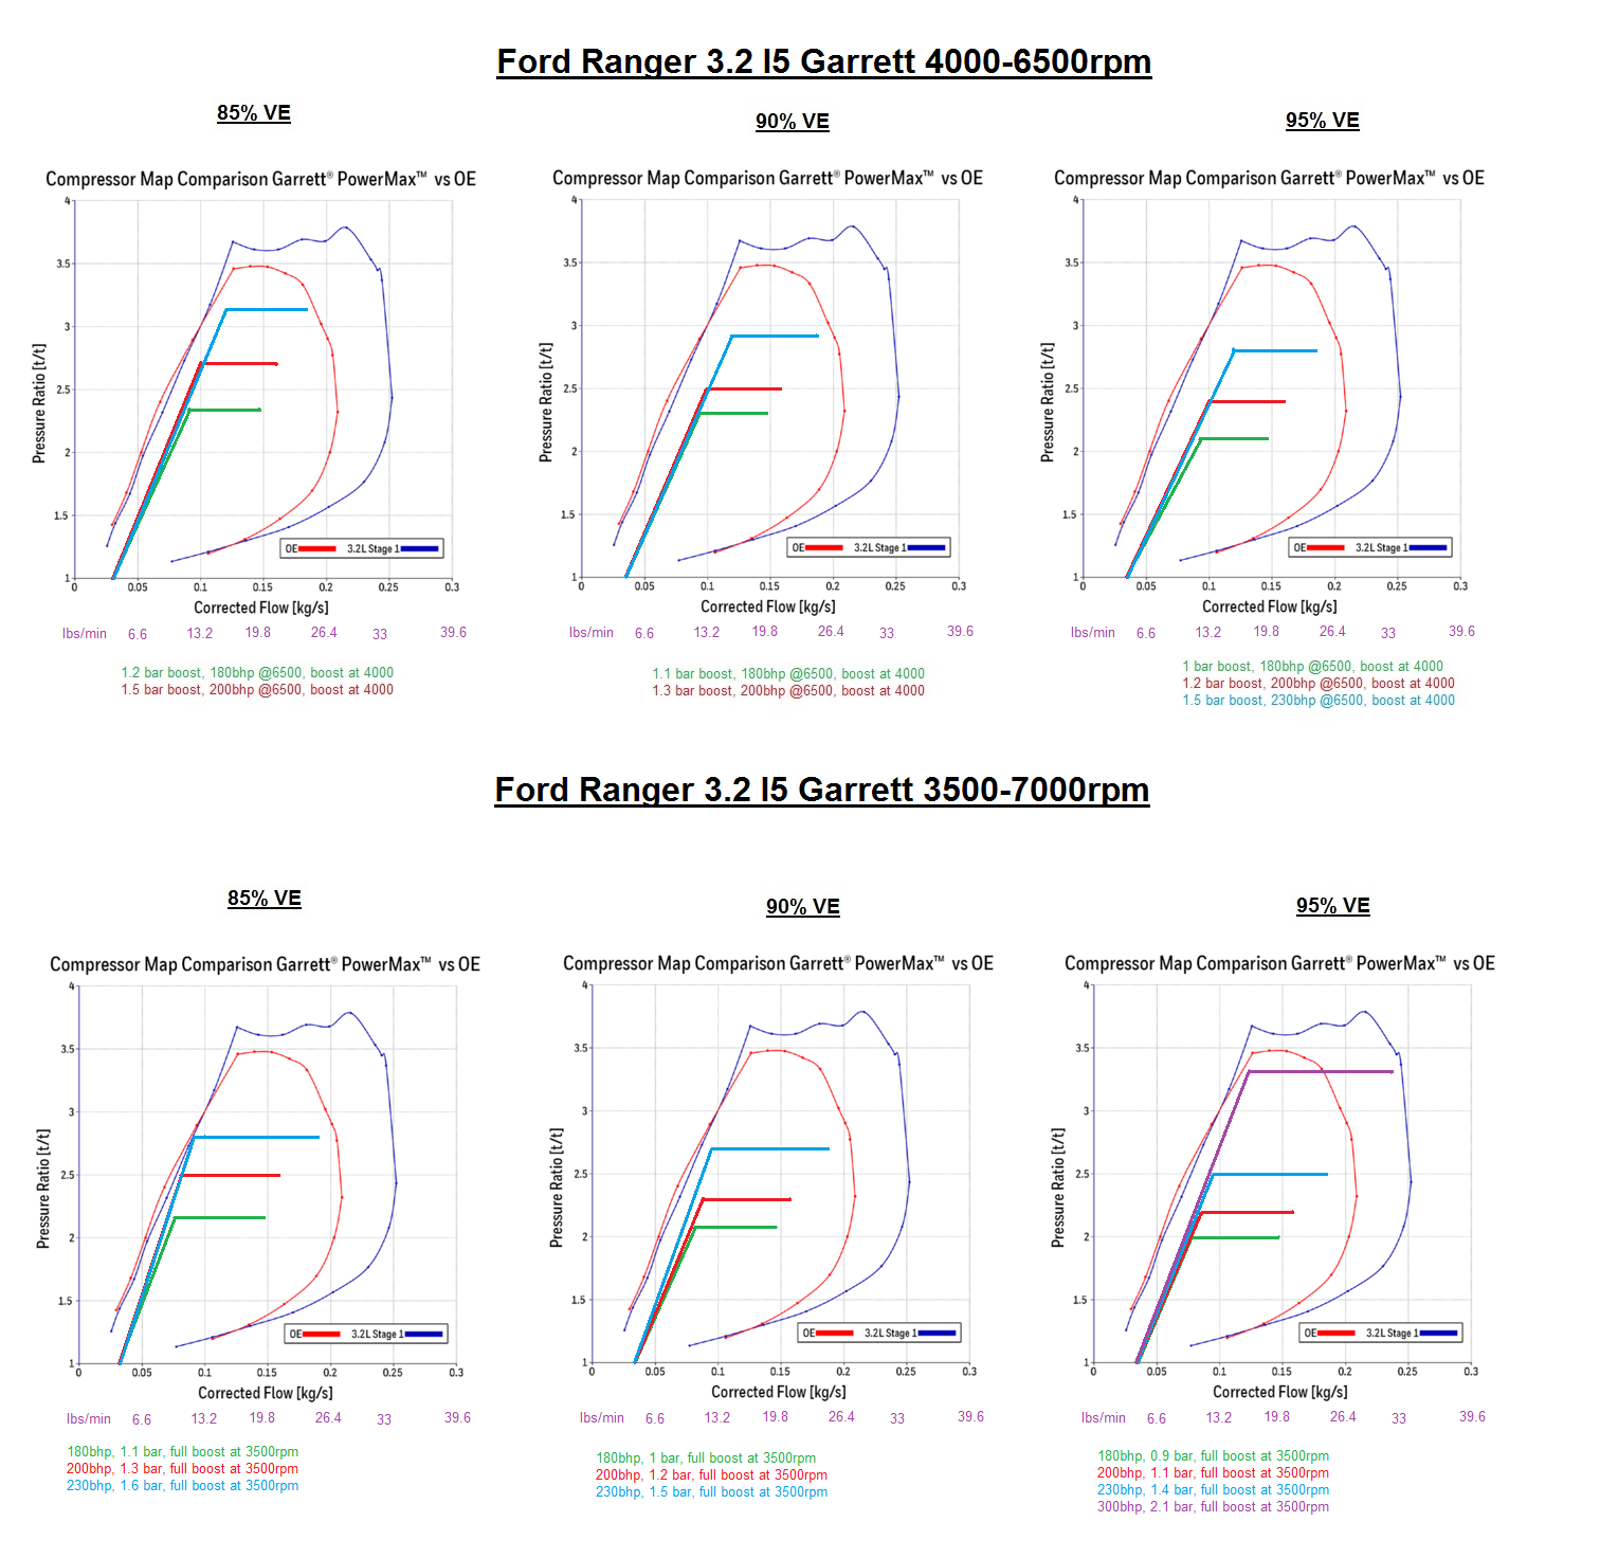 If I can get it to spool (maybe see if someone can hybridise it onto a T25/T28 or something) then it might be just what I'm after  it's also in Australia which may prove to be somewhat difficult, but considering that it suits much better than any other turbo I've found (save maybe the T3 45 trim), I think there might be some merit in diesel turbos after all... Oh, and the purple line on the final map is just playing around. If you can get it to flow and keep intake temps reasonable then the uprated turbo might just be able to make 300bhp without surging! A lot of ifs, but it's promising  |
| |
|
|
Darkspeed
Club Retro Rides Member
Posts: 4,878
Club RR Member Number: 39
|
|
|
|
Well, it turns out they're more complicated than you'd think! Especially for small displacement, relatively big power. Would be worth it for a turbo G15 though... Turbo on a G15/Imp engine - seen some try and most fail miserably by trying to reach for numbers way past what the engine is structurally capable of containing. Ultimately the transaxle is the limiting factor and the package needs to work as a unit. Which is why the BMW K works so well. I find that the most cost effective approach is to not worry about bothering with turbo's until you run out of finding extra capacity. - 180BHP - 200BHP from a 1.3 - I would just fit a 1.8L - For the X1/9 my thinking would start with the Toyota 2ZZ engine and 6 speed and then fit a Dallara body kit - once that's done turbo and supercharger kits for the 2ZZ are off the shelf - if the 100% reliable 190BHP and 8500 RPM is not doing if for you. |
| |
Last Edit: May 4, 2019 12:17:25 GMT by Darkspeed
|
|
scimjim
Club Retro Rides Member
Posts: 1,503
Club RR Member Number: 8
|
|
|
|
|
Have you looked at variable vane turbos?
|
| |
|
|
|
|
|
|
|
Darkspeed Yeah not surprised people go for way too much power when turboing G15s. I expect it's similar to Spitfires in that a lot of the mechanicals were designed over a decade before they wound up in a 60s sports car so they're reaching their designed envelope before you even start modification. The Spitfire's diff was originally designed for a car with all of 35bhp so no wonder they shear stub axles when you put 200bhp through them. Normally I'd be with you on searching for displacement before going for a bigger turbo, but I've already got one big swap project that needs finishing so the X1/9 will need to live with bolt-ons for a bit before I can think about stroker kits. The numbers I'm looking for aren't unreasonable either. There's plenty of unported Uno turbos running 180bhp, and at least one I've seen running a peaky 230bhp. It's the 'full boost down low' bit that's proving difficult. Actually, in all my research I hadn't come across boost solenoids before. Since discovering they were a thing turbo selection has become much easier as I don't have to worry quite so much about the low-rpm boost. I'd quite like a full-fat torque curve, but it does make it less critical to find a turbo that will do it all. Oh, and an engine-swap is a possibility, but honestly I quite like the little UT engine  scimjim scimjim Interesting you mention those as I've just been informed that the GTB2256VK I was looking at in the Ranger is in fact a variable vane turbo. It would seem like I'm restricted to one of those if I don't want a boost solenoid. Either that or find a turbo that nearly fits and control the boost until I increase the displacement at some future point 
|
| |
|
|
scimjim
Club Retro Rides Member
Posts: 1,503
Club RR Member Number: 8
|
|
|
|
|
I don’t know that much about turbos specifically, (even though I have a Nissan CA18ET powered car) but I do know quite a bit about gas turbines.
Stalling and surging can wreck a gas turbine and as centrifugal compressors are “over-efficient” at lower speeds, they use a bleed valve to stop them generating more pressure than the rest of the engine needs (a wastegate on a turbo) - a boost solenoid just changes the wastegate control pressure in order to expand the design envelope.
Instead of bleeding air off to slow the compressor down, a variable vane turbo will spin at higher speeds without generating max pressure or overboosting - that means the turbo is quicker to respond to boost requirements as it’s already up to speed.
So previously you had 2 choices (ignoring compound charging) - small turbo with power from low rpm but a limited top end, or a big turbo with bigger power at the top end at the expense of low down power (ie turbo lag). Now you have a third choice of the variable vane turbo. One of our members cars is running a CA18DET (170 BHP with a Garrett T25 (.48 A/R) as standard) at 310 BHP with a variable vane turbo at 1.1 bar (it has run at 1.6 bar) and it’s more like a supercharger in the way it’s power delivery is so linear.
|
| |
|
|
|
|
|
Jun 10, 2019 12:36:13 GMT
|
scimjim Well, after a bit more research it turns out that the Ranger turbo is a variable vane jobby, hence why it has such a broad operating envelope. It'd bee good to try and find some compressor maps for other common small-displacement modern variable vane turbos, but I think people are still pretty secretive with them at the moment. Part of the motivation for all this research into turbos was that after less than a month of reliable driving the Fiat started running massively rich again and I was thinking 'why not just bankrupt myself and go standalone, at least I'll have a running car'. However, I've solved it! I noticed that the running problems would disappear after a hot dry day, and reappear again when it rained so it's probably something electrical getting wet. It also started just after I topped up the coolant, so I looked down next to the tank and there sat the RPM sensor I'd replaced:  Whipped it off and found that the seal where the wires entered the body of the sensor looked tight, but when you wiggled the wires little bubbles of water came out. Gotcha! So, dried it out and stuck some rtv around the joint and it's been fine ever since  my wallet can breathe a sigh of relief (for now...). I also discovered why the brakes still weren't sealing very well. One of the brake lines was still weeping so hit the mating surface wit ha bit of sandpaper on a flat block and this is what it showed: 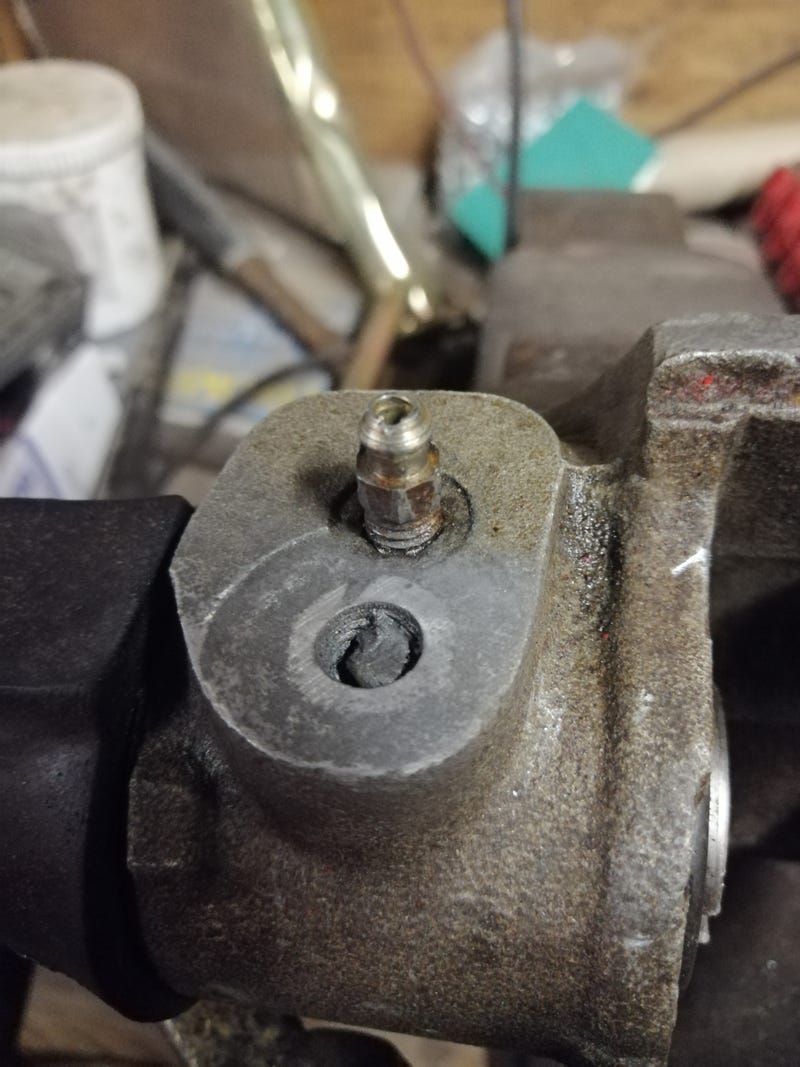 No wonder. Flattened that off and it seals much better now  Here it is looking very pretty (and also functional!). 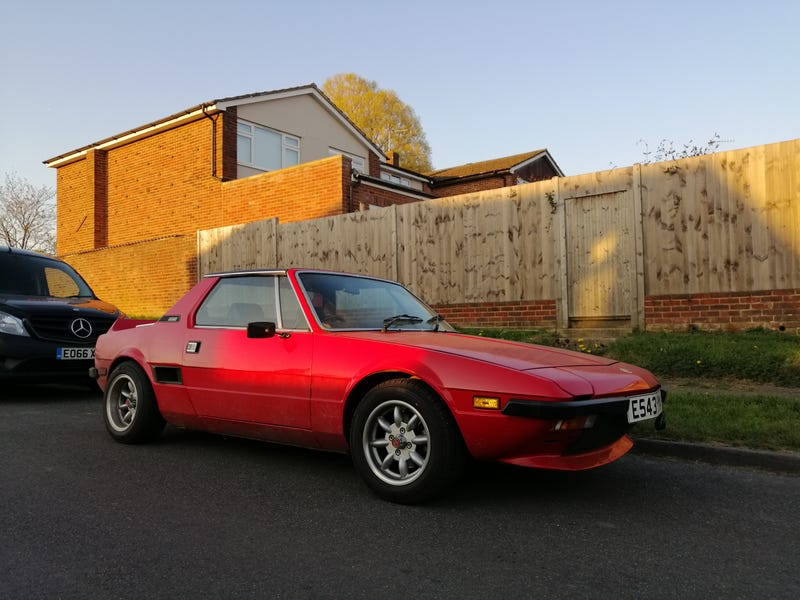 Now if only I could work out why the fans won't come on anymore...
|
| |
|
|
|
|
|
Jun 20, 2019 23:23:24 GMT
|
I knew I shouldn't have mentioned it. Running problems are back. Same issue of running rich, but replacing the RPM sensor hasn't done the trick this time. So, she's off the road for a bit while I get some bits and pieces together to change the engine management system. I've got all the bits from a Punto GT which should be workable (and mappable!), but while I'm doing that I might as well see about a bigger turbo and a cam  However, theres some other bits and pieces that need sorting before I can do that. First off was the fuel pump which was still whining (people seem to say that walbro 255s just whine...but I don't buy it). While I was taking the pump out of the tank the crimp for the negative wire just pulled off in my fingers. That'd do it! Rewired the whole thing in slightly beefier wiring just in case there was a voltage drop problem as well. Second is the coolant system. I've suspected a leak somewhere for a while and think I've found a pinhole in the stainless pipes I made to the rad. I've welded that up, and also used some mole grips with a bead of weld run into the jaws to create a bit of a flange on the pipes for a better seal: 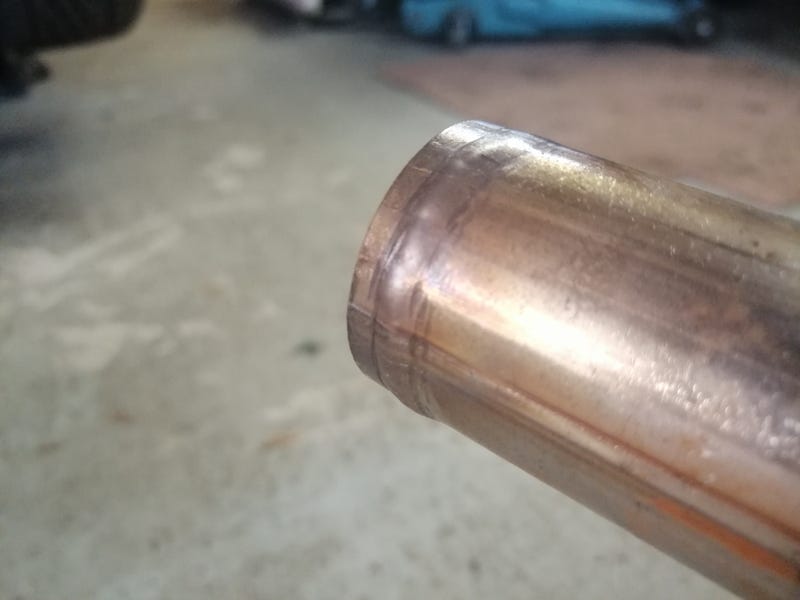 Fingers crossed that does the job  Next on the list of things to fix before it'll be comfortable with some more power is the gearbox. This one's already showing the strain a little from just 130bhp, and had started being pretty reticent to get into reverse...or fifth...or first...or any gear a little too quickly. One option is to replace the internals with the ones from a Mk1 Uno Turbo gearbox, but as far as I can tell there aren't LSDs available for those. So, I've decided on the stronger C510 top-change gearbox from a Punto GT  The recent 10% sale sitewide on eBay netted me a quaife LSD so we're on! First issue to overcome is the gear linkage. It's been sorted before using an MGF linkage so I figured that would be a good place to start. Here's the two side-by-side: 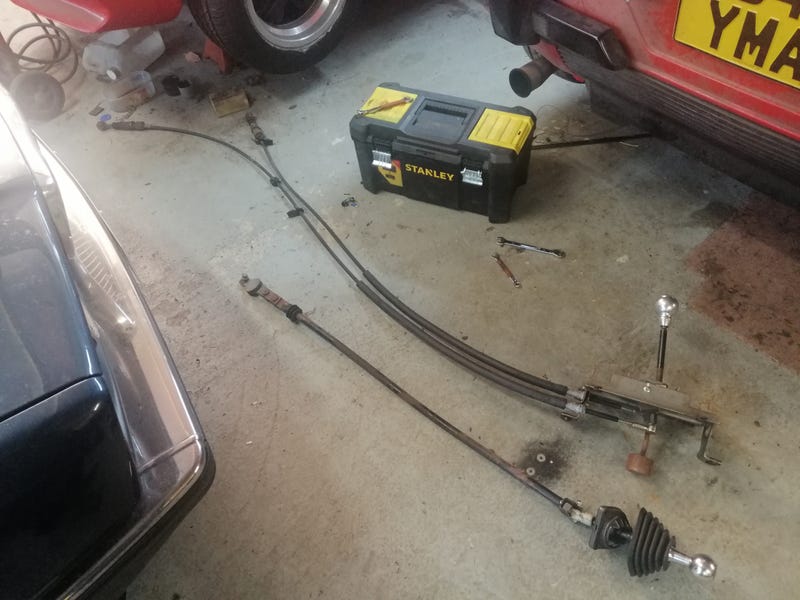 The X1/9's is a solid tube so there's no good routing for that to the top of the gearbox, but with cables you can be a little more flexible. 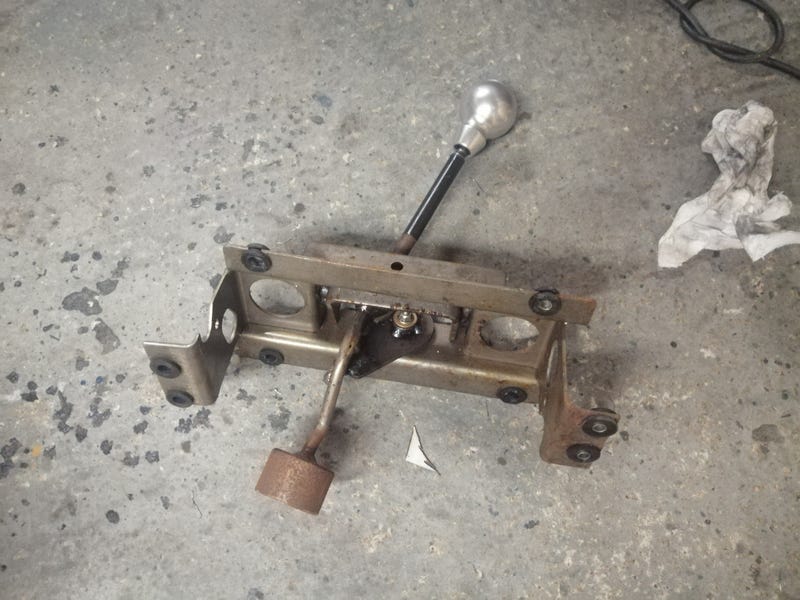 The MGF linkage seems like a pretty good design. The only issue is it's bloody massive. The previous chap only shaved down the counterweight and bolted it directly to the tunnel, but that required a modified centre console so I thought I'd have a go at cutting it down to fit. Started like so: 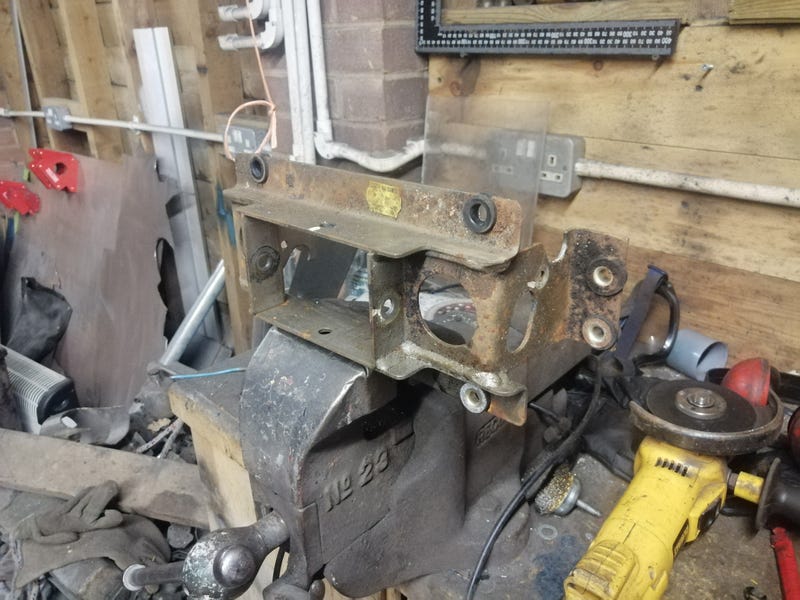 Ended like so: 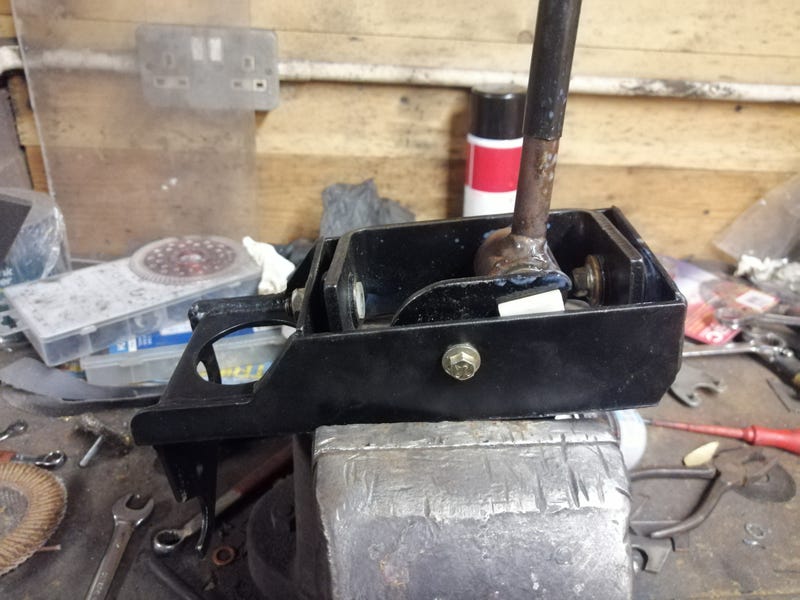 This means that with a bit of minimal cutting to the centre tunnel it'll slot down neatly inside it  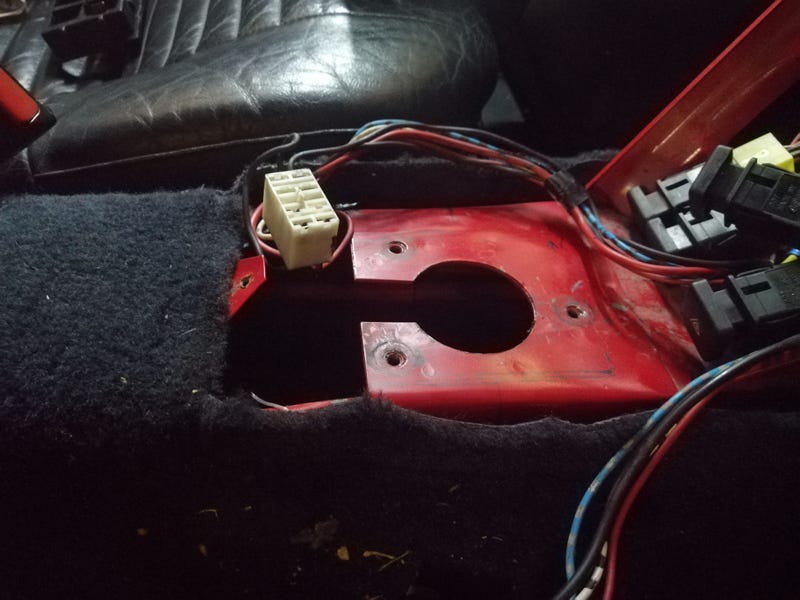 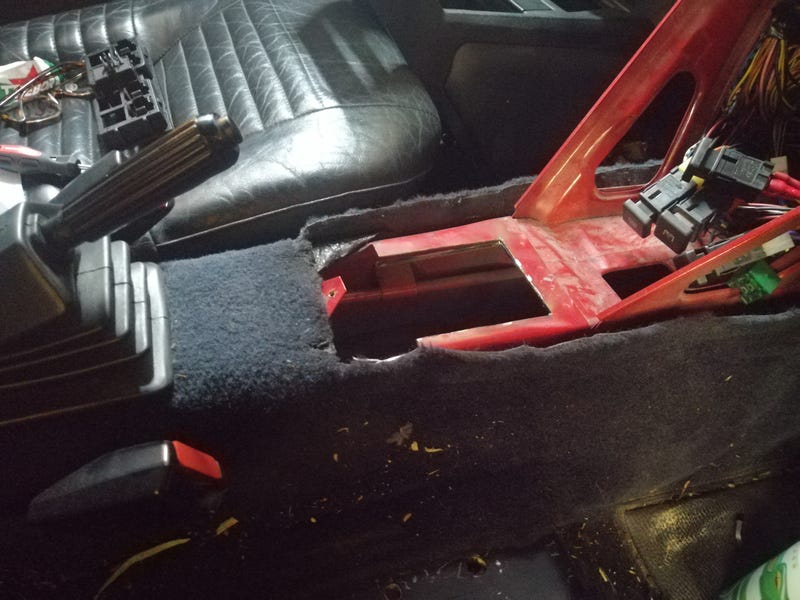 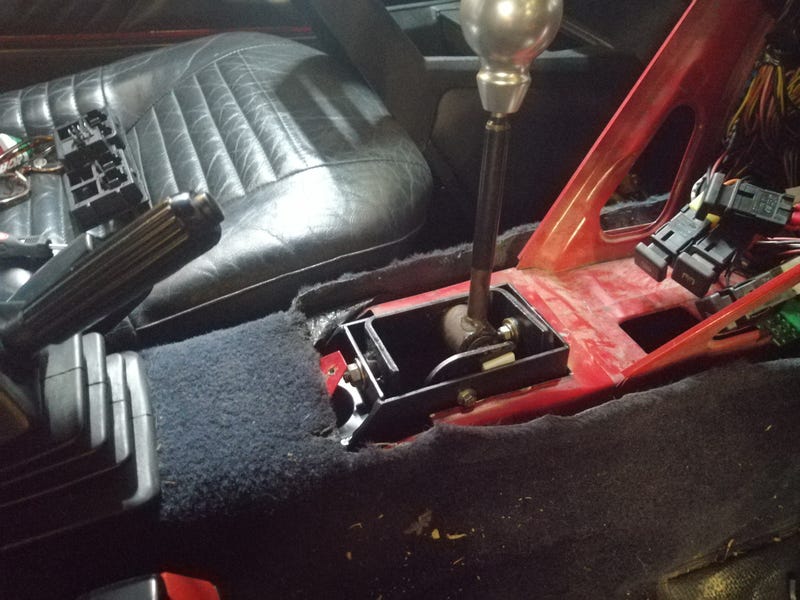 There's options to drop it even lower if necessary to clear the electric window switches, but that's basically it  gearstick is in pretty much the same position as the original  Also, just look at all the extraneous weight I've chopped off  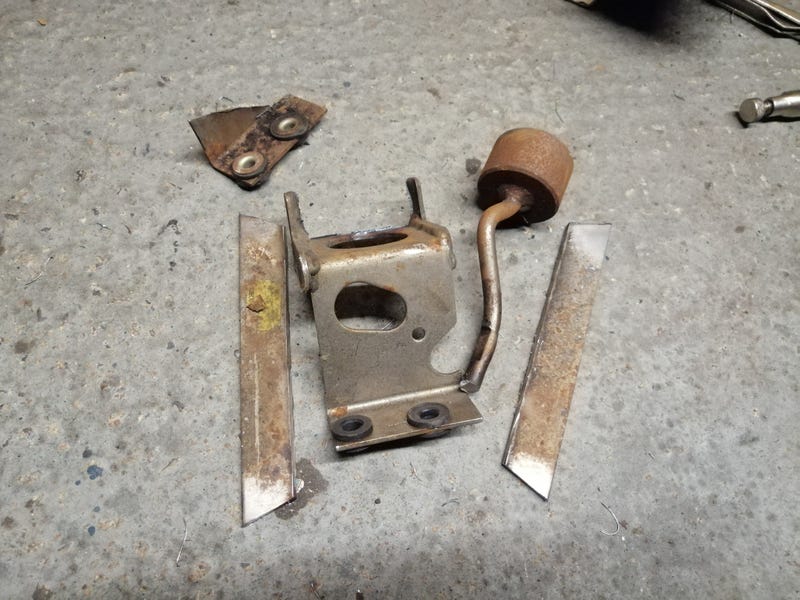 Might not seem like a massive amount, but me and a mate did some corner-weighting on some cheap eBay scales a while back and we've just got round to 'calibrating' them by comparing various different weights between them, some bathroom scales, some kitchen scales and a weighbridge at the local metal recycling place. Turns out they were consistently reading 2% high. Applying that, we've got the following for a couple of our lighter cars: - X1/9 Uno Turbo wet sans driver: 921kg, 40.3% front
- X1/9 Uno Turbo wet with driver: 990kg, 41% front
- MX5 NA turbo wet sans driver: 1020kg, 51.9% front
- MX5 NA turbo wet with driver: 1102kg, 51.4% front
- MX5 NA 1.6 wet sans driver: 930kg, 52.1% front
- MX5 NA 1.6 wet with driver: 984kg, 51% front
The turbo MX5 is the green one in this pic, and the 1.6 is my sister's graffiti-paint purple one   Couple of bits and pieces have changed since then. The MX5 has added 4-pots on the front (with alloy bells), bigger rear discs, an oil cooler and deleted the towing tie-downs. The X1/9 is before the alloy rad, oil cooler, wiring, front spacers and coolant pipes. Still, it's tantalizingly close to being sub-900kg without a driver. Every little helps! |
| |
Last Edit: Jun 20, 2019 23:29:11 GMT by biturbo228
|
|
|
|
|
Jun 24, 2019 22:25:14 GMT
|
Next little bit of work on the Fiat. Did a little more chopping about to get the gearstick in the right place. If anyone's thinking of doing this, you don't need to go quite this far but it was nice to have some room to work with. 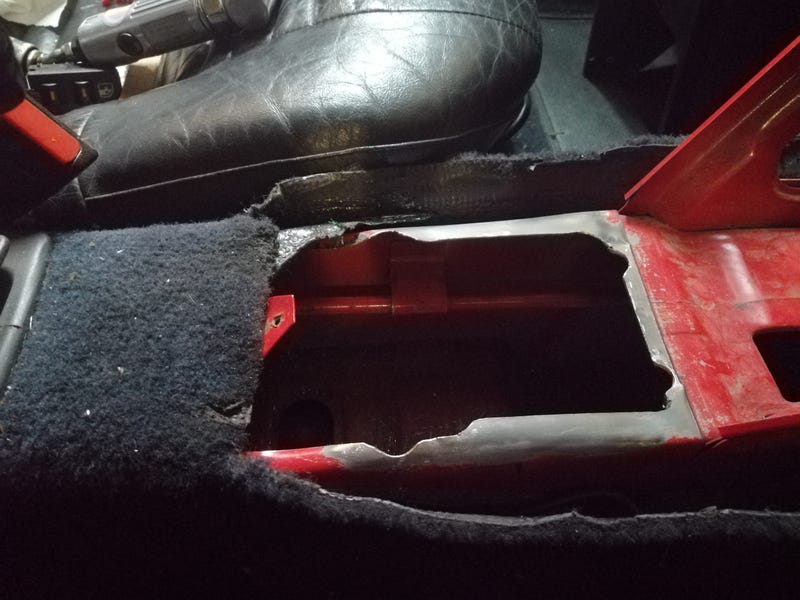 One of the principle issues for fitment is the standard window controls which need about 70mm of clearance below them, and there's only 35mm of clearance between the centre console and the level of the tunnel, meaning you still need at least 35mm of clearance between the tunnel and the gear linkage. You could mount it quite low down and a bit further forwards than the standard location which would be doable with the switches...but then the clamp for the cables fouls on the heater matrix return hose: 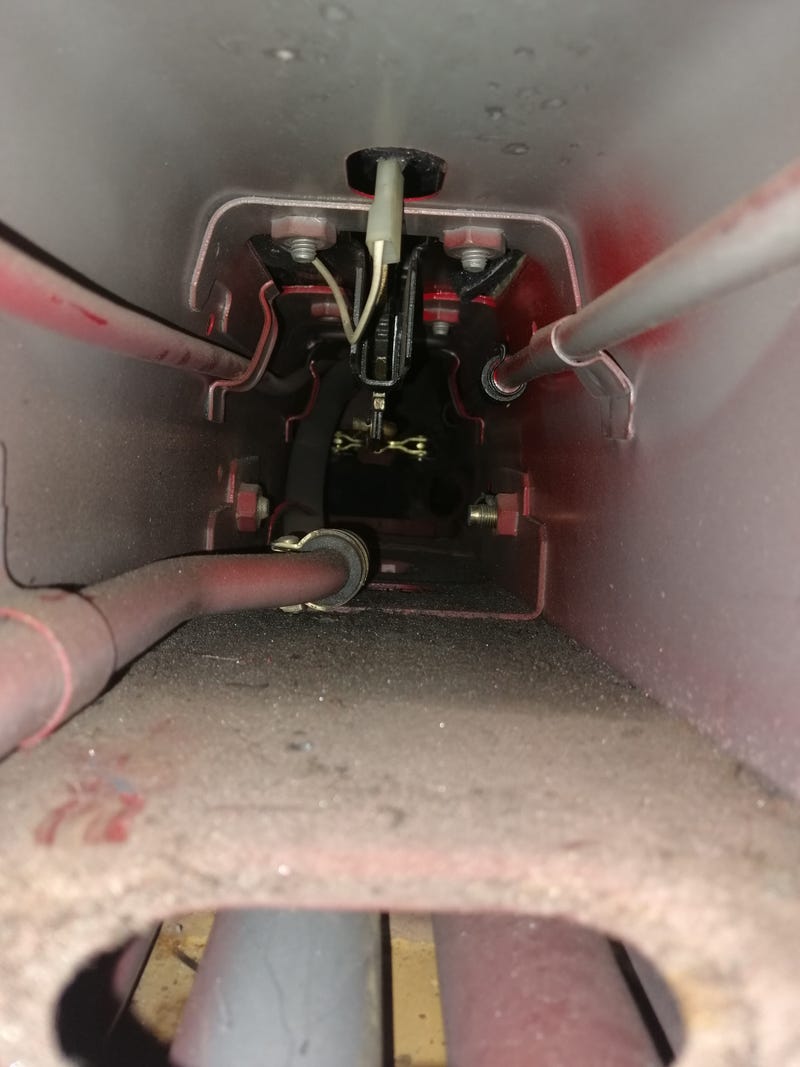 I was all ready to chop the metal line and run some rubber hose along the opposite side where it'll clear when my mate wanders in and says 'could you not move the switches?'. Oh yeah. I could... Tested them in a couple of blanks that sit below the hazard warning switches and we reckon they'll fit once you remove the dividing piece of plastic. Perfect  So the gearstick can sit a little higher to clear the coolant pipe, and back in the standard position. I also decided to weld up a bit of a beefier 2mm mounting for the linkage as I'd noticed the 1mm wall tunnel had started to crack around the old mounting position. Probably not strictly necessary, but seemed worth the effort and added weight. 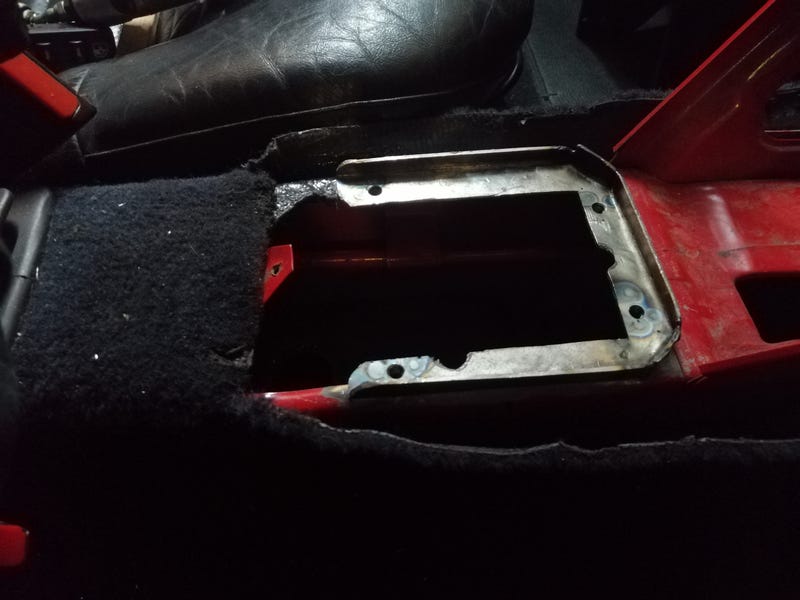 Speaking of added weight, the new linkage is a little heavier than the old one at 1850g vs 580g. I'll probably drop a little with a non-chrome aluminium knob, but that'll probably be made up for with the new brackety thing. 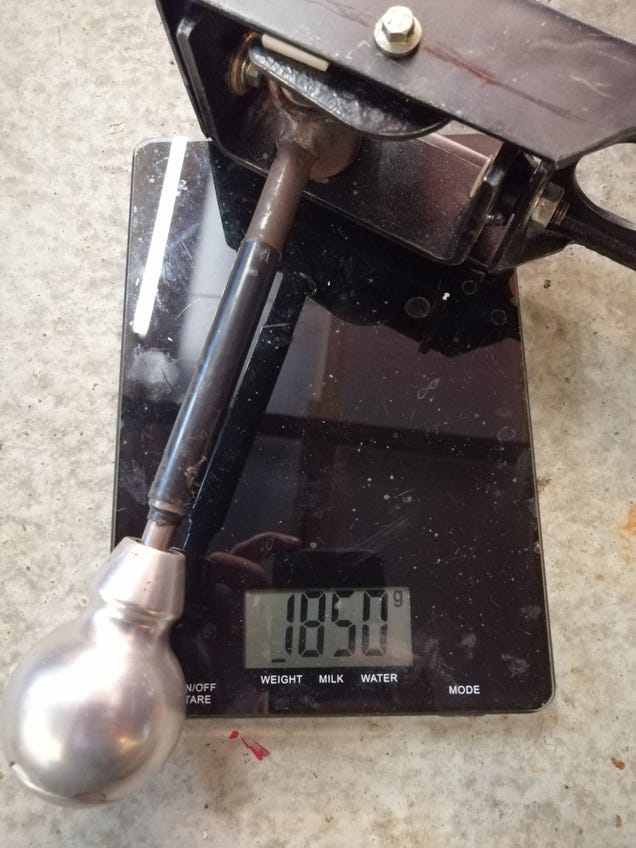 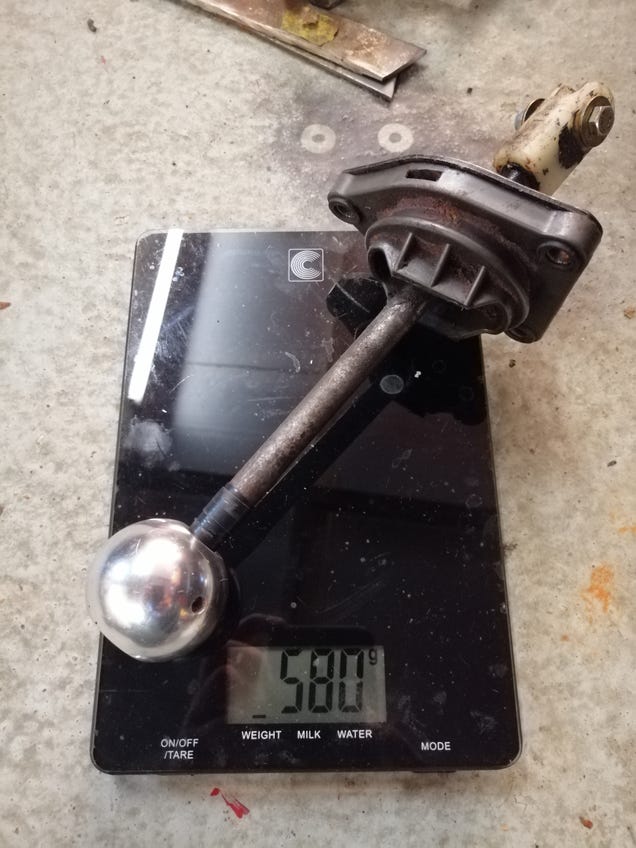 I did manage to cut out over a kilo of weight from the original MGF linkage. Man those things are heavy. Nice shift quality with all that weight, but happy to make that sacrifice  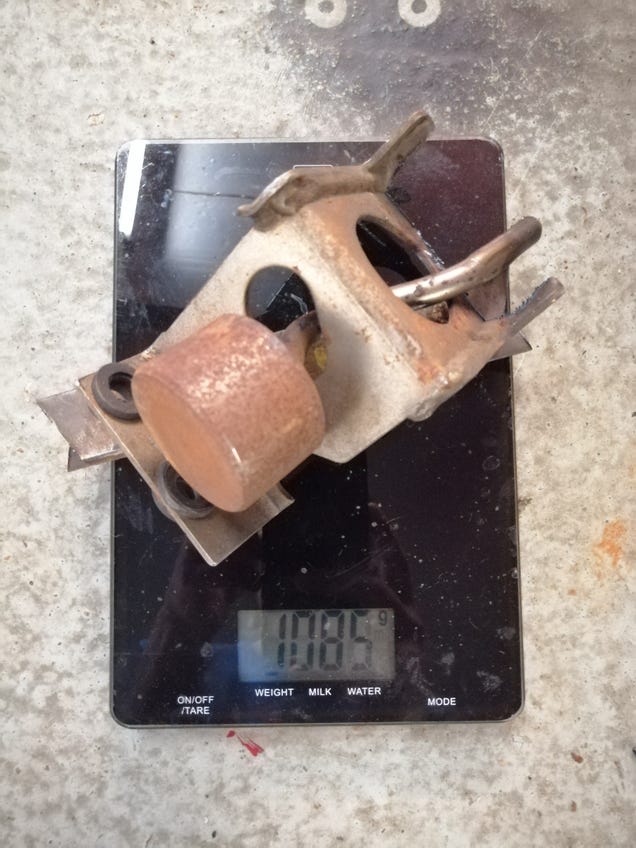 |
| |
Last Edit: Jun 24, 2019 22:27:12 GMT by biturbo228
|
|
|
|
|
|
|
|
|
Well, the front end's sorted now  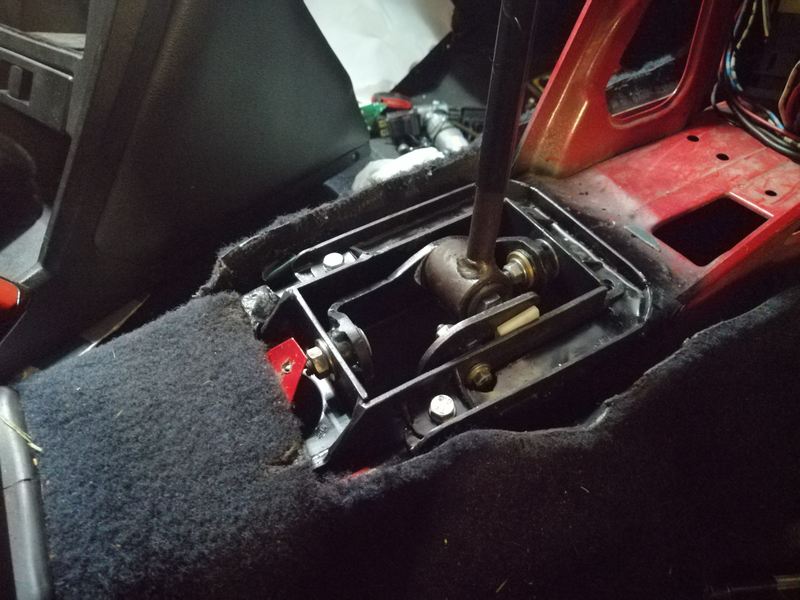 Had to shave down some of the rotating part of the mechanism to clear the centre console in 5th and reverse. 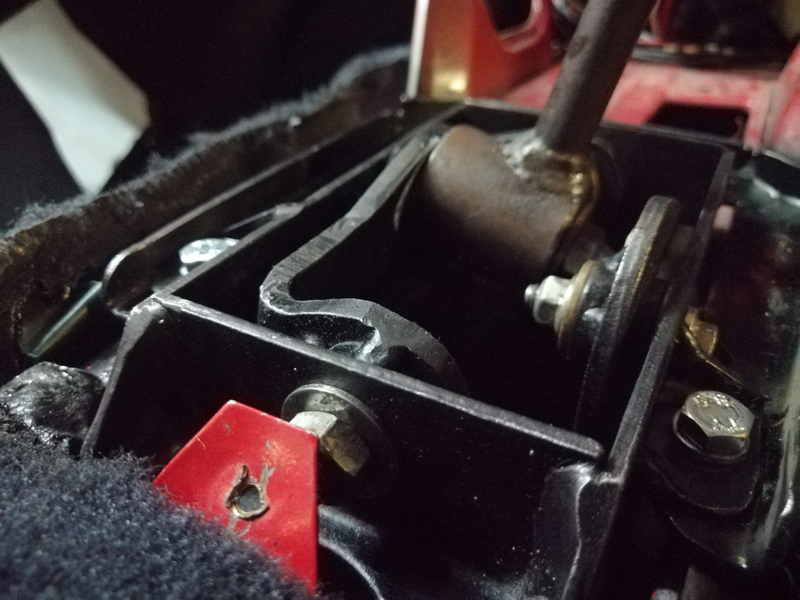  Saved another 170g though  if it flexes too much I'll have to put some stiffening ribs in, but we'll see how it goes. Next problem though. Not sure how the previous guy got them to work, but the MGF cables are definitely too long. 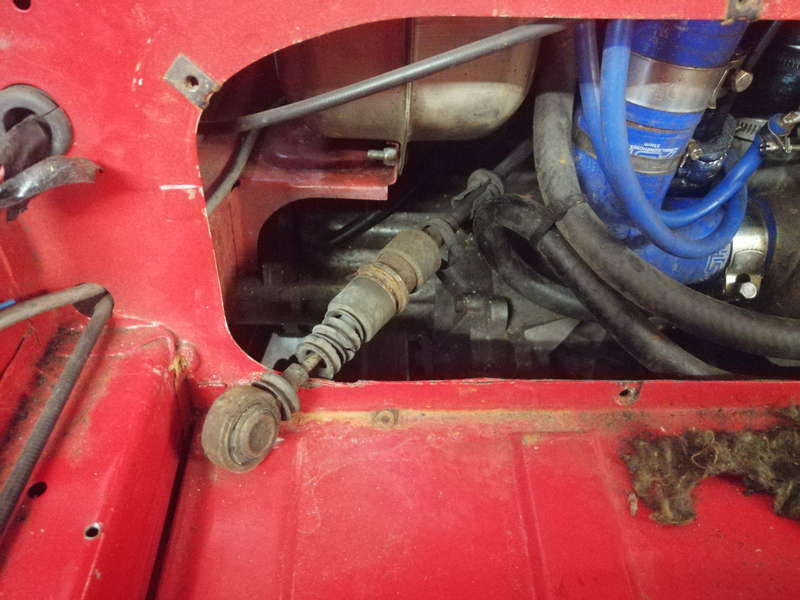 Started searching around for shorter ones as the MGF eyes are threaded on so anything I can cut an M6 thread onto would work. Then I found out that you can get a whole load of crimpable (and swageless) stuff for stainless steel boat cables so might have a go at shortening the cables I have  If anyone's got any clever ideas I'm all ears  |
| |
Last Edit: Jun 30, 2019 10:28:22 GMT by biturbo228
|
|
|
|
|
Jul 10, 2019 14:43:32 GMT
|
First off, I now have a gearbox in the car! 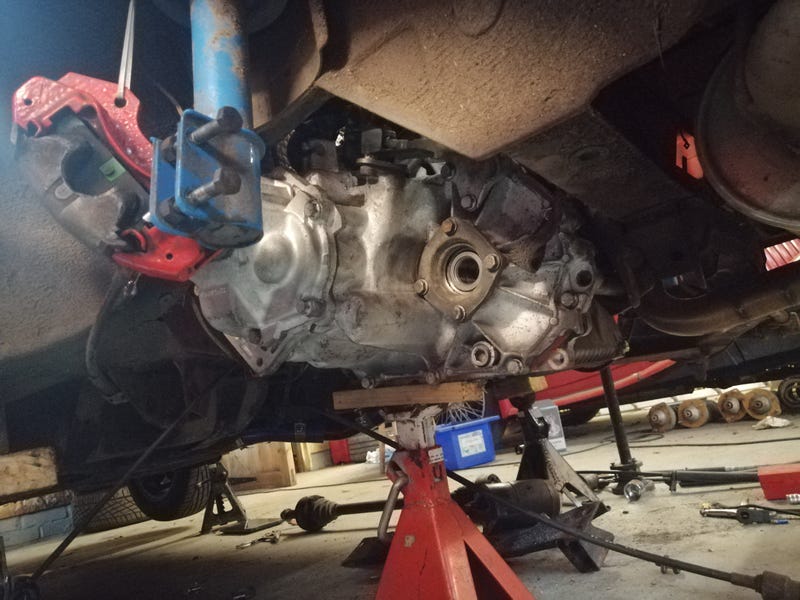 There's a bit of cutting to do of the bodywork and a bit of the gearbox to make clearance. The top section helps when it's fitted, and the left helps massively when fitting the gearbox. 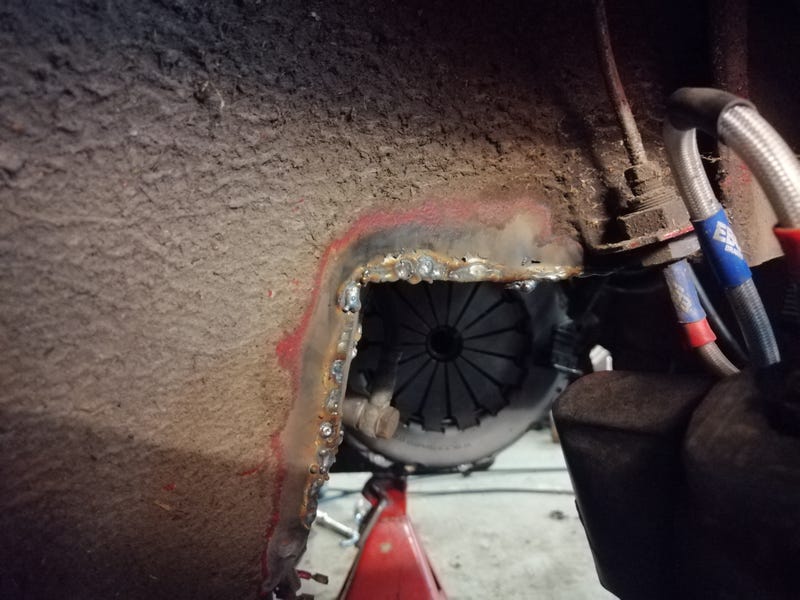 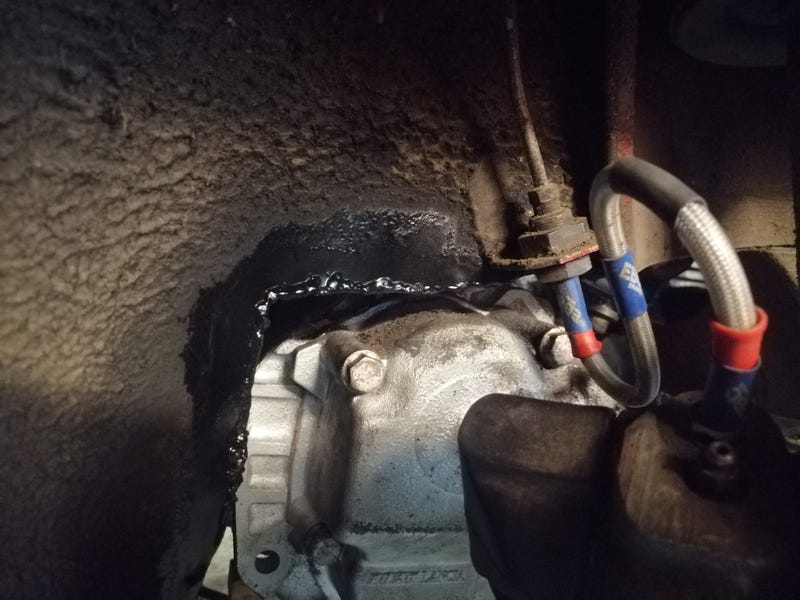 Couple of interesting things I've noticed. A few people seem to have used the original crossmember and engine mount with a little plate on two of the holes, but offering it up they seem to put a lot of torsion into the mount so I've bought some bits to make some poly mounts and a different crossmember. I've also put some more thought and a bit of experimentation into the cabling issue. Speaking to people who have done it before, they put the cables down under the sump and up the back of the gearbox which does work reasonably well, but the cables aren't quite the perfect length so they get quite close to some other components. I think we can do better with custom cable lengths based on the long cable. This is the plan  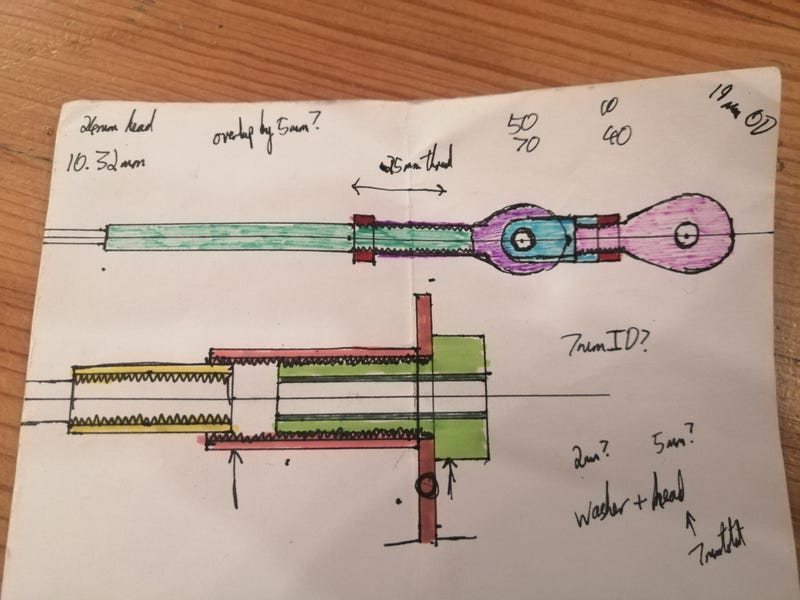 The bottom picture is the new cable end. The yellow is an M10 threaded sleeve which threads snugly onto the rubber of the MGF cable (I tested it with an M10 nut which held on pretty strongly so a 30mm run should be solid. If not I've bought some rubber-to-metal glue). That slots into an M16 threaded sleeve (pink) and is welded in place. A 30mm (or better 35mm) M16 bolt (light green) is threaded into that which clamps it against the gearbox bracket (brown). An 8mm hole is drilled through the M16 bolt, and into that is pressed an 8mm hard nylon tube from an air line to provide a bearing surface (dark green). The upper picture is the swaged on threaded rod that connects the cable to the gearbox arm (green). Onto that is threaded an M6 female rose joint (purple) and a locknut (red). The light blue is an M6 nut with a couple of tabs welded on that bolts to the first rose joint, and into which the pink male M6 rose joint threads with its locknut. The second rose joint then bolts to the gearbox. The reason for having two rose joints is that the gearbox arm describes an arc as it moves, so the inner rose joint allows the outer one to follow that arc. Without this, the swaged rod would bind in the M16 bolt (or you'd have to widen the central hole through the bolt to allow for the movement which would make it wear oddly). The stock cables get around this by having the nylon tube that supports the rod swivel at its base. Overall, the double-linked rod is only a couple of millimetres longer than the plain rod (could be less if you had half-nuts for locking, but I'm not sure how good of an idea that is). 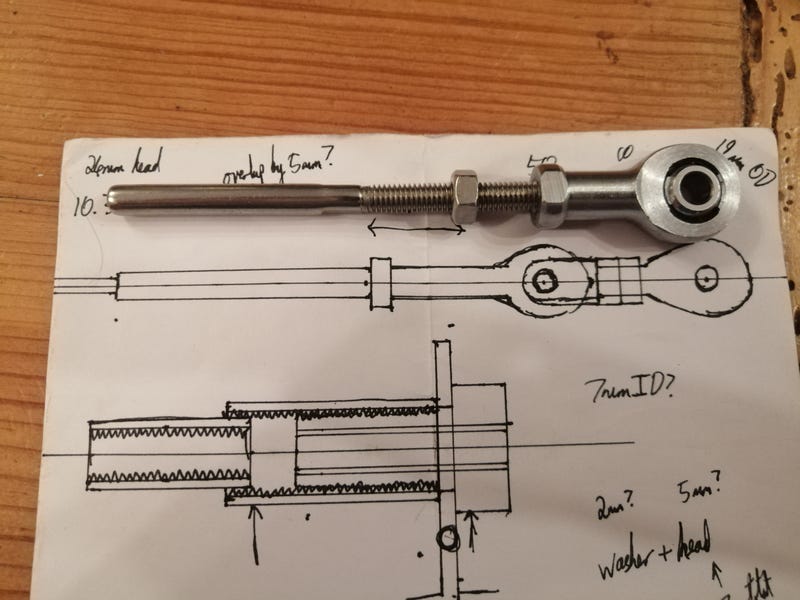 It could probably do with a little more support through the 40mm travel of the rod, but it's still supported by at least 10mm at the furthest part out (which I'm not even sure it'll reach in normal operation). 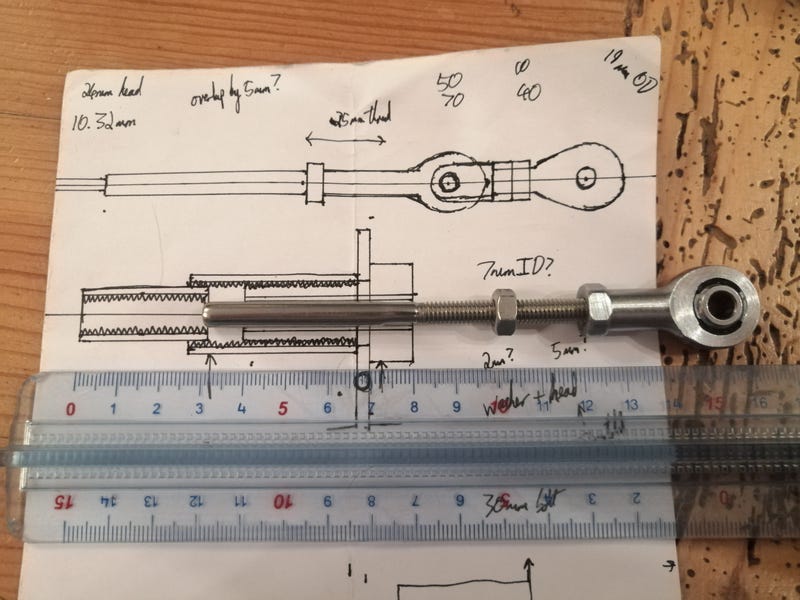 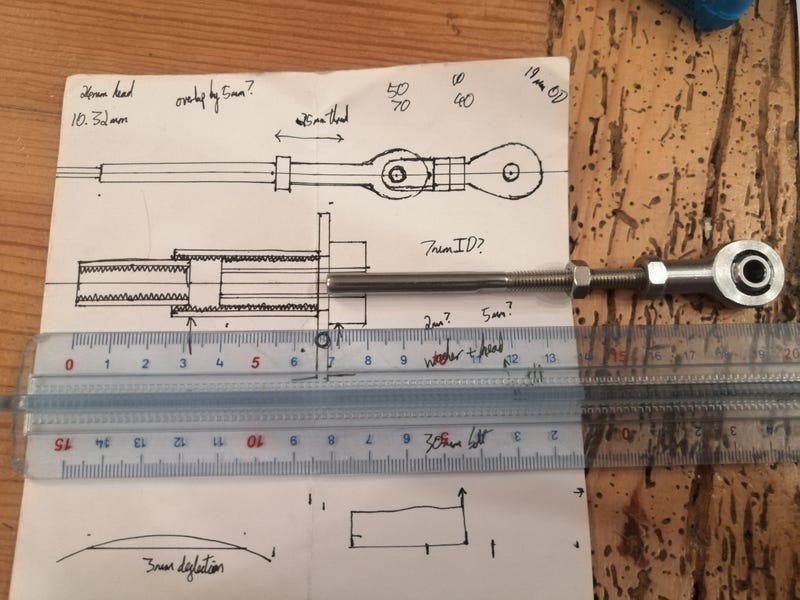 That's the plan! We'll see how it goes in practice  |
| |
|
|
|
|
|
Jul 22, 2019 13:00:59 GMT
|
Well, two weeks later and a lot of false starts and we now have working linkages! Man those clacky noises are satisfying  nice feel with the rose joints as well, although will need to compare that to the added vibration coming back through them when it's running. The shortened cables worked a treat. Bought two long MGF cables and cut them both down to size (the short cables would have worked for the shorter of the two, but they're always in worse condition than the longer ones second hand). Here are the dismantled bits for it. 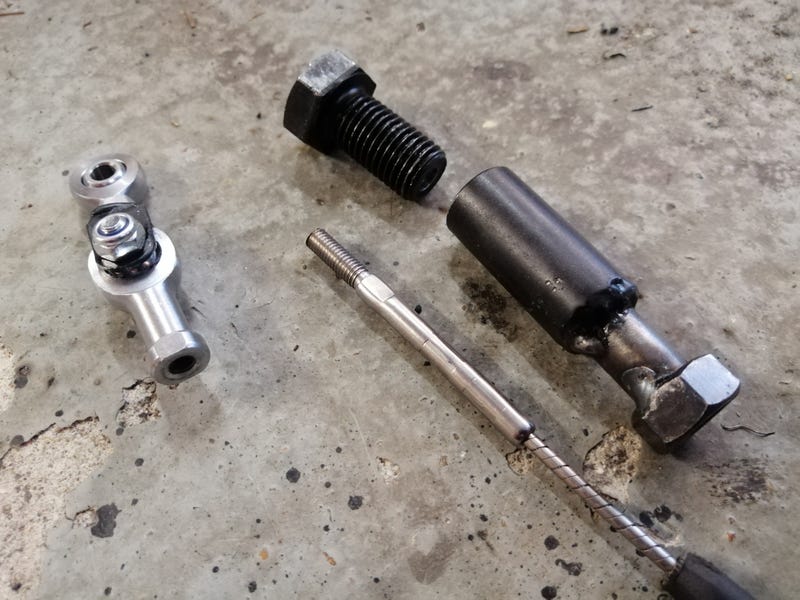 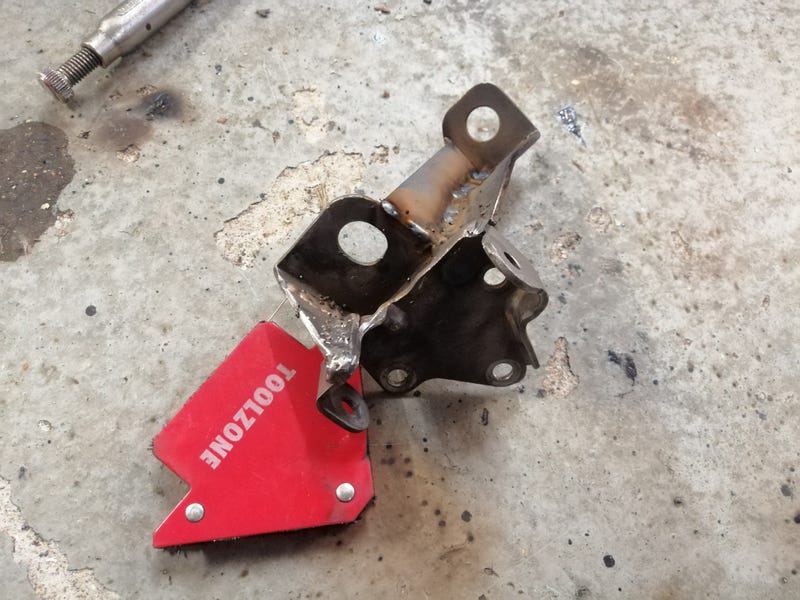 Turns out the swaged terminals are a little wider than 6mm so I drilled out the centre of the bolts to 6.9mm which worked ok (7mm should be fine too). Had to do away with the nylon bearing surface due to this as well, but I'll just grease the metal on metal with something lithium based and it should be ok. Worst case scenario the stainless terminal will wear the bolt which is replaceable anyway. Took a fair bit of jiggery pokery to get it all to sit nicely as well (accidentally cut one of the cables too short which was a £40 mistake). Another late discovery was that the left-right motion of the gearstick translated to the wrong way round from this side of the gearbox. There's no space between the diff housing and the body to put the arm on the gearbox on the other side either. I've seen it done with the cables coming in from overhead, but that area's a bit crowded with the intercooler and coolant tank. Eventually I worked out that with some modification you can flip the gearstick around to reverse the operation left-right. I don't have before/after pictures, but you have to dismantle the linkage to flip the gearstick itself. Drill a 9mm hole on the left-hand side of the outside frame and weld up the existing one on the left as it's just in the wrong place. Then you also need to shave down the side of the little tube on the pivot so it sits 3mm proud rather than 6mm. The opposite side of the bush will need spacing out with some washers ground down to the right thickness as well. Oh, and the bit that holds the cables on the rear will need to be chopped off and flipped around. All of that does mean that I can mount it much lower down in the tunnel though as it clears the coolant pipes, which means the centre console will fit together a little neater. The cables also foul on the stock crossmember, and the regular engine mount needs modification anyway so I thought 'sod it I'll make my own'. This uses 40x20x2 box section, polybushes from a mk1 Ford Cortina rear leaf spring (superpro part number SPF0935K), 50.8x2 steel tube which the bushes fit snugly inside and M12 bolts which fit well enough into the 1/2" Cortina crush tubes and will thread into the M12x1.25 threads in the Punto gearbox. It'll also have some captive nuts welded in for p-clips to hold the cables away from other things. 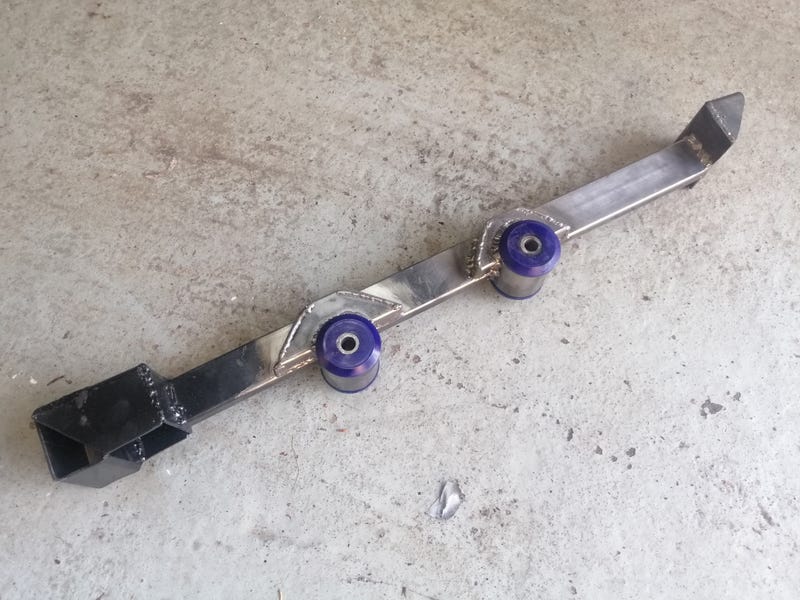 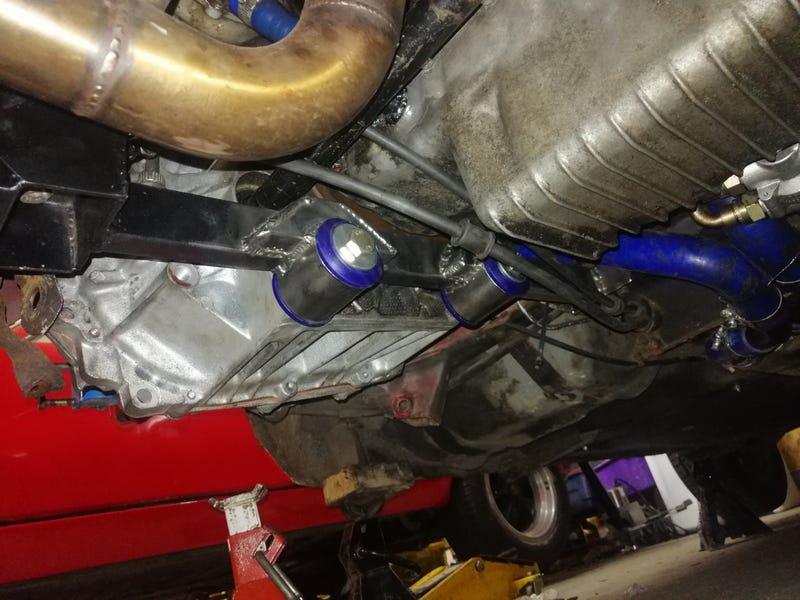 One of the bolt holes will need drilling out to 10.9mm and tapping to M12x1.25. This I discovered after fitting the gearbox, so had to fart about drilling it by hand with a tap handle, a step drill and progressively larger drill bits up to 10.9 in an attempt to get the hole straight. Miraculously that seems to have worked alright but I definitely wouldn't recommend it  drill it out beforehand. 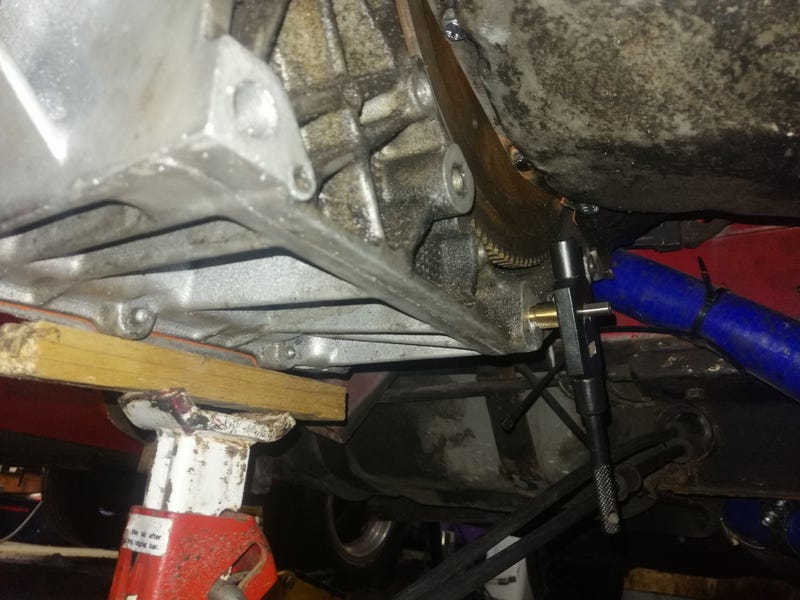 I'm also wondering how stiff it'll wind up being ('rather' I think), but X1/9s have a habit of quite quickly stretching out the now-out-of-production top torque link so a bit of extra location will probably help a lot once it starts making a bit more power. Oh, last thing is I made a bit of a mistake when swapping in the Quaife diff. Thinking about it I would need the X1/9 speedo drive gear kit, not the Punto one. Luckily, I worked out the speedo difference and it's ~1% which isn't too bad. The only other issue is that the hole for the cable on the Punto one is bigger than the X1/9 cable. Luckily, I found you can buy little brass box sections that fit neatly inside each other which I used to bulk out the cable end. It needs the end cutting down, a 7/32ths box slotting over it and a 1/4" box over that which fits snugly in the Punto drive. The brass boxes will need chemical metal-ing to the speedo cable as they do fit reasonably well but the inner cable can rattle about a bit so it'll wear over time if not. 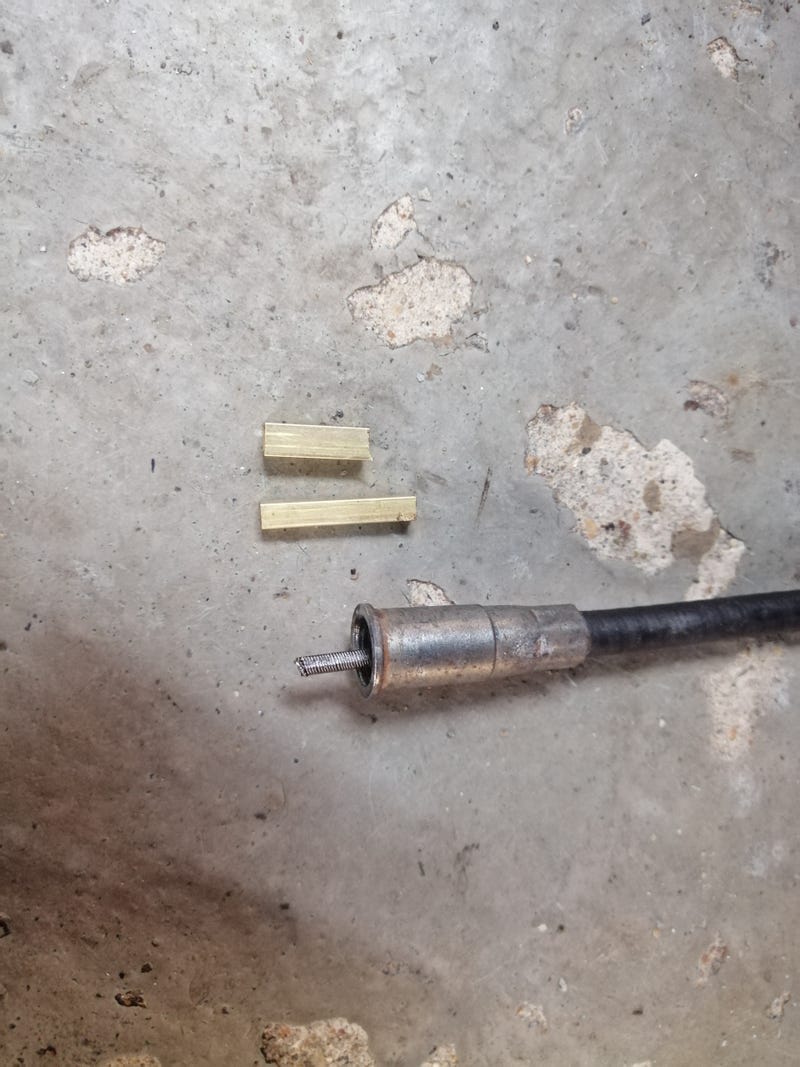 Getting there! Hopefully that's the bulk of the fabricating done and dusted, although I must admit I did miss fabricating things when everything was bolt-on. |
| |
Last Edit: Aug 21, 2019 10:07:08 GMT by biturbo228
|
|
|
|
|
Jul 22, 2019 23:13:13 GMT
|
In a rare turn of things working out really nicely without me having to muck about with it, the MGF dust boots I had fit neatly over both the rose joints and the 24mm bolts. Just added a small cut down washer so they could hook the other side, painted everything and put it all together  looks almost factory, save for the rose joints... 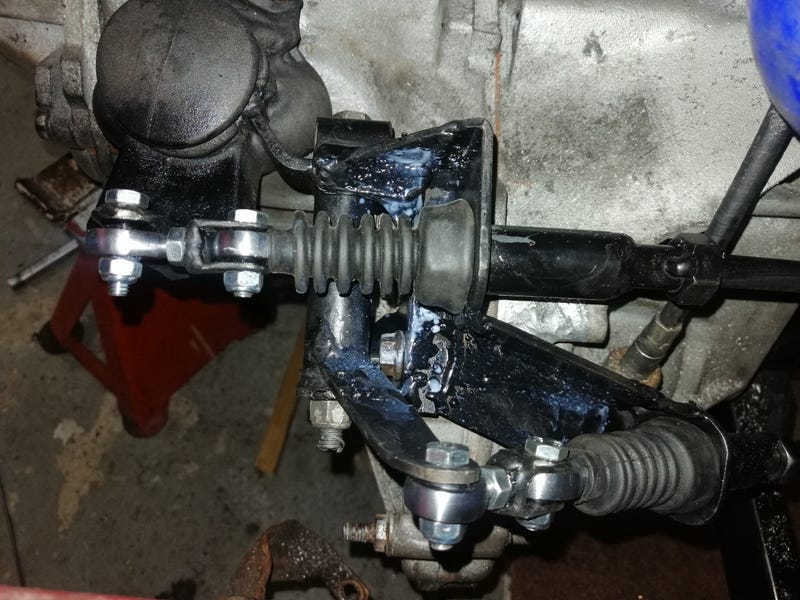 I also chopped off the little ball from the underside of the gearstick and rewelded it so it points back slightly (as it does in the stock linkage) and the gearstick sits nice and central now too  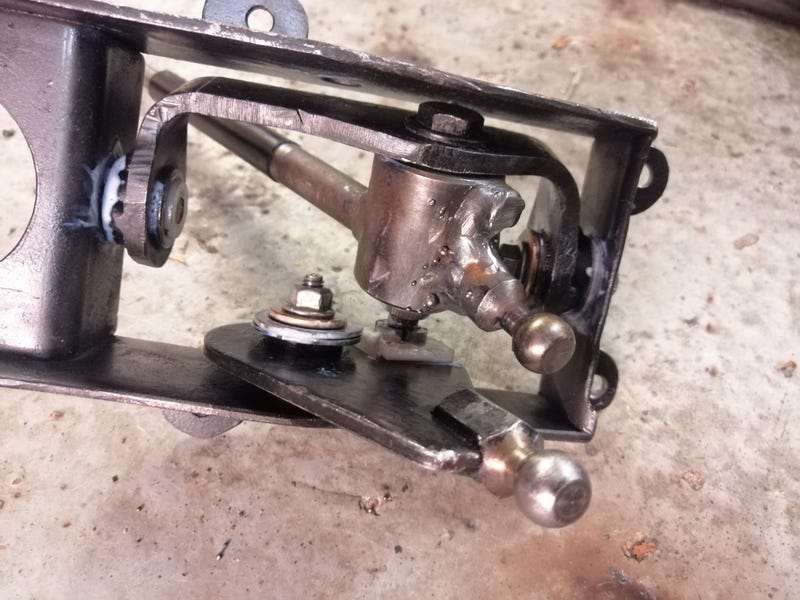 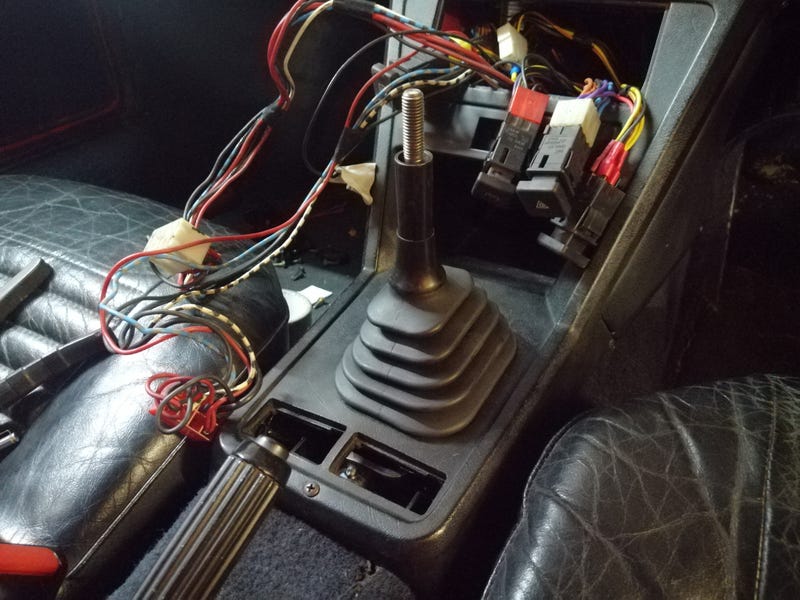 Now it's just pick up a diff spacer and hope I've measured it right, fit the driveshafts, sort out the clutch slave (not sure if the X1/9 one or PGT one will work better), fill it with oil and hope it's sealed, sort out the buttons in the cabin, bleed to coolant and sort out the running problems. Doesn't sound so bad! |
| |
|
|
|
|
|
Jul 30, 2019 23:22:41 GMT
|
|
Some fine work on those linkages!
I'd still be scratting my head.
|
| |
|
|
jamesd1972
Club Retro Rides Member
Posts: 2,921  Club RR Member Number: 40
|
|
|
|
Some fine work on those linkages! I'd still be scratting my head. I still am after reading it it! Top job. James |
| |
|
|
|
|
|
|
|
Haha thanks guys  I'm definitely still scratching my head about some things (namely how I can have bolted up the suspension in exactly the same way as it came off, all the shims in the right place etc, and gained about 5 degrees of toe out...) The rear tie rods are looking a bit tired anyway so I've got some more bits and pieces on the way  However, on the positive side the cabin's all sorted now  you'd never guess much has changed! 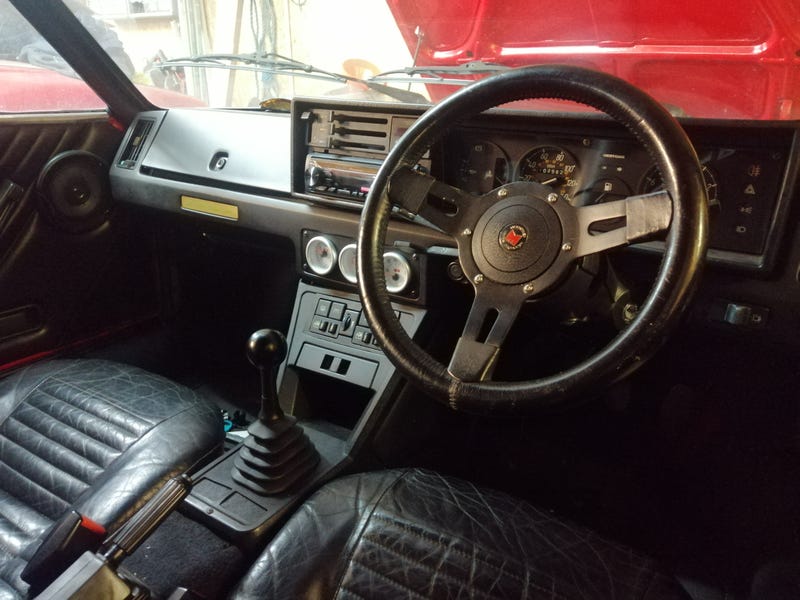 Alternator's sorted with a bit of cutting and welding, and the Punto starter is one of those gear-reduction ones and is nearly 2kg lighter which is a nice bonus  between this, the slightly lighter engine crossmember and the lightweighting on the gear linkage the whole swap's only added about 1.8kg, even with an LSD, stronger gearbox, and heavier equal length driveshafts. 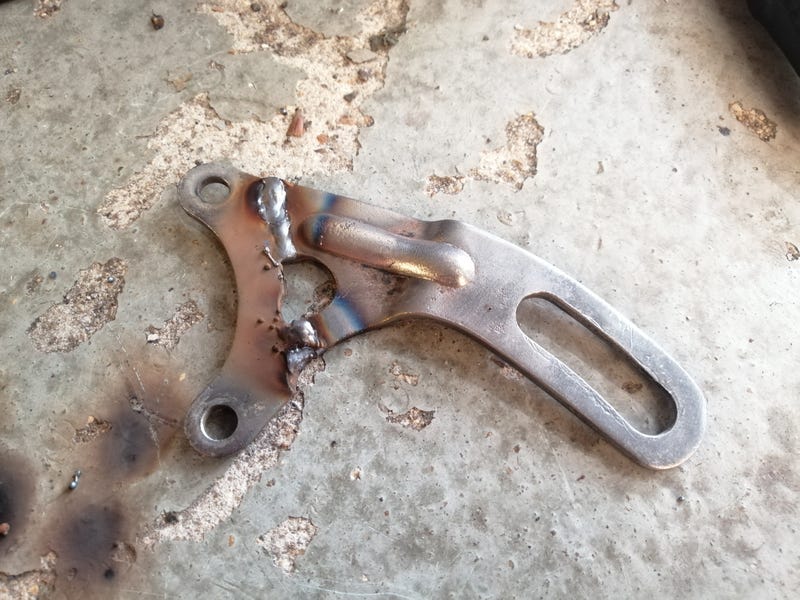 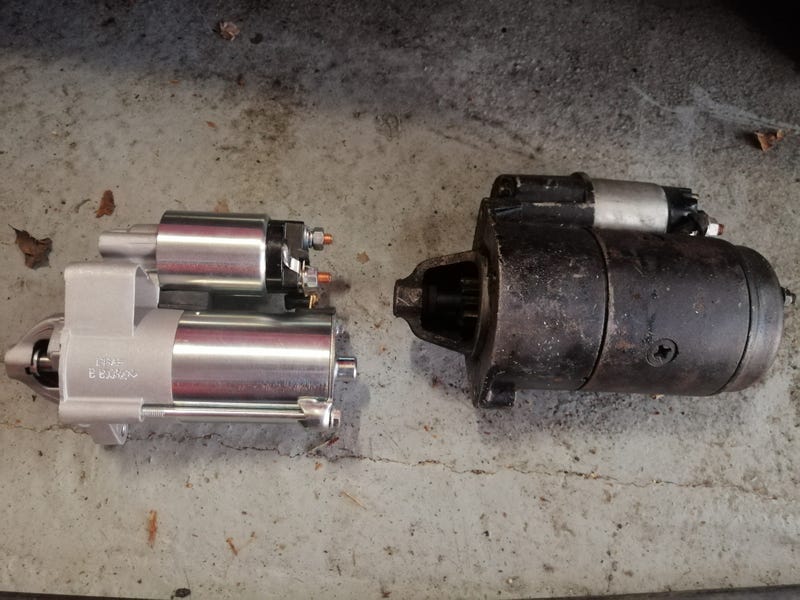 Bit of a problem getting one of the suspension bolts back in as well. Previously it went in from the front, but the gearbox now fouls on it and the exhaust fouls on the rear. I took one look at the bolts on the turbo downpipe and decided to chop the exhaust and weld a joint into it so I won't have to drop the exhaust each time I do the bushes. 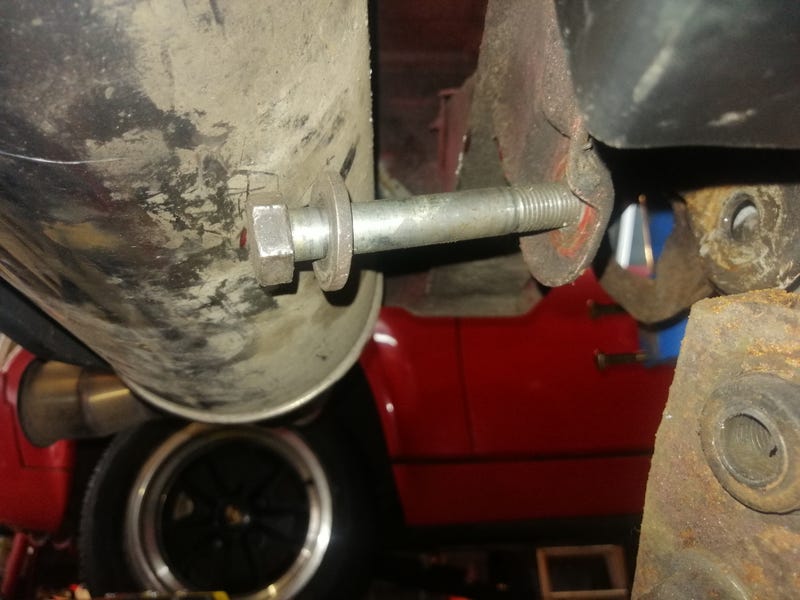 Does also make it easier to experiment with slightly lairier 'silencers' which is nice  Oh, and clutch slave attached and bled up. Used the PGT slave cylinder which has a 25.7mm bore rather than adapting the X1/9 19.05mm bore slave. Did the maths and was worried you'd end up having to put the pedal through the floor to lift the clutch, but that seems to have been unfounded  not sure what bit I'd missed out (probably clutch fork length), but it all works ok in practice. |
| |
|
|
|
|
|
|
|
|
So, next couple of updates. Some good, some bad :S
The good is that it's now running again! The last two bouts of running issues had been rpm-sensor related (there's a sensor on the flywheel that gives the fuel ECU its rpm info). The first original one just died a death due to age. The replacement fixed it but died when it rained and I found out water gets into the sensor itself. Replaced that with another one that was waterproofed which I think never worked right in the first place.
Refitted the now dried out good sensor and it works again! Need to waterproof it, but think I might be alright. Shame about the new replacement as the old sensor had evidently worked since the 1980s...
On the topic of curse word replacement parts, the bad is that the 25.4mm bore slave cylinder doesn't work after all. Tested it and the biting point is about 2mm off the floor of the car (still drags the clutch when it's at the bottom). Pretty certain the slave is dead.
Did the maths with the various ratios and it definitely doesn't check out. The 20.6mm bore works out much closer to what I need. The issue is that no-one seems to make the 20.6mm slave anymore, and post the 25.4mm one as an alternative. Fairly certain that's the case anyway. I've asked if someone on the UT forum can measure the bore on his working PGT setup in an X1/9.
Will report back!
|
| |
|
|
|
|
|
|
|
So, next couple of updates. Some good, some bad :S The good is that it's now running again! The last two bouts of running issues had been rpm-sensor related Bloody sensors. Mine refused to start. Why? Cam sensor. Apparently the ECU will run happily without cam sensor input, working on last known position. Until the battery dies. Then... Fortunately it was curse word in the connector, combined with a three-year-old dying battery - about as long as you get here. Temp sensor. Not the one for the gauge, the one for the ECU which in the earlier '95-97 P38s, mine, shuts everything down. Later ones just take a bit of churning to start when hot. New BMW(?) part fitted, problem goes away. Thank god for my little plug in box. Points you straight to the issue. |
| |
Last Edit: Aug 6, 2019 12:21:25 GMT by georgeb
|
|
|
|
|
|
|
Ugh tell me about it. Still haven't worked out how Fiat in the 80s (that pinnacle of engineering reliability) can make a sensor that lasts 30 years, but the one I've bought just now packs in when it rains... Wish I had a little plug-in box that tells me what the problem is. I still like the XJ40's one which is simply a little box next to the steering wheel, you press a button and it pings up any fault codes on a little screen. No mucking about with cables and propriety software. Press the button, look the code up, fix the problem  Next little bit of mucking about on the clutch. The chap on the UT forum came back and he's definitely been running his 25.4mm slave cylinder on his race car with the same setup, but I've back-bled mine to make sure it's bled up properly and no change. Still has a biting point on the floor of the car. Bizarre. However, I have found that a Fiat Doblo uses the same gearbox and has 20.6mm slave cylinders available. It does however have a weird quick-release hose fitting on which I'm not 100% keen on so decided to chop off the end, drill and tap it for the stock X1/9 banjo bolt  Looks like this now. Time will tell if I've managed to file it flat... 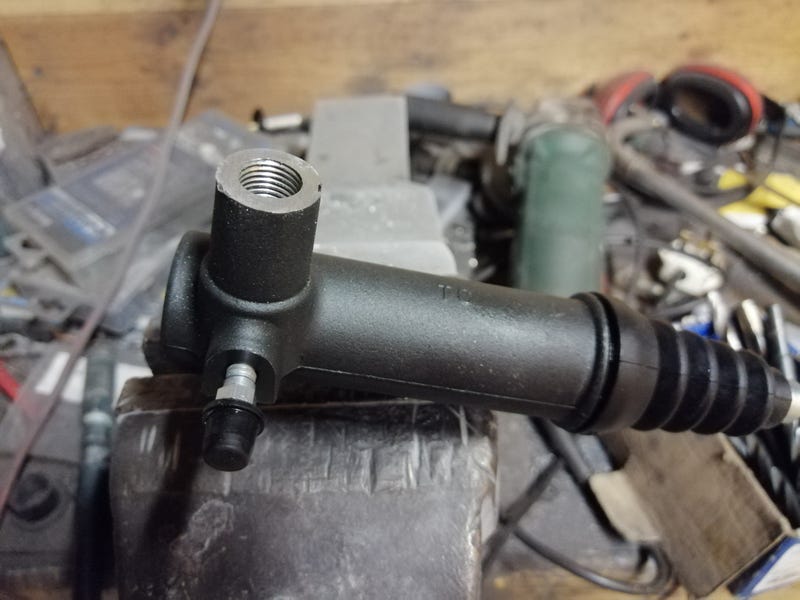 Did the maths and if the 25.4mm slave moves the arm 14mm and that's about where the biting point is, the 20.6mm slave will move the arm 21mm so the 14mm biting point is 2/3rd down the travel which is pretty much perfect  Oh, and it's alloy too so saves about 250g which is a bonus  |
| |
|
|
|
|


 it's also in Australia which may prove to be somewhat difficult, but considering that it suits much better than any other turbo I've found (save maybe the T3 45 trim), I think there might be some merit in diesel turbos after all...


