Thyck
Part of things
 
Posts: 21 
|
|
Nov 17, 2019 17:19:47 GMT
|
Whilst I was in the process of stripping the left side, I also dismantled the right-hand side to use as patterns…and Peter got straight on the process of making jigs for the rockers and wishbones.  I tell you, the man has a shed FULL of every tool known to man…and more…and yet he still didn’t have anything to bend small diameter tubing, so ordered one of those used by the Bad Obsession Motorsport guys with project Binky (I tell you, if you don’t know about this project and are into fabrication, put this channel on your MUST watch list!). This meant wishbone tubing could be made up   …there it is again, then…the Widow Maker! It's had a newer (slower) motor fitted and new bearings, making it slightly less lethal (I know, I still have to get a video done!!)   …and he got BUSY!   This way we’ll have a whole bunch of spares to last us quite some years should the unthinkable become reality again…although that's dependent on whether Someone has learnt their lesson… We also had a whole bunch of new spacers made up by Mr Lathe Man...  Just some nickeling work, along with manufacturing suspension brackets, an engine mounting brace, an exhaust manifold and a floor tray to go then…and a shed load of assembly work and the dreaded fibreglassing gear gets pulled out… looking forward to that  |
| |
Last Edit: Nov 17, 2019 17:21:12 GMT by Thyck
|
|
|
|
Thyck
Part of things
 
Posts: 21 
|
|
Nov 17, 2019 17:38:57 GMT
|
 So onto the brackets then. Peter got out his crayons and Etch-a-Sketch and got to business… …then promptly let the plasma cutter do all the work…    …and then sent me a proud message about how hard he’d worked…whereas, let’s be honest, he was just suppin’ tea whilst the machine did all the work…slacker… …but at least the brackets were basically done and dusted (although holes still need to be drilled). |
| |
|
|
Thyck
Part of things
 
Posts: 21 
|
|
Nov 17, 2019 17:47:57 GMT
|
…in the meantime I jumped onto a ferry and burgered off to the Lake District to visit my sister on my other toy, a 2014 BMW R1200GSA. A bit cliché and I was against it at first, but I eventually gave in…the thing is awesome. Peter convinced me to get into bikes a few years ago and promptly hang up his helmet…useless. Anyway, I’ve never been on a crossing so rough as this, there were people barfing all over the place and whilst I don’t normally have issues with it, I was also feeling a bit green. All in all I got fed up with the usual arduous process of getting suited and booted, got totally soaked by continuous rain, froze my nuts off and had a few 2-pence-5-pence moments due to gravel and leaves on the road…why do I do this again?! I’d love to replace it for something with four wheels one day, but you just can’t beat the (reliable) bang for buck a bike gives you.   |
| |
|
|
Thyck
Part of things
 
Posts: 21 
|
|
Nov 17, 2019 18:23:12 GMT
|
Then Peter was the bearer of bad tidings…the aluminium bracket between engine and chassis was cracked. A small piece with a relatively quick fix, but most spontifuously (new word) irritating of all…it meant splitting the chassis/engine. Sigh. Been there. A lot. Cars like this don’t have a chassis that the engine sits in. The engine forms a structural part of the chassis, to which it is bolted…and the rear suspension is bolted to the gearbox. This means you can basically split the car into two pieces…which is, as it happens, how I bought it. Knackers…back to square one. So I promptly spent the good part of a day splitting the two together with another mate of mine who’d stupidly offered to come and help for the day (sucker).  See…that’s it…just this…as good as a days work…stupid thing. If you look carefully you can see the crack under the right hand hole (through which a stud goes).  …and there you have it, even less than we had before   So whilst we were at it, we might as well get rid of the grotty mashed floor trays  You can just see the end result on the left in this shot of Peter’s workshop (or at least, part of it)…with three large piles of work (none nearing completion any time soon).  There’s not much left now…just a bath tub and a big pile of bits… Peter was in the meanwhile making up front rockers…here’s the basic form of the shorter side…  …so you weld two together and get this:  …then the same thing with the longer side:  We’re just waiting on some bits in order to get moving further with these, so Peter got on with making up the rear suspension spider, which is a bit of conundrum as it has 3 different planes and when you make a jig you make it for both sides…that will take some puzzling to get right.  One day we’ll get her back in business…  |
| |
Last Edit: Nov 17, 2019 18:24:32 GMT by Thyck
|
|
Thyck
Part of things
 
Posts: 21 
|
|
Nov 17, 2019 18:26:18 GMT
|
|
Right then, all up to date! Finally…I’ve possibly talked the back legs off a herd of donkeys…
…and just to keep the focus issues going, we’re now thinking about a bit of luxury on our car jaunts and so building a van, truck, trailer to include living area, storage for tools/parts and maybe a car (or two)…we just can’t make up our mind which would be best…
Van:
+ probably the most practical choice
- a bit small (we’re both big guys) and involves monthly costs if we’re not using it
Big-ass Trailer:
+ the financially sensible choice, although the right sized one is quite expensive
- needs a tow car (which Peter has right now, but we both have a sort of negative magnetic attraction to stuff, so the question is for how long) and might get a bit big with everything we want
Mini-artic:
+ totally awesome, loads of room and can take a huge awning
- proper expensive, a bit over the top for two amateurs and also involves monthly costs if we’re not using it
Truck:
+ how cool is this
- totally over the top and let’s not talk costs (monthly, maintenance, taxes, etc)…plus Peter, the useless bag, doesn’t have a truck licence
Any advice? Let us know!
|
| |
Last Edit: Nov 17, 2019 18:26:53 GMT by Thyck
|
|
|
|
|
Nov 17, 2019 20:02:20 GMT
|
Truck with a box body & tail lift is normally what the race guys go for over here - you convert the tail lift with a pair of hinged extending ramps that the car rolls onto - then just use the tail lift has normal to get the car in / out of the truck body - convert the front section to sleeping accommodation with a diesel night heater + small galley kitchen - rest of the body houses the car / tools / wheels and becomes a mobile workshop 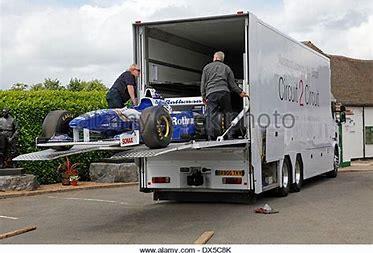 Does not have to be has big or fancy has this Buy a coach and convert the rear section (remove the seating floor after the rear spring hangers / chassis ends - build a pair of ramps - roller shutter door on the rear end - partition off to form seating & sleeping accommodation at the front - our old converted coach transporter can be seen in the below pic - you can make them has basic or has exotic has you wish 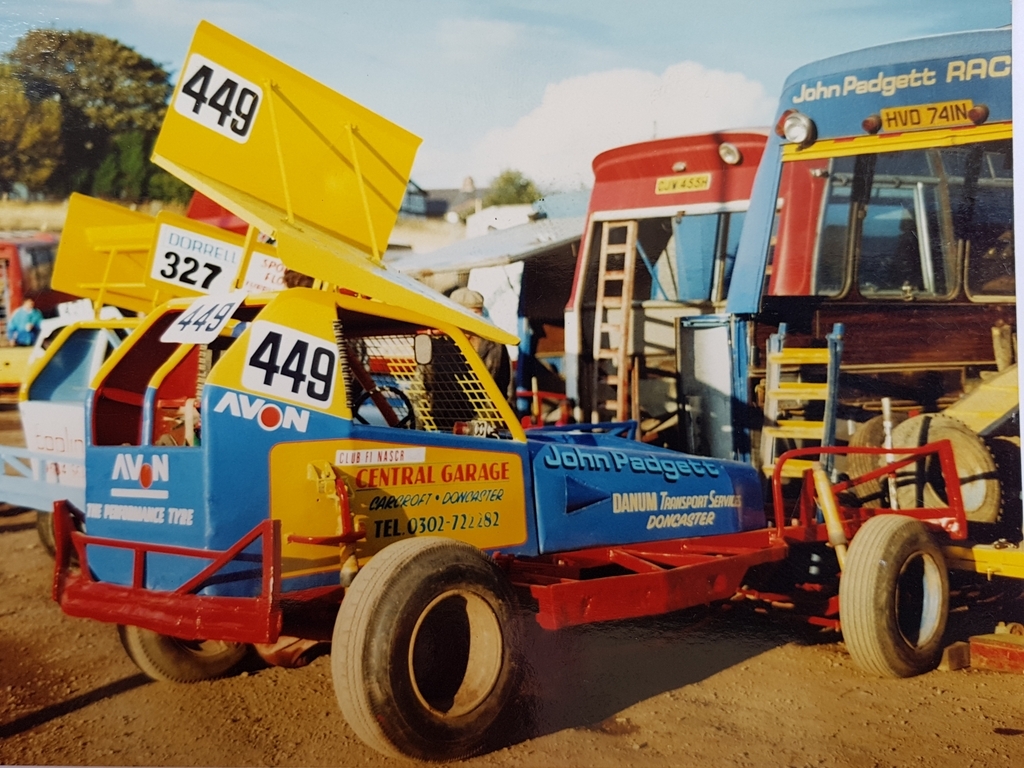 And some racing teams have some very smart outfits 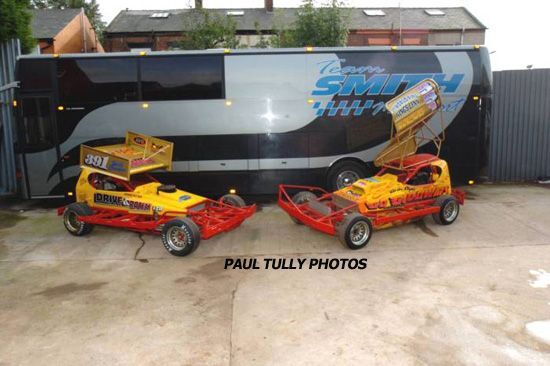 You also have the option of once built - hiring it out to recover some of your costs when you are not using it |
| |
Last Edit: Nov 17, 2019 20:08:29 GMT by Deleted
|
|
|
|
|
Nov 17, 2019 20:05:37 GMT
|
Or there is a red goddess for sale in this very parish  |
| |
|
|
Frankenhealey
Club Retro Rides Member
And I looked, and behold, a pale horse! And its rider's name was Death
Posts: 3,885
Club RR Member Number: 15
|
|
Nov 17, 2019 20:43:58 GMT
|
Or there is a red goddess for sale in this very parish  You need this  (The one at the back) 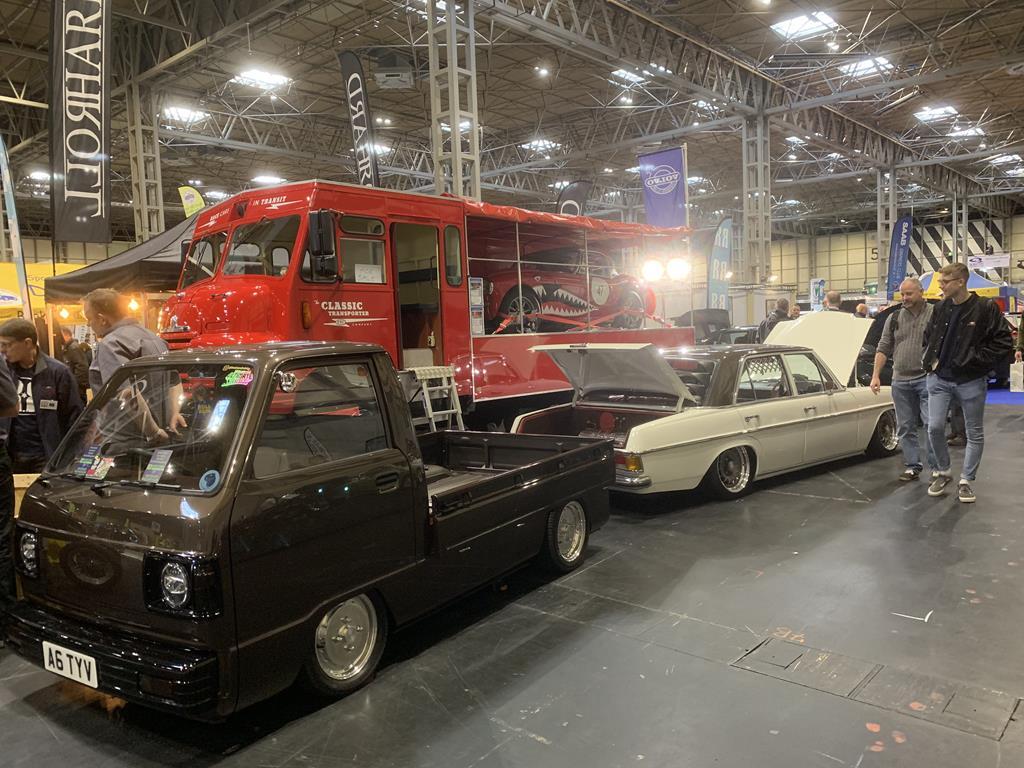 |
| |
Tales of the Volcano Lair hereFrankenBug - Vulcan Power hereThe Frankenhealey here |
|
Thyck
Part of things
 
Posts: 21 
|
|
Nov 19, 2019 22:27:59 GMT
|
Truck with a box body & tail lift is normally what the race guys go for over here - you convert the tail lift with a pair of hinged extending ramps that the car rolls onto - then just use the tail lift has normal to get the car in / out of the truck body - convert the front section to sleeping accommodation with a diesel night heater + small galley kitchen - rest of the body houses the car / tools / wheels and becomes a mobile workshop  Does not have to be has big or fancy has this Buy a coach and convert the rear section (remove the seating floor after the rear spring hangers / chassis ends - build a pair of ramps - roller shutter door on the rear end - partition off to form seating & sleeping accommodation at the front - our old converted coach transporter can be seen in the below pic - you can make them has basic or has exotic has you wish  And some racing teams have some very smart outfits  You also have the option of once built - hiring it out to recover some of your costs when you are not using it Ohhhhh a truck or coach would be awesome...particularly a converted coach, that's right on the bucket list! The thing is, they're quite expensive in Holland where we are. Purchasing price isn't the biggest problem, but the running costs are quite significant... |
| |
|
|
Thyck
Part of things
 
Posts: 21 
|
|
Nov 19, 2019 22:29:54 GMT
|
Or there is a red goddess for sale in this very parish  Or there is a red goddess for sale in this very parish  You need this  (The one at the back) Ah yes, I've been following that thread...what an utterly cool truck! It'll have to stay on the 'cool' list, though, 'cos it's waaaaay down on the 'practical' list  |
| |
|
|
|
|
|
|
Frankenhealey
Club Retro Rides Member
And I looked, and behold, a pale horse! And its rider's name was Death
Posts: 3,885
Club RR Member Number: 15
|
|
Nov 20, 2019 10:37:29 GMT
|
Or there is a red goddess for sale in this very parish  You need this  (The one at the back) Ah yes, I've been following that thread...what an utterly cool truck! It'll have to stay on the 'cool' list, though, 'cos it's waaaaay down on the 'practical' list  Practical is for wimps  |
| |
Tales of the Volcano Lair hereFrankenBug - Vulcan Power hereThe Frankenhealey here |
|
jamesd1972
Club Retro Rides Member
Posts: 2,921  Club RR Member Number: 40
|
|
Nov 20, 2019 10:38:05 GMT
|
|
They can be cheap as a basis but the bottom foot of the wood might be 'damp' in the back of a horsebox...
What are the regulations over there ? Here its complicated with vehicle classification / speed / weight limits. Camper vans / horseboxes can have different speed limits vs trucks etc.
Have you seen Project Escargo from the Binky people ? some good ideas (taken too far as usual).
Nice to see the fab work coming along nicely.
James
|
| |
|
|
|
|
|
Nov 20, 2019 11:04:16 GMT
|
Looking forward to the rebuild and the answer to the transporter conundrum.  |
| |
|
|
|
|
|
Nov 20, 2019 16:38:46 GMT
|
Hey, a fellow Dutchman! You'll find there are quite a few on here... also some uk people working in the Netherlands as well. This sounds like a very interesting project so I for one also bookmarked this. Sommige wonen in Down under  Sommige wonen in the UK... Very interesting project, will follow this. Groeten, Daan |
| |
|
|
|
|
|
Jun 14, 2020 18:58:34 GMT
|
Update time, it already has been a couple of months when Jon made an attempt to get this threat up to date, I guess it is behind again.  I will go a deeper into the fabrication details, As I like to read how you guys all conquer your building problems. As you can see in the photo, the left rear chassis took quite a hit, resulting in a bended gearbox mount and a slightly twisted mounting point in the main tub. 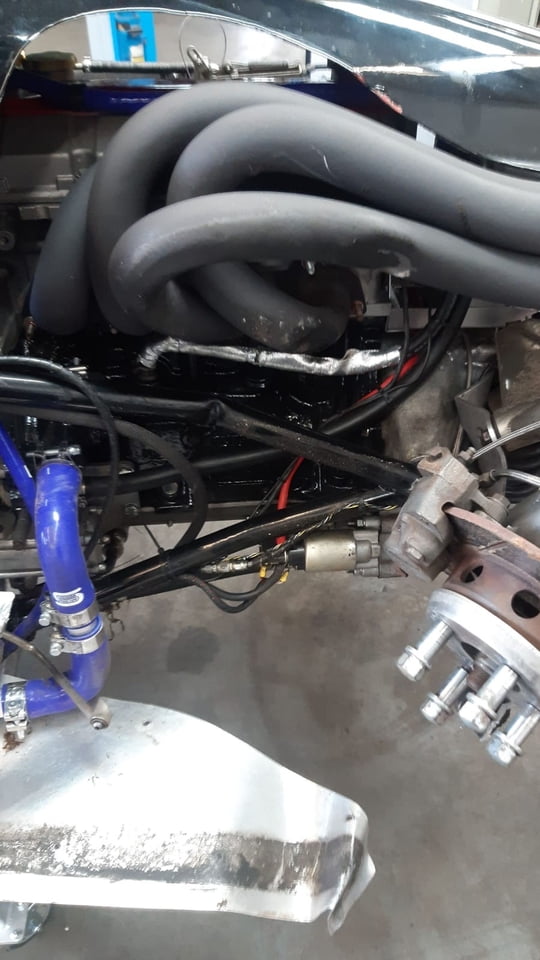 ![]() The right side is undamaged, so it would be easier to make a jig for the right side, take measurements and reverse engineer a jig for the left side, or shouldn’t it be that easy ? Jon was kind enough to dismantle the rear end, so I could get going fixing stuff  the undamaged right side in the jig  fired up the lathe and made the necessary bushings , this is for 1 side   All tubes notched, this is a time consuming job to get it as neat as possible  all welded up So now we have a spare right hand side ( wich we don’t need  )  I took the measurements from this jig, and mirrored it, and made a right hand side jig.    After welding and relaxing the frame ( heating all the welds again with a blowtorch to get al the tension out of the tubes ) this side was done. Moment of the truth:  Looks good  Or doesn’t it ?  That's a fail in my book I suppose I don't have to tell you that guys, that the neighbors could hear me cursing  Back to the drawing board, I could only think of 1 other options to do it the right way. So I bolted the main tub to a big flat surface ( a bed of a very big mill ) mounted the undamaged left side, and made a jig.     That's more like it Of course I made 2, so we have a complete spare set, ready to be powder coated So that's the chassis sorted out then, on to the next part to build Some things a very easy, but somehow I always find a way to make stuff overcomplicated. I needed to weld threated bushings in a 19mm tube, as my arms don’t make a 360 degree cirkel, I made a welding manipulator, nothing fancy, just a cheap chinece rpm controller, a 12v wiper motor and a 1:10 tranferbox of chinabay . A couple of hours later, I had a working welding manipulator. Even painted it green, fits the rest of the machines I have.   So these parts were easy to make  I ordered threaded bosses from rallydesign, and the correct size tube, fits like a glove and 2 sets of tie rods  Next on the list, upper wishbones. They took some time to get the right  . |
| |
Last Edit: Aug 3, 2021 18:55:42 GMT by fat-stig
If it doesn't fit you need a bigger hamer
|
|
|
|
|
Jun 14, 2020 23:25:15 GMT
|
Excellent fabrication, as usual! Any news on a transporter?  |
| |
|
|
|
|
|
Jul 14, 2021 19:11:39 GMT
|
 OMG it has been months since I made an update, sorry guys. wishbone's was next on the list The wishbone’s are made from sheet steel folded into a box shape, which makes them light and stiff. So it was best to copy that design the best I could. I made a jig from the undamaged side of the car and just flipped the jig to make the left side. Again I made a double set, so 2 new lefts and 2 new rights upper rear and the same on the front . So in the end we got a complete set of wishbone’s all round as spare.  The rear jig. The original was built entirely out of sheet steel, but I found it impossible to get a nice radius bend with the tools I have available so best to keep it within my capabilities. So the wishbone’s are made out of thin wall chromoly tube covered with thin steel sheet   Made a cardboard template, so I could make a drawing of it and cut it out with the plasma table  Trial fit   Fully welded and ready to be polished. The front upper wishbone where simpeler to made, being narrow, so these are exactly the same as the original one’s .     In the jig ready to be fully welded  Made a little press tool to give the bracket the right shape    All done and ready to be nikkelplated Somewhere around this time I bought a CNC mill ( one can never have to many tools ), witch came in very handy to mill out the bearing pockets ( they where a little distorted from the welding heat )   With all the wishbone’s finished, It was time to make the rear wishbone stay. It is a tubular frame which mounts to the gearbox . Again I first made a jig from the undamaged side and then mirrored it for the other site.   All the mounting bushes were made on the lathe.   tube’s are made from chrome moly tubes, so they are light and strong.   After completion of these cages I mountend them on the car and made them red hot with a torch, so that all the welding tension could escape . Ready for final polish and nickel plating( al tube’s were polished in the lathe prior to welding ).   Time to do a dry build before plating and painting.  With most of the big things done it was time to start looking at the exhaust. The exhaust fitted on the car wasn’t the original one, 2 of the pipe’s had some big dents in it , so we decided to make a completely new exhaust manifold. but this time inside the body, as per original. As I have made a couple of exhausts in a trial and error kind of way, I was keen on doing it a smarter way this time. So I bought a 3d printer and had it print exhaust modeling blocks ( free to download on grabcad )for days. With these modeling blocks it is very easy to make and adjust the manifold as you go. After you finalize the design you can easily copy it to mandrel bends by using a band saw and a saw jig.   After an hour of modeling .   slowly transferring it to stainless steel .  exhaust manifold ready for final welding with backing gas.  Next update in a couple of days |
| |
If it doesn't fit you need a bigger hamer
|
|
mylittletony
Posted a lot
  
Posts: 2,421
Club RR Member Number: 84
|
|
|
|
|
Truly excellent stuff!!
|
| |
|
|
|
|
|
|
|
The exhaust was one of the last bigger fabrication jobs. After some investigation on how to nickel plate parts, I decided it was wise to outsource the plating. After calling a couple of shops who plate it became obvious that the most time was spent on sanding and polishing the parts prior to plating. So out came the DA sander, and hours of sanding began.  Working my way up from 120 grit to 600.    After sanding I got the buffing wheel on the workbench and the real dirty job began. I can assure you, that after a day of polishing metal, you look like you came down a chimney  . It is not polished to chrome look gloss, it is a race car and they were never made for show.  This is how they came back.  all inside cavities weere given a good coat of dinitrol      New parts were ordered and starting to arrive. |
| |
If it doesn't fit you need a bigger hamer
|
|
|
|


 (The one at the back)


 )
)


