|
|
|
|
|
|
Just read through the thread, some great things going on here. I'll try to help you with some of your questions.
For engine mounts I'm not 100% sure but I suspect that you can use the mounting arms from a r107 300sl, with the w108 rubber mounts. Failing that custom arms are the way to go.
The m104 is meant to sit at angle with the sump flat to the ground, do not stand it upright.
The gearbox you have is the correct one to use, it is from a m111 4cyl. The v6 gearboxes have a completely different bell housing pattern and don't fit (m112 and m272).
You mentioned about fitting efi injectors into the intake. If your planning on going efi you would be better to use the later engines that use efi already, it saves alot of work. The inlet on those is smaller so will help with your space issue.
Flywheels are a bit crucial to your swap. If your keeping the cis injection then the flywheel you've bought is perfect. If your going standalone then the flywheel from a late m111 will be better as it has a 60-2 trigger wheel built in. (the m111 crank sensor is a perfect fit in the m104 block to read it). If you swap to a later m104 engine (m104.991 onward) and want to use the factory efi, the flywheel must have the 3 timing segments AND the cps magnet for the ignition timing to work.
The cis wiring harness needs 3 wires powering up to run the engine, nice and simple. The efi engines need a little more work but is fairly straightforward.
Hope the above is of some help.
|
| |
1988 Mercedes w124 superturbo diesel 508hp
1996 Mercedes s124 e300 diesel wagon
1990 BMW E30 V8 M60 powered!
1999 BMW E46 323ci project car
|
|
|
|
brc76
RR Helper
Posts: 1,108 
|
|
Mar 14, 2019 16:11:45 GMT
|
|
Old transmission is a 716.628, new is a 716.648. I had to do some work with sandpaper to reveal the part numbers
The 716.628 is from a m271 engine I now see. Ugh. At least the 648 will work nicely
|
| |
Last Edit: Mar 14, 2019 16:14:32 GMT by brc76
|
|
|
|
|
Mar 14, 2019 20:05:00 GMT
|
Old transmission is a 716.628, new is a 716.648. I had to do some work with sandpaper to reveal the part numbers The 716.628 is from a m271 engine I now see. Ugh. At least the 648 will work nicely The bolt patterns are the same so either will work, it's the ratios that are slightly different. As long as the box doesn't come from a v6 your fine. |
| |
1988 Mercedes w124 superturbo diesel 508hp
1996 Mercedes s124 e300 diesel wagon
1990 BMW E30 V8 M60 powered!
1999 BMW E46 323ci project car
|
|
|
|
|
Mar 18, 2019 16:12:49 GMT
|
Same engine as I've put in mine, i will keeping a eye on your progress.  |
| |
Instagram - Woodym3evo
W114 M104 69 Merc
1 Series 135i M-Sport
#thegovernorsclub
#TeamAF
#baggedbenzuk
|
|
madmog
Club Retro Rides Member
Posts: 1,160
Club RR Member Number: 46
|
1966 Merc 250s M104 madmog
@madmog
Club Retro Rides Member 46
|
Mar 19, 2019 20:54:35 GMT
|
I got the column out as well, so will see what will happen there. I have this bizzare idea of converting the column shifter from the Auto to work the manual gearbox. I can visualize what would be needed to do this, but right now I think it's beyond my pay grade. Hi, Just spotted this. This could be relatively easy and definitely in your pay grade. IF you can bear to use a 5 speed manual Mercedes gearbox rather than a 6. You should be able to find plenty of used 5 speeds out there, just a question of the ratios and strength. M104 engine probably came with a manual option somewhere. If not something off a M103 or M111. Anyhow, a 5 speed for a slanted inline engine (not V6) is not that different to the original manual gearboxes for your ancient engine. Three levers on the side of the gearbox: old 1:2 3:4 R: New 1:2 3:4 R:5 Mercedes didn't offer a 5 speed column shift, I think column shift was seen as a bit outdated and 5 speed new and sporty. Anyhow the 4 speed manual column shift mechanism can be adapted for a modern Merc 5 speed, I've done it albeit on a /8 W114 Okay, you've LHD auto trans column yes? That has only one plane of movement and you need two. If you get the LHD manual column shift - let me see if I can find one on German Ebay Something like this www.ebay.de/itm/MERCEDES-W110-Heckflosse-Original-Lenkradschaltung-Lenksaule-Lenkung-1114622995/253296052214?hash=item3af99f07f6:g:O8oAAOSw401aJq7CThe magic word is "Lenkradschaltung" You should see three levers with balljoints at the engine end of the column shift mechanism. (Auto has one only) These connect to gear lever rods that connect to the three levers on the side of the gearbox. In my case the gearbox rod for the lever nearest the engine on the old gearbox fitted the new gearbox with no modification. And the new gearbox fitted the old slider mounts on the body too. The other two rods needed lengthening. A bit of trial an error with coathangers got me in the ballpark. And there's adjusters on these rods. Plus I needed to put the balljoints on the other side on Items 149 and 150 on this diagram: 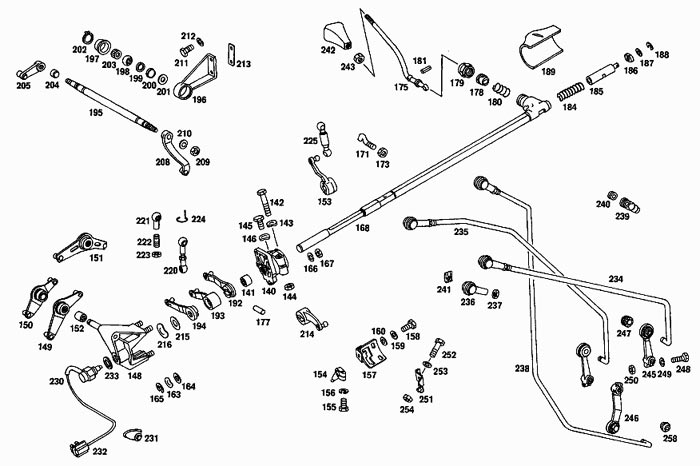 Or have a look here for pictures and using Chrome you can google translate. www.strichacht-forum.de/knowhow-v2/index.php?title=Einbau_LenkradschaltungIt looks more complicated than it is. Don't let the exploded diagram put you off. It's actually a simple set of levers and rods connecting the steering column shifter to the gearbox. There may be detail differences between this and your model and the more common W114 or W115 or they may be somewhat interchangeable. They turn up cheap if you lurk long enough. Actually, I _may_ have a spare W114 column shift as I'm adapting from manual to power steering which has a different steering column. I can't remember if I got the whole thing or just the shorter column. I don't suppose you're in Essex or London you could at least take measurements to see if the column mechanism is interchangeable between models. 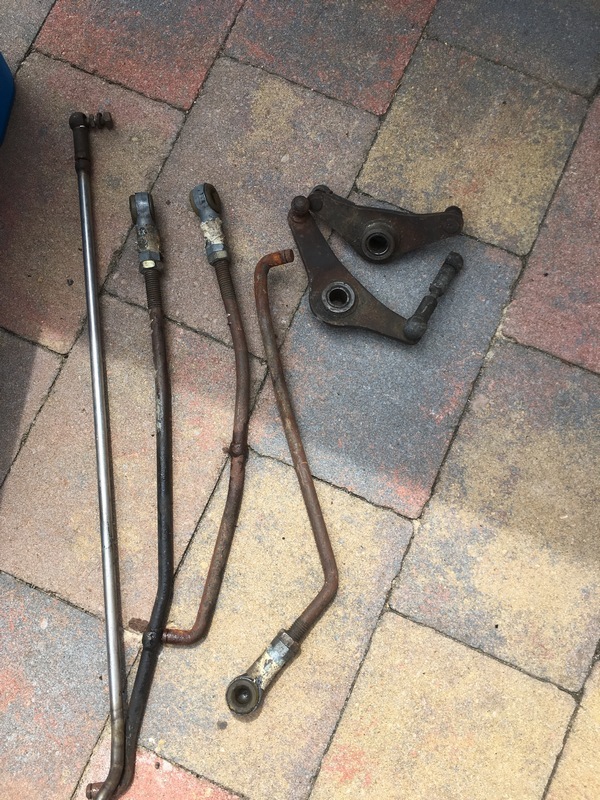 On the image above, ignoring the shiny rod, the other 3 connect to the gearbox levers on the side of the gearbox. The two longest needed to be a bit longer. The two levers had the balljoints at the rod end put to the other side. That's it. Oh and the gearbox mounted to the body will kind of force the engine to the correct angle |
| |
|
|
brc76
RR Helper
Posts: 1,108 
|
|
|
|
|
I've been thinking a lot about the gear change, I've got the 6 speed box in place, its heavy. I don't want to take it out again....
Joking aside, I'm over in England every 6-8 weeks on average, It's still in my thought process for a future project, but I think I'm going floor shift at the moment. The 716.748 linkage is a nasty affair of cast aluminum alloy and rust. I've heard rumors that people have adapted a E36 shifter but while investigating that, I realized that it's similar to the shifter used in the late W110 cars with a floor shift. My 1st w108 ( the brown cop spec one on page one) had that transmission arrangement rather than the one more commonly found in w108's I'm going looking in the basement tomorrow to see if I can find it, l and also I think I may have cut out the transmission tunnel with it. If I can shorten that, my problems have been solved. well, that problem anyway.
So I have modified the crossmember and welded new engine mount locations to suit the m104. That's painted and the engine is currently sitting about 20mm above the crossmember. I could lower it a little more, but lets see where this brings me. I can get the transmission bolted up and had to do some adjustment to the transmission tunnel where the linkage bolts to the side of the transmission. With a 4lb lump hammer. Only after that did I realize about the linkage. Oh well. That bit needed clearance anyway for the hydraulic line.
I also found a vintage Mercedes place in Harvard, Mass that one of the Techs was selling a 3.27 axle, as it was surplus to requirements. He was in the middle of putting a w210 E55 drivetrain in a late w108. I could have hoped for a LSD, but a 3.27 rear end is still a 3.27 and nothing to be sniffed at if one is found. I already had the 4.08 in the grey car and a 3.92 from the brown car. neither was going to be ideal with on the highway, but the 3.27 will be much much better.
So left to do right now is to make a new transmission mount and then figure out the shifter. Then driveshaft. then electrics. then cooling, then rust repair, then.....
My Clarke 135te has been a champ. after 6 years not used, crossed the Atlantic, it started working without drama or problem. It seems to not care about the AC frequency difference between the UK and USA (60 vs 50 hz). Genius!
|
| |
Last Edit: Mar 20, 2019 2:28:10 GMT by brc76
|
|
brc76
RR Helper
Posts: 1,108 
|
|
|
|
Found all the manual transmission gubbins from the brown car. It looks possible to shorten as appropriate to fit the 716.648 box. I'll need to figure out how to get the side arms positively located on the box and also how to mount either the K4A025 selector end onto the 716.648 or modify the 716.648 selector to accept the K4A025 linkage. 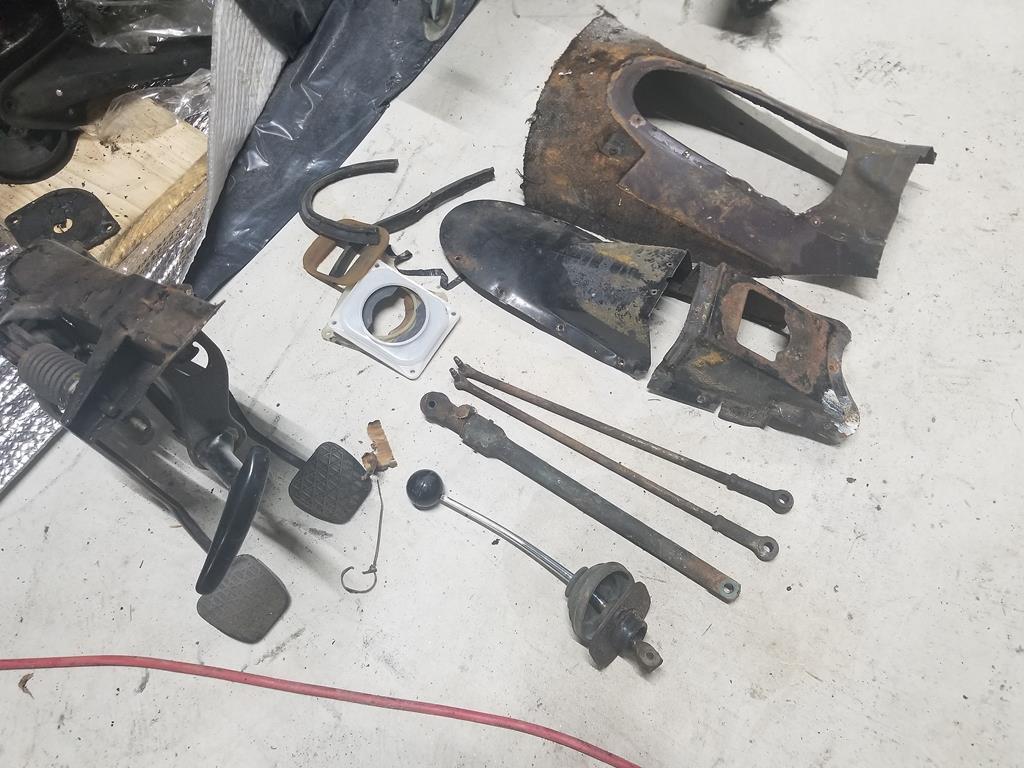 |
| |
Last Edit: Mar 21, 2019 1:30:44 GMT by brc76
|
|
|
|
|
Apr 25, 2019 13:50:33 GMT
|
|
Tiling done??
|
| |
|
|
|
|
|
Apr 29, 2019 21:54:35 GMT
|
|
Nice to see you're still working on this. I've stopped all of my projects currently due to life and work. That M104 looks cozy in there!
|
| |
'85 Euro 190E 2.3-16 '84 Euro 500SE ~100k miles '51 Euro 170S M117 Swap Project?! '97 Jeep Wrangler Sport ~42k miles '09 E350 ~51k miles '98 Dodge Durango SLT+ 5.9L Magnum V8 ~Josh |
|
brc76
RR Helper
Posts: 1,108 
|
|
|
|
So the tiling is done! So is the trim, which I had to make to match ( or at least give the appearance of matching ) the rest of the house, underfloor heating, painting, made some steps and I'm sure several other things, like working on the acre of land our house sits on. I'm making excuses, so I will move on. I made a crossmember for the gearbox. It bolts up and I think the gearbox will not interfere with anything. The output shaft seems to be pretty inline with the driveshaft carrier bearing. I will probably need to cut the top of the gearbox tunnel for the linkage, but nothing too daunting. I've made the gearchange mechanism and I used the spare 6 speed as the mock up. I'm really happy with that. I managed to use the W110 style linkage by shortening the links and I also used the m10 bolt from the 6 speed to mount the w110 shift link. They took to welding very well and I beveled the joint so I would get it as solid as possible. I can use the stock bushings and that seems to make me happy! The only downside to using the w110 stuff is the lack of a reverse lockout. Will this be a problem? Time will tell?!?!?!? 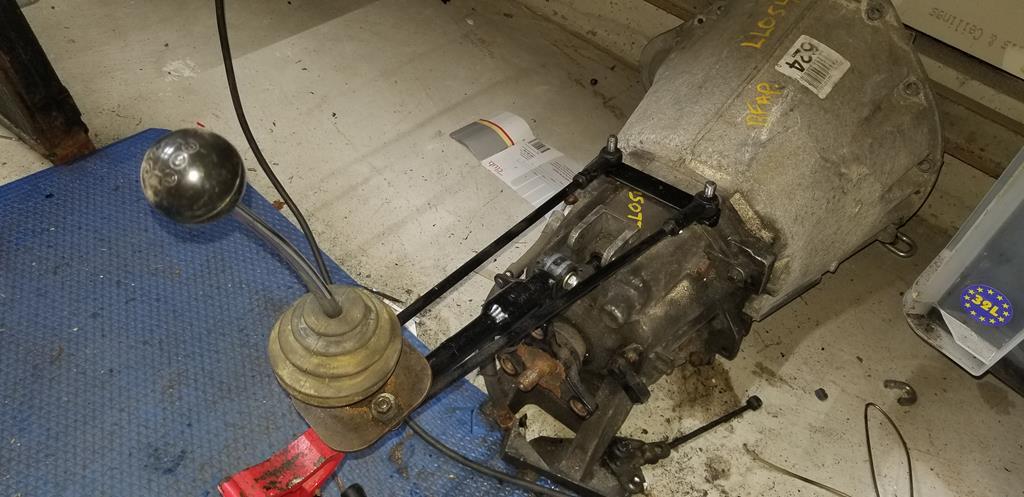 Removed the battery tray, cleaned up some corrosion under that and then test fitted the inlet from the M104. Did it fit? No it did not. Fouled on the brake MC slightly, but fouled the inner edge of the chassis leg rather more. I have 305mm (or 12" for those more local to me) of clearance to work with. My solution is to shorten the intake from the middle, use 50mm ID hose to join the runners back and call it good for the short term. I don't like it, but I will plan on making a new intake in the future. I've also modified the injector bosses to accept modern injectors, I just need to order fuel rail and injectors. 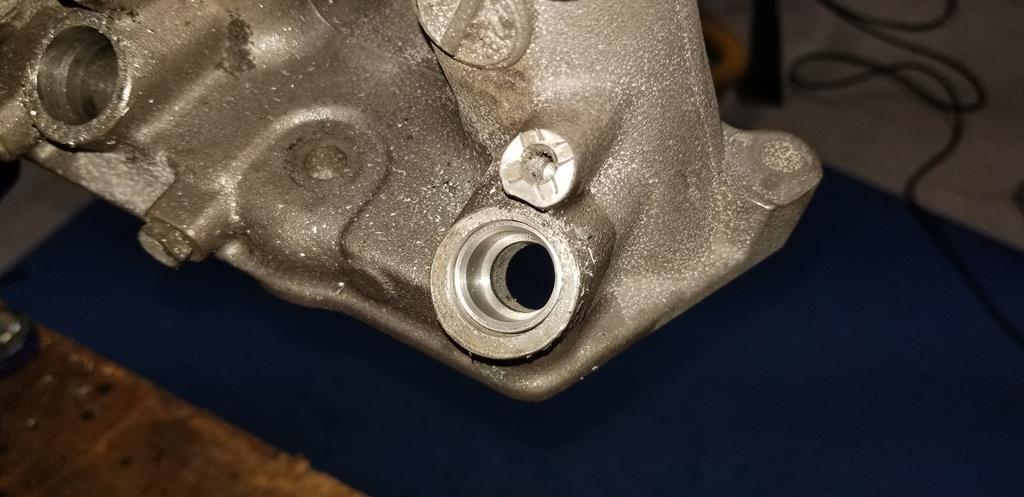 That is all! |
| |
Last Edit: Jun 23, 2019 3:06:20 GMT by brc76
|
|
|
|
brc76
RR Helper
Posts: 1,108 
|
|
|
|
|
I have started getting the wiring loom going as a "I can do this in the evening and not make enough noise with the grinder or welder to annoy anyone" job. I'm actually quite happy with wiring.
But, I finally got my hands on a later HFM fuel rail with the stock injectors. I made some new brackets to fit to the CIS-E intake, all on the bench, so I can get the injector connectors all fitted and then wired to the correct lengths. I started to put the intake back on the car, it now won't fit. The fuel regulator is interfering with the water pump. I thought I would reverse it, the regulator hits the oil filter housing. FFS. I don't really want to spend $170 on a billet aluminum fuel rail that may or may not fit. I also looked a an entire HFM intake. I would still need to shorten it to fit and I think it would still hit the water pump. The online EPC is down at the moment and I can't see if there is a different water pump for the 2 models, however I'm pretty sure that they are different.
|
| |
|
|
|
|
|
|
|
I have started getting the wiring loom going as a "I can do this in the evening and not make enough noise with the grinder or welder to annoy anyone" job. I'm actually quite happy with wiring. But, I finally got my hands on a later HFM fuel rail with the stock injectors. I made some new brackets to fit to the CIS-E intake, all on the bench, so I can get the injector connectors all fitted and then wired to the correct lengths. I started to put the intake back on the car, it now won't fit. The fuel regulator is interfering with the water pump. I thought I would reverse it, the regulator hits the oil filter housing. FFS. I don't really want to spend $170 on a billet aluminum fuel rail that may or may not fit. I also looked a an entire HFM intake. I would still need to shorten it to fit and I think it would still hit the water pump. The online EPC is down at the moment and I can't see if there is a different water pump for the 2 models, however I'm pretty sure that they are different. The hfm fuel rail shouldn't hit anything in your application, the water pumps are different but it's the outlet for the top hose that changes. The .980/1 has it going into the side of the head like a m103, the .990 upwards has it going into the front of the timing cover. Could it be the injectors are now sitting to low in the intake where you have machined them out? I'll check later but if that's the case there are bushes available to fit the efi injectors into the cis manifold. The hfm inlet manifold wont help you as the bolt pattern is different for those. Hope that helps. |
| |
Last Edit: Jul 5, 2019 8:46:06 GMT by carat 3.6
1988 Mercedes w124 superturbo diesel 508hp
1996 Mercedes s124 e300 diesel wagon
1990 BMW E30 V8 M60 powered!
1999 BMW E46 323ci project car
|
|
madmog
Club Retro Rides Member
Posts: 1,160
Club RR Member Number: 46
|
1966 Merc 250s M104 madmog
@madmog
Club Retro Rides Member 46
|
|
|
|
If you can't make it fit with the Merc waterpump, perhaps a Davis Craig electric one can be mounted somewhere more convenient.
|
| |
|
|
brc76
RR Helper
Posts: 1,108 
|
|
Sept 27, 2019 0:37:23 GMT
|
Long time no post! Lost motivation for a bit, worked on the house for ages, painted the outside of the garage and mudroom, so they don't start rotting over the coming winter. Tiled extension, did all the built in cabinets and trim. Wiring is about 1/3 done, I also have a PI3 with a monitor setup to work with the MS3X, all working fine. I have a solution to the fuel rail and I'm making a more well thought out intake so I can clear the brake booster and all the relevant "stuff I don't really want to move". While waiting for some aluminum to cool after soldering, I thought I would start on the O/S sill that is missing the leading and trailing end. Started clearing off the paint where I had planned on cutting the ends off. I have a replacement outer sill for both sides and had planned to just use the ends, Well once I started poking around a little more, It looks like I'll be much better off using the whole sill replacement panel. Many, many holes. 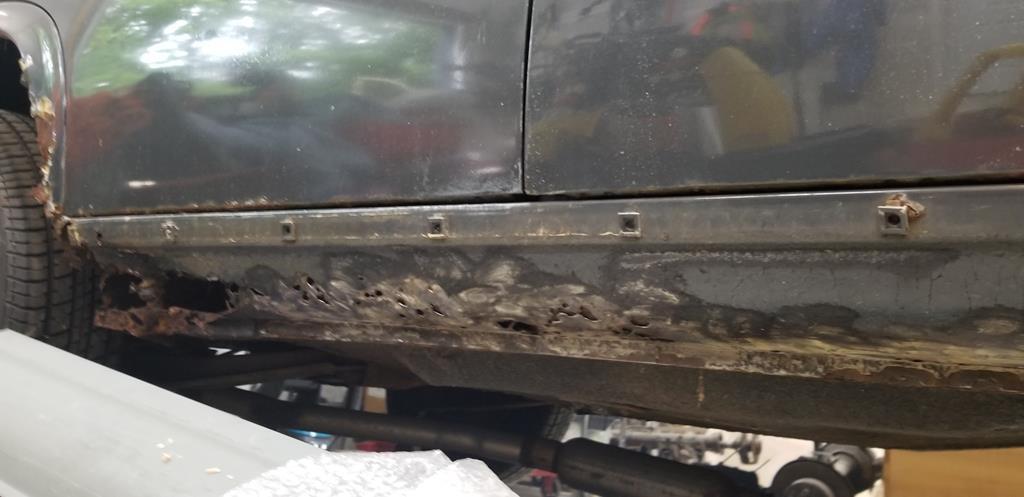 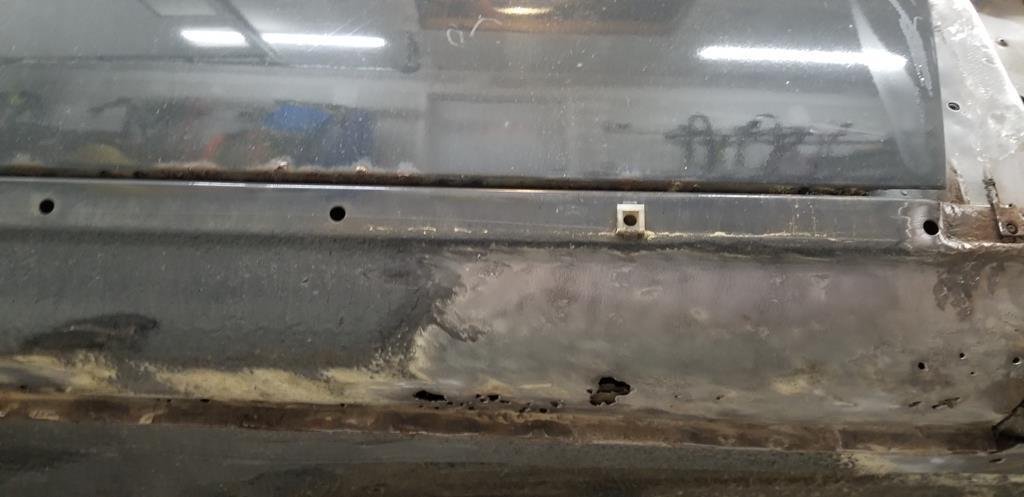 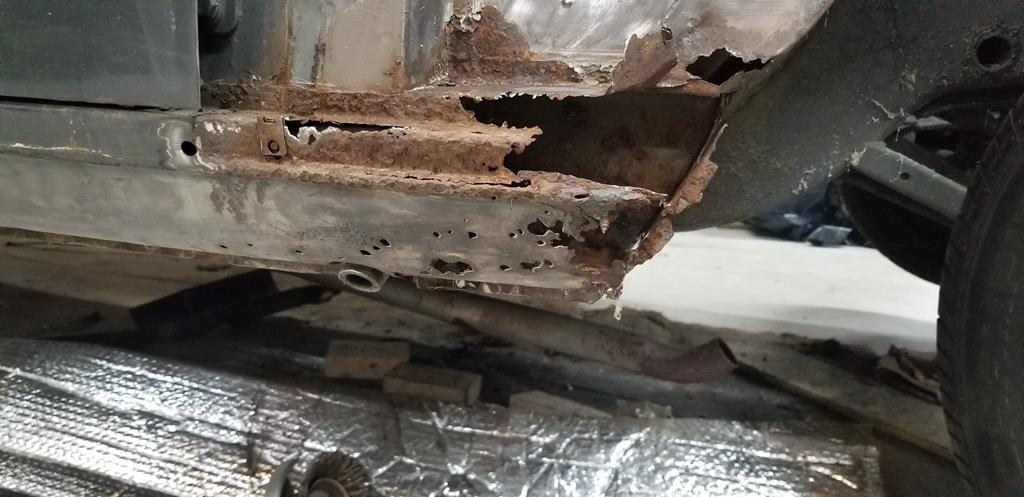 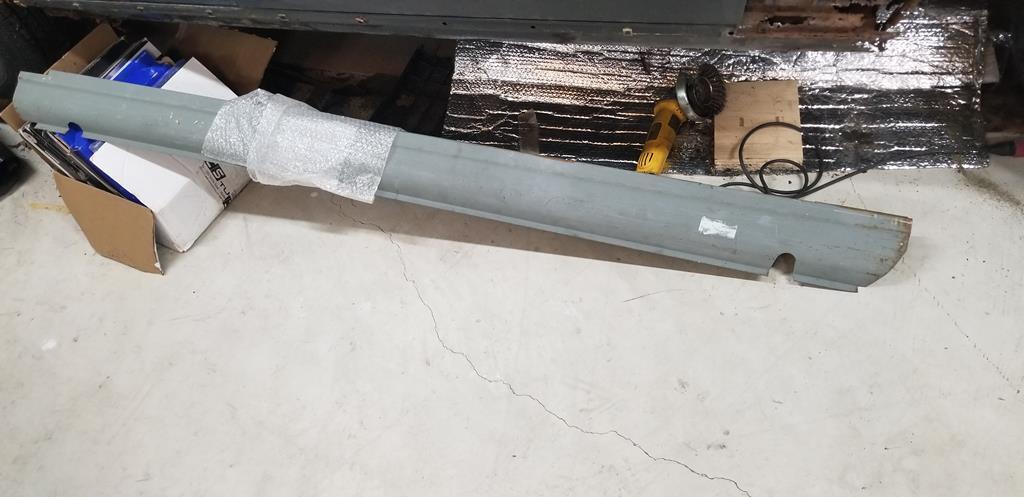 Also some rust at the top of the inner wing on that side, 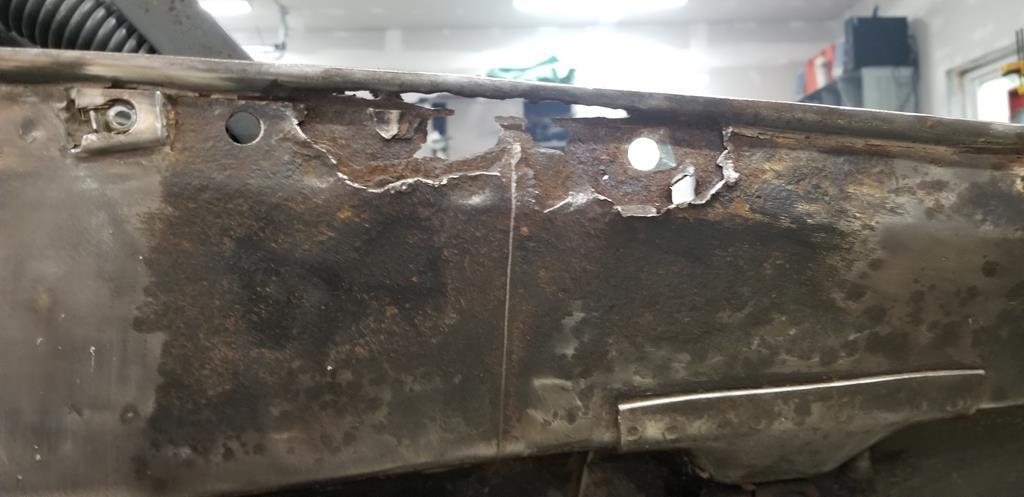 Everything else under the inner front wing has been surface rust and cleaned off easily. The worst part is the factory underseal. Nothing like hot stringy death covering everything. mmm. I'm not sure if I will need to brace the door openings or not. If I'm only replacing the outer sill, do I need to box the openings? I've just placed an order for some new spot weld cutters and forgot to order some weld-through primer. Best do that now! D |
| |
Last Edit: Sept 27, 2019 0:51:25 GMT by brc76
|
|
|
|
|
|
|
|
Glad you are back in the saddle on this. It's not easy to maintain momentum when the rest of life is making demands on you.
Keep going!
|
| |
|
|
brc76
RR Helper
Posts: 1,108 
|
|
|
|
Patched a hole in the firewall, that someone had drilled to get at the blower motor. It's not pretty as tonybmw, but it'll do! 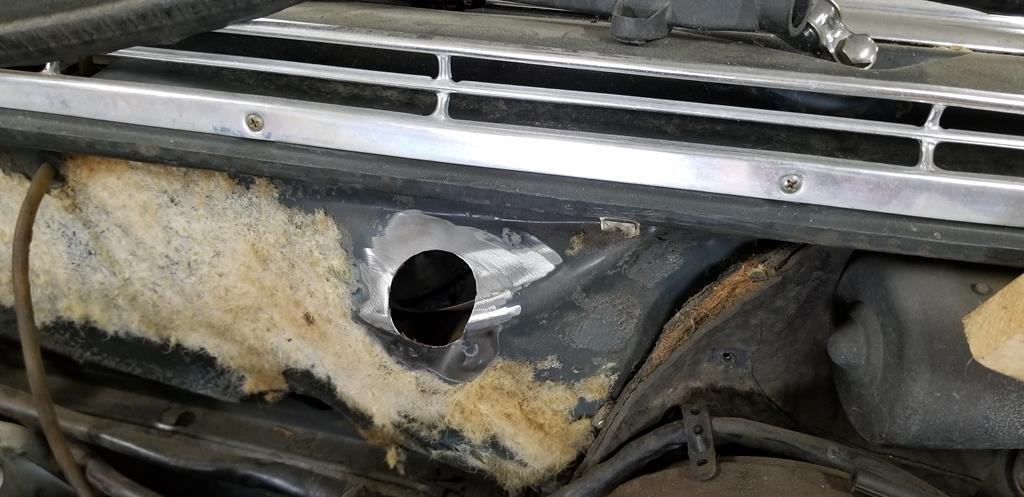 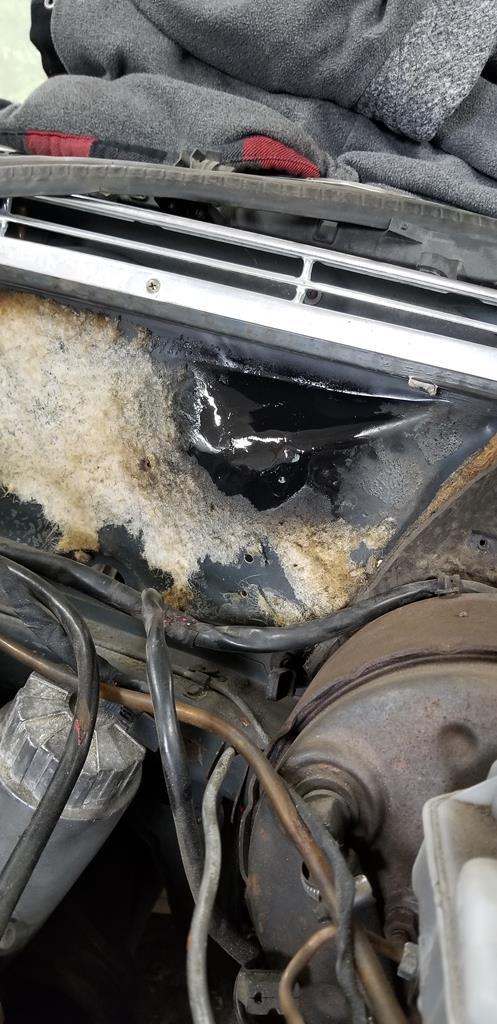 I also have the holes from the dealer installed A/C, I plan on doing a vintage AC later, so I may leave these for now and just treat the rust below. 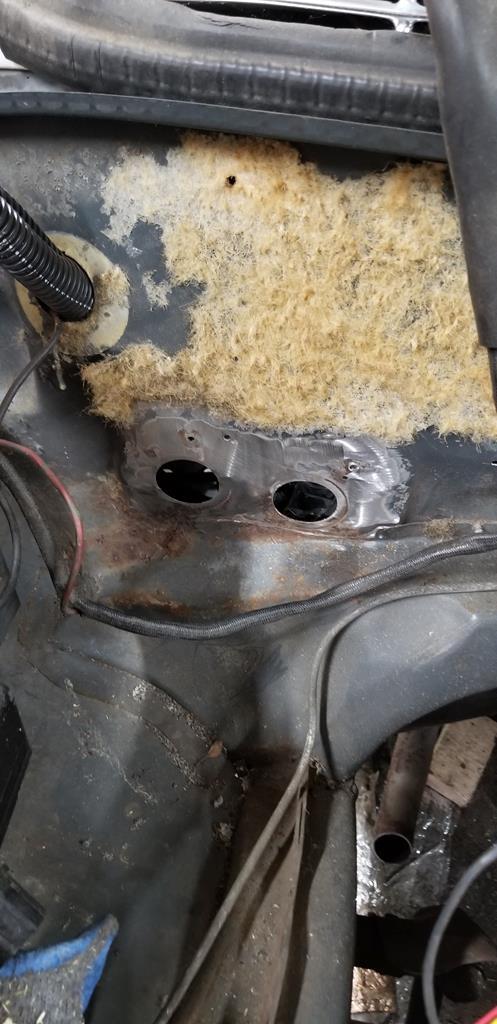 Spent the evening drilling and chiseling the spotwelds at the bottom of the sill. I blunted the spotweld bit so resorted to using a combination of metal bits and the spotweld bit to get it done. 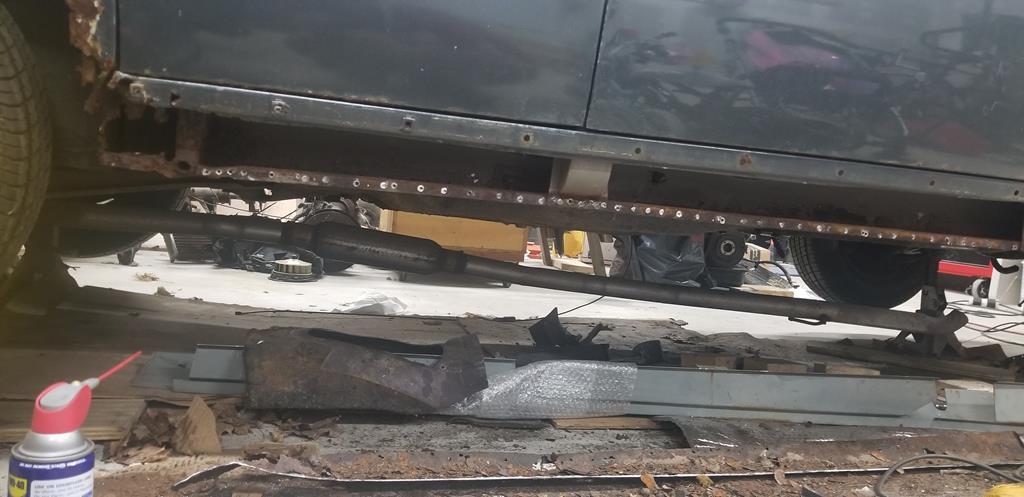 Lots of rust, mostly isolated to the outer sill, there are a few crusty bits but that'll be a patching rather that replacement. I ran a cutting disk along the sill so I could get a look inside, the top half of the sill is still attached to the car ( apart from the leading end, that is out too) 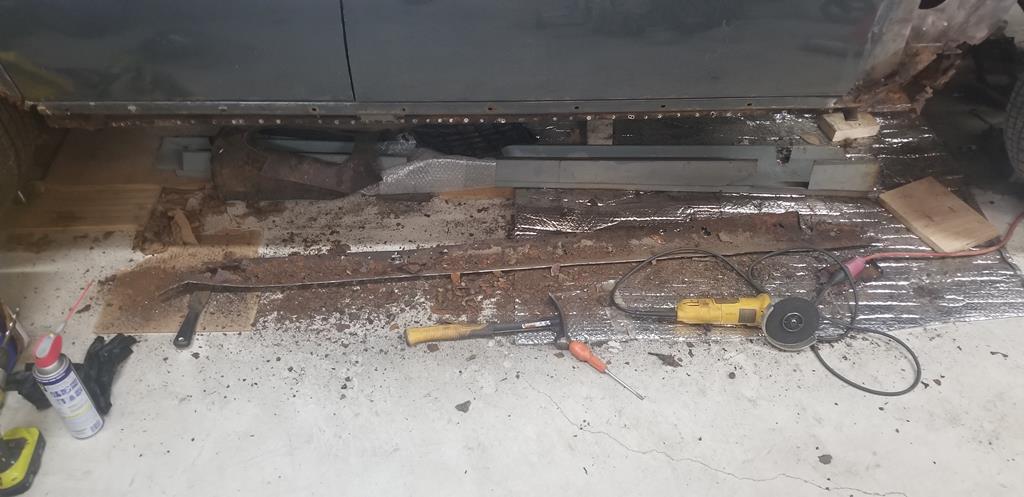 I flipped the sill over so you can see just how bad that was. 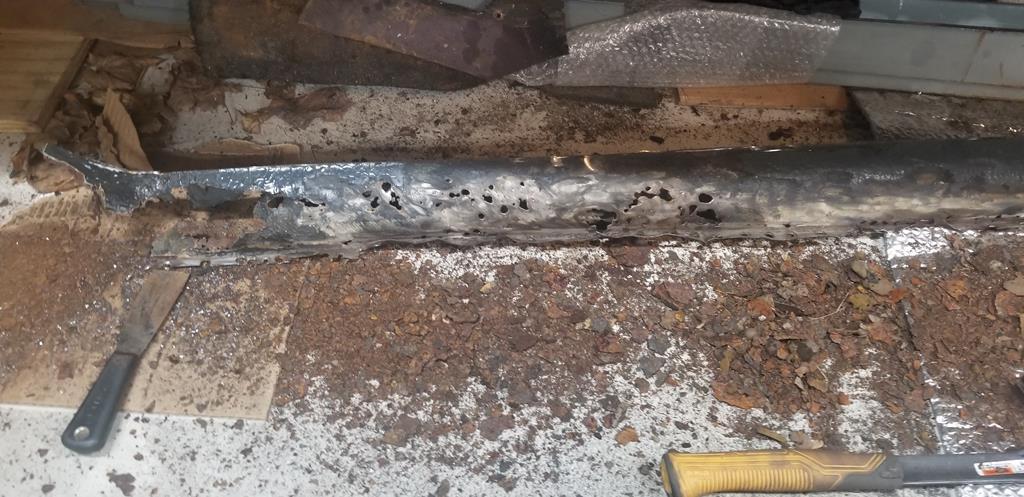 The leading edge of the inner sill has a hole right in the back corner and also anothe one at the top of the outer sill upper plate where it meets the inner kick panel. 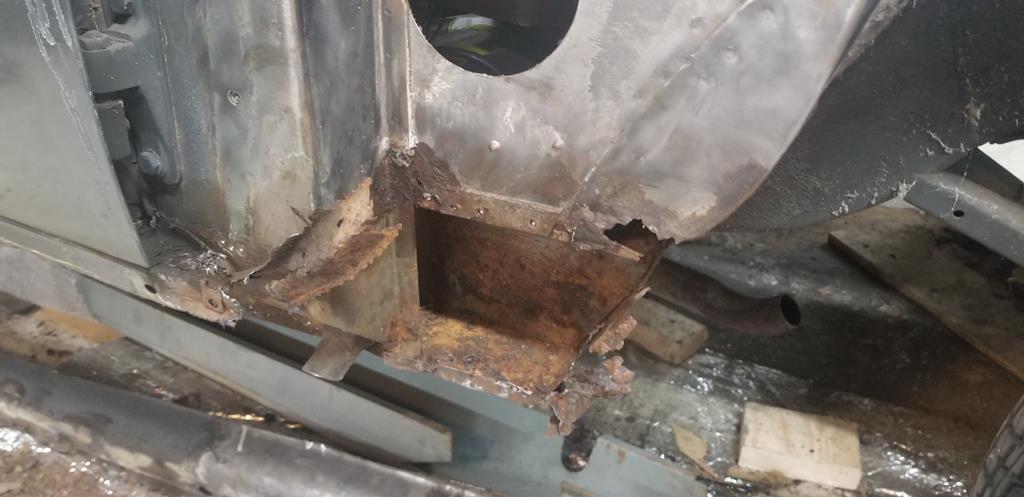 So I guess the question now is do I A) graft in the lower half of the outer sill , as the top half is totally fine, and this would stop me having to drill out the thousand spot welds and disturb the factory work, or B) keep removing it all? |
| |
Last Edit: Oct 3, 2019 1:50:34 GMT by brc76
|
|
madmog
Club Retro Rides Member
Posts: 1,160
Club RR Member Number: 46
|
1966 Merc 250s M104 madmog
@madmog
Club Retro Rides Member 46
|
|
|
|
I can't exactly visualise what part would remain but if it is sound and a properly joined bit of metal that would not create a stress concentrator or weakness I'd add the metal and not cut more than you need to.
I had a similar situation a few weeks ago, and was lucky enough to have a bodyshop pro look at the damage. They said, in a nutshell, that rust treating the surface rust with phosphate, replacing the bad metal and waxoyling will last longer than I will. Cutting out every panel that has a rusty bit will turn into an 80,000 hour project (seems excessive but it's what they said - perhaps taking into consideration I'm working on the driveway) as I chase rust everywhere. They put thousands of hours into early 911 bodies to make perfect but the value of the finished product justifies that level of work.
Or, here's a thought experiment. If you couldn't get the panel and had to make the piece from scratch, would you make the whole thing or just cut out and replicate the rusty patch with good metal?
|
| |
|
|
brc76
RR Helper
Posts: 1,108 
|
|
|
|
Bit more tonight, a bit lax on the photo work. Cleaned back the trailing edge of the sill, and wheel arch so I can start to see what is what. Everything behind the rear jack stand was very thin, holed or both. Remade the base of the inner sill, inner part of the inner arch and return for the jacking point. 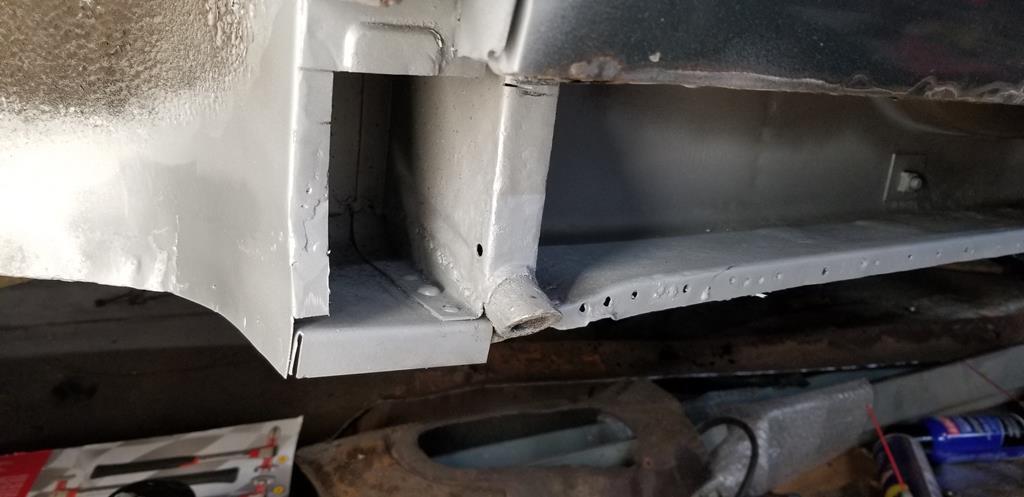 I need to get the outer sill in place so I can get the inner wheel arch and sill end closer CAD template made. Took the passenger side front door off so I could get at the last bit of rot on the outer sill, or so I thought. Cutting out a 30mm x 10mm rectangle turned into chasing holes covered by filler. 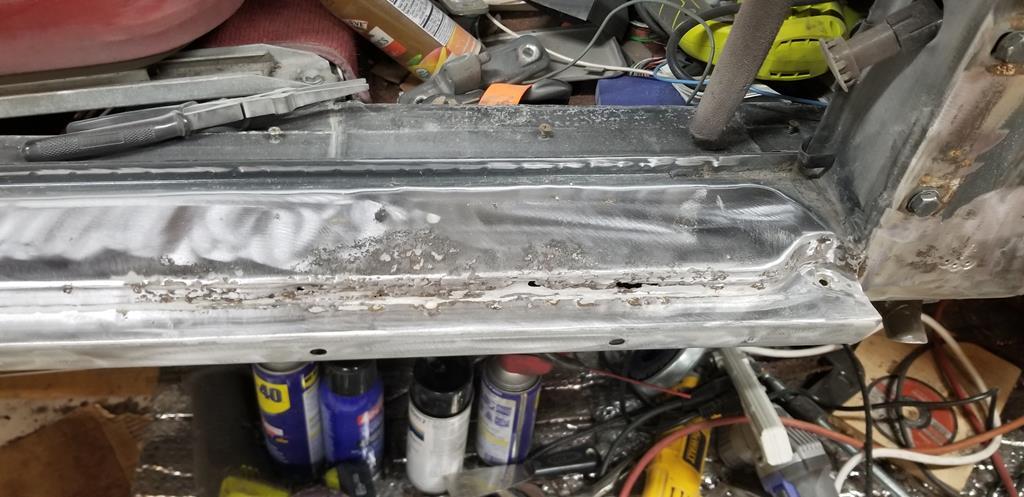 Cleaned up and tuned out the lights for the night. I'm very glad I didn't start cutting up the replacement sill already! |
| |
Last Edit: Oct 11, 2019 1:48:40 GMT by brc76
|
|
brc76
RR Helper
Posts: 1,108 
|
|
Oct 17, 2019 15:52:39 GMT
|
|
Still going. Spent an extraordinary amount of time beating on the sill to make it fit. Genuine Mercedes replacement, slightly different profile. Ugh.
I also made a good start of rebuilding the front and trailing ends of the inner sill.
|
| |
|
|
brc76
RR Helper
Posts: 1,108 
|
|
Oct 28, 2019 21:41:30 GMT
|
|
|
| |
Last Edit: Oct 28, 2019 21:41:47 GMT by brc76
|
|
|
|


