|
|
|
|
|
Don't know how I missed this so far, but now I know about it ... bookmarked!  First thing I did when I got mine was to buy 2 new sills, it's a good place to start for rust repairs  Keep up the good work, shout if you need any parts (or factory workshop manuals / parts books  ) as there are a few Rootes fans on here.  i might have to take you up on that offer later on. but untill ive sorted out my sill issue (its not good, will post pictures this afternoon) i don't want to buy any more panels just incase i cant save the car.
however if i can save the car i will be in need of a passenger side front wing, so if you could keep your ears open i would be very appreictive. Your thread has been a very good source of information and its nice to know some one else is actively restoring these cars. (means i can pinch your ideas  ) ) |
| |
1972 viva 'Sparky'
|
|
|
|
|
|
|
Jan 21, 2015 18:41:19 GMT
|
... if i can save the car i will be in need of a passenger side front wing, so if you could keep your ears open i would be very appreictive. Your thread has been a very good source of information and its nice to know some one else is actively restoring these cars. (means i can pinch your ideas  ) Shame it's not the drivers side you're after - I have a spare NOS drivers steel wing (see sales ad in my sig  ). The shabby wings from mine may be replaced soon and would then be available (& cheap) but I'm not sure they're much better than the ones you have. Always happy to share ideas, that's one of the reasons I keep adding useless info to the build thread   |
| |
|
|
|
|
|
Jan 24, 2015 13:55:16 GMT
|
|
|
| |
1972 viva 'Sparky'
|
|
retrolegends
Club Retro Rides Member
Winging it.....Since 1971.
Posts: 3,726
Club RR Member Number: 94
|
|
Jan 25, 2015 11:17:39 GMT
|
|
Good Grief!!!!!! I'm sure you'll be ok looking at your previous repairs though, looking forward to more updates.
|
| |
1974 Hillman Avenger 1500DL1992 Volvo 240SE1975 Datsun Cherry 100a flying custard1965 Hillman SuperMinx Rock N Roller1974 Austin Allegrat Mk1 1.3SDL1980 Austin Allegro Mk3 1.3L1982 Austin Allegro Mk3 on banded steels2003 Saab 9-3 Convertible 220bhp TurboNutter1966 Morris Minor 1000 (Doris) 2019 Abarth 595C Turismo (not retro but awesome fun) www.facebook.com/DatsunCherry100a |
|
|
|
|
Jan 25, 2015 22:18:52 GMT
|
so today task was to start repair the drivers side inner sill. which was a achieved without many hiccups. the task its self went okay but it covered more rust and holes that i will need to fix. sadly this is the only 'before' i really have. i should of taken more but oh well.you can see its bad and in dire need of replacement.  this is above pic showing the top part of the sill with its homemade replacement panel next to it. 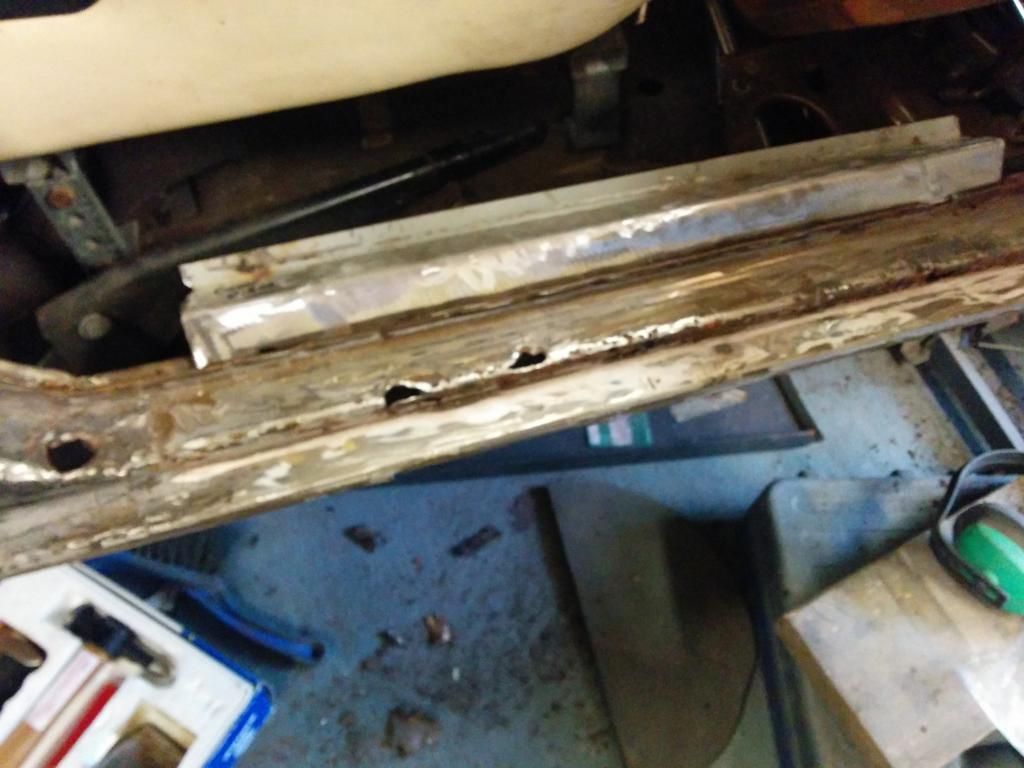 cutting out the rot and getting rid of all the bad metal,ready to have some shiny rust free metal put in. cutting out big bits out of the car can be some what scary.so its one of those things were its just best to have a simple plan an jump straight in. don't over think it or you never do it. you can always find solutions as problems appear. its worked for me so far. haha  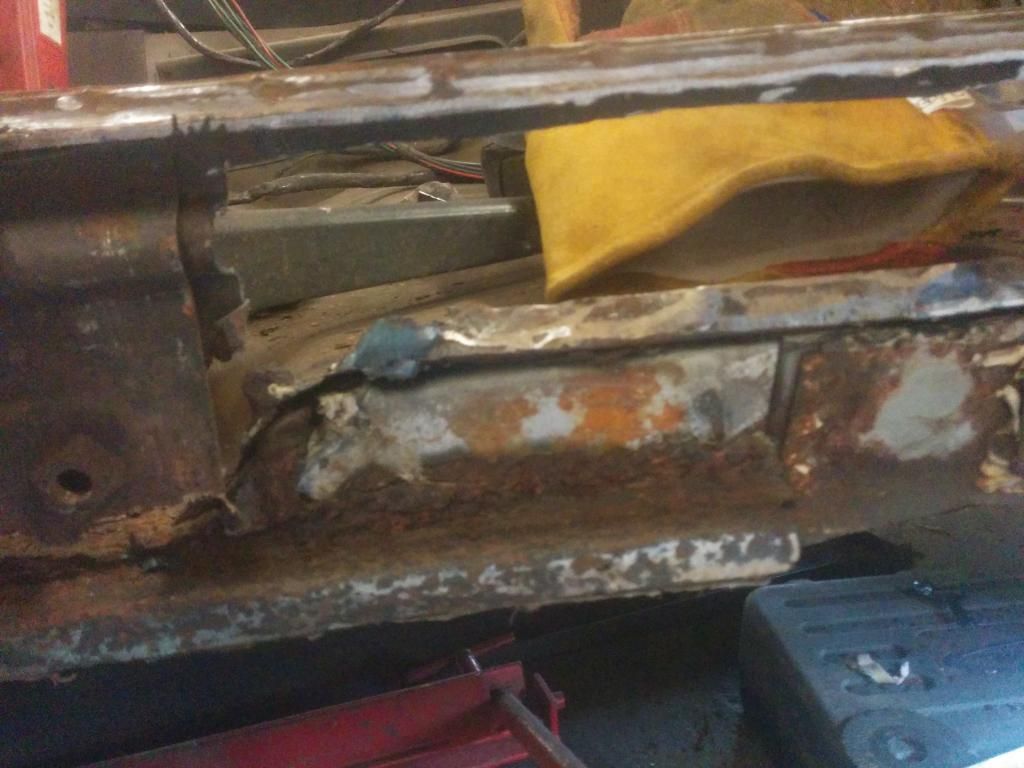 now to grind back the rest of the rust to find the good metal, admittedly i half except to not find any but happily i did. heres the proof.  see, told you there was good metal. i covered that in cure rust, then in hammerite rust proof primer, this should hopefully stop the rust. next i need to make my panel. but of course the hole i made was 2 inches longer than the lengh of my metal bender. so i had to get creative.... 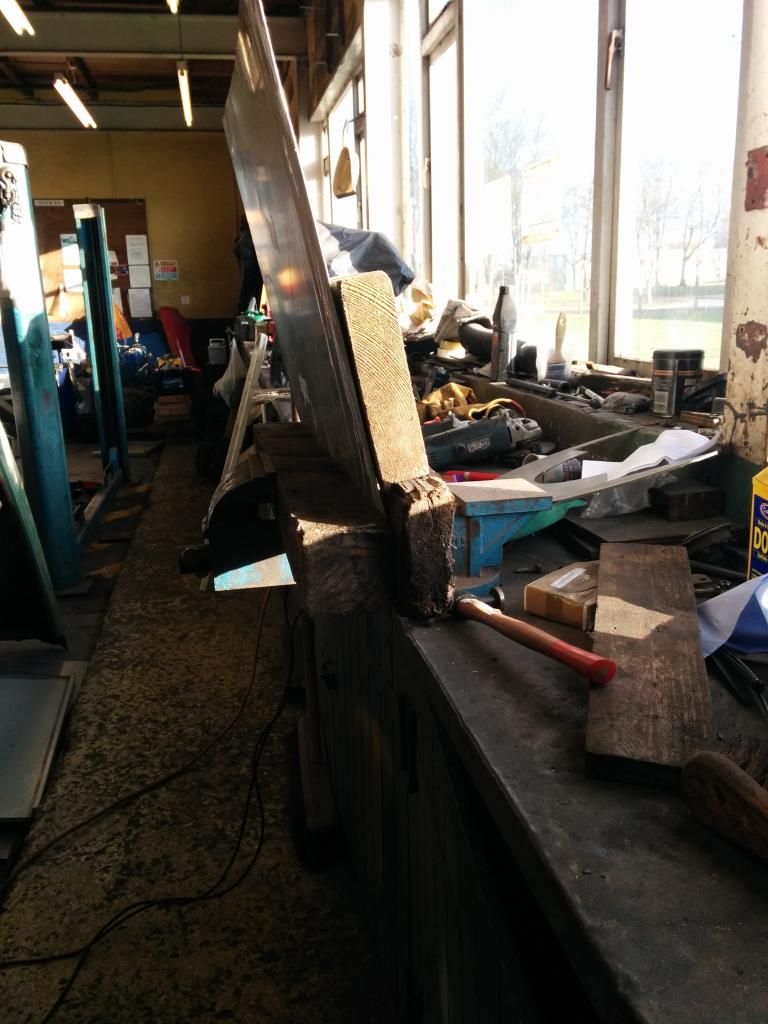 hitting the piece of wood to bend the metal just made more sense in my head thab just hitting the metal, probably saw in it a show some where  i repeated the process till i had a U piece of metal that fitted beautifully (no pics of that, sorry) then it was just a case of welding it in,its welded at the bottom lip, in the middle in the interior part of the car at the floor plan and at the bottom of the 'top' part of the sill. the welded strips are meant to be reinforcements however they might not actually do anything. hopefully never be in a position where ill need to find out. and of course a coating of black hammerite rust proofing paint. here's the (practically) finished bit (i need to tap the top part till its a bit straighter)  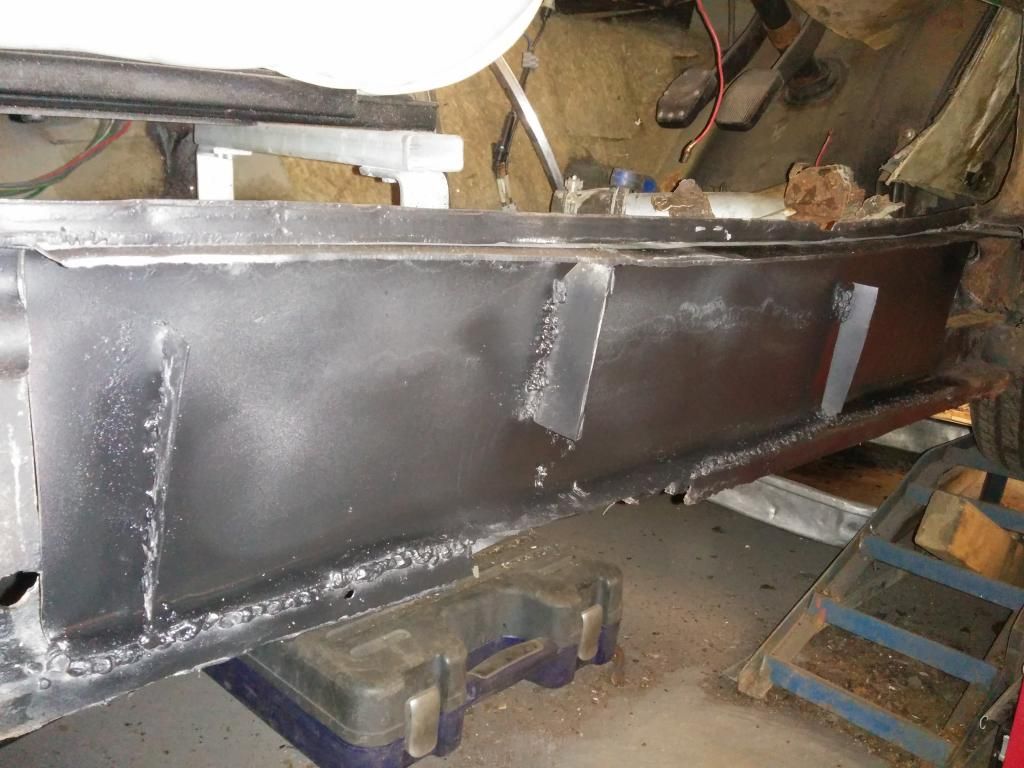 picture of the inner welds  but of course it never is that simple with this car, upon stripping back the metal, i found out the the front drivers side foot well was covered in a rubbery substance about 2cm thick (this was what the accelerator was practically screwed to) and underneath was trapped water which had rusted the floor and made some holes :/ whats that saying? two steps forwards one step back? 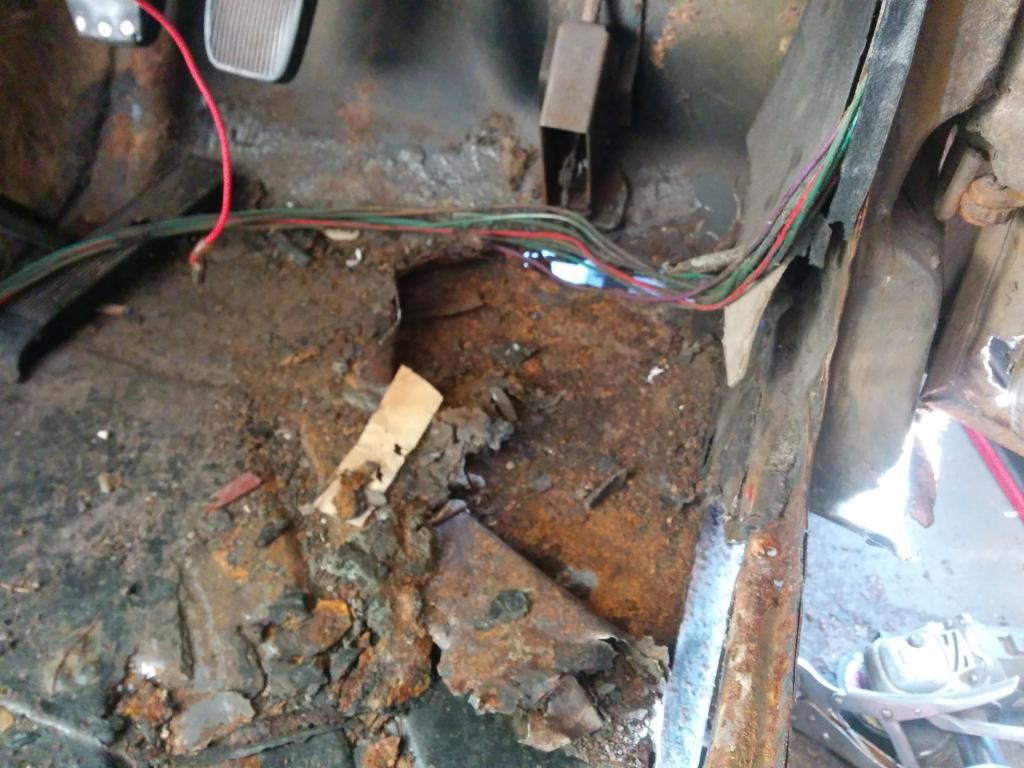 thank you for all the good feed back,hope you enjoy reading this thread  |
| |
Last Edit: Jan 25, 2015 22:25:55 GMT by Ebejeebies
1972 viva 'Sparky'
|
|
Seth
South East
MorrisOxford TriumphMirald HillmanMinx BorgwardIsabellaCombi
Posts: 15,542
|
|
Jan 25, 2015 22:33:42 GMT
|
Damn that's bad! Good on you trying to save it.  |
| |

Follow your dreams or you might as well be a vegetable. |
|
|
|
|
Jan 25, 2015 22:37:47 GMT
|
Damn that's bad! Good on you trying to save it.  yeah that's what i said, only with a few more profanities  |
| |
1972 viva 'Sparky'
|
|
vulgalour
Club Retro Rides Member
Posts: 7,275
Club RR Member Number: 146
|
|
|
|
|
It's amazing the sills are so bad when the doors look so solid, I would have expected lace curtain bottoms on the doors with that extent of rust! Top marks for endeavouring to beat the crumble bug.
|
| |
|
|
|
|
|
Jan 26, 2015 11:44:13 GMT
|
It's amazing the sills are so bad when the doors look so solid, I would have expected lace curtain bottoms on the doors with that extent of rust! Top marks for endeavouring to beat the crumble bug. yeah, there not solid, i just havent put any pictures of them up (when i get around to doing the doors you'll see what i mean), the drivers side doors have holes at both bottom corners. i think the reason for the sills being so bad is that there have been quite a few repairs underneath the car and instead of repairing all the rust, by either cutting it out or grinding it back, it was just covered in filler or some sort of rubbery substance and then plated over. they didnt even cover the inner parts of the replacement bits, just left them as bare metal. some people. i am trying my best to remove as much rust as possible either by cutting it away or grinding it and then treating it and then spraying everythig with rust prevention black. |
| |
1972 viva 'Sparky'
|
|
Rob M
Posted a lot
  
Posts: 1,915
Club RR Member Number: 41
|
|
Jan 26, 2015 13:55:15 GMT
|
|
Got a couple of mates near you? If you have, get them to pat you on the back.
This is what restoration and bringing cars back from the brink is all about IMHO.
Your enthusiasm is excellent, you are using your brain to over come problems, you are getting stuck in and learning as you go.
Many people would, probably, have just swept the car up and put it in the bin ( it aint good is it!!) but you have gone for it.
You are on the road to saving it and, for me, they are way underated cars that need saving.
Top top work!
|
| |
|
|
|
|
|
|
|
Jan 26, 2015 14:53:01 GMT
|
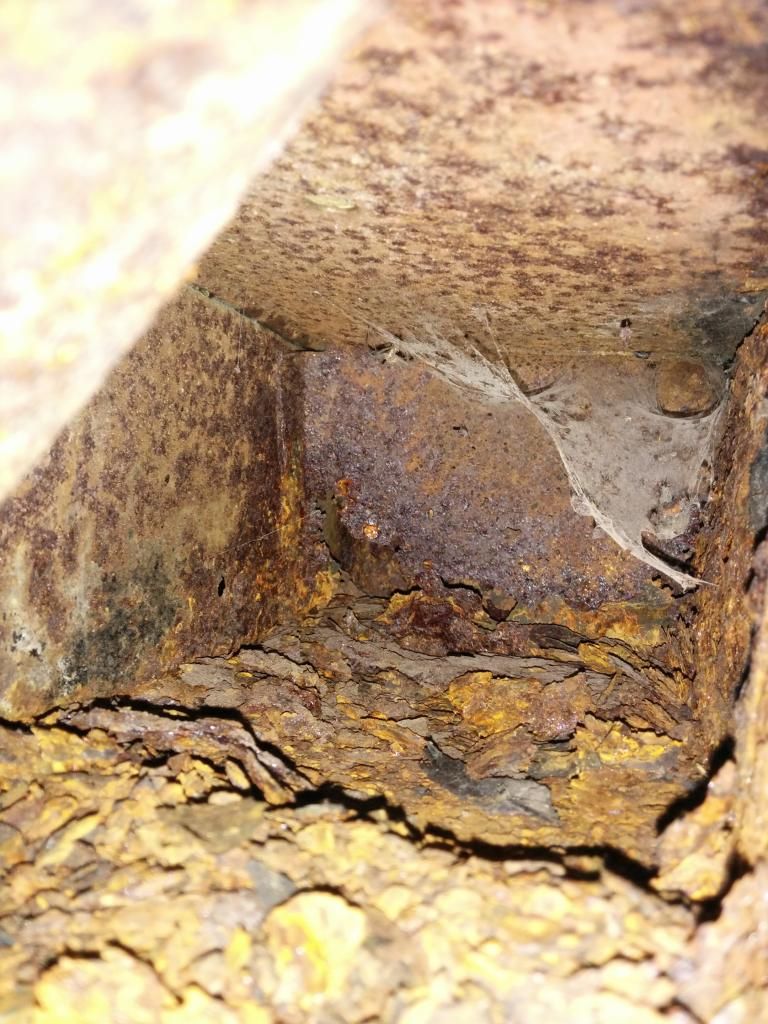
Got a couple of mates near you? If you have, get them to pat you on the back. This is what restoration and bringing cars back from the brink is all about IMHO. Your enthusiasm is excellent, you are using your brain to over come problems, you are getting stuck in and learning as you go. Many people would, probably, have just swept the car up and put it in the bin ( it aint good is it!!) but you have gone for it. You are on the road to saving it and, for me, they are way underated cars that need saving. Top top work! Thank you, that has genuinely made my day and put a smile on my face  Your right it isn't good, I've already got 5kg of rust and scrap metal in a bin bag and sadly its only going to get heavier |
| |
1972 viva 'Sparky'
|
|
|
|
|
Jan 26, 2015 14:53:44 GMT
|
|
You deserve a Knighthood for the time and effort you're putting into saving this car sir... GO ON...!!!!!!!!!!!!!!
|
| |
***GARAGE CURRENTLY EMPTY***
|
|
fer4l
Posted a lot
   Testing
Posts: 1,497
Club RR Member Number: 73
|
|
Jan 26, 2015 15:27:09 GMT
|
Seconded! (thirded? fourteenthed?! Whatevers, keep up the good work - 'tis a marvellous thing you are doing here. My old man had the twin of this car in the 70's, in a slightly lighter gold colour. Seem to recall it went very well, nicely appointed etc. Well worthy of the salvation being bestowethed  Cheers Matt |
| |
|
|
bazzateer
Posted a lot
   Imping along sans Vogue
Posts: 3,653
|
|
Jan 26, 2015 18:21:30 GMT
|
|
Mate,
when you finally drive away from the MoT station with that 12 month road worthiness certificate you will experience a complete feeling of utter satisfaction. It will be worth every expletive, every skinned knuckle, every metal splinter and weld spatter burn.
Kudos to you.
|
| |
1968 Singer Chamois Sport
1972 Sunbeam Imp Sport
1976 Datsun 260Z 2+2
1998 Peugeot Boxer Pilote motorhome
2003 Rover 75 1.8 Club SE (daily)
2006 MG ZT 190+ (another daily)
2007 BMW 530d Touring M Sport (tow car)
|
|
|
|
|
|
|
thank you all kind words and motivation. this weeks update consists of continuing of rebuilding the drivers side inner sill, hand brake and floor panel (well a small bit). here's some before pics. And yes it it somehow passed a mot like this. 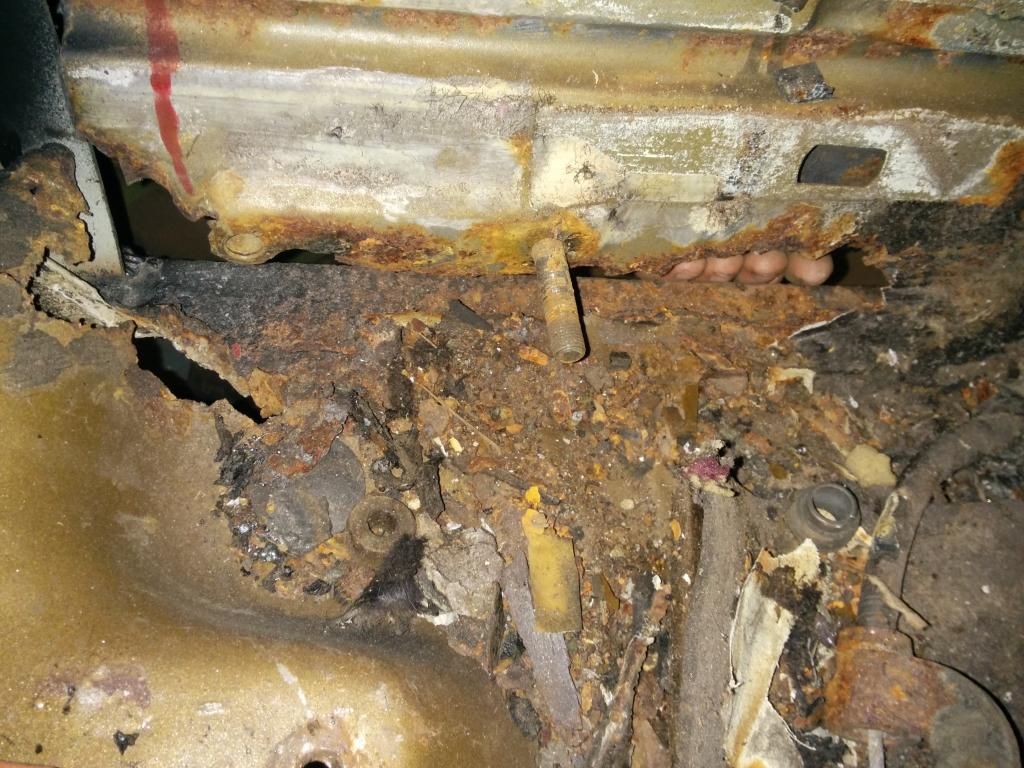 the stud is where the hand brake attaches, you can see the hole for the second bolt for the hand break. you can see the hole in the floor to the top left of the pic and my fingers to show you the lack of metal on the inner sill where the hand brake should be attached. 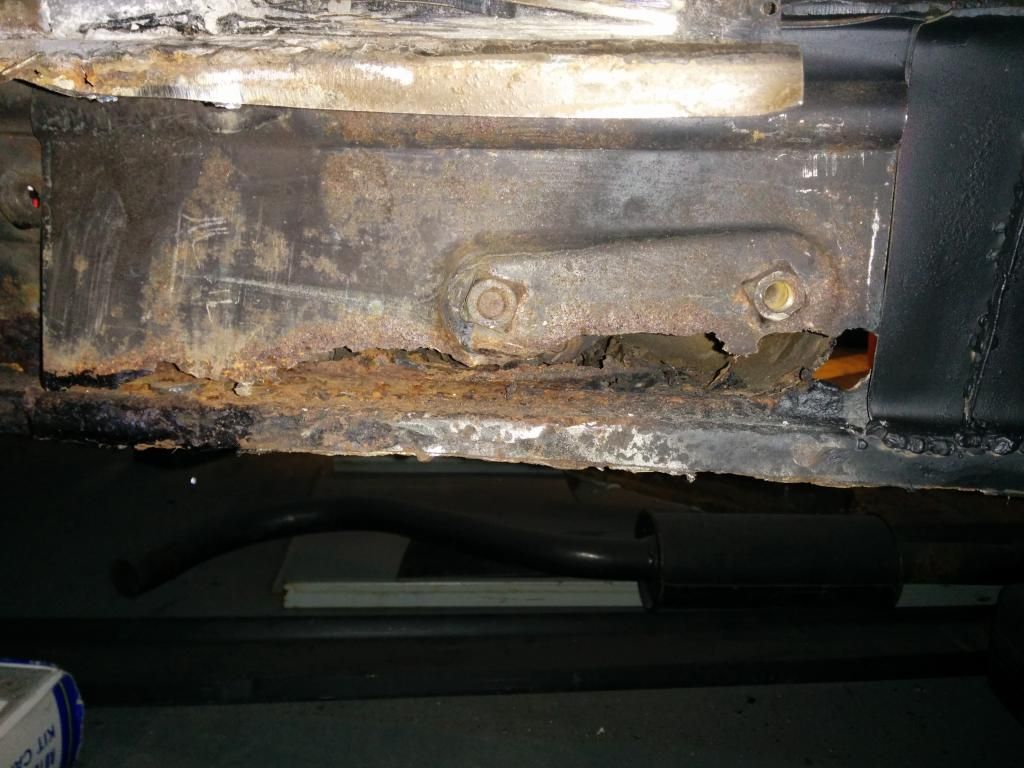 And here's the view from the other side,shows you how bad it really is. so first i went about cutting all the scrap metal out putting in the new home made sill  this has been welded along the bottom, and along the other side, you can see the heat marks. the new sill now in place but theres still the issue of the hole in the floor. 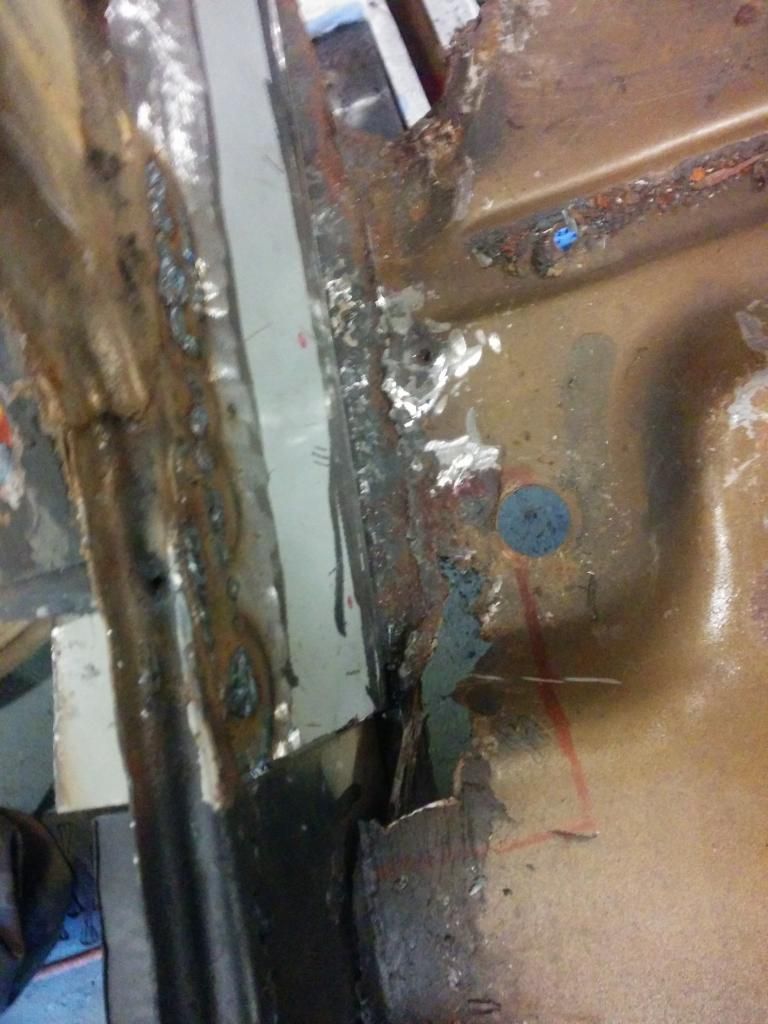 so i patched that up and learned that welding upside down is rather hard. but hey, one less hole in the car now. 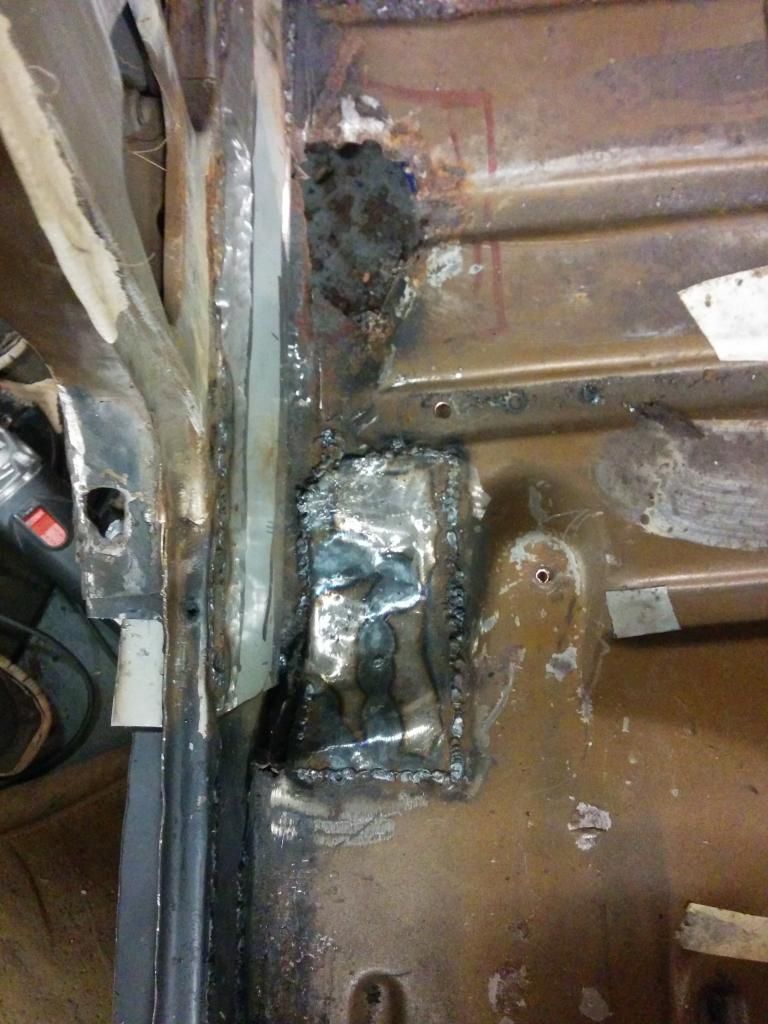 yes,i know there is a hole behind it still, its on the to do list (its quite a big list tho). any guesses what the pics below are of?  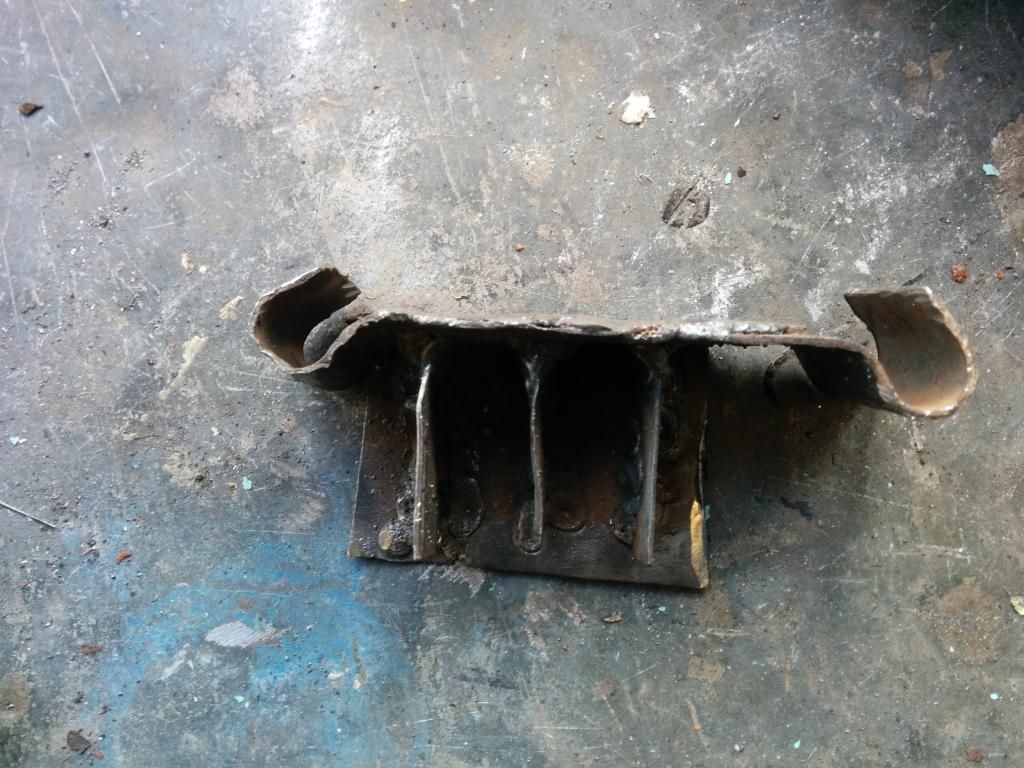 well done if you guessed handbrake bracket. here it it welded in place (reminds me of darth vaders mask)  the other side. its had uprights welded in for strength, a second plate welded on to spread the load and the original nuts welded into place. all in all i'm pretty pleased with it. its works and certainly isnt going anywhere.  and here are some more pics of the hand brake installed.   |
| |
1972 viva 'Sparky'
|
|
|
|
|
|
|
Full marks for putting the time in to fix this up!  Thoughts from my project ... Mine has a couple of 1" square holes cut along the inner sill under the doors to let the sills "breath" and dry out, just add internal rustproofing and sill repairs should last for years. Check for any water leaks ( I think a lot of the problems in my floors came from a leaking windscreen rubber  ). The same bodyshells are used for LHD/RHD cars, on the passenger side just cut out the handbrake bowl and replace with flat floor for a much neater & easier repair. Rustproof the drivers-side handbrake bowl well, it's a water trap. Keep up the good work, remember we like pics here   |
| |
|
|
|
|
|
|
|
|
thanks, yeah i currently have removed the wind screens (front and back) so new rubbers should hopefully stop any water leaks. the strips of rubber on the windows need replacing and i plan on changing every bit of rubber on the car to hope fully stop any leaks. yeah i was thinking about drilling a few small breather holes at the bottom of the sills.
yeah pics are always good,i sometimes get abit to carried away when working (which is no bad thing) and forget to take pics,so things do jump for one thing to another.
i've still got to replace the passenger side inner and outer sill as well. so they will get a rust proofing as well and pics of that when it happens.
thanks for the advice and interest
|
| |
1972 viva 'Sparky'
|
|
djefk
Part of things
 
Posts: 844
|
|
|
|
|
This is a great read, thanks for keeping it up to date.
On the mechanical side, what are your plans - standard, mild tuning or engine swap? I always thought that due to the alloy head this engine would respond well to some mild gasflowing, full electronic ignition (or even Megajolt) plus SU carbs for tuning purposes to get it near the Holbay power output without Holbay / Weber prices and fuel economy.
|
| |
|
|
|
|
|
|
|
This is a great read, thanks for keeping it up to date. On the mechanical side, what are your plans - standard, mild tuning or engine swap? I always thought that due to the alloy head this engine would respond well to some mild gasflowing, full electronic ignition (or even Megajolt) plus SU carbs for tuning purposes to get it near the Holbay power output without Holbay / Weber prices and fuel economy. the only upgrades i plan to do on the engine is just an electronic igintion. the twin stromburgs on there are meant to put out 89bhp as standard so I'm not doing any thing with that. i knew it wasnt going to be fast when i brought it,more of a cruiser than anything, she should hopefully happily sit at 70 (if not then further tuning will have to be done). however i do have a crazy idea of, in a few years time, dropping a bmw straight 4 turbo diesel engine in it(something out of a 320D perhaps) . that should have around 150bhp, better economy, more pulling power and makes it a bit more unique. and the challenge of it will be fun, because ill probably be bored again by then and be itching for another project of some kind. |
| |
1972 viva 'Sparky'
|
|
Rob M
Posted a lot
  
Posts: 1,915
Club RR Member Number: 41
|
|
|
|
|
These engines make for a quick car, obviously that's relative to cars of today but, in standard form, it will easily hold its own in traffic.
If anything Id be looking at the gearing, diff ratios/OD gearboxes to get as much out of the fuel consumption as is possible.
Superb save, this one.
|
| |
|
|
|
|


 ) as there are a few Rootes fans on here.
 )
)




 Your right it isn't good, I've already got 5kg of rust and scrap metal in a bin bag and sadly its only going to get heavier


 ).
).