|
|
|
Oct 20, 2013 21:02:20 GMT
|
Right so where to start...  Front Beam Removed Front Beam Removed by Steven Buckland, on Flickr We've had this for a few years now and its more or less always been a rolling project. It was purchased locally through a friend of yoeddynz (Alex) on here and it seems was always a local car staying within the same family. As such, it wasn't modified in any way other than set of front discs which had recently been fitted and hadn't received loads of nasty repairs over the years. |
| |
Last Edit: May 23, 2021 22:36:17 GMT by stevenery
|
|
|
|
|
|
|
Oct 20, 2013 21:16:34 GMT
|
Typically there was rust to contend with but, thankfully the heater channels and floor pan were OK needing just a couple patches. However, the same can't be said for the bumper hangers with both needing repair:  Rotten Bumper Mounts Rotten Bumper Mounts by Steven Buckland, on Flickr 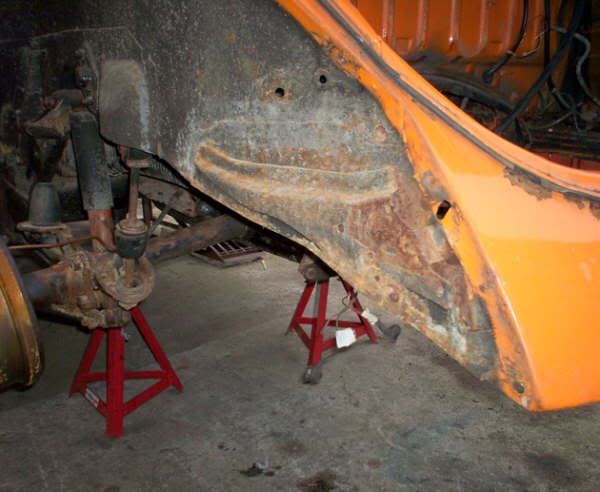 Rotten Bumper Mounts Rotten Bumper Mounts by Steven Buckland, on Flickr Not a tricky job with panels easily obtainable, the area was simply cut out and new panels welded in place:  New Bumper Mounts New Bumper Mounts by Steven Buckland, on Flickr The original frame head plate also required replacement due to rust. The replacement was very thick, so should last for many years to come. 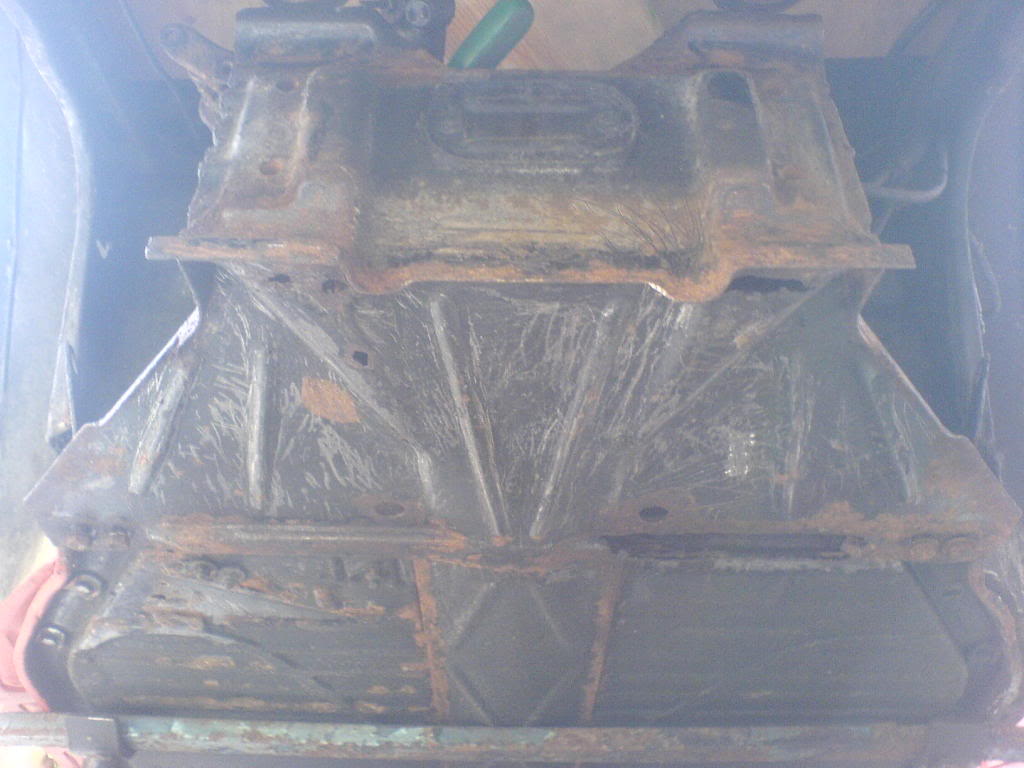 Framehead Plate Removal Framehead Plate Removal by Steven Buckland, on Flickr  Framehead Plate Removal Framehead Plate Removal by Steven Buckland, on Flickr  Framehead Plate Removal Framehead Plate Removal by Steven Buckland, on Flickr 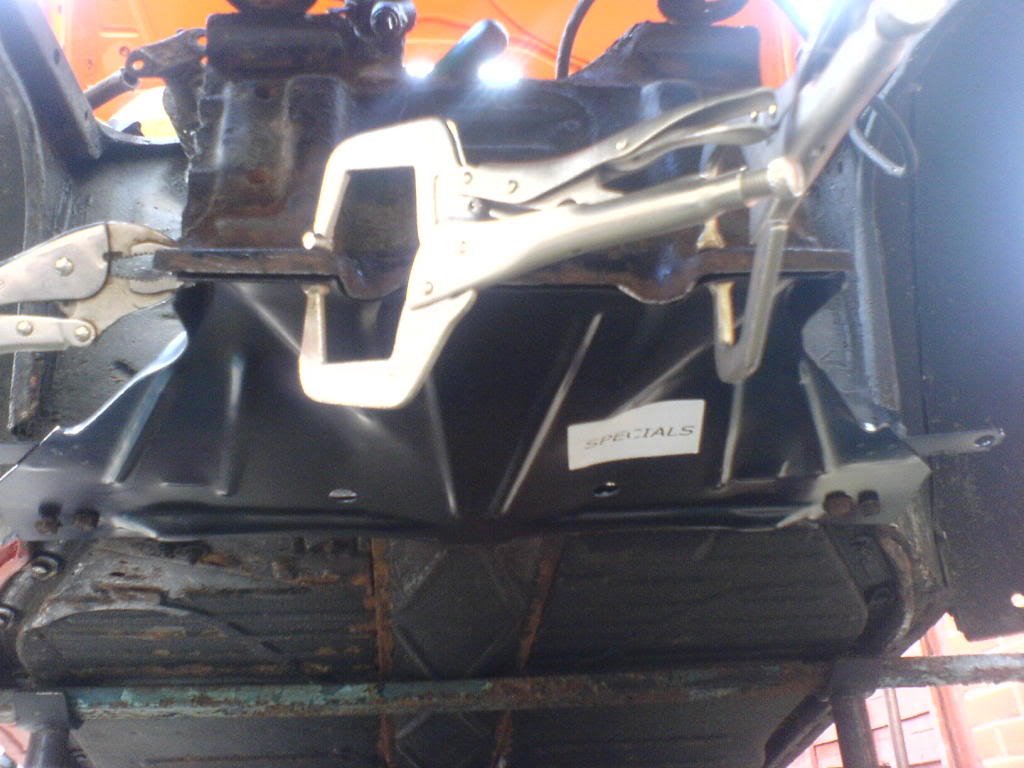 New Framehead Plate New Framehead Plate by Steven Buckland, on Flickr |
| |
Last Edit: Nov 29, 2020 19:34:11 GMT by stevenery
|
|
|
|
|
Oct 20, 2013 21:20:55 GMT
|
|
Before I bore people to death with pictures of rust I'll leave this here - I promise it will get better so stick with me
|
| |
Last Edit: Oct 20, 2013 21:21:48 GMT by stevenery
|
|
|
|
|
Oct 20, 2013 21:37:07 GMT
|
|
|
| |
Last Edit: Nov 29, 2020 20:51:37 GMT by stevenery
|
|
|
|
|
Oct 20, 2013 22:10:58 GMT
|
I'll have to apologise for the quality of the photos. I think most were taken on an old Sony mobile phone (probably top of the range back then.. ) One modification that makes removing the engine a whole lot easier is bolting the valance up rather than welding it in place. Unsurprisingly the one on this car was quite rusty so cutting it off was logical anyway  Rotten Valance Rotten Valance by Steven Buckland, on Flickr At this point in time the rusty bits were more or less taken care of and thoughts could be moved onto other areas. Now me and my dad have always browsed on eBay and just happened to get super lucky winning these wheels  Ronal Kleeblatts Ronal Kleeblatts by Steven Buckland, on Flickr They are Ronal Kleeblatts and an original 70's wheel. We travelled down to Portsmouth to pick them up off a chap that had stored them for many years in his garage. He was into powerboat racing and bike engined Minis - at the time I think he had a Triumph engine he was prepping to fit in one. Any way the listing had a poor title and we got them for a steal, he even gave us the original bolts and centre caps! |
| |
Last Edit: Nov 29, 2020 20:53:09 GMT by stevenery
|
|
|
|
|
Oct 20, 2013 23:11:21 GMT
|
So continuing on. Somewhere along the line the car had lost its door cards and much of the interior - there isn't much in a Beetle to begin with. This is what we had to work with:  Stock Dash Stock Dash by Steven Buckland, on Flickr That should also be the last of the awful photos! Some aluminium sheet was acquired and a set of door panels made up. No real reason for this other than the idea they might not look too bad. Along with these a set of seats from a Mazda MX5 were purchased and hacked up. Again I have no photos of the process here but essentially the runners from the Beetle bases were welded to those of the Mazda. The seats themselves are much nicer than the low back originals and fit in really well with the rest of the interior - similar pattern and same vinyl colour as the rear seat. In hindsight making the bases/runners from scratch might have been a better idea as they sit a touch too high but thats a job that can wait  MX5 Seats MX5 Seats by Steven Buckland, on Flickr We had acquired (and still own) another Beetle which had been fitted with loads of accessories back in the 70's including a set of VDO gauges. So we swapped them into this gaining a rev counter, oil temp, oil pressure, and a voltmeter. From the states we bought a cylinder head temperature gauge although once the engines hot it doesn't tend to move much. It'll probably prove useful in the future for testing different fan set ups. Also fitted a wood rim Mountney which serves its purpose well and doesn't look too bad for a cheap wheel. 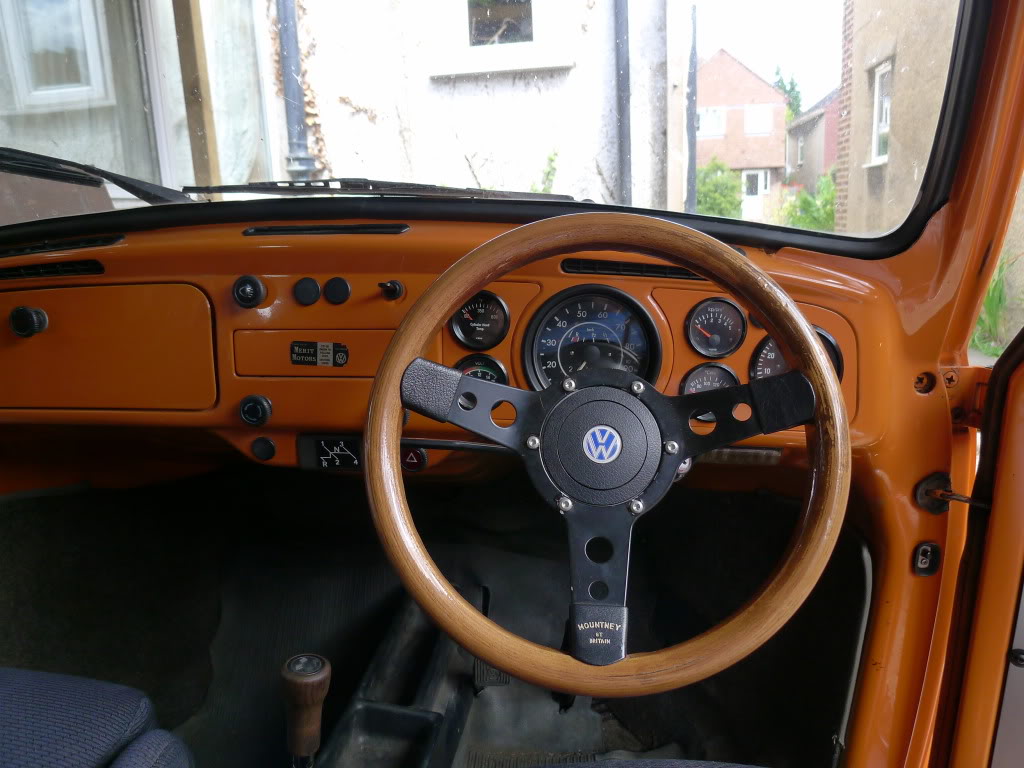 VDO Guages VDO Guages by Steven Buckland, on Flickr You can also make out the Formula-V shifter in that photo. Well as I say stick with me as recently that changed to something a bit more interesting:  901 Gearbox 901 Gearbox by Steven Buckland, on Flickr |
| |
Last Edit: Nov 29, 2020 20:58:00 GMT by stevenery
|
|
|
|
|
Oct 20, 2013 23:18:59 GMT
|
|
Ooo.... a 901?
Subbed.
|
| |
- Joe
Wisco
'73 Porsche 914
'97 Chevy Chuburban 454
|
|
|
|
|
Oct 21, 2013 20:09:40 GMT
|
At this stage the welding was complete and the car just required general set up of the brakes with new lines and hoses throughout. Having spent so long in storage the fuel in the tank had turned to sludge and a build up of rubbish blocked the outlet on the bottom of the tank - another tank taken from a Beetle we broke a while ago sorted this. Fuel lines were also replaced along with all sorts of other seals and rubber bits. Engine wise a 1600 with a single Weber carb was fitted to get it going. It was a little rattly but went well enough and it was only really to get it through the MOT. No pictures fitted I'm afraid but it was only temporary any way. At this point in time this is how the car stood. By now the wheels had been fitted with a decent set of tyres all round, think the fronts are 155 55 and the rears 205 55 or 65. Also fitted a new set of running boards and sprayed a set of headlamp rings to match the rest of the car.  On the road On the road by Steven Buckland, on Flickr With the MOT out the way it was time to think about engines. The type 4 lump fitted to type 25 vans and Porsche 914's is arguably much stronger and torquier then the standard type 1 unit. Cost of parts is typically higher but you can still pick up bargains from eBay and the various forums. Another big plus is the amount of info available with regards to tuning them with guys in the US, Australia, and Scandinavia all big fans of type 4 conversions. This is the stock cooling setup with the fan overhanging the back of the engine. The car was ran for a short while like this more to gather what the standard bus engine went like than anything else [  Type 25 Engine Type 25 Engine by Steven Buckland, on Flickr  Type 25 Engine Type 25 Engine by Steven Buckland, on Flickr  Type 25 Engine Type 25 Engine by Steven Buckland, on Flickr  Type 25 Engine Type 25 Engine by Steven Buckland, on Flickr  Type 25 Engine Type 25 Engine by Steven Buckland, on Flickr |
| |
Last Edit: Nov 29, 2020 21:12:58 GMT by stevenery
|
|
|
|
|
Oct 22, 2013 10:36:12 GMT
|
A fairly inexpensive and also efficient way of cooling these engines when fitted to a Beetle is to use the upright type 1 style fan shroud. You need to fabricate your own tinwork and can either make up or buy a pedestal for the alternator to sit on. Most tend to do away with the stock oil cooler and fit a remote one however we chose at first to retain the stock cooler and duct air over it direct from the fan shroud. Although close to rising heat from the exhaust this set up worked fine with oil temps only getting high on one occasion coming back from the gathering at Prescott in 2012 - we had taken the car up the hill that afternoon and it was also a really warm day so no surprise really. Anyhow heres a couple pics of the engine being assembled. The basic spec is as follows: -2.0 bus heads cut for heavy duty type 1 springs and higher compression -Euro race G grind cam -stock 2.0 914 flat top pistons and cylinders -Stock 2.0 crank and rods -Twin 40 Weber carbs -Custom stainless exhaust made by a local firm At a dyno day organised at the now shut down Bob Watson Porsche, it put out 105hp which for a home built engine owing not a lot of money doesn't seem too bad  Engine Build Engine Build by Steven Buckland, on Flickr  Engine Build Engine Build by Steven Buckland, on Flickr In a job lot of bits we had picked up a breather box which can be seen bolted to the firewall behind the engine. This has a couple hoses running from each rocker cover back to the box and then a couple back into the air filters with the idea being the gases travel into them.  Type 4 Engine Type 4 Engine by Steven Buckland, on Flickr  Type 4 Engine Type 4 Engine by Steven Buckland, on Flickr Once again here it is on the dyno: |
| |
Last Edit: Nov 29, 2020 21:41:17 GMT by stevenery
|
|
|
|
|
Oct 22, 2013 10:47:58 GMT
|
As mentioned above at the 2012 Gathering we managed to get in line early enough to have a go up Prescott. This was lots of fun and for anyone that hasn't yet done it we can highly recommend it! 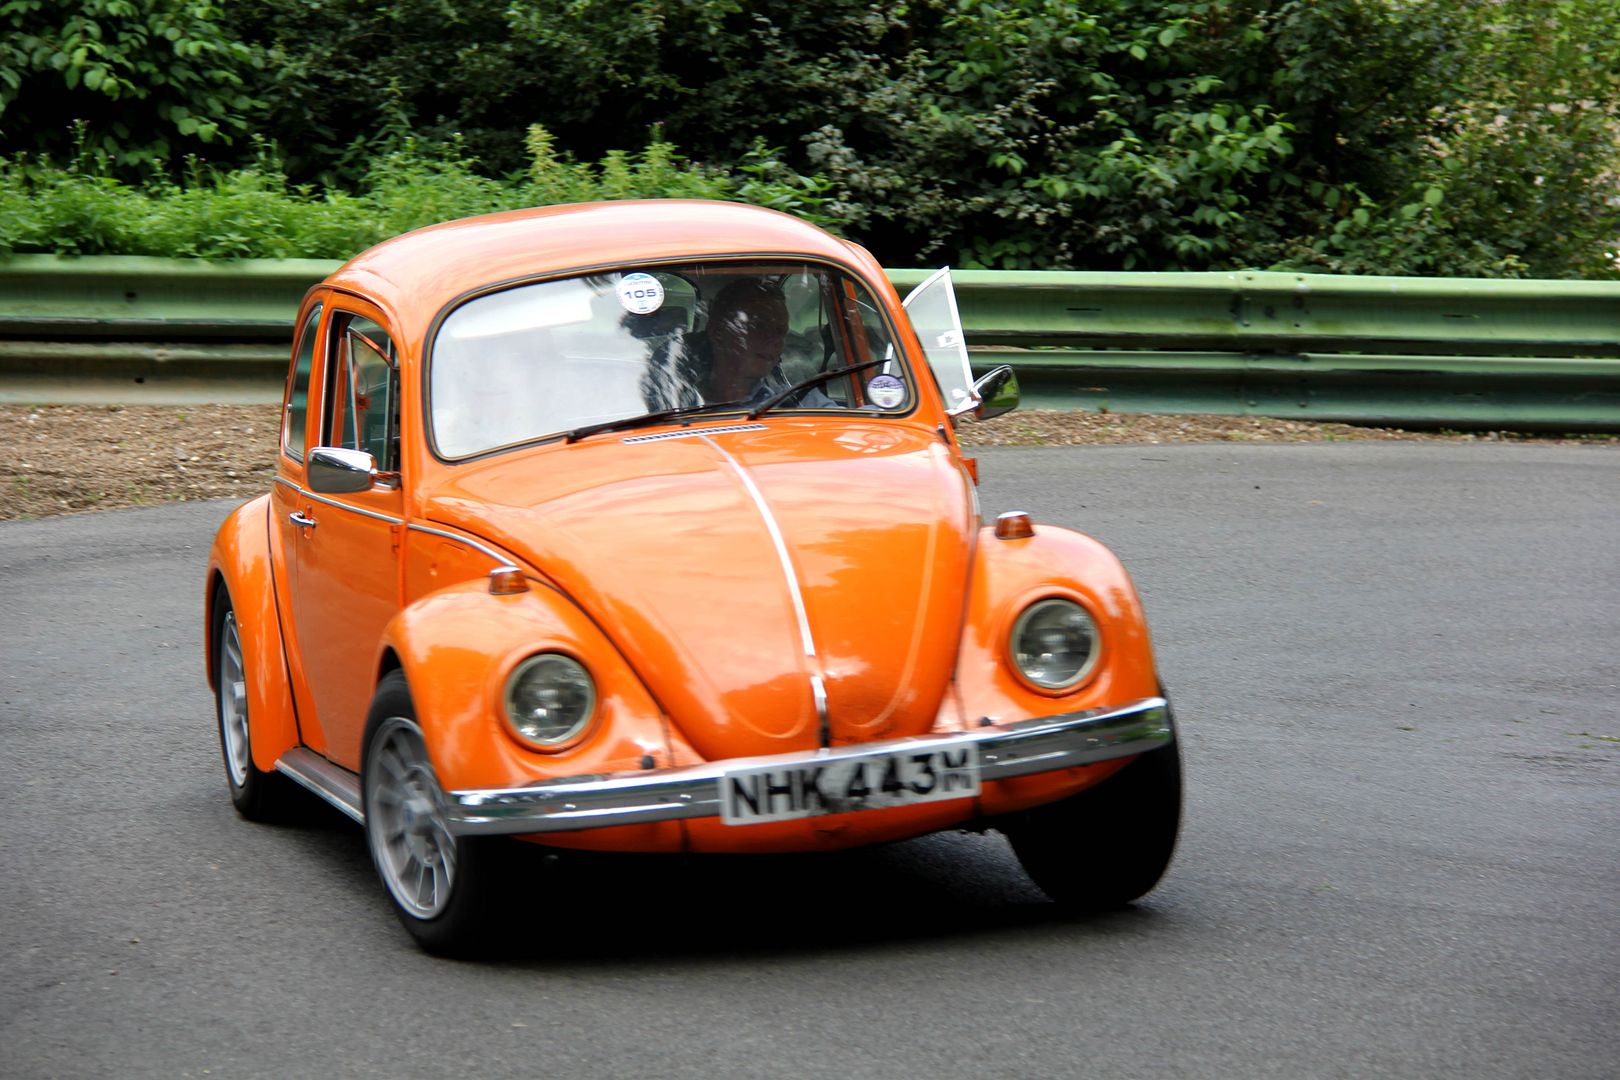 The aim was to take it again this year however the work we were doing kept causing hiccups. Here is a bumpy video from 2012 - the screech at the end is the window being wound down |
| |
Last Edit: Oct 22, 2013 10:53:37 GMT by stevenery
|
|
|
|
|
|
|
Oct 22, 2013 11:12:31 GMT
|
In addition to the above lots of little bits had been attended to. In order to lower the front of the car a couple of these lumps were taken out with a hacksaw  Lowering the Front Beam Lowering the Front Beam by Steven Buckland, on Flickr Leaving a couple gaps like this to be filled  Lowering the Front Beam Lowering the Front Beam by Steven Buckland, on Flickr With a pair of these adjusters  Beam Adjusters Beam Adjusters by Steven Buckland, on Flickr Which takes us up to how the car was for a year or so. Everything worked well enough and the engine always fired up without issue so we had no reason to do much to it however with a stock 1300 gearbox the car always felt under geared. |
| |
Last Edit: Nov 29, 2020 21:44:48 GMT by stevenery
|
|
|
|
|
Oct 22, 2013 12:41:04 GMT
|
|
This is excellent. Bookmarked.
|
| |
|
|
|
|
|
Oct 22, 2013 14:41:11 GMT
|
This is excellent. Bookmarked. Thanks! My only regret with this is not taking enough photos of the processes involved. I'll add links were I can to guides we used and other sites that have been mega useful. With projects like this its easy to scan through a couple pages and think you'll be able to replicate the work yourself quite quickly - at least this is what we thought on tackling the next stage of work. The easiest way of increasing the gearing was to swap the gearbox out for something else however this cars suspension design was over 70 years old so thought also turned to that. Later 1302 and 1303 models benefited from Independent Rear Suspension (IRS). The benefit here for us was greater choice of gearboxes and improved handling. Besides we already had the gearbox and suspension arms so it was a no brainer really. We pulled this lot out approximately six or so months ago...  Swing Axle Setup Swing Axle Setup by Steven Buckland, on Flickr All we had to do was fit a couple of these to the chassis  IRS Bracket IRS Bracket by Steven Buckland, on Flickr Bolt up a pair of these arms  IRS Arm IRS Arm by Steven Buckland, on Flickr And in the end we would end up with a rear end that looked something like this 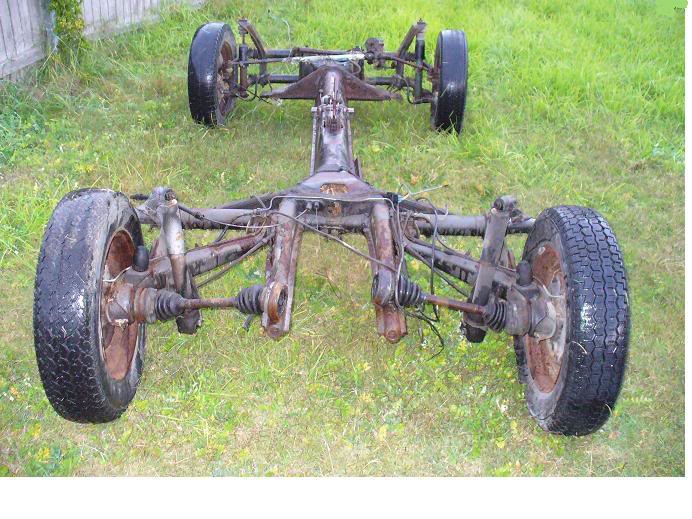 IRS Chassis IRS Chassis by Steven Buckland, on Flickr Sounds easy doesn't it |
| |
Last Edit: Nov 29, 2020 21:49:01 GMT by stevenery
|
|
|
|
|
|
|
Dude! You get my PM?  |
| |
|
|
|
|
|
|
|
OK so time for a long overdue update: As previously mentioned we wanted to convert the car to IRS. The arms, torsion bars, and driveshafts were all acquired from a local scrapyard off a 1303 - people use 944 stuff which widens the track but this also entails switching to the 944 discs, five stud wheel pattern, wider wings… not what we wanted. So to begin you have to remove everything from the rear end. Gearbox, suspension, the lot. This leaves a not-so cavernous space to work in: 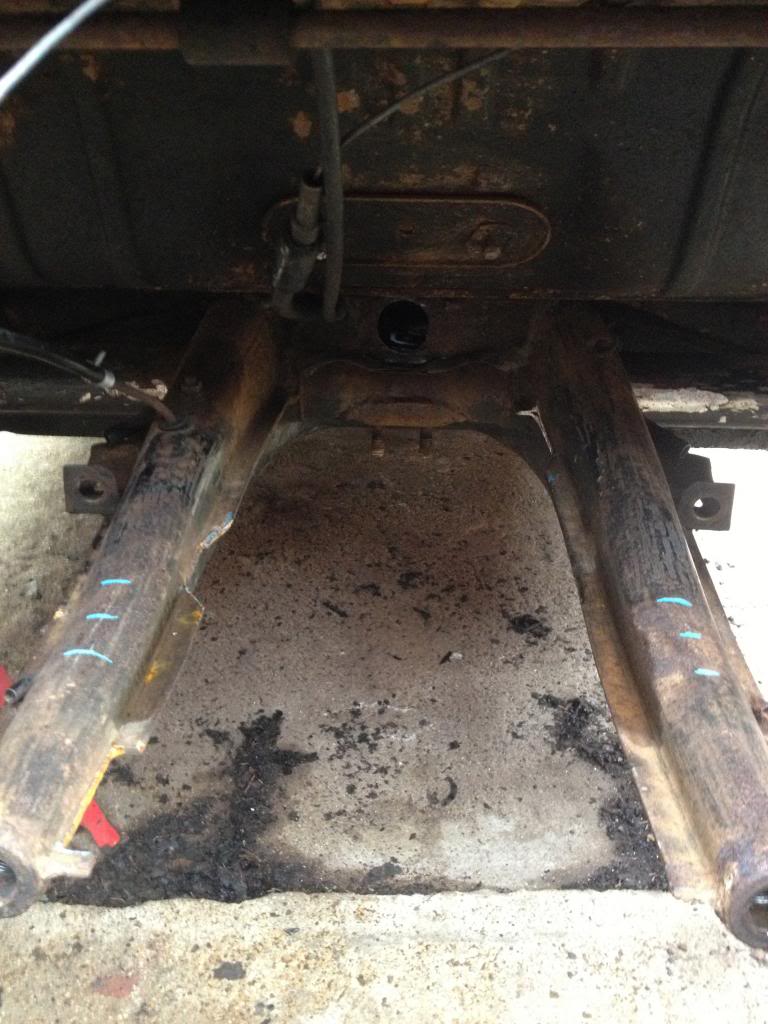 Frame Horn Modification Frame Horn Modification by Steven Buckland, on Flickr For the arms to bolt up a couple brackets need to be welded in place. We spent some time cutting up a spare rear chassis section in order to work out how much metal to take out and from this made a template to transfer onto the car - in addition we purchased a jig from VW Heritage for getting the brackets on at the right angle. Initially we thought having the spare chassis to play around with we could work out the angle our selves and see where the arms wanted to sit however it just doesn't work and the jig really is necessary. Here are the first few cuts. Had to be careful throughout the job not to weld/cut/damage the handbrake cable tube in anyway, in the end it did need to be bent quite a bit.  IRS Bracket Prep IRS Bracket Prep by Steven Buckland, on Flickr And here is the other side with the template mocked up.  IRS Bracket Prep IRS Bracket Prep by Steven Buckland, on Flickr Thinking back the hardest part of this was just knowing how much to cut out. A borrowed metal sander also proved mega helpful in taking the area down bit by bit. Finished pics to come.. |
| |
Last Edit: Nov 29, 2020 22:02:31 GMT by stevenery
|
|
|
|
|
Jan 11, 2014 18:57:41 GMT
|
|
This is a cool thread. Interesting for me as I know nothing about beetles. Cheers for posting it.
|
| |
|
|
|
|
|
Jan 13, 2014 18:52:01 GMT
|
This is a cool thread. Interesting for me as I know nothing about beetles. Cheers for posting it. Cheers Alex! So as it stood we could now bolt up the IRS arms and along with this a later gearbox - more to the point we now had a much greater range of boxes to choose from A few years prior we had actually won on eBay a 1700 914 engine and 5-speed 901 gearbox as fitted to 914's and early 911's. Both had been stored outside under a tarp for many years and it showed! However it was all quite cheap. This box would give us much taller gearing which would suit the 2.0 engine a lot better. For anyone looking to do this conversion consult this thread as I don't have enough photos to go through step-by-step : www.aircooled.net/vw-transmission-porsche-5-speed-conversion/ But this is more or less what we had to work with. The main issues being the shift linkage which comes out the side of the box and the two horns on the nose cone which were never going to fit in the beetle chassis  We were lucky enough to come across a guy over on www.ddk-online.com/phpBB2/index.php (If you've time to kill check the resto threads on there!) who supplied us with a nose cone which had been chopped around a bit.  Nose Cone Modification Nose Cone Modification by Steven Buckland, on Flickr  Nose Cone Modification Nose Cone Modification by Steven Buckland, on Flickr This still required a lot of work to get right not helped by the fact its magnesium so sealing that hole proved tricky. Through here made contact with a guy who offered to weld it but in the end a plate was made up to bolt. Also had the internals out many times to get the shift rods right as these were cut and welded to allow the shift rod to come out the end.  Nose Cone Modification Nose Cone Modification by Steven Buckland, on Flickr We could have purchased a 911 nose cone and shift rods from the US - should have done really but this way worked out cheaper and not had any issues running it so far. Now getting it to fit in the car was also a bit tricky. The box isn't that much bigger than a Beetles but it is bigger so there was lots of trial and error putting it in place then taking out again for clearance and cutting of various sections In this picture there are a few cuts along the inside left of the frame horn - these are for the clutch fork/cable to clear. In addition the two bolt threads hanging down at the front of the picture needed cutting out and then a square patch underneath for the shift rod to go through as it sits lower than the beetle one. And were those blue marks are we had to flatten with a lump hammer so the driveshafts would clear. Oh, and that plate in the top of the photo needed sections taken out and more clearance made with a hammer - The internet didn't tell us half of this! 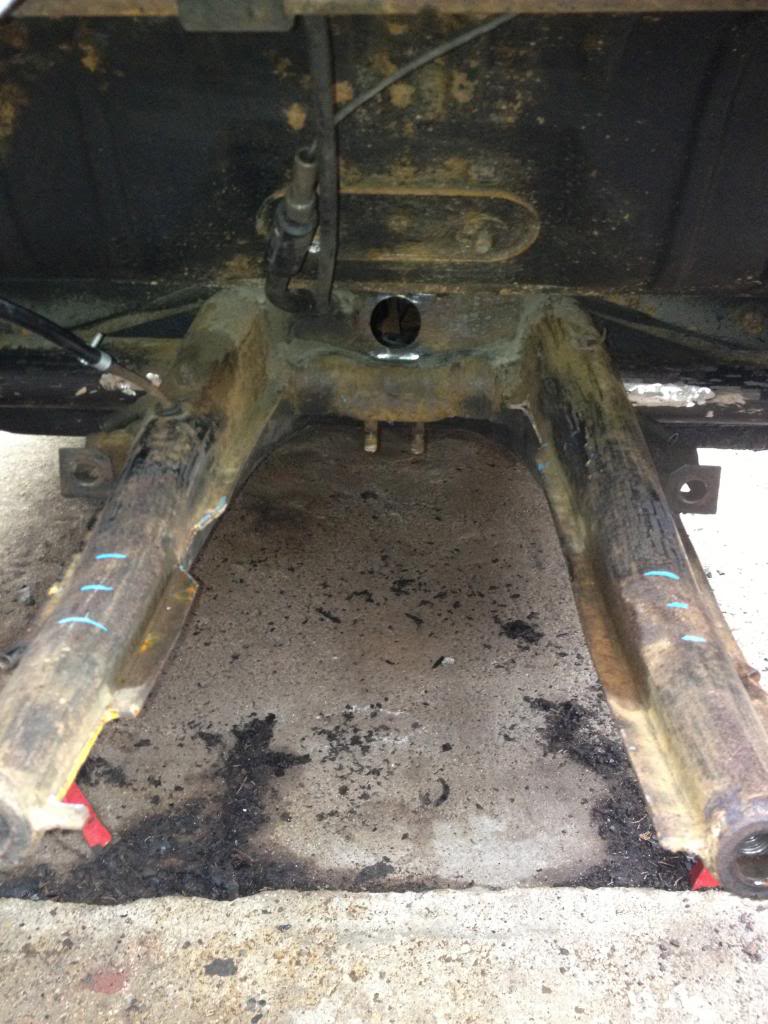 Frame Horn Modification Frame Horn Modification by Steven Buckland, on Flickr This is clearance the clutch cable had…  Clutch Fork Adjustment Clutch Fork Adjustment by Steven Buckland, on Flickr And here is the fork in the box. This needed bending in the end which was done on a hydraulic press - didn't need much  Clutch Fork Adjustment Clutch Fork Adjustment by Steven Buckland, on Flickr Now to link the box in the car is another challenge. People recommend using the Porsche parts - rear coupling to go on the gearbox end, long shift rod, for the tunnel, and then a Porsche shifter and all the bits under there. Great in theory but far too expensive. We acquired a Porsche shifter and the coupling which the shift bush sits in and then messed around with beetle parts till it all worked. Had to clearance around the opening for the sifter so it had more throw in all directions but otherwise just a bit of trial and error. 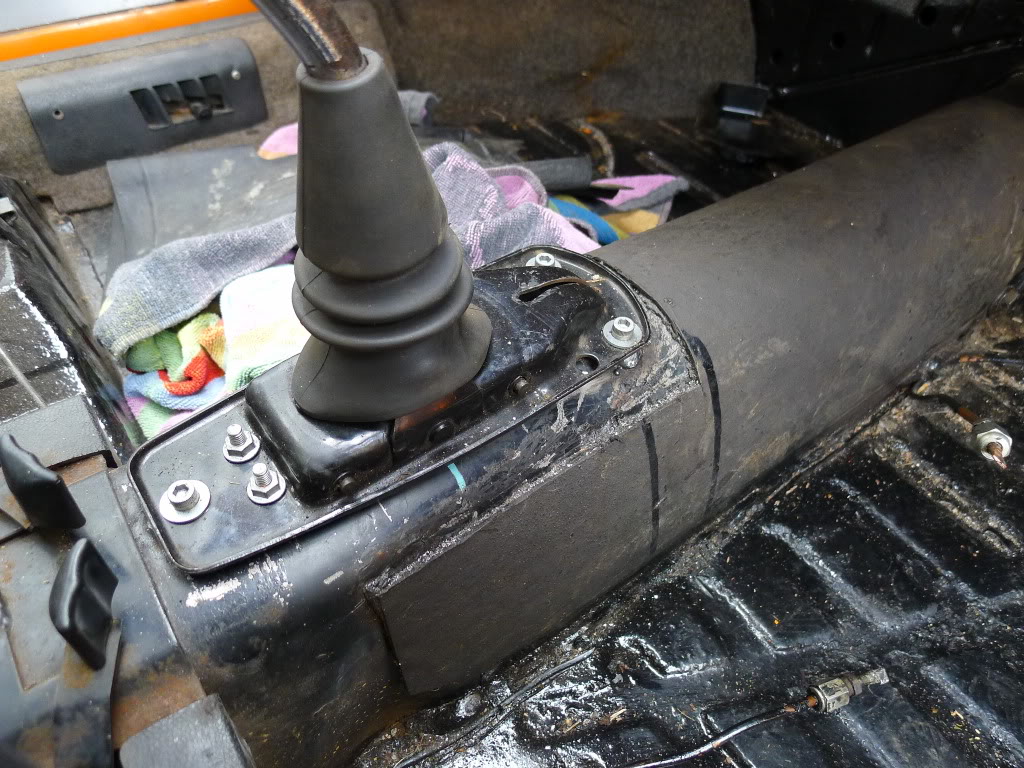 914 Shifter Fitment 914 Shifter Fitment by Steven Buckland, on Flickr |
| |
Last Edit: Nov 29, 2020 22:04:41 GMT by stevenery
|
|
|
|
|
|
|
Jumping forward in time we now had the gearbox bolted in and attached to the engine. When fitting a type 4 engine to a beetle box you have to use a smaller type 4 flywheel - 200, 210, and I think 215 also works. However with the Porsche box we needed to use the Porsche flywheel otherwise the starter wouldn't engage. Our one turned out to be really badly worn and so back over on the DDK forums we were lucky to source a replacement in much better condition. 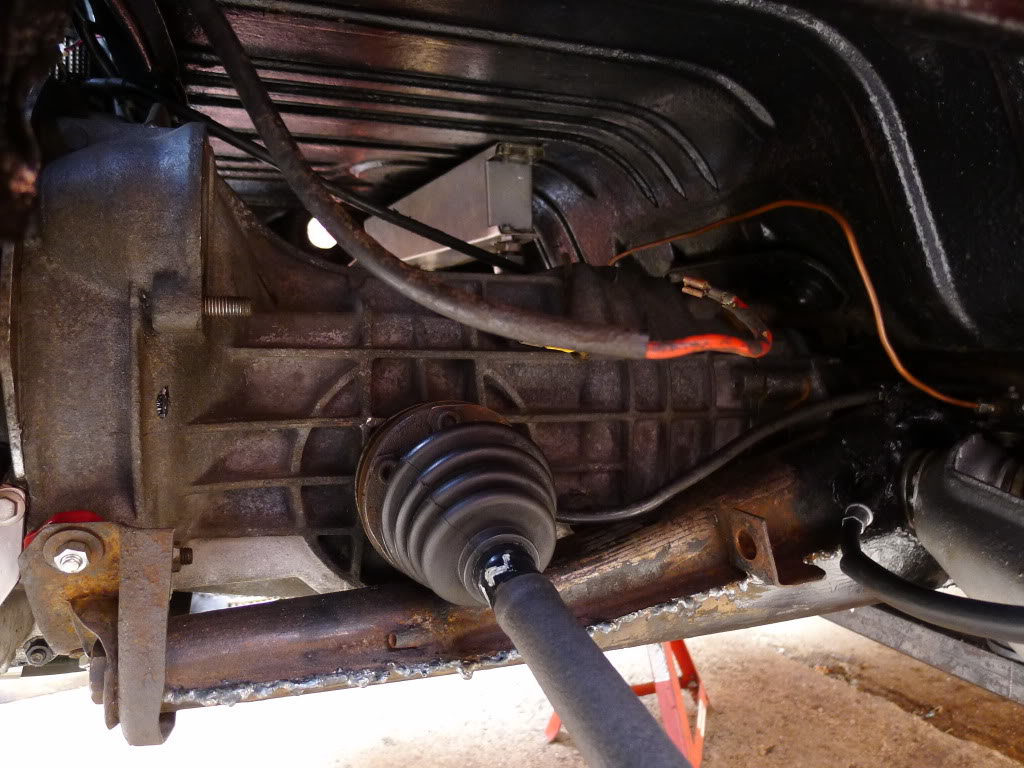 Driveshaft Fitment Driveshaft Fitment by Steven Buckland, on Flickr  External Oil Cooler External Oil Cooler by Steven Buckland, on Flickr In this photo you can also make out the front support for the box. We used a couple Land Rover engine mounts and then a simple bit of box section across - hangs quite low but its out the way and not hit anything yet! In addition under here is another oil cooler with a cowl made up which ducts hot air away from the inlet for the engines fan 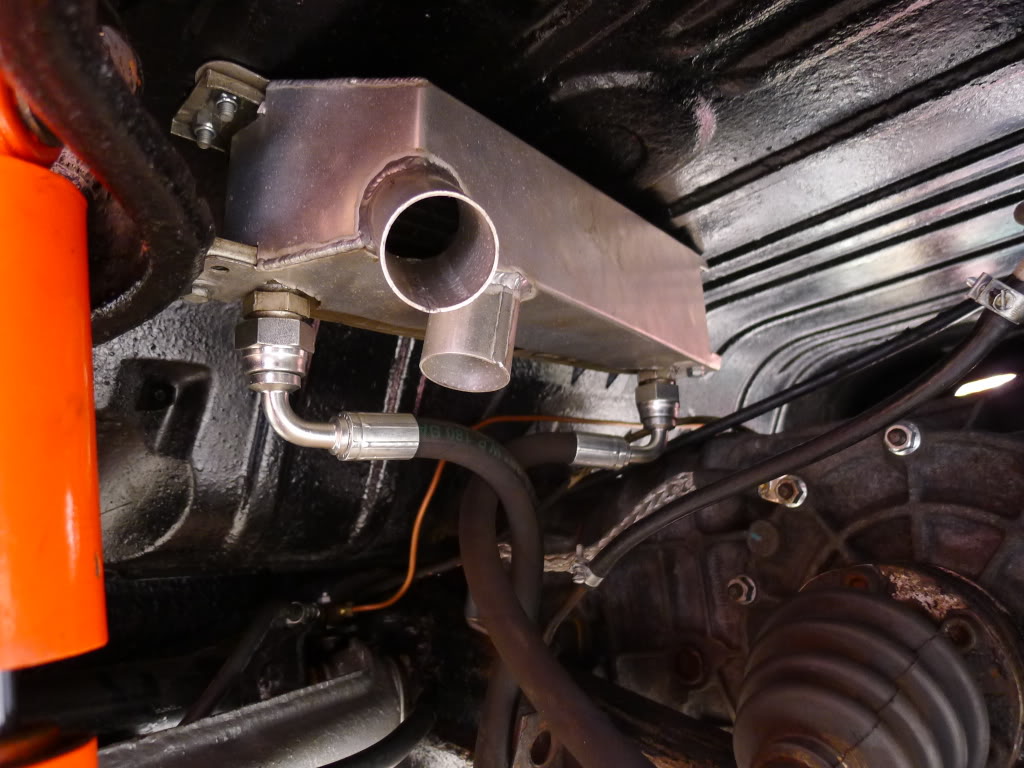 External Oil Cooler External Oil Cooler by Steven Buckland, on Flickr However there is a distinct lack of starter in these photos. Turns out the one we acquired from another source was a dud. There was some kind of bearing missing from inside the end of the starter so the gear kept slipping off. Porsche parts are very interchangeable so we promptly got on to a breakers and got hold of a much larger starter - something like double the power and off a later 3.0 SC I believe  914 vs 915 Starter Motor 914 vs 915 Starter Motor by Steven Buckland, on Flickr With this bolted on the engine started straight away! Its a monster and way more than the car needs really but the engine is running higher compression and does get used in the cold so kind of justified. Next up we move on to stopping power! |
| |
Last Edit: Nov 29, 2020 22:07:26 GMT by stevenery
|
|
79cord
Posted a lot
  
Posts: 2,617
|
|
|
|
|
Looks like many worthwhile revisions to improve the car!
|
| |
|
|
93fxdl
Posted a lot
   Enter your message here...
Posts: 2,019
|
|
Jan 14, 2014 10:23:11 GMT
|
|
Following with interest as am planning a 5 speed conversion on my beetle, but using the Audi/passat box. Thanks for sharing the pitfalls of the rear suspension conversion.
Ttfn Glenn
|
| |
|
|
|
|
 Front Beam Removed by Steven Buckland, on Flickr
 Front Beam Removed by Steven Buckland, on Flickr


