|
|
|
Feb 10, 2014 16:11:17 GMT
|
|
Thanks John,
I also got an answer from Ditchdigger, which is great. in preventing getting the angle wrong, he says the best is just extend the uprights and don't add any angle.
Could you maybe measure the distance between the 2 lower holes? I have read somewhere it should be about 1 inch(2,5cm)
Thanks
|
| |
|
|
|
|
|
|
|
Feb 10, 2014 19:28:16 GMT
|
|
really well done. great looking little car!
JP
|
| |
I know its spelled Norman Luxury Yacht, but its pronounced Throat Wobbler Mangrove!
|
|
JohnT
Part of things
 
Posts: 66 
|
|
|
|
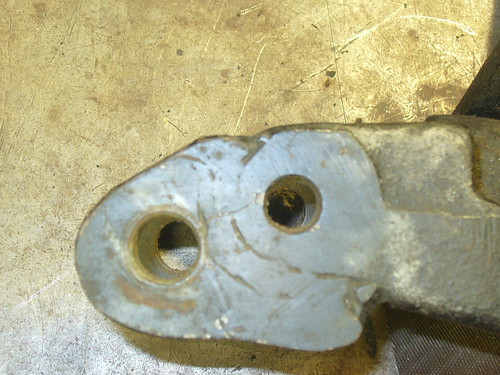
Thanks John, I also got an answer from Ditchdigger, which is great. in preventing getting the angle wrong, he says the best is just extend the uprights and don't add any angle. Could you maybe measure the distance between the 2 lower holes? I have read somewhere it should be about 1 inch(2,5cm) Thanks Here's some Fiat 600 lowering ears done by PBS. The 850 version is identical except for a smaller lower bolt hole. Center to center between the lower mounting holes is 1-3/16". 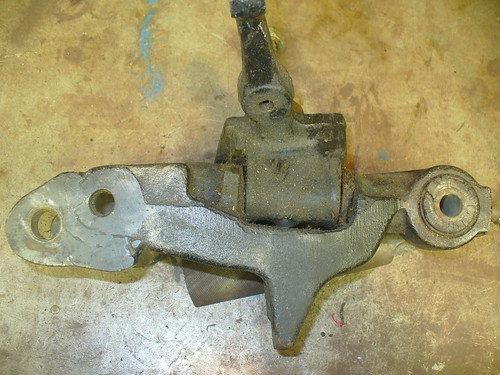

|
| |
Last Edit: Mar 10, 2014 2:28:59 GMT by JohnT
John T
Fiat 600 60HP, Fiat 850 60HP, 70 Plymouth GTX 500HP
|
|
gavs1
Part of things
 
Posts: 571
|
|
|
|
|
Really stunning and well thort out, bookmarked for sure
|
| |
|
|
|
|
|
Mar 11, 2014 15:41:58 GMT
|
Thanks John, I also got an answer from Ditchdigger, which is great. in preventing getting the angle wrong, he says the best is just extend the uprights and don't add any angle. Could you maybe measure the distance between the 2 lower holes? I have read somewhere it should be about 1 inch(2,5cm) Thanks Here's some Fiat 600 lowering ears done by PBS. The 850 version is identical except for a smaller lower bolt hole. Center to center between the lower mounting holes is 1-3/16". 


Thank you for posting these pictures John, I also have had contact with Paul van der Heyden, who owned scuderia topolino, He told me the bottom hole should be 25mm lower and 5mm more inward. Your pictures seem to confirm that. |
| |
|
|
JohnT
Part of things
 
Posts: 66 
|
|
|
|
Harness BarNever too late for adding some safety equipment, but it sure would have been easier if the car was still in primer.  These are 4-point 2" wide seat belts and shoulder harness being installed a bit too late in the build process. That is the reason for all the sheets and covers to prevent weld spatter from melting into the Lexan rear windows and front windshield. You can see where I had to sand off paint on the rollbar too. Nothing like doing things over again.  I decided on a proper install directing the shoulder harness nearly straight off the shoulders rather than bolted to the floor. For access to the rear of the interior I chose a harness bar install which was removable and hence required all this fabrication. The removable harness bar kit is generally marketed as a door swing-out bar, but I adapted it to a removable harness bar. The kit came with the weldon ears which were a bit too large and interfered with installation of the belt retainers (i.e. loops on top of the bar). There are ways to fabricate these pivots or just weld the harness bar directly to the rollbar, but these CNC pieces look impressive and work great. Here are some sources for the Kits: Chris Alston Rollbars Similar to what I used Applied Racing Tech What I used with an extra pin added to the order Mcdonald Bros Racing One of my favorite kits with extra nice pins 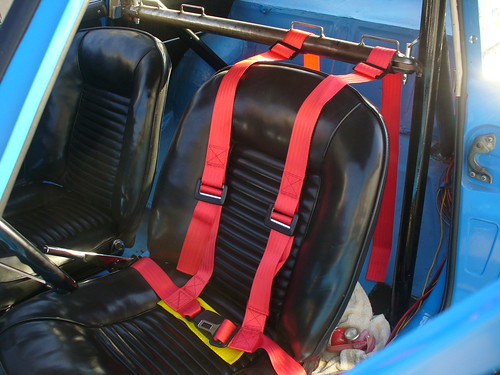 Test install after all the welding was complete. The car is so small that the left shoulder belt is almost on top of the pin location. This is the reason for shortening the ears that weld on to the main hoop and getting the pivot nearly up against the main hoop. 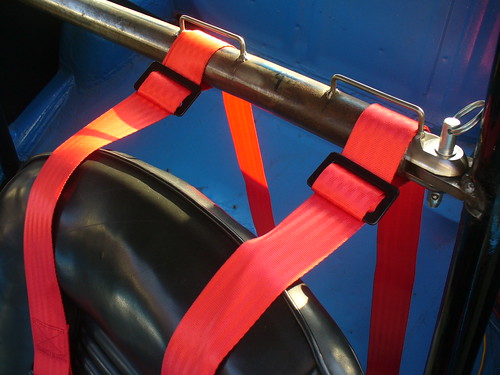 ![]() Here the initial tack welds are complete  Retainers are big enough for 3" belts in case I decide on wider belts in the future 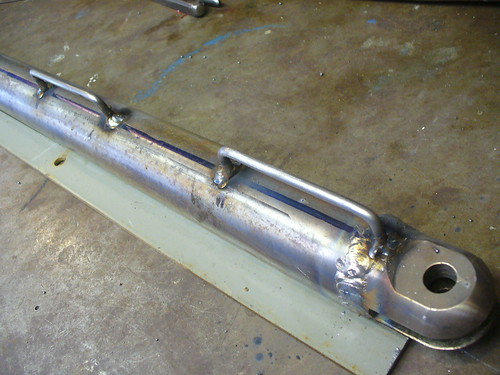 Ears had to be shortened so the harness retainers could be installed. Otherwise the pins would be located where the retainer needed to be welded. 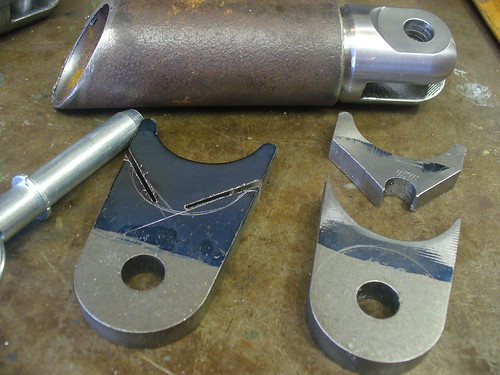 Cutoff wheel used to make a v-cut and a hole drilled in the middle made it easy to remove a section of the ear. A grinder was then used to get it back into shape and a final finish with a half-round file.  Initial mockup of the retainers in place with magnets while I sat in the seat to get the belts where I wanted them. The black wire is holding the extra belt in a roll to keep it from hanging to the floor. After I paint the bar and do the final install, the extra length of belt will be rolled up tight and held in place by a zip-tie. 
|
| |
Last Edit: May 18, 2014 3:59:01 GMT by JohnT
John T
Fiat 600 60HP, Fiat 850 60HP, 70 Plymouth GTX 500HP
|
|
|
|
|
Mar 17, 2014 12:16:26 GMT
|
|
Nice John! looking good,
Did you make your own rollcage?
|
| |
|
|
JohnT
Part of things
 
Posts: 66 
|
|
|
|
Nice John! looking good, Did you make your own rollcage? Didn't really make my own since I couldn't move my car to a tube benders shop. I looked around for a main hoop to start with. Found and old 850 spider rollbar and modified it to fit. I'm just guessing it's a Fiat bar, maybe it's for another car, but the point is I think I could have started with just about any rollbar. I was a bit reluctant adding this rollbar since the car is mostly a street car. I decided against a full rollcage due to all the weight. This is heavy wall tubing and is very heavy. If I could do it over again I would use thin wall chrome moly tubing. Added about 4 inches to the bottom of the main hoop since it was too short. This is the main hoop after pool acid bath (hydrochloric acid) and extra tubing tack welded to the bottom. The little rusty pipe on the floor is what it used to look like.  New floor plates along with the old bolt-in's  Everything is tack welded in place and ready for final welding. This would have been a good time to install the harness bar. I just didn't have my mind made up yet on a 3-point, lap belts, floor mount and so on. 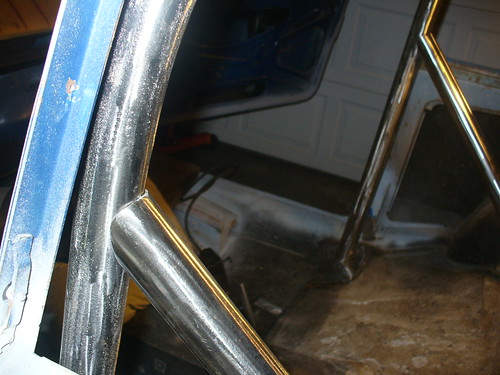 Steel floor plates being welded to the floor and the bar is being positioned for welding.  The most risk in this install was guessing how much clearance will be needed for a headliner.  |
| |
Last Edit: Feb 3, 2015 16:29:12 GMT by JohnT
John T
Fiat 600 60HP, Fiat 850 60HP, 70 Plymouth GTX 500HP
|
|
|
|
JohnT
Part of things
 
Posts: 66 
|
|
Sept 25, 2014 5:36:27 GMT
|
KYB Gas Shocks modified for installation on a Fiat 850
The loop/bushing on the top was donated from my old 850 shocks and the bottom pin is from the top of some Monroe-Matics. You can see a picture of the blue Monroe Matic (rear 1973 mustang) in a previous post on modding some Spax shocks. A shock with a pin on the top is useless for an 850, so I chop off what's needed from other shocks to make them work on a Fiat. I've given-up trying to locate shocks for an 850, since they are usually expensive Koni's that need a rebuild. Plus, my car is lowered and needs more than a replacement shock, so altered spec shock is needed that has a reduced travel distance between compressed and expanded. The new top and bottom are mig welded using a spray water bottle to reduce heat between tacks and prevent burning the rubber bushing and exploding the canister. Sometimes I use a clay heat barrier, but I think water cooling is fool-proof. I have never met anyone willing enough to weld on a gas shock and I'm not endorsing it, cause I sure wouldn't want anyone to get hurt. Personally, I'm more afraid of working under a car on my back, even with jack stands.  If you dissect a shock, you'll find the bottom cup you weld on is really thick and it's not likely that you would blow a hole though it during welding. Plus, what I attempt to do is leave some "meat" from a left over loop or pin from what was cut off. Actually the most ideal shock for welding are KYB's with a bottom strap mount (60's Ford Mustang?). I just cut the ends of the straps off and weld on the center left-over strap. I've been test driving the coupe for a couple days and they are fantastic. The factory spec shocks allowed the suspension to bottom-out very easily since they compress with no resistance, unlike GAS shocks. Now with the Gas charged versions I can go over any speed bump, dip or hard corner without constantly riding on the bump stops. I don't even think I'm hitting the rubber bump stops at all or just barely. It's a good firm feeling without the constant beating and hammering on the rubber bump stops. Here they are just after welding the top loop and bottom stud. The dust cover is no longer needed IMO. But installing boots or the original cover is possible for extra protection. 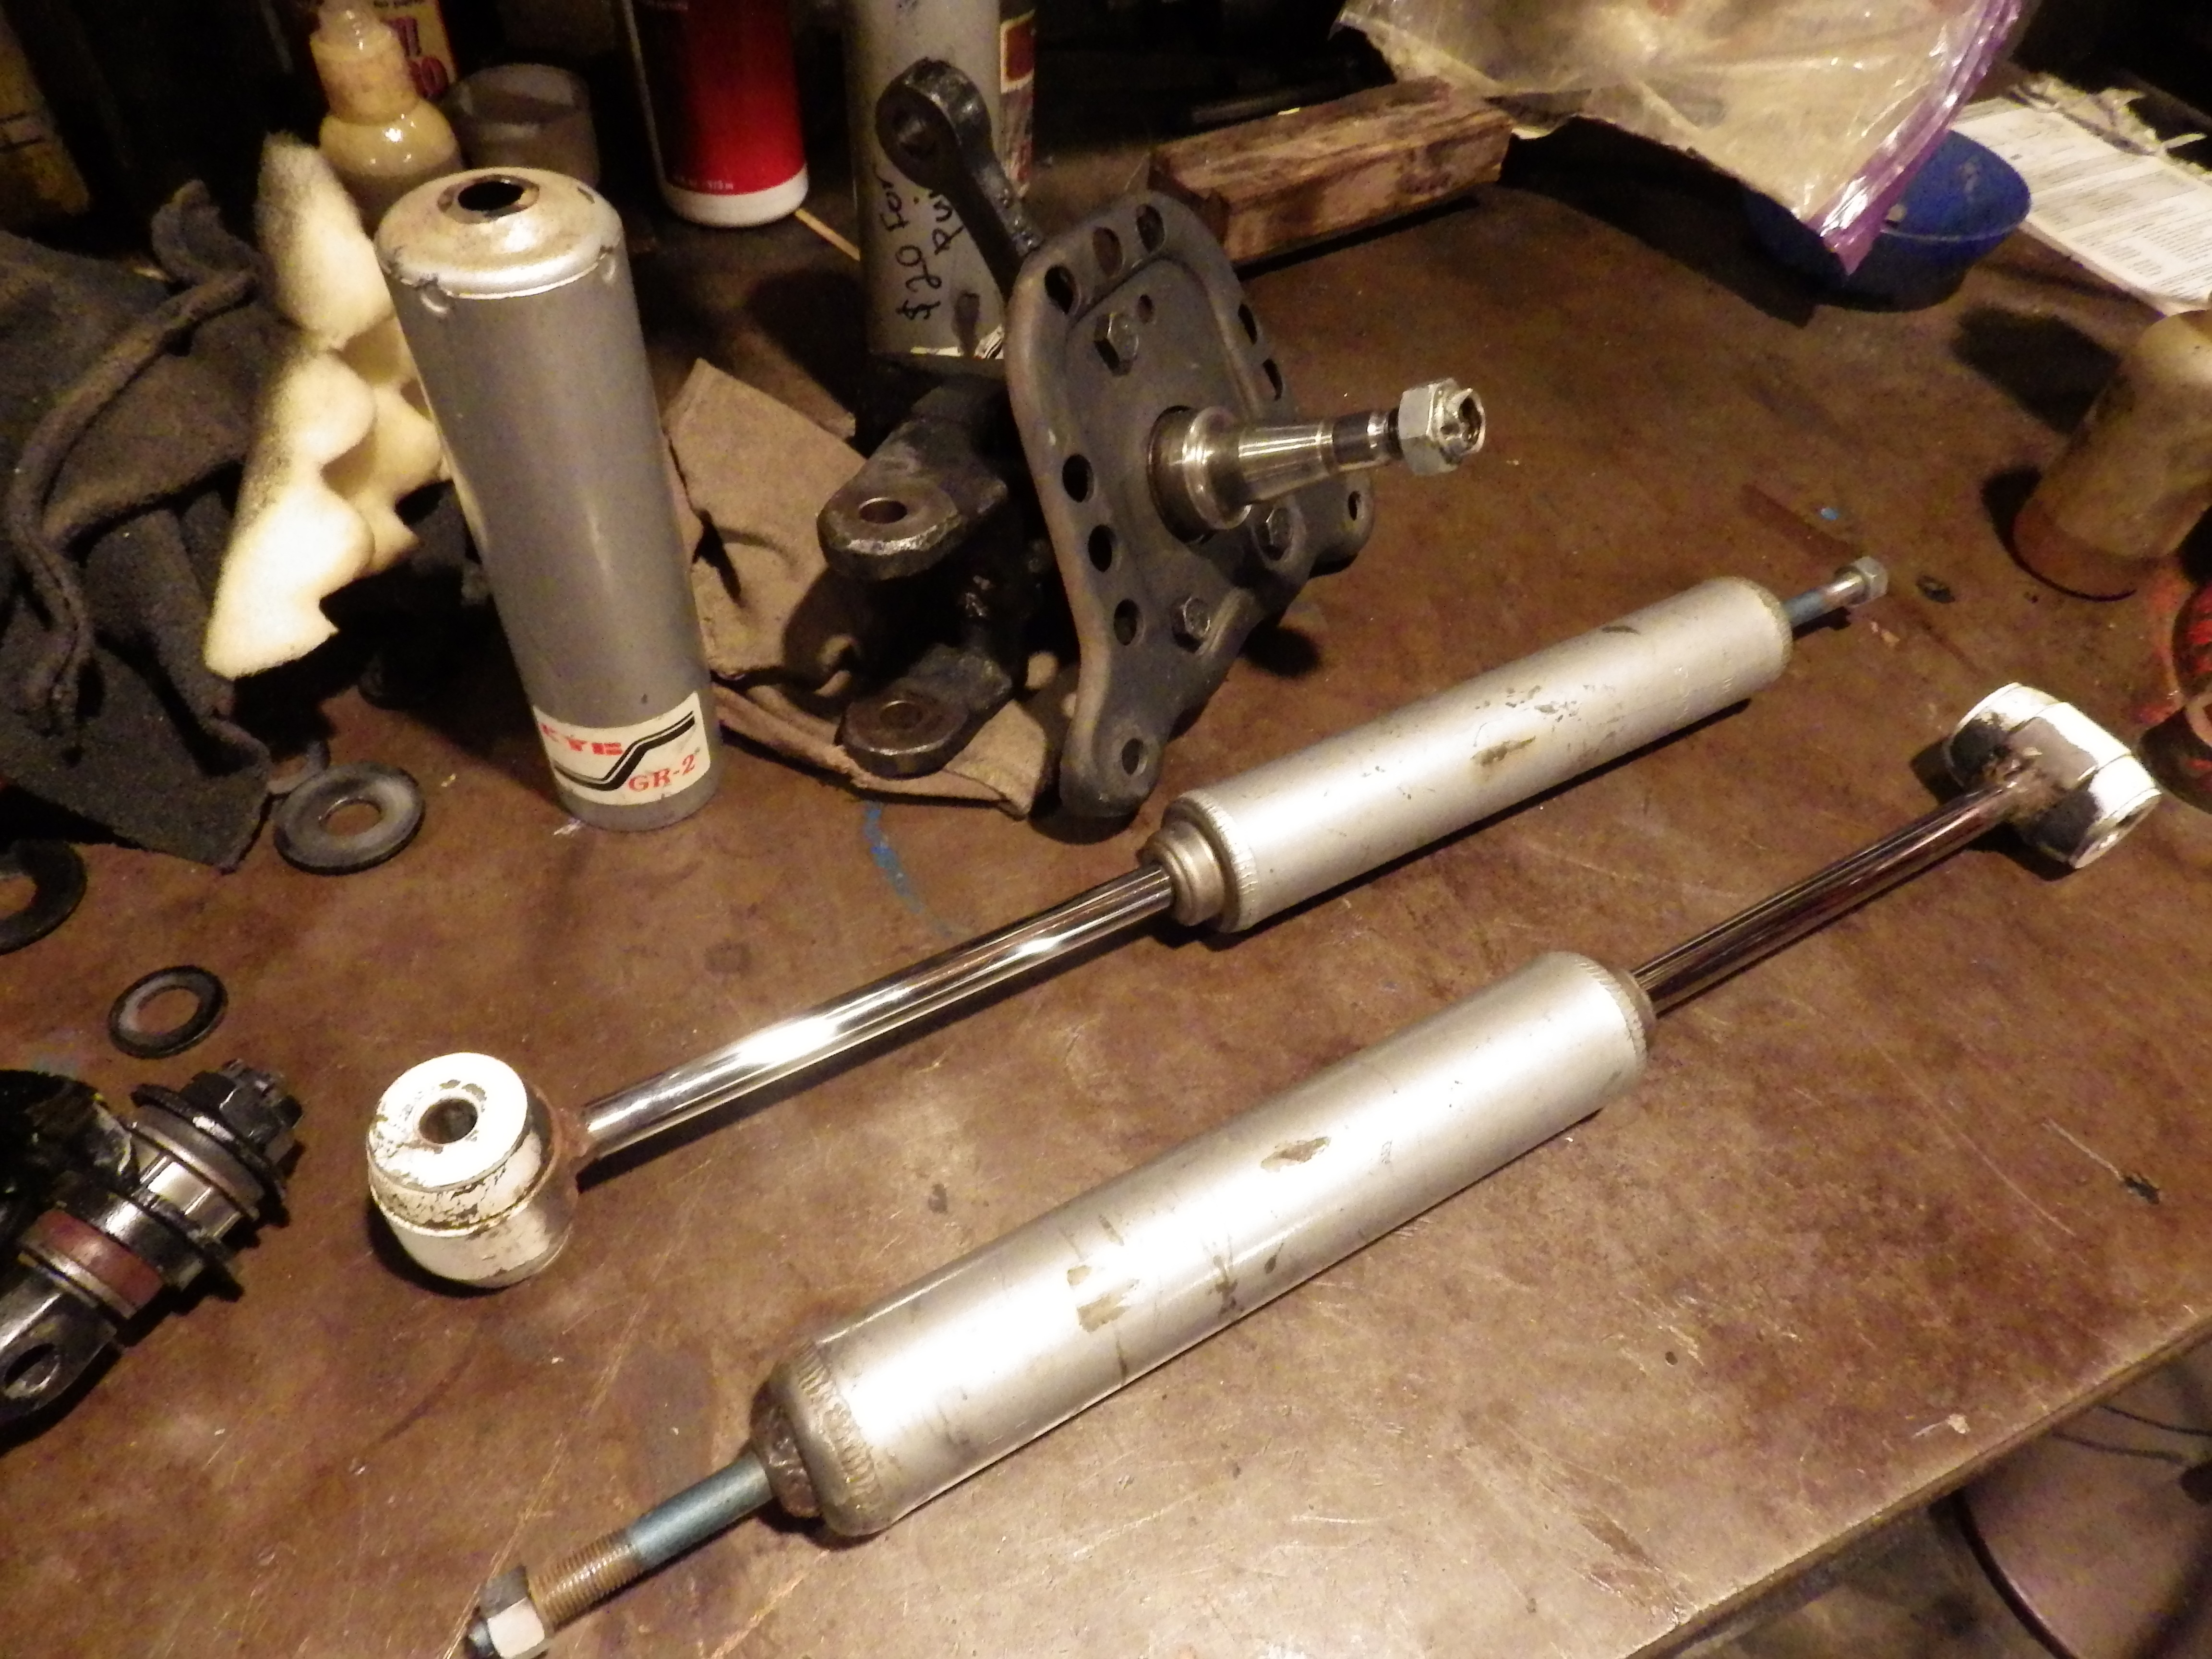 After some paint and stickers they kinda look like they were made-to-fit. 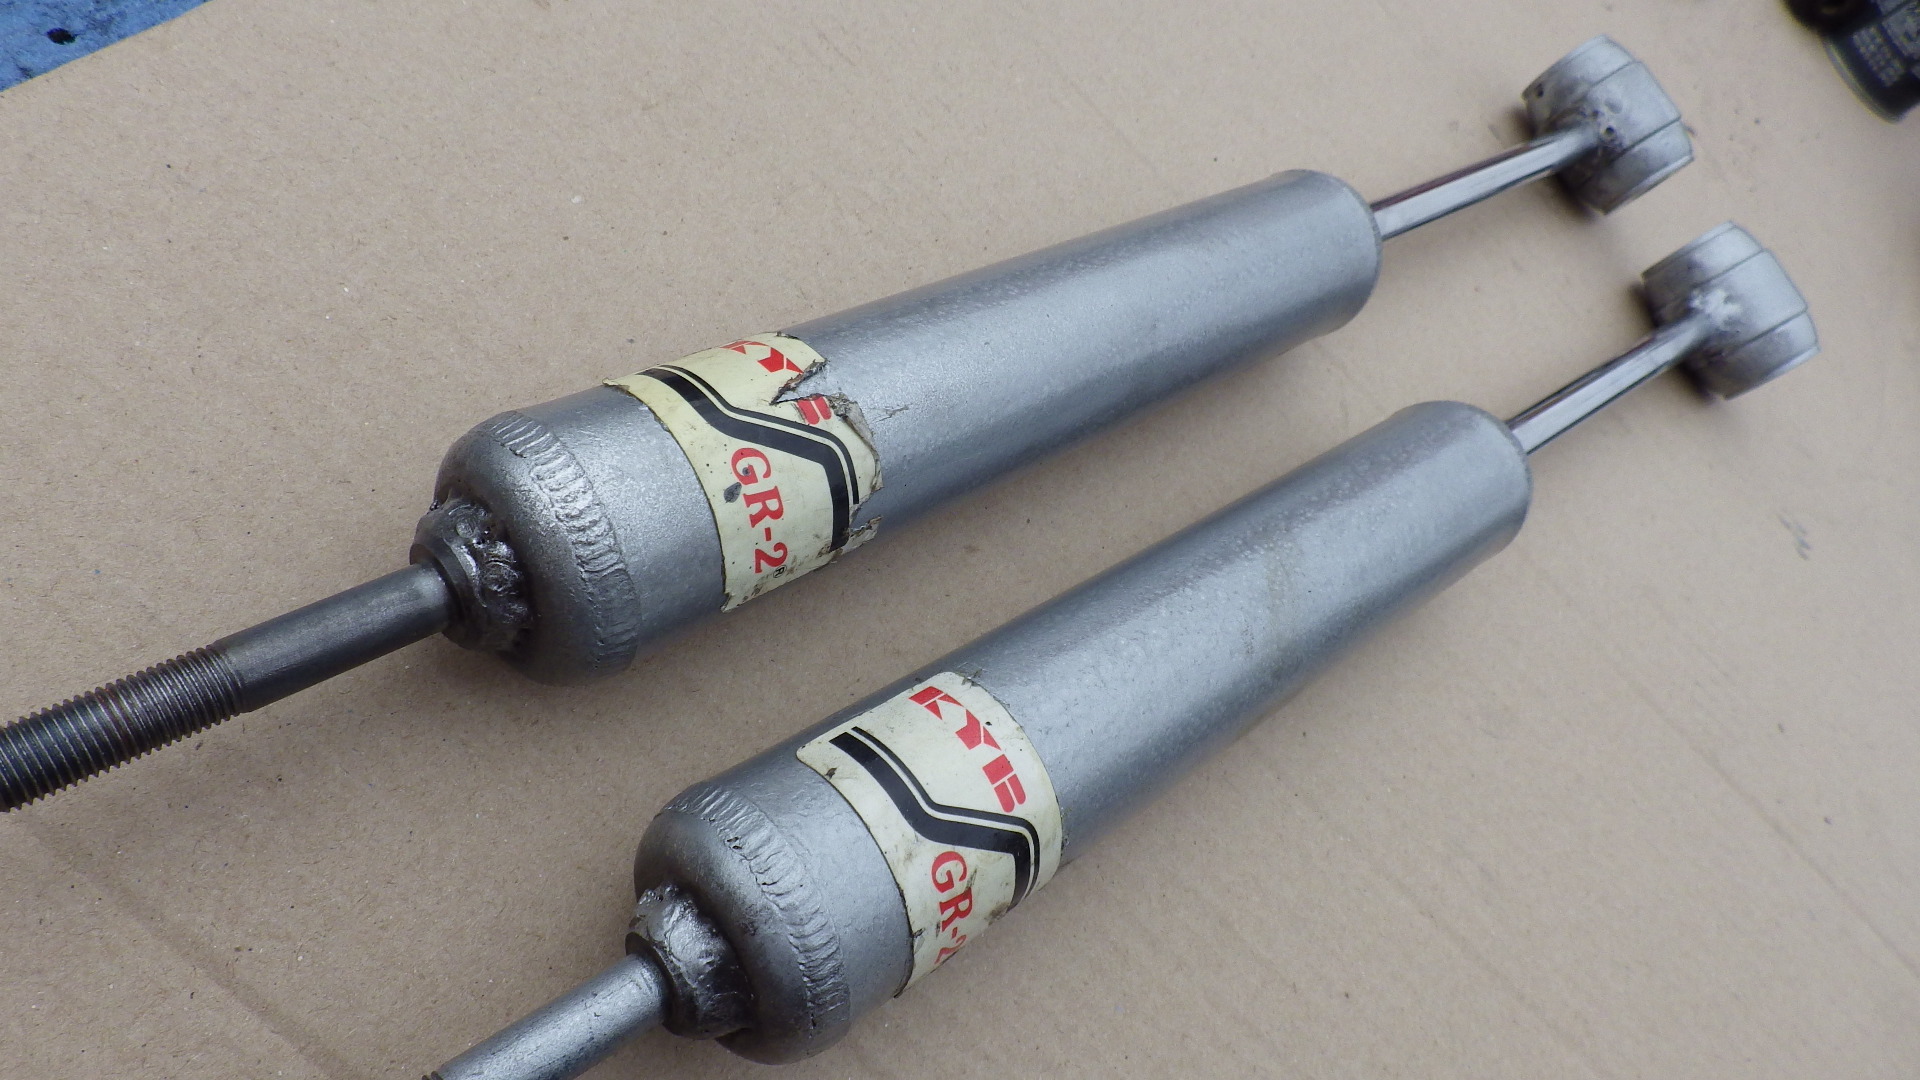  Just started playing around with fabricating polyurethane bushings for the a-arms. So far I can't tell much difference with stock bushings since the shocks over compensate or coverup/eliminate any sort of fair way to make a judgment. To really feel the difference, only One change should be made instead of multiple changes and expect to tell what improvement was made my each modification. I would just have to say things feel more: precise, firm, controllable and predictable. But anything would be better than old bushings that tore themselves apart (see pic below). What is the part number of these bushings? I'll have to dig it up, but just ask or post a question to remind me.  Note the chunk of plastic missing on the inner top hole of the bushing caused by running a drill too confidently through both bushings in one pass. Sometimes the cost of learning new things can be costly and time consuming, but in this case I don't think it impacts operation at all. The zerks need to be removed during installation and you need lots of patients installing the second bushing and lots of coaxing with a small tool to help slip the bushing in it's position. 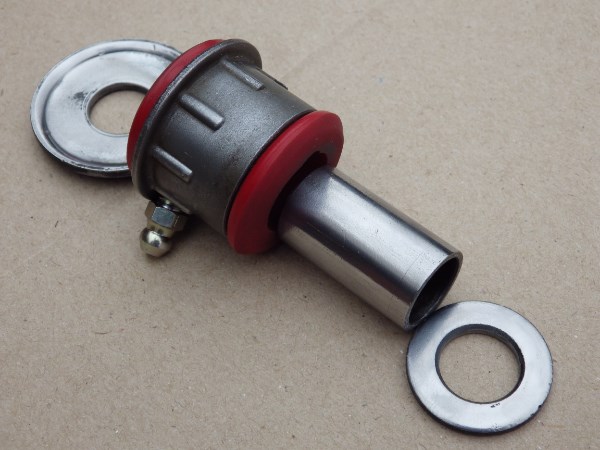 1/4-28 grease fittings/zerks might be more common in US parts stores but I chose the metric 6.00M x 1.00 style since they are slightly more compact. That is a small area you have to work with. I got a bag of 10 Dyna-Flow Zerks (made in UK) from Fastenal for $3.00. Harbor Freight also has an assortment box of fittings, but I find those break too easy. Of course there are many other brands, but I think something more robust with better metallurgy will holdup better during frequent grease gun attacks.  Surfaces that pivot against Steel are polished to further prevent any binding. The flat washer was sanded on a scrap piece of carpet to hold it in place while using a DA with 120 grit for the 1st pass. I followed that with aggressive Black polishing compound on a buffing wheel to get a mirror-like finish. The concave washer couldn't be sanded by machine to easily, so most of it's polishing was done on the wire wheel then buffing wheel. 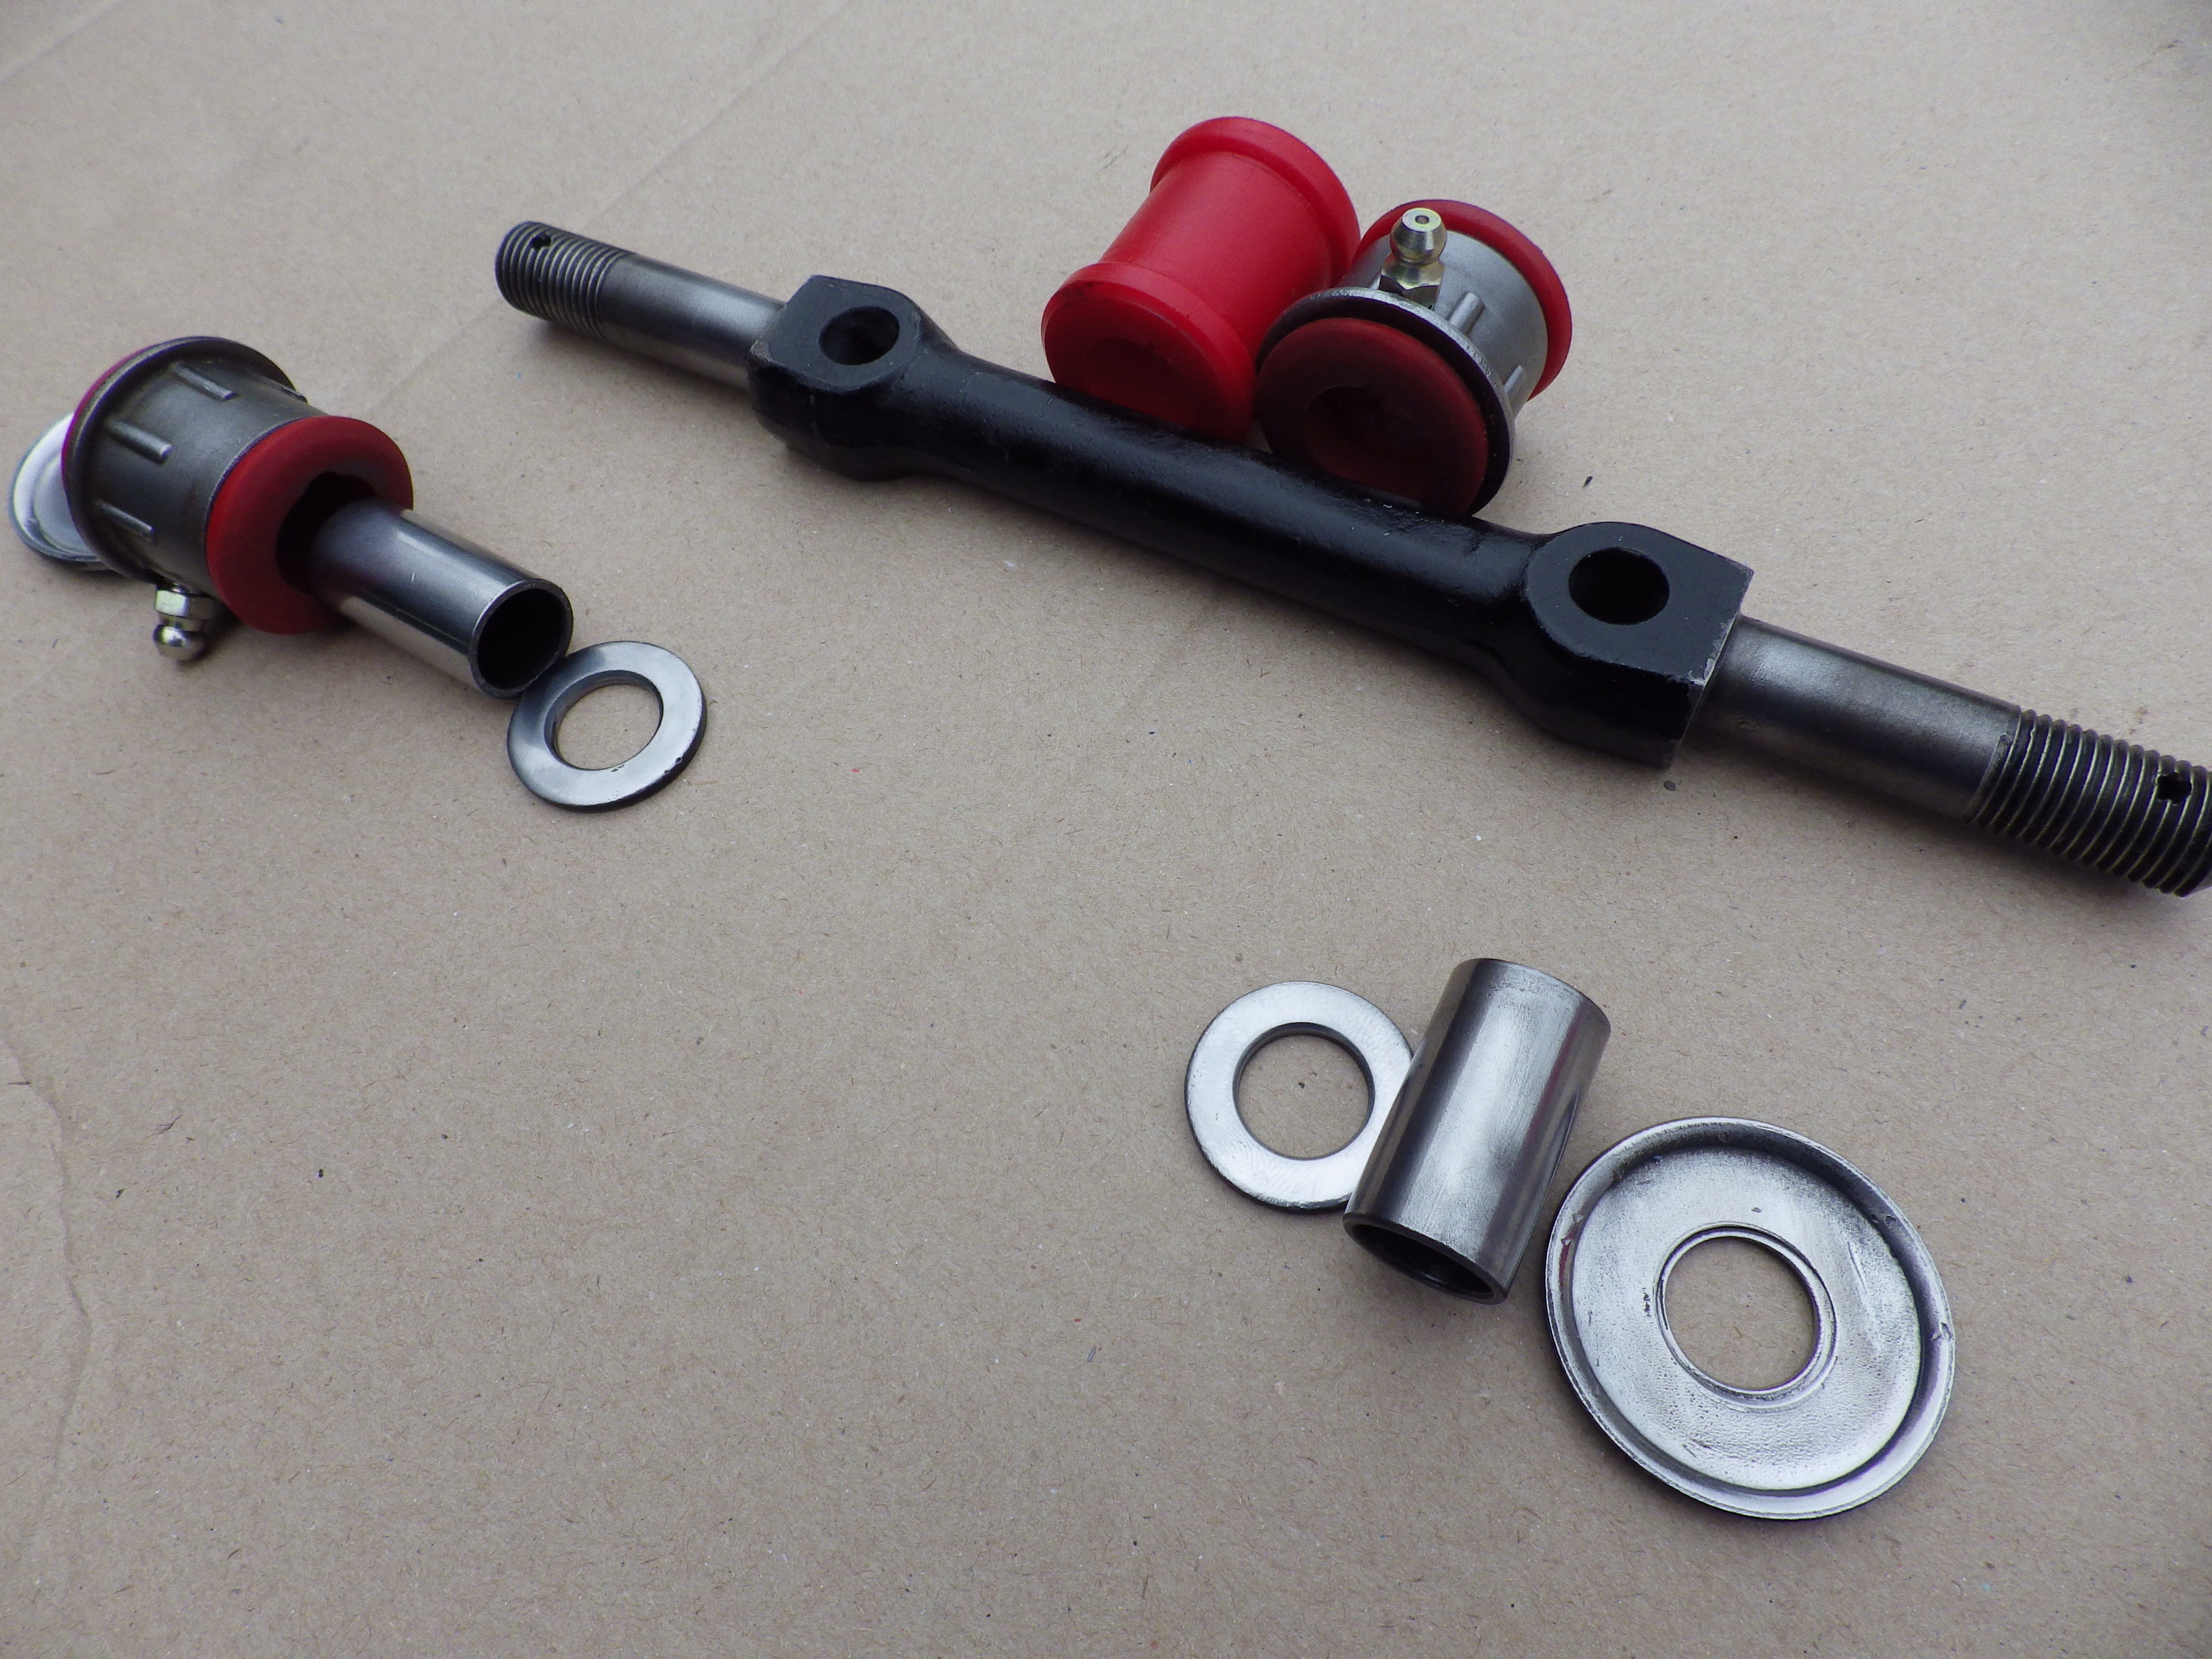 ![]() See this video to get an idea of what binding and careful fitting is all about. This video has excellent examples about how bushings are supposed to work and what makes them work right or be full of squeaks. Here are the the rebuilt a-arms being greased along with the kingpin assembly. I used a very "sticky" trailer axle bearing grease for the a-arm bushings and Amsoil Synthetics for the kingpin grease. You can see the Red Amsoil grease still on the grease fitting before I wiped everything clean. I haven't greased the front end since building the car 2000 miles ago and they were empty or maybe you could say DRY. It took several pumps of grease to get some oozing out again. I would suggest greasing the kingpins every 1500 miles, which I think is what the factory says (I could be mistaken). Next time I have the front end apart I'll be installing Delrin or Poly bushings in the upper kingpin bushings.  If someone has already figured out the bushing part number or size of material to use, Please let me know. 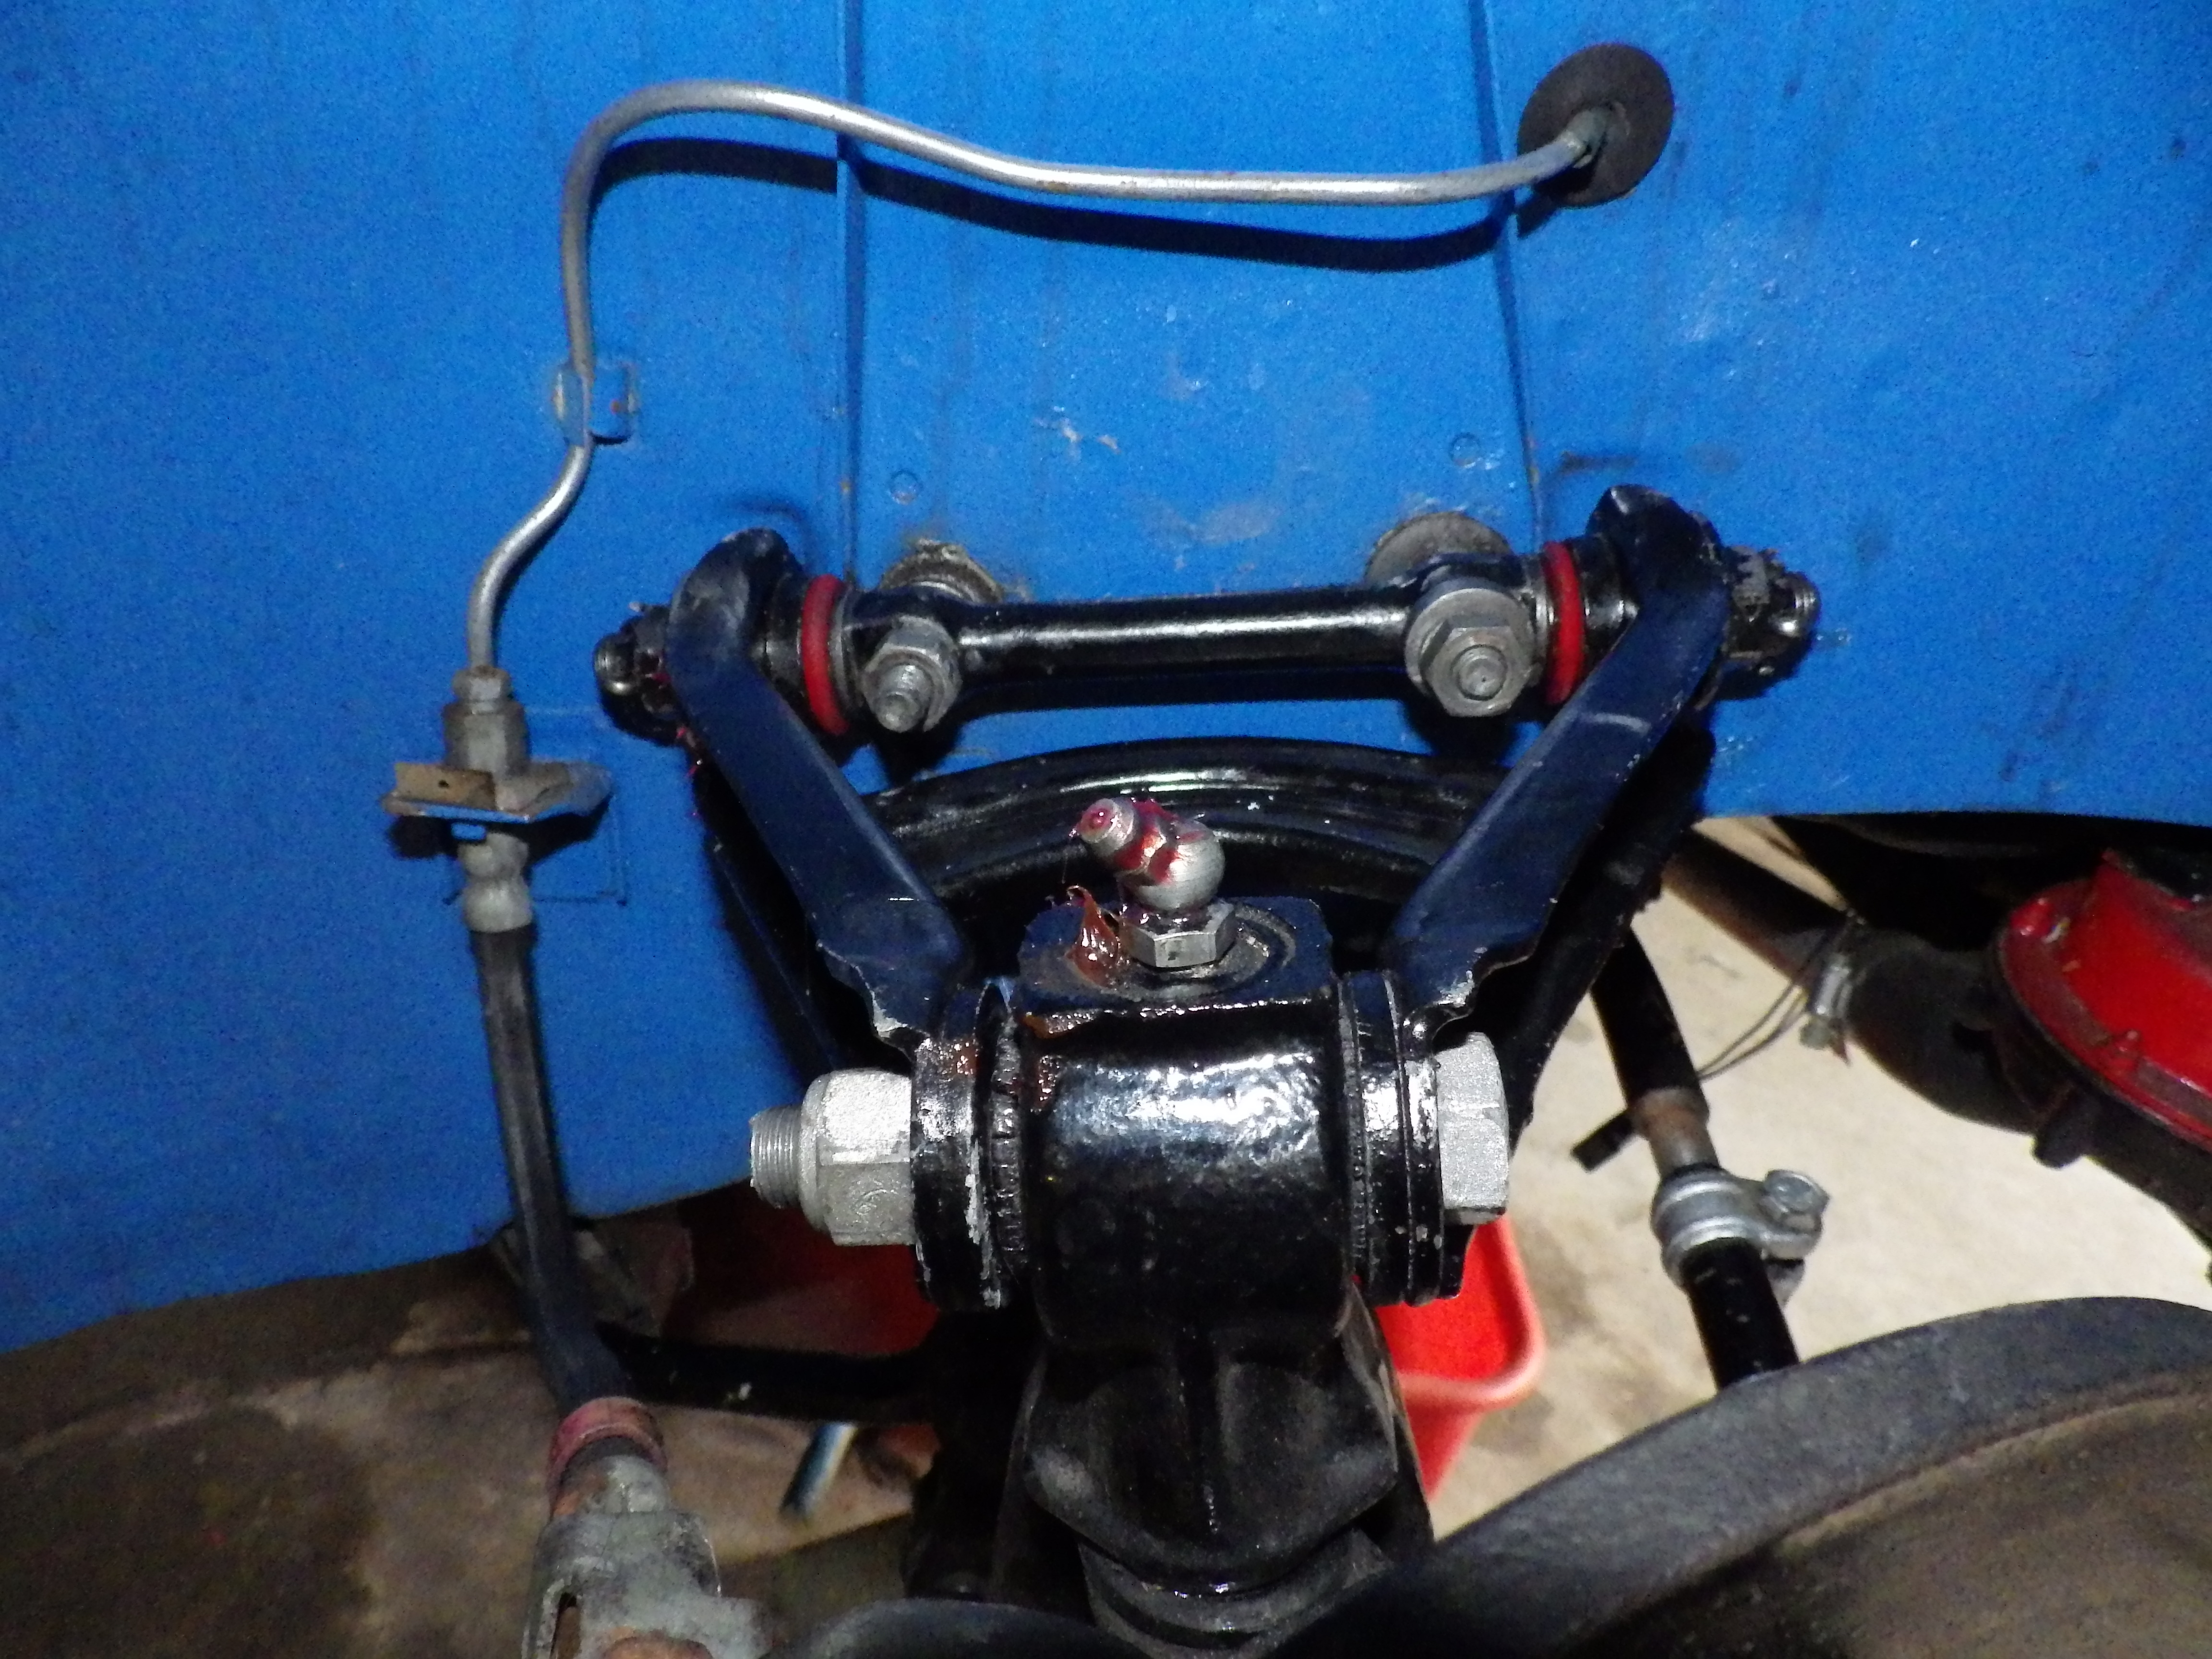 These are my factory original rubber bushings. They exploded like this because they must hate being reinstalled on a different car or switching sides. Could be someone was driving the car to aggressively  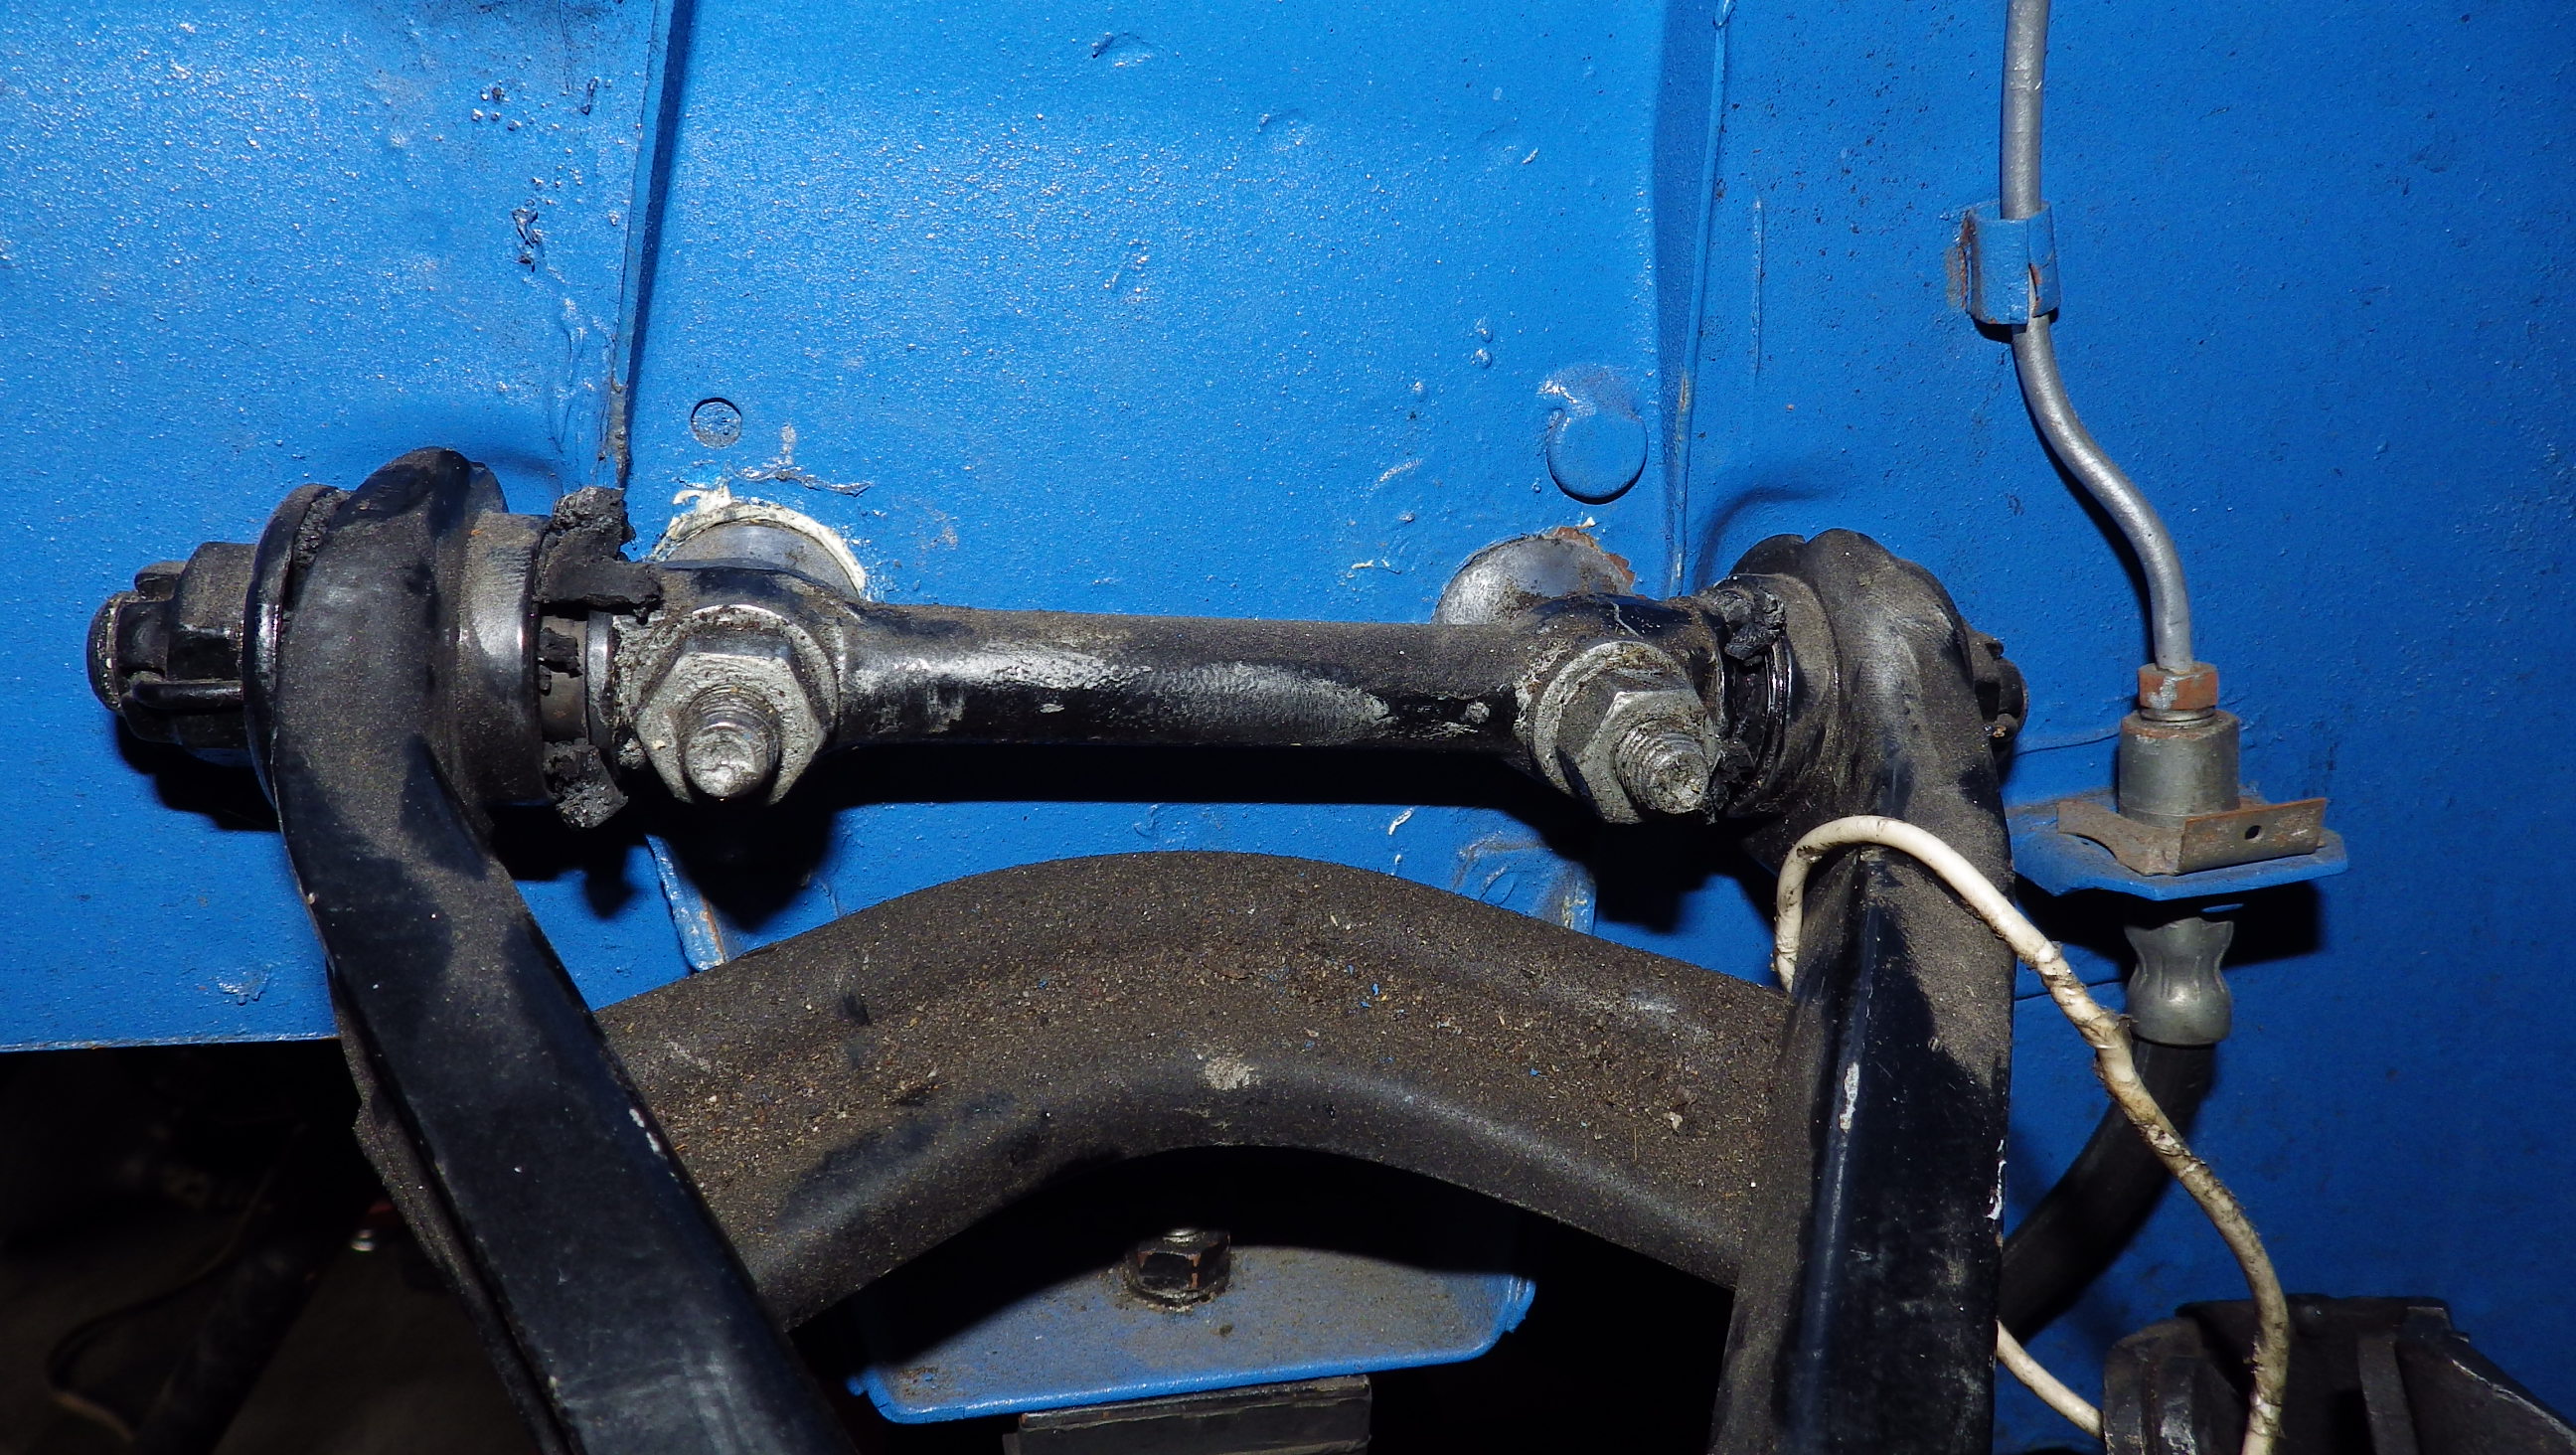 |
| |
Last Edit: Feb 13, 2015 6:55:25 GMT by JohnT
John T
Fiat 600 60HP, Fiat 850 60HP, 70 Plymouth GTX 500HP
|
|
|
|
|
|
|
Sept 26, 2014 1:25:08 GMT
|
|
Do you mind sharing the source of those bushings? I've been looking at the Energy Suspension catalog.
|
| |
1987 Alfa Milano/75
1979 Alfetta Mille Miglia
1976 Alfetta GT race car
1970 Lancia Fulvia 1.3 Rallye S
1968 Fiat 850 spider
|
|
|
|
|
Sept 26, 2014 10:36:20 GMT
|
|
Great update! love to know the source of the poly-bushes also.
|
| |
|
|
JohnT
Part of things
 
Posts: 66 
|
|
Sept 27, 2014 4:53:40 GMT
|
Great update! love to know the source of the poly-bushes also. Here's what I have for now.... Jegs Prothane Universal BushingsProthane 19-909 are the bushings I used in Red. They come in black also. I think energy suspension makes them too. They are 5/8" ID (.625) and 1.090" OD in the center section and 1.4 OD" on the hat. I was also looking at these: Prothane 19602 - Pivot Bushings - 1-1/8 OD - 9/16 ID - 1 Inch Long These assemblies are more complete and come with robust hardened steel inner bushings designed for use as a pivoting bearing surface. The ID of the inner bushing is 9/16" which is about .010 clearance on the Fiat 14mm a-arm shaft. This approach needs more looking into. The OD seems a little too big to me and might not fit into the Fiat outer bushing shell. If anyone trys this out, please let me know what you find. It might be an easier and better way to go. There might be better choices out there, but not for $8.34 shipped to your door for both sides. Jegs has the craziest Free shipping policy I've ever seen. Love it  Sorry it probably doesn't apply to my friends overseas.  They are not a direct fit, but are the closest I could find. I didn't choose them based on price but the least amount of cutting, sanding and drilling. There is a lot to making a set of these, so please don't misunderstand and think they just pop in. It's hard to explain all this in text. Makes me want to start making some Utube videos of this stuff  Basically this is what you have to do: Basically this is what you have to do:- Cut them in half. I made a jig to hold a bushing in a drill press while I used a hacksaw blade to get a straight cut. A miter saw setup might work too. You can sand it down (step 2) to get it straight if you can't cut straight like me.
- Shorten each half to fit in the Fiat bushing housing (it's a tight fit, but that's the only way to make this work). Leave the OD of the bushing alone to keep the tight fit. You have to squeeze the bushing half's into the housing in a vise and persuade them to pop in with a small screw driver till they pop in.
- Bevel and thin down the outer hat or ring/CROWN (see the Bushing tuner Utube video to see why this is done; but not critical in this install) The bevel is optional but they must be thinner (not as tall) or you won't be able to clamp them down enough to fit the cotter pin on to the shaft during final assembly.
- Assemble both bushing half's in the Fiat outer housing. Keep them in the same position since once you do the next step you want them to stay aligned as you'll never be able to get a completely straight hole. Ever try drilling rubber
 . If the halfs are drilled and removed from the housing the center bush won't go in smoothly since the bushing halfs may be offset too much for the inner bushing to push thru easily. . If the halfs are drilled and removed from the housing the center bush won't go in smoothly since the bushing halfs may be offset too much for the inner bushing to push thru easily.
- Drill a 11/16" hole though both bushings being careful this operation doesn't take a chunk of urethane with it (happened to me and you can see it in the pictures) GO slow with that Huge Bit.

The OD of the center bushing is .675 which is 11/16th to the nearest 16th. This gives about the perfect fit where you can push the center bushing in by hand. This is where you want smooth rotation. - A hand mandral/dowel to hold the bushing while turning it is how I did my sanding on a belt sander with 120 grit paper. Next time I'll mount it in a drill so it's rotating constantly thereby getting an even bevel/taper.
Here you can see how all the hand fabricating looks like. This picture was taken during the process and you can see the channels I carved into the ID to provide a place for some grease to do it's job (still needs a cleanup in this pic to get rid of the melted urethane). Not sure if these would squeak with the precise fitting I did to prevent binding on the outer washers, but installing grease zerks is kinda easy. Just don't point them the way I did. Point them outward to allow a grease gun head to have enough clearance. The smallest grease fittings/zerks for this job are 6m x 1.00. Extended to long zerks would give you the best clearance for a grease gun.  Thermoplastic Acetal Resin (Delrin is Duponts name for this stuff) is what I'm going to try next with some round stock of 1.25". This material is in between Polyurethane and hiem joints or sperical bearings. The round stock of Delrin I got for about $12 for a 1' length at McMaster Carr. This will require a lathe, which I haven't figured out how to accomplish yet. All I have is a small UniMat hobby lathe, which might be more than ideal; I HOPE  . If someone wants to make some of these in volume you can get 6' lengths of it on ebay for around $30. Once they are done you can hook me up with a set.  Here is a link to more info on Delrin Del-A-Lum - For over twenty years - THE NO squeak bushing setup |
| |
Last Edit: Oct 5, 2014 18:14:31 GMT by JohnT
John T
Fiat 600 60HP, Fiat 850 60HP, 70 Plymouth GTX 500HP
|
|
|
|
|
|
|
|
I think your explanation is pretty clear.
And I haven't seen or read any stories yet about putting PUR bushes on a fiat 850 or 600.
In Holland we probably can't find the bushes that cheap.
with my former job a had some bushes made up from PUR. they used a lathe but had to put the PUR in the freezer first.
still love the car and updates!
|
| |
|
|
JohnT
Part of things
 
Posts: 66 
|
|
|
|
I think your explanation is pretty clear. And I haven't seen or read any stories yet about putting PUR bushes on a fiat 850 or 600. In Holland we probably can't find the bushes that cheap. with my former job a had some bushes made up from PUR. they used a lathe but had to put the PUR in the freezer first. still love the car and updates! Fantastic IDEA! Freezing them would be a way to machine them. I could just throw them in the freezer overnite and drill them the next day. This should give me a straighter hole. Great, no cost solution. Thank you very much. I really wish I could have done a more sano job on these, but at least they work and I can just call them my 1st prototype, even if they are rather crude. BTY I only did the right side since as I lost the other Poly bushing. I've been taking it everywhere sharing the idea and must have slipped out under a bench somewhere. Now I can't really tell the difference in these materials. One side of my car has new urethane and the other has New rubber bushings and I don't think anyone can feel a difference on the street. Over all I'm very happy with the idea and plan on converting the other side next time I have the front end apart. I'm tempted to use Zero-Play bushings like Heim Joint or Spherical bearings for my next version. The only factory cars I know of today that run Spherical suspension bearings are extreme street performace cars lik Ferrari Scuderia or Porsche 911 GT3 RS. I don't consider an 850 in the same class but the way my car is set up; I would say it's on the extreme end, and wouldn't be that much of a hinderence in maintenance. I just have to figure out the correct sizes and get them ordered. I really hope you can find them in or around Holland. Since the bushing is small and is considered a shock absorber bushing, I hope it will not be expensive. We have a lot of competition between mail order catalogs now and that's the reason for the cheap price I quoted. One of the USA vendors might ship overseas too, so it might be worth checking. Glad you like the updates  and the car. 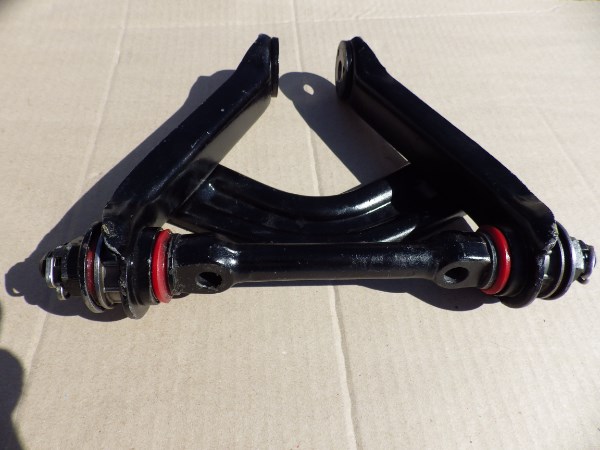 |
| |
Last Edit: Dec 4, 2014 6:14:41 GMT by JohnT
John T
Fiat 600 60HP, Fiat 850 60HP, 70 Plymouth GTX 500HP
|
|
JohnT
Part of things
 
Posts: 66 
|
|
|
|
Since my Media blaster cabinet is too small for 13" wheels I used hydrochloric acid to get most of the rust off. Normally called "pool acid" or "muratic acid" is a diluted version of a potent rust remover. These are X/19 centers with golf cart 7" rims I found in my inventory. I'll have to get a couple more made, but for now I'm going to try them for size. Here I'm using large plastic trays to contain excess acid. Any acid that's left over, I put back into a plastic container for future use in maybe DE-rusting a pile of bolts.  More cleanup after the acid treatment with Wire wheels and 80 grit sandpaper.  Here are some rods of Delrin getting ready for forming into Fiat suspension bushings.  |
| |
John T
Fiat 600 60HP, Fiat 850 60HP, 70 Plymouth GTX 500HP
|
|
|
|
|
|
|
|
Thanks for listing the bushings and the update. Looking forward to seeing the wheels on the car.
|
| |
1987 Alfa Milano/75
1979 Alfetta Mille Miglia
1976 Alfetta GT race car
1970 Lancia Fulvia 1.3 Rallye S
1968 Fiat 850 spider
|
|
|
|
|
|
|
|
I really love these little cars, fantastic and thorough work being carried out here too. Well done.
|
| |
|
|
JohnT
Part of things
 
Posts: 66 
|
|
|
|
Thanks for listing the bushings and the update. Looking forward to seeing the wheels on the car. Glad you can use the information on the bushings and hopefully You come up with something better, easier and more Sano.  I'm also looking forward the seeing the wheels on the car. I just primed them and now looking at a possible primer/filler coat to fill in the rust pits on the visible parts of the wheels. These rust pits are left over from the acid bath. Might be over-kill for some wheels but I've been hasty before on some pitted wheels, and sure enough, those pits really showed thru on the final coat of paint. Here are the wheels prior to chemical paint remover and final sanding. Maybe a paint remover could be used before the acid bath. It could help to more clearly see the rust better with no paint to obscure things. Keeping the wheels constantly wet takes hours of monitoring thru the day. At some point I said that most of the rust was gone and began doing some mechanical cleaning with wire wheels and sand paper. With some imbedded rust still visible I switched to a phosphoric acid to at least convert the remaining rust. See more about acid treatments in some other post in this thread or just post a question here and I can provide more info. Sometimes these widened wheels happen to be chrome plated which one of these is. I don't like it, and would like to have the chrome removed, but I don't want too wait or add cost, so I just peel off any flaky chrome and sand down whatever I can reach for good paint adhesion.  The wheel color on my car has been a sore point with many who see the car.  Opinions very from I should've painted them White to the Body color to center Black and outer rims another color. The deep dish wheels currently on the car were supposed to be powder coated a typical Chevy Ralley wheel silver. I think the powder coater used something lighter and too little of it since they are rusting already. This pair of new wheels will be painted with light grey color called Mesa Grey from TCP Global. Don't know if they'll stay that color or not; just going to try it out. They should be painted and posted here within a few days. BTY, the two wheel places here in Southern California (that I know of) who do this sort of wheel widening matched their prices at $65.00 a wheel. I think they can go as wide as 10" too.  New Fiat 500 15" Wheels New Fiat 500 15" Wheels Now I wonder who is going to fit some of these on a Rear Engine Fiat. They will sure give the wheel widening places more to work with since 15" wheels are more abundant. Anyone have any thoughts  Thanks for all your support and good comments  |
| |
Last Edit: Oct 10, 2014 15:19:13 GMT by JohnT
John T
Fiat 600 60HP, Fiat 850 60HP, 70 Plymouth GTX 500HP
|
|
JohnT
Part of things
 
Posts: 66 
|
|
|
|
Just sprayed 3-4 coats of Evercoat URO-Fill Acrylic Urethane Primer Surfacer over the grey epoxy primer. This primer/surfacer did a great job and lays out smooth.   Final coat of Mesa Grey Acyclic Enamal from TCP Global. I think I put around 3-4 coats before I noticed I lost some of the Line-detail in the wheel center (see pick below). I normally don't have to watch for losing detail when painting car parts, but these wheel have some stamped detail in them that can easily be lost with too much paint.  Oil Change Time Oil Change TimeHere is a good view of the plumbing, suspension and Spax Shocks. The Electric water pump is visible along with the water inlet fitting attached where the standard Fiat water pump attached. With no rain in Southern California for few years the car is rather clean underneath. This shot was taken during an oil change to Kendell GT1 30 Weight. <img src="https://farm6.staticflickr.com/5599/15507796091_6cd1435d78_o.jpg" style="max-width:100%;" alt=""><br><br>My oil pressure lite stays ON Hard at idle with 30 wieight oil. That's another nice thing about the 20/50 motorcycle oil, is it keeps the idiot lite off longer. I'd like to figure-out how to install oil pressure sender which won't send a signal at low pressures. The light will turn on at idle, and always keeps me "bleeping" the throttle just to make sure nothings broke. I shouldn't complain since I'm running bearing clearances a bit wider than stock and my Oil Pump is highly modified for more flow and preventing cavitation. Here is one of the oil pump pickup modifications where the screen was replaced to pass oil Faster and with more Volume when running heavy weight racing oils at high RPM.  <img style="max-width:100%;" src="https://farm9.staticflickr.com/8388/8451326892_41697c66ac_o.jpg" alt=""><br><br><br><br><u><b>Crankcase Breather Tank</b></u><br>Where those 2 little screw holes are is where 1967 Coupe ID Plate resides on the left side of the engine bay. I haven't installed mine cause it's all corroded and lost much of it's black text. I'm Thinking about putting a decal over it to clean up the lettering and oxidized aluminum.<br>All later coupes have the ID plate and Vin are stamped the the flrewall below the gas tank sender hole. <br>In this pic you have a view of the Crankcase Breather Setup. The "Puke" tank is a Dollar Store stainless steel hand soap bottle with the pump removed. I made a bracket and added a filter to the top then drilled a hole on the side with a rubber thru-ring to insert the breather hose from the Tri-ad. 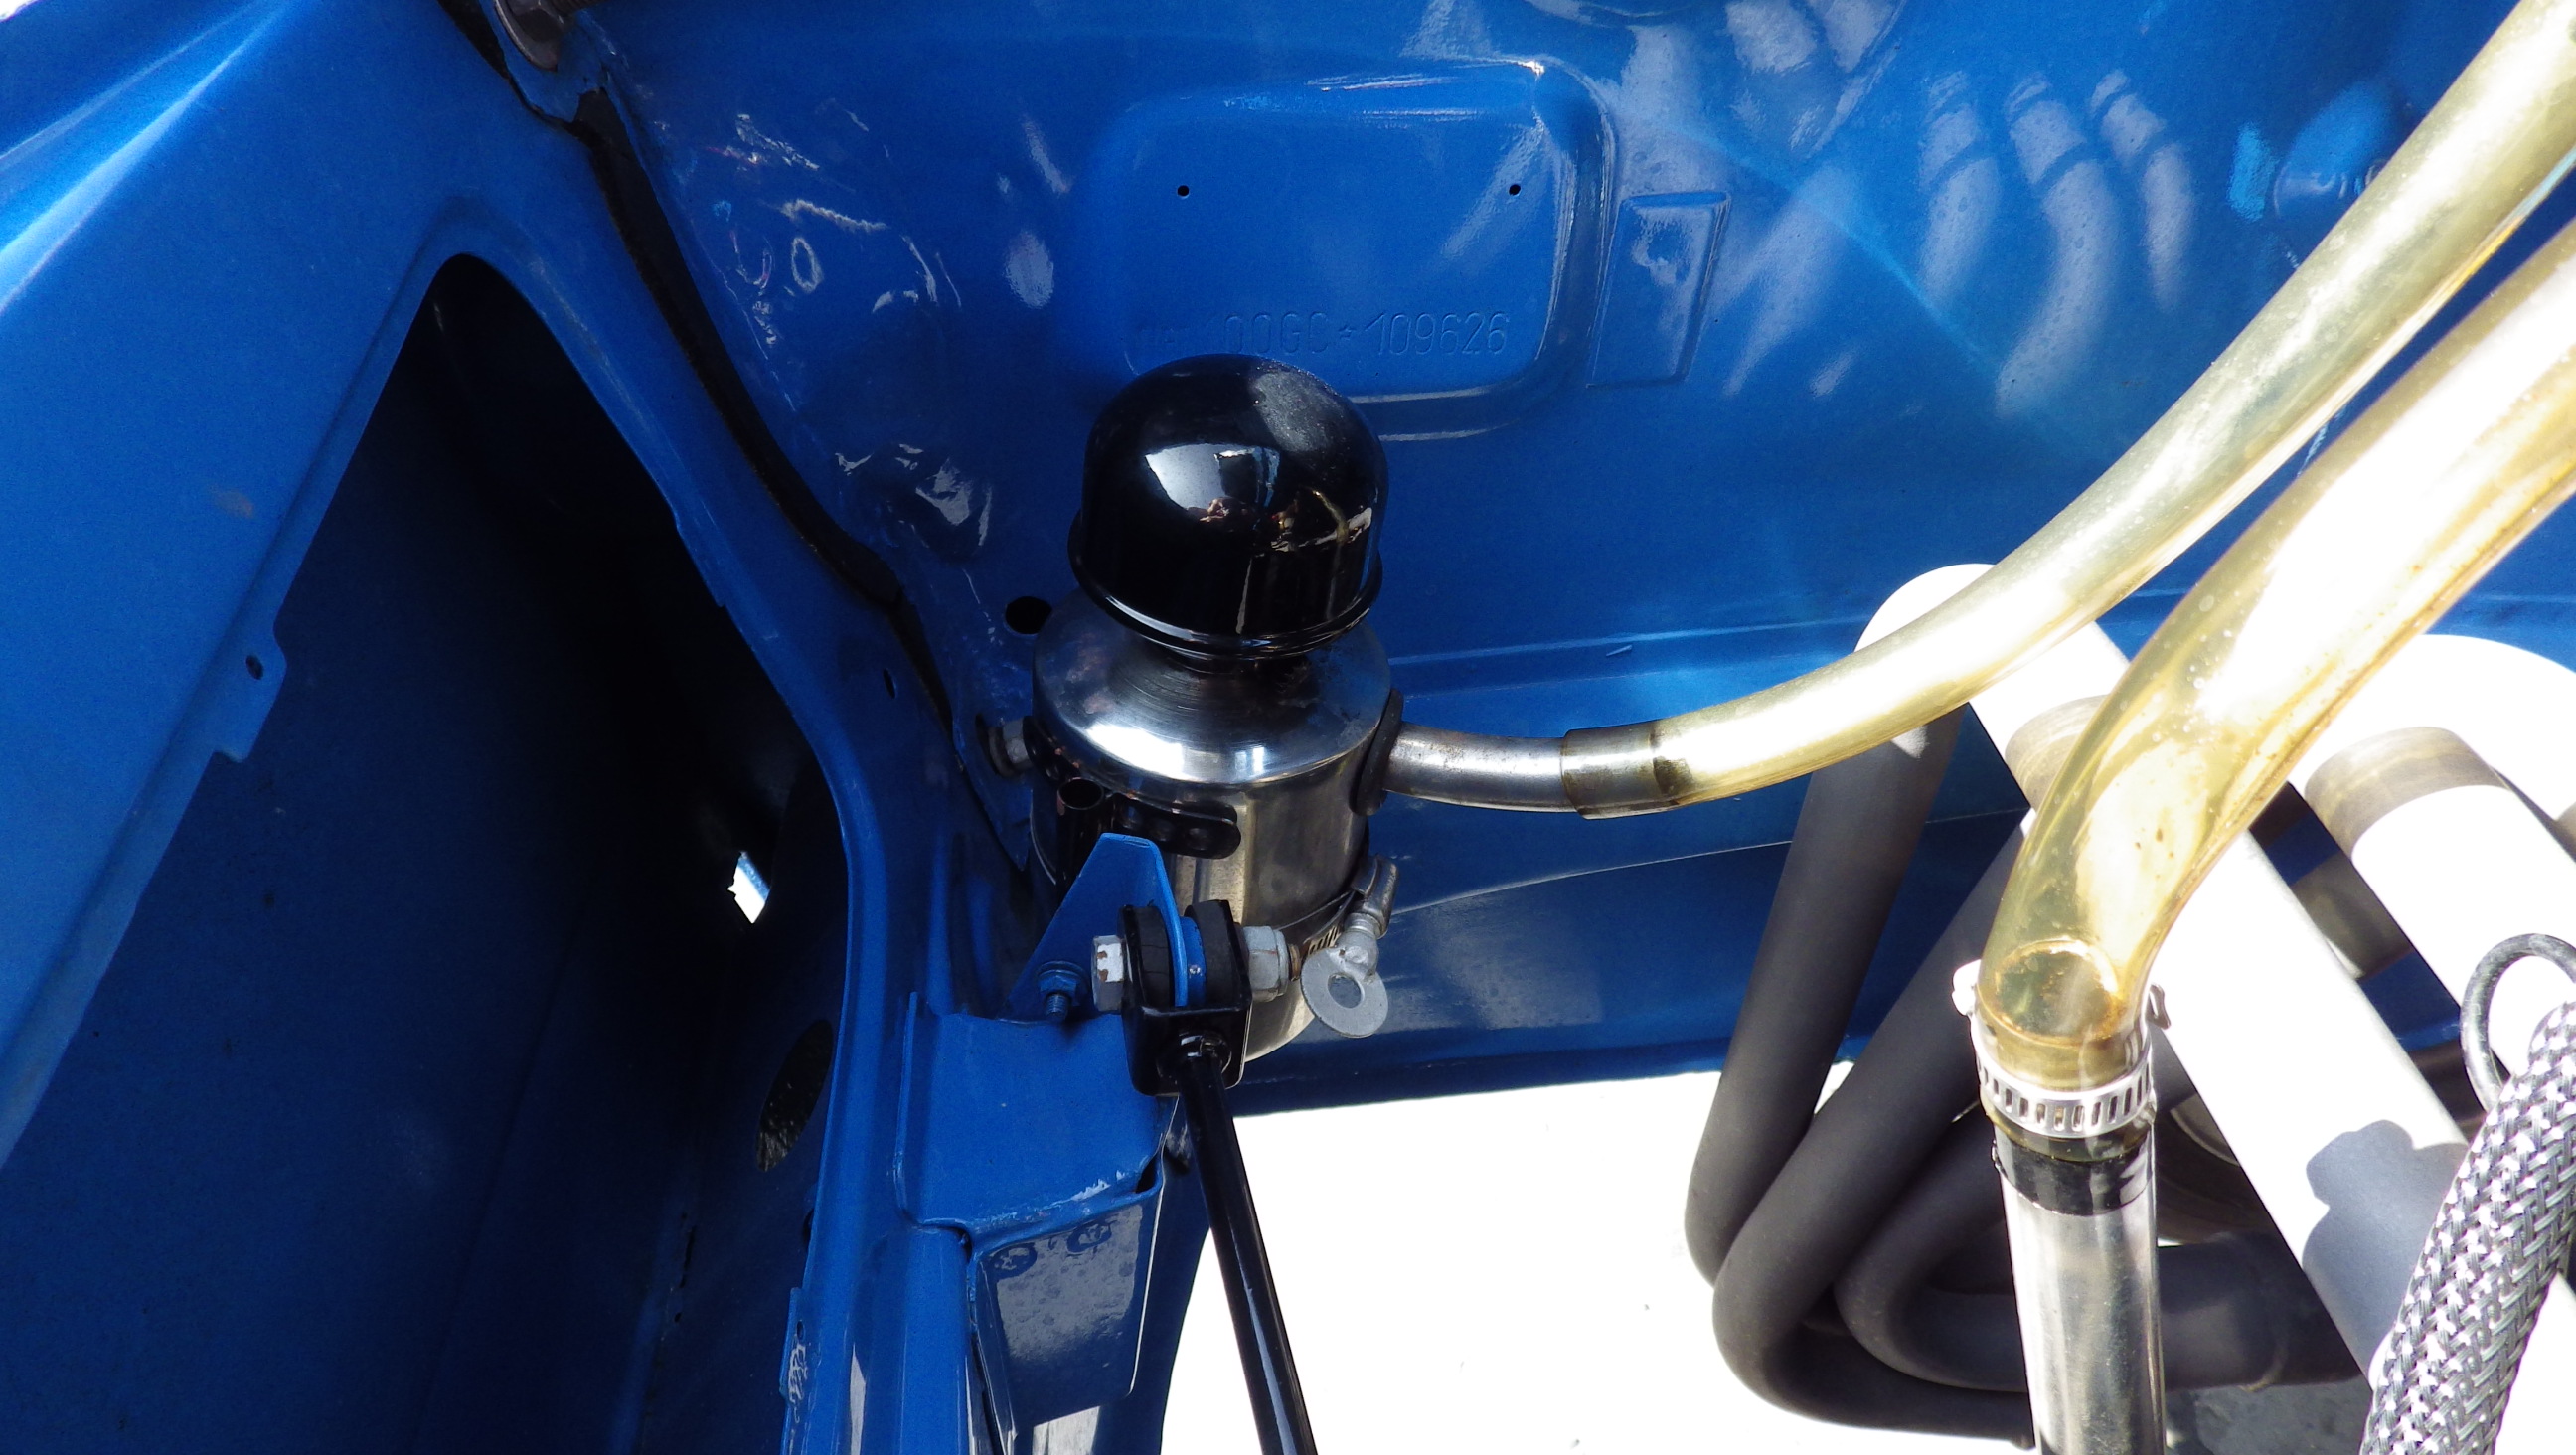 |
| |
Last Edit: Dec 4, 2014 6:06:39 GMT by JohnT
John T
Fiat 600 60HP, Fiat 850 60HP, 70 Plymouth GTX 500HP
|
|
|
|


 If you dissect a shock, you'll find the bottom cup you weld on is really thick and it's not likely that you would blow a hole though it during welding. Plus, what I attempt to do is leave some "meat" from a left over loop or pin from what was cut off. Actually the most ideal shock for welding are KYB's with a bottom strap mount (60's Ford Mustang?). I just cut the ends of the straps off and weld on the center left-over strap.


 If someone has already figured out the bushing part number or size of material to use, Please let me know.


 Sorry it probably doesn't apply to my friends overseas.


 . If someone wants to make some of these in volume you can get 6' lengths of it on ebay for around $30. Once they are done you can hook me up with a set.


