ChrisT
Club Retro Rides Member
Posts: 1,638
Club RR Member Number: 225
|
|
|
|
What little trimming skills I had seem to have deserted me..... 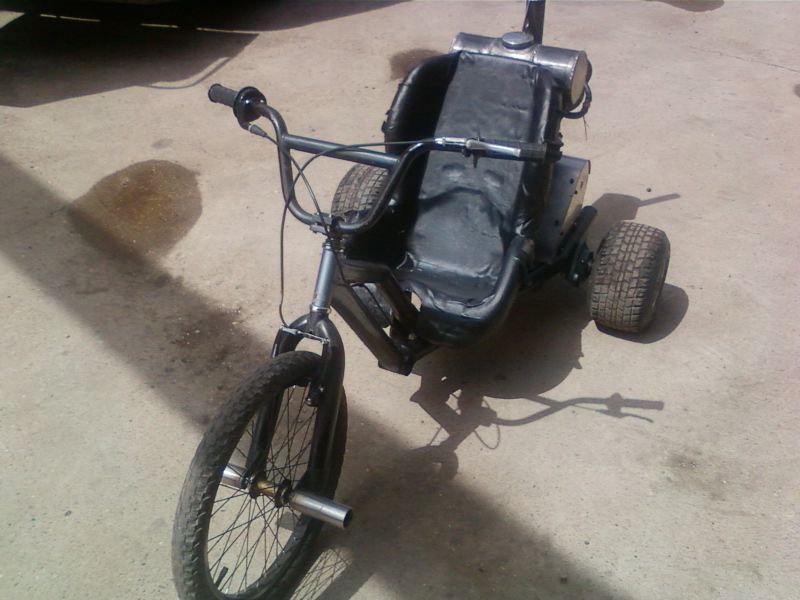 Think it'll be replaced with some kind of material that will stretch better than vinyl Replaced the earlier facebook video - it's now on youtube so should be viewable  |
| |
Last Edit: Jun 16, 2013 9:06:12 GMT by ChrisT
|
|
|
|
ChrisT
Club Retro Rides Member
Posts: 1,638
Club RR Member Number: 225
|
Legal questionChrisT
@christ
Club Retro Rides Member 225
|
|
|
|
Doesn't sound the best of plans to me - going on a road trip in a car you think isn't road worthy and coming on an open forum saying you're planning on driving it for a few days with no MOT.....
|
| |
|
|
ChrisT
Club Retro Rides Member
Posts: 1,638
Club RR Member Number: 225
|
|
Jun 14, 2013 19:11:45 GMT
|
Cleaned up the welds on the frame and gave it a bit of paint....... 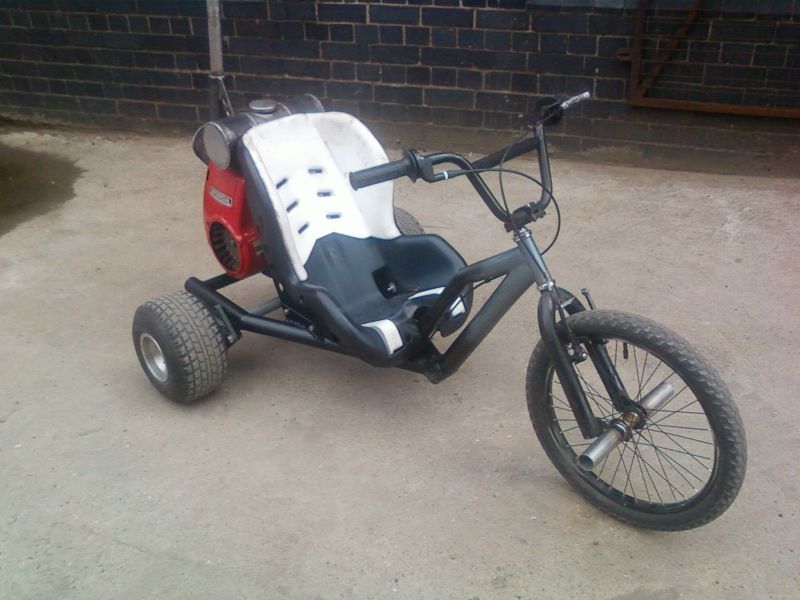 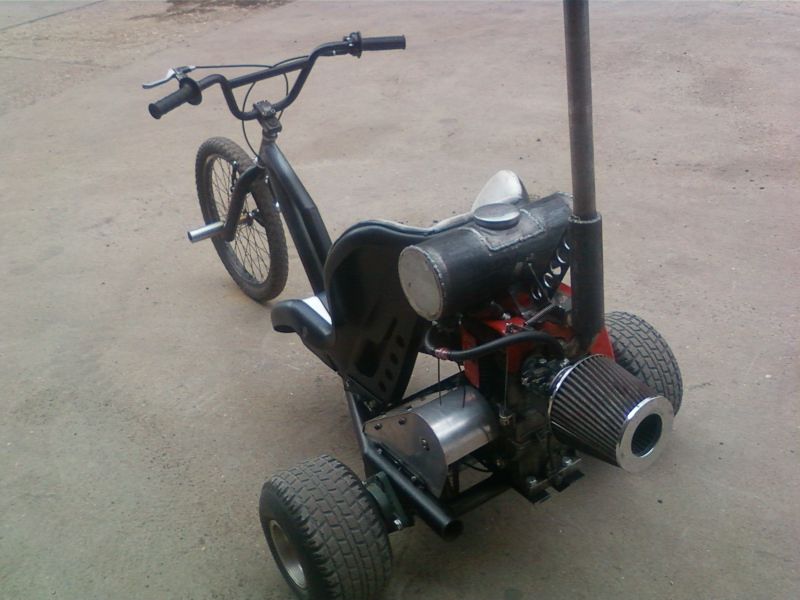 Added speed holes to frame and seat.... 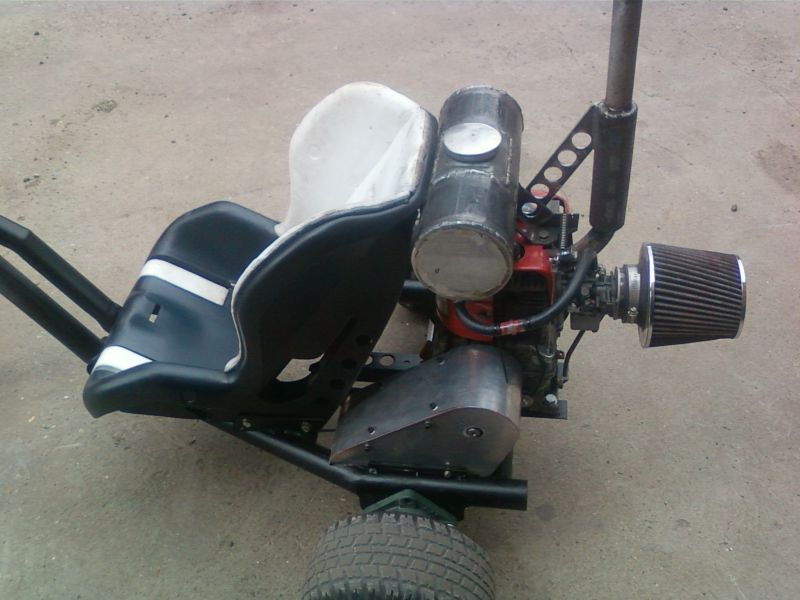 Still one wheel drive, not ideal but definitely fun Slightly larger axle sprocket fitted now for better pick-up. Contemplating fitting a diff (spare one in the shed) but not sure if it'll make any difference to the handling  |
| |
Last Edit: Jun 14, 2013 20:29:44 GMT by ChrisT
|
|
ChrisT
Club Retro Rides Member
Posts: 1,638
Club RR Member Number: 225
|
|
Jun 11, 2013 23:48:10 GMT
|
|
It'll get painted at some point, probably......
Problems with the carb again today, think I've traced it to the fuel supply which was being limited by the rubber seal I made for the tap - wasn't at all petrol resistant and had swelled/split blocking the flow.
Thought I see it runs with 1 wheel drive, disconnected one of the hubs from the axle, greased it and welded a bolt in the end so I could wind on a nut/washer to stop the hub from coming off - it turns now very well but under power it kind of torque steers.
|
| |
|
|
ChrisT
Club Retro Rides Member
Posts: 1,638
Club RR Member Number: 225
|
|
Jun 10, 2013 19:15:47 GMT
|
Very nice, don't give me ideas - and yes they are a bit difficult to ride to start with, get used to it after a while. Well it seems to go OK  or this pov one... 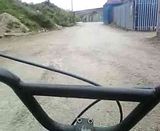 Still a lack of steering on anything but loose ground, did try cutting up a plastic oil drum to fit over the tyres.... 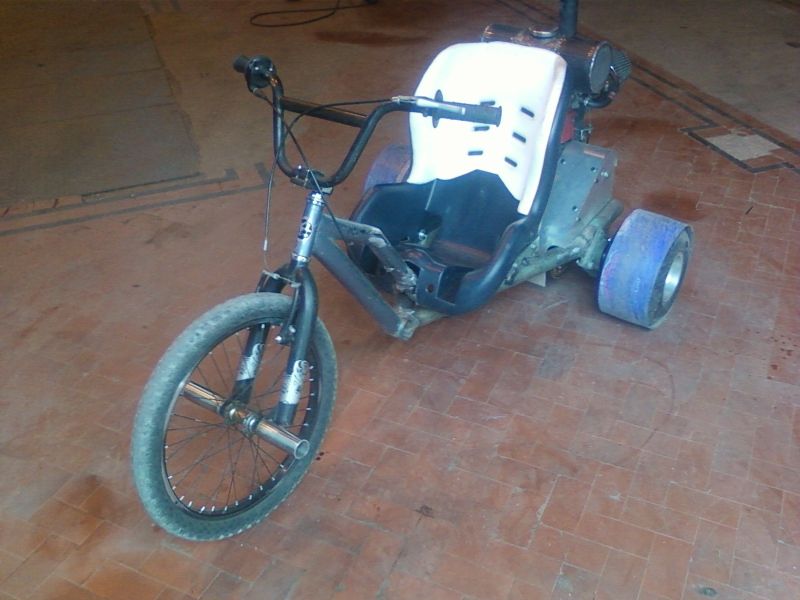 ....which was fun but makes it lethal as there's no grip whatsoever and goes into a spin with little notice. Exhaust does shake loose after a while so I'm going to cut it down slightly and fitting a brace.... 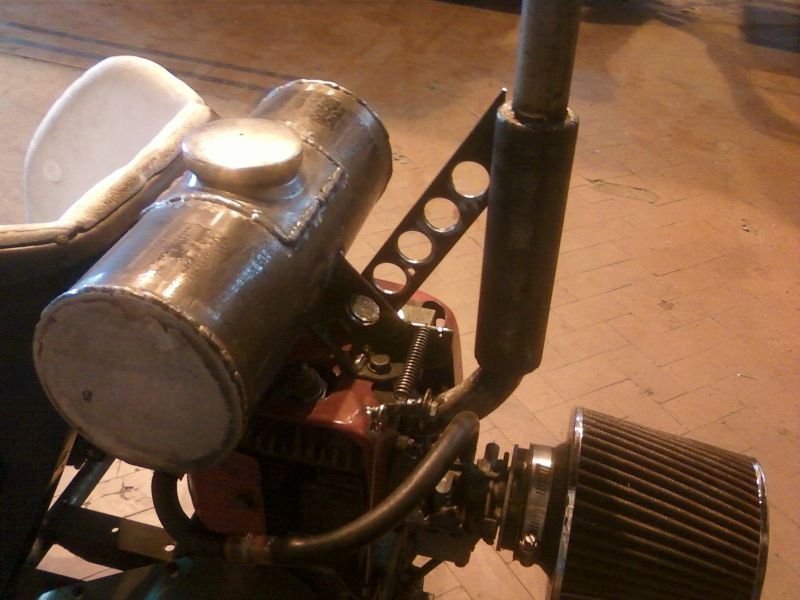 |
| |
Last Edit: Jun 16, 2013 9:04:47 GMT by ChrisT
|
|
ChrisT
Club Retro Rides Member
Posts: 1,638
Club RR Member Number: 225
|
|
|
|
|
That's one of my options if I can't source any pvc, should slide very easily and I've got no problem knocking up a set of steel bands but it'll be horribly noisy.
|
| |
|
|
ChrisT
Club Retro Rides Member
Posts: 1,638
Club RR Member Number: 225
|
|
|
|
|
|
| |
|
|
ChrisT
Club Retro Rides Member
Posts: 1,638
Club RR Member Number: 225
|
|
|
|
Cheers for the offer, there's a salvage/demolition company next to work so I'm hoping they'll have something in the yard..... Brilliant project my eldest lad has seen this and wants one !!! Get him one made, and one for yourself |
| |
|
|
ChrisT
Club Retro Rides Member
Posts: 1,638
Club RR Member Number: 225
|
|
|
|
|
.....
|
| |
Last Edit: Jun 9, 2013 12:27:07 GMT by ChrisT: double post
|
|
ChrisT
Club Retro Rides Member
Posts: 1,638
Club RR Member Number: 225
|
|
|
|
|
Doesn't seem to matter what engine you use as long as it's a horizontal shaft (so not off a rotary lawnmower), there seems to be trikes with most sized engines from mini-moto upwards, the only reason I went for mine was it was localish and cheap on ebay.
The tyres are generally covered in PVC drain pipe so they give no traction and make drifting easier, something I need to source next otherwise steering on anything but a loose surface will be very difficult as there's no differential on the axle - didn't realize this until I fixed the hubs to the axle and tried moving the trike about, apparently normal karts have the front geometry set up so the outside rear wheel lifts slightly when turning to overcome the problem.
|
| |
|
|
|
|
ChrisT
Club Retro Rides Member
Posts: 1,638
Club RR Member Number: 225
|
|
|
|
Covers had to go - not keen on the pattern and they took up vital millimetres of space, not quite such a tight squeeze to fit in now Today I've replaced the joined throttle cable with a new one piece one which seems to work OK. Done a bit more work to the chain gaurd - covered in the side by the wheel to keep as much curse word out of the clutch as possible. And chopped the kids seat about a bit and fixed it to the frame...... 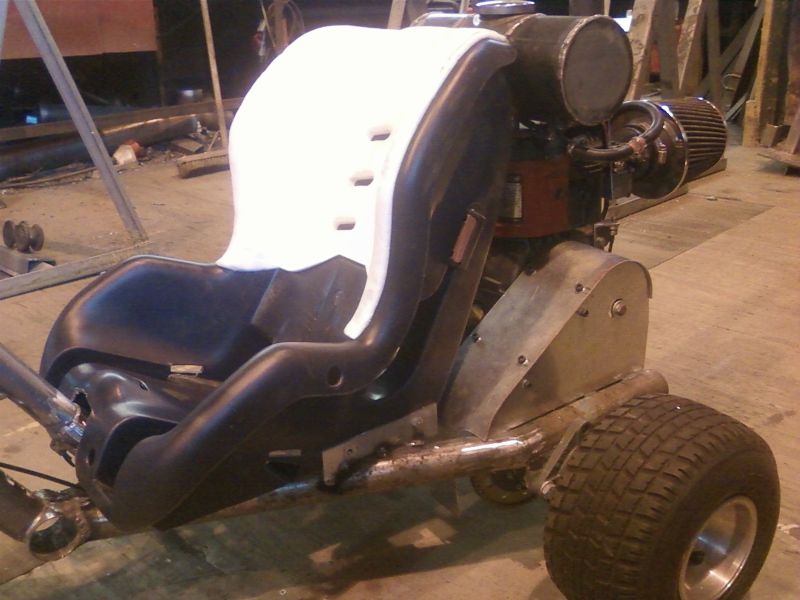 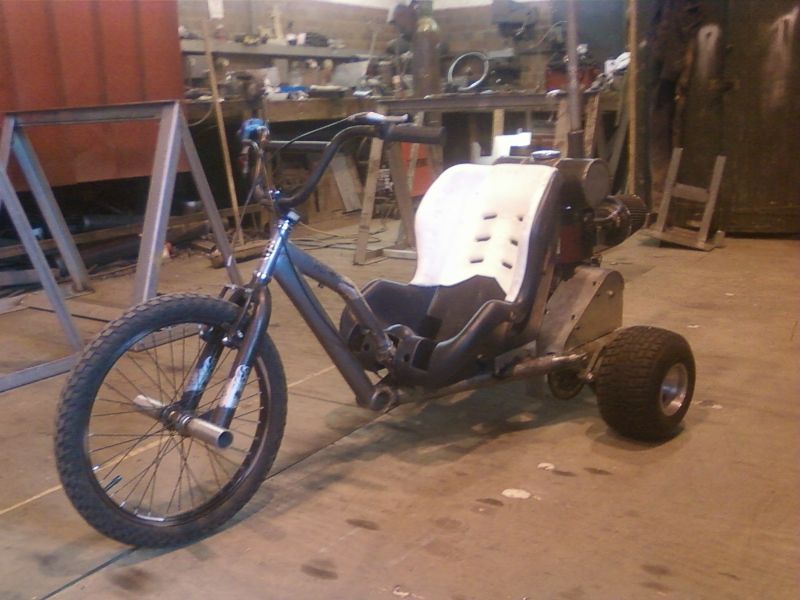 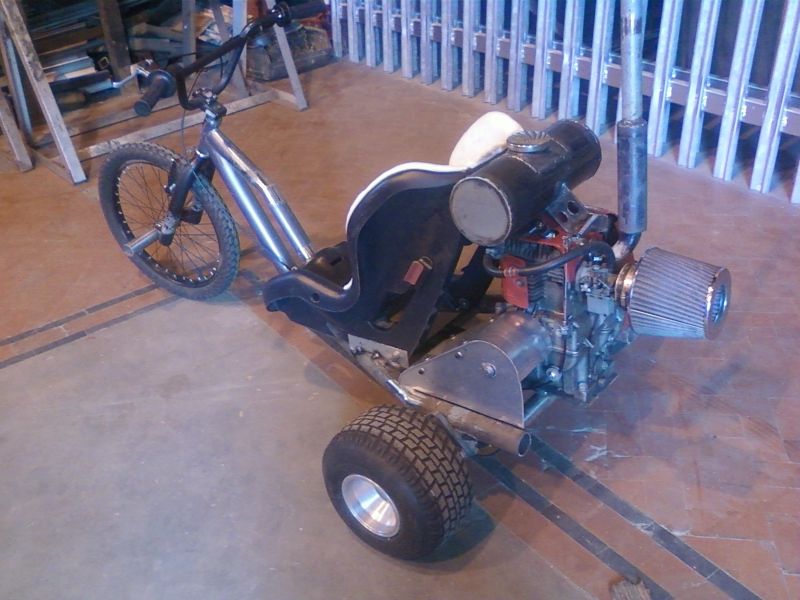 Got it running ok, bogs down a bit when the throttle opens but a lot better than it was yesterday. Clutch and twist grip work fine... Gave it a quick test drive in the workshop (about 6m of space) and I'm impressed but the engine decided not to idle and die before I could take it out for a proper test  |
| |
Last Edit: Jun 8, 2013 21:07:37 GMT by ChrisT
|
|
ChrisT
Club Retro Rides Member
Posts: 1,638
Club RR Member Number: 225
|
|
|
|
Yeah, I've been watching a few to see what kind of price they go for. My mate did come up with an idea yesterday though..... 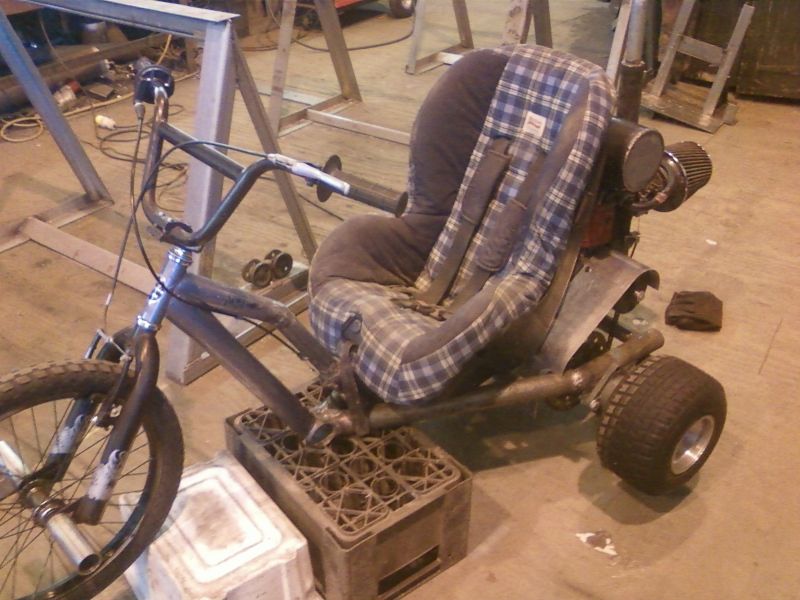 It'll sit lower with some chopping about and look better without the cover on - it's a snug fit so there won't be much chance of falling out of it........ |
| |
|
|
ChrisT
Club Retro Rides Member
Posts: 1,638
Club RR Member Number: 225
|
|
|
|
Output shaft adaptor done and clutch fitted... 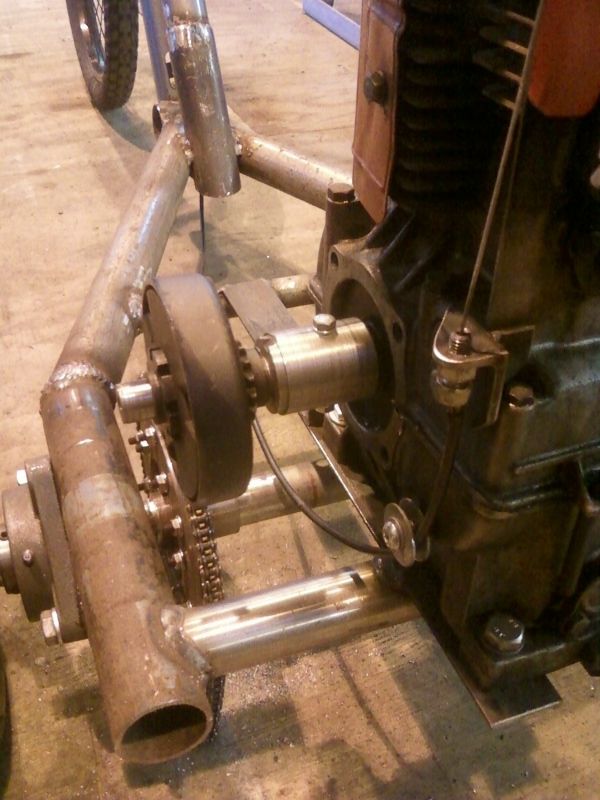 Chain guard on..... 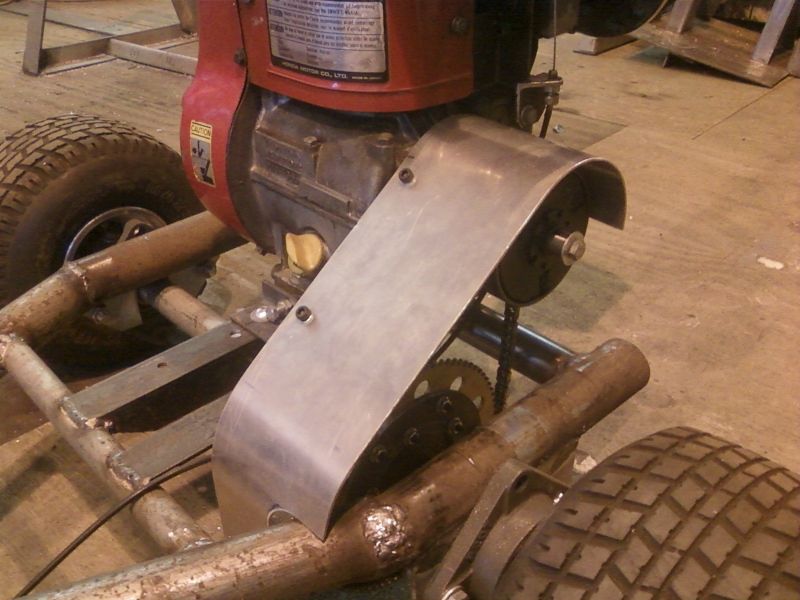 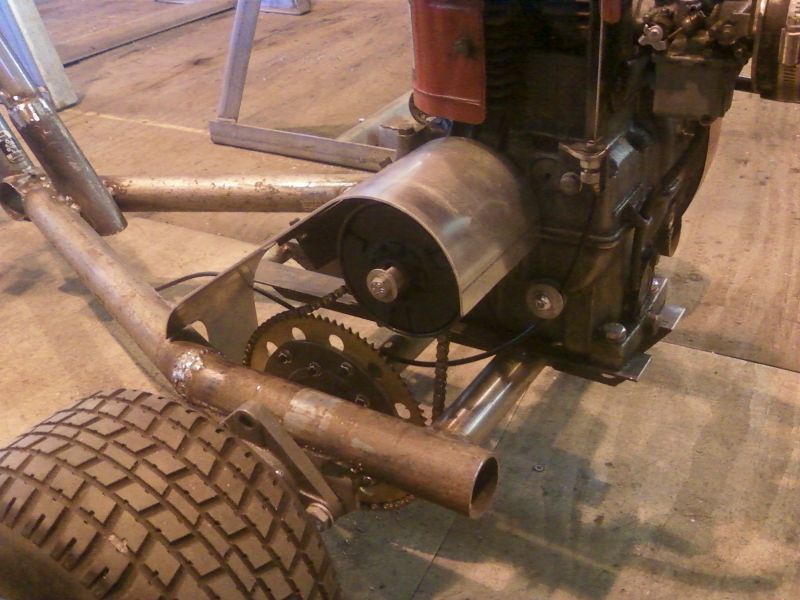 Quick test on axle stands..... Carb needs tweaking, mixture screw seems to have no effect... |
| |
|
|
ChrisT
Club Retro Rides Member
Posts: 1,638
Club RR Member Number: 225
|
|
|
|
Axle sleeves for the sprocket carrier and bearings now welded in place and hubs bolted to the axle - have been reading about slotted sprockets which makes fitting/removal much easier with no need to pull the axle apart.... Slotted the engine mount holes so there's about 50mm of movement back and forth which should be enough to take up slack on whatever size axle sprocket I end up using. Made up a tensioner for the engine, from a bit of angle and a couple of bolts, to keep it in place while the bolts are being tightened - it can be mounted at the far end of the slots as pictured or moved to the other mounting holes behind it depending on where the engine needs to be.... 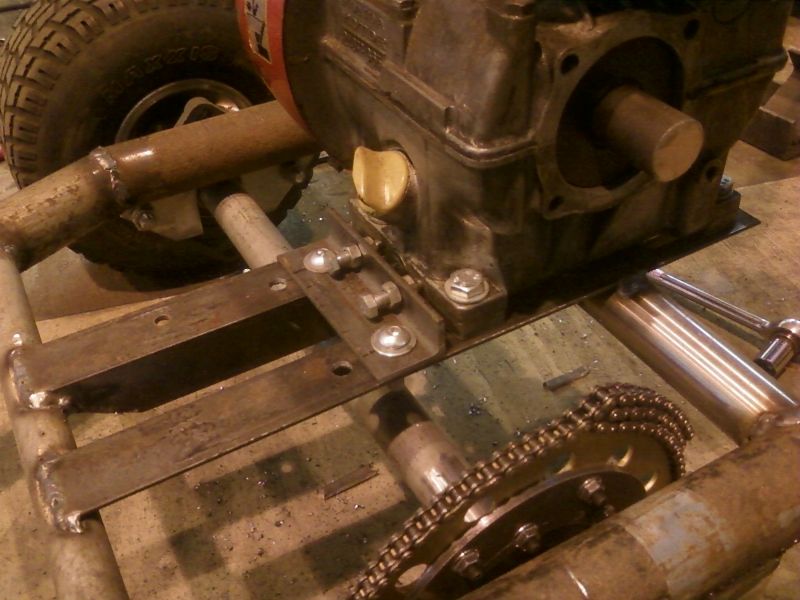 A bit more work done on the throttle cable, the one that came with the twist grip only reaches midway down the bmx frame so I'm using the rear brake cable to make up the rest of it, the end that was in the lever is now attached to the throttle arm, made up a bracket for the end of the cable outer to fix to - just need an adjuster to replace the broken one I'm currently using...  Also tested the fuel tank with some degreaser, can't see any obvious leaks and the fuel tap seems to work/not leak either which is a surprise - I'm thinking when I fill it with fuel tomorrow it won't be the same story, petrol is very thin and will find the smallest holes..... |
| |
|
|
ChrisT
Club Retro Rides Member
Posts: 1,638
Club RR Member Number: 225
|
|
|
|
I was thinking along the lines of some plastic chair but I'd like a little more side support than most of them provide, I'll probably fashion something out of steel, I've got some off cuts of foam somewhere that'll give it a bit of cushioning. Made some progress on the crank adaptor, keyway is now cut and it fits the clutch. Starting to wish I'd just taken an angle grinder to the original output shaft and taken it down to the right size - would have been a lot quicker, but maybe not so accurate.... 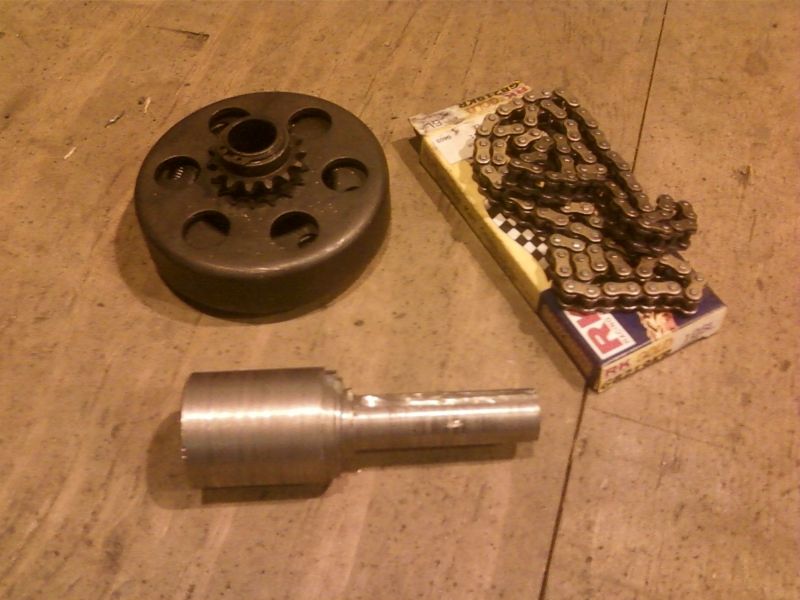 Now I've got the chain and clutch I can gauge where to mount the engine, looks like it's going to go back a few inches, need to drill the frame, slot the holes and make up some adjuster (bit of angle, captive nut and a bolt) so I can get the tension just right on the chain by moving the engine back. The tube I'm using as an axle is just slightly small in the bearings, about 1.3mm under, I've not got anything thin enough to go round the axle and make up the difference but I have got some 1.1mm sheet so I've turned down part of the axle where the bearings sit by about .5mm so I can wrap a piece of 1.1mm steel round to make it fit the bearing. 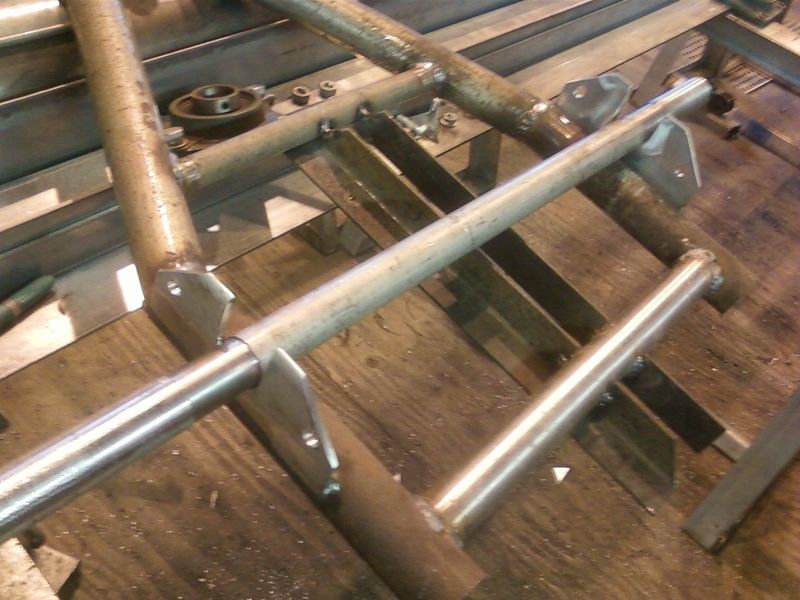 The wheel hubs and sprocket carrier were made with tube just over 2mm bigger than the axle so they'll fit without any machining to the axle. Still to decide whether I weld the hubs to the axle and put a joint in the middle to fit/remove the bearings and carrier or keep the axle one piece and bolt the hubs on...... |
| |
|
|
ChrisT
Club Retro Rides Member
Posts: 1,638
Club RR Member Number: 225
|
|
|
|
^^^haha, awesome, although the front 'wheel' seems to be mounted the wrong way round, wouldn't grip very well that way... Looking forward to seeing the finished project nice work! So am I  Think I've got all the parts together now, centrifugal clutch and drive chain arrived today so that's everything apart from the seat but I should be able to make something that'll do the job....... |
| |
|
|
ChrisT
Club Retro Rides Member
Posts: 1,638
Club RR Member Number: 225
|
|
May 30, 2013 18:29:43 GMT
|
Thanks, I'm hoping it will be fun..... Tank's now mounted, although not leak tested yet.....  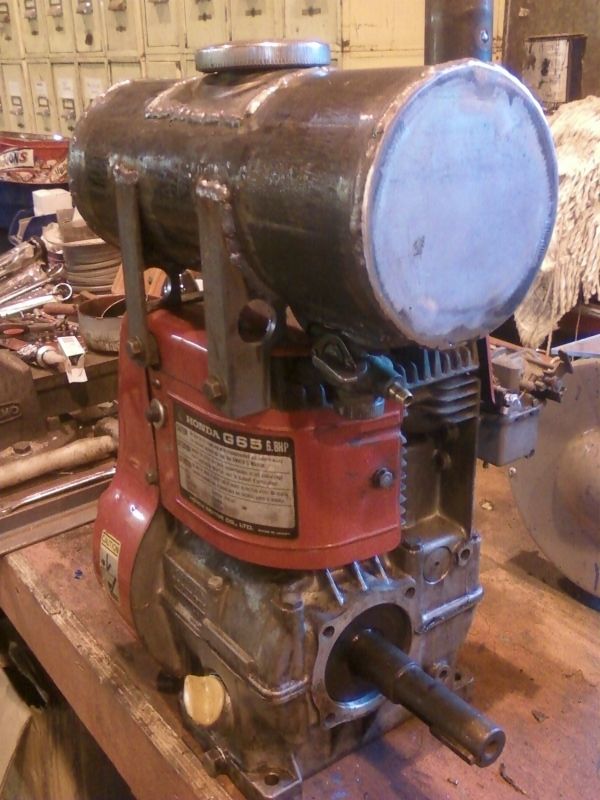 And made a start on the adaptor for the crank....... 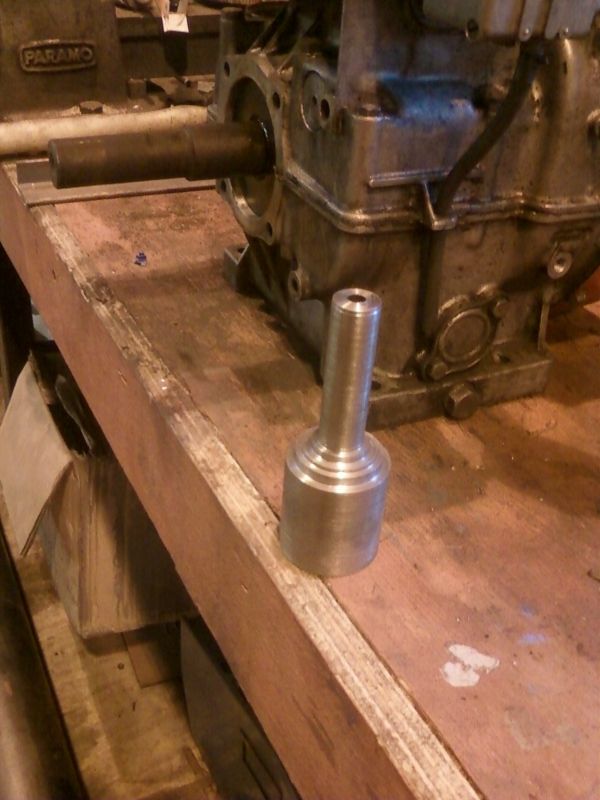 |
| |
|
|
ChrisT
Club Retro Rides Member
Posts: 1,638
Club RR Member Number: 225
|
|
May 29, 2013 19:16:45 GMT
|
New fuel tank fully welded, filler cap and neck from old tank....... 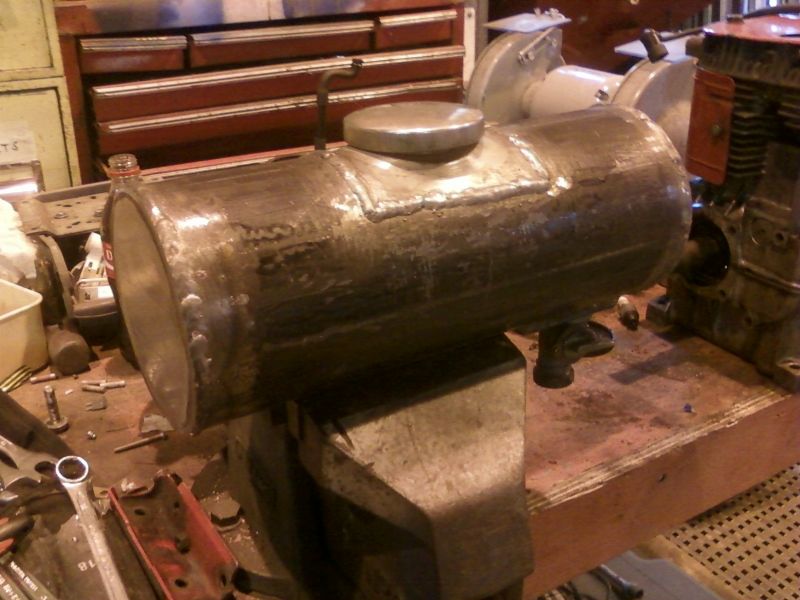  Not leak tested yet though....... |
| |
|
|
ChrisT
Club Retro Rides Member
Posts: 1,638
Club RR Member Number: 225
|
|
May 28, 2013 20:03:11 GMT
|
|
haha, it's not that big, probably less capacity than the std one - 120mm ID, just over 300mm long so about 3.7 litres if I've done my maths, think the std one is about a gallon.
|
| |
|
|
ChrisT
Club Retro Rides Member
Posts: 1,638
Club RR Member Number: 225
|
|
May 28, 2013 19:21:49 GMT
|
Engine's back together, cleaned up the carb before refitting it - blew through everywhere and no obvious blockages, had noticed before that there were three holes visable just above where the throttle flap is (something to do with letting air past it when it's closed) fairly sure they shouldn't be visable from the outside though so need to make a bung to cover them. They're where the square hole is in front of the mixture screw.... 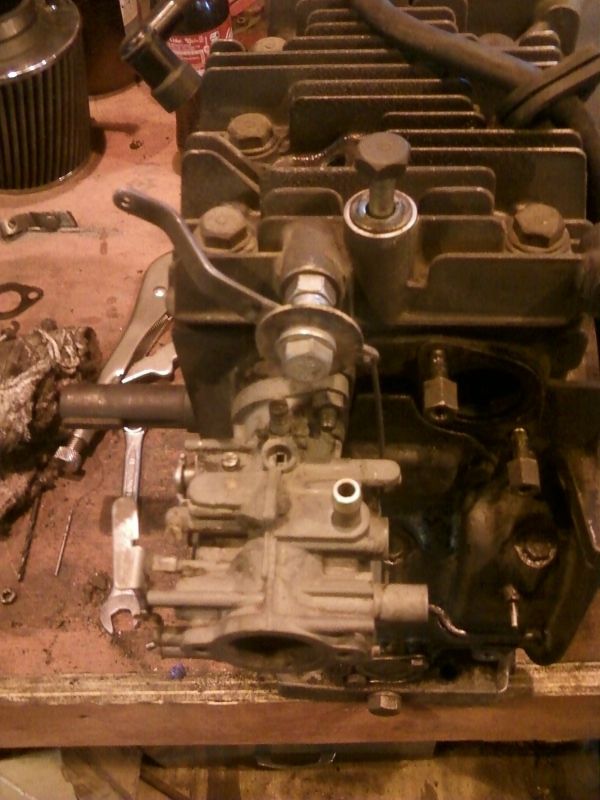 Also made up a throttle linkage - the original one incorporated a governor which I've done away with. The twist grip pulls the cable about 50mm but the throttle flap lever on the carb only moves about 10mm so had to make something with a 5:1 ratio. 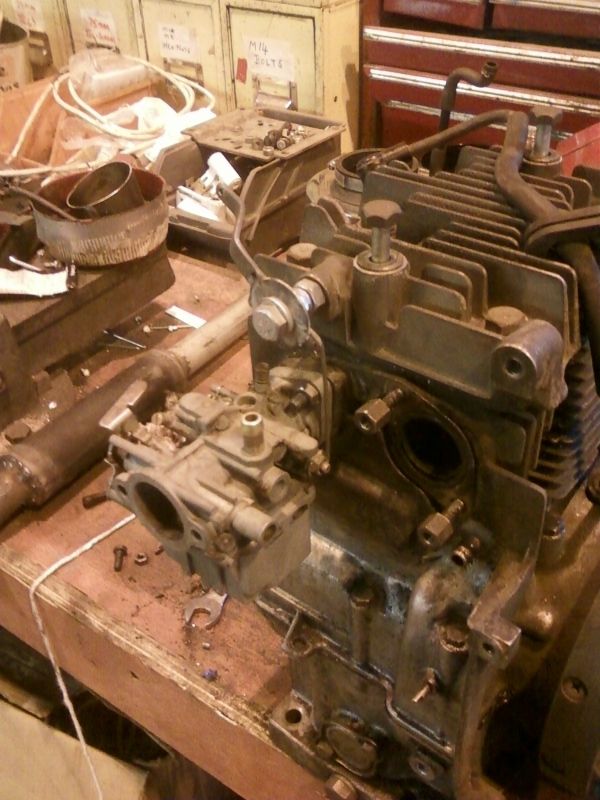 Bodged together a return spring too, not overly impresed with the bracket but it works which is the important thing at the moment - once I know it all works I can refine/improve parts.... 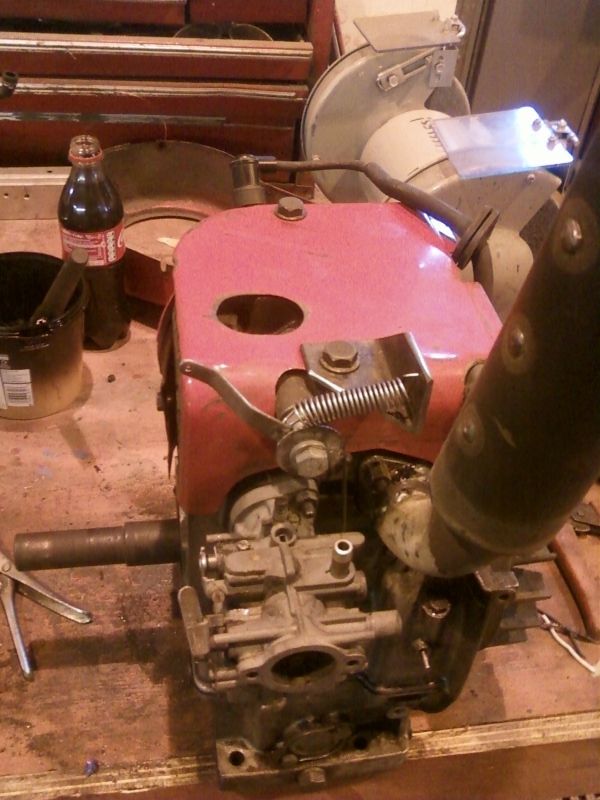 And made a start on the fuel tank, reckon I can make a rubber gasket for the original fuel tap so it will work. Welded a plate to some tube to mount it to, just need to seal both ends and find a filler neck/cap.....  |
| |
|
|
|
|


