|
|
|
|
|
|
dude thats just spectacular!!!!!!!
i utterly love it. you should be very proud of your work man, its top notch.
keep it up man, you've inspired me to do things with a little more time and finesse (which will only last for the next day or so knowing me)
sheepers.
|
| |
|
|
|
|
|
|
|
Apr 11, 2010 21:47:51 GMT
|
|
thanks for the kind words.
I'm a design engineer so i kind of do do this for a living.......
i reckon id go mad if i actually built cars all day every day. sometimes things don't go right and you have to walk away for a while, I'm sure you all know what i mean.
anywho, I'm looking for a driveshaft at the mo so id better get back to it.
sheepers.
|
| |
|
|
|
|
|
|
|
got new springs for the rear and was able to finish the strut towers. ive got a couple of holes to patch in the floor and some seatbelt mounts to put in but the structure is finished. i pick up my wheels on wednesday and that will be the final test really. I'm happy with the rear end and where everything is sitting and how it all moves. it will all be sweet. starting to think about driveshaft and a few other little odds and sods then i can drive it!! 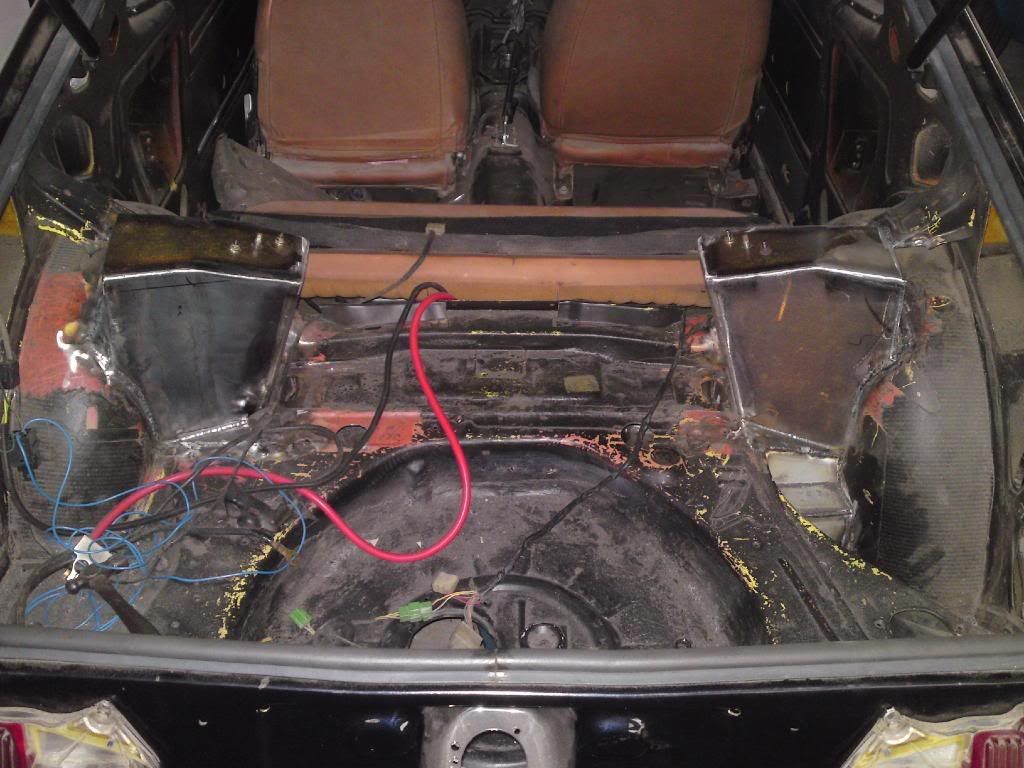 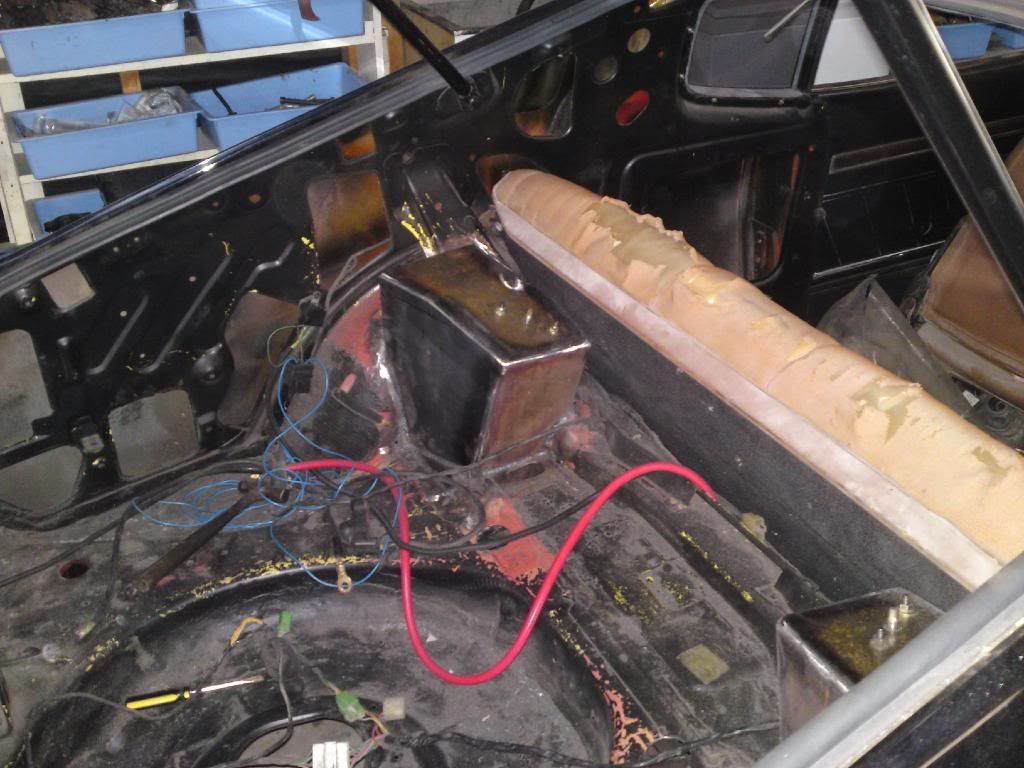 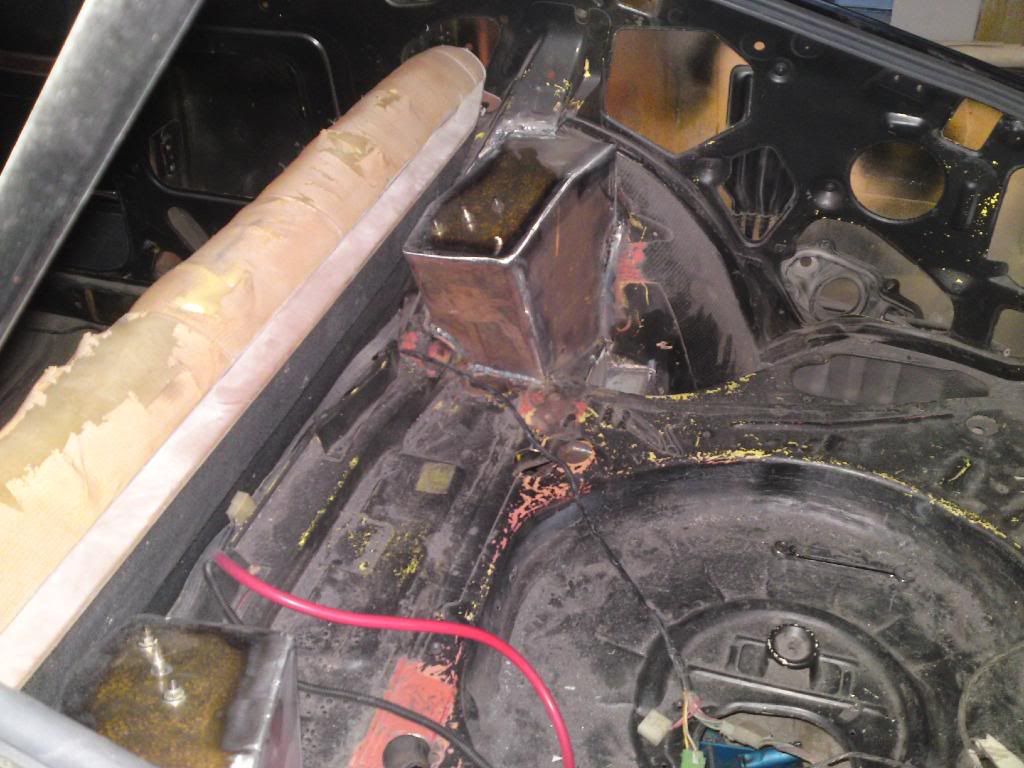 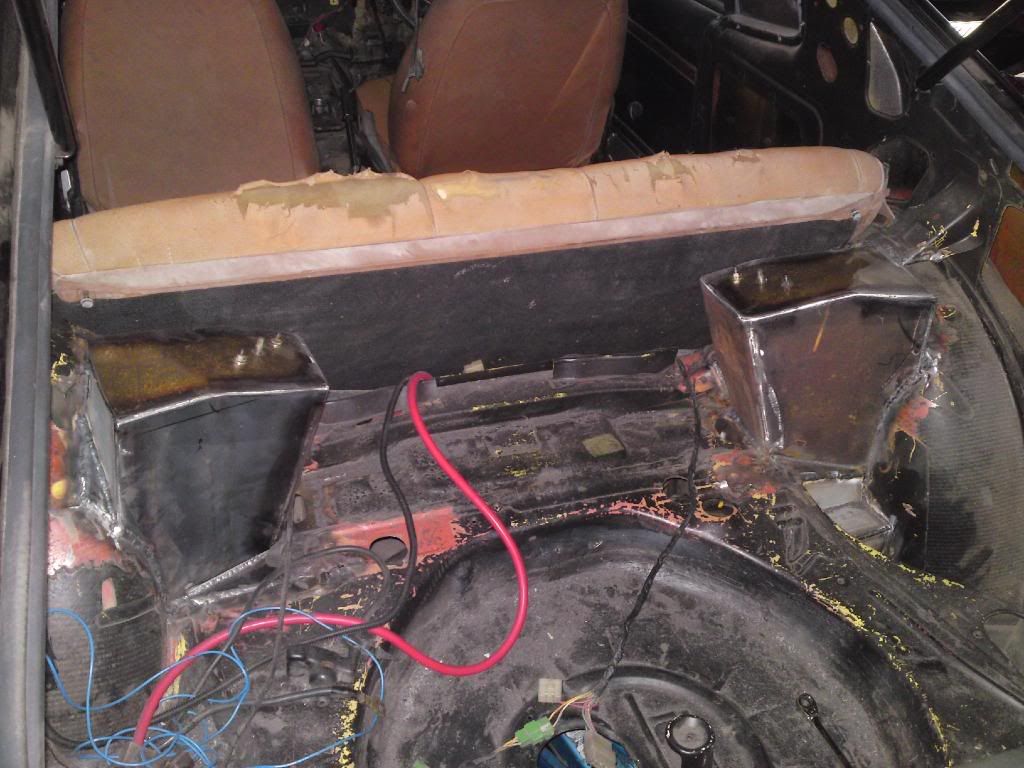 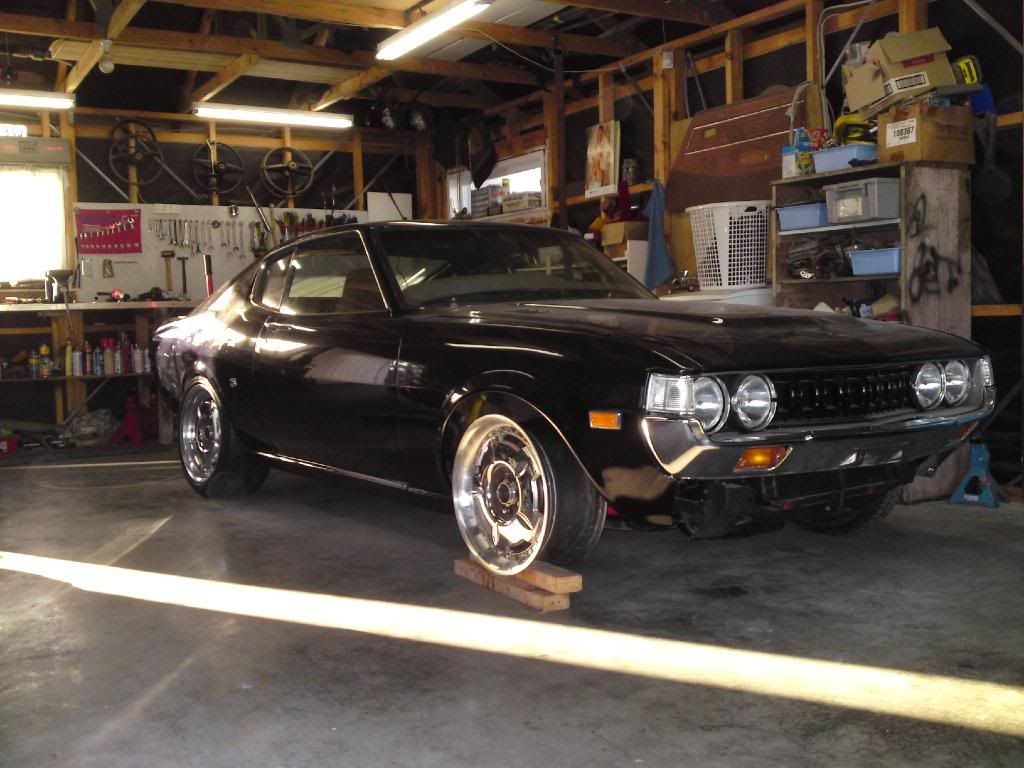 sheepers. |
| |
|
|
|
|
|
|
|
|
dude your work is so sweet!!
this car is going to look/go so choice! cant wait to see it finished.
sheepers.
|
| |
|
|
|
|
|
|
|
some progress, 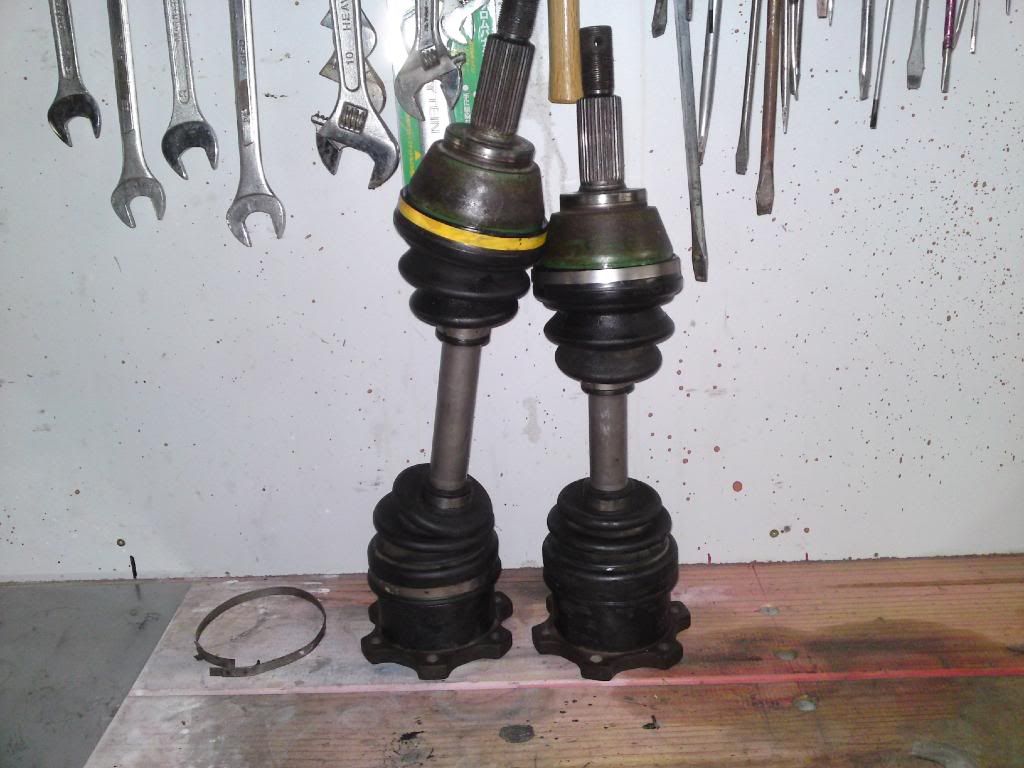 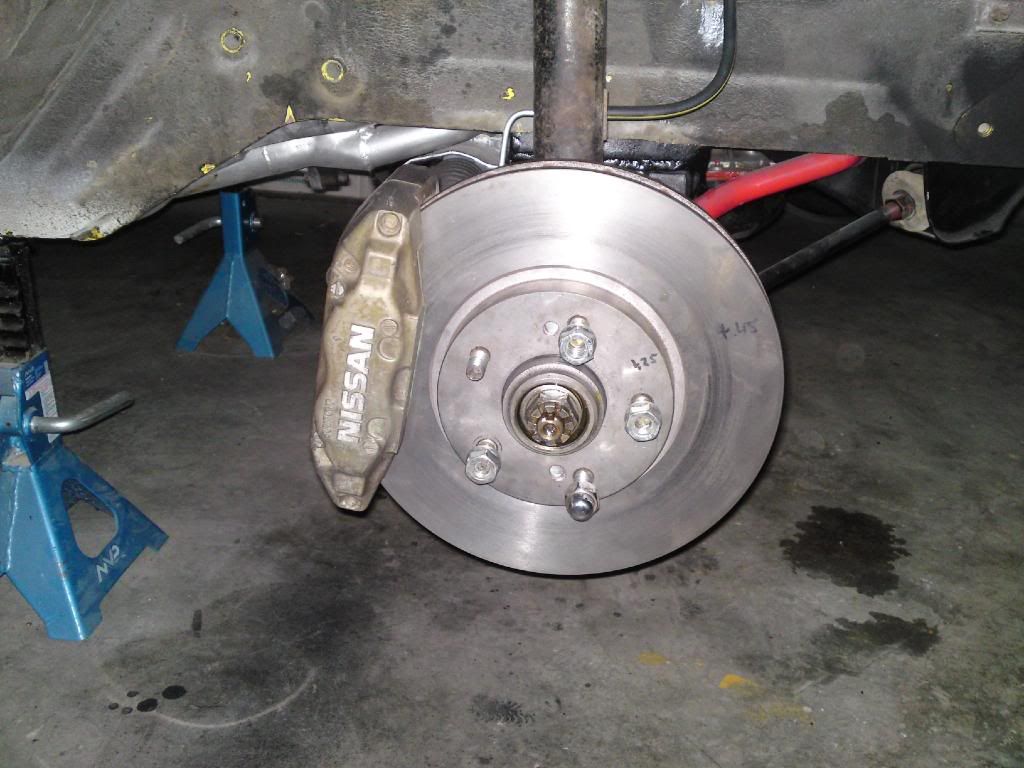 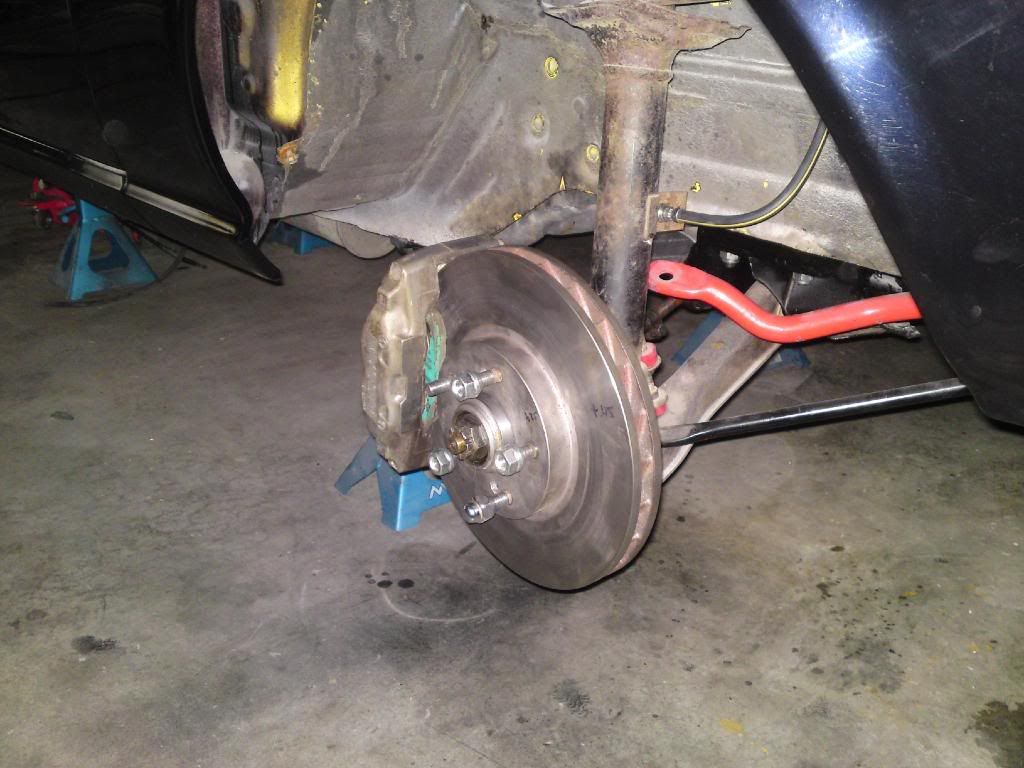 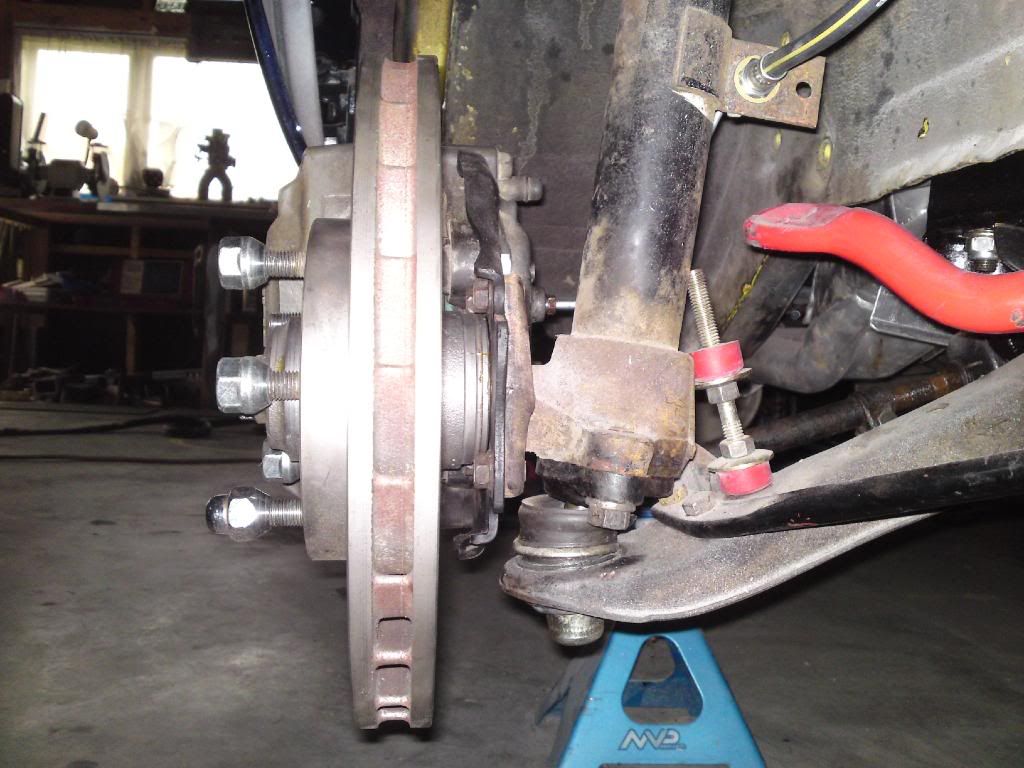 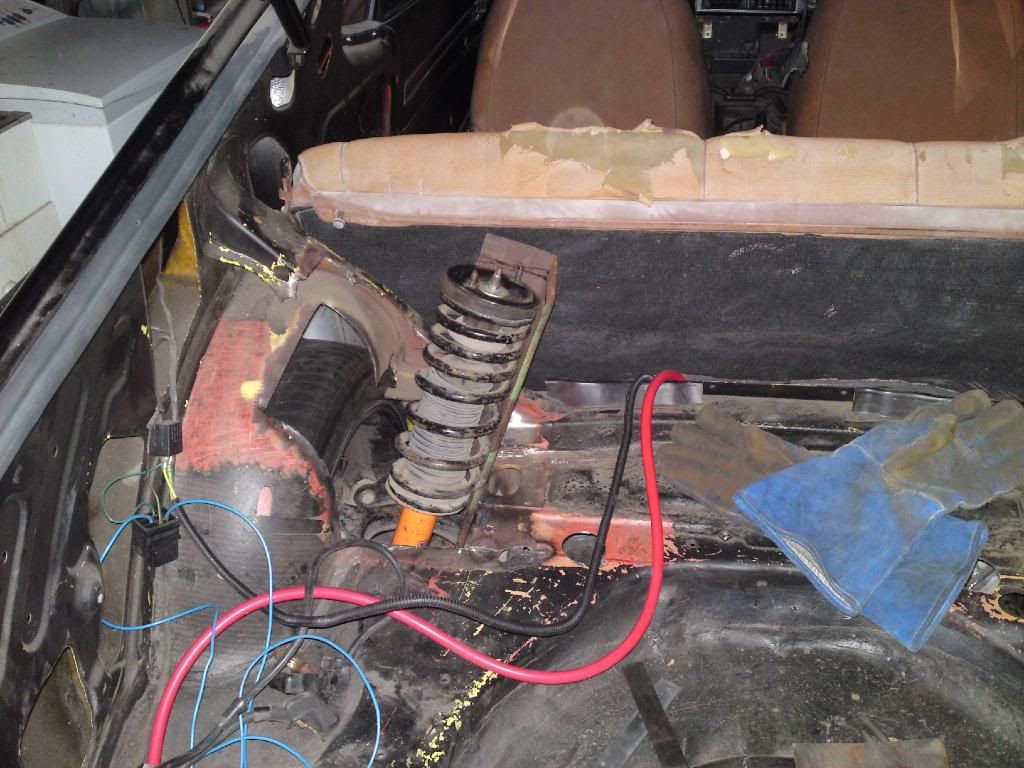 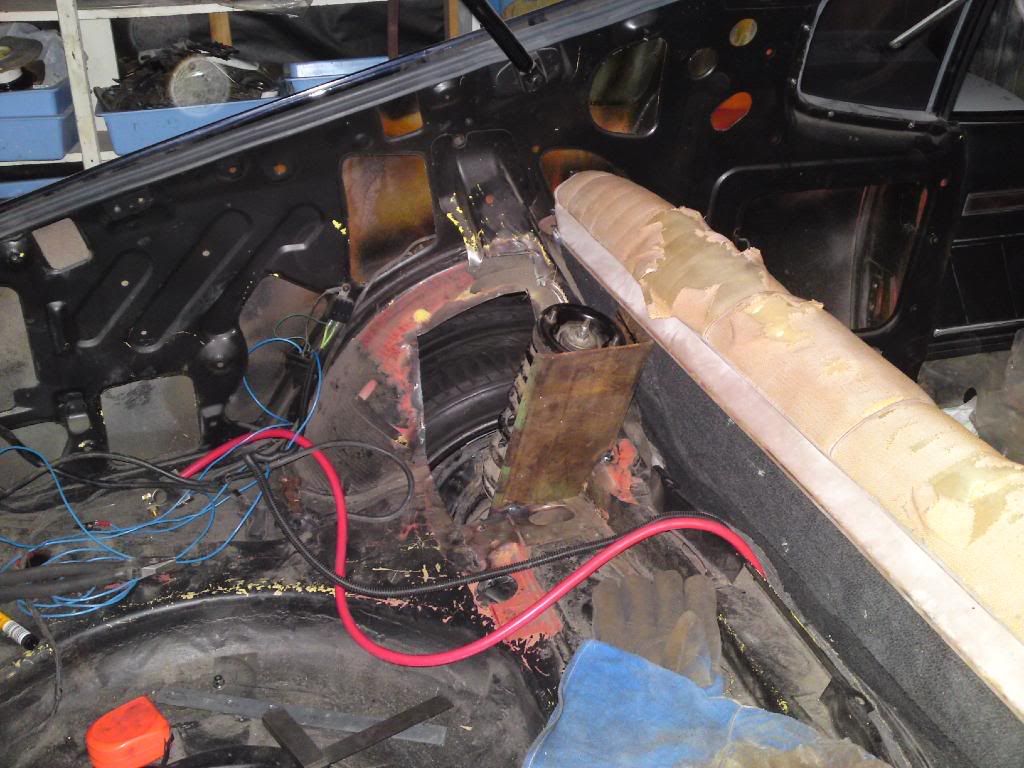 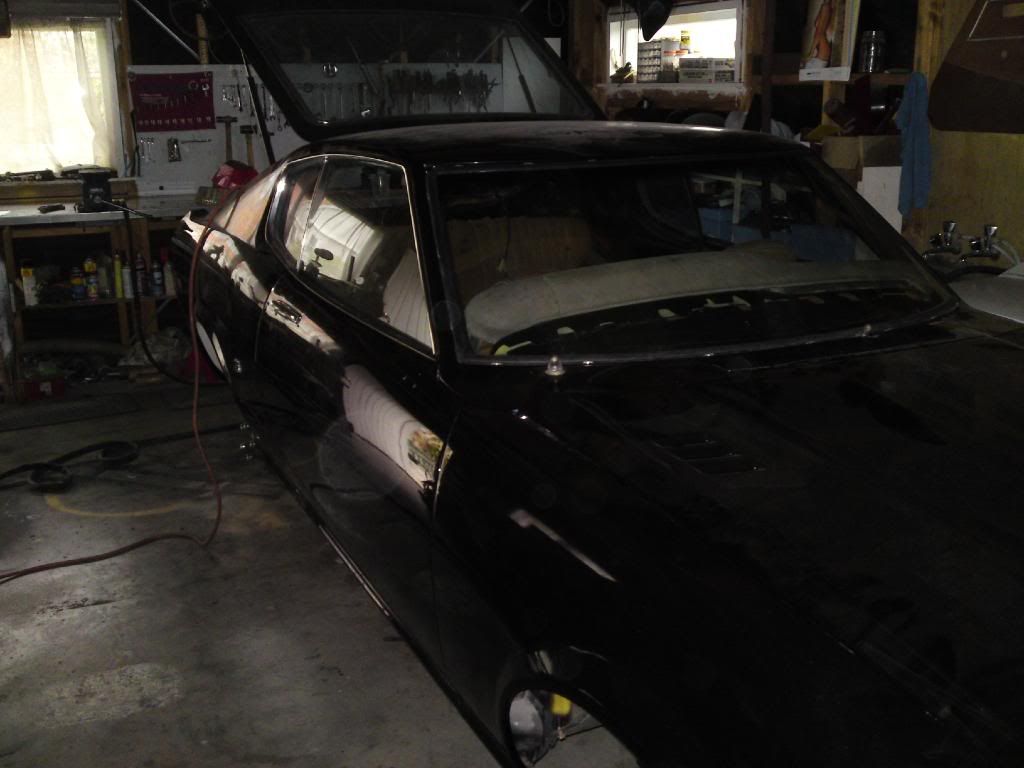 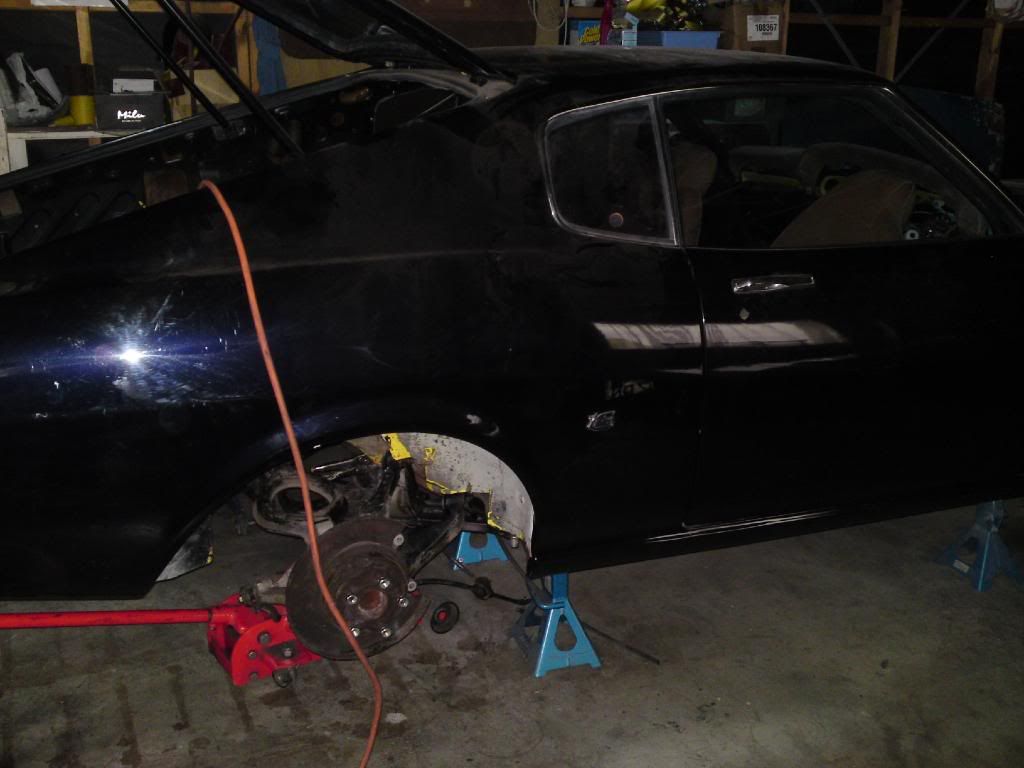 and some more progress, got the passengers side strut tower pretty much finished. i cant put a top on it yet because i need to change the springs that i have for the rear struts (current ones are way to stiff) so the height will change a bit when i get the softer springs in. i reckon the top will be about where the line is. i can get the back seat in and it will latch up in its normal place so thats pretty sweet. pics, 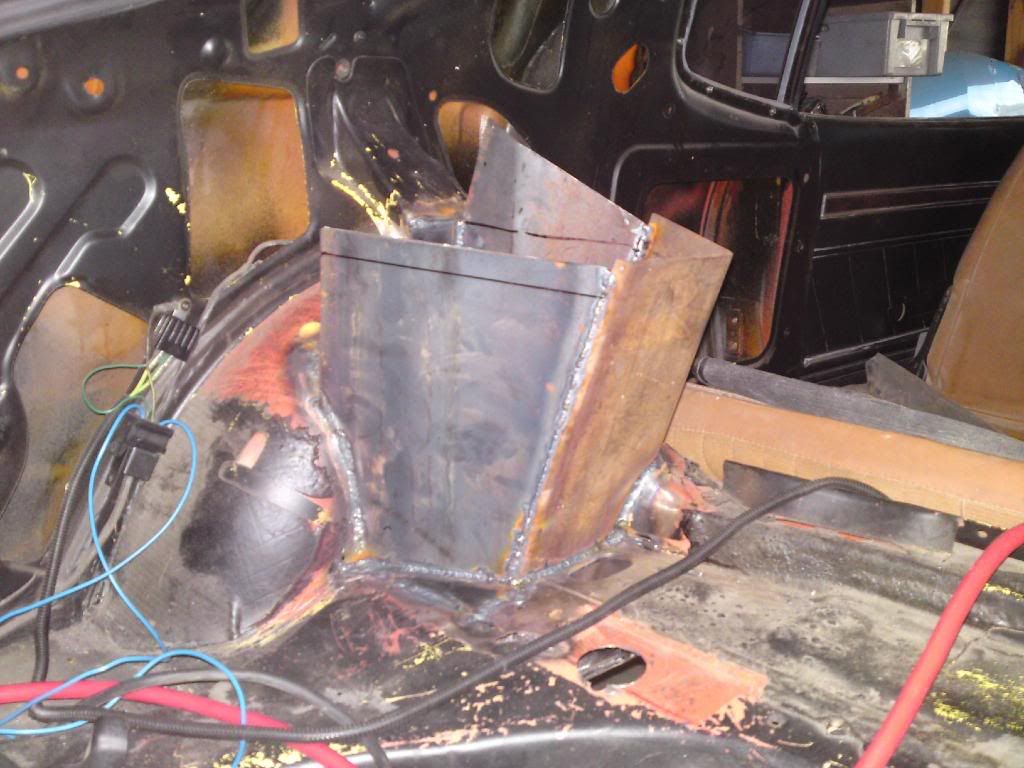 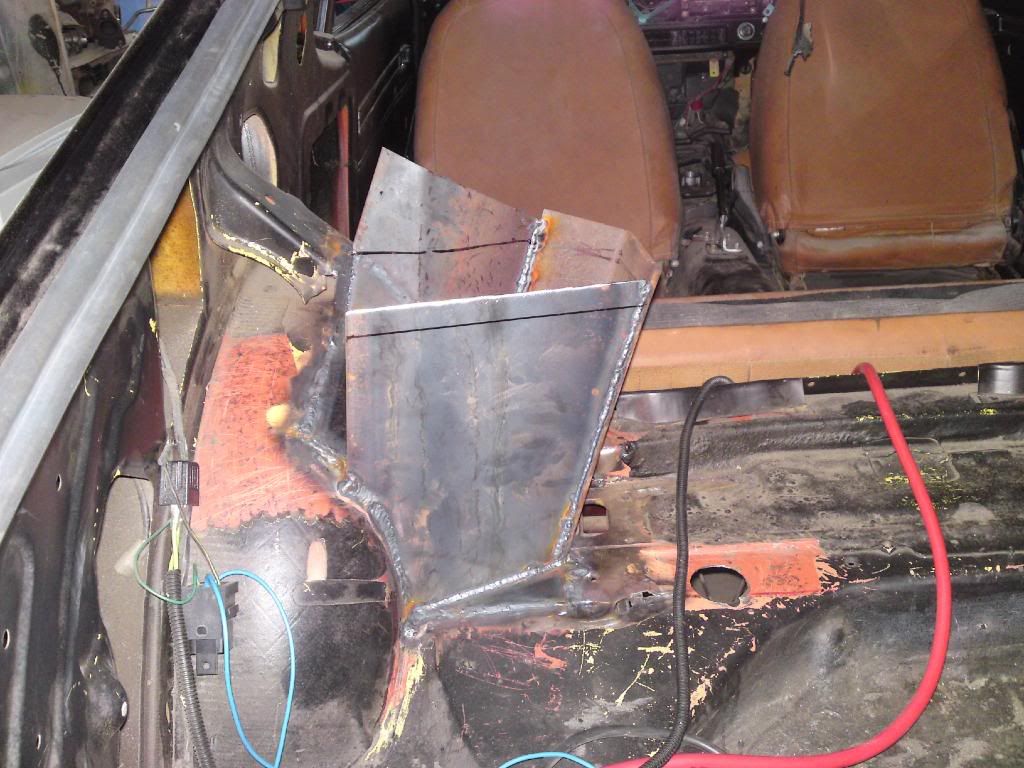 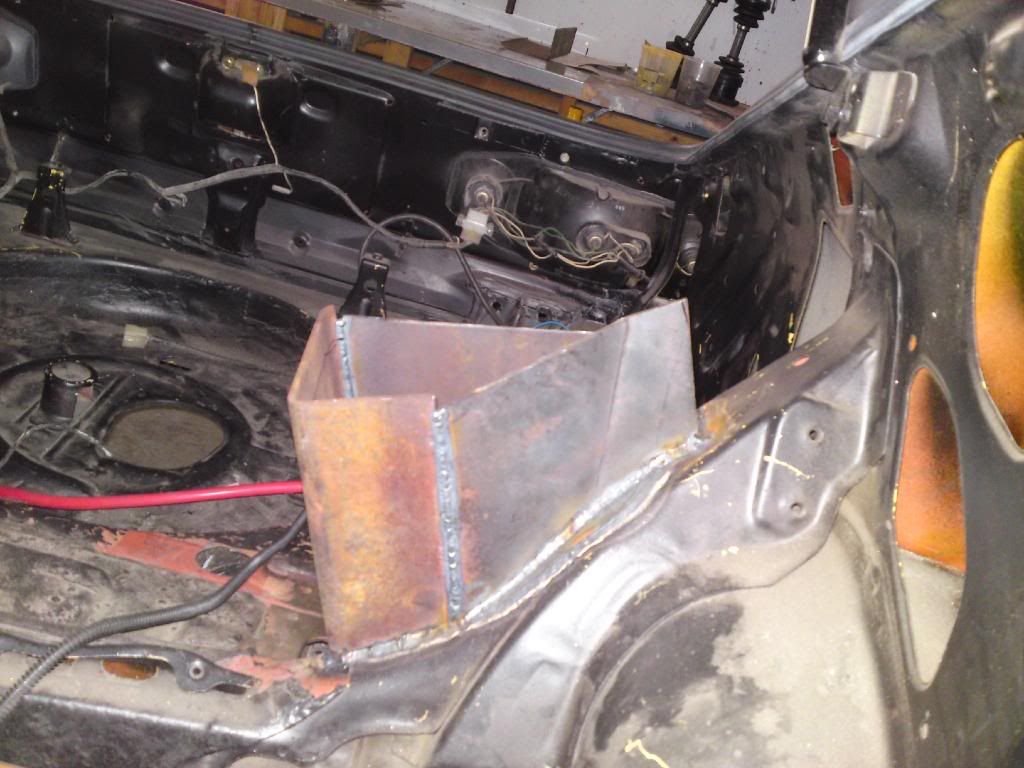 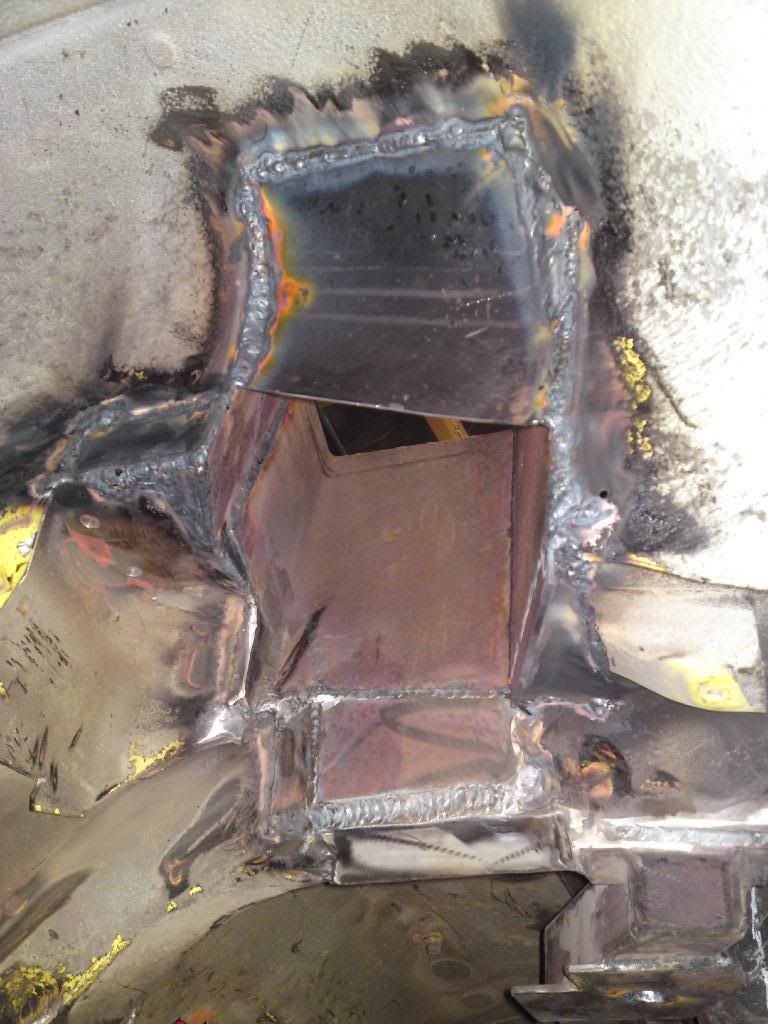  I'm gonna buy some wheels this week, i need to machine the front wheels to give them a bit more offset but the rears wont need it, in fact ill need to run a 20mm spacer to get them sitting right. this makes the stats on the wheels, front 17 x 8 +33 and the rears 17 x 10 -8. when i get some propper wheels made some time in the future i will have heaps of room for the megga dish of doom on the back. twill be sweet. but for now, a basic list of things i need to do so i can drive it round the block, make drivers side strut tower make a throttle cable make a driveshaft acquire and fit rear brakes acquire and fit comminwhore in tank fuel pump fit fuel tank make hand brake work get a set of locks and key tumbler so they all use the same key find and fit seat belts. strip and paint/HPC rear subframe install new bushes and assemble/install rear subframe and diff. there is lots of little things that i cant think of right now that will take ages and lots of money but its getting close.... sheepers. |
| |
|
|
|
|
|
|
|
thats some really nice work man. can you post a million pics of the engine and the interior and everything?  ? oh, and the skid videos don't seem to be loading? much kudos to you! sheepers. |
| |
Last Edit: Apr 3, 2010 7:17:31 GMT by sheepers
|
|
|
|
|
Mar 28, 2010 23:43:17 GMT
|
|
thanks man!!!
i think of myself as a looney with an angle grinder and a welder.
sheepers.
|
| |
|
|
|
|
|
Mar 28, 2010 20:32:08 GMT
|
front brakes are finished. still need new flexi hoses and that but the brackets are done and it all bolts up. got CROWN hubs, GTR disks and GTR calipers. i found that with the GTR disk sitting on the CROWN hub the caliper needed to be 4mm away from the factory bracket. i welded a scrap bit of metal on first so i could get the holes in exactly the right place, i had to slot the holes a bit and curse word around with getting the caliper sitting in exactly the right place but once id done this i welded the final piece of 4mm plate on the other side and transferred the holes through. then i cut the scrap off. simple once its done. i welded another bit of 4mm plate into the gap on the other side so it was a bit stronger, then i just transferred the holes from left to right. i also found that the brackets will swap from left to right so i can put the calipers on the front of the disk or the back. they clear on either side so I'm going to run them on the back of the disk. heres some pics of the stock caliper mounting bracket and the modifications i made to bolt up the GTR stuff. its a bit hard to see clearly but i think you'll get the idea. this is the side of the bracket that faces the disk, the caliper mounts against this side. 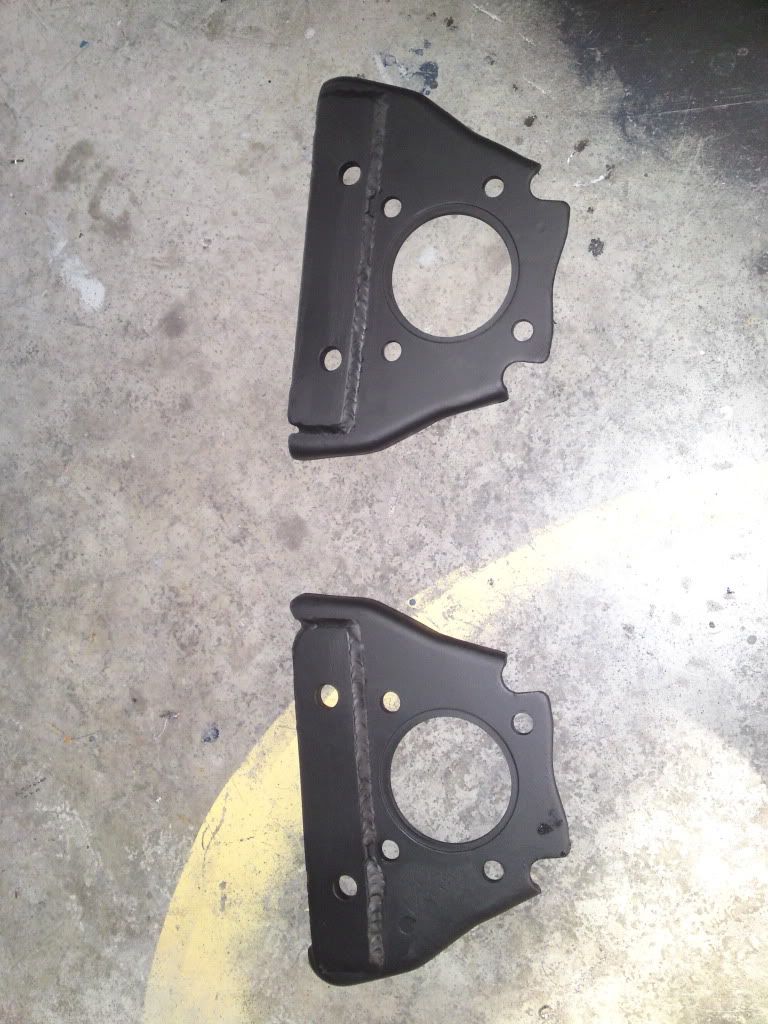 this is the other side, the bolts go in from this side. they aren't the same because i changed my mind after id made the first one........ 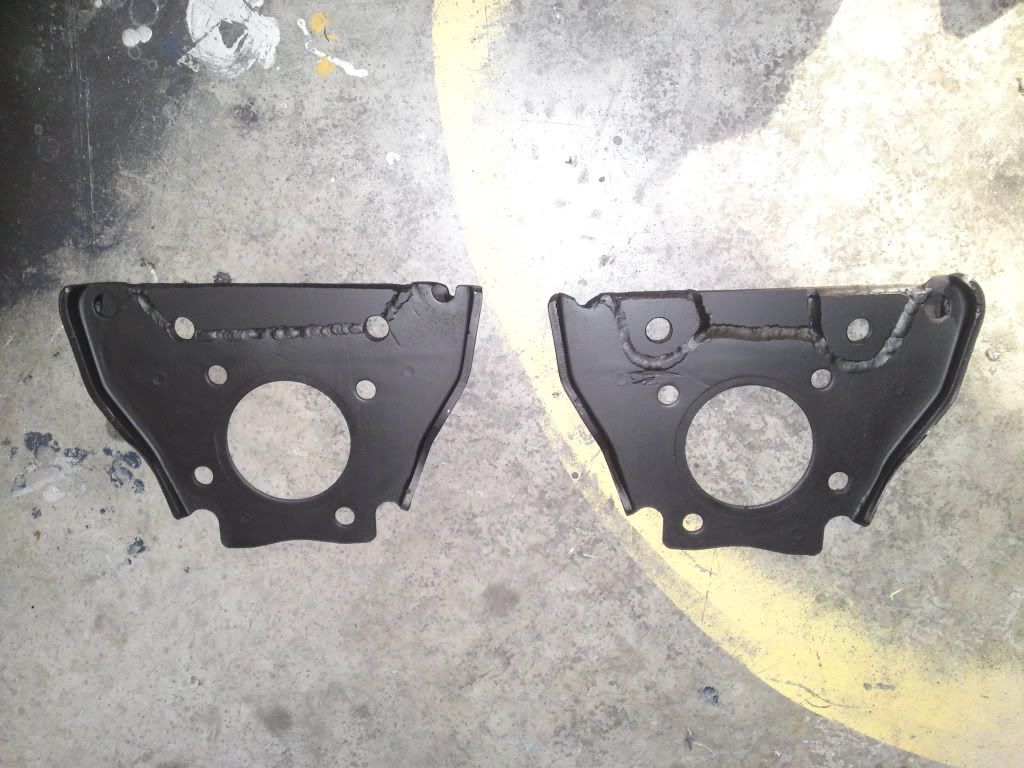 you can kind of see the 4mm offset that i needed in this photo.  now i got brakes!!! I'm really happy with how easily this bit came together. sheepers |
| |
|
|
|
|
|
|
|
wellllllllll, after what seems like ages but has in fact been 3 months i have made some actual parts for this car. ive made the rear chassis mounting point for the subframe. and ive welded it to the car. in some of the photos taken from bellow the car you can see lots of parts of the roof of my shed, this is because there are still many large holes in the car. but slowly, slowly I'm filling them in with stuff. this is the last major structural part (apart from the strutt towers) that was left to make. there are lots of little hole in the rails to fill but these are easy to do. soon, very soon I'm going to sit it back on its wheels. then its only a matter of making the GTR brakes fit on the front, building a driveshaft and i can drive it. i can believe i just said that, "drive it". it hasn't moved under its own power for about 16 years........ 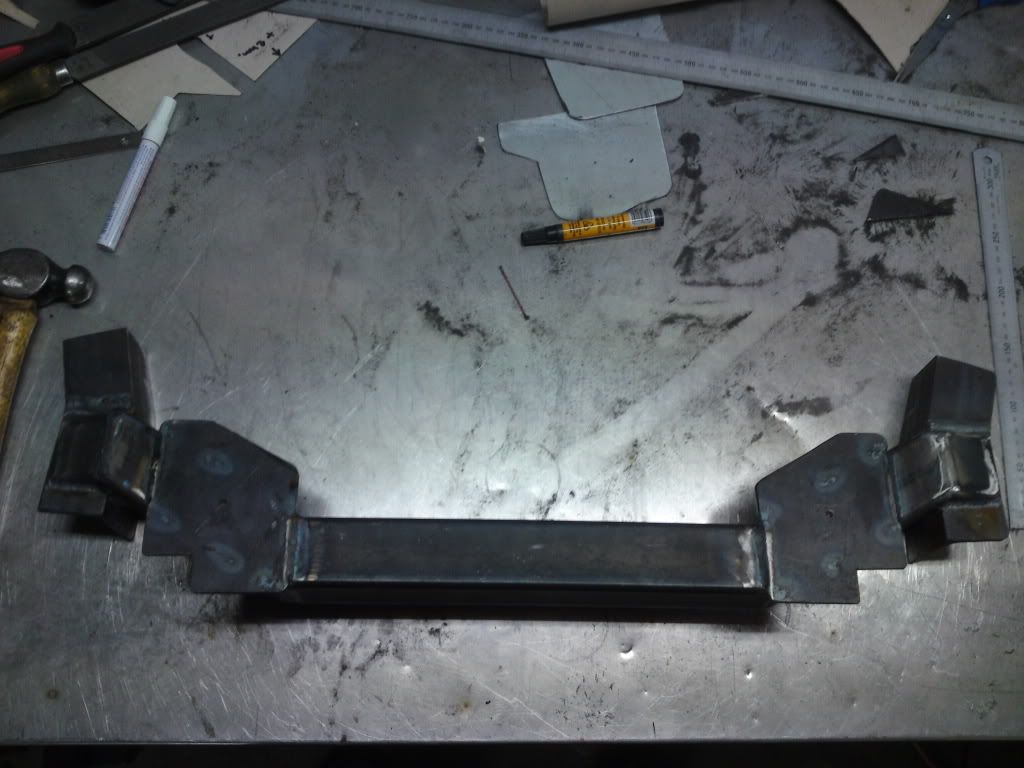 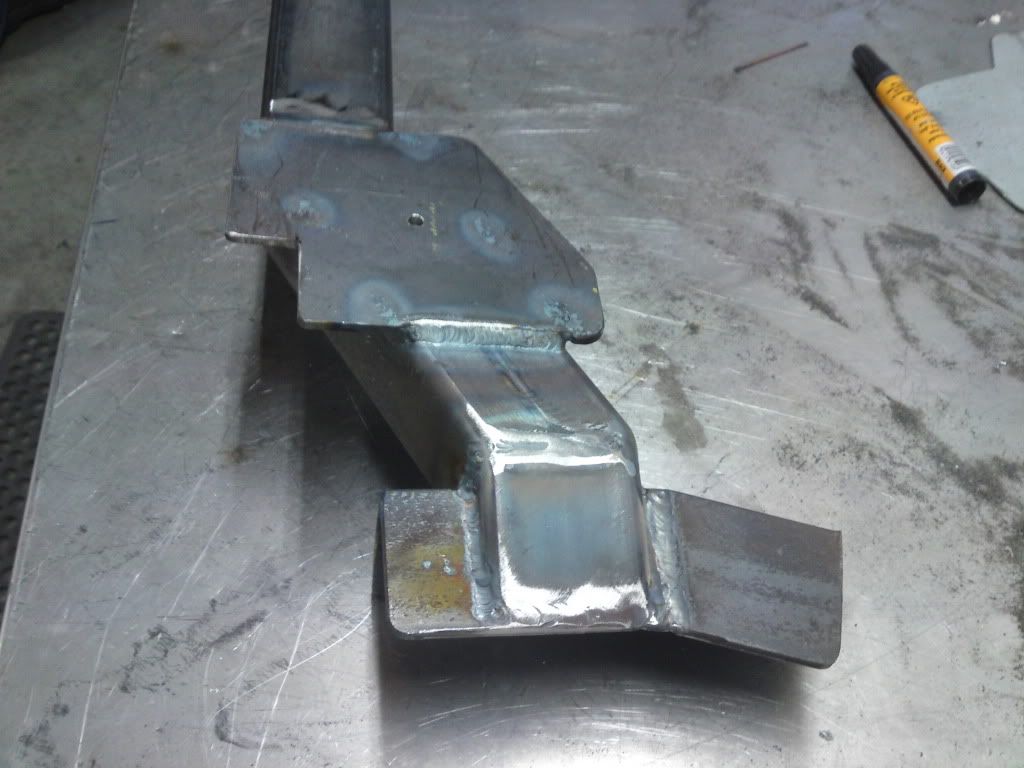 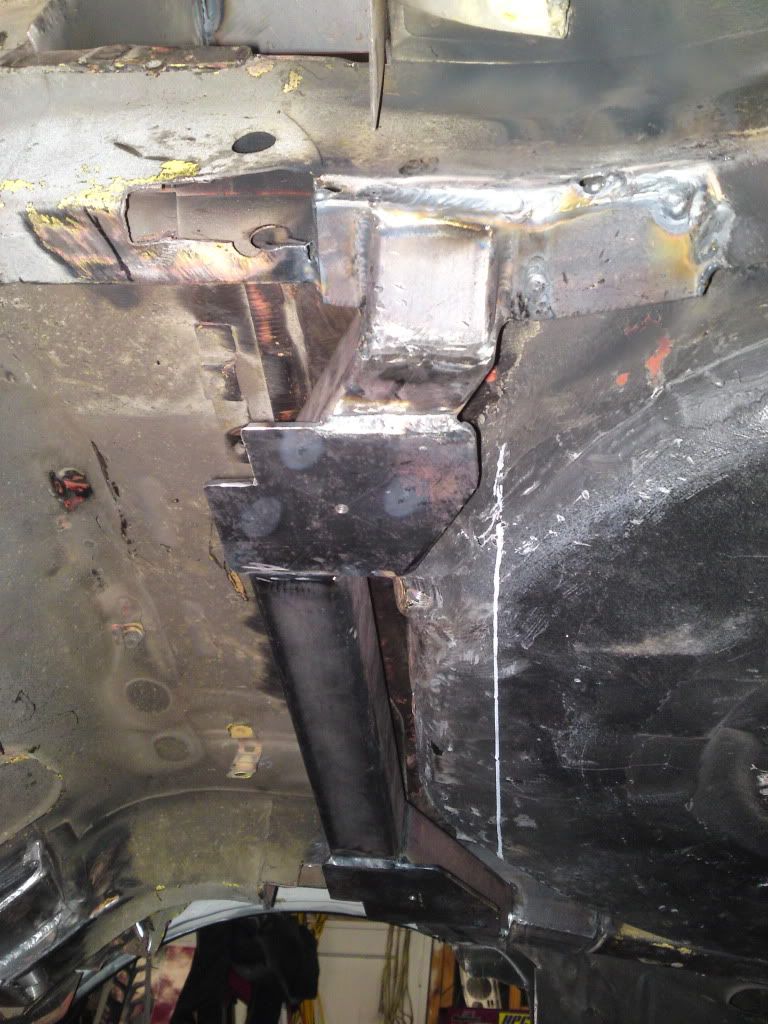 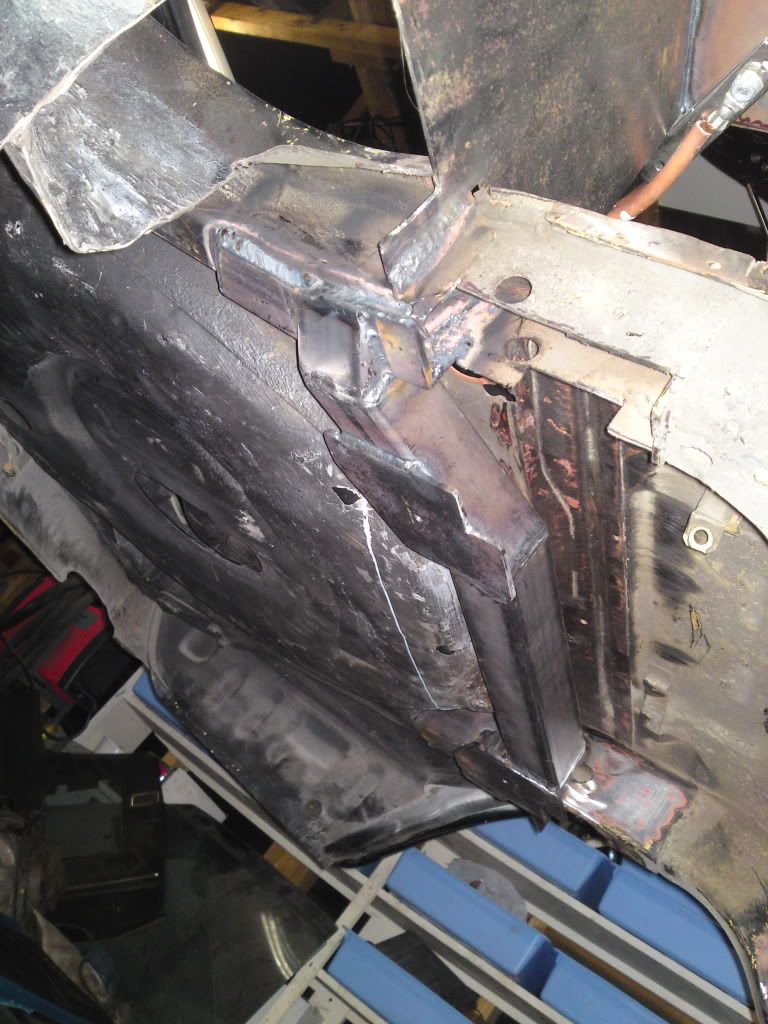 sheepers. |
| |
|
|
|
|
|
|
|
|
i did.
the only thing i didnt do on this car is lay on the final coat of colour and the wiring.
i going to re-do the wiring latter this year when i take the motor out for a few mods.............
|
| |
|
|
|
|
|
|
|
|
|
well. raced at Taupo again. decided to use my street tyres to see what they are like. and there was a slight chance of rain, which i would have loved to have a go in because ive never raced in the rain and its something i need to learn a hell of allot more about. anyway, Bridgestone RE001's are very very good for track use. they are nothing like as good as slicks but for road tyres they are curse word sweet. oh, i did roll one of the bead and it went flat, pumped it up and it was all good. i also tried a bonnet lift kit which made no difference to engine temps. i will give it a go at Pukekohe just to see if i still get as much front end lift when your 200+ but it made no difference at lower (sub 180) speeds. car went exceptionally well. drove it down, raced, then drove it home. sweet as. front bake rotors have had a bit of a thrashing though, they cant really handle the heat. i had no fade or brake issues but at the end of the day i had some pretty mad shudder. time to skim the disks again... umm, i think ive rambled enough without making sense. ill link some photos. 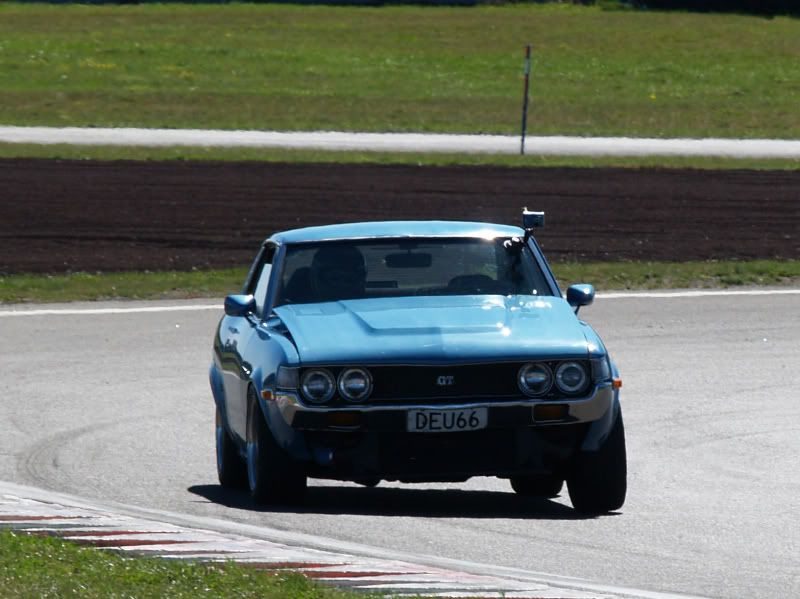 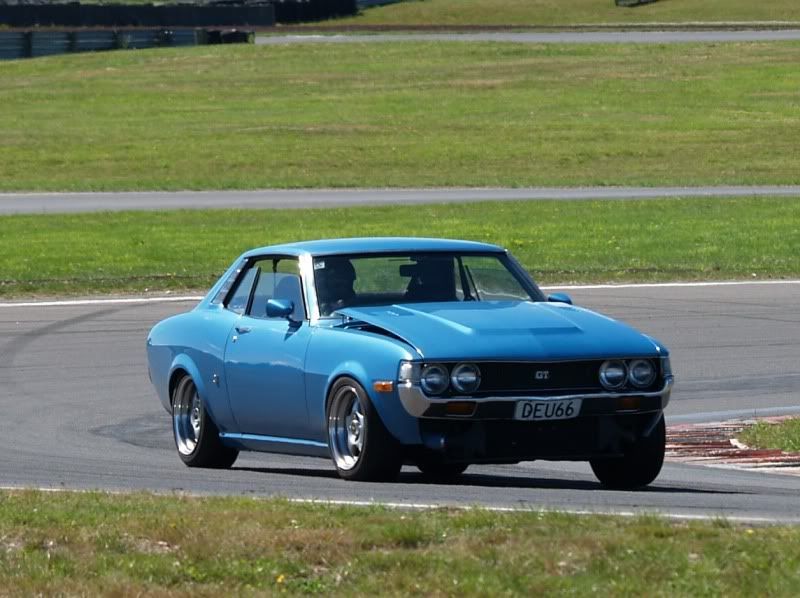 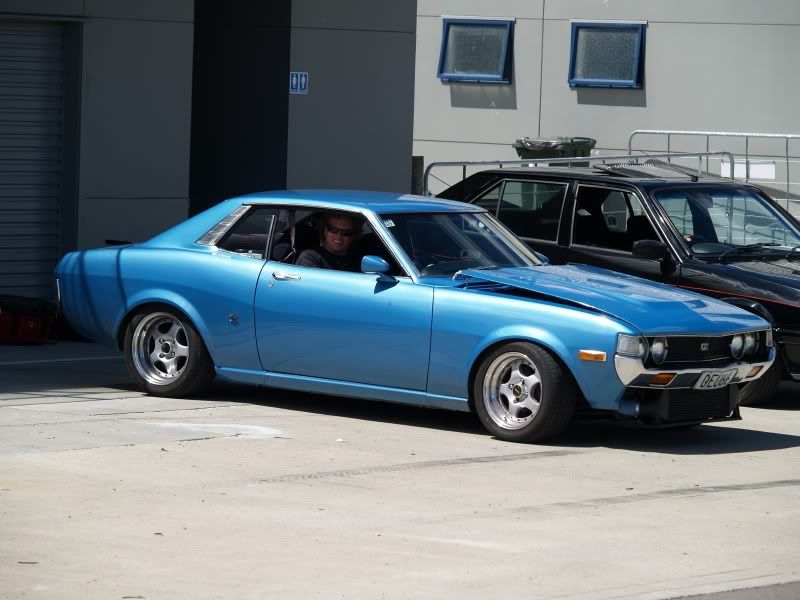 and also this, the whole old school track day. picasaweb.google.com/oldschool.co.nz/OldschoolNats10Videos#5443570777532852178 |
| |
|
|
|
|
|
Feb 19, 2010 10:11:54 GMT
|
|
cliff,
ive been watching your build on SXOC for the last however long its been since you started,
i thought about signing up to that site just to tell you how brilliantly inspiring your build has, is and will be. but i kind of though it wouldn't mean anything much coming from someone youve never herd of and never will again.
anywho, ive put some details up of my cars on this site (no links in my sig cauz in a cyber spazz, you,ll have to search "sheepers") and I'm hoping that my words might actually mean something on a site we both share.
keep on keeping on.
sheepers.
|
| |
|
|
|
|
|
Jan 27, 2010 18:22:28 GMT
|
|
so thats it as of right now.
the onlty things that have changed since christmas are that ive put the rear screen in, put the front screen in which then promptly cracked in half, bought a new front screen and aquired some bits of steel to make more parts of the floor with.
ive been very busy with my other celica so this one has had a bit of a rest lately.
ill be back into it now though, i realy want to drive this car, its been in a shed over half its life and its high time i drove it!!!!
sheepers.
|
| |
|
|
|
|
|
Jan 27, 2010 18:15:30 GMT
|
passengers side chassis rail is finished. ive used 3mm plate and tied it all in pretty well. i used the old upper control arm mounting point as part of the structure so its pretty strong. ive started on the drivers side and will probably get it 99% finished tomorrow. still got allot to do but its coming along. 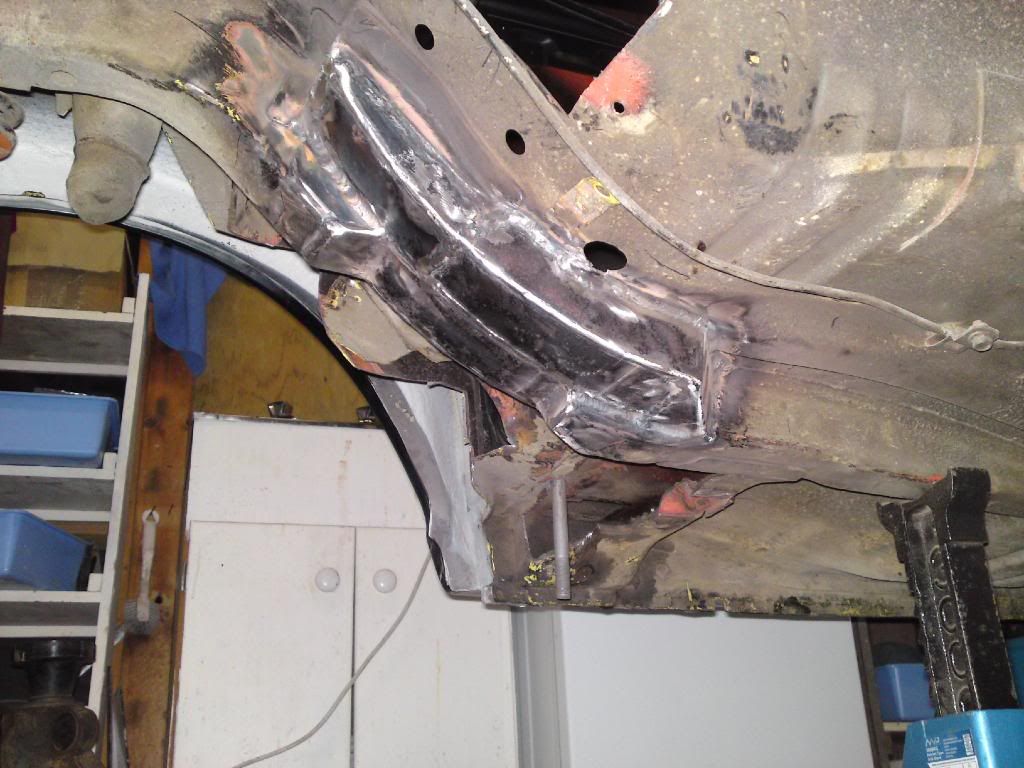  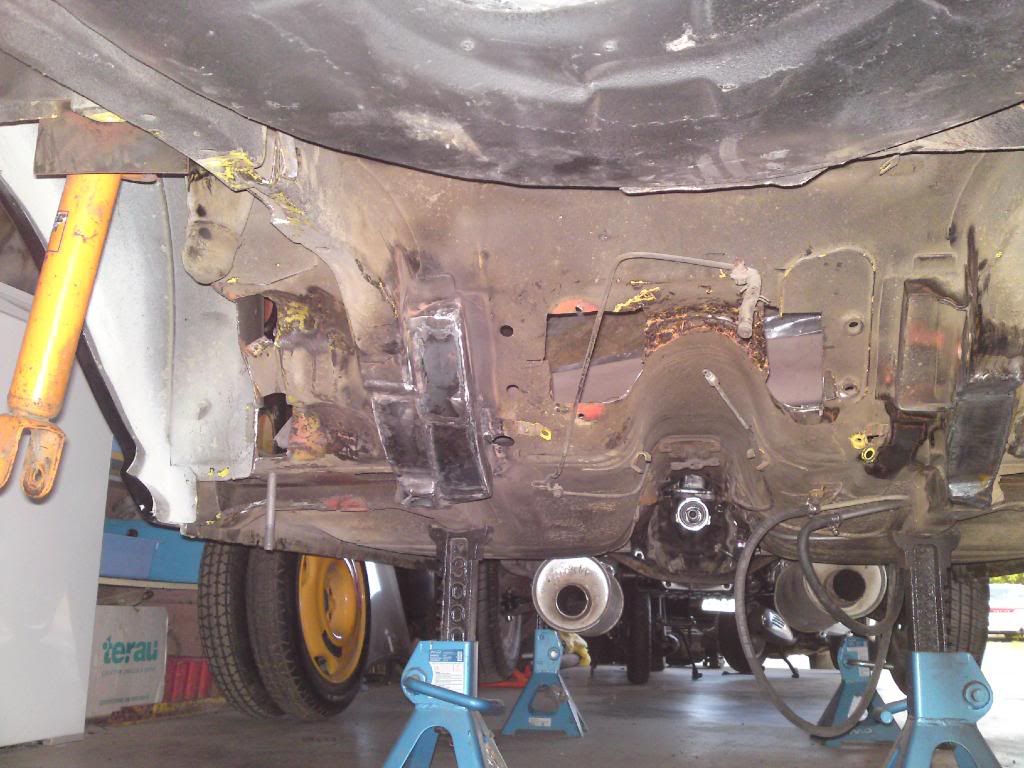 more has been achieved in the area of welding bits on. Ive got the subframe sitting where i want it, i was going to move it forward by another 10mm but i don't think i need to. the reason i was going to do this is all to do with wheel clearance issues i had with the 23, but none of these rules apply here because the wheel wont move in an arc like it does on a normal live axle car. ill take out the strut and check wheel clearance but i think I'm good to go with where it sits now. the wheel thats on the car in the photo bellow is about 630 in diameter, roughly the same as a 235/40/17. with the car on the ground the wheel moves up about 15-20mm from where it is now (the strut and spring i have is very stiff, ill be changing this but its all i have for now) but thats the ride height I'm aiming for. i have to make some more plates and such for the mounting points and to strengthen up the floor. but the rails are done and there is clearance (curse word all but enough) between the chassis rails and the subframe. 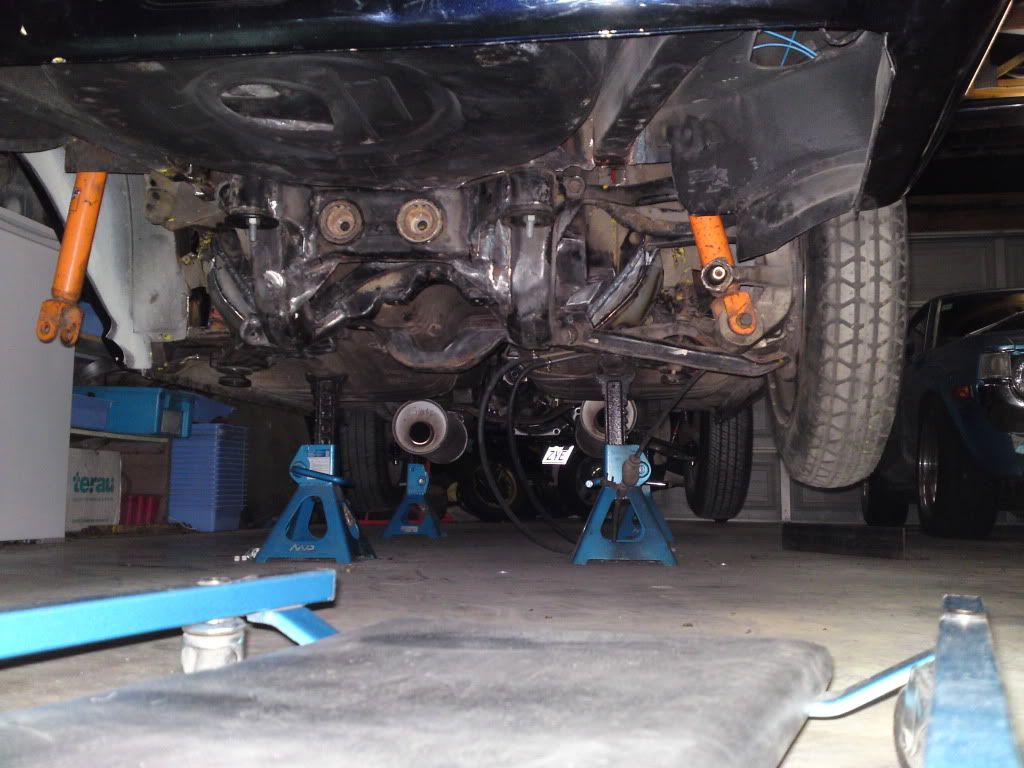 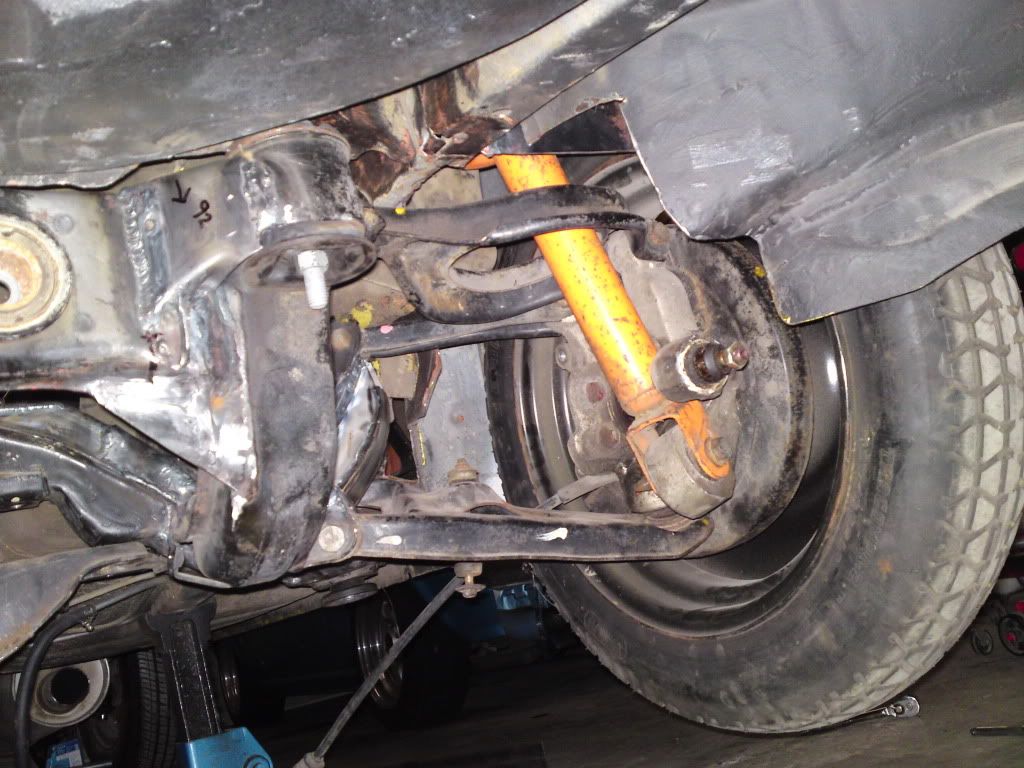  so its more upside down welding for me. i went out in the shed last night but i couldn't hold my arms up above my head any more so i had a night of, i need to acquire some 10mm plate and some huge angle iron bits and pieces to make stuff with. i can actually see a light at the end of the tunnel now. hard to believe. and it looks like ill be able to have a back seat as per normal too. |
| |
|
|
|
|
|
Jan 27, 2010 18:13:49 GMT
|
right, on with the rest of the build up untill now.... well ive been doing some measuring and stuffing about and ive arrived at a final figure of 85mm per side must be removed to get me back to stock celica hub face to hub face (1370mm total) I'm going to have a look around a 4x4 wreckers tomorrow and see if i can find some nissan navara shafts that are somewhere near right. if i can find some that are 3" shorter then we'll be in business. I'm not holding out much hope though, this would make a very short shaft indeed and not the sort of thing youd want on a long travel 4WD setup, time will tell. and so this update isint completely lame heres a pic of the cradle stripped ready for me to make a jig then cut it and shut it.... 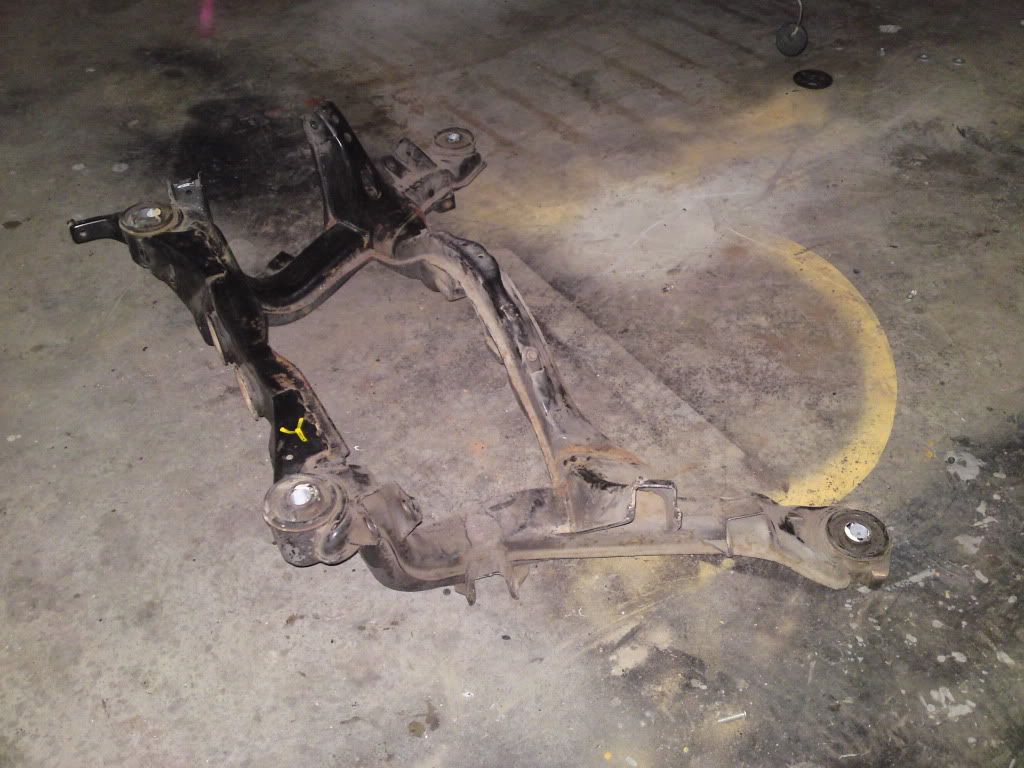 also i have done this to assure no hope of future success. right! how to cut up a perfectly good GTR subframe. first, weld some random bits of steel you have lying around the shed to it in a fairly inconvenient place, then cut some bits off. 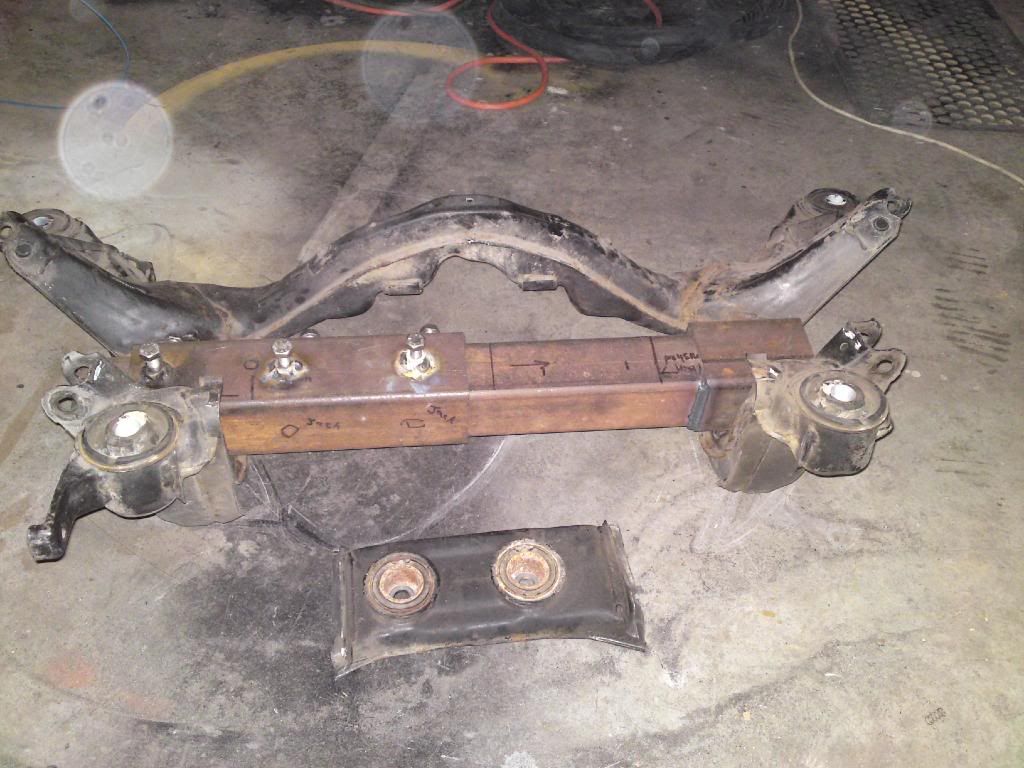 once you've done this, cut up the bit you cut off into even smaller pieces. 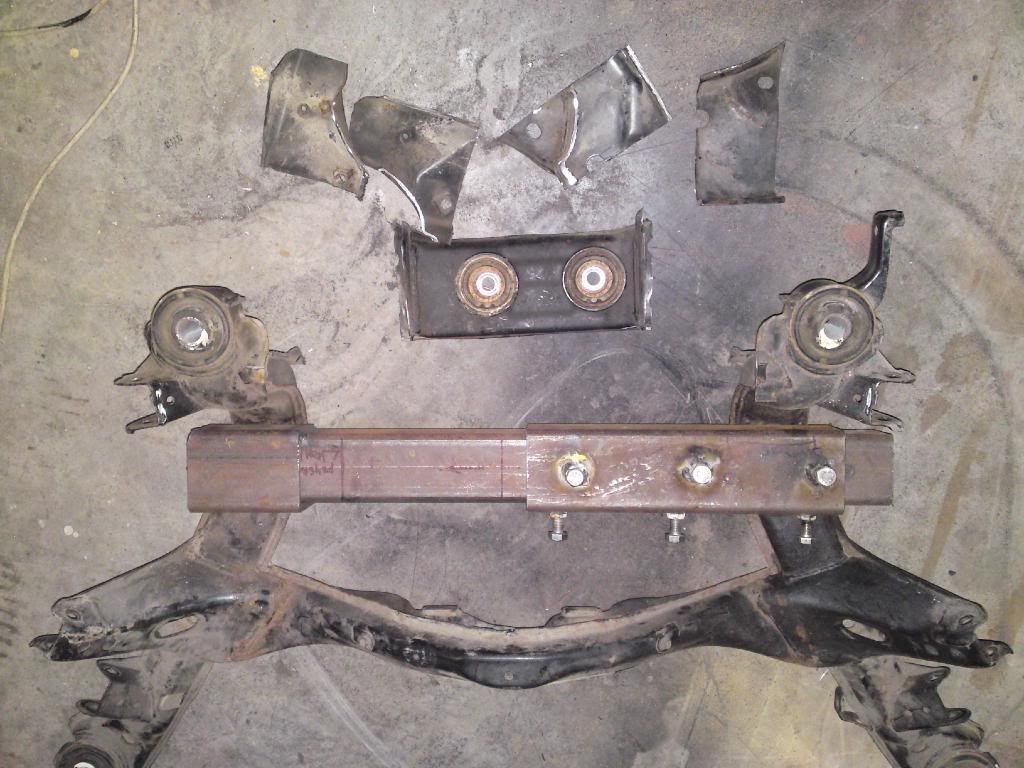 if there is any bits joining your two half's together, cut them off as well. 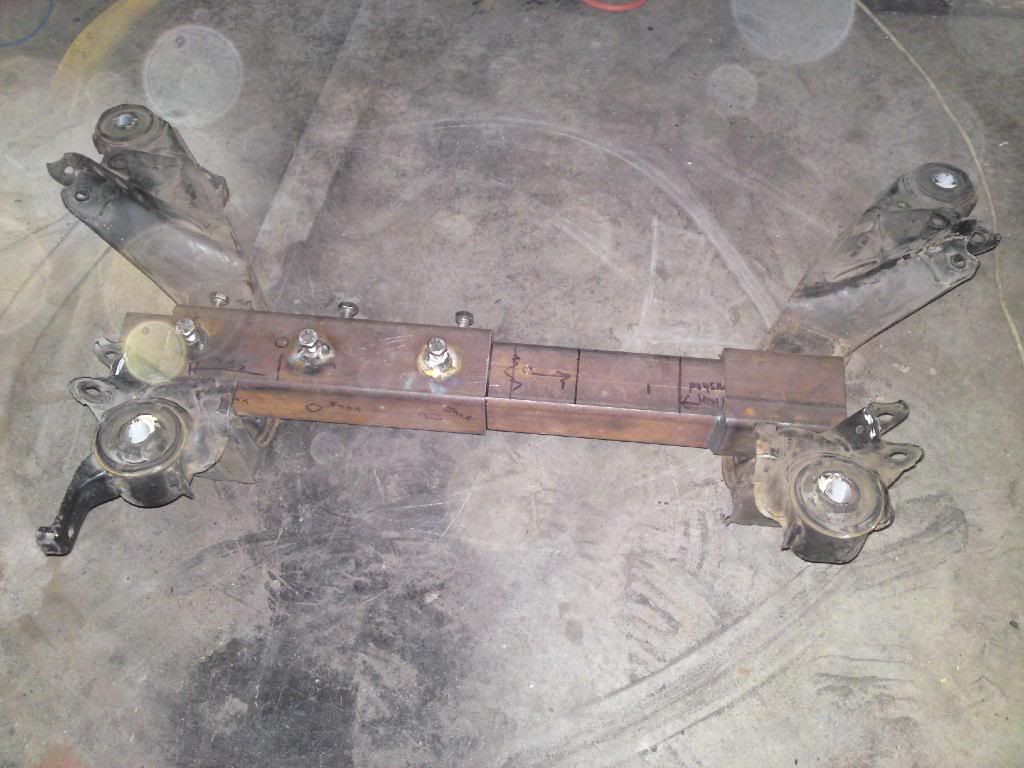 then move the bits all over the place so you have no idea where they were and you can possibly put it back together. 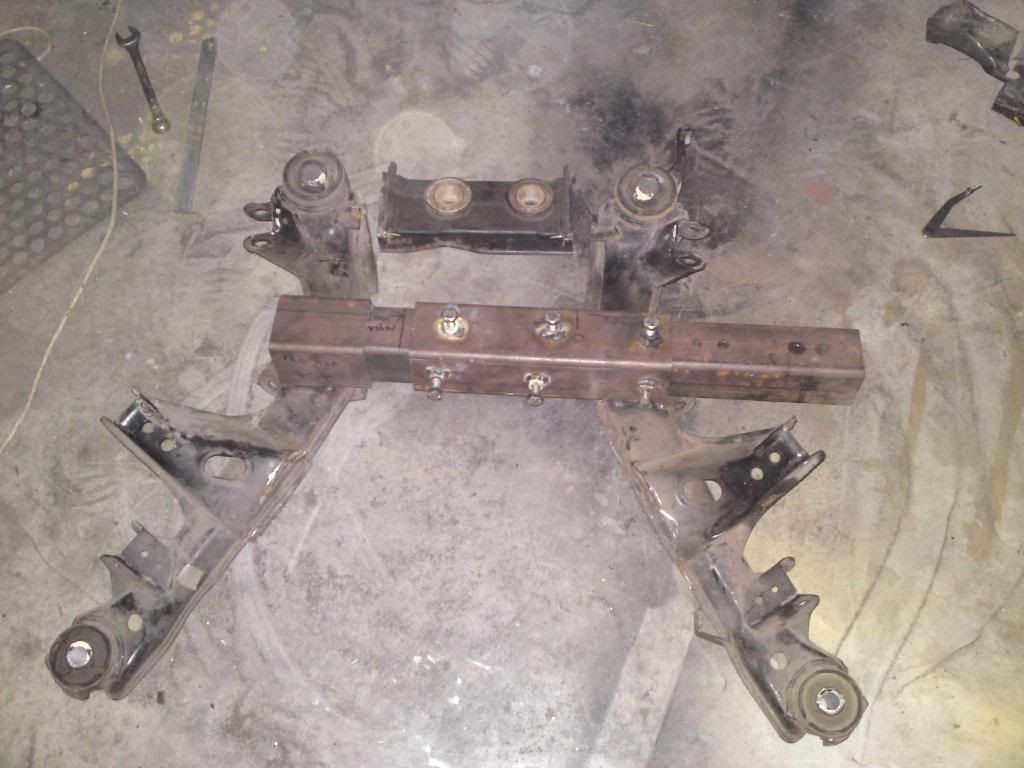 try to put it back together and fail miserably. by now you should have something that looks like this, and no hope of it ever working again. 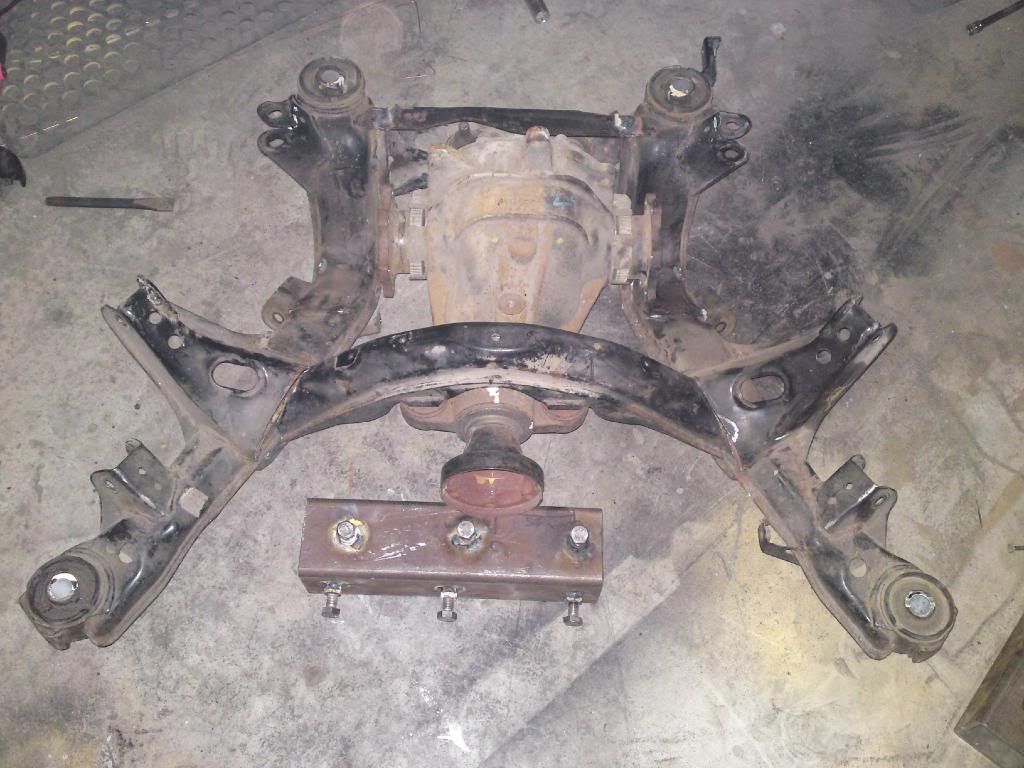 now that ive created this edifice i have no option but to try to make use of it somehow. there will be more to this story i can assure you.......... well for those of you who think ive been sitting round doing nothing except going "a doop pe do, a doop pe do do do, doopie do" i haven't. and to prove it i have photoshopped up some images that look like progress. the subframe is back together and fully welded/strengthened and ready to go into the car. it fits where i want it to and i reckon its plenty strong enough. i still have to weld up and strengthen the floor and chassis rails but its getting there. half shafts are almost finished and i can start to think about putting it together properly and bolting it all in.. some pics of the frame. i might weld some more bits on it but i don't reckon i need to.... 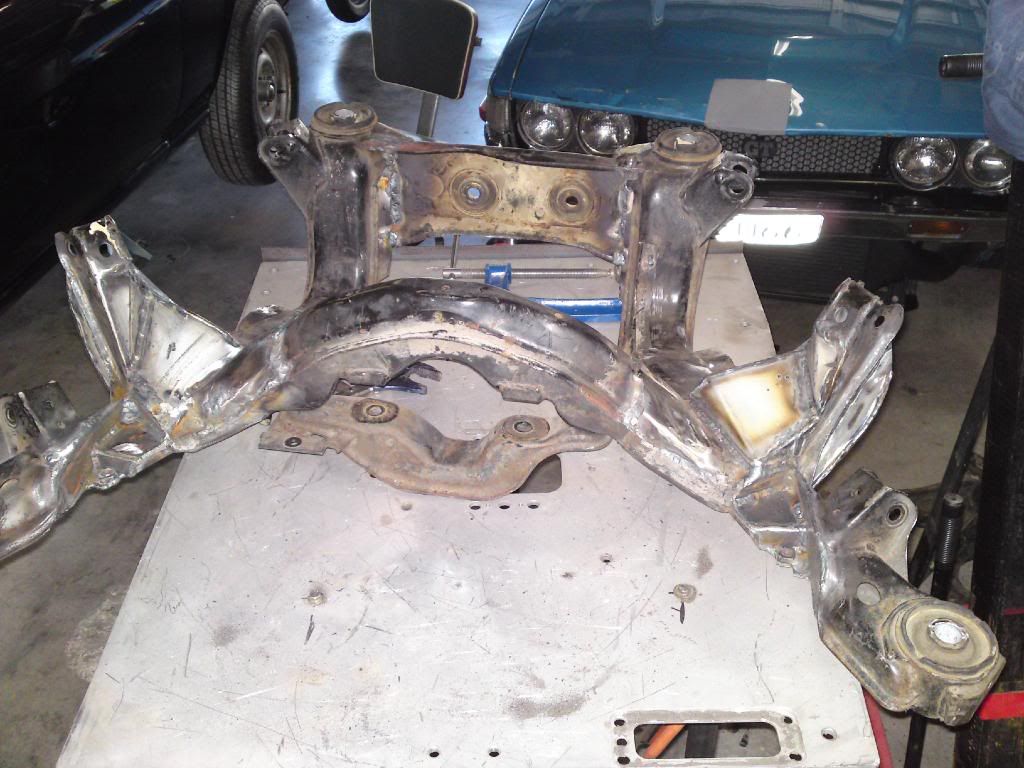 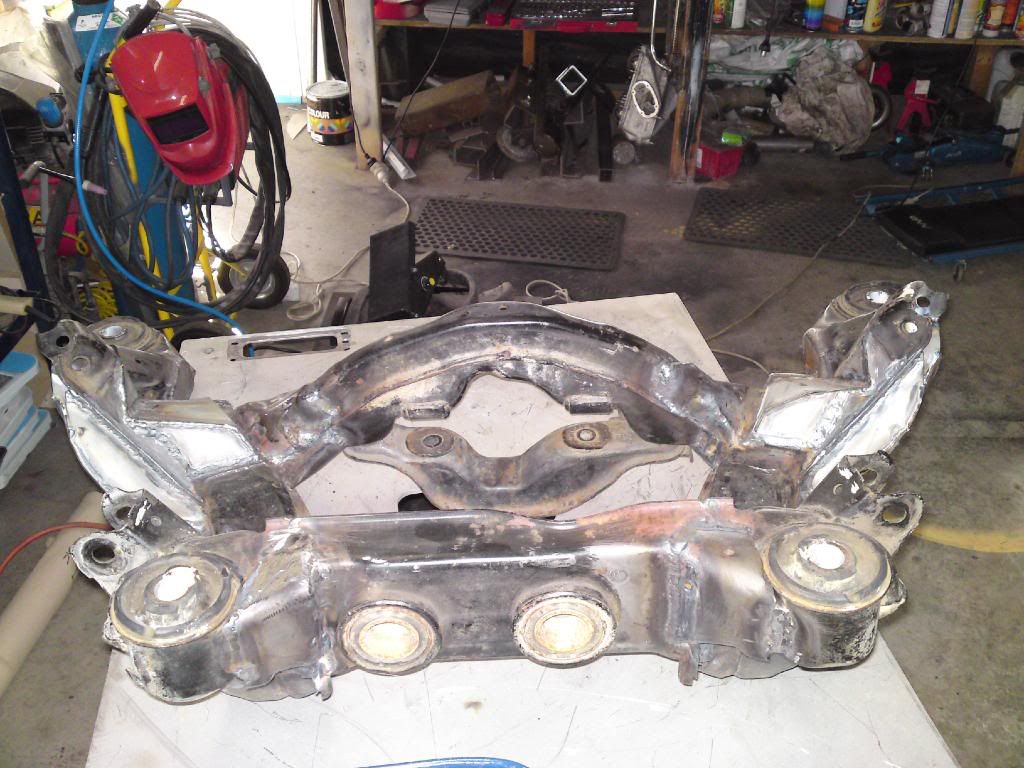 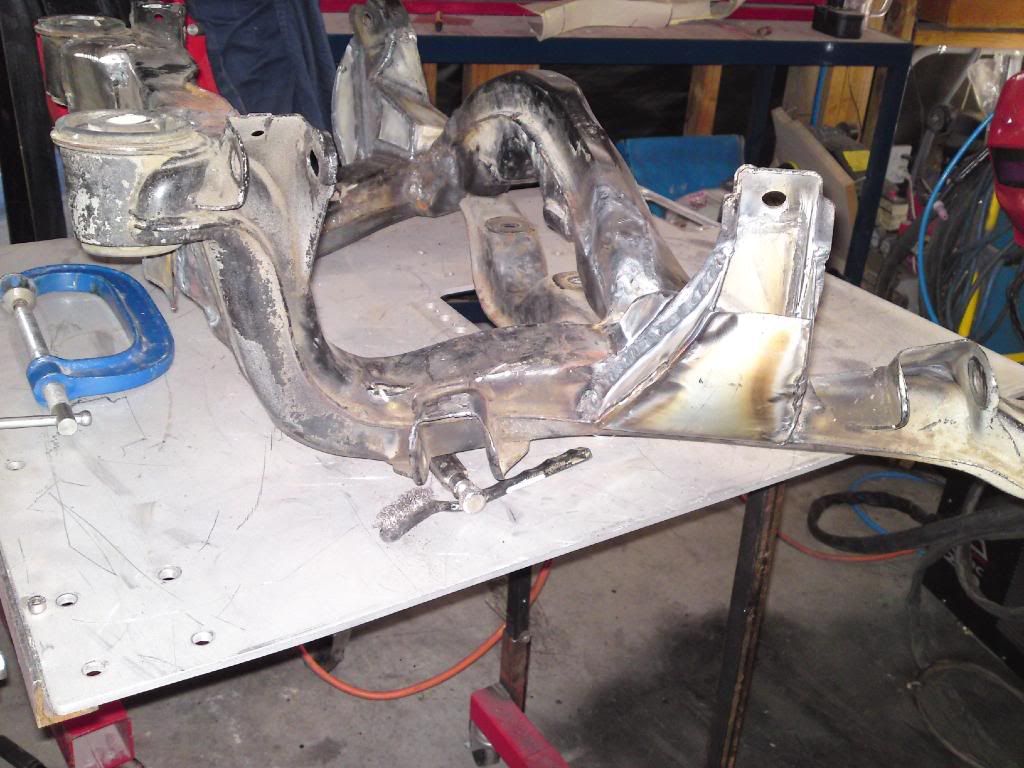 sheepers |
| |
|
|
|
|
|
Jan 27, 2010 18:10:33 GMT
|
|
its manual, W57.
ive run with factory computer for now. this car is going to be a cruiser with air con and power steering, Ive got my other one (see "1976 celica RA23" for my fast one) to go fast in, I want this one for road trips and cruising.
I will probably run an aftermarket computer when I supercharge it but thats a year or two off yet.
it runs allot better now that all the air pipes and whatnot are sorted out, ill stick up another vid.
sheepers.
|
| |
Last Edit: Jan 27, 2010 18:11:42 GMT by sheepers
|
|
|
|
|
Jan 26, 2010 23:46:22 GMT
|
|
the diff is out of a VL commodore LSD, its been cut and shut and had the celica mounts put on it.
its a borg warner 8". they came out in heaps of stuff, most of the 6 cylinder falcons, cortinas, holdens, lots of stuff.
|
| |
|
|
|
|
|
Jan 26, 2010 23:42:20 GMT
|
That's really great! Great work! I hope you don't mind me asking something for my own piece of junk car: Where did you get the part of the air intake in between the two silicon hoses where the small diameter hose connects to. i made it, sorry its not an off the shelf bit. it was pretty easy to make, just roll up a piece of flat alloy to the diamater you want then stick a pipe on the side. i suppose it helps if you have a AC tig welder..... also, there is more of this build to come, i ran out of time to finish the thread but ill put the rest up tonight. sheepers. |
| |
|
|
|
|
|
Jan 26, 2010 19:31:22 GMT
|
|
well, its funny how you get yourself into these situations but here i am.
i have had a re-measure of the rear subframe. in order to get it the same width as stock celica( and therefore run the uber dish that should be required by law on these cars) i need to take 95mm out of each side.
i cant shorten the arms by this much because the geometry will be poked so the only option left is to cut and shut the cradle.
you can see now how i have begun to paint the floor, working meticulously away from the door into the farthest corner. from here it goes downhill.
cutting the cradle isint toooooo much of a world stopper and at this point i think i can pull it off. it will require some "interesting" bulges in the floor and some very delicate "rust repairs" to the chassis rails but sacrifices have to be made.
but then we move onto the half shafts. ive not taken them fully apart yet and I'm still at this point assuming you can, they have a spline that fits into the ball carrier on the hub end so I'm guessing they come apart here. unfortunately the shaft is slightly "necked" so in order for me to cut the shaft down and re-spline it i will first have to build it up with weld so i can have the correct diameter spline. joy.
its about now you ask your self "my god, what have i done" but in the immortal words of whoever it was who read the questions on master mind "I've started, so ill finish."
and its with this new mantra firmly implanted in my head that i move on into the abyss.
here are some things i know, my friend works in a metallurgy lab so i can give him a sample of the half shaft and find out what will be the best process and filler rod to use to build up the shaft. i have access to the gear required to machine the shaft and do the re-spline myself. my engineer has said i can legally do what i propose as long as he sees what I'm doing.
so its all gravy really, what could possibly go wrong........
bloody hell.
|
| |
|
|
|
|
|
Jan 26, 2010 19:30:47 GMT
|
this is the current state of play. need throttle cable, radiator overflow /washer bottle and bottom valance. oh, and also an air cleaner, which i hadn't even thought about until now. everything else is done. it starts and idles from cold as it should and all things appear to be working. in the next day or two I'm going to turn it around in the shed and jack it way up in the air. then the fun begins. 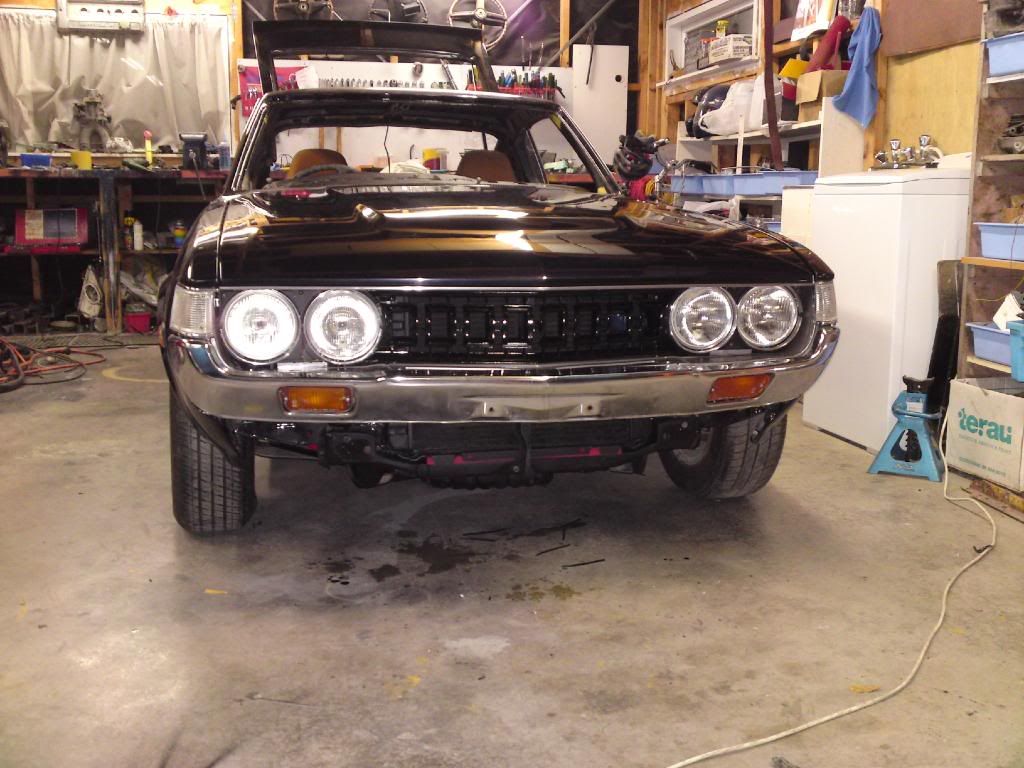 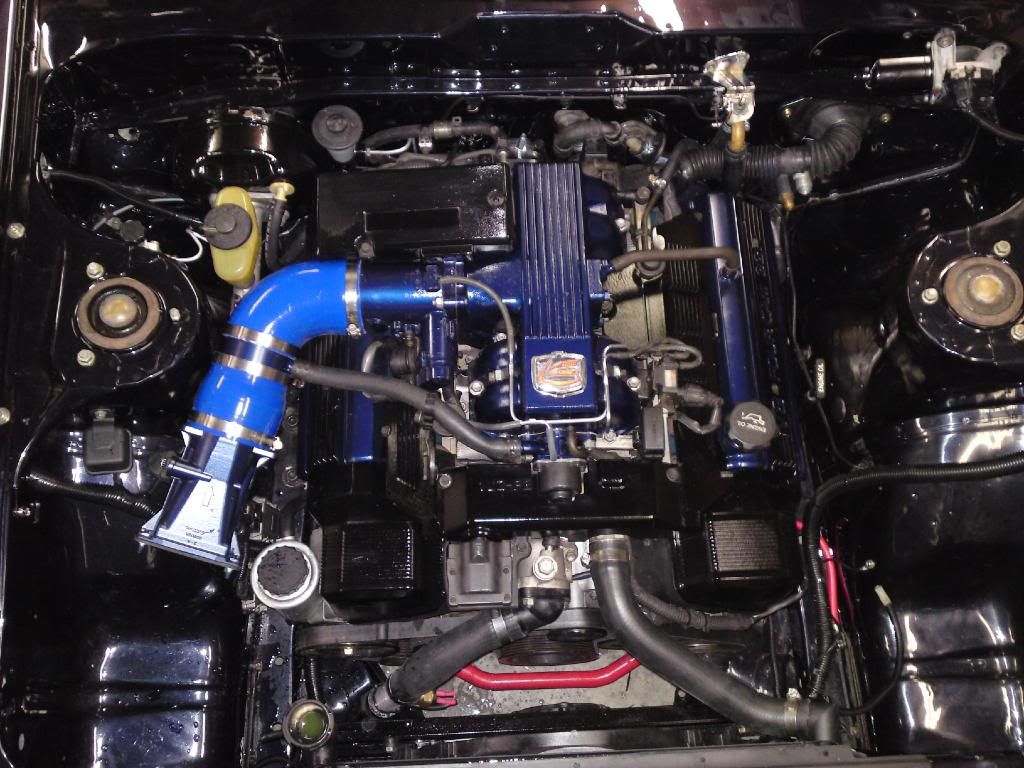 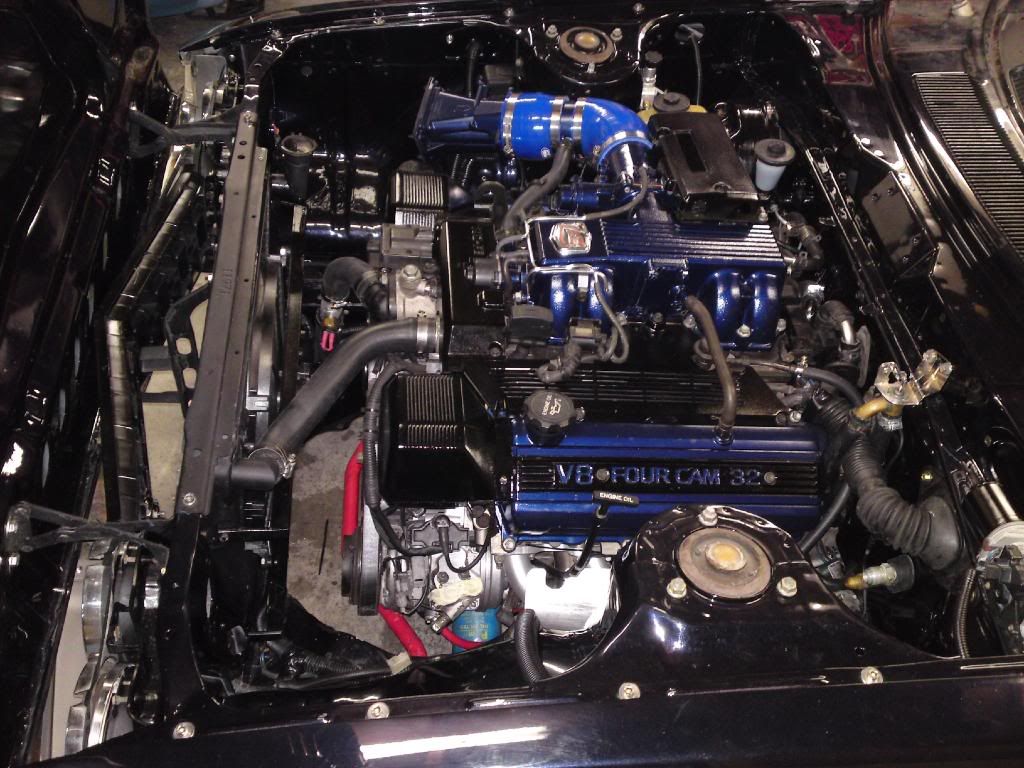 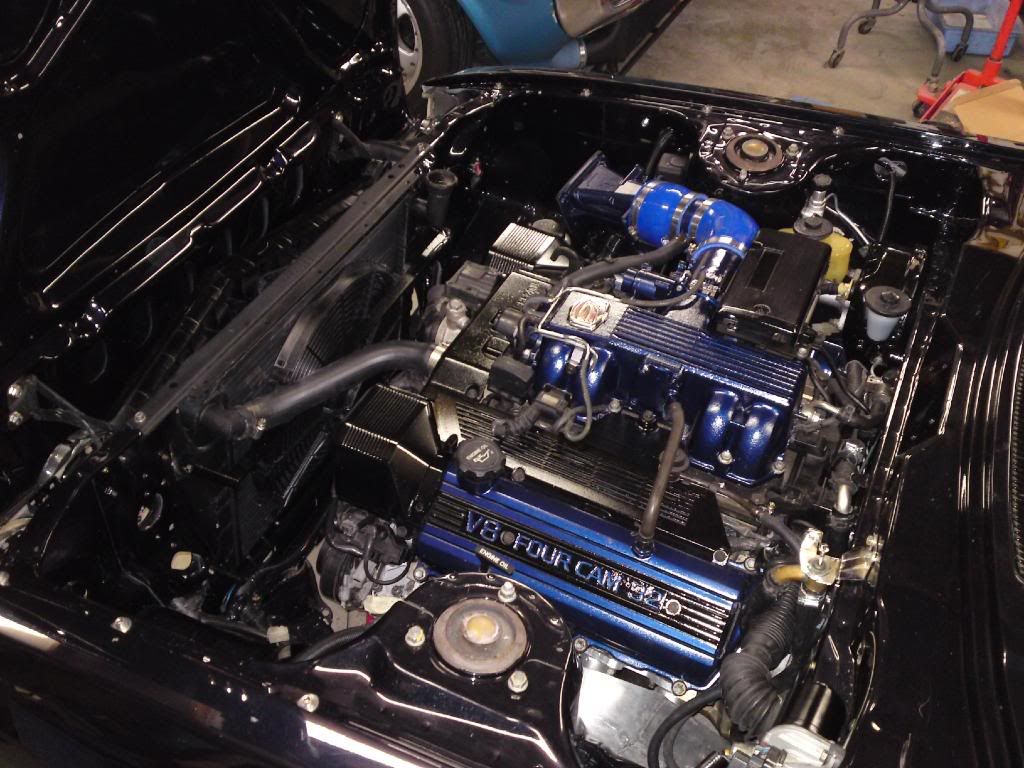 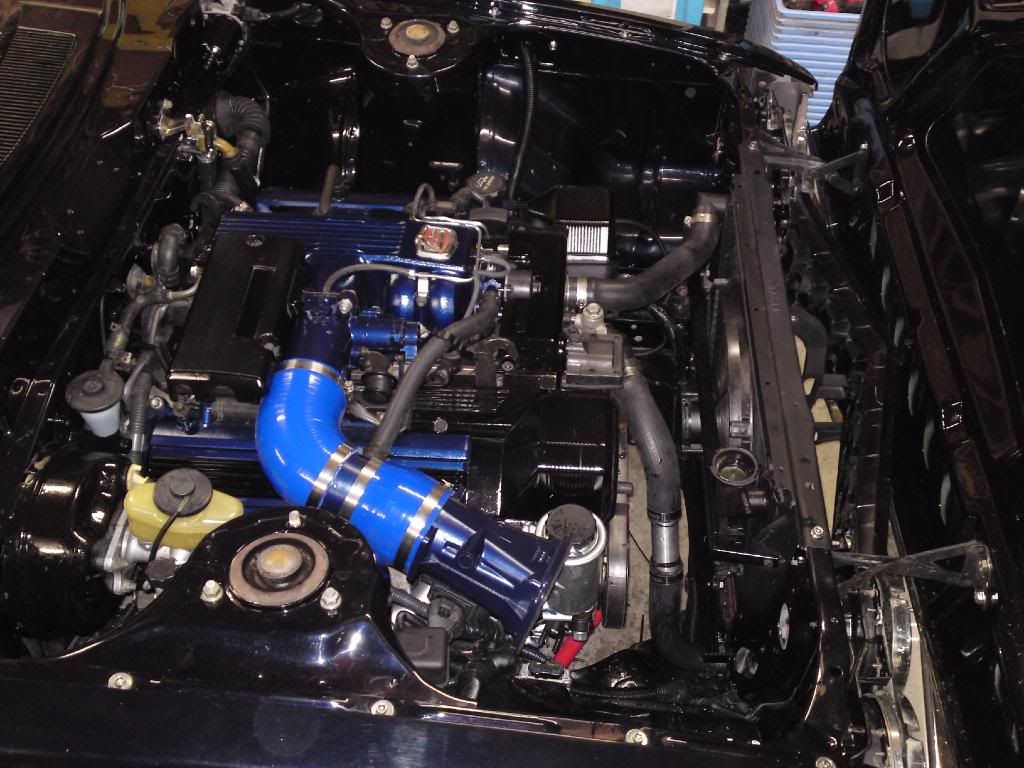 sheepers |
| |
|
|
|
|


