merryck
Club Retro Rides Member
Posts: 477
Club RR Member Number: 9
|
|
|
|
Impulse buy today at the tip shop. Still no idea why I bought it 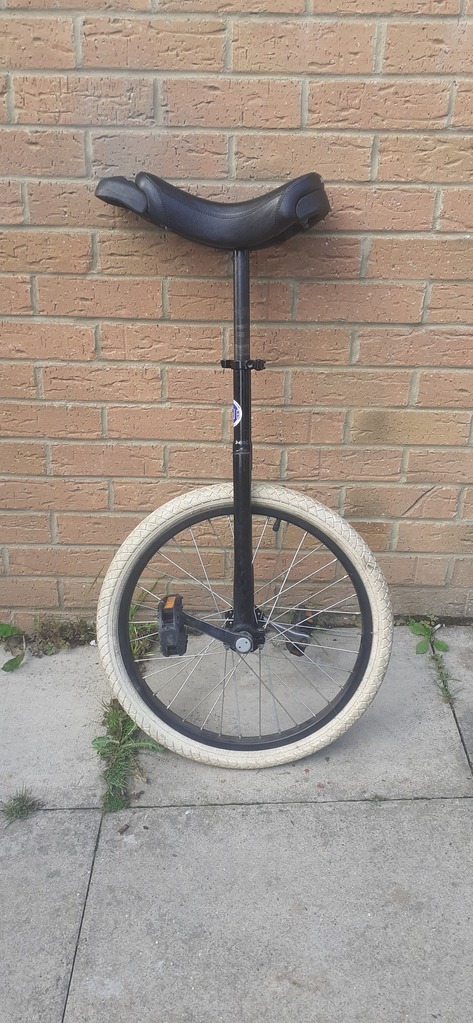 Casualty department on code red. I used to work in a pub that overlooked a busy road. One day the regulars were in, I was pottering about behind the bar, it was fairly quiet. We all seemed to notice it at the same time - a dude rides down the hill (steep hill) on a unicycle, gets to the busy crossing, waits for the lights to go red (while balancing on the unicycle) then crosses the road. That would have been impressive enough, but then he hopped up onto the railings - the grey galvanised ones you get around crossings on busy roads - and rode ALONG the railings, hopped off the other side, crossed the other side of the road and went on his way. Such an insane display of skill. We were all left entirely speechless, just watching this guy go on his way down the road into town. None of the other staff believed me that evening until they'd all done day shifts and the daytime regulars had backed up my story. So anyway, I expect you to be at least that good by the end of the month! |
| |
|
|
|
|
merryck
Club Retro Rides Member
Posts: 477
Club RR Member Number: 9
|
Finn's tot rodmerryck
@merryck
Club Retro Rides Member 9
|
Sept 26, 2022 12:47:08 GMT
|
|
Thanks, I'm really pleased with it. I was very disappointed when the paint failed, but I've got a number of ideas for where things could be improved, so I'm going to get hold of some more steel and make another (better) chassis with better steering, a hidden (and wrapped!) wiring loom that isn't made of Wega connectors and odd leftover wires stapled onto the base!
The front hubs are a little loose, but only at certain angles, so there's something not straight somewhere either in them or the kingpins. They're only held in place by M8 bolts with no shoulder, so they'll wear the bushes out quite quickly.
This was slapped together in a couple of weeks powering through evenings and nights while working full time. It's a miracle it happened, and I'm very proud of it, but there's tons of room for improvement. I've got some more photos of it I'll post up later.
|
| |
|
|
merryck
Club Retro Rides Member
Posts: 477
Club RR Member Number: 9
|
Finn's tot rodmerryck
@merryck
Club Retro Rides Member 9
|
Sept 26, 2022 6:16:36 GMT
|
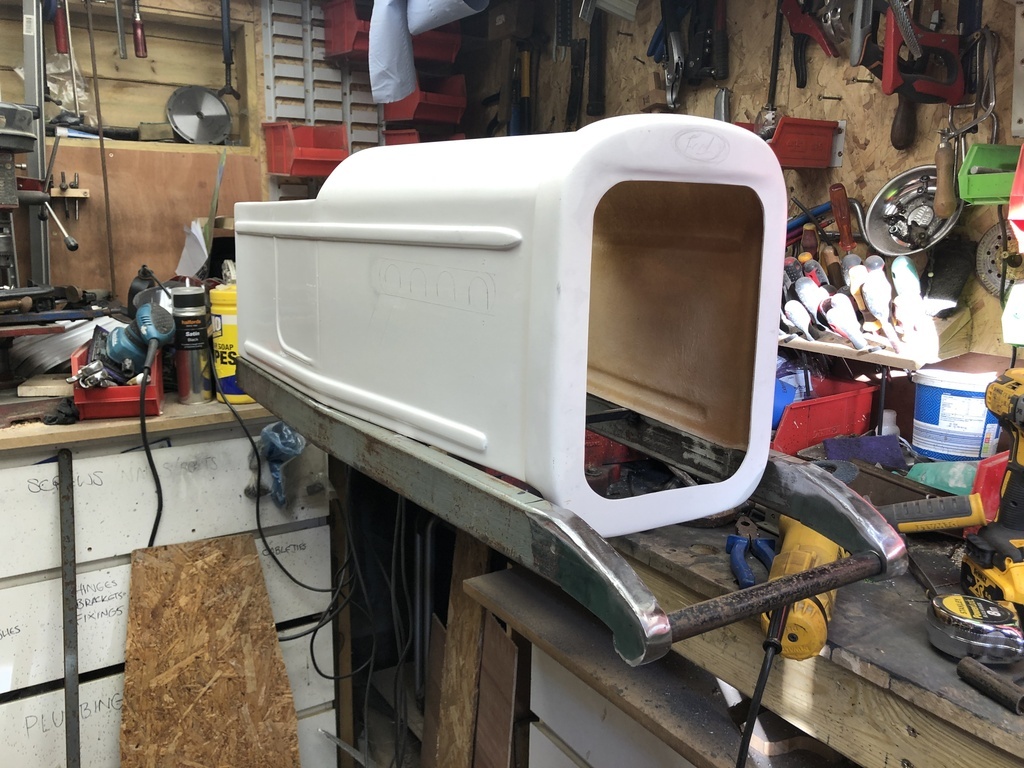
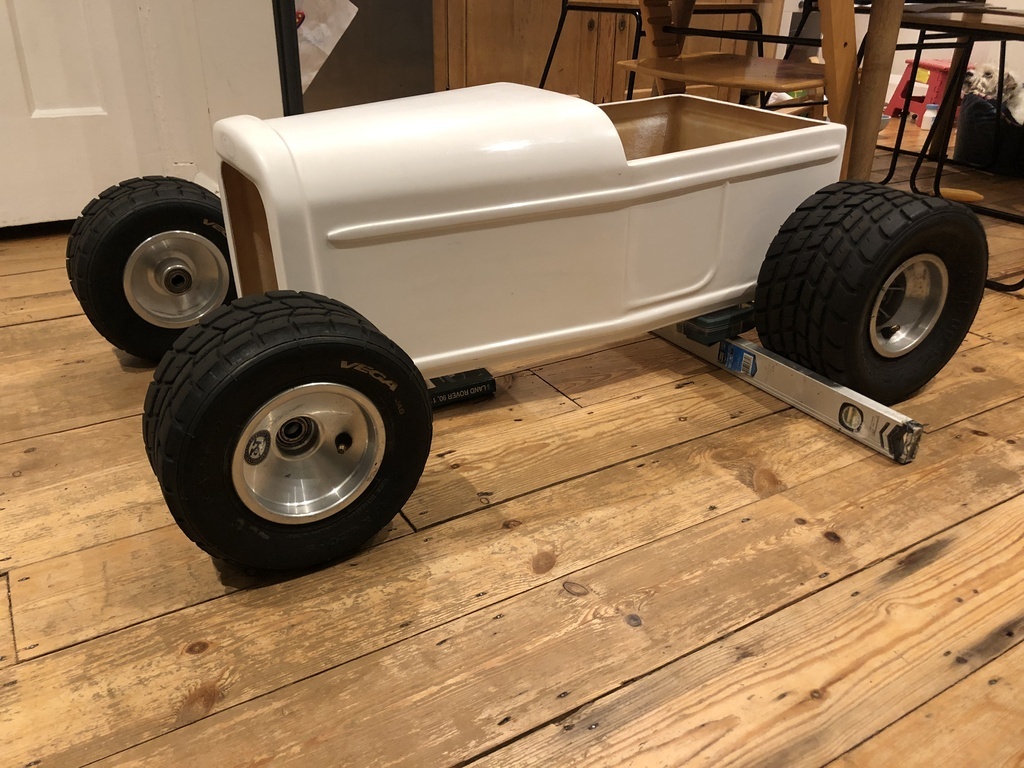
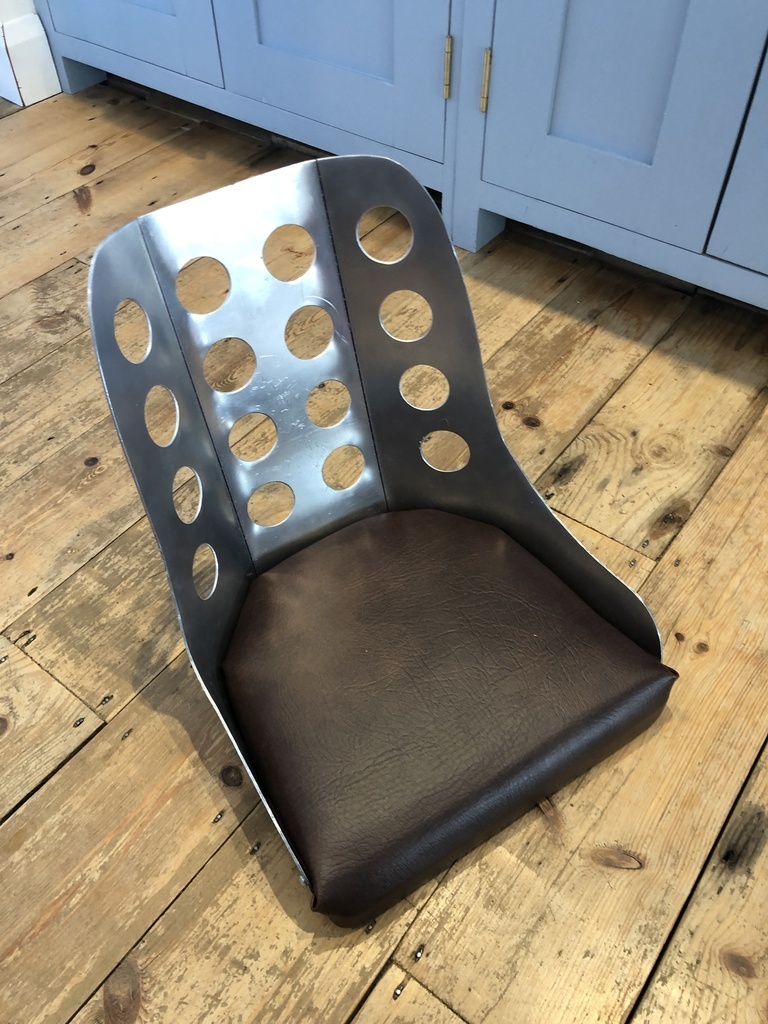
I managed to get it ready enough to take it out to the show! Unfortunately I messed up the paint FOUR times, resulting in it just being satin black with no flames. Now he's seen it he doesn't want me to change it, so I guess I'm off the hook on painting flames for now! I've hardly got any photos from the last push unfortunately, because I was just rushing to get it done. However, there are a couple. I started by doing some filling on the body. There were a few scratches that were a bit deep, and I didn't really like the profile of the radiator cowl, so squared up some of those edges. I also don't really like the moulded door shapes on the side. Can't do a huge amount about the bit that sticks out, but filled the dip while I was there.  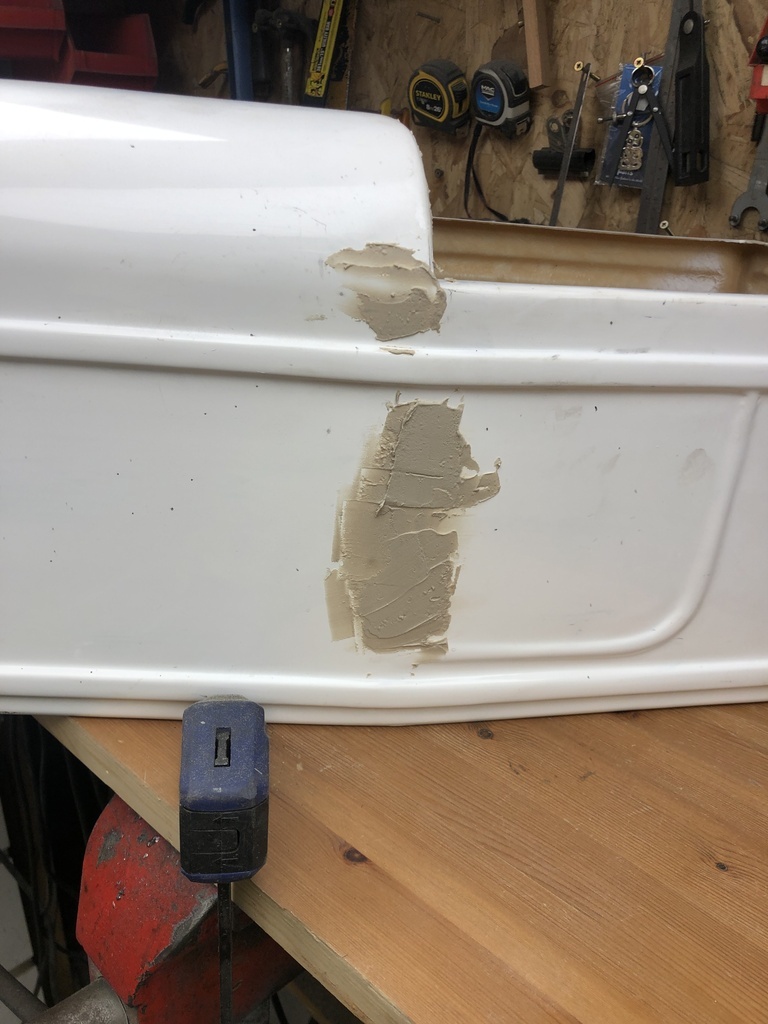 I made a gear lever out of an offcut of the steel I used for the front axle. Added some speed holes, welded a bit of threaded bar on and forced a spare aluminium gear knob I bought years ago for a Mini but never fitted. He spent all day playing with it while he drove around. It was a last minute idea I had after finding it in a box. Very glad I did it! 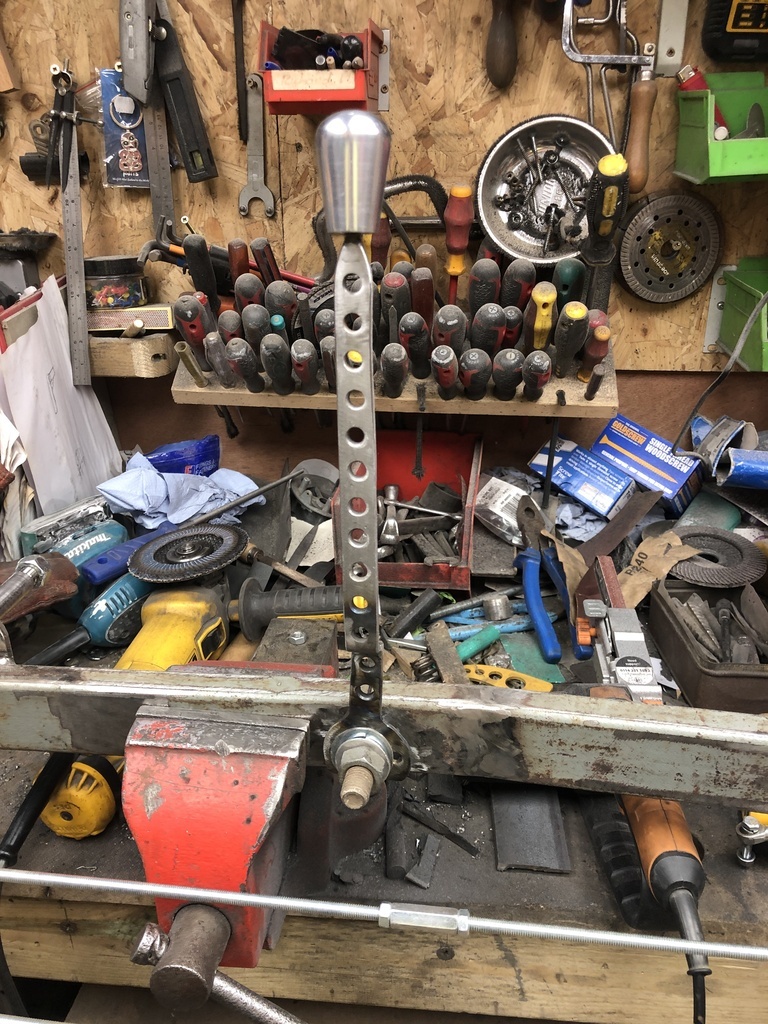 Filler primer - at this point it all looked great, and I was getting really excited about it being done. Unfortunately this was the beginning of the issues with the paint. Not sure if something reacted but it kept crazing and or not drying in certain patches, even after a couple of hours. 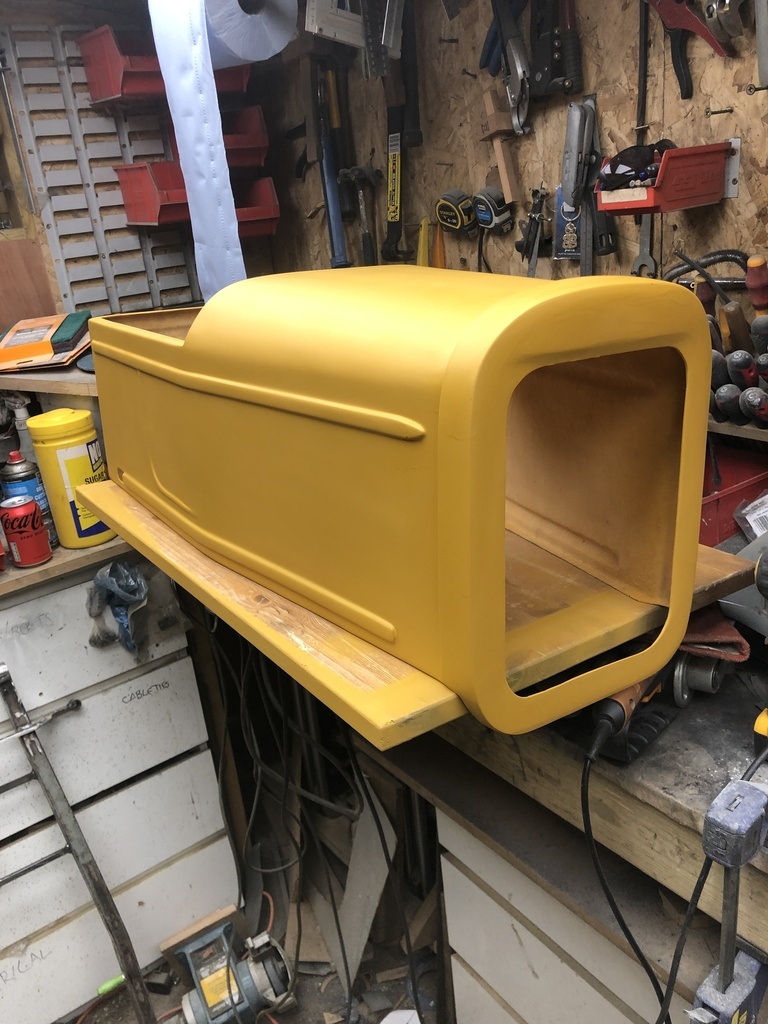 Aaaand it's done. I really didn't take ANY photos!! I'll write up how I did the rest of it and put it up later. Quite a few people stopped me to ask about it at the show and I said I had a thread up for it and I'd put up some info, so I really should! 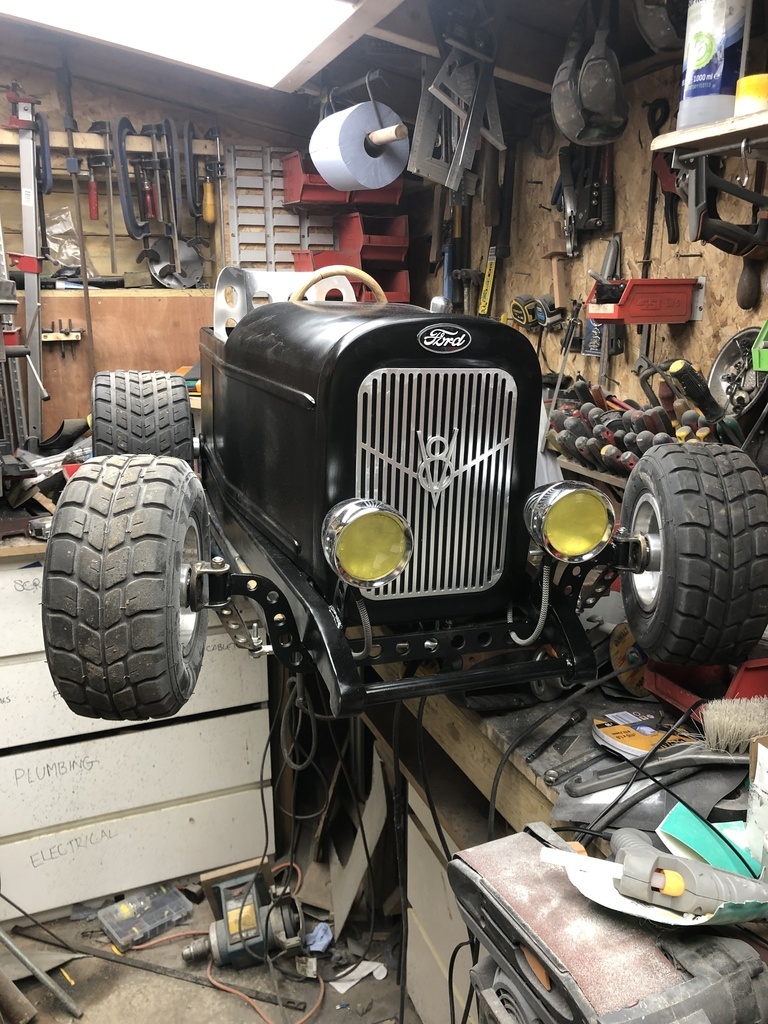 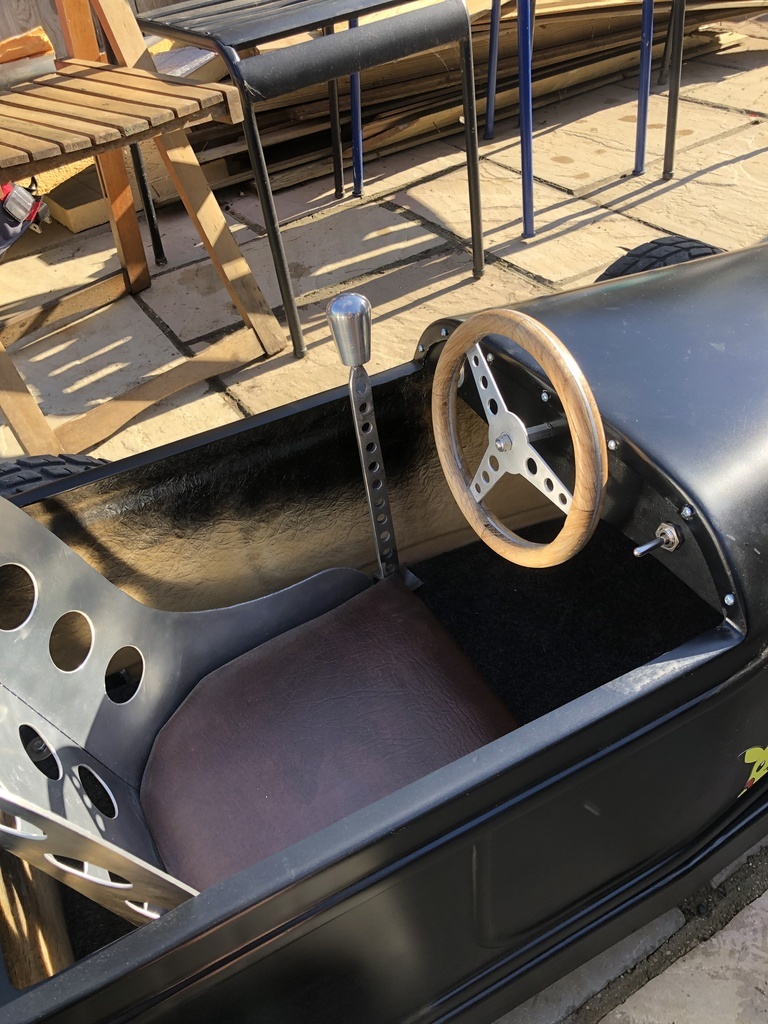 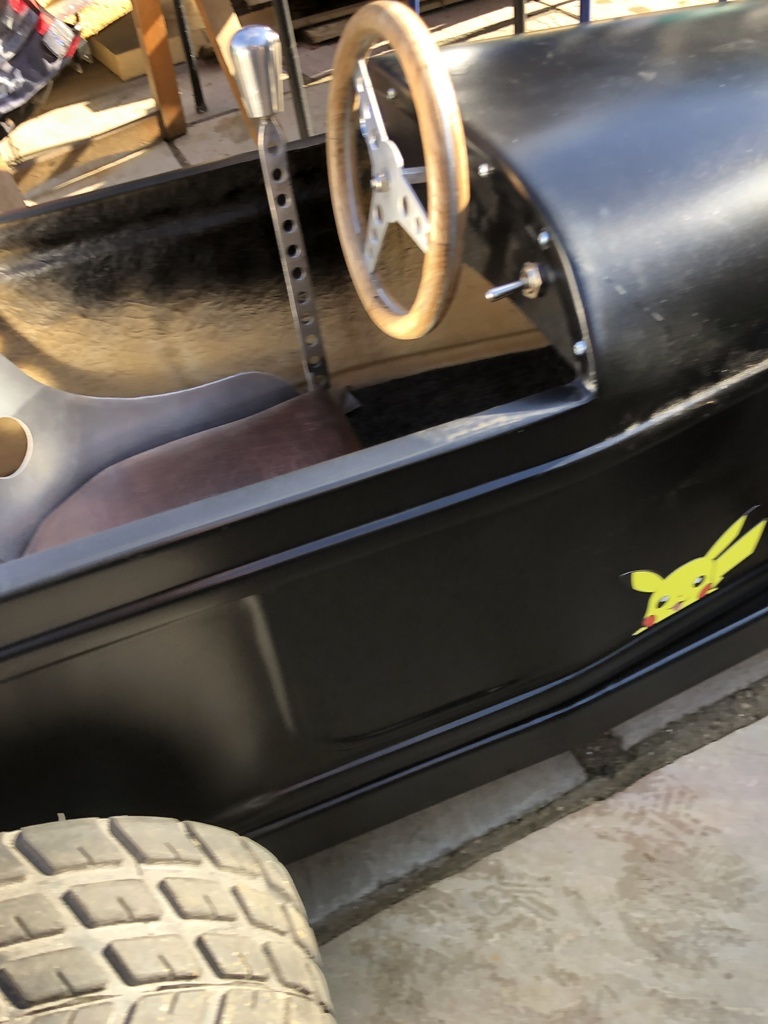 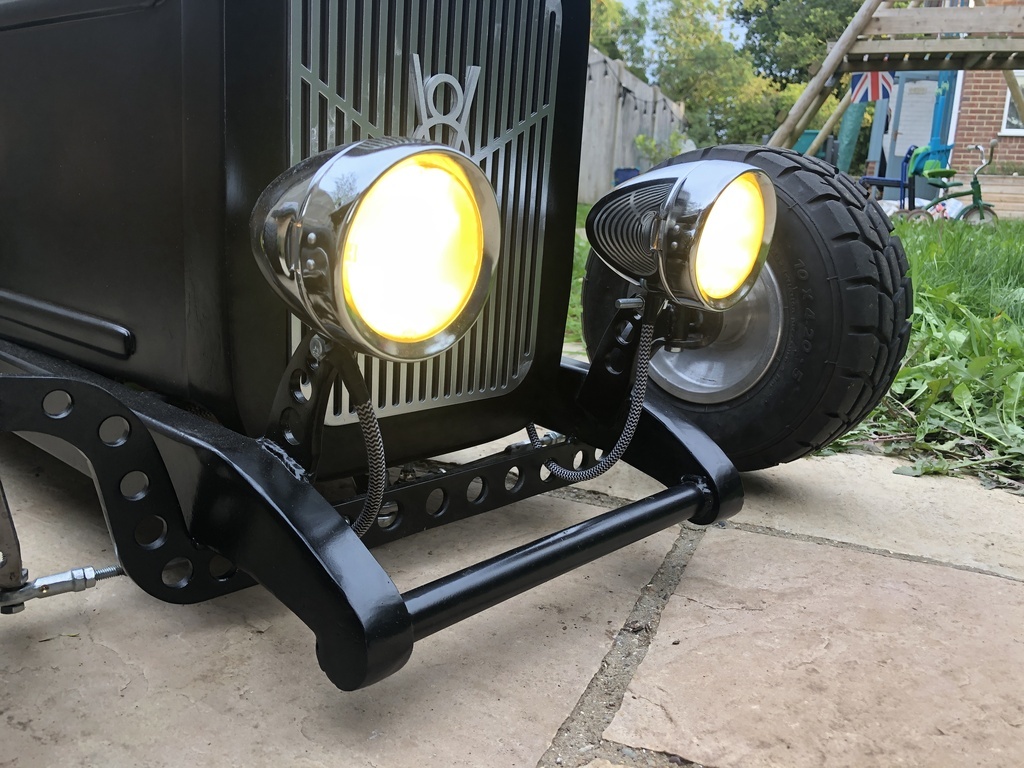 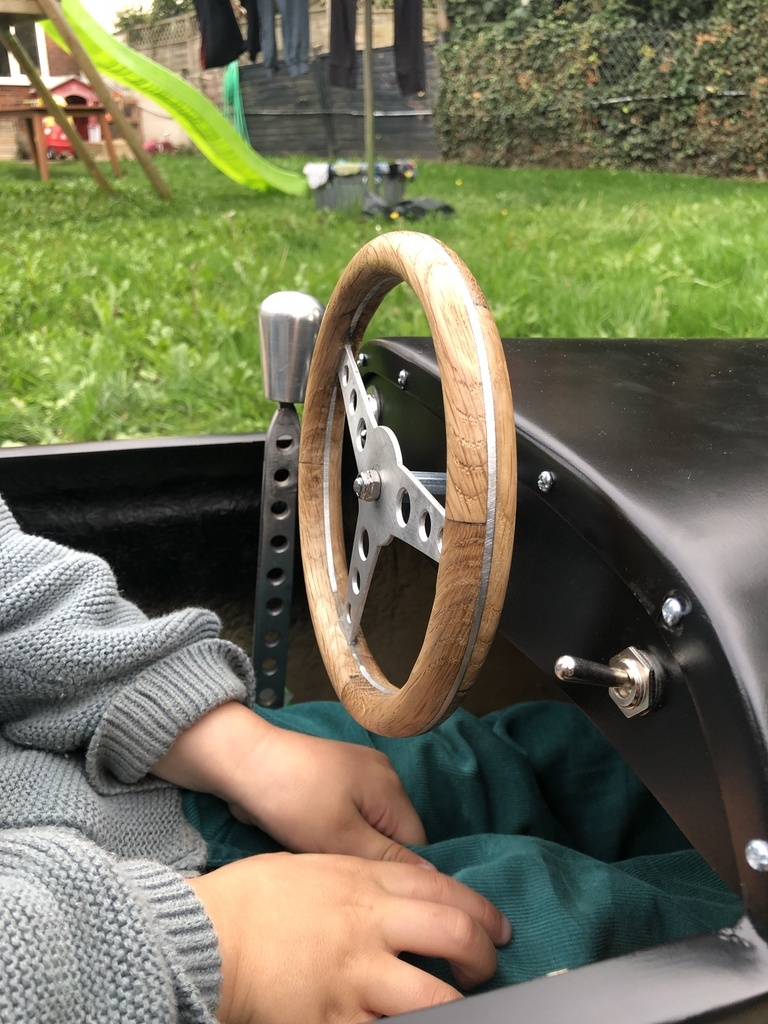 |
| |
|
|
merryck
Club Retro Rides Member
Posts: 477
Club RR Member Number: 9
|
Finn's tot rodmerryck
@merryck
Club Retro Rides Member 9
|
Sept 23, 2022 21:33:01 GMT
|
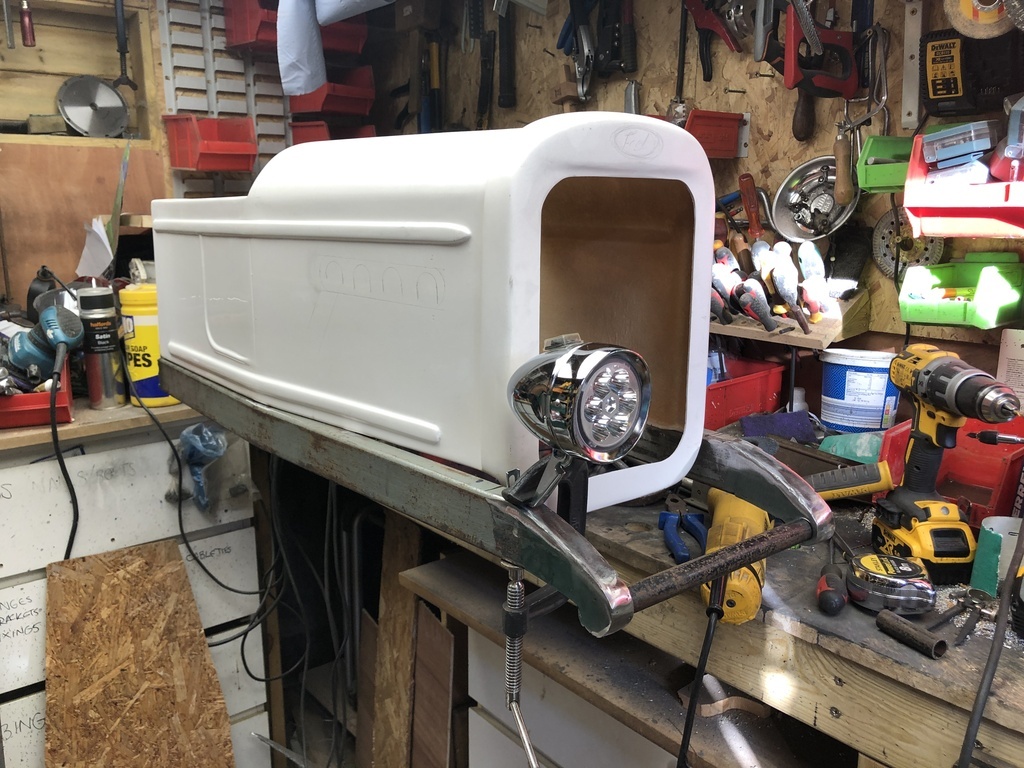
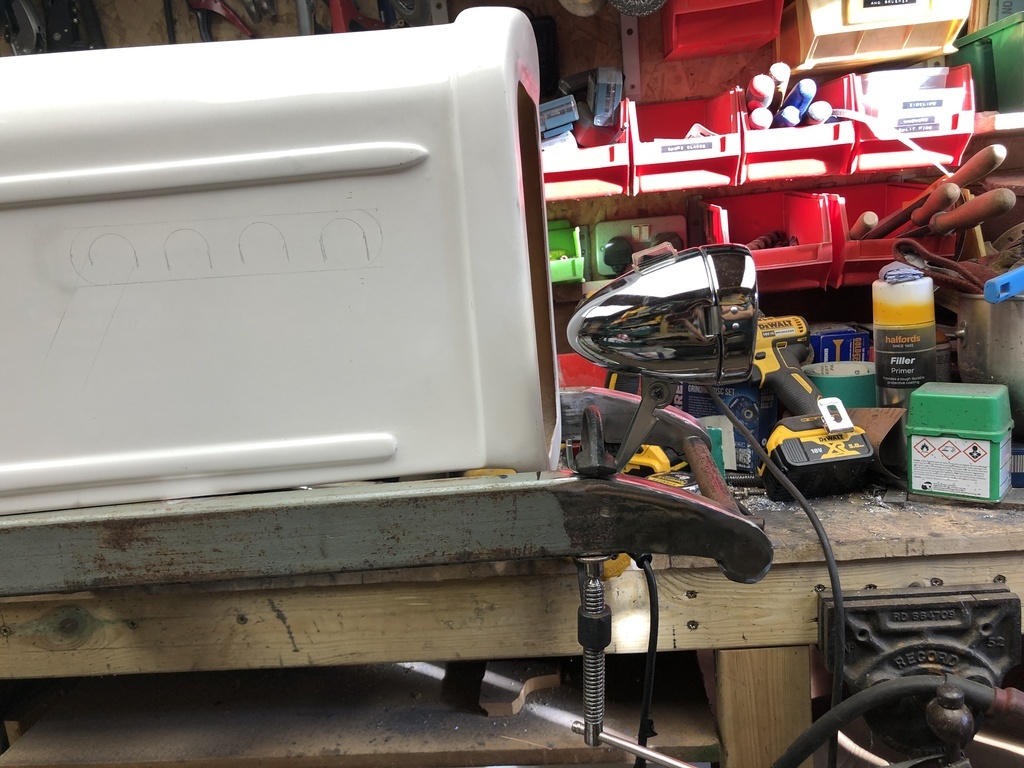
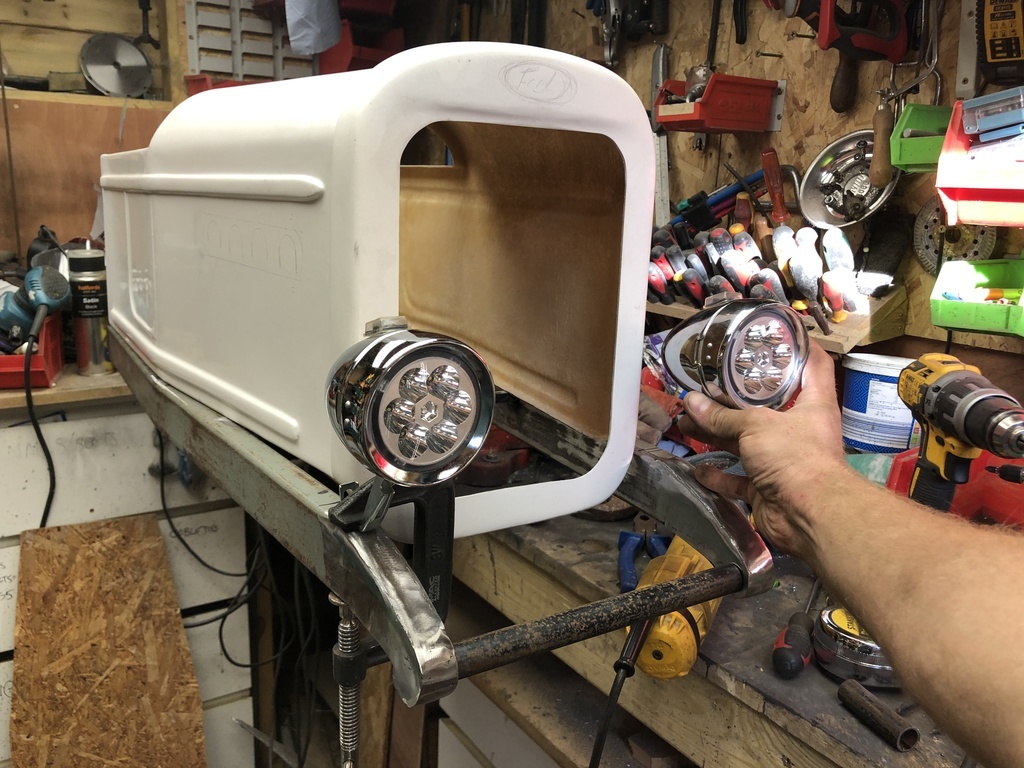
Ok, picture updates. I was too tired to do anything on it tonight. Been burning the candle at both ends trying to get this thing done. Tomorrow is the big final push. Since the last update I've sorted out the steering properly, completely re-done the lights and welded on the stub axles. This included a lot of wasted time trying to make my own hubs and stub axles. After I bought them it was an evening's work getting them all on, square and at the right height. Photos! I've never been a fan of the lights I bought, and when I tried to make them a bit better I realised they were always going to be curse word, so I emptied out all the gubbins, and using some LED strip lights, fancy cable and aluminium tape I managed to vastly improve them. Gubbins all ripped out; 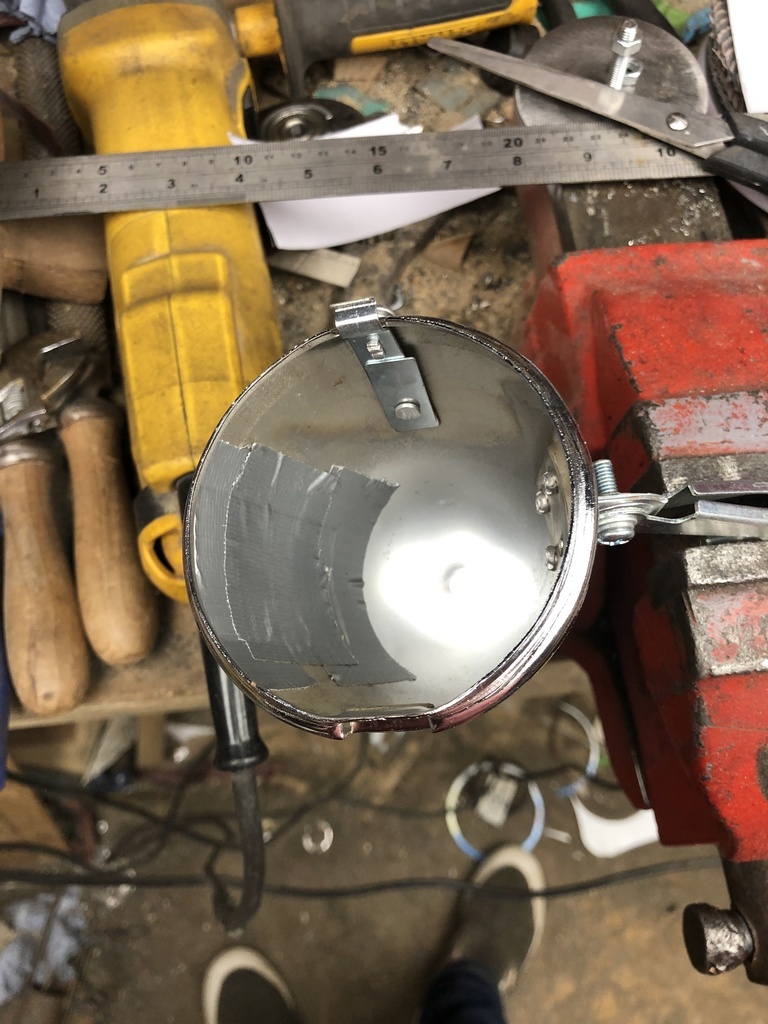 Before and after; 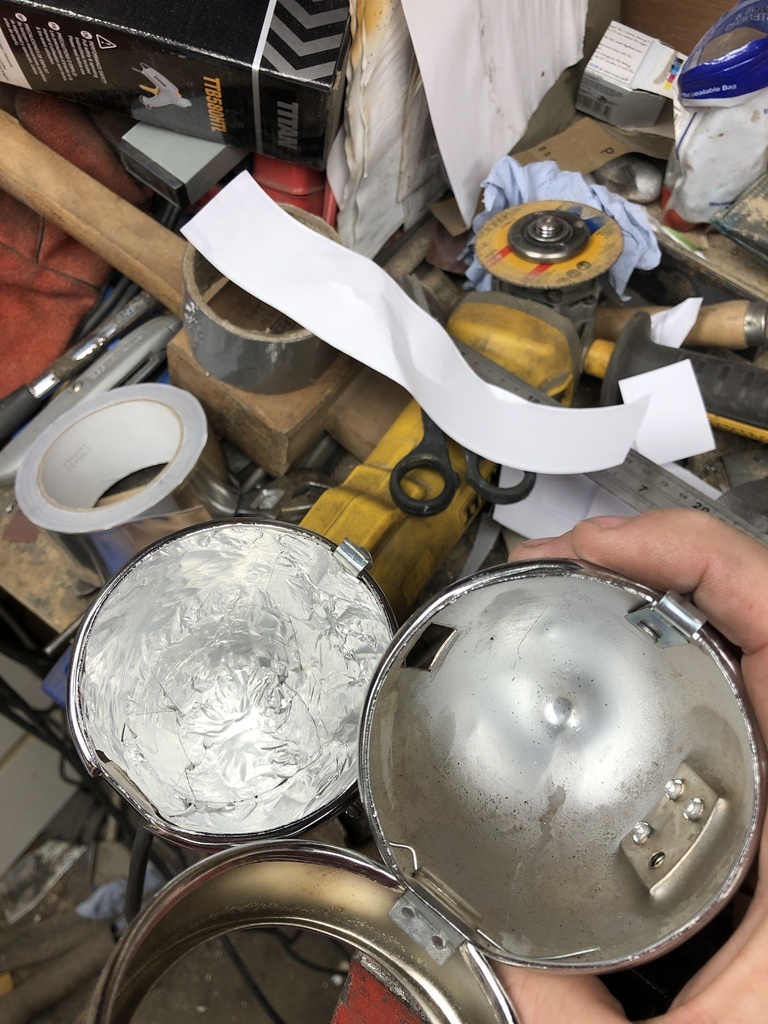 Testing... 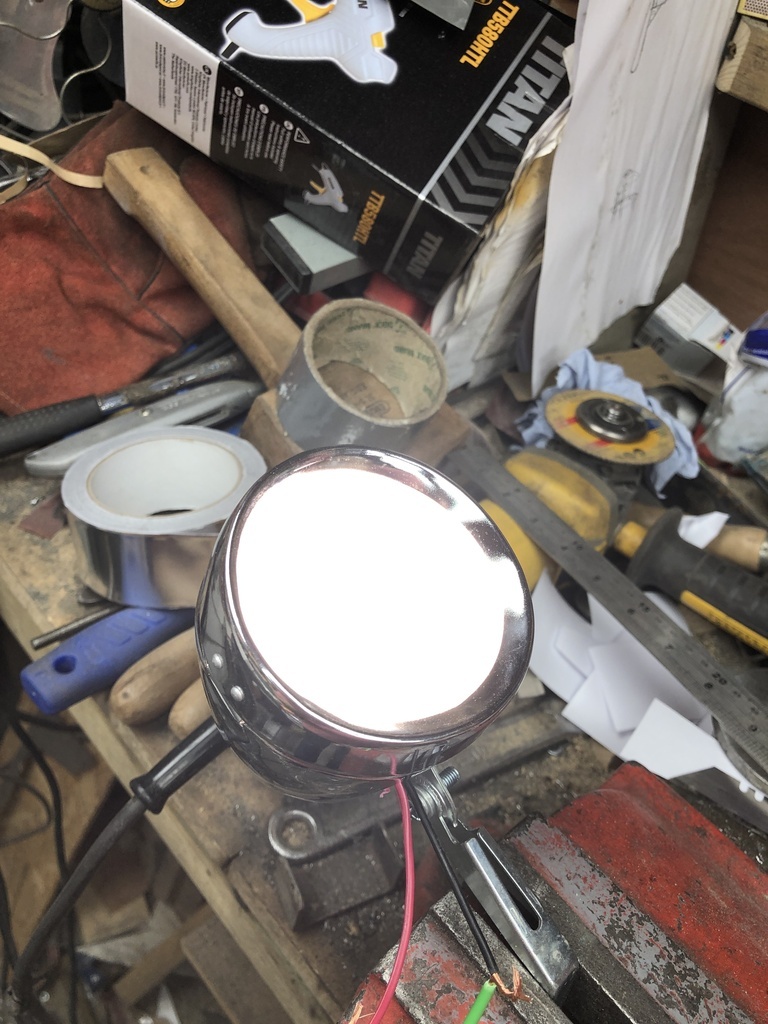 And with fancy braided cable. Had it in the box and it'll be on show, so might as well make the most of it! 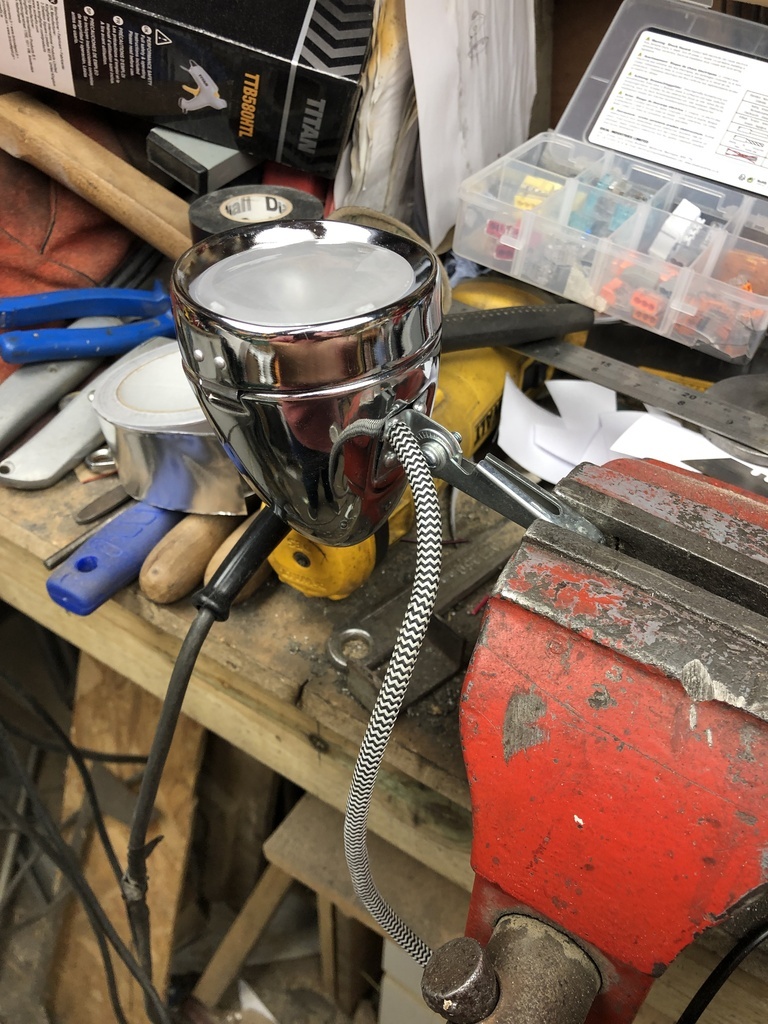 In some of these photos you might be able to see the clips holding the lens in place. I've since used the aluminium tape to do that. I wasn't sure if it would work, and any force would easily pop them out, but it's good enough. Also I scuffed up the lens with some wire wool to diffuse the light somewhat. Below is me testing the wiring loom. It'll have a light switch, two headlights, a push button and a horn. The horn is for a motorbike because it was somehow cheaper than the car horn by £5. It is loud. Really loud. Specifically 112db loud. Tomorrow I need to work out a way to make it quieter. I'm thinking wrap it tightly in ducktape to stop it from vibrating too much then wrap it in some leftover seat foam, and mount it inside the car at the front by his feet. Not sure. We'll see. I'm hoping I'll be able to mount the battery underneath at the back. If there isn't enough room it'll go at the front by his feet for now. I'm using a 24-12v regulator to bring the 18v drill battery down to the correct voltage. It was a fiver on Amazon. 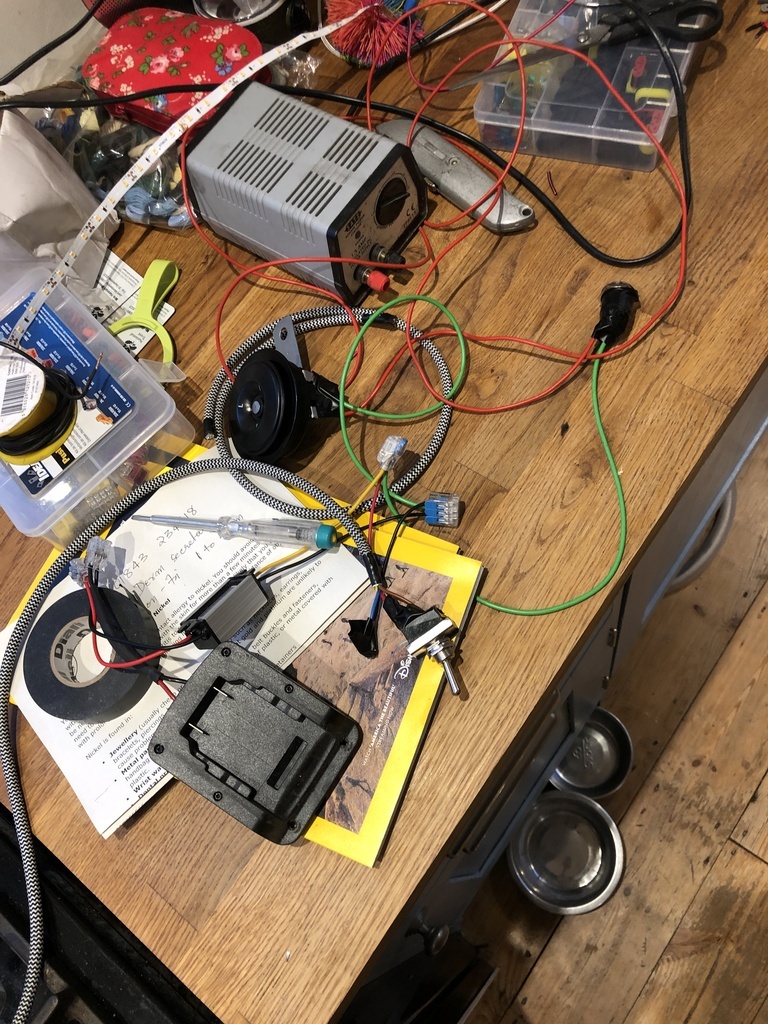 Next up, wheels! I welded on the front stub axles, because I'd worked that height out quite carefully to make sure the steering assembly would fit ok. It does, barely, but I might need to bring it up a bit. So once that was done I took it outside and used some bits of wood to support the rear until I was happy with the height. 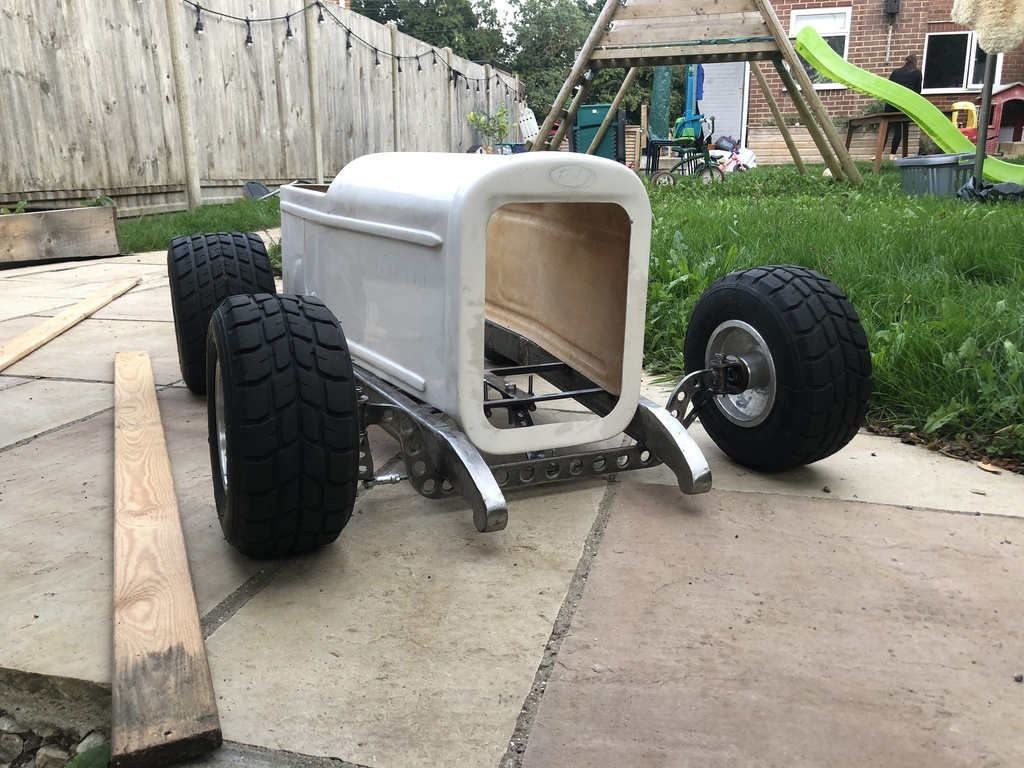 After that I spent the entire evening cutting and measuring and grinding and cleaning and welding until it was dark. So when I went outside to see if it was ok on the rear wheels I needed some light. 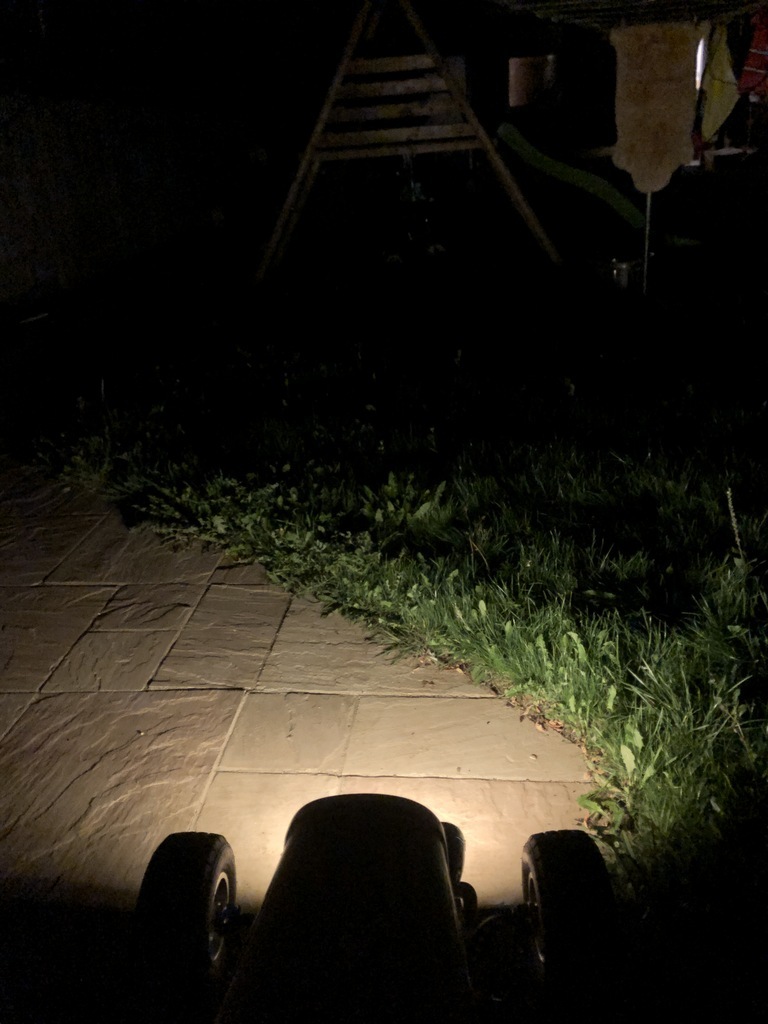 Surprisingly bright. Also cool. 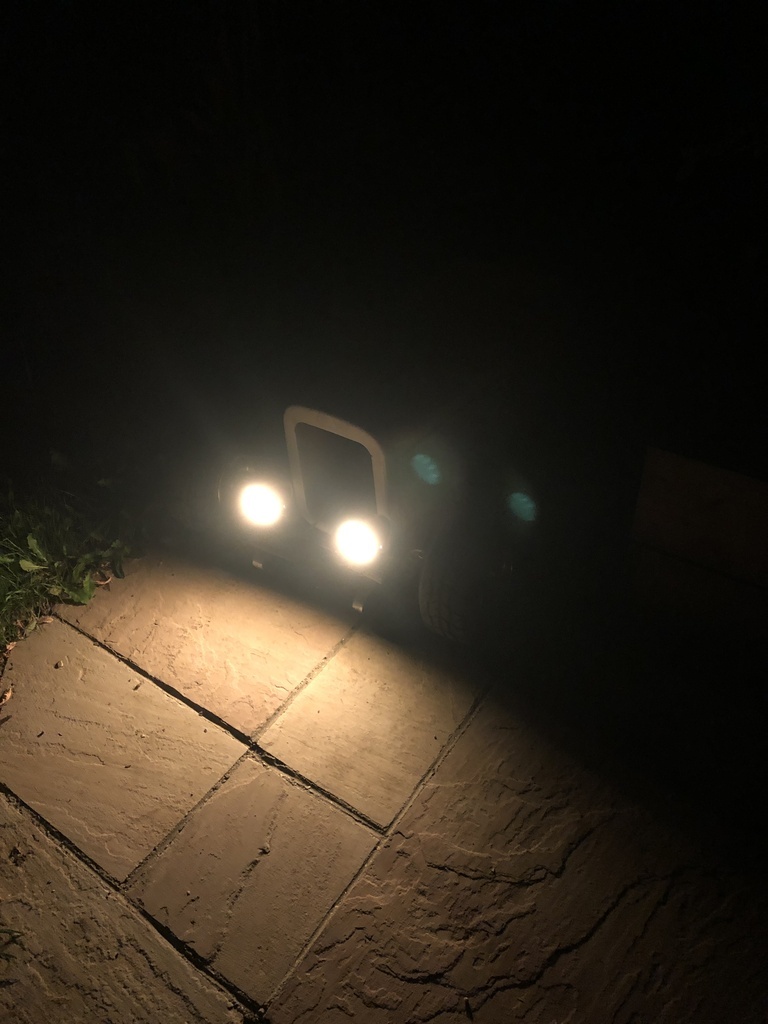 Money shot 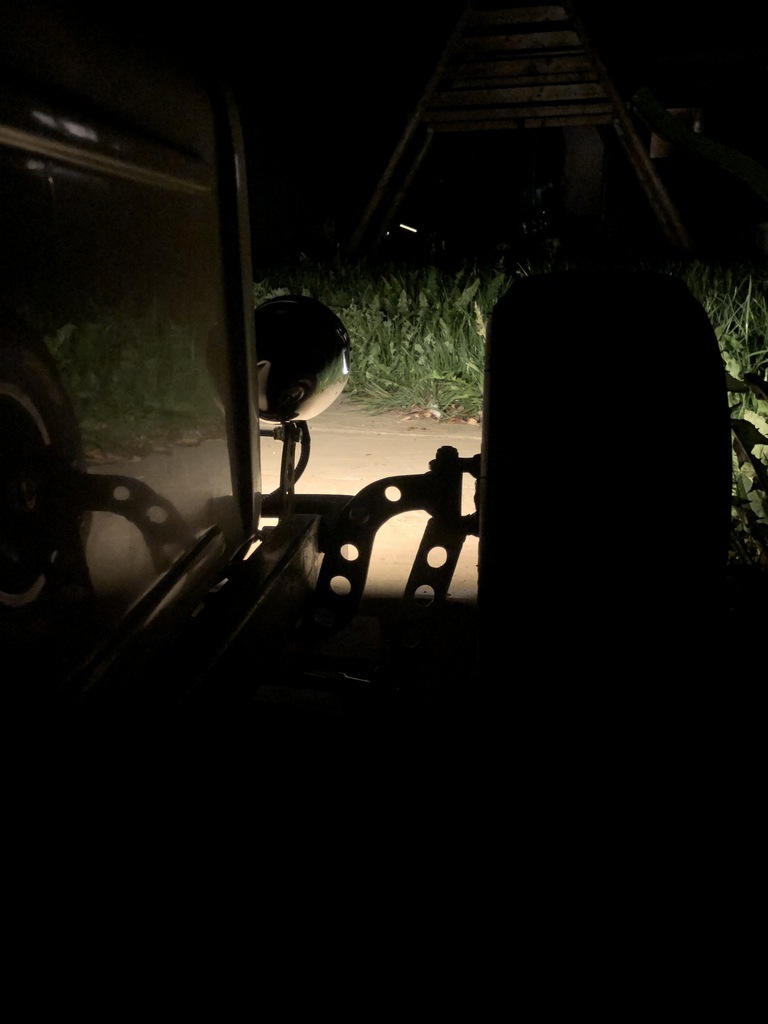 Very happy with that. To finish, have a shot from this morning.  Tomorrow's jobs are; Make up gear lever Fill and sand Filler primer and sand Paint body Line the inside with 4 way stretch to cover the rough fibreglass Paint grille/grille back/badges Make up steel mounts for lights Make up front numberplate mount Wiring loom Fit wiring loom Dashboard Try and find the little steel screen it came with and fit that if I can I think that's it. |
| |
|
|
merryck
Club Retro Rides Member
Posts: 477
Club RR Member Number: 9
|
Finn's tot rodmerryck
@merryck
Club Retro Rides Member 9
|
Sept 23, 2022 13:01:50 GMT
|
|
Colours are going to be satin black with gloss blue flames. Hopefully.
Haven't taken many photos and can't upload them from where I am, but it's currently rolling! I managed to get hold of some extremely cheap hubs from Dartford Karting. They were an old pair they had laying around. While talking to the guy there I discovered they also had some stub axles that had been machined at the wrong angle, so I bought four off him, again for a very reasonable price and let my friend know he wouldn't need to turn me any.
I welded them all on last night and after a bit of fettling they were all good.
I've also ripped out all the internals for the lights, replaced them with some LED strips, run some wire off to a battery and covered the lenses with some yellow tinted vinyl. They're looking much better.
Just got to race to get it finished for Sunday now. Will post pictures when I get the time!
|
| |
|
|
merryck
Club Retro Rides Member
Posts: 477
Club RR Member Number: 9
|
Finn's tot rodmerryck
@merryck
Club Retro Rides Member 9
|
Sept 20, 2022 12:16:28 GMT
|
|
I've found a place in Dartford that sells go kart bits so I'm going to pop up there tomorrow before work and pick some hubs and some 17mm bar up. Hopefully I'll just be able to weld them straight on and we'll be golden.
Tonight's plan is to get some filler onto the body, sand it back and get a coat of primer on.
|
| |
|
|
merryck
Club Retro Rides Member
Posts: 477
Club RR Member Number: 9
|
Finn's tot rodmerryck
@merryck
Club Retro Rides Member 9
|
Sept 19, 2022 20:11:50 GMT
|
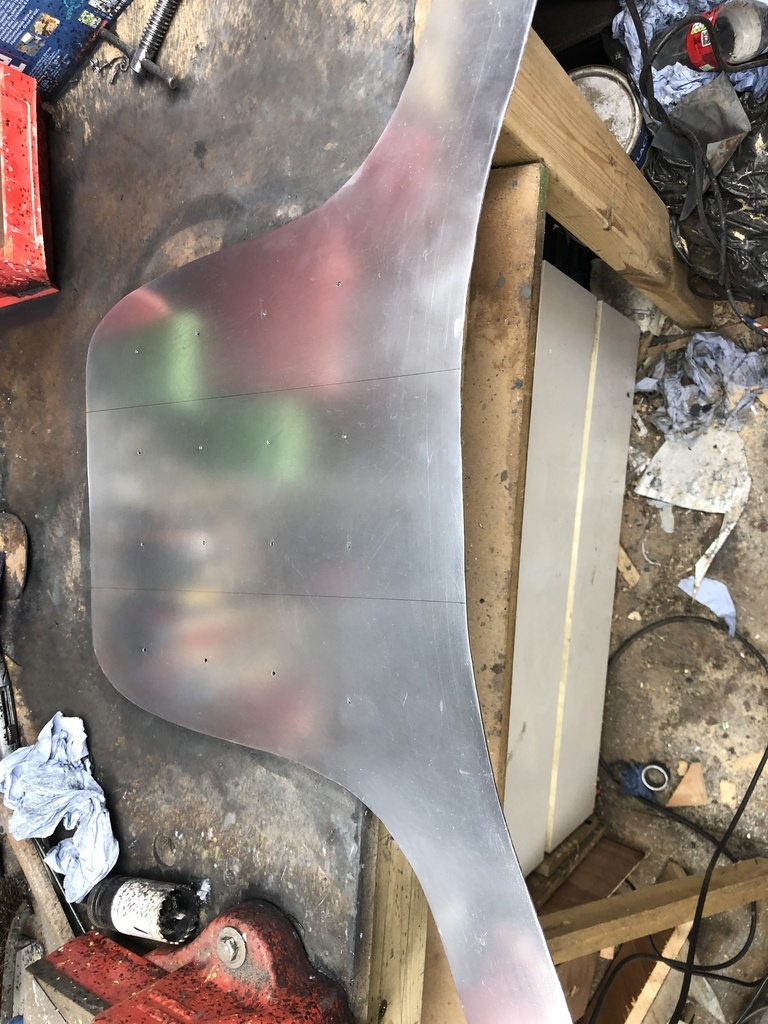
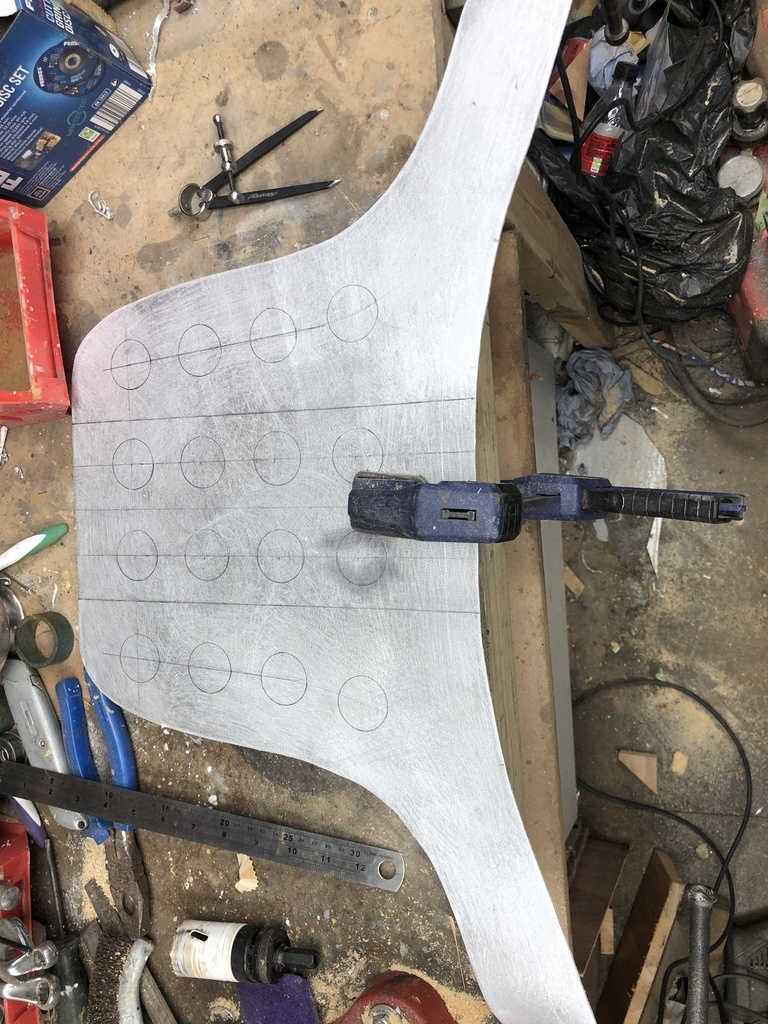
Unfortunately today I tried and failed to make some hubs for the rear wheels. I just can't get it concentric with the tools at my disposal. I'm running short on time now as the Oh So Retro show is next weekend, so I'm going to try and get some go kart hubs bought tomorrow. We'll see! Anyway, I made a handle for pushing it along with out of some old steel trunking. The wall was a bit thin and I blew through it a couple of times when welding the 1" square tube to the bottom, so I added a gusset a the point it bends. I also had a spare cork handlebar grip which fitted nicely, so that went on.    I was going to paint it, but I'll probably just go over it again with a wire wheel and lacquer it as is. I got a bit of chrome effect paint on one of the badges to make sure it'll look alright. Obviously not as shiny as the real thing, but certainly not bad for some 3mm MDF with a quick spray of filler primer. 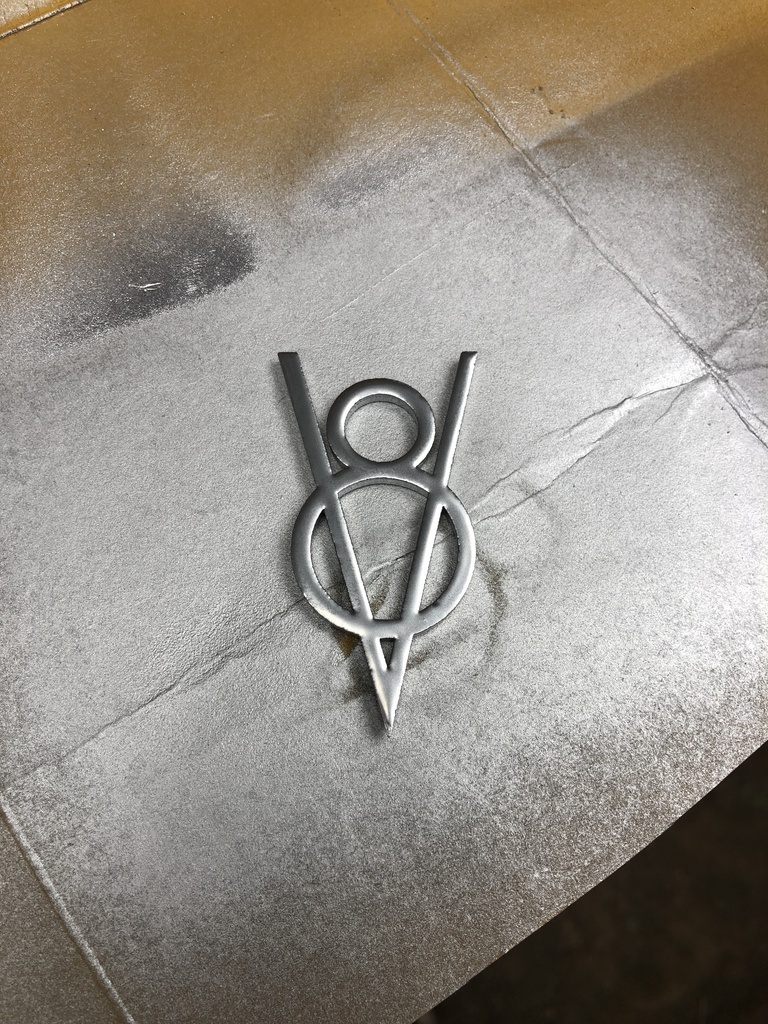 Last night I made a start on a steering wheel. I'm very pleased with how it turned out. First I cut out a 150mm bit of aluminium, then using a pair of calipers I roughed out where I wanted the three arms to be. After that I drew and re-drew (multiple times) the holes in the arms. When I was happy with them I drilled them out first. The reason for doing those first was that if I messed them up I'd have to start again and of all the parts of the steering wheels those holes will stand out most if they're wrong. 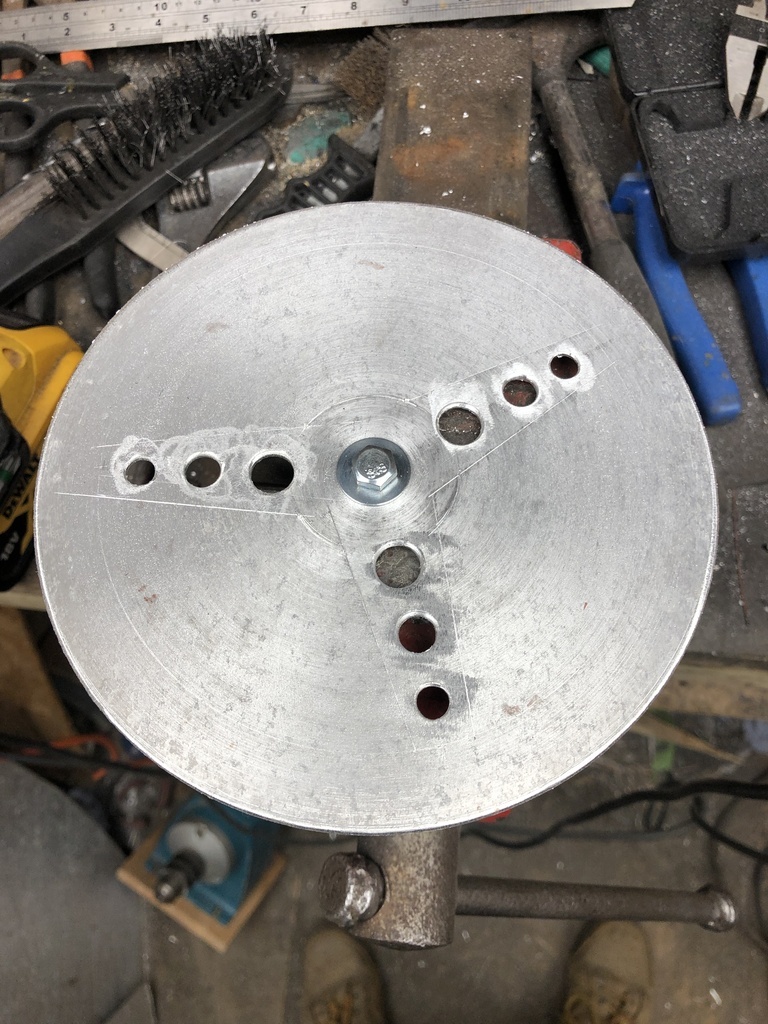 After that I used a coping saw with some fine jewellers blades on it to cut out the rest. This took forever. Somehow some of the blades had managed to rust and they kept breaking. It took me a while to notice the reason why. Eventually I managed to find some non-rusty blades and get it cut out.  Next I found a piece of oak off-cut and cut out enough to make up a rim, glued them together and left it overnight. It doesn't need to be amazingly well glued as I'm going to fill any gaps and the wood will be epoxied onto the aluminium. It just had to hold together long enough to cut it down to the correct shape, which it did! 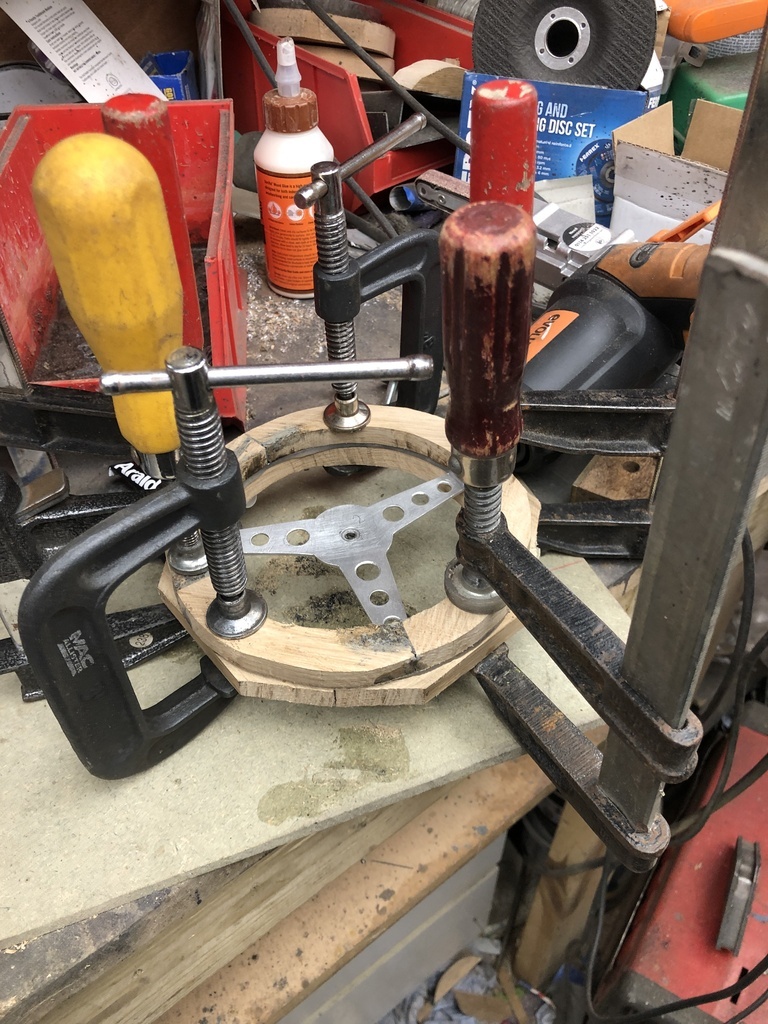 Mounted it into my very high tech, and not at all dangerous spinning device and using the combination of an angle grinder with a flap wheel and a finger sander I managed to get it round. 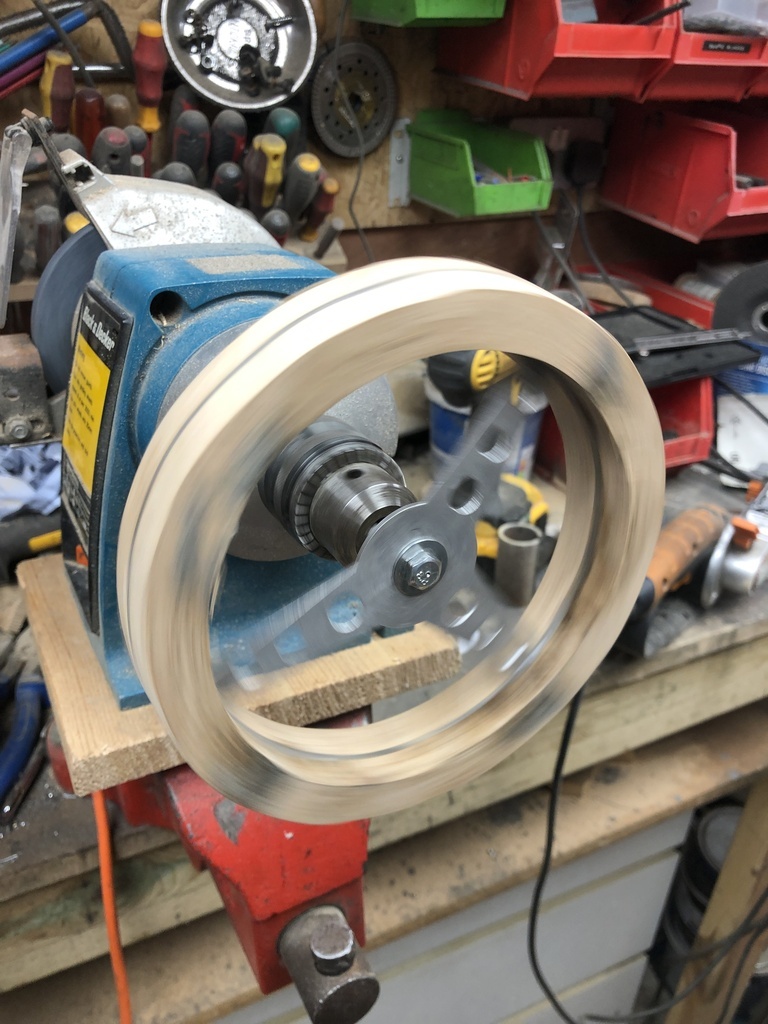 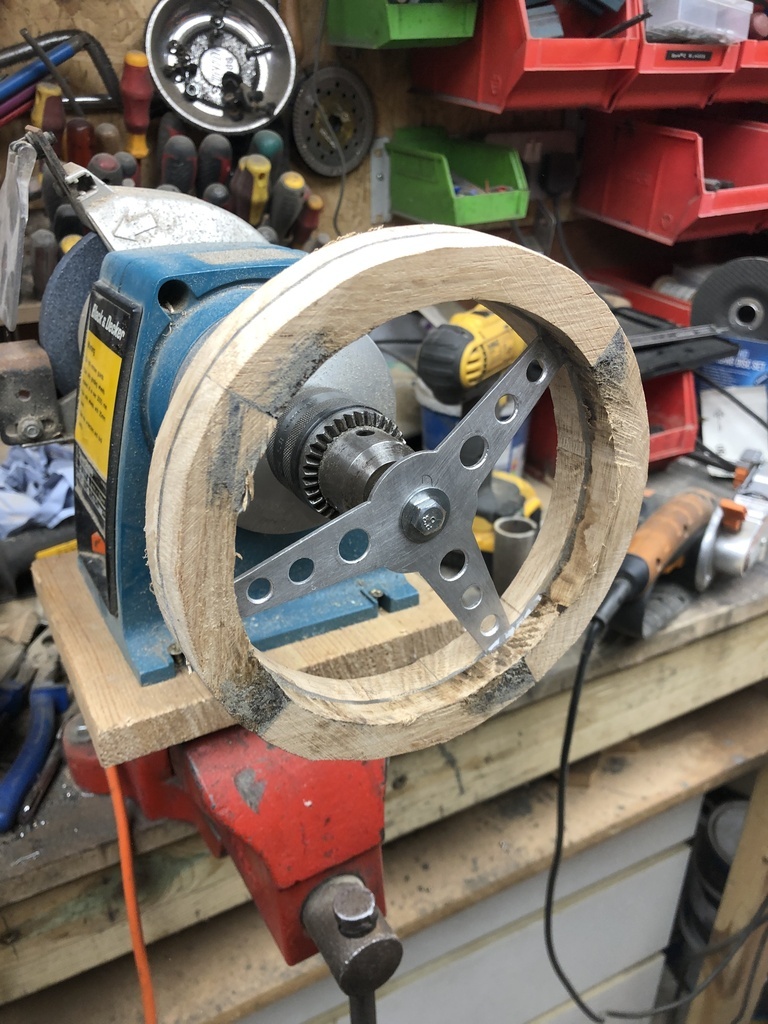 Finished it off with some sandpaper by hand; 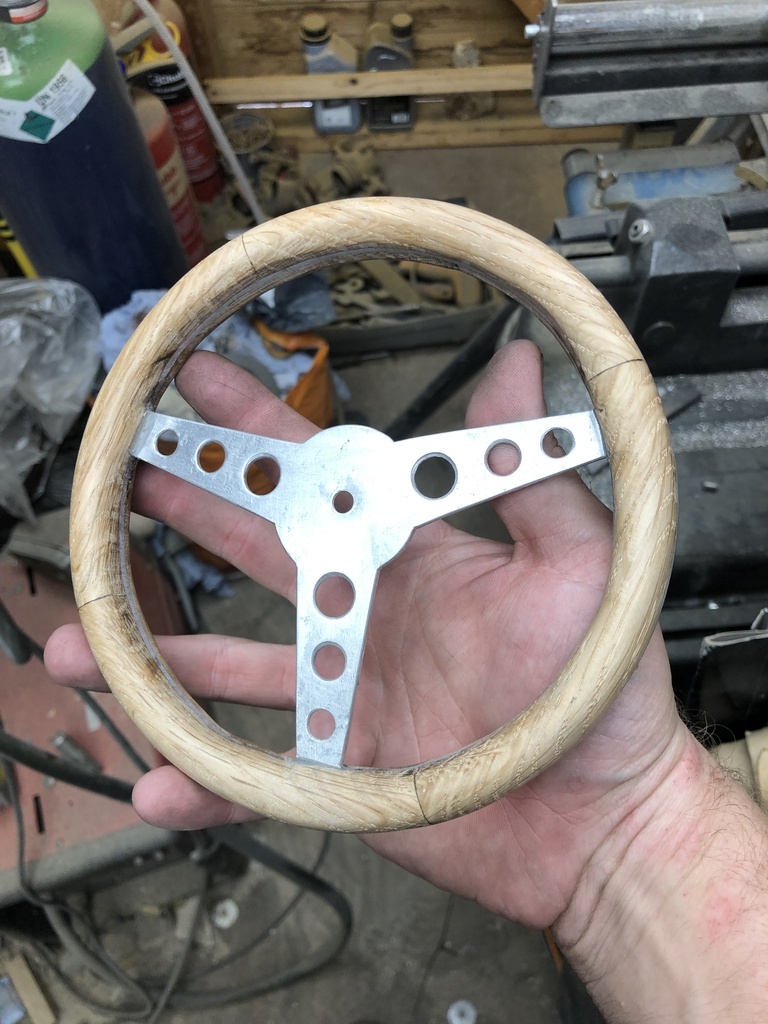 It's perfect. It's a miniature version of an Astrali wheel I've got for a Mini. Didn't intend on that being the case. I was working from a very vague memory of the wheel my dad had in his MGB when I was young. So next up is to sand, fill and paint everything, try and get the lights sorted so they don't look quite so modern (trying to fit some proper bulbs in instead of the LEDs - if that's a no go I've scuffed up the inside of the lenses a bit to diffuse the light). Need to do the dash, trim the interior, and sort these bloody rear wheel hubs out. Also there's a bit of play in the front king pins, so I need to sort that out. Probably just needs a washer or two. |
| |
|
|
merryck
Club Retro Rides Member
Posts: 477
Club RR Member Number: 9
|
Finn's tot rodmerryck
@merryck
Club Retro Rides Member 9
|
Sept 18, 2022 7:15:07 GMT
|
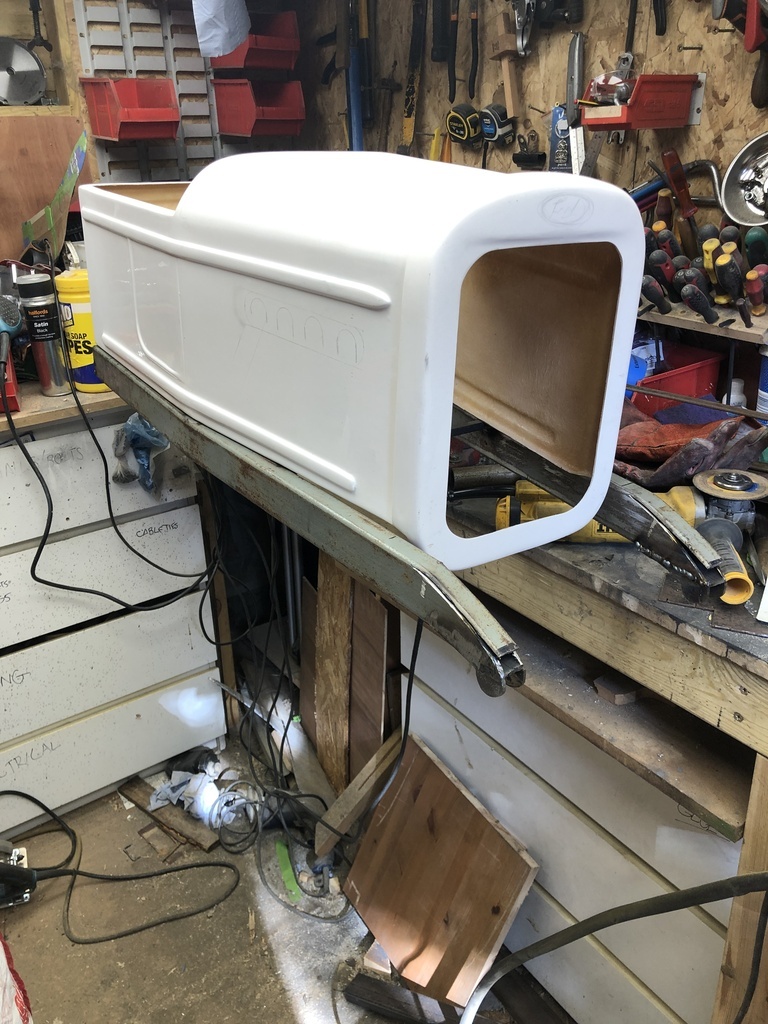
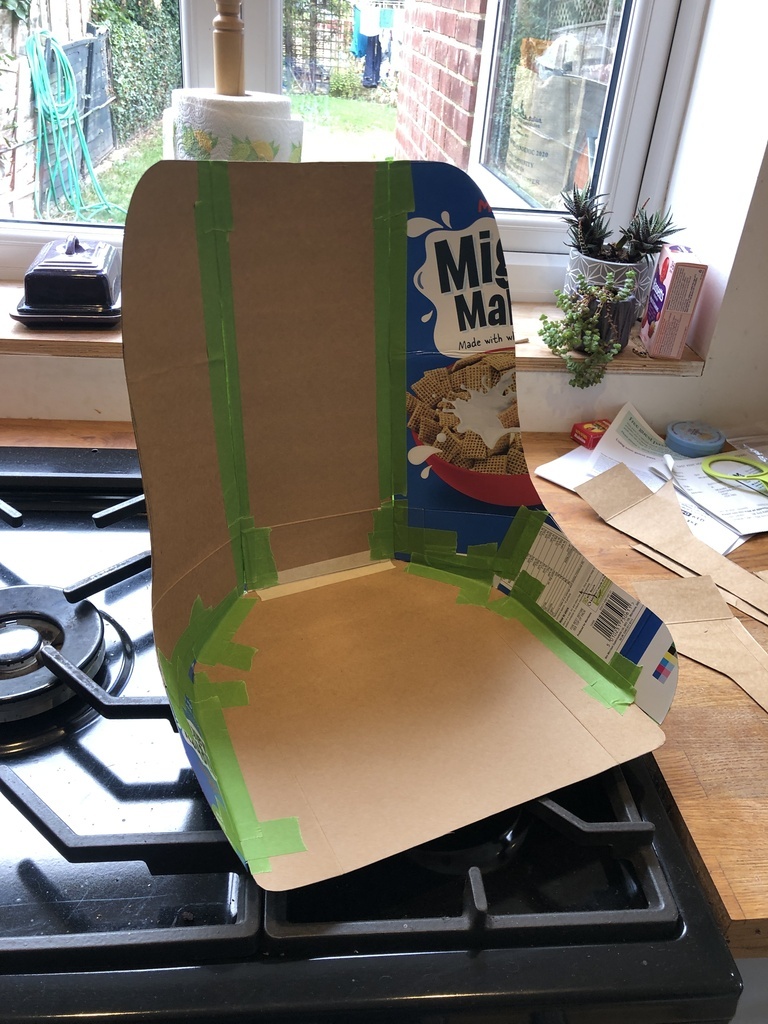
Next up was the steering mechanism. I'm going to be pushing it from behind and I need to be able to steer it as well, so added a frame to support a steering arm. 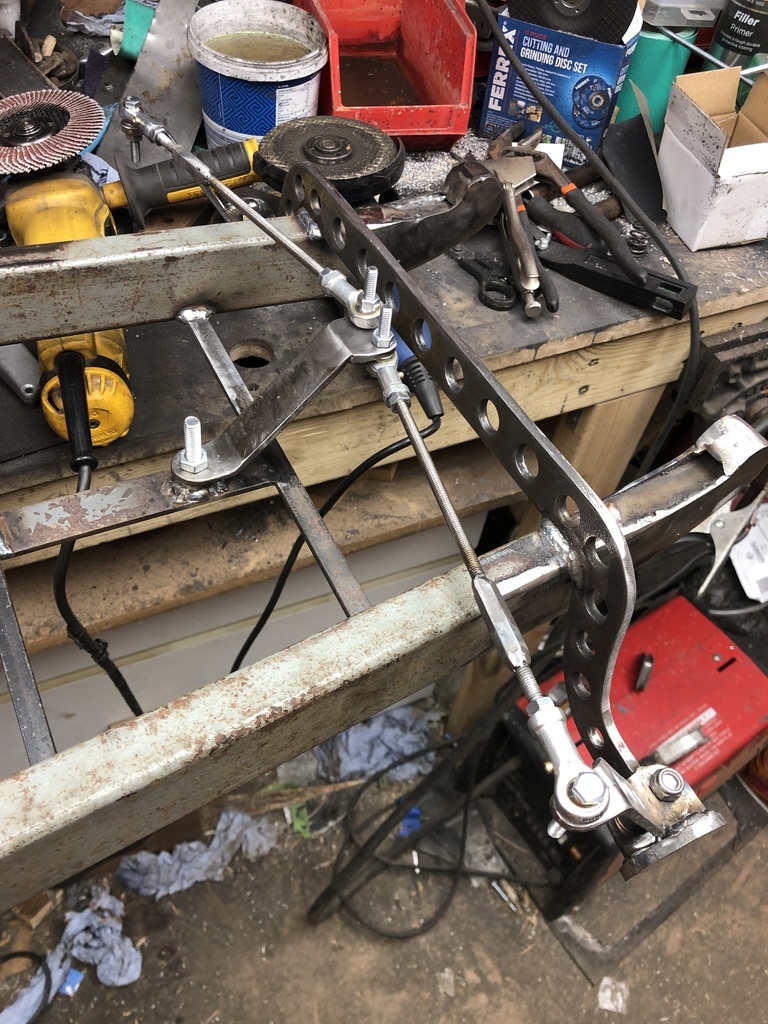 I then went and collected the laser cut bits;  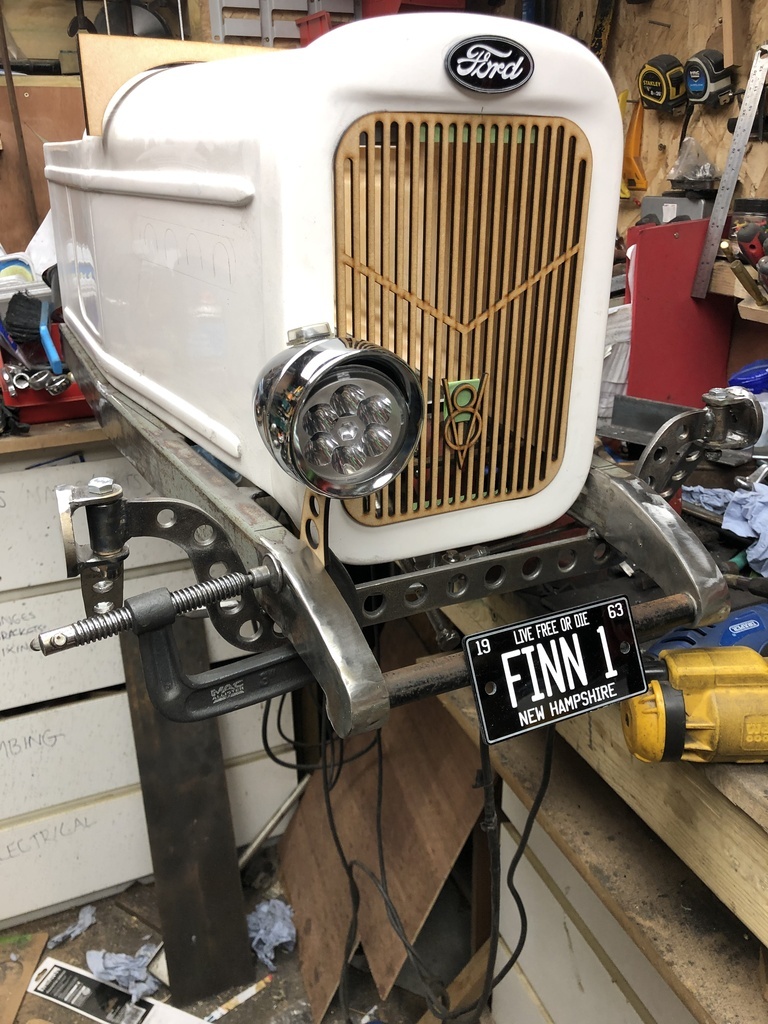 Some of these require the MDF to be glued into layers and sanded round. The rear light in particular is a lot thicker than I'd prefer because the body has lights moulded into it, and these will need to sit on top of that. 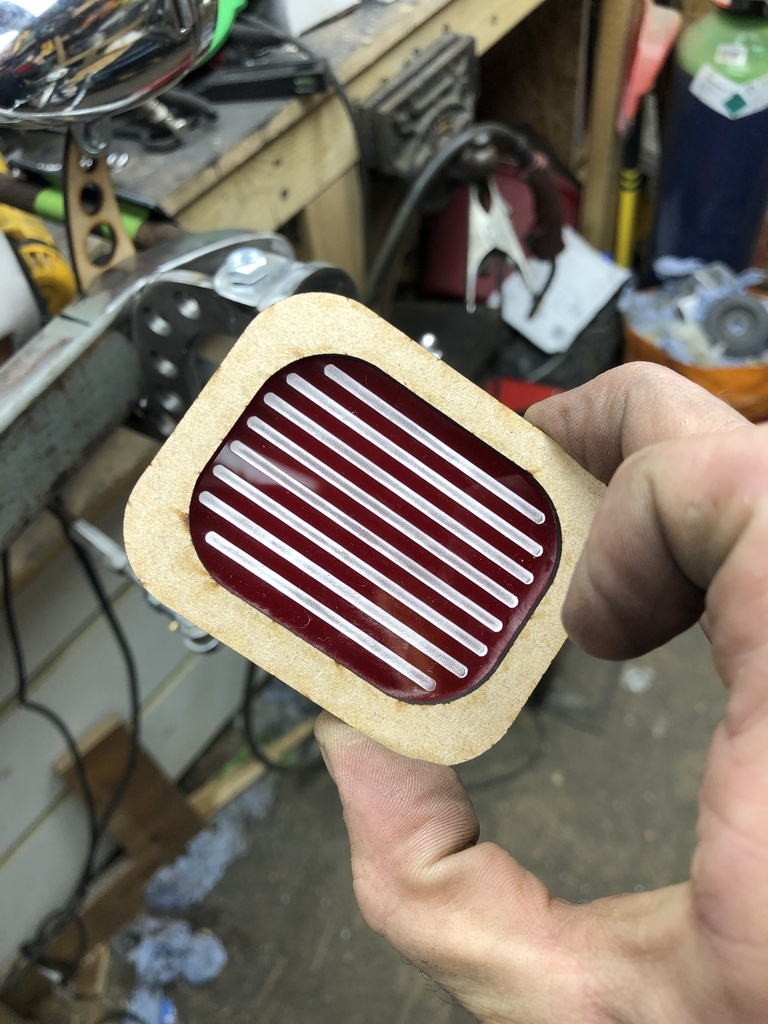 The MDF will be filler primered, sanded smooth and painted with chrome effect paint. Ideally it'd all be cut out of metal, but I don't have the skill to make something look that uniform and I don't have access to any CNC machining! I carpeted some OSB I had cut down for the floor. I'll probably carpet the inside of the bodyshell as well. It's the easiest way to cover the raw fibreglass. 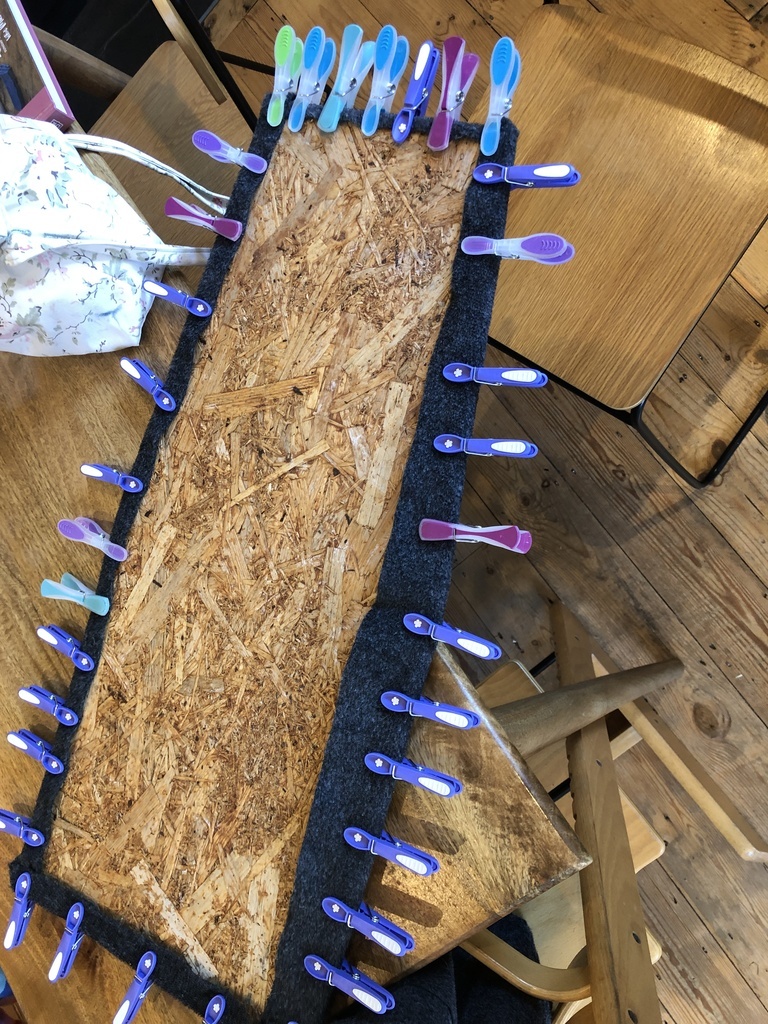 I've done the rear steering mechanism, but I only took a video of it and don't know how to add video to posts. I'll get some photos later. I need to adjust the angle of the steering arms because I currently have reverse ackerman angle. By my rough calculation they need to come in about 35mm each. |
| |
|
|
merryck
Club Retro Rides Member
Posts: 477
Club RR Member Number: 9
|
Finn's tot rodmerryck
@merryck
Club Retro Rides Member 9
|
Sept 18, 2022 7:01:16 GMT
|
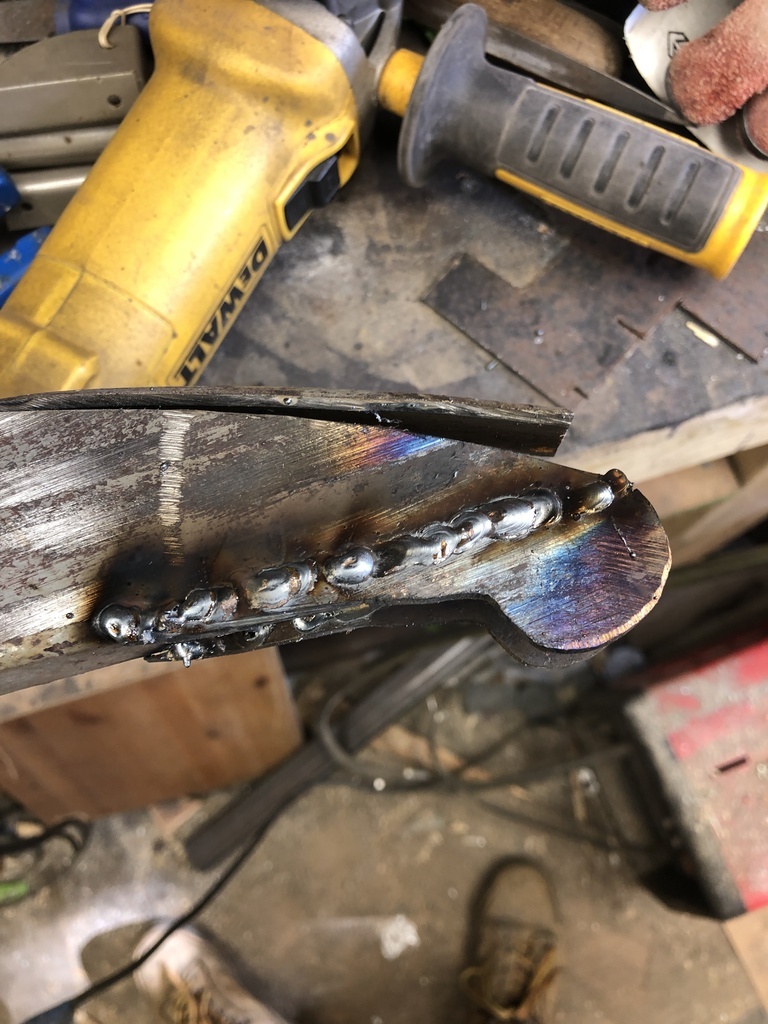
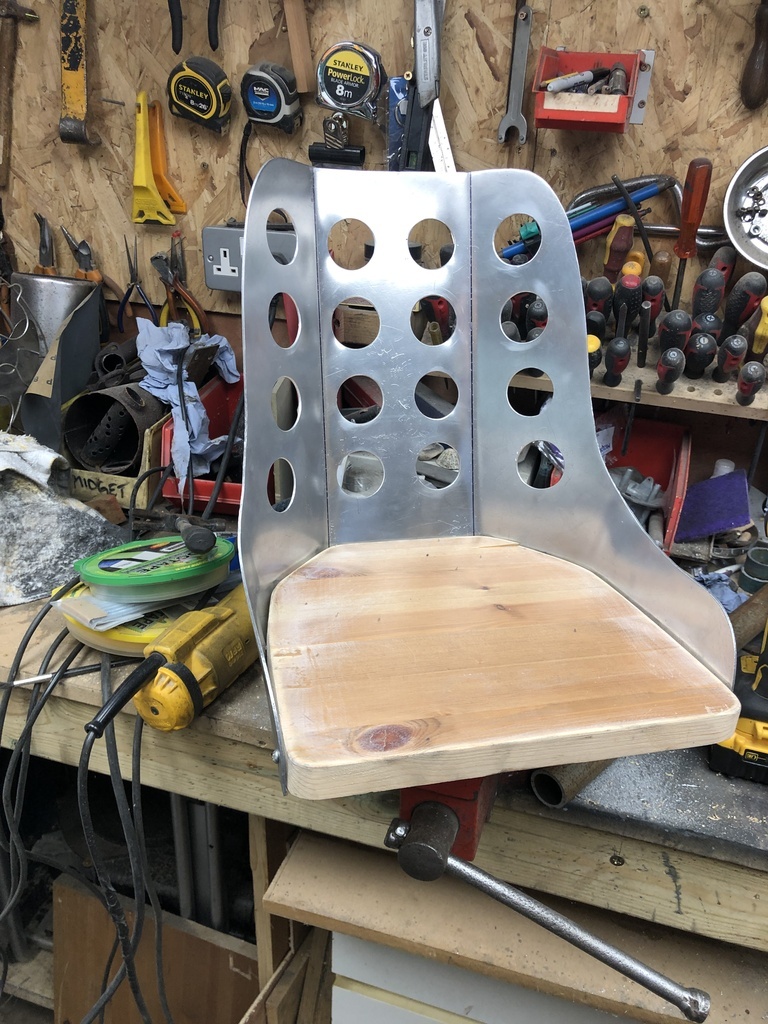
Been doing more with this, been very busy! Made up the front axle; 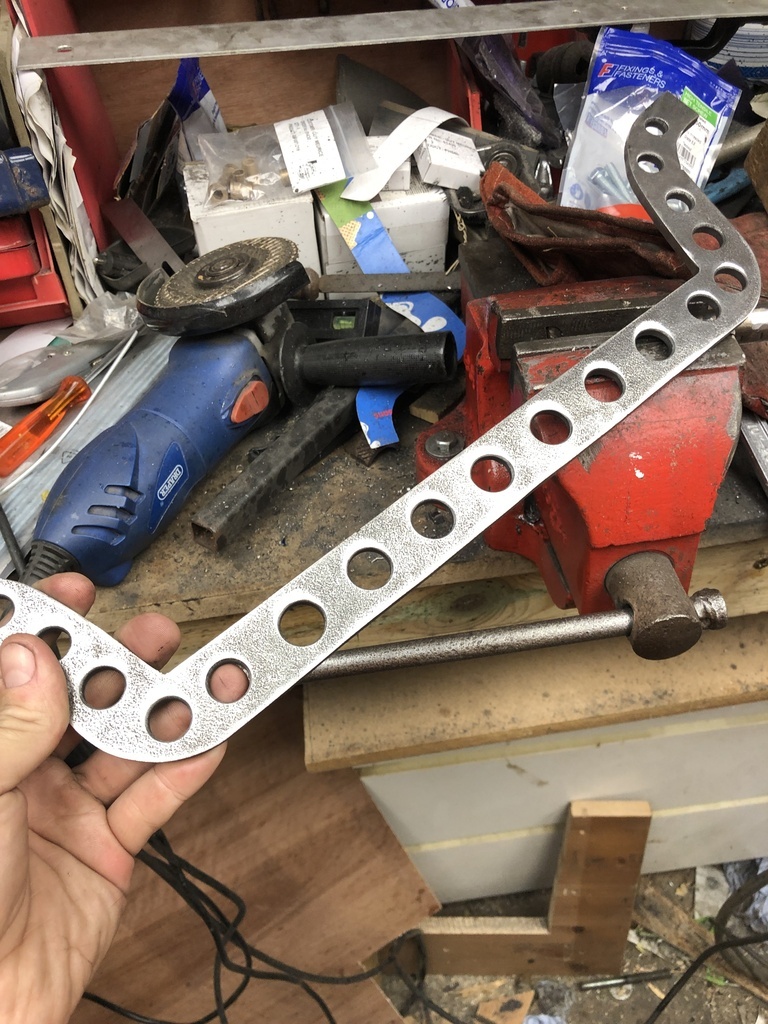 I was going to make an I-beam looking thing, but the steel I had was about 1/4" thick. This thing is already getting heavy, and it's more than strong enough without it. Added some speed holes for more speed 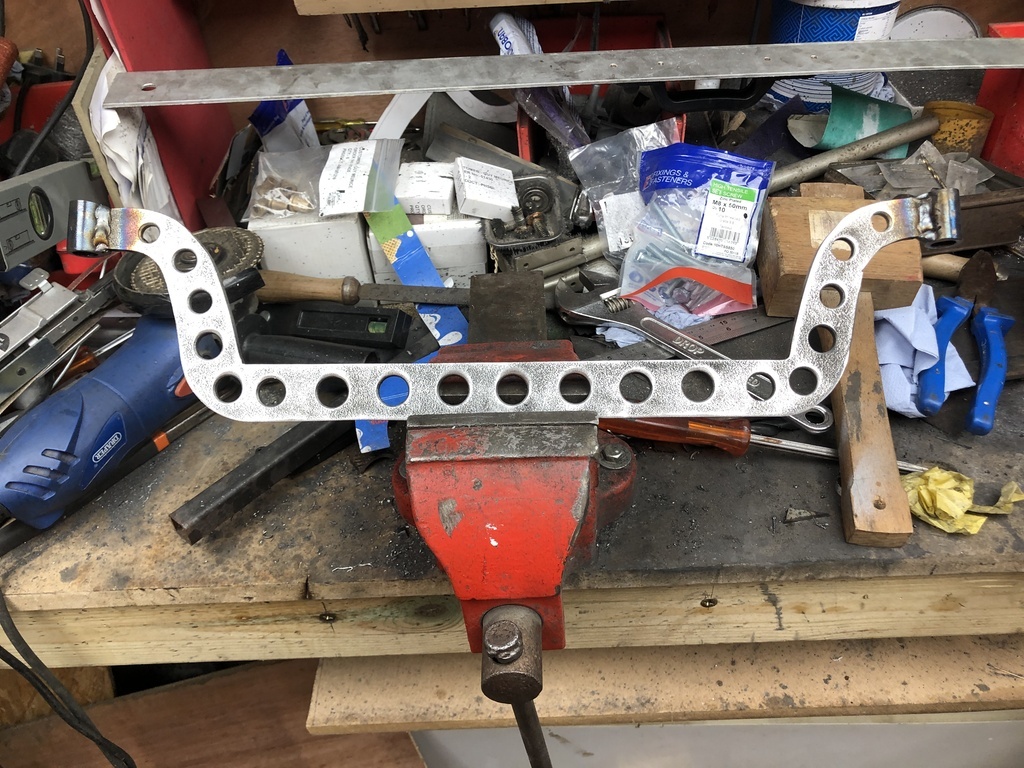 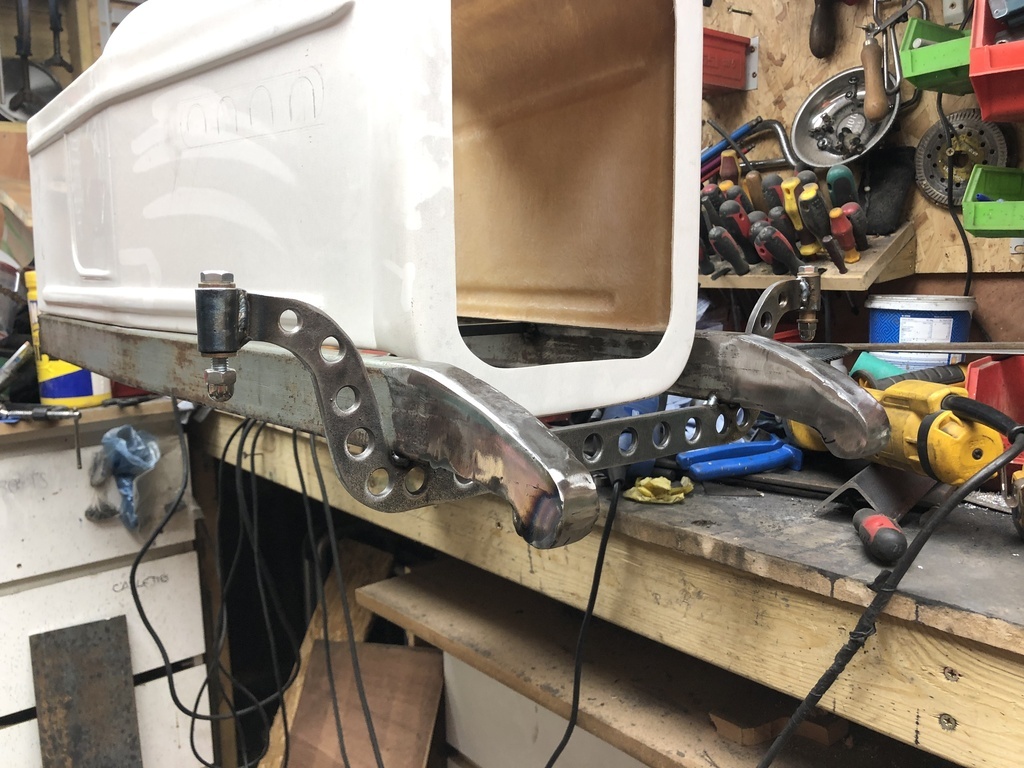 Made up the rest of the assembly and welded it in place. Next up was steering arms. 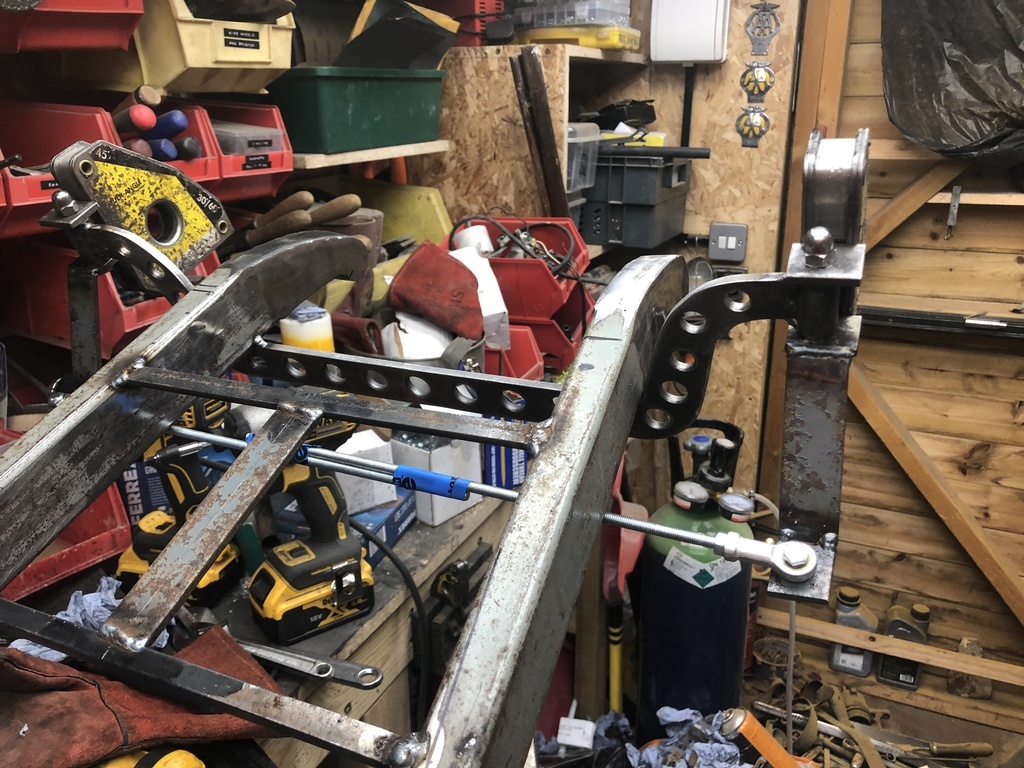 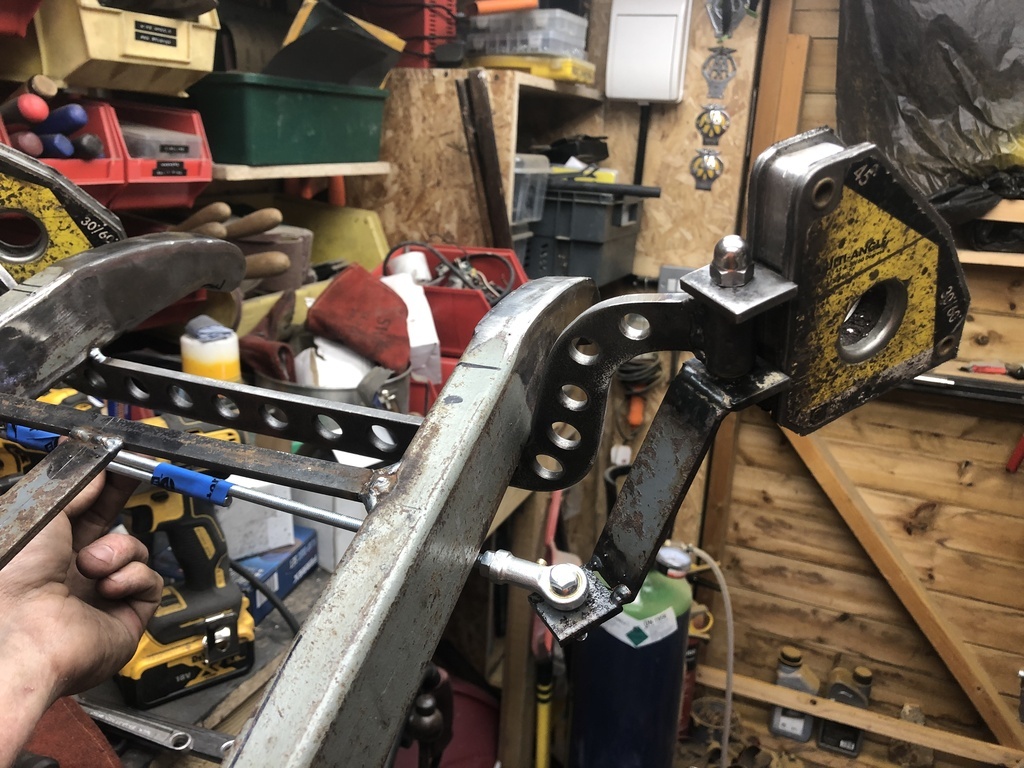 Then I cleaned them up, made some round bits out of the chunky steel plate I've got and added some speed holes. 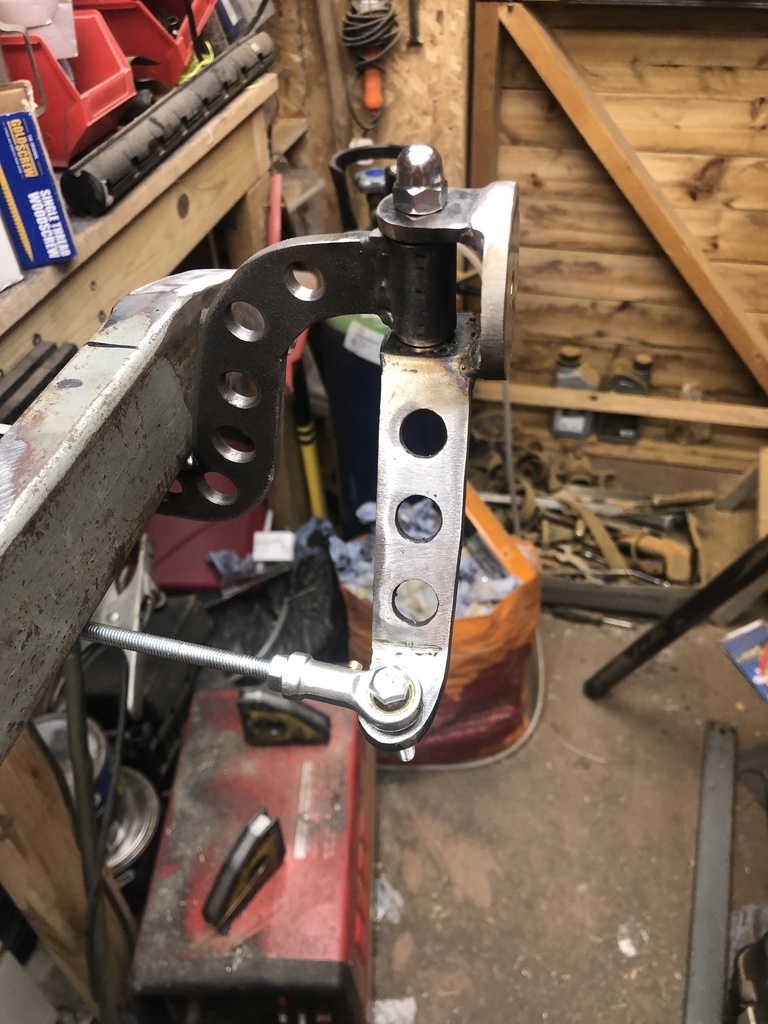 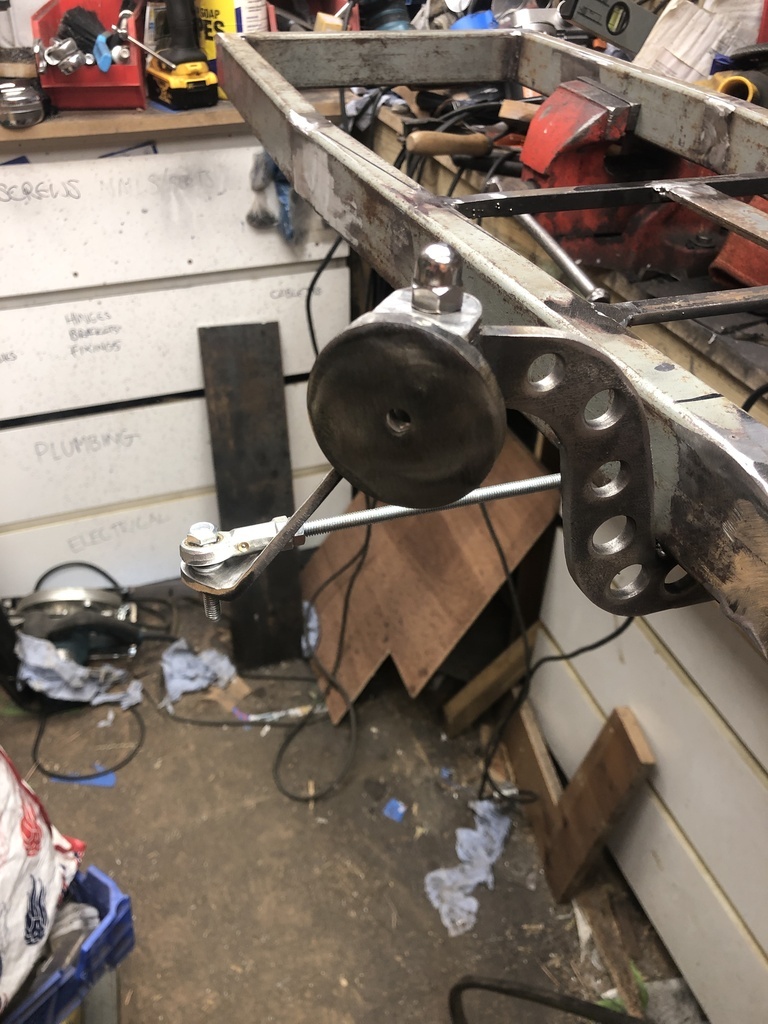 |
| |
|
|
merryck
Club Retro Rides Member
Posts: 477
Club RR Member Number: 9
|
|
Sept 13, 2022 12:53:06 GMT
|
Not sure what it is about this, but it looks fake. I think that curve is so perfect my mind is saying "Oh look, something made by a computer!" Phenomenal work, you've created such a perfect arch that my brain doesn't accept it! |
| |
|
|
|
|
merryck
Club Retro Rides Member
Posts: 477
Club RR Member Number: 9
|
Tot rod wheelsmerryck
@merryck
Club Retro Rides Member 9
|
Sept 11, 2022 21:17:43 GMT
|
|
|
| |
|
|
merryck
Club Retro Rides Member
Posts: 477
Club RR Member Number: 9
|
Finn's tot rodmerryck
@merryck
Club Retro Rides Member 9
|
Sept 11, 2022 21:16:57 GMT
|
|
|
| |
|
|
merryck
Club Retro Rides Member
Posts: 477
Club RR Member Number: 9
|
Finn's tot rodmerryck
@merryck
Club Retro Rides Member 9
|
Sept 11, 2022 12:44:25 GMT
|
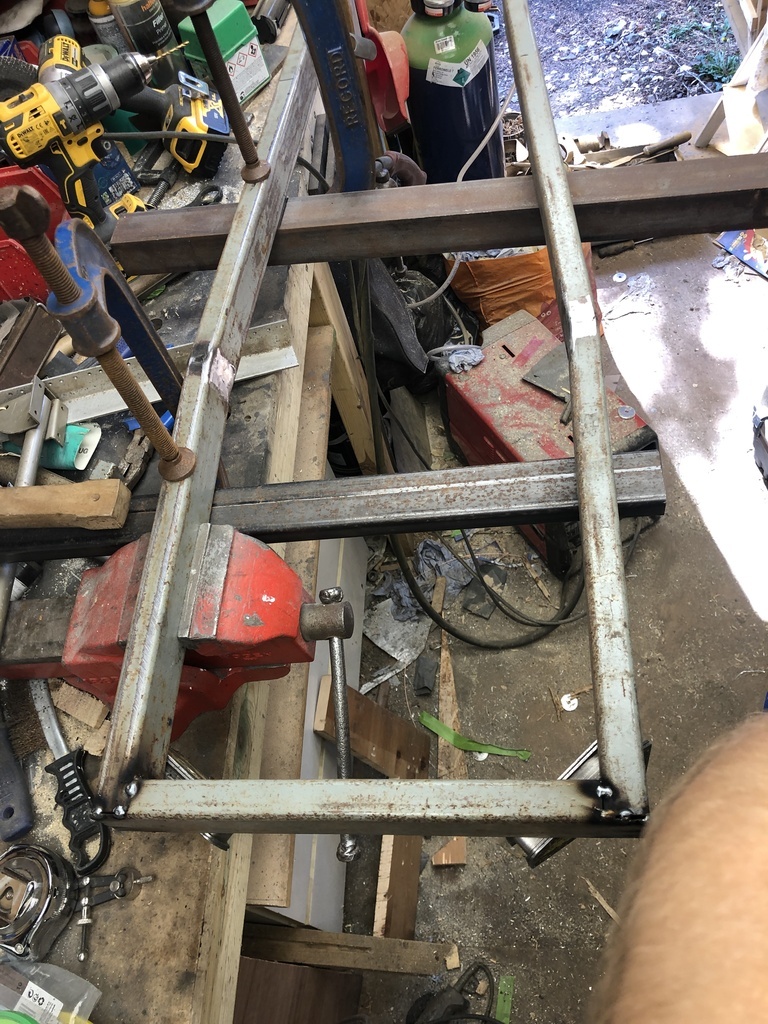
Been making up the chassis this afternoon. I've stopped for lunch as I've noticed I've made a little bit of a mistake. 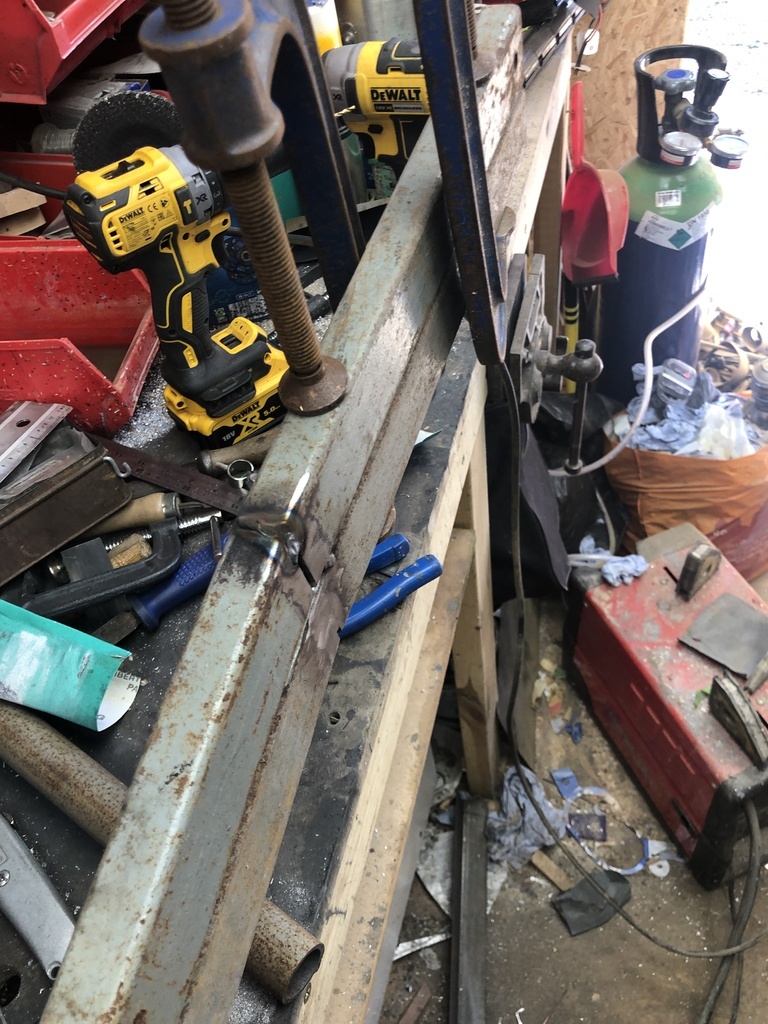 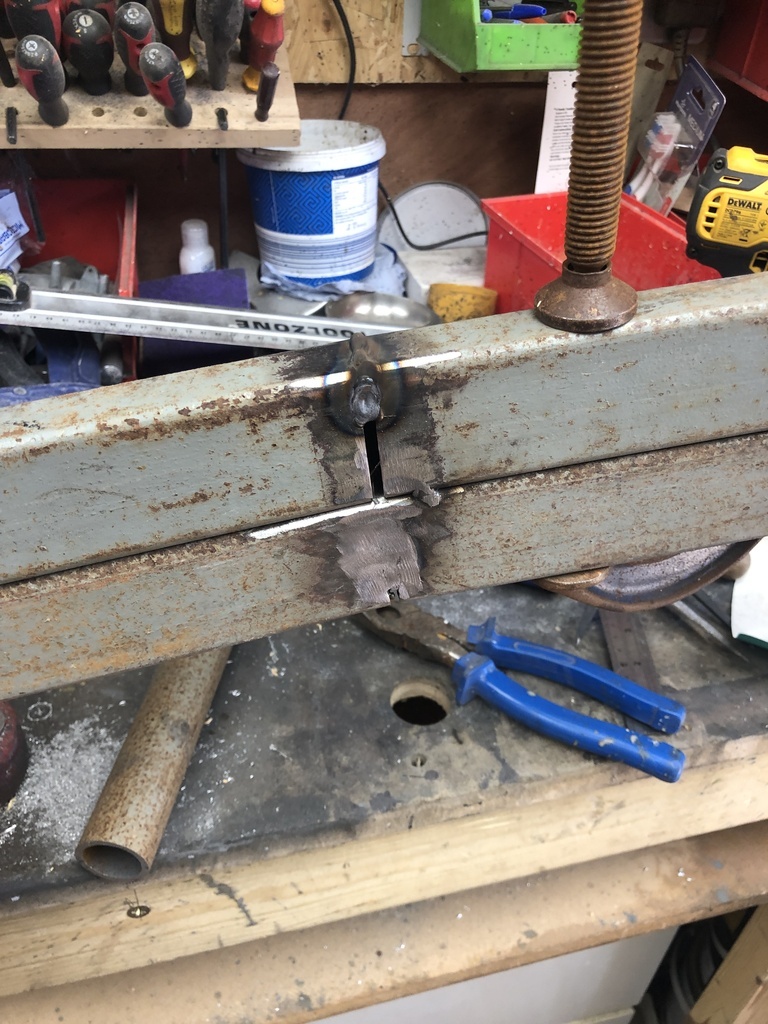 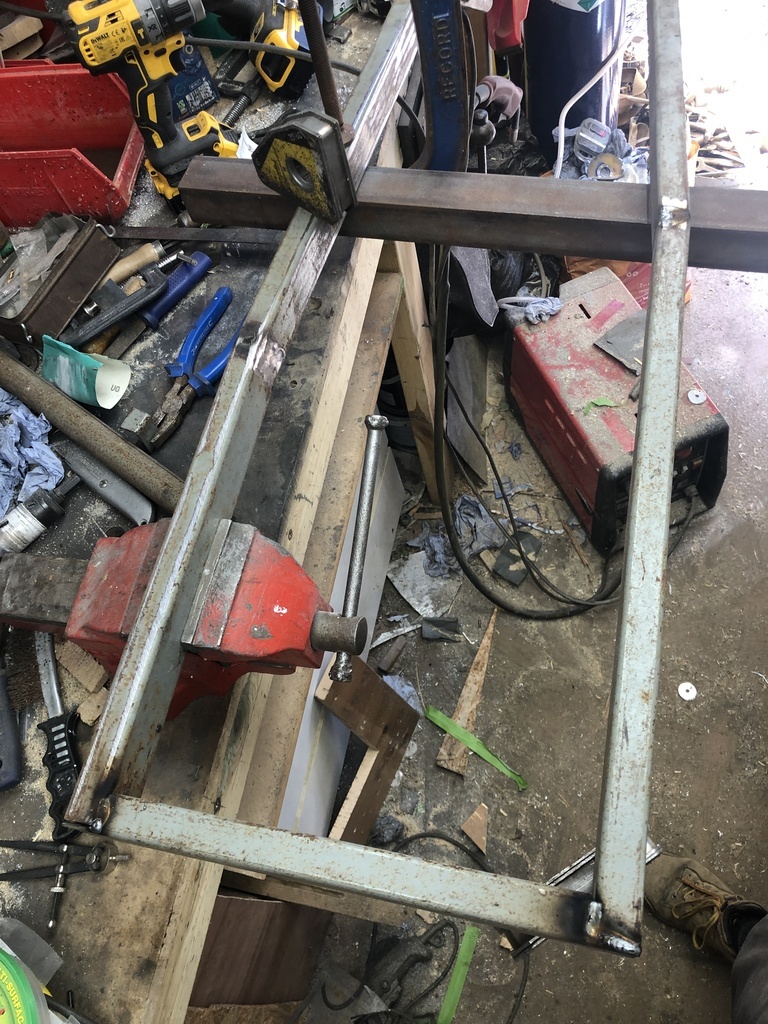 One of the chassis rails is backwards. In my defence, I wasn't paying enough attention to what I was doing. |
| |
|
|
merryck
Club Retro Rides Member
Posts: 477
Club RR Member Number: 9
|
Finn's tot rodmerryck
@merryck
Club Retro Rides Member 9
|
Sept 11, 2022 12:41:30 GMT
|
|
|
| |
|
|
merryck
Club Retro Rides Member
Posts: 477
Club RR Member Number: 9
|
Tot rod wheelsmerryck
@merryck
Club Retro Rides Member 9
|
Sept 10, 2022 17:04:48 GMT
|
|
Looks like the inner diameter of the bearings on the front wheels is 17mm - I had planned to make the stub axles out of threaded rod, but it'll either be 1mm too big or small. Are there any imperial sizes that might do? I've not got easy access to a lathe, otherwise it'd be rather simple!
|
| |
|
|
merryck
Club Retro Rides Member
Posts: 477
Club RR Member Number: 9
|
Tot rod wheelsmerryck
@merryck
Club Retro Rides Member 9
|
Sept 9, 2022 19:01:11 GMT
|
Yeah, the go kart wheels are dead on, top work grizz . I had looked previously, but all I could find were ridiculously wide ones. I looked again after you suggested them and these were the first result. I've mocked them up very roughly where they're going to sit. It might end up sitting a little higher than this, but I'm hoping that it won't be too far off. Just doing all the drawings tonight for the bits I need laser cut. I'll be making a solid axle over the weekend, and the beginnings of a chassis. Deadline is the 25th for the Oh So Retro show in Margate. Plenty of time!!  |
| |
|
|
merryck
Club Retro Rides Member
Posts: 477
Club RR Member Number: 9
|
Tot rod wheelsmerryck
@merryck
Club Retro Rides Member 9
|
Sept 8, 2022 16:01:54 GMT
|
|
That was my initial concern over go kart wheels. Far too wide, but I've found some almost as cheap as two sets of the sack barrow wheels that the yellow one has on it would be, and they don't look too good either, so if I go with the go kart wheels, at least I'll have them for the next iteration of it.
Plus, wider is always better, and while I might just be pushing him round a car show you never know when you're going to want the extra grip. You never can be too safe.
|
| |
|
|
merryck
Club Retro Rides Member
Posts: 477
Club RR Member Number: 9
|
Tot rod wheelsmerryck
@merryck
Club Retro Rides Member 9
|
Sept 8, 2022 12:52:42 GMT
|
I can't seem to find the original listing, but it looks to be the same body as this one; www.ebay.co.uk/itm/303826804868?hash=item46bd7d2084:g:OBAAAOSwpkpf6RovThe go kart wheels look great on the red single seater you built, hopefully they'll go well with the body I've got. I think I had a thread somewhere, just after he was born! Once I get going with it properly I'll start updating it again. |
| |
|
|
merryck
Club Retro Rides Member
Posts: 477
Club RR Member Number: 9
|
Tot rod wheelsmerryck
@merryck
Club Retro Rides Member 9
|
|
|
I've found some wet weather go kart wheels nearby for £40. I'll go pick them up Friday. I'm not sure they're really what I'm after, but they'll definitely do for now! I've found myself looking at casting my own alloy wheels. It's entirely unfeasible, but would be a lot of fun! I saw Vespa split rims, which you can get quite cheap, but they're 10", so with a tyre they'd be far too big for the body I've got. I couldn't find any other type of scooter wheels that were split and smaller. If I can find something then all I need to do is cut a thick piece of aluminium/steel and bolt them together. 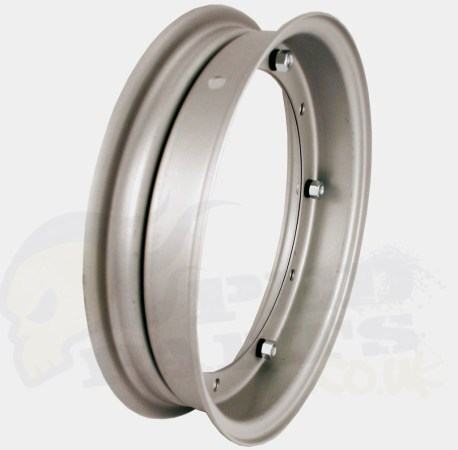 |
| |
|
|
merryck
Club Retro Rides Member
Posts: 477
Club RR Member Number: 9
|
Tot rod wheelsmerryck
@merryck
Club Retro Rides Member 9
|
Sept 6, 2022 21:44:34 GMT
|
|
Anyone got any ideas where to look for something that's not going to cost a fortune, but is going to look reasonably decent?
Ideally I'd like to find a tyre tread that looks like it would've been used on a car, probably 10 inch wheels. All I'm finding are sack barrow wheels, and they really don't have the right look!
|
| |
|
|