lebowski
Part of things
 Hillman Avenger, Clan Clover
Posts: 476
|
|
|
|
|
Does it have an idle valve? Or is the idle set with the throttle stop screw?
Cold start tuning is reasonably straight forward to get it 90% of the way there. It takes ages for that last 10% of refinement though.
|
| |
|
|
|
|
lebowski
Part of things
Hillman Avenger, Clan Clover
Posts: 476
|
|
Oct 24, 2023 13:51:41 GMT
|
|
The 80's/90's Renaults such as the Renault 5 used a thermostat which goes inside one of the hoses. It might be possible to fit one in as it doesn't need a housing or anything, but it would depend on your hose diameter. You'd just need to ensure that your sensors are located somewhere sensible on the engine side of the circuit.
I have a Renault thermostat here which I can measure if it's any help.
|
| |
|
|
lebowski
Part of things
Hillman Avenger, Clan Clover
Posts: 476
|
|
Oct 24, 2023 12:14:07 GMT
|
|
Nice work. Are you running a heater and a thermostat? I can't see where your coolant pipes are routed.
I initially ran without a thermostat on mine, but it ran too cold and didn't want to go over about 50c except when idling at a standstill. Even with the electric water pump barely ticking over it stayed very cold, and some flow is necessary to avoid localised boiling around the cylinders. I ended up replacing the thermostat and putting one of the (3!) temperature sensors in the heater circuit.
|
| |
|
|
lebowski
Part of things
Hillman Avenger, Clan Clover
Posts: 476
|
|
Sept 10, 2023 16:32:17 GMT
|
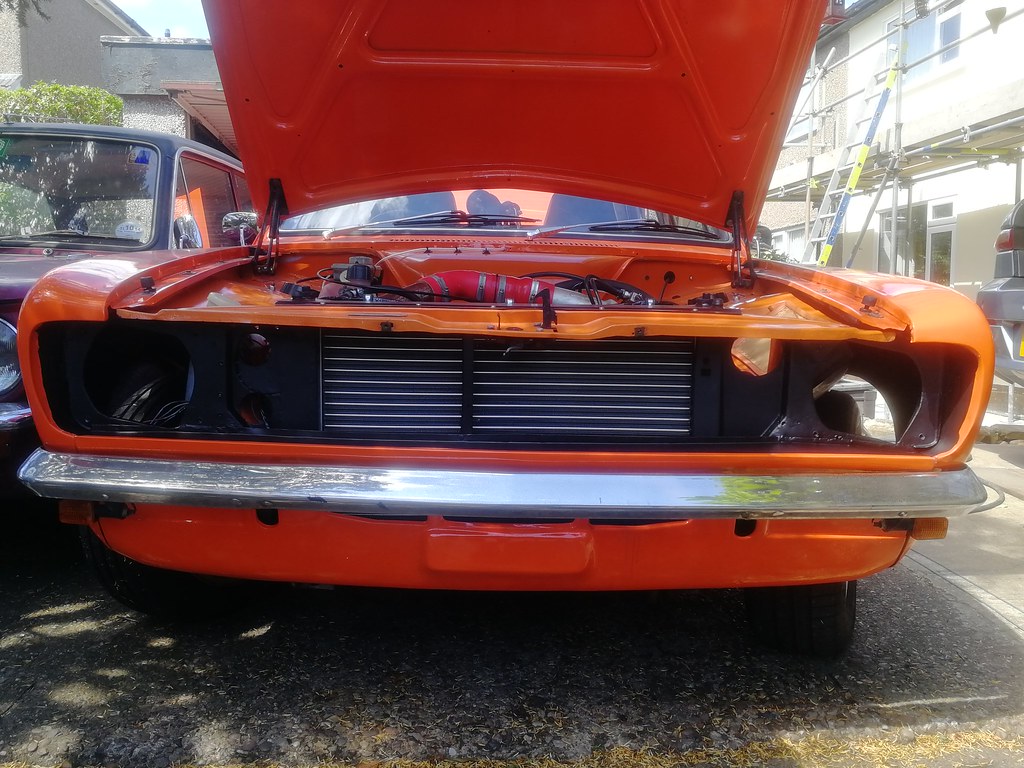
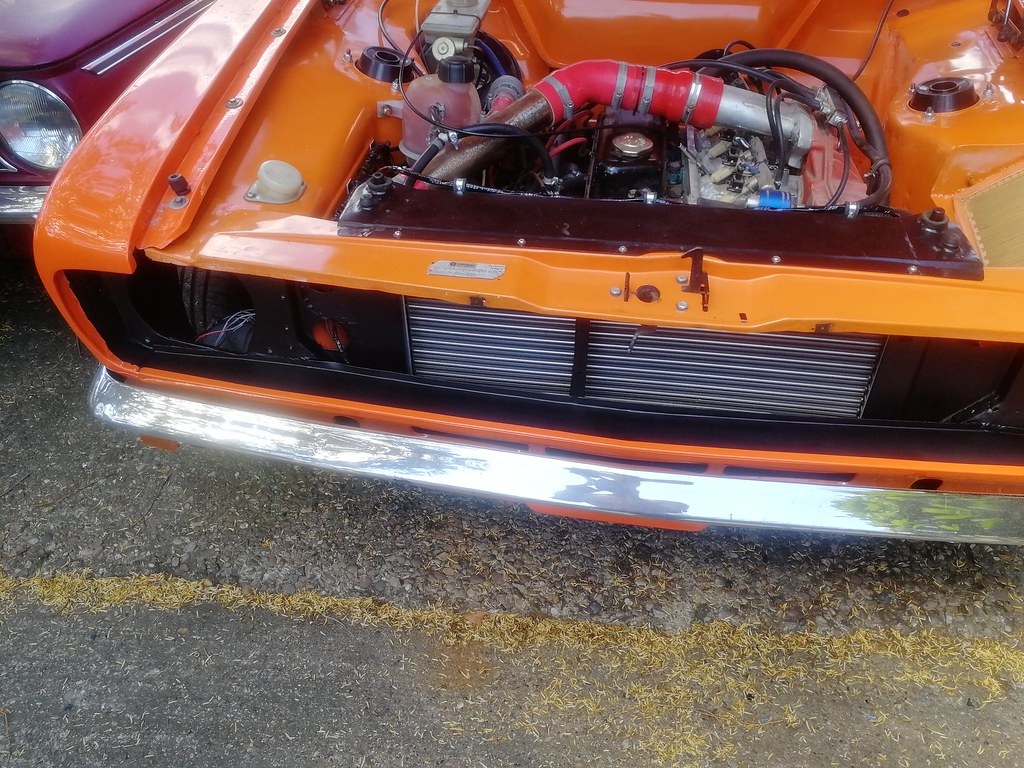
Well I still haven't built the back axle, although I did paint it along with the arms. I've also been messing with an idle valve. Up to now, the car hasn't had any idle control, other than setting the throttle stop to give a sensible idle. I had the warm idle speed set to about 850rpm, which meant the cold (summer) idle was very slow at about 500rpm. It's not a major problem as I only use the car in the drier months, but it would be nice if it started and idled perfectly in all conditions. It is possible to control cold/warm idle speeds by having fairly retarded ignition timing at idle. This means that the throttle has to be cracked open a fair bit, as retarded timing at idle slows the idle speed. By then using more advance when cold, the engine makes more torque and speeds up. The problem with doing it this way, is that Tunerstudio's cold advance feature adds timing everywhere during warmup, meaning if you command an extra 20 degrees advance to bring the idle speed up, the entire table will have that extra 20 degrees until warm. Besides, when messing with the idle timing, I've found it makes the most torque at about 35 degrees of advance, and it picks up and generally feels 'better' with the high advance. So I've left it at 35 degrees. So anyway, the idle valve. It's a Bosch 3 wire PWM unit, which I've tied into the intercooler piping and the existing vacuum manifold like so:   I've opened out the hole in each manifold runner from 3mm to 5mm, although the barbs are 4mm bore. The vacuum manifold is fed via the idle valve through a barb with a 7.5mm ID. This combo gives me the ability to idle over 2000rpm or so, so it's plenty. I only plan to use the idle valve during warmup, and once warm it will be closed. It does leak a bit of air through though, even when closed, so I had to back off the idle screw on the throttle bodies to account for this. For now it idles warm at about 950rpm, which is the lowest I can get it without retarding the idle timing as mentioned above. I had to add an upgraded transistor to the ecu, as the standard one can only carry about 0.8 amps. It's the one stuck to the lid on the left. The other is boost control.  |
| |
Last Edit: Sept 10, 2023 16:34:58 GMT by lebowski
|
|
lebowski
Part of things
Hillman Avenger, Clan Clover
Posts: 476
|
|
Jul 24, 2023 20:28:07 GMT
|
|
|
| |
|
|
lebowski
Part of things
Hillman Avenger, Clan Clover
Posts: 476
|
|
Jul 13, 2023 14:13:45 GMT
|
Always an option, although I do like the current wheels. I do think it would look amazing on a set of these Tvr wheels though, although they're 15" and the wrong pcd.  IMG_20230713_151124 IMG_20230713_151124 by Chris Witkowski, on Flickr |
| |
|
|
lebowski
Part of things
Hillman Avenger, Clan Clover
Posts: 476
|
|
Jul 13, 2023 13:23:03 GMT
|
|
You mean by machining the wheel mounting faces? Yes probably, but I'll see how they go on first. Otherwise I'll end up with a pair of wheels specifically for the back of the car, or I'll have to get all 5 done.
|
| |
|
|
lebowski
Part of things
Hillman Avenger, Clan Clover
Posts: 476
|
|
Jul 12, 2023 17:26:23 GMT
|
|
|
| |
|
|
lebowski
Part of things
Hillman Avenger, Clan Clover
Posts: 476
|
|
|
|
|
The exhaust looks nice at least. What's the system diameter? I could do with a 2nd silencer at the back like yours.
|
| |
|
|
lebowski
Part of things
Hillman Avenger, Clan Clover
Posts: 476
|
|
Jun 29, 2023 14:54:53 GMT
|
Very nice! You wouldn't be willing to share some of the dimensions for the caliper brackets would you? I'm looking to do a disc brake rear conversion myself and Golf Mk4 calipers are on the list of options, but I don't know 100% if they'd fit without buying a set. I suppose key measurements would be diameter of the disc, lug spacing, and distance of the lug mounting holes radially from the centre. There's 90mm between the mounting hole centres, and the holes are threaded M10x1.25. I'm not using a Golf disc, but an Escort Mk3 front disc, which is 239.5mm diameter and 10mm thick. I've mounting the calipers as the below picture, which puts the pads right at the edge of the disc.  2023-06-29 15_44_06-ASM0001 (Active) - Creo Parametric 2023-06-29 15_44_06-ASM0001 (Active) - Creo Parametric by Chris Witkowski, on Flickr If you're a CAD user I can share a step file of the assembly with you. |
| |
|
|
|
|
lebowski
Part of things
Hillman Avenger, Clan Clover
Posts: 476
|
|
Jun 29, 2023 13:07:32 GMT
|
One thing I forgot to check yesterday was whether the damper clears the new brake calipers. I reassembled the axle today and put a pair of spare dampers on. There are two positions that the caliper can sit in, as seen below, depending on which way round the mounting bracket is fitted. Which is best will depend on handbrake cable routing etc, so I'll decide later.  IMG_20230629_133655 IMG_20230629_133655 by Chris Witkowski, on Flickr  IMG_20230629_133708 IMG_20230629_133708 by Chris Witkowski, on Flickr Both positions clear the damper, although I had to swap the handbrake return springs so that they point upwards.  IMG_20230629_133025 IMG_20230629_133025 by Chris Witkowski, on Flickr |
| |
|
|
lebowski
Part of things
Hillman Avenger, Clan Clover
Posts: 476
|
|
Jun 28, 2023 19:24:41 GMT
|
Making some progress on the rear disc conversion. The axle flange needs one corner relieving slightly, otherwise it bolts straight on and fits nicely.  IMG_20230628_161903 IMG_20230628_161903 by Chris Witkowski, on Flickr  IMG_20230628_161916 IMG_20230628_161916 by Chris Witkowski, on Flickr 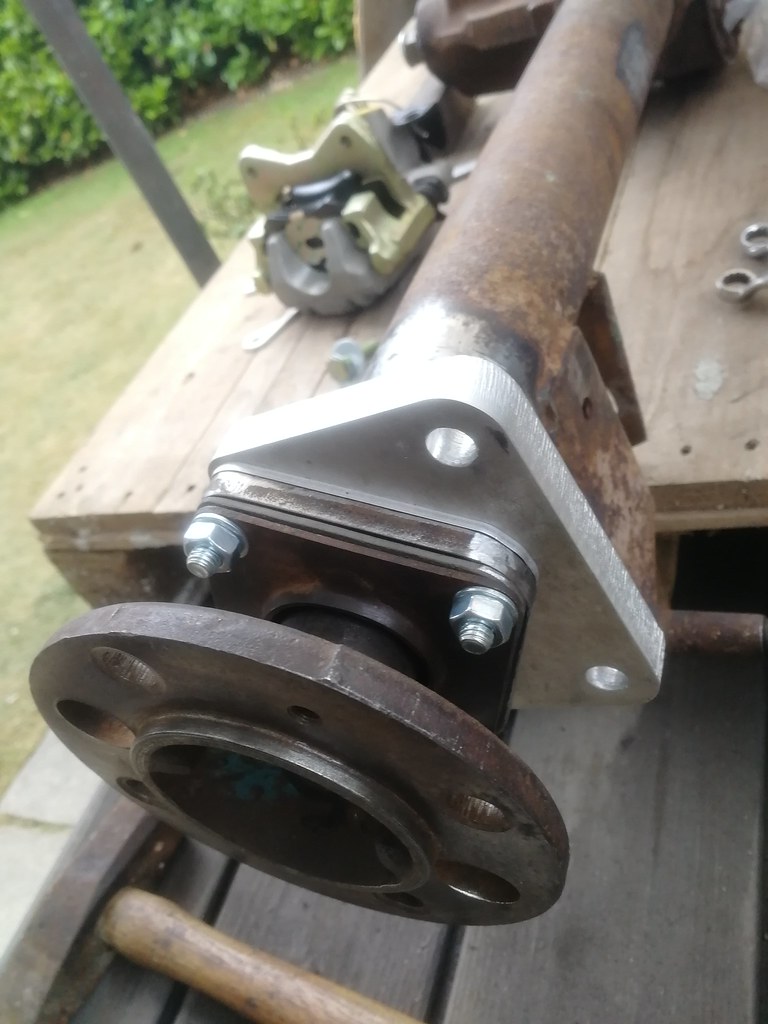 IMG_20230628_162704 IMG_20230628_162704 by Chris Witkowski, on Flickr 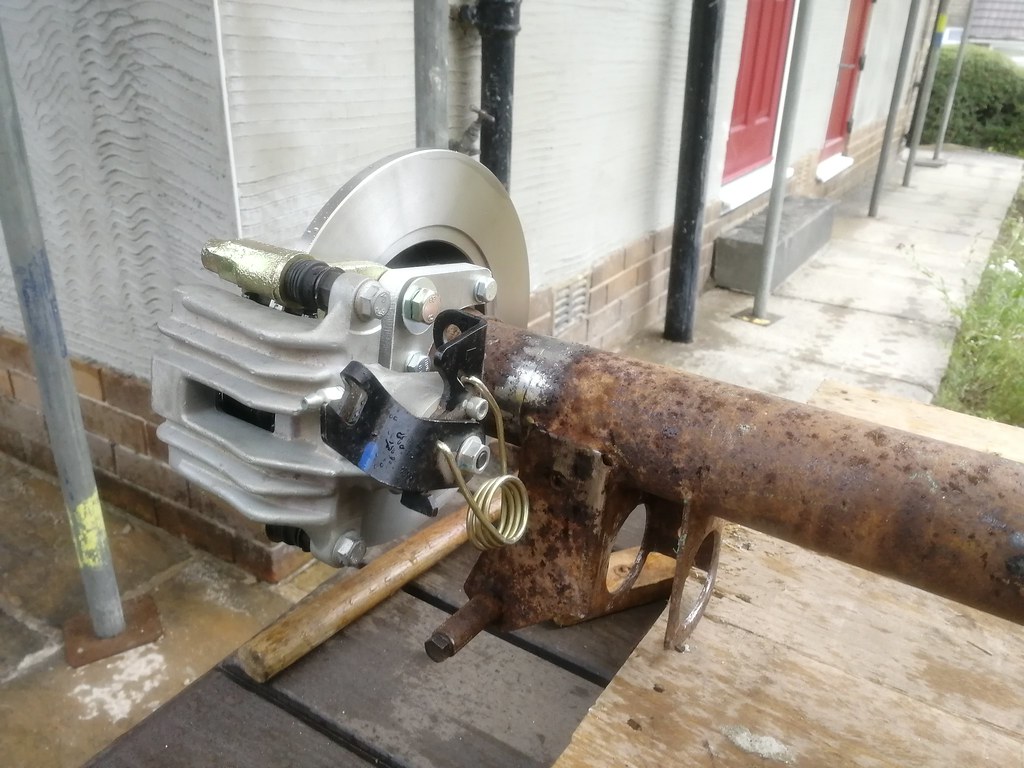 IMG_20230628_163829 IMG_20230628_163829 by Chris Witkowski, on Flickr  IMG_20230628_163806 IMG_20230628_163806 by Chris Witkowski, on Flickr  IMG_20230628_163815 IMG_20230628_163815 by Chris Witkowski, on Flickr  IMG_20230628_163822 IMG_20230628_163822 by Chris Witkowski, on Flickr The axle is ready for blasting next, then it needs a couple of bush tubes welding in before painting and assembling. One bad thing about the disc conversion is that the disc mounting face is about 3.5mm thicker than the drums, meaning the wheels will be 3.5mm further out. I'm already tight on space on the rear wheel arches so I'm hoping it's OK. |
| |
|
|
lebowski
Part of things
Hillman Avenger, Clan Clover
Posts: 476
|
|
Jun 28, 2023 14:24:27 GMT
|
|
Get a couple of long pieces of cardboard and draw some kind of reference grid onto it. Bolt the pieces of card onto the baseplates of your wing using low profile bolts, and then carefully place the wing into the correct position. Make markings on the bootlid which join with the grid on the cardboard. Remove wing. Remove cardboard from wing, and put back onto bootlid, aligning with the markings. Mark the position of the holes.
|
| |
|
|
lebowski
Part of things
Hillman Avenger, Clan Clover
Posts: 476
|
|
|
|
|
You can also use 8mm Cupro Nickel brake pipes for fuel lines. It's what I have front to back on my Avenger. You can use a brake flaring tool to put a small flare on the ends and then put your rubber hose over with a hoseclip as normal. I haven't had any issues in 4 years using this method, although nylon is no doubt easier to route. You do need a pipe support at regular intervals though, although that would be best with whatever material you choose.
|
| |
|
|
lebowski
Part of things
Hillman Avenger, Clan Clover
Posts: 476
|
|
Jun 26, 2023 16:48:20 GMT
|
|
Broken diverter flaps under the dashboard? Meaning it's blowing cold air from outside rather than air through the matrix.
|
| |
|
|
lebowski
Part of things
Hillman Avenger, Clan Clover
Posts: 476
|
|
|
|
I disagree on not having the return to the catch tank. If you do that, you need to make sure the low pressure pump always outflows the high pressure pump. Fair point, listen to this man. |
| |
|
|
lebowski
Part of things
Hillman Avenger, Clan Clover
Posts: 476
|
|
Jun 22, 2023 14:54:21 GMT
|
My rear caliper brackets have turned up from the laser cutters. They look good and all the holes line up nicely. I'll need to do a bit of deburring on the thicker brackets and then I'll tap some M8 threads into the 3 smaller holes of the thick plates. I got them from Lasered Components, who were really easy to deal with and very quick.  IMG_20230622_152759 IMG_20230622_152759 by Chris Witkowski, on Flickr  IMG_20230622_152848 IMG_20230622_152848 by Chris Witkowski, on Flickr |
| |
|
|
lebowski
Part of things
Hillman Avenger, Clan Clover
Posts: 476
|
|
Jun 22, 2023 13:49:10 GMT
|
|
Just to add, I once had a Clan Clover with similar problems. It started occasionally stuttering to a halt and losing power. Sometimes it would restart immediately and drive fine. Others it would leave me stranded for 20 minutes before eventually restarting.
It had no fuel filters, even on the pickup inside the tank. When I took the top off the (mechanical) fuel pump, the gauze filter inside the pump housing was full of rubbish. I cleaned it out, blew compressed air through the fuel pipes and then fitted a small in tank filter inside the fuel tank. It never happened again after that.
|
| |
|
|
lebowski
Part of things
Hillman Avenger, Clan Clover
Posts: 476
|
|
Jun 22, 2023 13:39:12 GMT
|
|
Great looking car.
I think if I were you I'd run the fuel return from the engine straight back to the tank. That way, all the fuel supplied to the swirl pot has always come from the fuel tank, where it is nice and cold, rather than circulating in the small circuit in the engine bay. You could leave the return from the swirl pot to the tank as well if you have space, as it will let the swirl pot evacuate air as it fills.
I'd also get rid of one of (or possibly both) the external fuel filters, and renew the other with a quality item. Blocked filters can certainly create intermittent problems like this.
|
| |
|
|
lebowski
Part of things
Hillman Avenger, Clan Clover
Posts: 476
|
|
Jun 14, 2023 15:48:58 GMT
|
I've been doing a fair bit on the Avenger lately. After fitting the new intercooler, I found that my front right indicator was no longer working. I probably accidentally disconnected one of the nest of bullet connectors when refitting the intercooler. Getting it reconnected was next to impossible, as there's no slack on the wires with where I've routed them, which is on top of the drivers side chassis leg, then across the inkwell panel under the rads. Anyway I decided to remove the rads (again) and extend the cables so I could have them in an accessible location. I also put a pair of connector blocks in as I hate bullet connectors.  IMG_20230609_144925 IMG_20230609_144925 by Chris Witkowski, on Flickr  IMG_20230609_144919 IMG_20230609_144919 by Chris Witkowski, on Flickr  IMG_20230609_144934 IMG_20230609_144934 by Chris Witkowski, on Flickr When I drained the radiator to do the above, the coolant that came out was absolute filth, so I gave that a good flush a few times. The radiator drain plug in the Focus radiator is right above the NS chassis leg (can just see it in the photo above), so it just pours all over the place and is a bit of a pain. I've just bought one of these Fumoto drain taps which has the right thread and has a ball valve. Should make it a bit easier in future.  IMG_20230614_154651 IMG_20230614_154651 by Chris Witkowski, on Flickr  IMG_20230614_154732 IMG_20230614_154732 by Chris Witkowski, on Flickr I've also been spending money willy nilly on other stuff for the back axle. I've got a Lotus axle casing with a pair of thick flanged halfshafts. A 3J lsd setup as per my last post...  IMG_20230614_155522 IMG_20230614_155522 by Chris Witkowski, on Flickr A pair of Golf mk4 rear calipers. They're pretty light for brake calipers.  IMG_20230614_154933 IMG_20230614_154933 by Chris Witkowski, on Flickr  IMG_20230614_154948 IMG_20230614_154948 by Chris Witkowski, on Flickr  IMG_20230614_155000 IMG_20230614_155000 by Chris Witkowski, on Flickr An axle brace 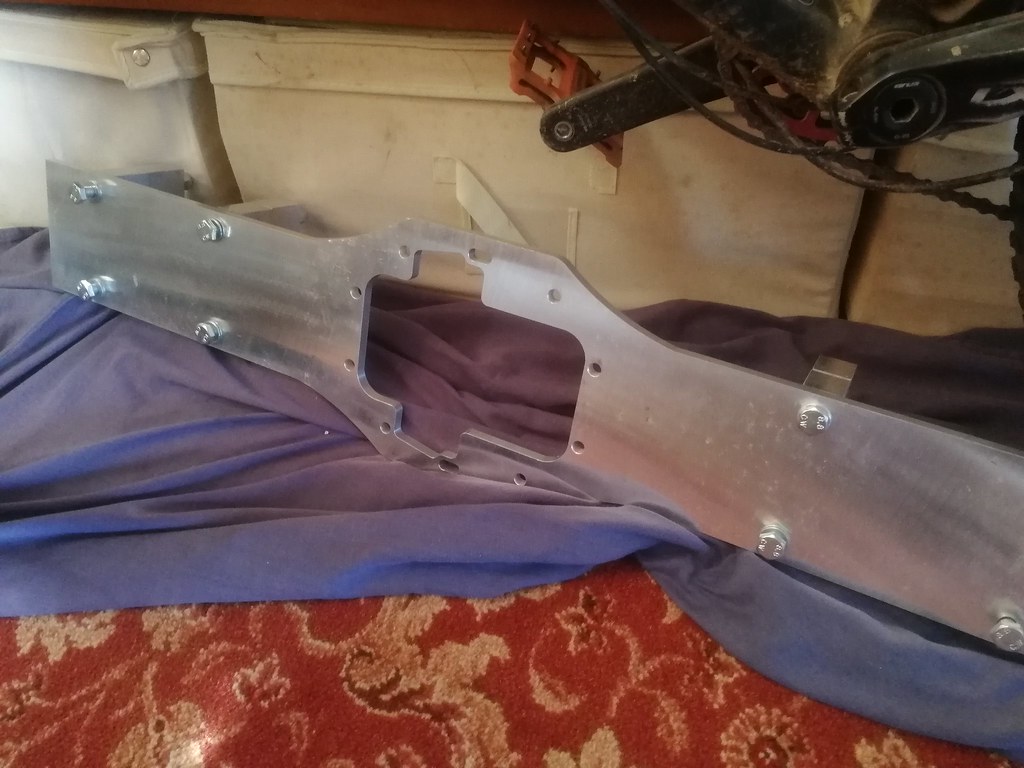 IMG_20230614_160404 IMG_20230614_160404 by Chris Witkowski, on Flickr And also a pair of mk3 Fiesta front discs and another pair of mk3 Escort front discs. These are identical other than the disc thickness and the offset. I modelled it up in cad with some axle measurements so I can get some caliper brackets laser cut.  IMG_20230614_155122 IMG_20230614_155122 by Chris Witkowski, on Flickr  IMG_20230614_155200 IMG_20230614_155200 by Chris Witkowski, on Flickr  IMG_20230614_155247 IMG_20230614_155247 by Chris Witkowski, on Flickr I'll probably get the brackets made in 15mm ish aluminium, and then a 3mm spacer is also required as below.  IMG_20230614_155326 IMG_20230614_155326 by Chris Witkowski, on Flickr My throttle cable sleeve also failed, so I've replaced it. It's lasted 4 years or so but not so many miles, so I'll probably redesign that at some point.  IMG_20230610_122222 IMG_20230610_122222 by Chris Witkowski, on Flickr I also refitted the front windscreen seal with the 3M sealer. Fingers crossed for a dry car from now on. And other than all this work, I have actually driven the thing aswell, which is nice. |
| |
|
|
|
|