

All the little jobs I need to do on the car seem to take longer than expected to sort out but I still feel the finish line is approaching. Tonight I was working on 3 different aspects. I'll explain more later about the coolant crosspipe but the other two things are quite straightforward.
1st is the headling. They sag badly on Jags for some reason. The cloth is attached (glued?) to something called 'the biscuit' which it a big thin piece of fiberboard which slots in behind channels on the four sides of the roof. There are firms who will sort it out for you but not in my home town and it's gonna be over £100 anyway so I didn't entertain that option. DIY route instead.
My parts lists show there were two colours used Fawn (ADH) and Silver (MDA) but the VDP only had Fawn.
Fawn, Beige, Cream, Sand, Brown all mean different but similar things to people and I wasn't going to search forever to get the right shade so as long as it was in that spectrum I was on the lookout for a suitable cloth to re-do it along with the cant rails etc.
The original material is quite cheap and nasty IMO so I thought 'why not go up a notch and do it in something nicer - alcantara for example'.....
There are lots of firms on German Ebay selling alcantara type faux suede materials in many colours plus a few in the UK in a more limited choice and after months of looking I was ready to buy some when a huge piece came up for sale from a lady who sells sexy outfits, of all things. She had a cream bit and this one which was listed as grey but it looks brown to me.
Anyway here it is plus some of the bits I removed from the car tonight. I originally expected to take the hardboard 'biscuit' out of the roof to re-trim it but the old cloth just pulled away in my hand and I reckon I could glue the new stuff on with it in-situ. We'll see....

typical saggy Jag headling. is it cream? beige? fawn?

large piece of 'alcantara' found on Ebay


pukka?

original cant rails removed for re-trimming. original headling came off in my hand

VDP coachbuilding. wooden block anf Scotchlock connector employed to fit the map reading light
The 2nd thing was that I finally got some black (synthetic enamel) on the IRS parts that I have been priming for a while. Everything has had about 3 coats of primer and been stored in the boot to keep dry so it's good to see the topcoat going on.


Lastly we have the coolant pipe. A couple of weeks ago I was looking at making a new one with bends that a guy on Ebay is selling but his bend didn't have a small enough curvature. I then saw a NOS crosspipe for a more modern XJ12 which only needed a the upright filler neck transferred to it to match the original but the seller very helpfully measured it for me and it was about an inch narrower overall. Doesn't sond much but could've been a pain to fit later on.
I'm therefore back to repairing the original. I have fixed one of the corroded ends plus a hole and am now making up a replica of the 2" wide downpipe.
The original is brazed to the horizontal part and I thought it would be impossible to get this off so planned to trim it down to just above the braze then weld a new stub on.
However, after reading a bit about brazing, I decided to have a go at un-brazing the rusted part. I didn't want to ruin it by mistake so first tried de-brazing the corroded 5/16" pipe stubs from the expansion tank (which also needs to be fixed but was less worthy). They came off no problem with only a few seconds heat applied with the oxy-acetylene at quite a low setting.
Encouraged by this I moved over to the irreplaceable crosspipe. This proved a lot tougher to shift. The baze is letting go gradually and some gaps are appearing. I left it for the night and am sure it will come off next time.

making up a section of 2" diameter pipe to replace corroded downstub on coolant pipe

socket is good former. in background is 'dummy run' one made a few nights ago

cut out made to sit on pipe per original

original stub did not sit centrally over pipe. cut outs made off centre to match this

flattened on one side to mirror original


1st attempt at de-brazing fittings worked no problem

not sure how to get braze residue off tho

2nd attempt also worked no problem. top of this pipe is fine but part inside tank badly corroded

braze on downstub to coolant pipe horizontal harder to shift

but is disappearing gradually


should get it off next time
I have also made up the long front section of the fuel return line with the NOS copper pipe I bought from USA a while ago. It seemed so much better quality than the modern stuff I bought from UK to make up the rear section. Will post pics of that later
Thanks for looking
1st is the headling. They sag badly on Jags for some reason. The cloth is attached (glued?) to something called 'the biscuit' which it a big thin piece of fiberboard which slots in behind channels on the four sides of the roof. There are firms who will sort it out for you but not in my home town and it's gonna be over £100 anyway so I didn't entertain that option. DIY route instead.
My parts lists show there were two colours used Fawn (ADH) and Silver (MDA) but the VDP only had Fawn.
Fawn, Beige, Cream, Sand, Brown all mean different but similar things to people and I wasn't going to search forever to get the right shade so as long as it was in that spectrum I was on the lookout for a suitable cloth to re-do it along with the cant rails etc.
The original material is quite cheap and nasty IMO so I thought 'why not go up a notch and do it in something nicer - alcantara for example'.....
There are lots of firms on German Ebay selling alcantara type faux suede materials in many colours plus a few in the UK in a more limited choice and after months of looking I was ready to buy some when a huge piece came up for sale from a lady who sells sexy outfits, of all things. She had a cream bit and this one which was listed as grey but it looks brown to me.
Anyway here it is plus some of the bits I removed from the car tonight. I originally expected to take the hardboard 'biscuit' out of the roof to re-trim it but the old cloth just pulled away in my hand and I reckon I could glue the new stuff on with it in-situ. We'll see....
typical saggy Jag headling. is it cream? beige? fawn?
large piece of 'alcantara' found on Ebay
pukka?
original cant rails removed for re-trimming. original headling came off in my hand
VDP coachbuilding. wooden block anf Scotchlock connector employed to fit the map reading light
The 2nd thing was that I finally got some black (synthetic enamel) on the IRS parts that I have been priming for a while. Everything has had about 3 coats of primer and been stored in the boot to keep dry so it's good to see the topcoat going on.
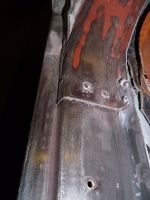
Lastly we have the coolant pipe. A couple of weeks ago I was looking at making a new one with bends that a guy on Ebay is selling but his bend didn't have a small enough curvature. I then saw a NOS crosspipe for a more modern XJ12 which only needed a the upright filler neck transferred to it to match the original but the seller very helpfully measured it for me and it was about an inch narrower overall. Doesn't sond much but could've been a pain to fit later on.
I'm therefore back to repairing the original. I have fixed one of the corroded ends plus a hole and am now making up a replica of the 2" wide downpipe.
The original is brazed to the horizontal part and I thought it would be impossible to get this off so planned to trim it down to just above the braze then weld a new stub on.
However, after reading a bit about brazing, I decided to have a go at un-brazing the rusted part. I didn't want to ruin it by mistake so first tried de-brazing the corroded 5/16" pipe stubs from the expansion tank (which also needs to be fixed but was less worthy). They came off no problem with only a few seconds heat applied with the oxy-acetylene at quite a low setting.
Encouraged by this I moved over to the irreplaceable crosspipe. This proved a lot tougher to shift. The baze is letting go gradually and some gaps are appearing. I left it for the night and am sure it will come off next time.
making up a section of 2" diameter pipe to replace corroded downstub on coolant pipe
socket is good former. in background is 'dummy run' one made a few nights ago
cut out made to sit on pipe per original
original stub did not sit centrally over pipe. cut outs made off centre to match this
flattened on one side to mirror original
1st attempt at de-brazing fittings worked no problem
not sure how to get braze residue off tho
2nd attempt also worked no problem. top of this pipe is fine but part inside tank badly corroded
braze on downstub to coolant pipe horizontal harder to shift
but is disappearing gradually
should get it off next time
I have also made up the long front section of the fuel return line with the NOS copper pipe I bought from USA a while ago. It seemed so much better quality than the modern stuff I bought from UK to make up the rear section. Will post pics of that later
Thanks for looking

 )
) 


 but if they hadn't got through I could've won up to £430 which would've came in handy for bits and pieces for the project.
 what the f**k do you actually get for that!? Leaves me almost bankrupt this month.


