|
|
|
Dec 29, 2015 23:59:55 GMT
|
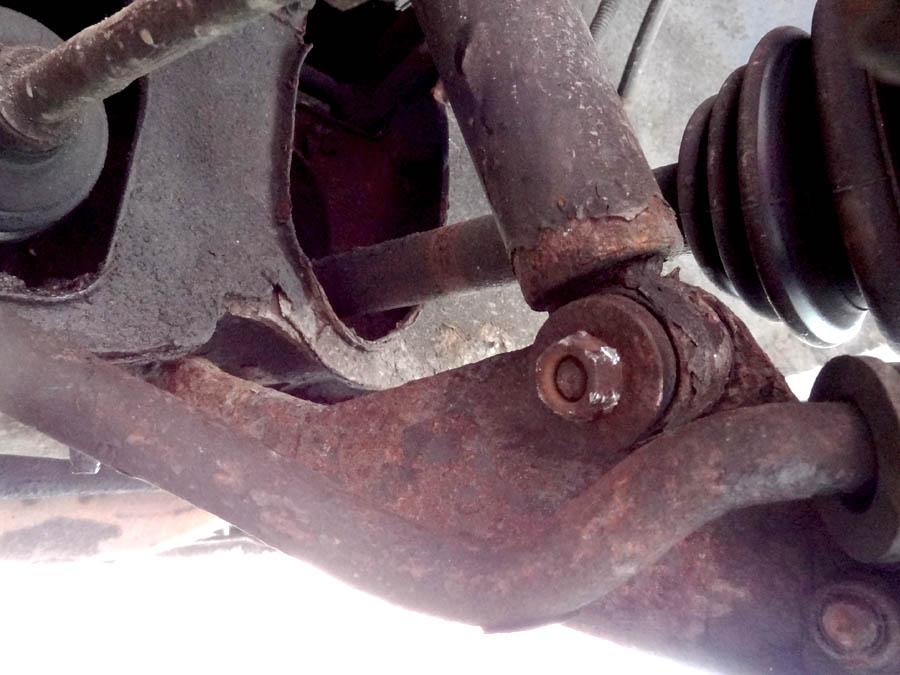
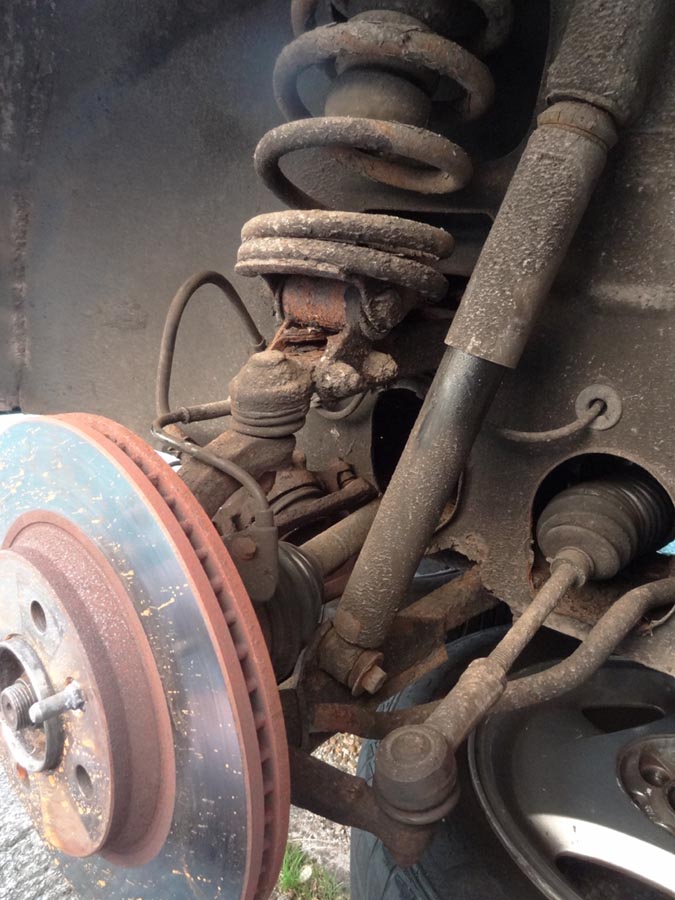
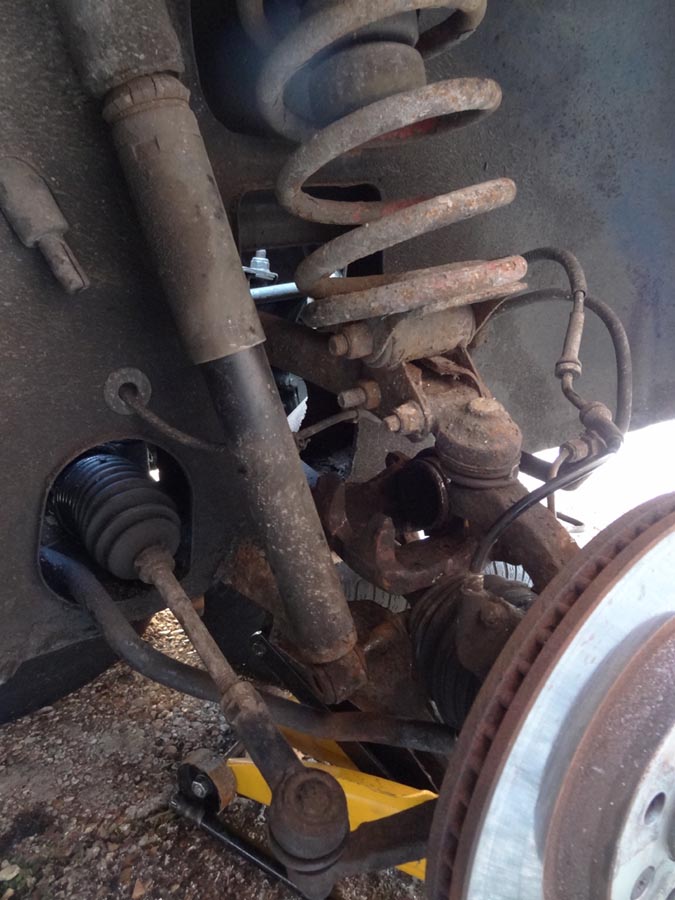
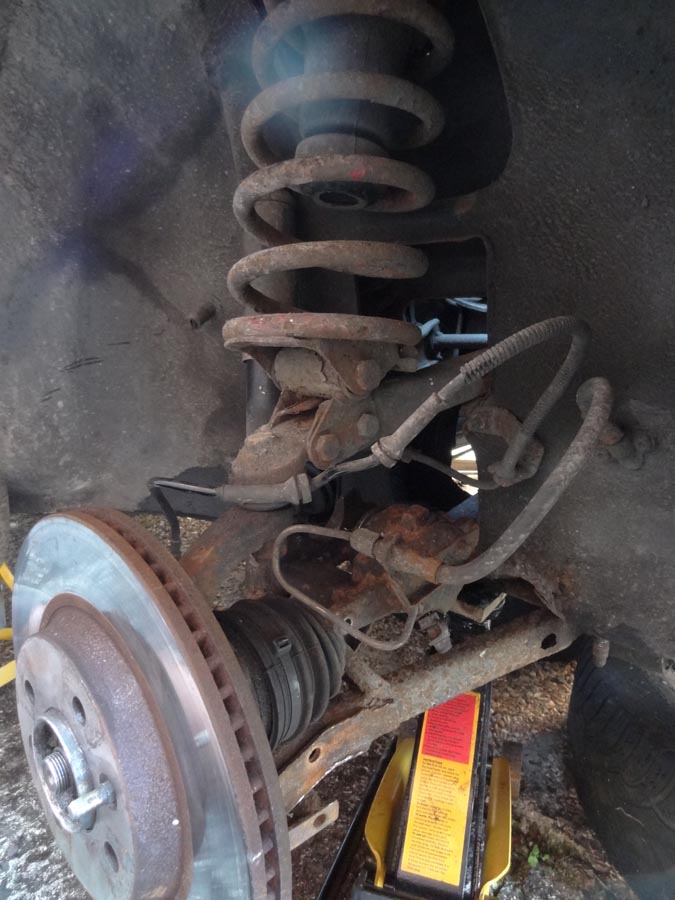
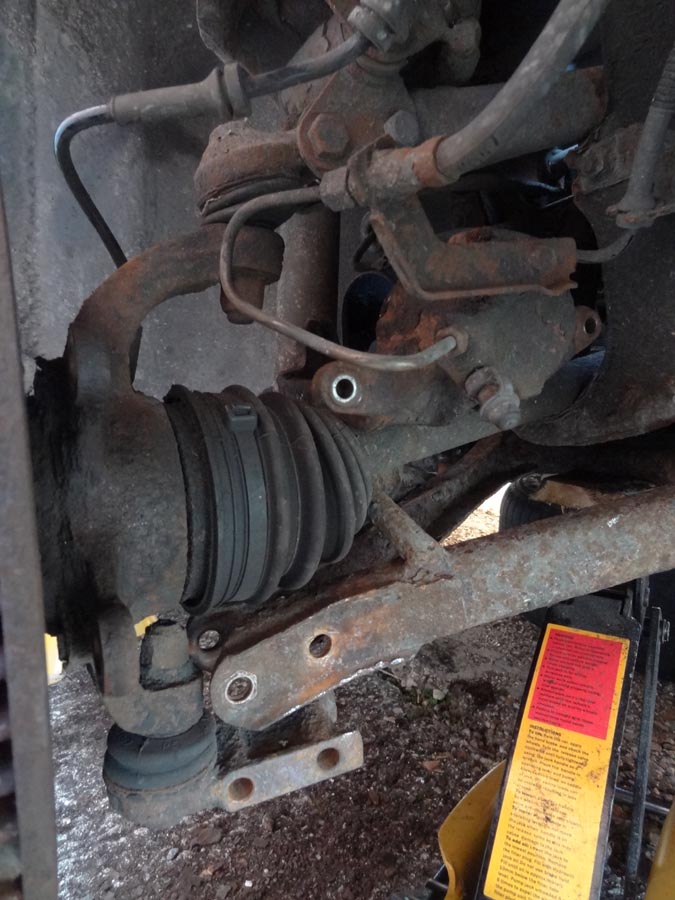
So, onto the next bit of welding. This bit is just behind the drive shaft tunnel on the drivers side. It'll require 3 or 4 small bits to build it back in. So first I cut out the bad metal. Leaving me with this. 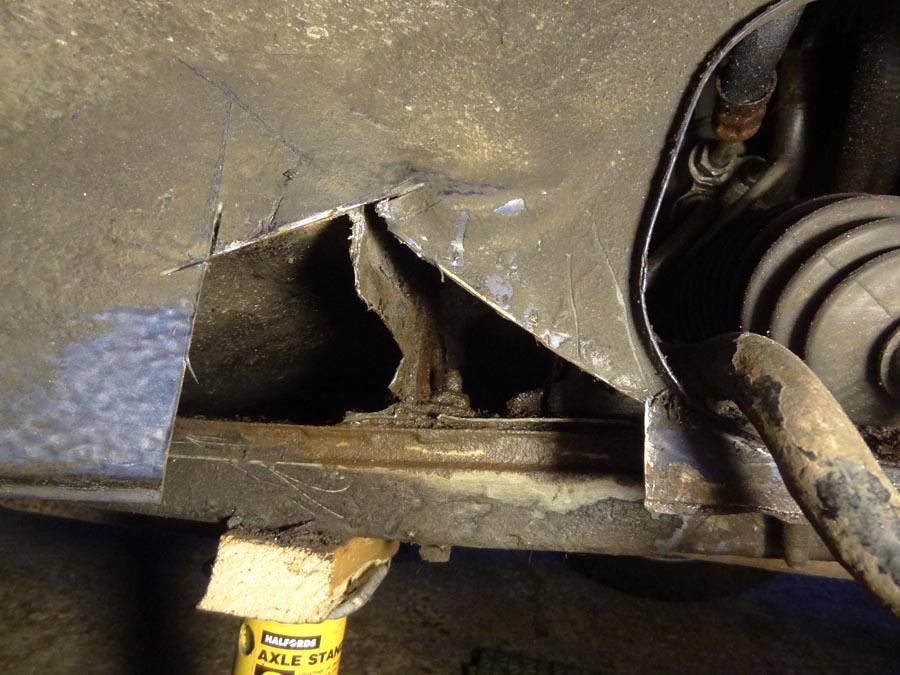 This was the underneath after being cut out. 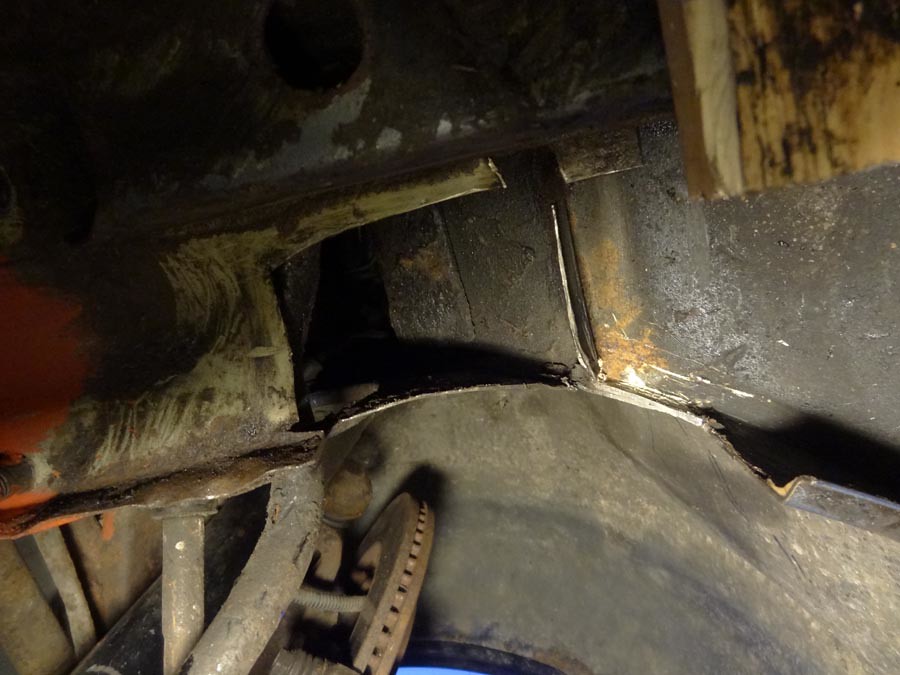 First patch made up. 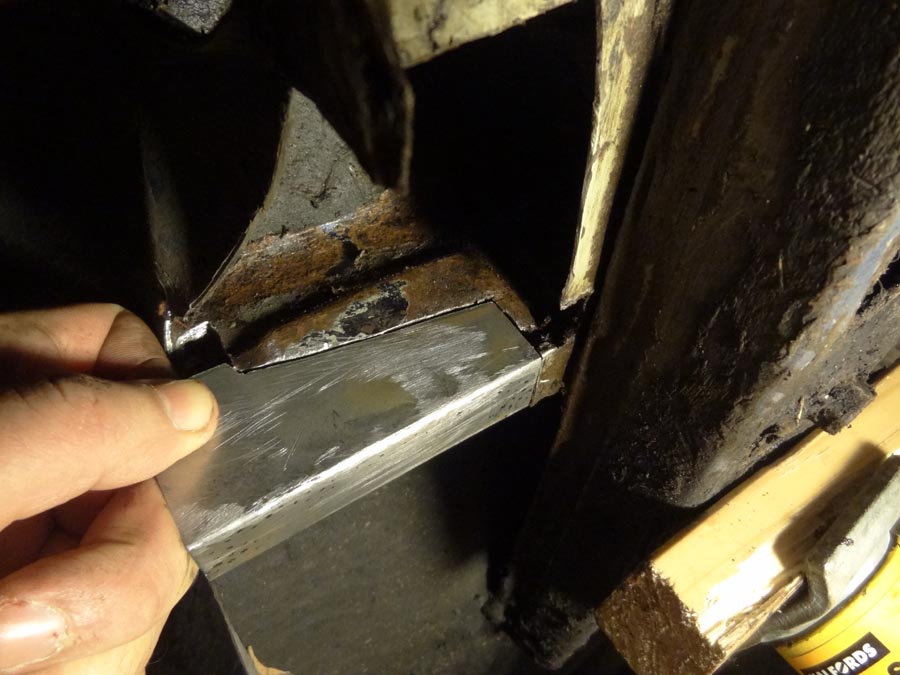 Welded in. Welds look ok. Strong but not pretty at all. 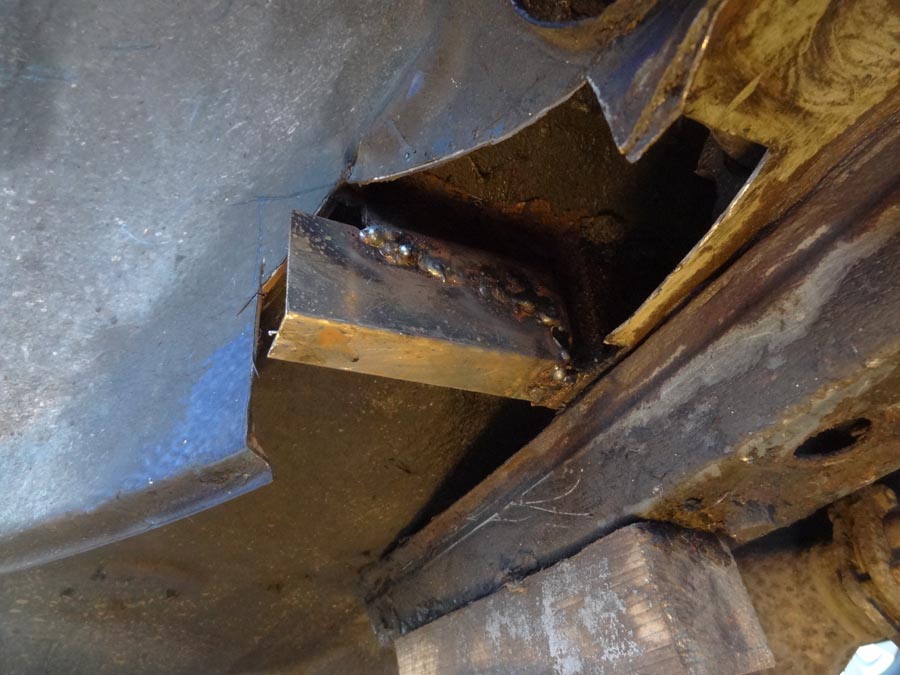 Next template made up from the ever handy cornflake box. 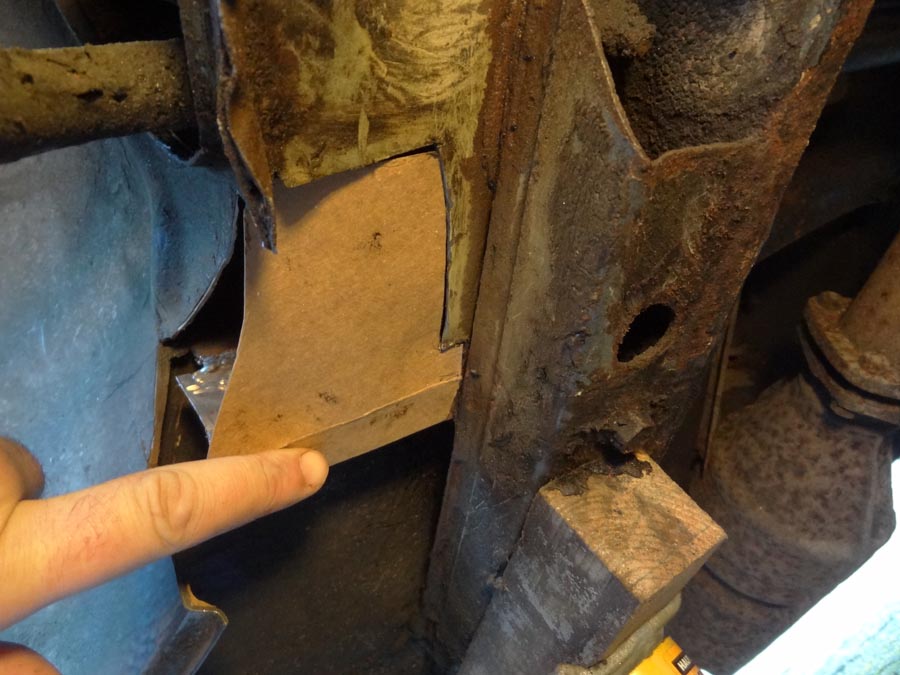 I though I'd try a jigsaw to cut the sheet metal this time. See how it does. Overall I liked the results. The easiest to get a nice controlled cut, but a bit more of a 2 handed job on the cutting side, so clamping the sheet steady was a must. Probably easier to cut it with a grinder when you can get away with being a bit rough though. The little mini grinder is probably the best overall, but disks are expensive comparitively and if I'm honest a bit less of an animal than a bigger grinder. ( I'm working on being less of a wuss too )  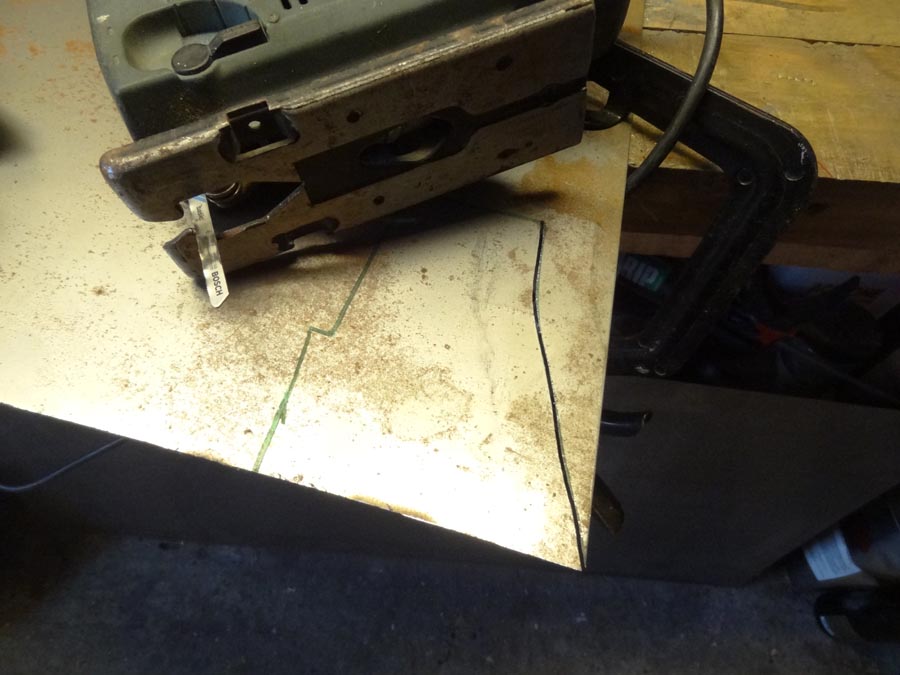 Patch drilled and primed on the back side. 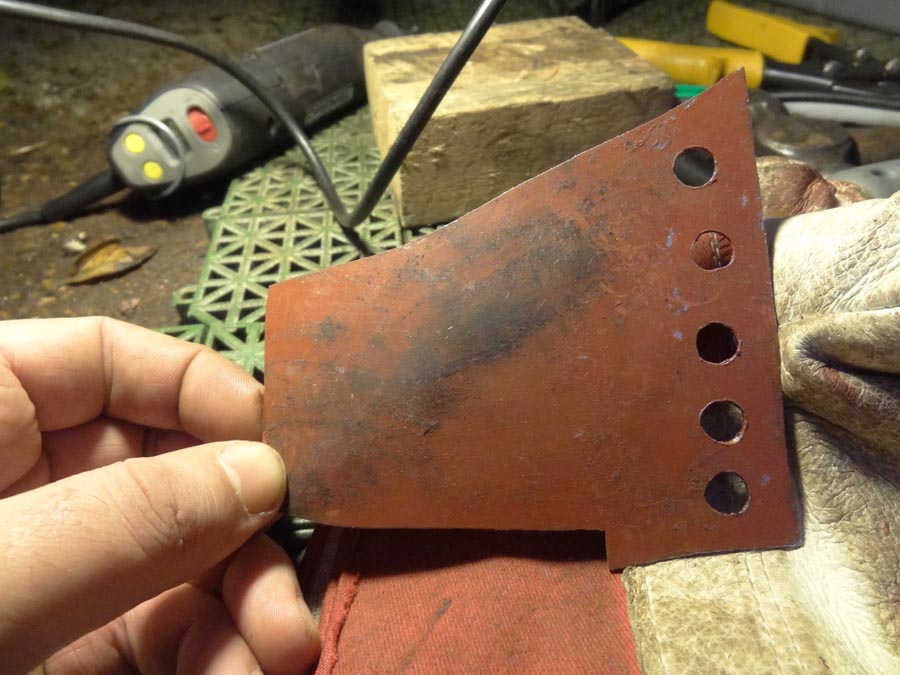 Clamped In Place ready to go. 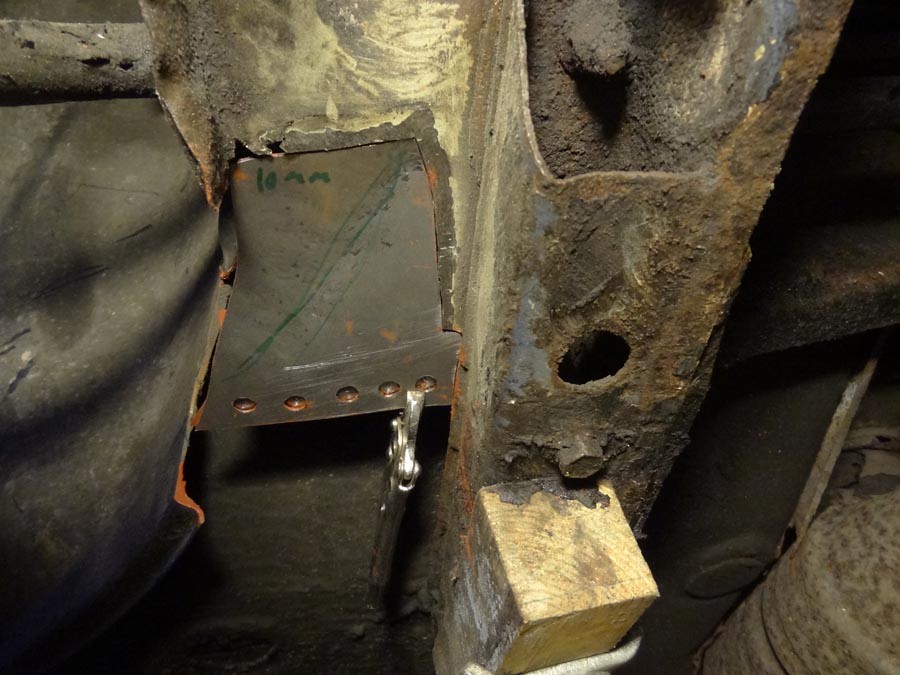 Still need plenty of practice with the welding as you can see. The plug welding bits seem easy enough to do. The butt welds seem to be more tricky. This work is still a year or so ago at this point and since then a mate of mine has given me a few pointers and its made a huge difference. I'll explain a bit more in depth when I get to that bit. Really helped me. 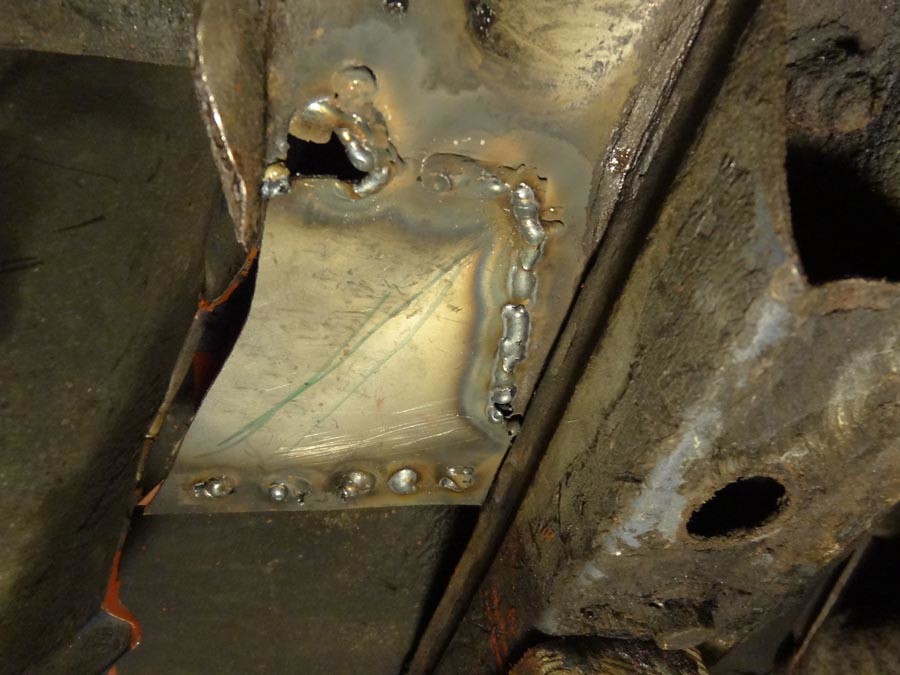 Patch made for the front plate. ( Beer crate card this time ) 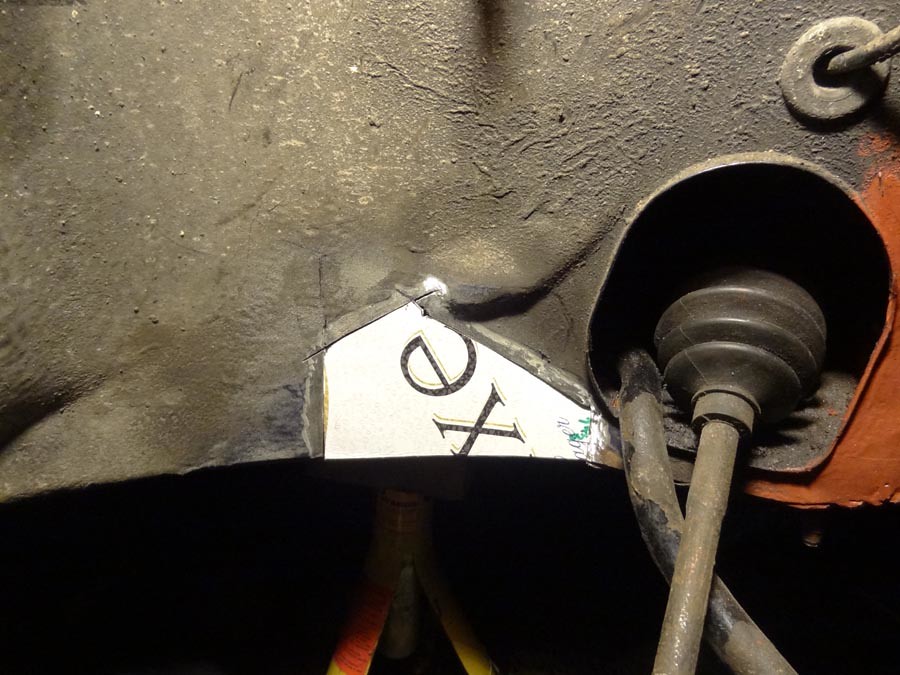 Plate made and welded in. Thought it needed the little lip bit putting back in there to tidy things up. 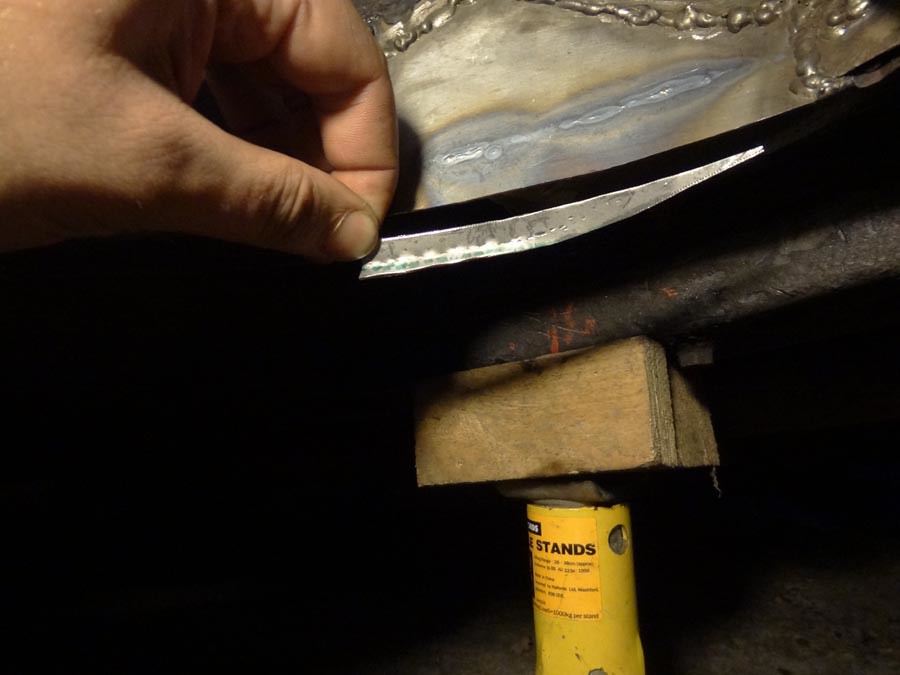 Bit better welding this time.  I intercepted a couple of my partners sons muscle protein powder tubs. They make a cracking tool / nuts & Bolts / paint holder if you know any gym types.  Next was a little patch up front. 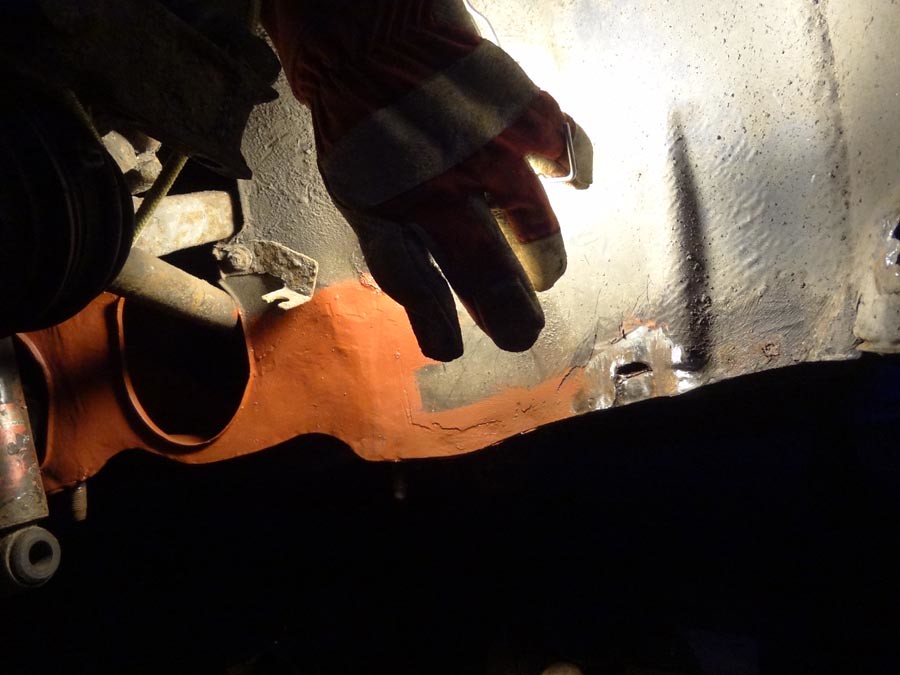 Clamped in there. 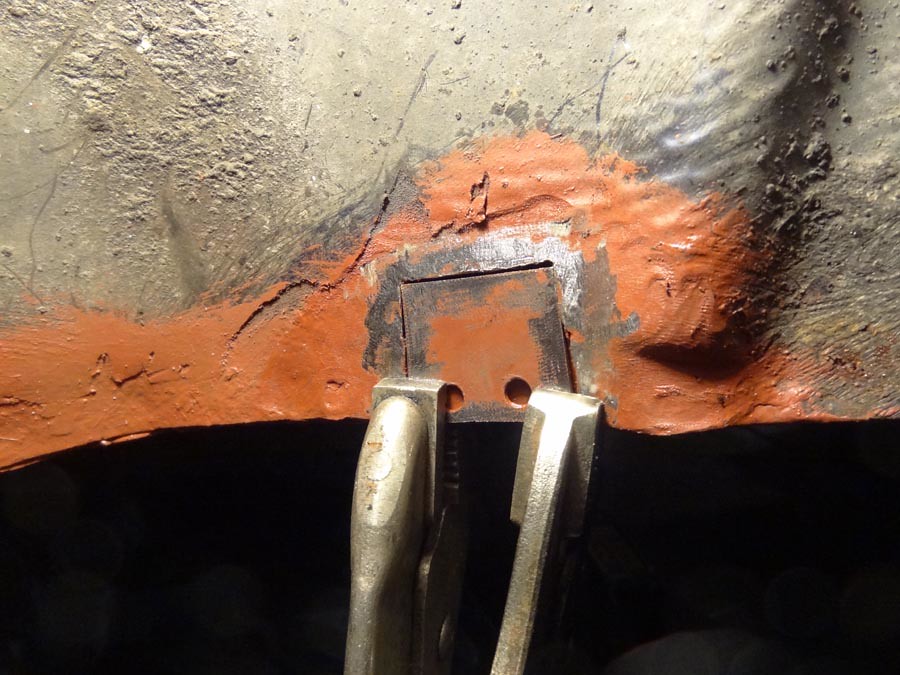 Little Patch underneath. 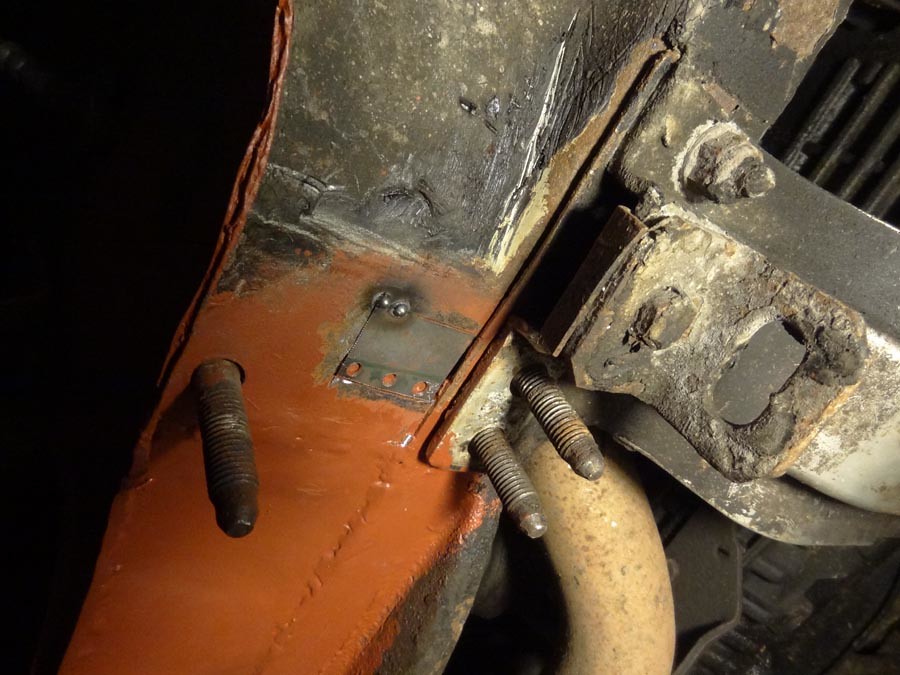 And thats the bottom bit of the inner wing work done for the time being. Till stonechip / paint time anyway. 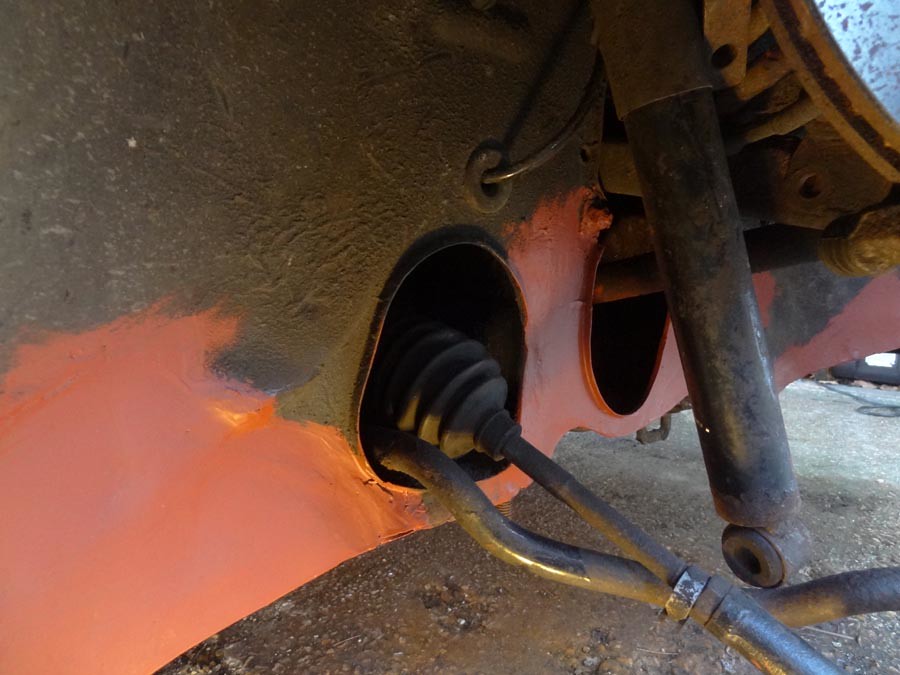 I might tidy the welds up a bit before I paint it all in properly. Not sure at this point, will think it over. 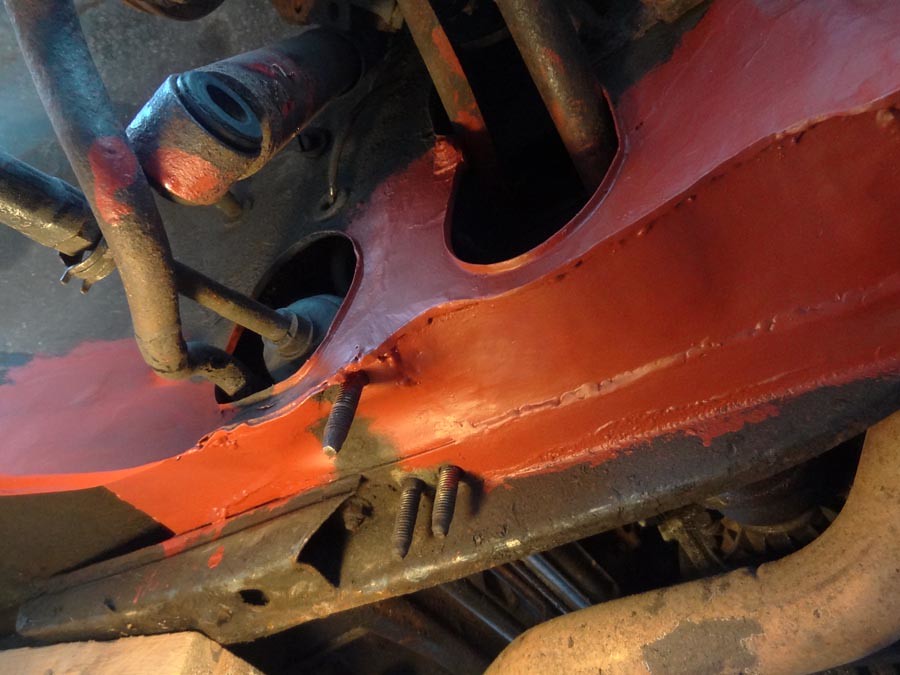 This is the hole I made ripping the brake pipe fitting off. The inner wing had corroded around the hole and turned into a bit of a mess, so out it came.  This is the point that my mate gave me a few pointers. As I've read on here too since in another thread. he said to hit the weld in stationary blobs. The thing that made a real difference to me here, was the advice to look at the little cherry red glowing bit of weld shrinking. Making sure the glow recedes an even width across the join, then hit it again at the edge of the previous weld, so each weld overlaps the previous by half, just as the cherry dissapears. The metal should very much dictate the timing of your hits as it were. I'm really happy with the results. He advised to leave a bit of weld proud when dressing for added strength and to make it clear where work has been done as an aide for possible future people working on it. I quite like that honest approach, sort of like its history. 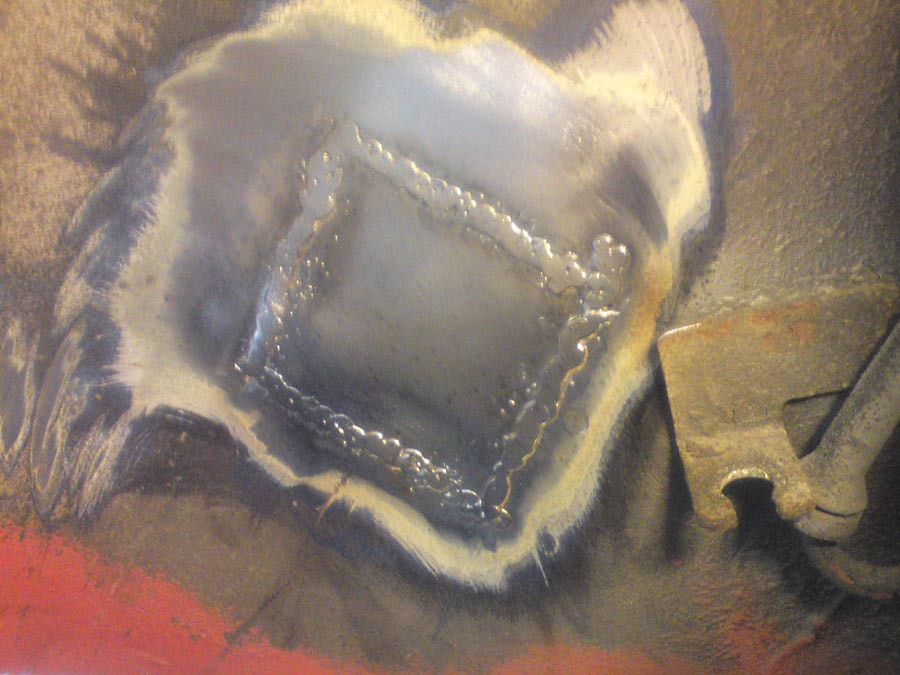 Painted in and holes cut ready for the brass brake pipe fitting. 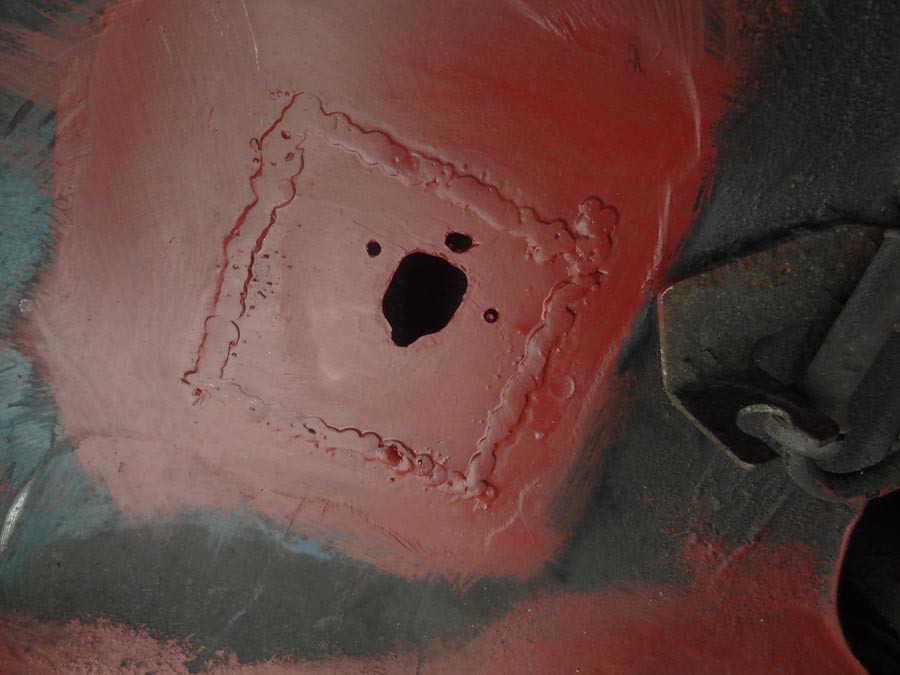 I've done the other side the same with the brake pipe hole area. No photos at the mo though. I'm pretty much up to date at this point. I've stripped the hubs back off and stripped the shocks and stabiliser bar etc out ready for new shocks and gaiters. I've got some replacement ABS sensors to put in too. I hit a bit of a stumbling block though. I can't get the nuts off the top of the shocks. I can't stop them spinning to get enough force to free the rusted on nuts. I've just got a replacement set of Sachs shocks, so I'll probably have to cut the old shocks off unless anyones got a better idea ? I went for sachs as the best option unless you really want to go to town with adjustables etc. Apparently Bilsteins are a bit on the hard side. Only what I've read though, I haven't got any real experience of shocks either way. Here's the new shocks. Different boxes and stickers though, same number on em is that usual ? 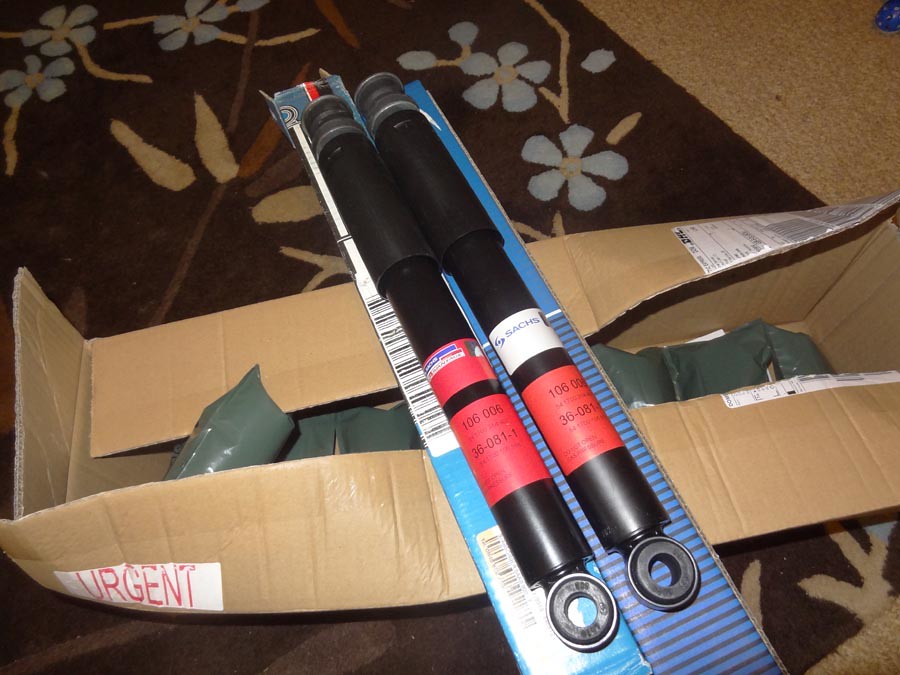 |
| |
|
|
|
|
|
|
|
Dec 22, 2015 22:28:21 GMT
|
Ha ha looks like the saab wheels are a bit of a marmite one I'm always faffing about with wheels / colours options etc. Thinking ahead a bit. I think It will be kept fairly standard in the end as it seems a really tidy car for its age. hmrclassics: Hiya mate. Yeh they are lovely cars. Great to drive with plenty of umph. Especially this model, very growly. I don't know if you know about these places: A firm called Jaymic. Really nice to deal with, always seem to be able to help. and this website: www.realoem.com/bmw/partgrp.do?model=4560&mospid=47240Brilliant for finding part numbers etc. Hope you manage to get it back on the road, proper old beast. |
| |
|
|
|
|
|
Dec 22, 2015 22:05:19 GMT
|
Darrenh: Really puts it into perspective doesn't it. Definately sounds like the way to go as long as you can put up the innitial money. Looking ahead, I want to be really happy with my welding skills. It's not going to be a plough loads of money into it thing. I will be putting plenty of time / thoughts etc into it though. It's still like witchcraft to me.  I've really enjoyed what I've done so far and I'm thinking not worrying about spending loads on gas will play its part in me getting better, so thanks again mate. Metroman: Thanks man, it's nice to know I'm not making a total hash of it. Will get the thread up to the present day soon I hope. I've done a bit more metal chopping and a bit of spannering stuff since my last postings. Most recently I've bought front shocks, CV gaiters and stabiliser bar ends. Hopefully that should sort the front end out enough for an MOT for now. Then onto the back end to see whats going on there and eventually fit another gearbox. Plenty to do still, can't wait to get it on the road. madwelshman: Cheers mate, there is something about a saab eh. Only downside I can see so far is that I feel a bit of a show off when I say I've got a Saab. Something about the word I think, could be the old 80's yuppie image I suppose too. I'll get over it though.  I haven't really driven it properly yet, but I've already got a thing for it. Puts a smile on my face. Would love to have a 99 one day too. I've got a distant memory of my dad driving one when he had a garage in the early 80's. He only had it for a few weeks, was a black turbo I remember that much. Some idiot drove up the motorway the wrong way in the snow coming towards us one evening. After both of us swerving to miss each other we ended up spinning up a big embankment covering the car in snow. "Dad.......are we upside down?"............"No son"........ ha ha. Drove straight out of the rough and carried on driving fine though. Great cars. |
| |
|
|
|
|
|
|
|
Wow, Thanks for the info mate. Very much appreciated. All sounds great and it seems to make loads of financial sense. I'm already on my 5th or 6th little bottle and I do limit my practicing because of the expence. I'll seriously look into it once christmas is out of the way, would be brilliant to get some serious experimenting done. Got loads of metal and wire and plenty of ideas for things to make as practice. Just had a look at the websites and I've got a supplier quite close by too. Happy days. Thanks again darrenh. Cheers. |
| |
|
|
|
|
|
|
|
Dear Santa..................  and for lounging.................  |
| |
|
|
|
|
|
Nov 28, 2015 22:43:09 GMT
|
Hi B7, thanks. He is indeed. He's a burmese, lilac. Loads of character too, loves to see what your upto etc. |
| |
|
|
|
|
|
Nov 28, 2015 20:36:23 GMT
|
|
Cheers Mattiwagon.Yeh It'd be nice to have more confidence working on cars. Hopefully it'll come with more time under my belt. I'm still having a great time getting stuck into it though.
Thanks darrenh. What sort of size bottle are you using ? like a pub gas cylinder ? I've got the welder setup for gasless at the moment as I've been welding the saab away from the garage out in the elements. It seems to produce messier welds, but they still look as strong and penetrated. I will go back to gas asap though. Be good to heed your advice and get a bigger bottle. Do you rent it or own it ?
|
| |
|
|
|
|
|
Nov 25, 2015 23:23:37 GMT
|
So next I got some 18 guage sheet metal and started cutting and shaping it to the card template I had made. I enjoyed this bit more thatn I thought I would. Love it. Metal is amazing to work with. It's great working with something you can and have to give a right beating to. I've made stuff out of wood / fiberglass / concrete / clay and you have to pussy foot about with it a bit. 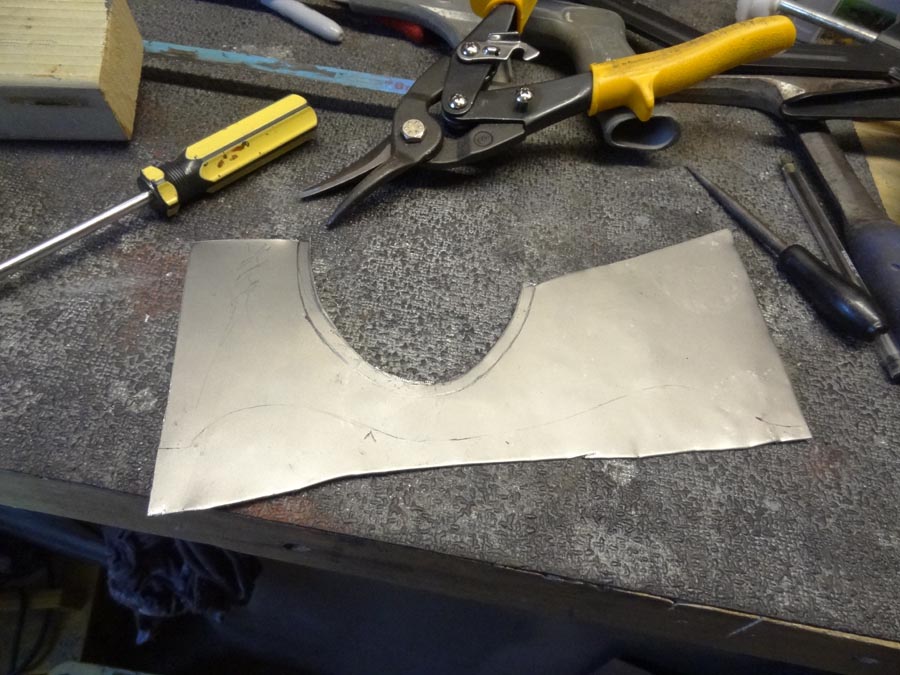 Metals quite thick. Tough to cut with snips, but doable. 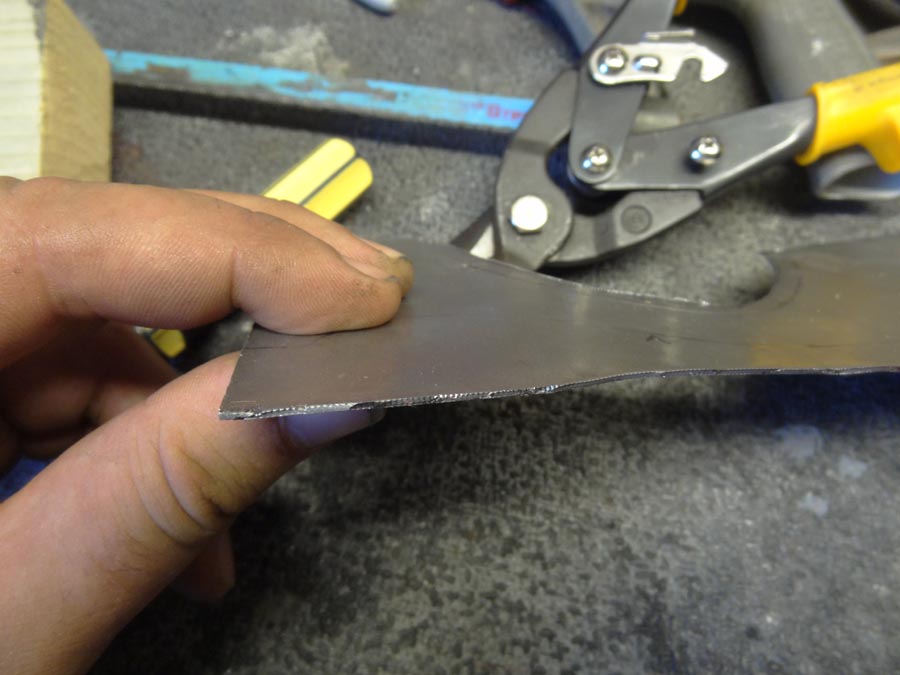 Finished face bit after a quick sand. You can't see it from this angle, but there's a lot of curves across the face too. Well chuffed with it. 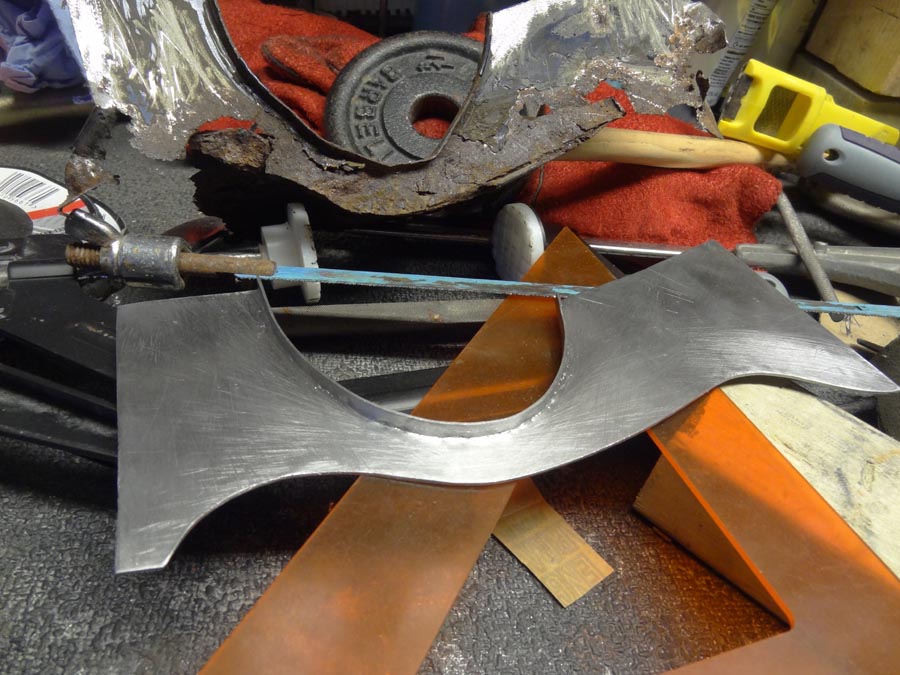 At this point, looking at the size of the new panel I'd made it struck me that It was quite an important bit of the structure of the front of the car, which made me s**t it a bit to be honest, so I started with a small patch, to practice my welding.  Card template made. 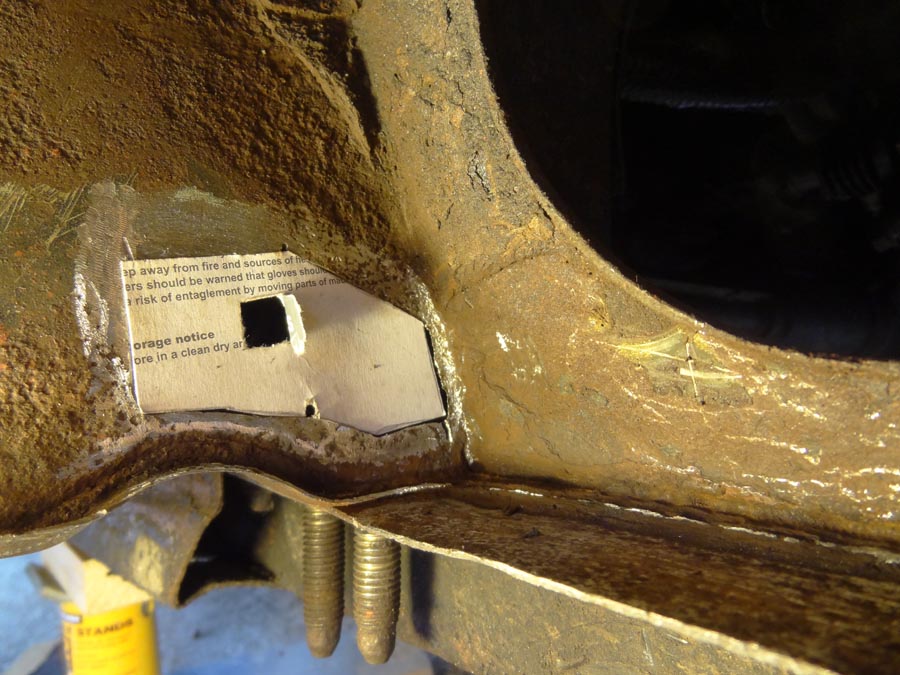 Patch made and welded in. As you can see. my welding is quite s**t at this point. Don't want to blame the welder ( it was kindly given to me ), but I suspected I could do better welding, even as a total novice. I think the welds are reasonably strong, with hindsight, now though, a year or so on, I'll go back and re-weld what I've done up till now, just for piece of mind. 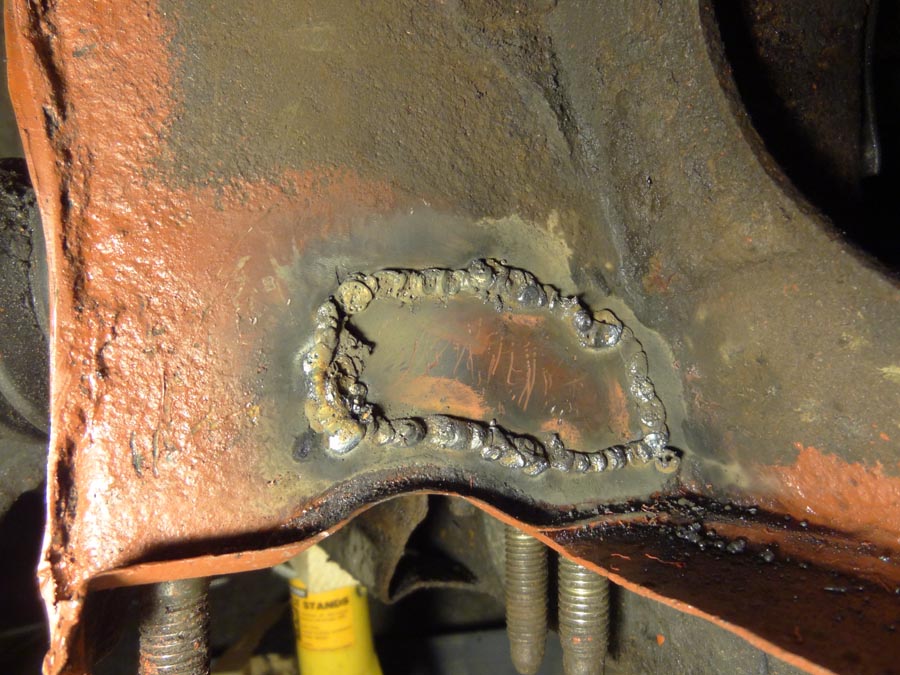 Weathers getting a crappy now, winters setting in, So I tried a few things to build a makeshift shelter to work in. All ended miserably, collapsing in the wind etc. So I bought a tarp and hooked it up to the underside of the garage door. Much better. 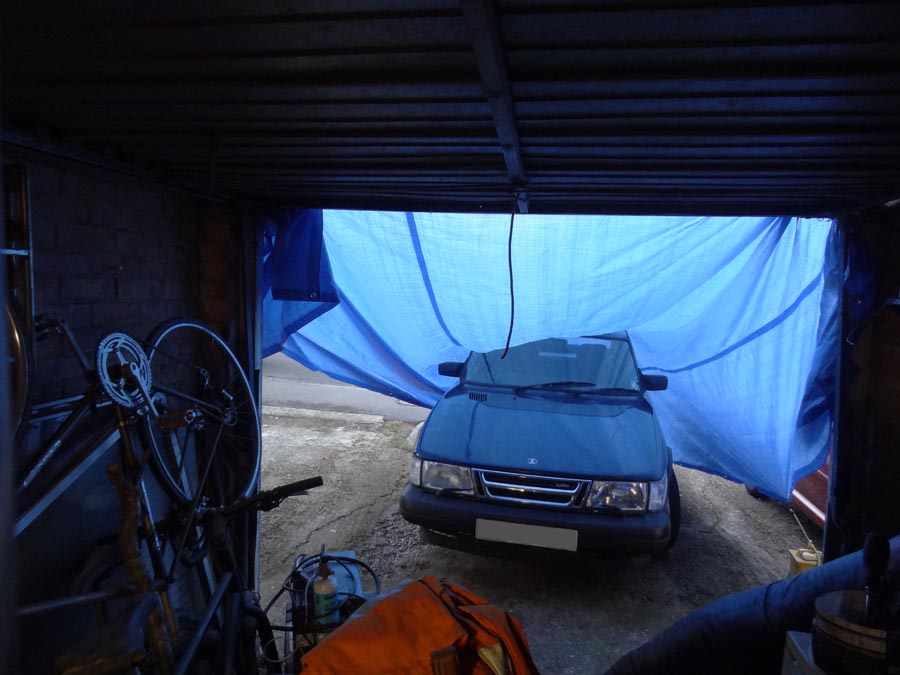 The tarp was brilliant, but it needed sorting out more to weld in, out of the wind etc. So I made some metal brackets to slide thin poles into to hold the tarp up and out. The welds all snapped in the wind, I fixed them, only for them to break again. So I did some more test welds so I had something to compare to as I was seriously thinking of getting a new mig welder. So, with progress ad safety in mind I treted myself to a welder. Was £220 or so I think, so I justified it with no beer for a month and early Xmas present which was only a month or so away. As you can see, the welds are very much sitting on top of the metal. Not doing its job at all I reckon. Little to no penetration on this metal at full power. 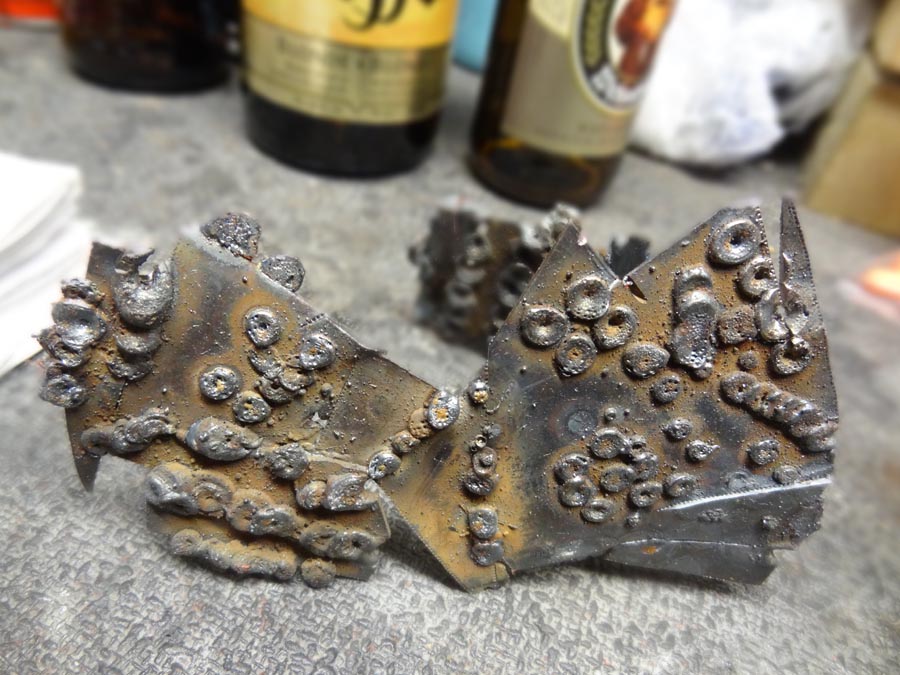 Here she is. Looks amazing. Loved getting stuck into using it. I spent the next day welding up my 1.2 corsa's exhaust. Thinking of all the things I'd make and repair now. 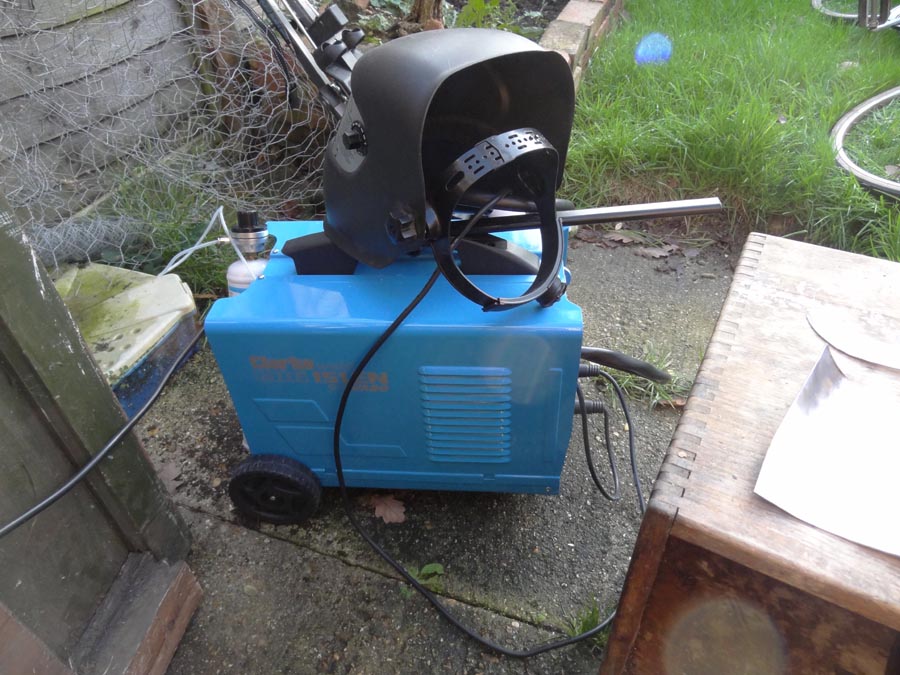 Here's the first weld I did with it. 0.8mm wire with Argon mix. The results were night and day different to my old welder. I was well impressed that the wire comes out at a constant speed Lovely to use. Very glad I bought it. 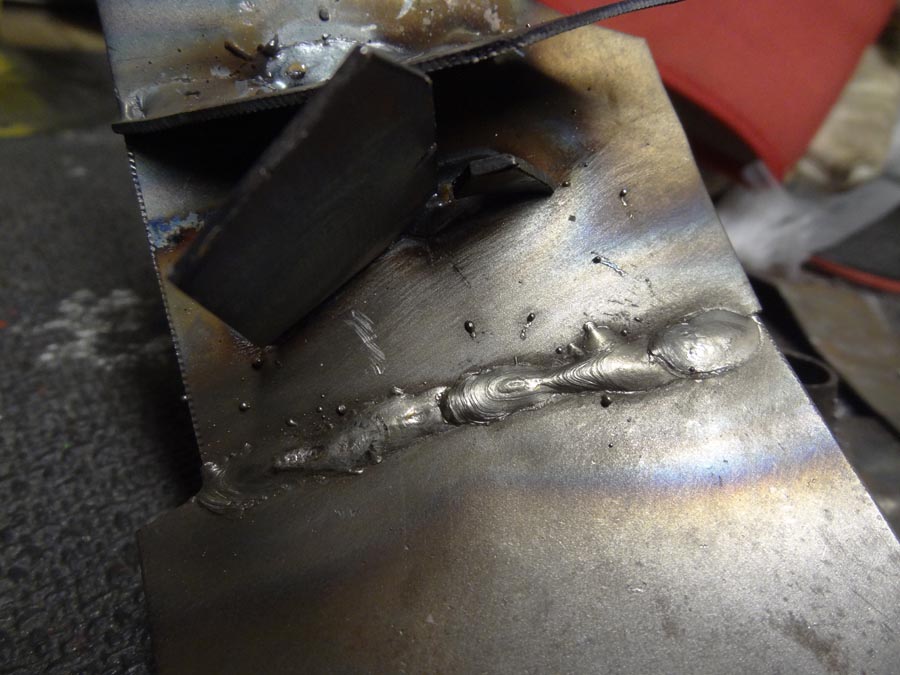 So I welded up a new bracket. (Still going strong) 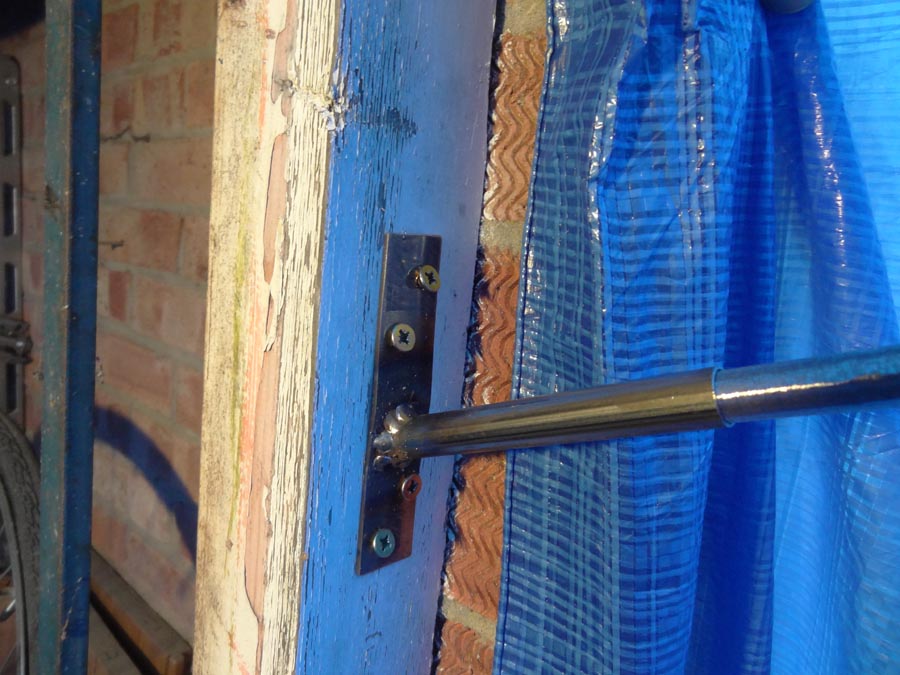 Which received the 'outrigger' to hold up the tarp. 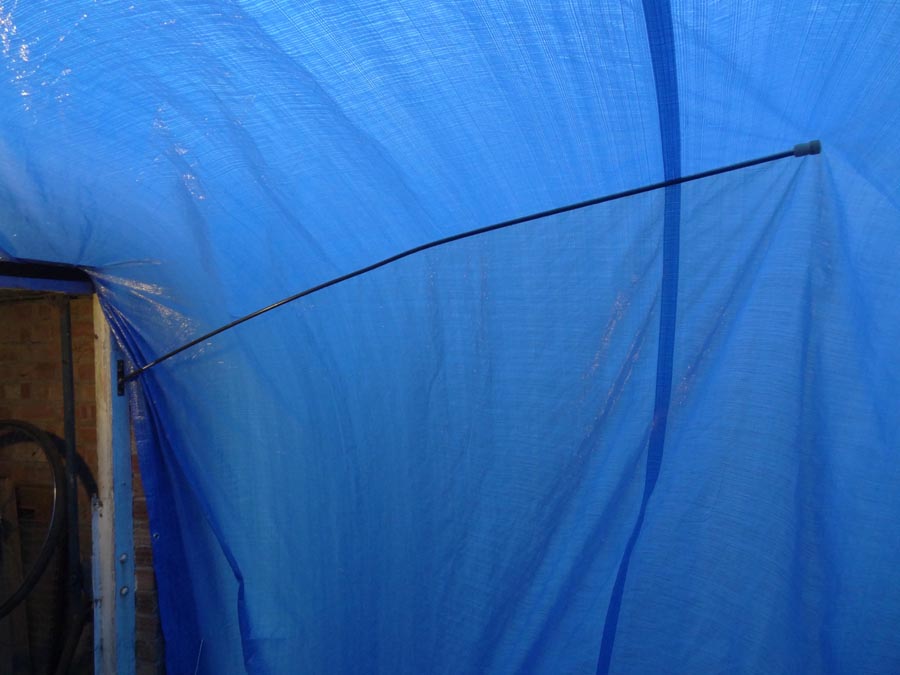 Which gave me this cocoon to work in. Luxury. Blocked most of the wind. Have to stuff underneath the car to get it more windproof, but it's not bad at all.  Sized up the patch that blue peter style, I'd made earlier. Was happy with the fit. Onto making the underneath bit. 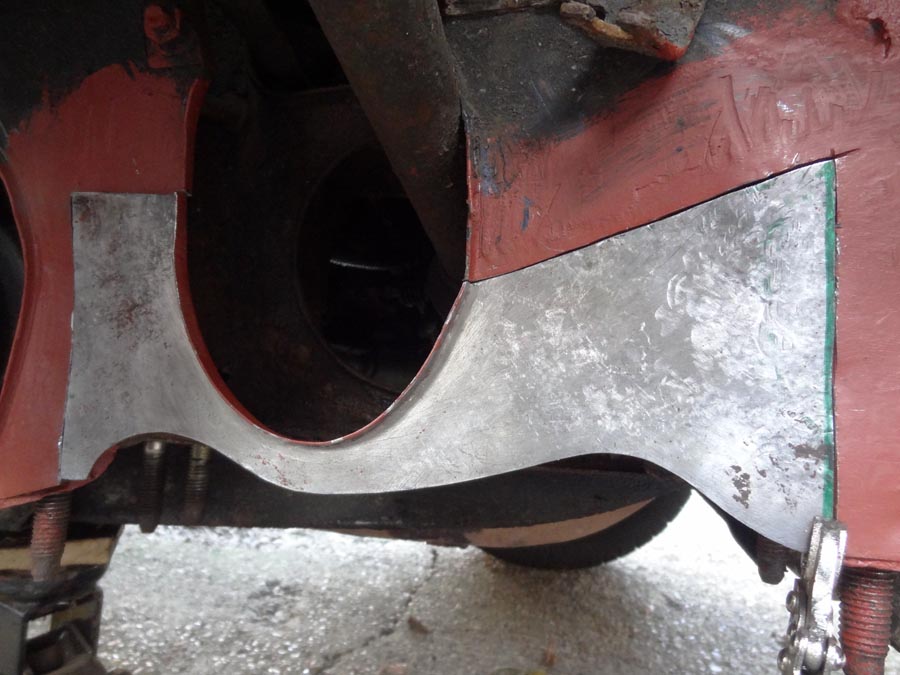 Marked it out with a card template. 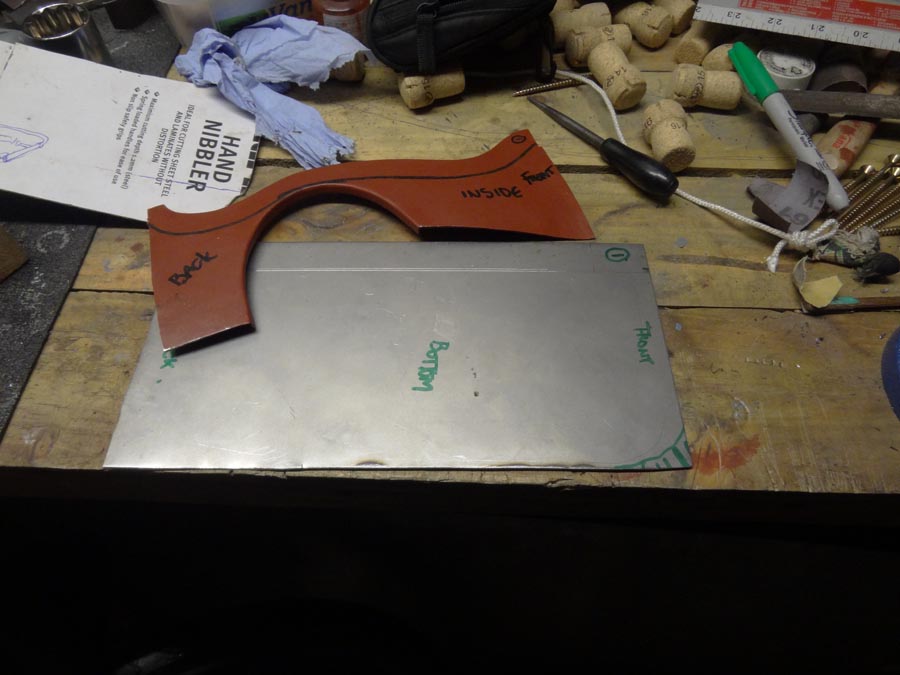 Beat it into shape. Again, loved this bit. Very satisfying. 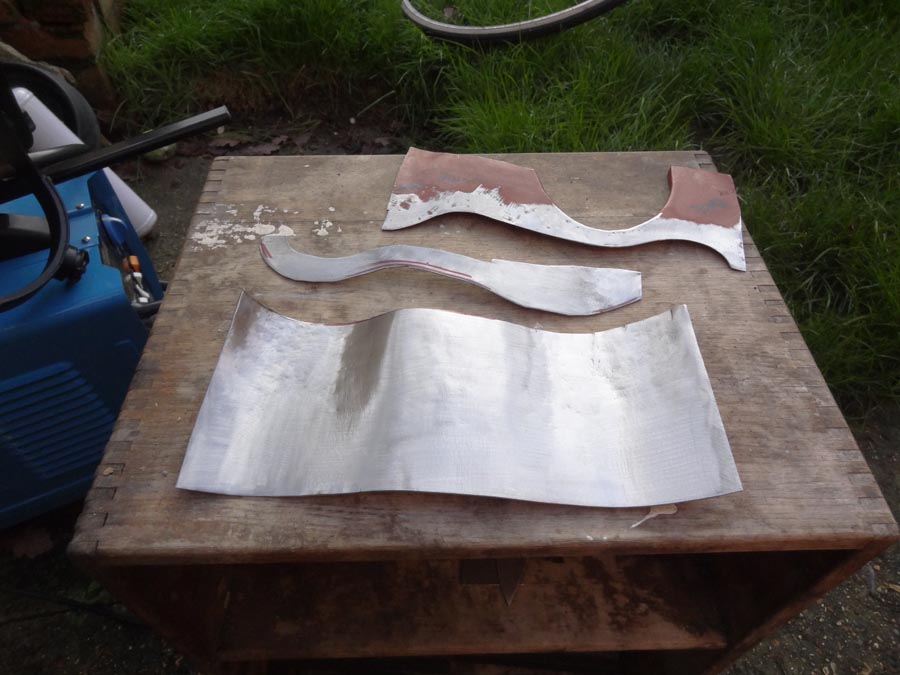 Welded an end plate onto it 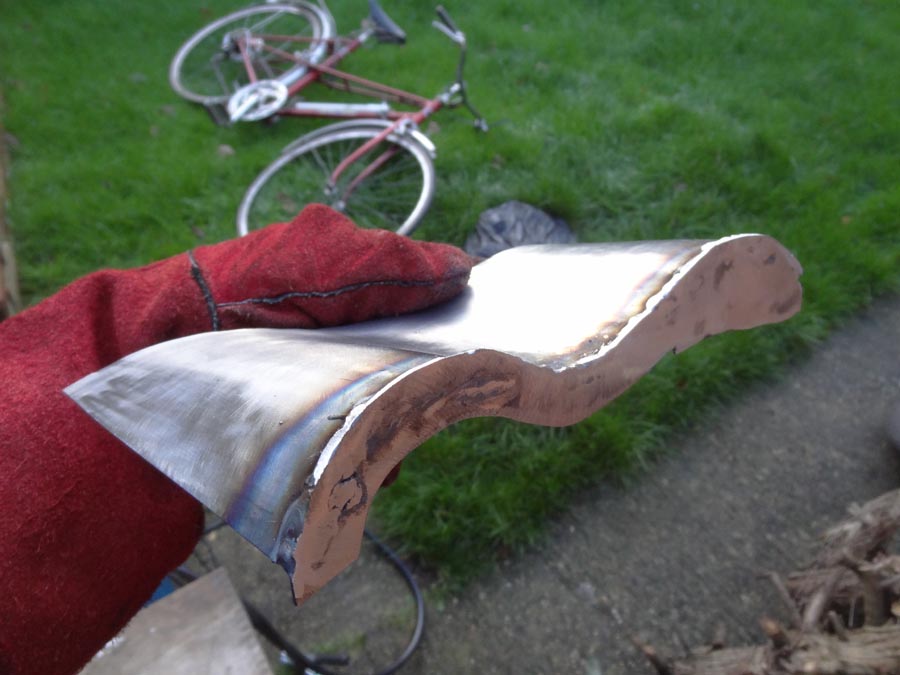 I welded over the welds too just to make sure. Bit tatty looking, but they look strong, they've all penetrated well as far as my limited knowledge can tell. 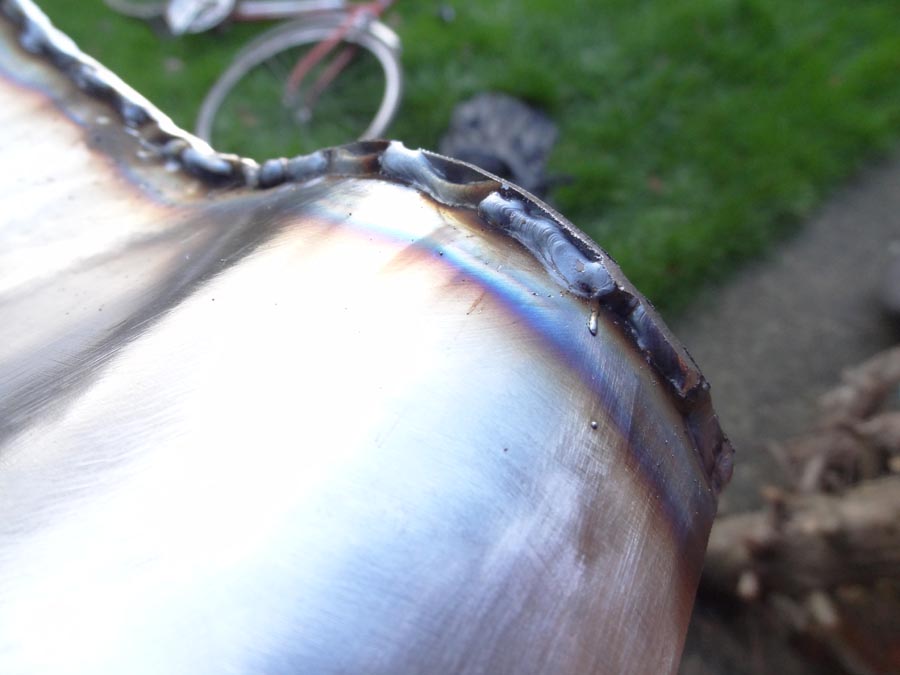 After I've got a grinder and some sandpaper to it. 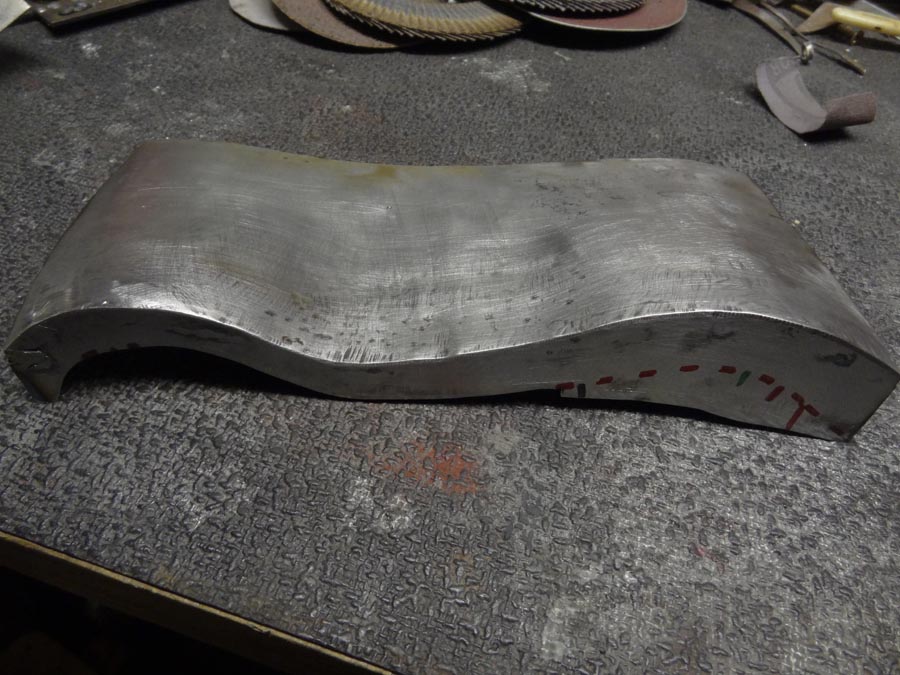 Welded into place. 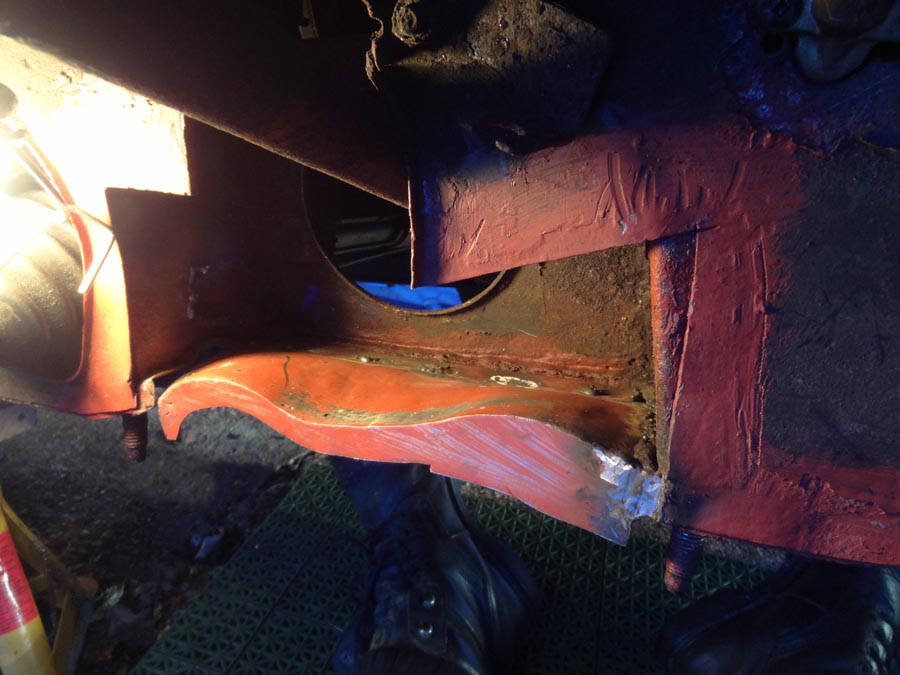 Underneath. 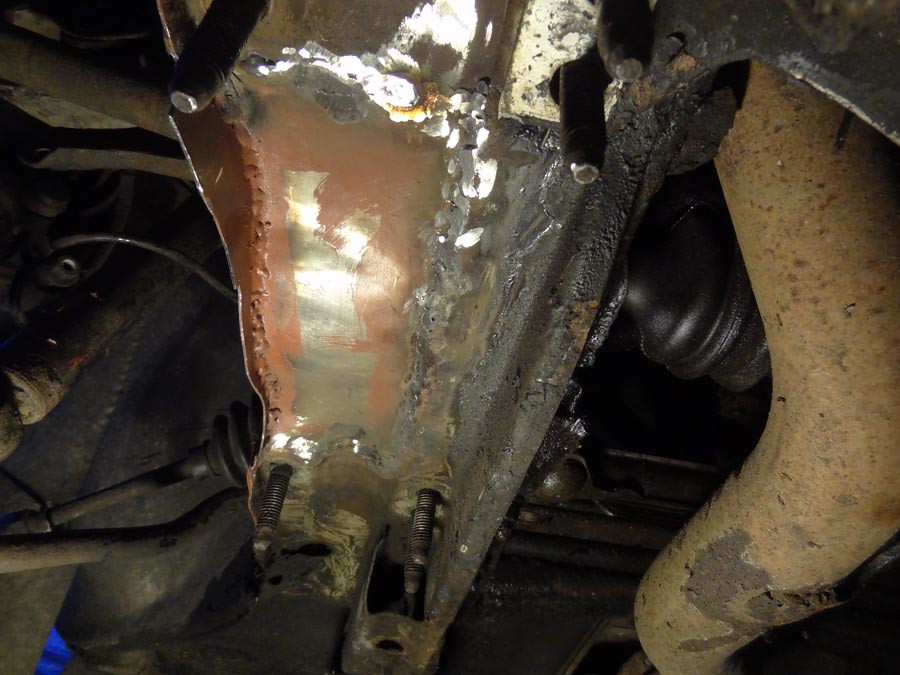 After some drilling and painting the front bit is ready to go on. 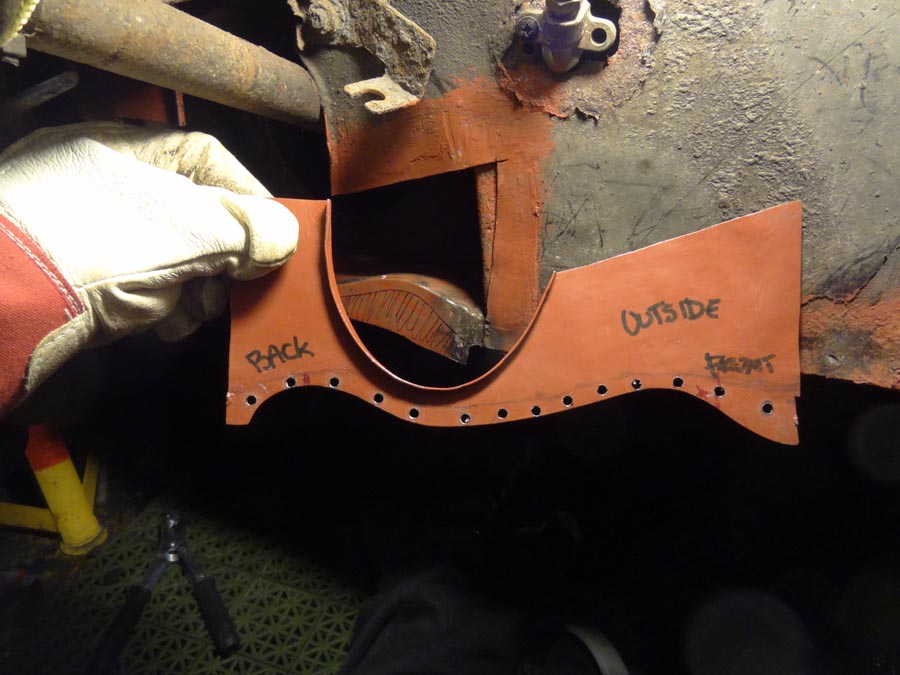 Clamped in place. 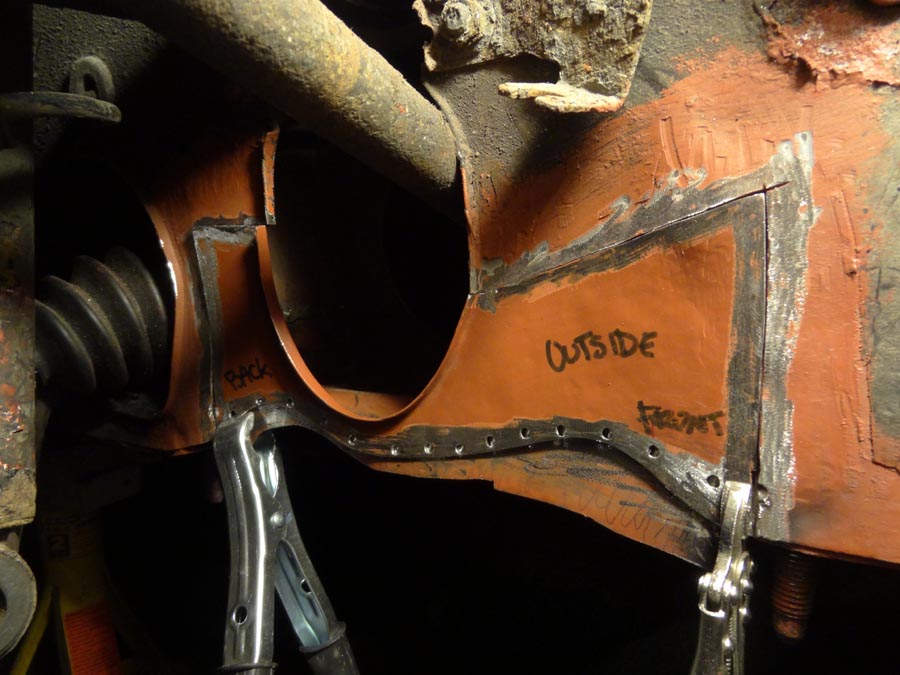 Tacked on. 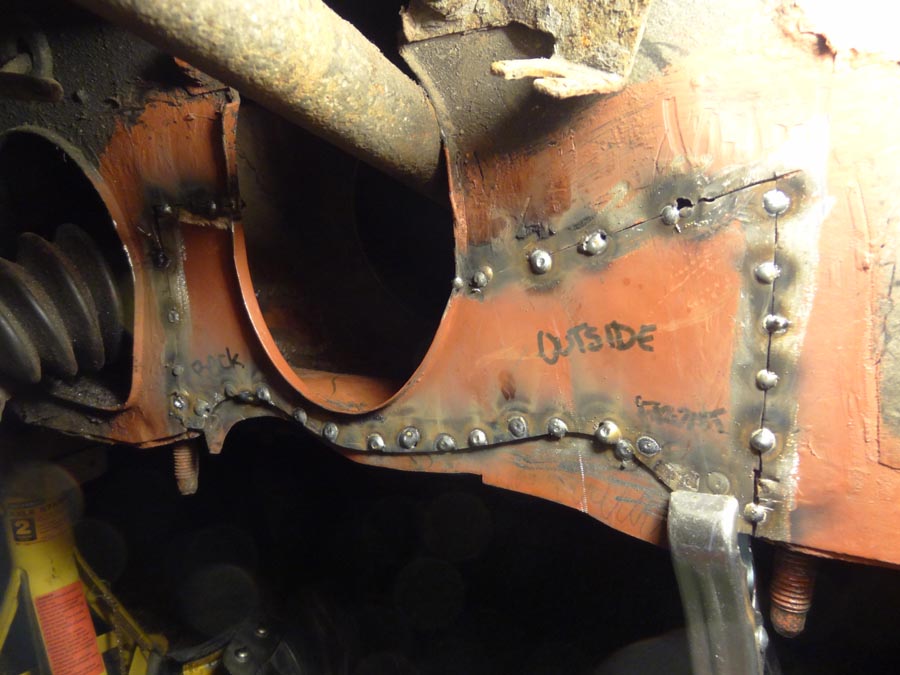 Welded up. Not the best looking welds, but I think they are structurally good. 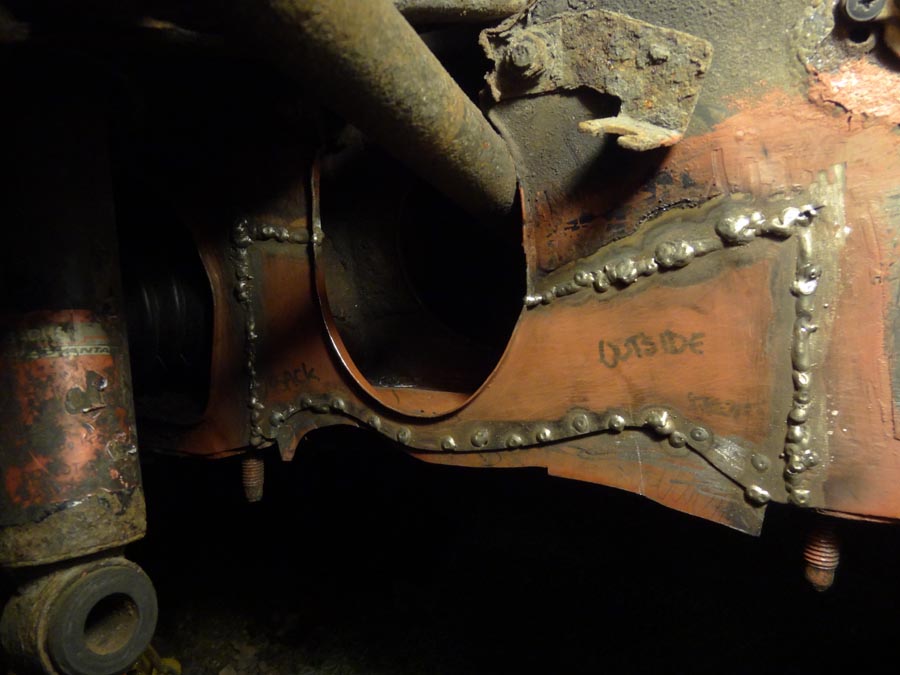 Bit of grinding later. This is my worst bit. I hate making so much noise with my neighbours all quite close by. Be nice to be in the middle of nowhere for this bit. Not going to happen though. At least its progressing a bit now. 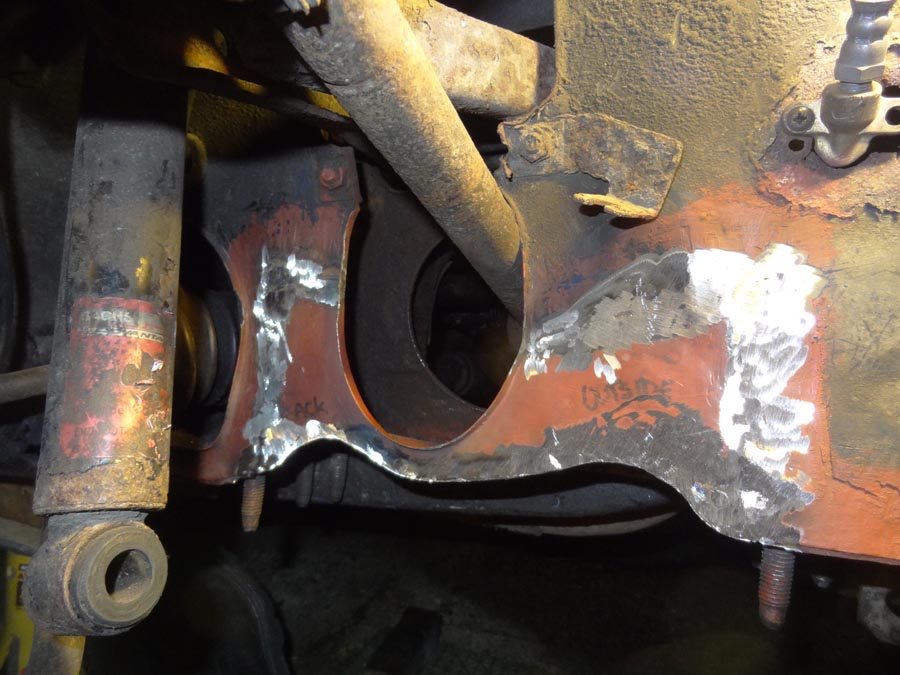 Underneath. 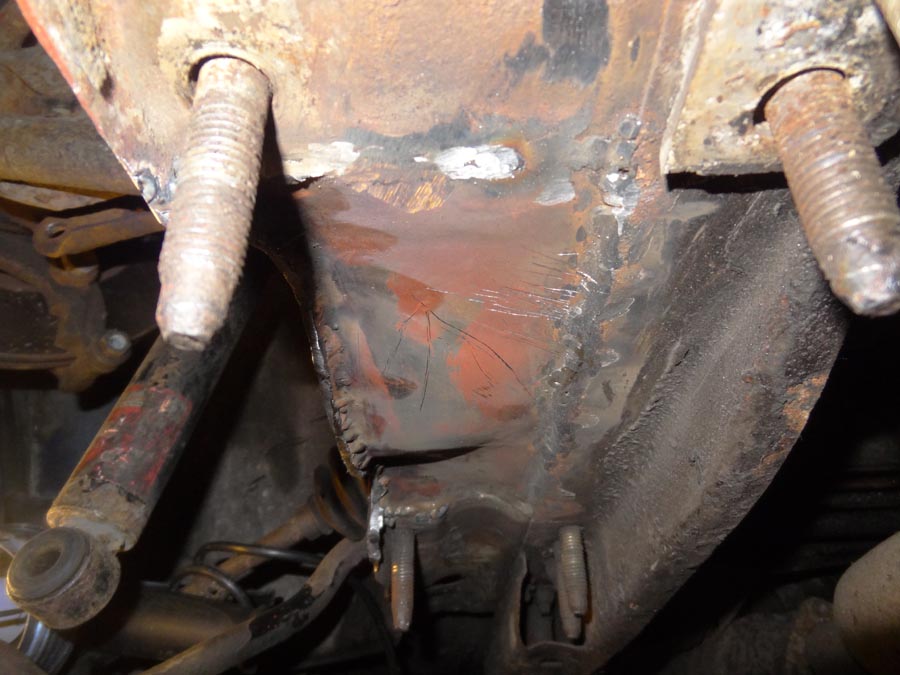 Got some good rust primer after reading up on the boards, went for bonda rust primer. 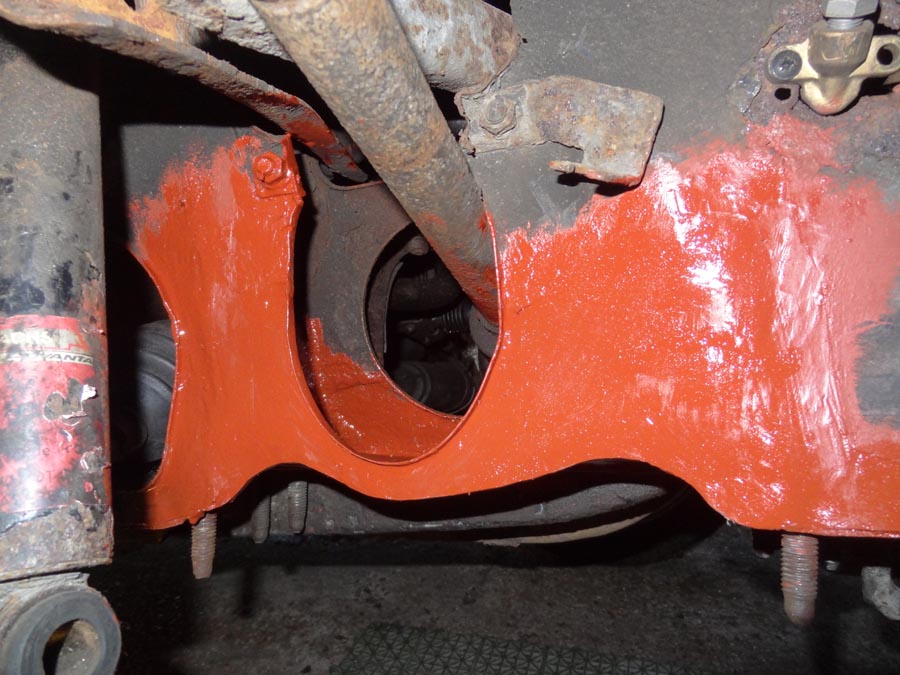 Underneath. 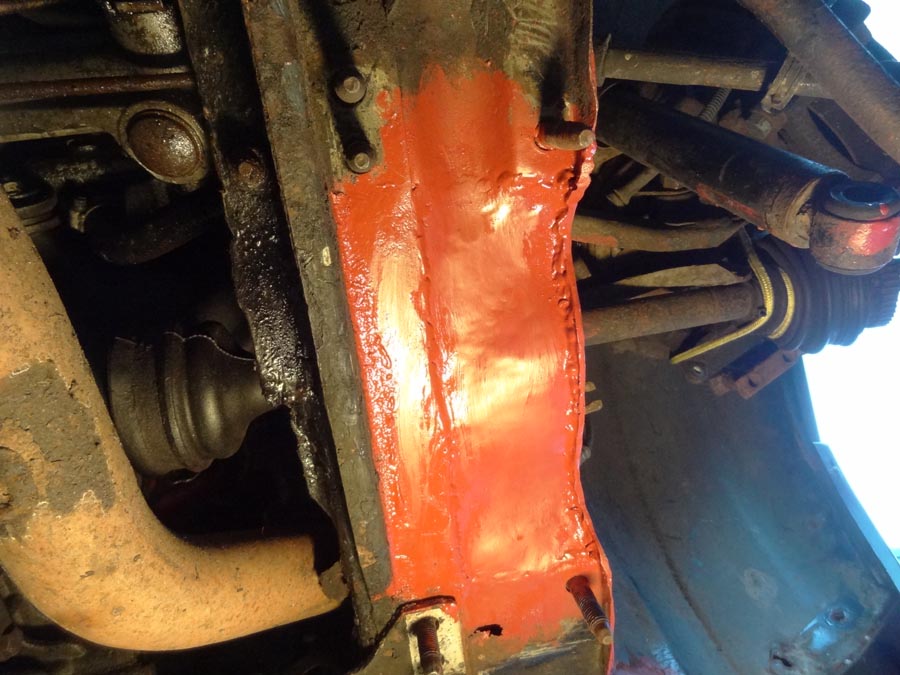 Just to round it off here's 'Site Inspector' / 'Zombie Cat', handsome fella giving me the management stare-down. You may notice, as I just have, my leaning towards 'safety first' in the background too. There was also a wheel under the car, you know, just incase, don't fancy crushed legs. 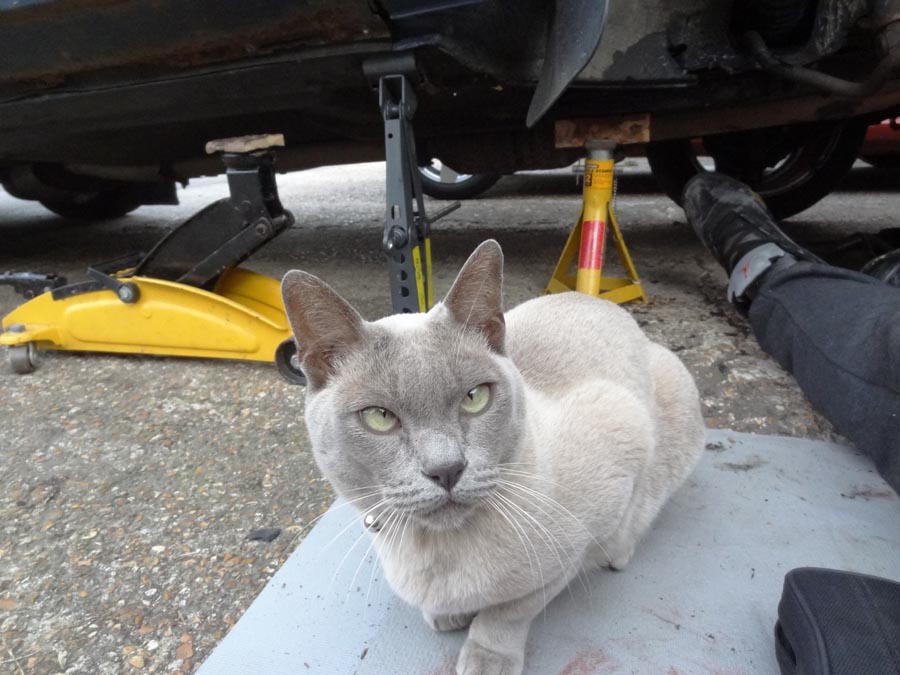 |
| |
|
|
|
|
|
Nov 25, 2015 21:54:14 GMT
|
Thanks a lot for that link eJenner. I'm a year or so behind with the photo's and write up. I'm going to start writing some more and uploading the photos in a bit, so you can see the progress. the tunnels are finsihed and primered now. But thanks again for the link, very handy indeed to know for the future. I'm sure I'll find more bits to cut out yet. Keithboy, wannabemechanic, hiswitsend: Cheers chaps. I think the car definately deserves to be rescued from being dismantled / crushed. Sad when it happens to brilliant old cars eh. Still,I'm determined to make this my daily trusty steed, with everything repaired as properly as I can learn. Hopefully It'll get lots more years under its belt. Thanks a lot for the comments. (Off to Upload pics for next update). |
| |
|
|
|
|
|
Nov 19, 2015 22:58:01 GMT
|
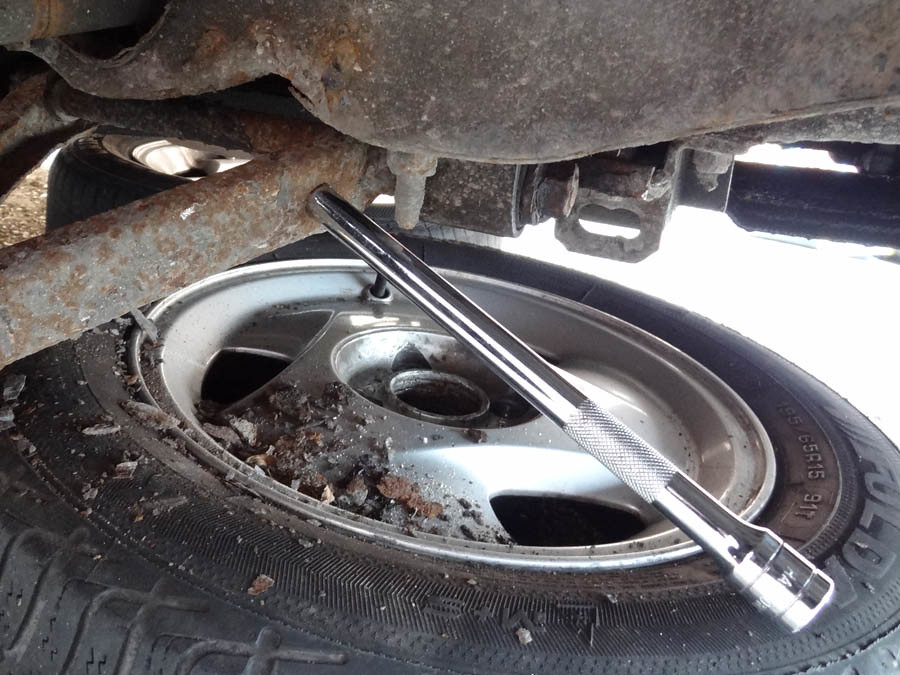
First job was to sort the brakes I thought. so I managed to get the callipers off. This one is the one with the piston seized out. I stripped off everything else brake wise and broke the metal brake lines. Ah well, another thing to learn I suppose.  So this was the bracket that goes through the inner wing after a bit of a buff up. 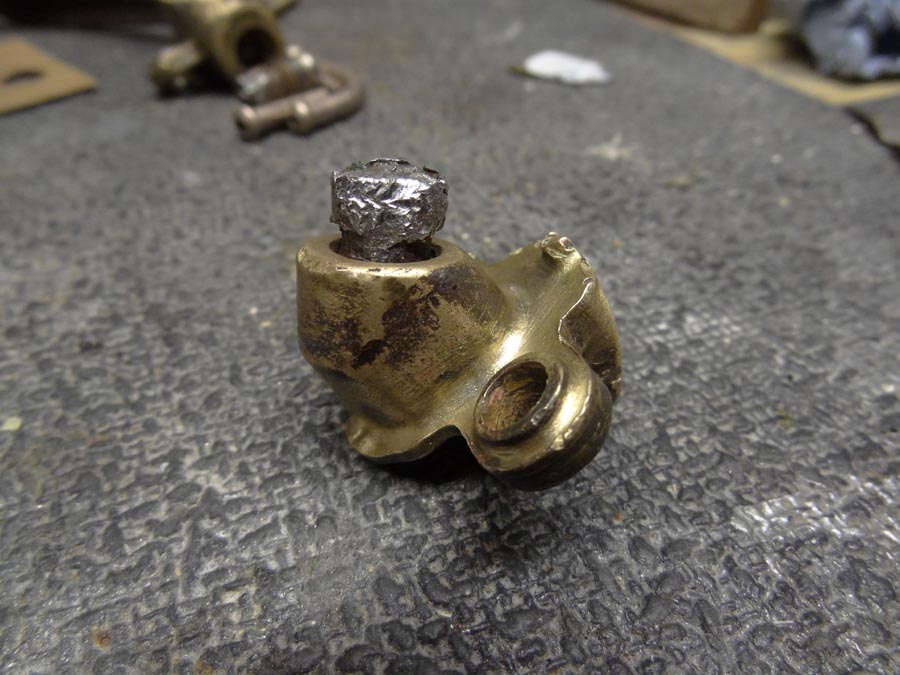 And old vs new with the new brake fittings. I got hold of a brake flaring tool for a few days and made up some test ends. Quite pleased with the results, 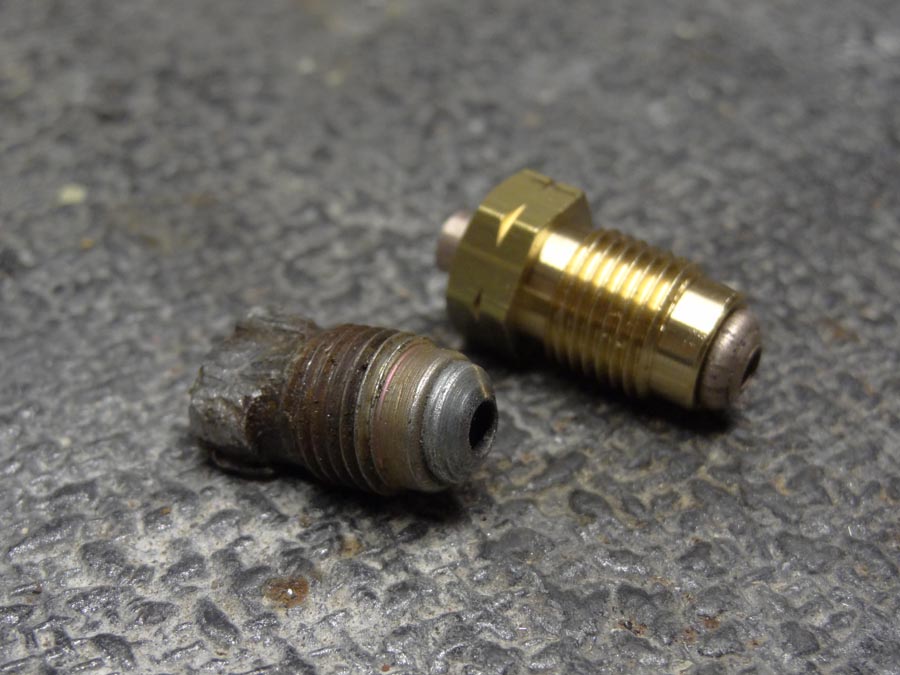 New brake lines made in the inner wings and the brass fitting back on again. You may notice a small hole where I struggled to get it off. Got 2 cheap 2nd hand callipers off the webs and all back on with new shoes. 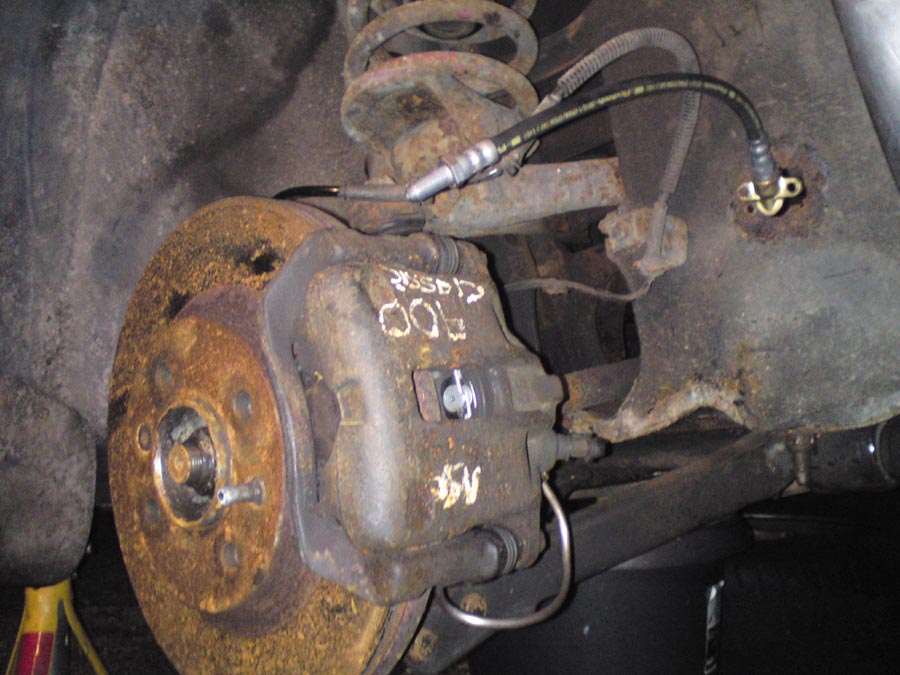 At this point in time my champ of a mate agreed to let me park my beemer at his house, so the saab could go infront of the garage. God bless mates eh. After making the hole taking the brakes off I thought I'd better try to repair the metalwork as all my work would be wasted if it was too big a task for me, forcing me to give up on it. I've got hold of an old mig welder at this point so jumped in cutting out the rust. Kerb side tunnels looked the easiest so I started there. 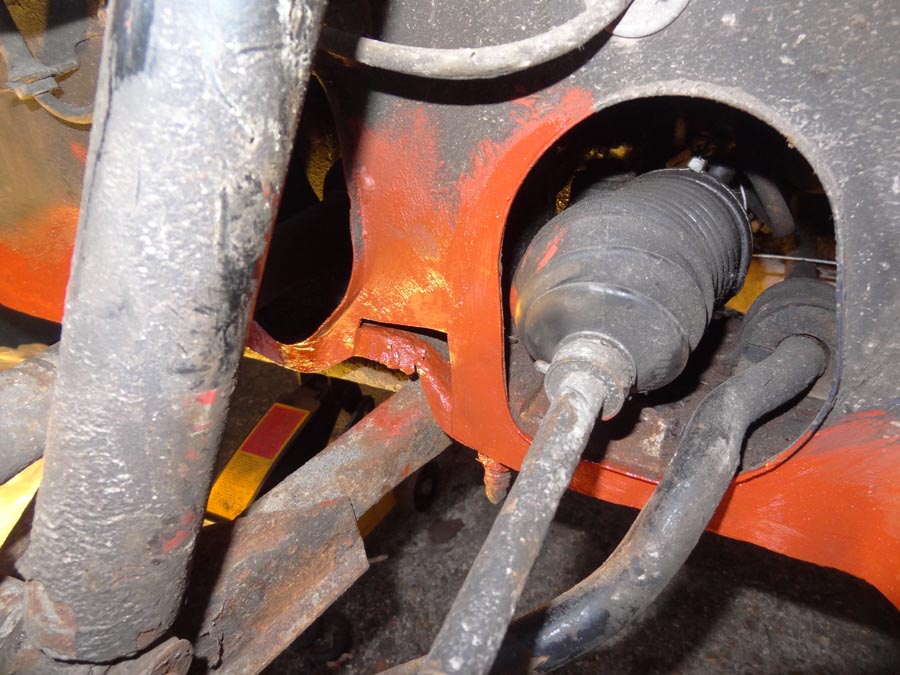 Inspector of works turned up at this point. Look lively !! 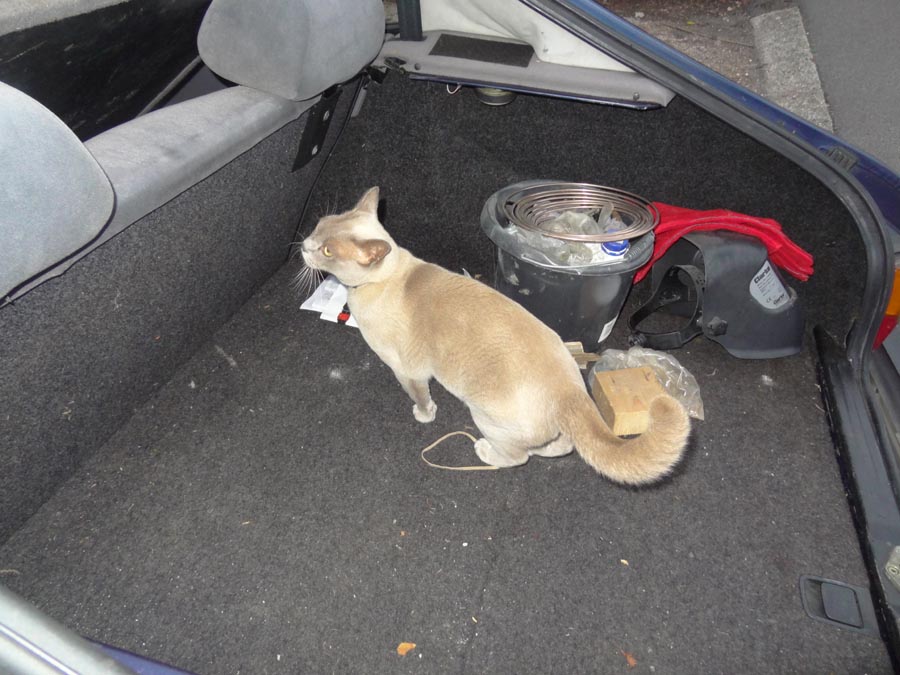 1 hole to replace 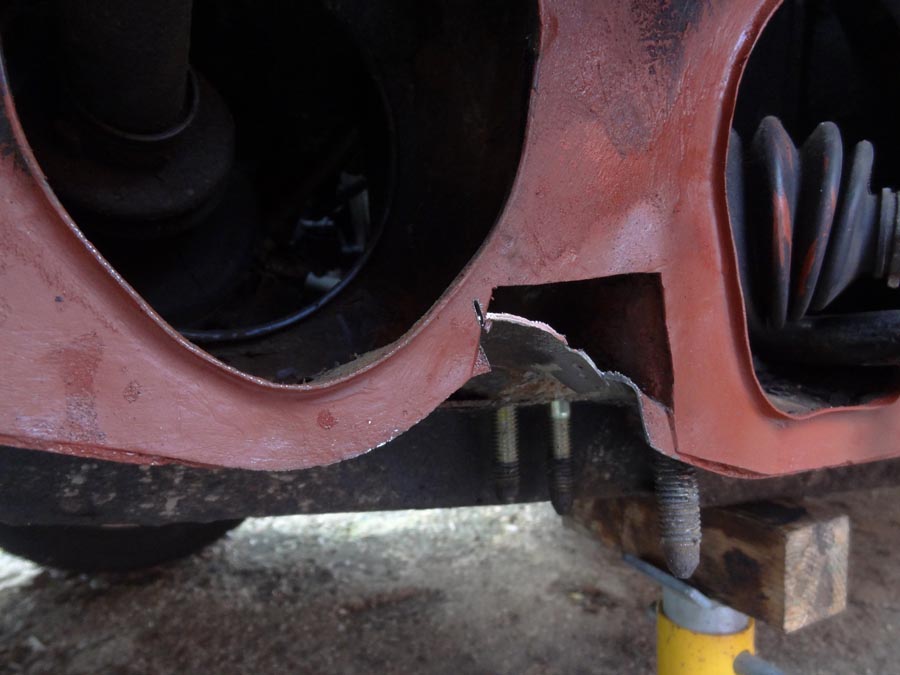 Card teplate fitted 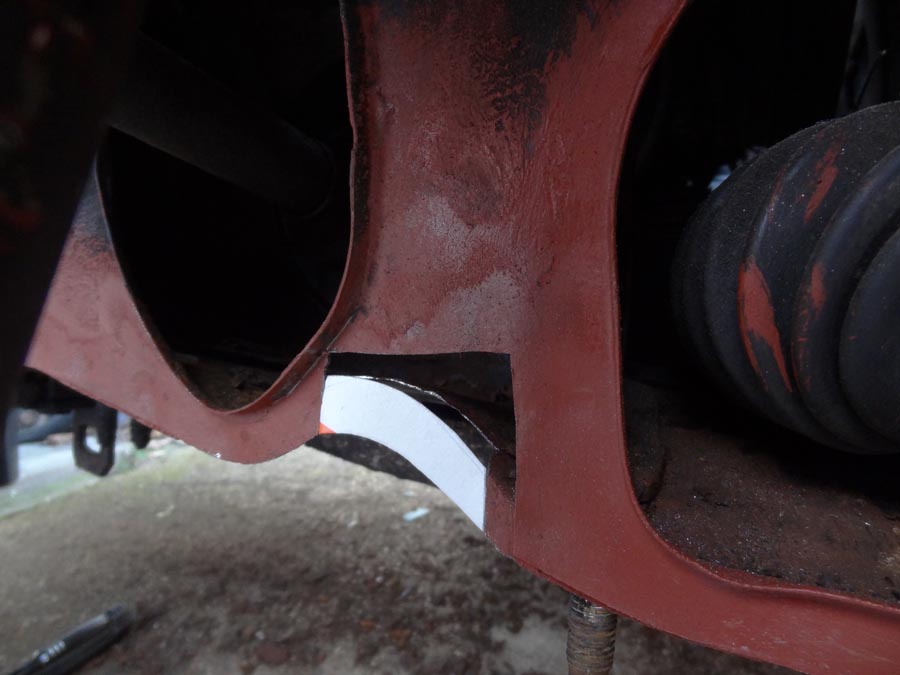 New metal succesfully welded in. Job done. 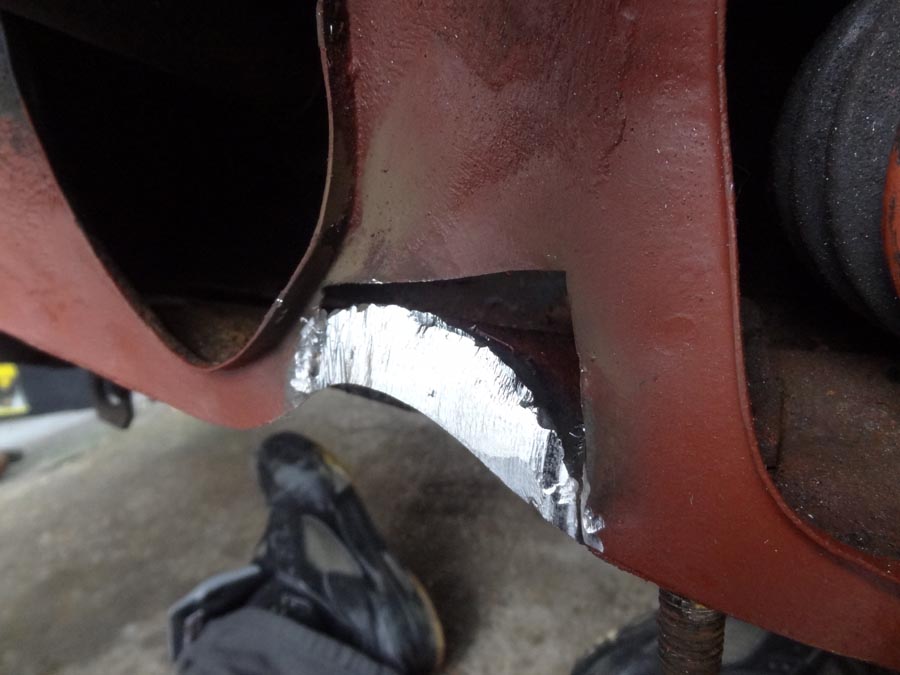 Made another new repair bit. 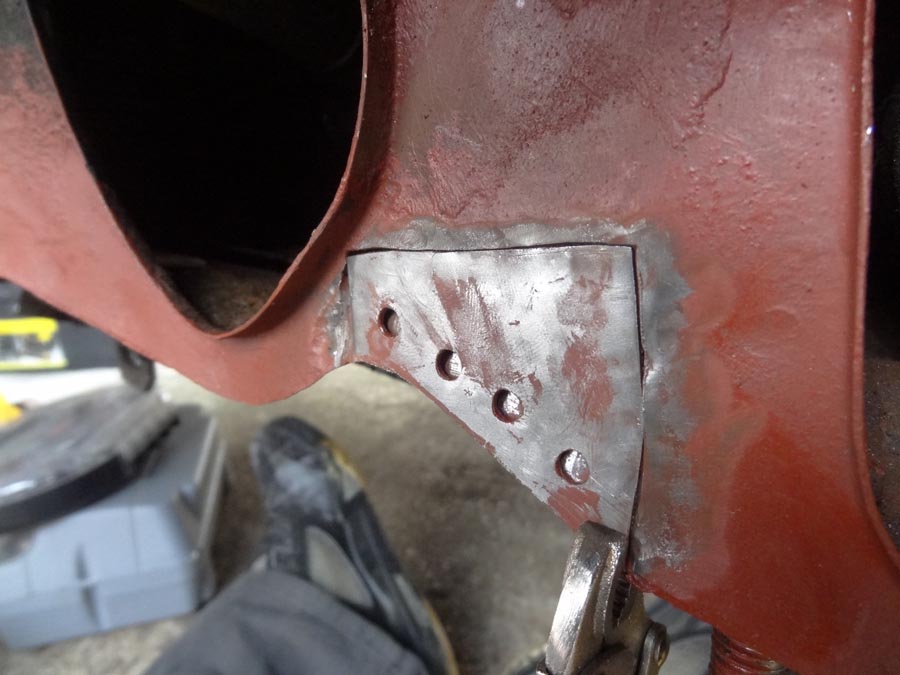 Welded that in and got the grinder to it. 2nd real session of welding ever, so I was quite chuffed at this point. 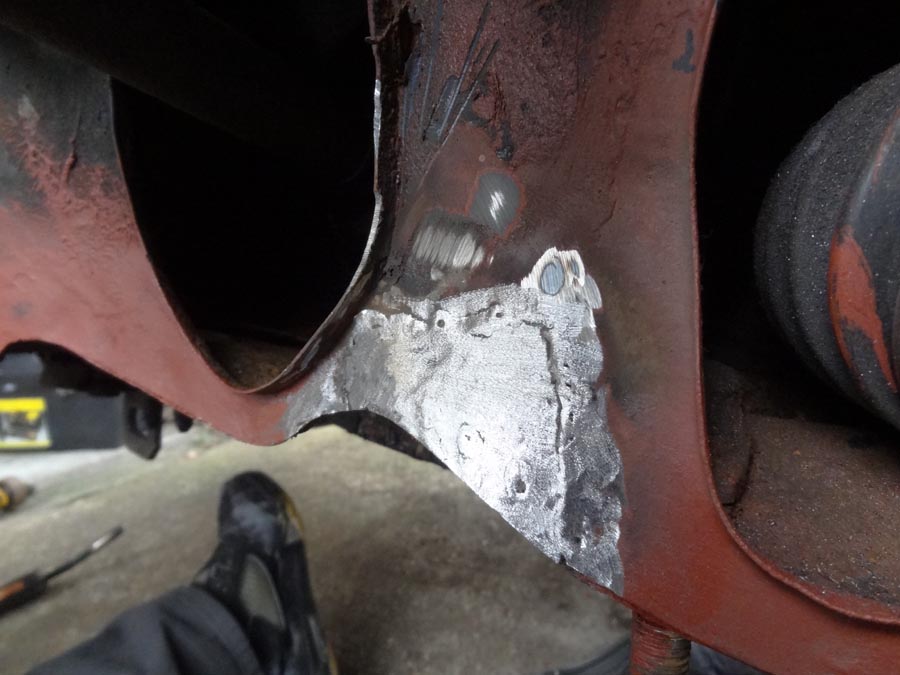 Painted in and ready to attack the other side. 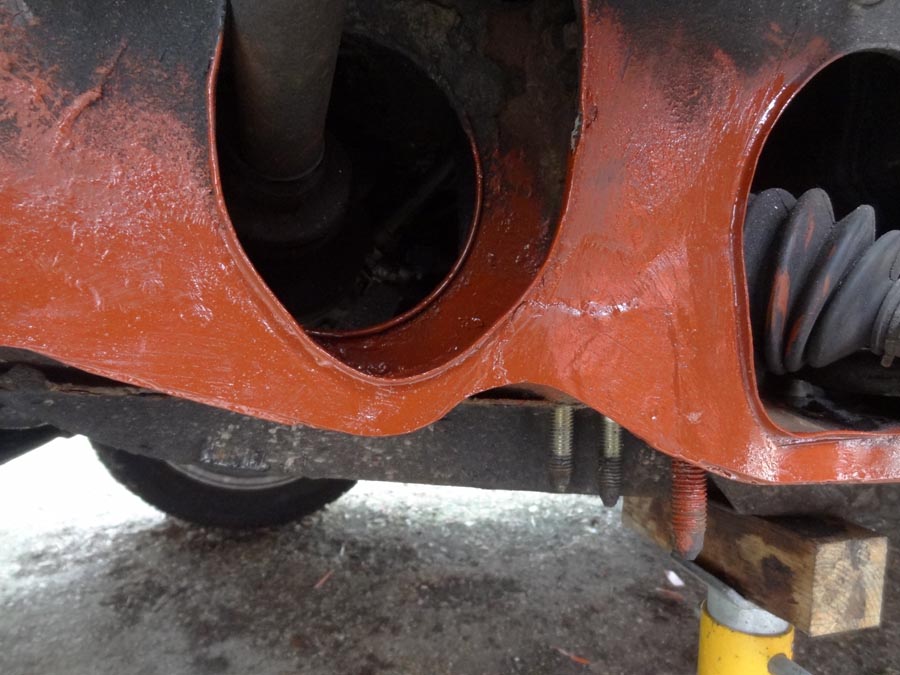 With a much bigger job on this side I decided to take the hubs off and get all the other bits either off or out of the way.  This came off in the process. ( ABS Sensor) Nothing wants to help me I swear. 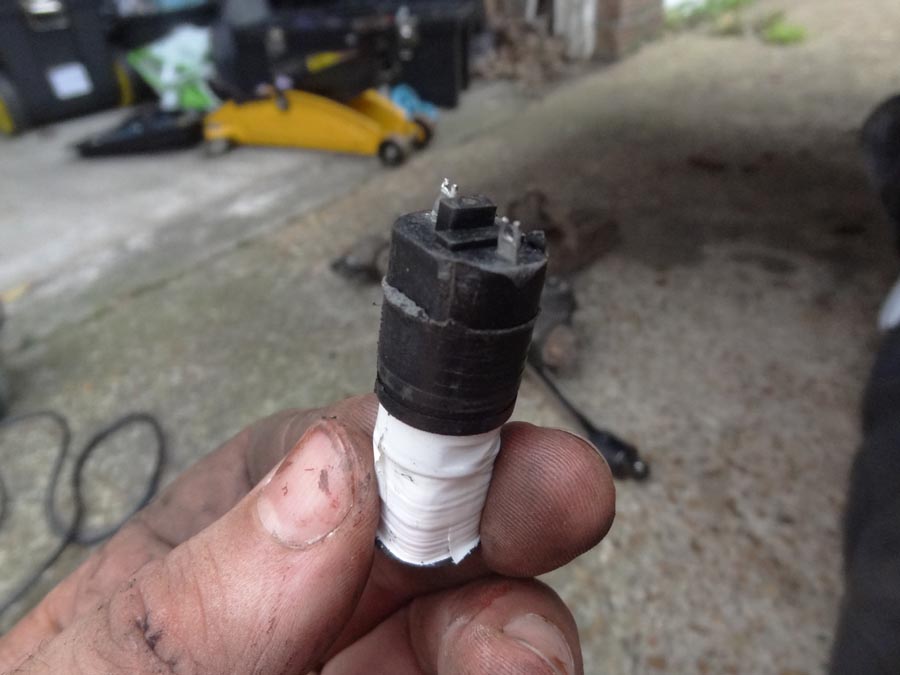 So its all out the way enough to take a deep breath and go in. 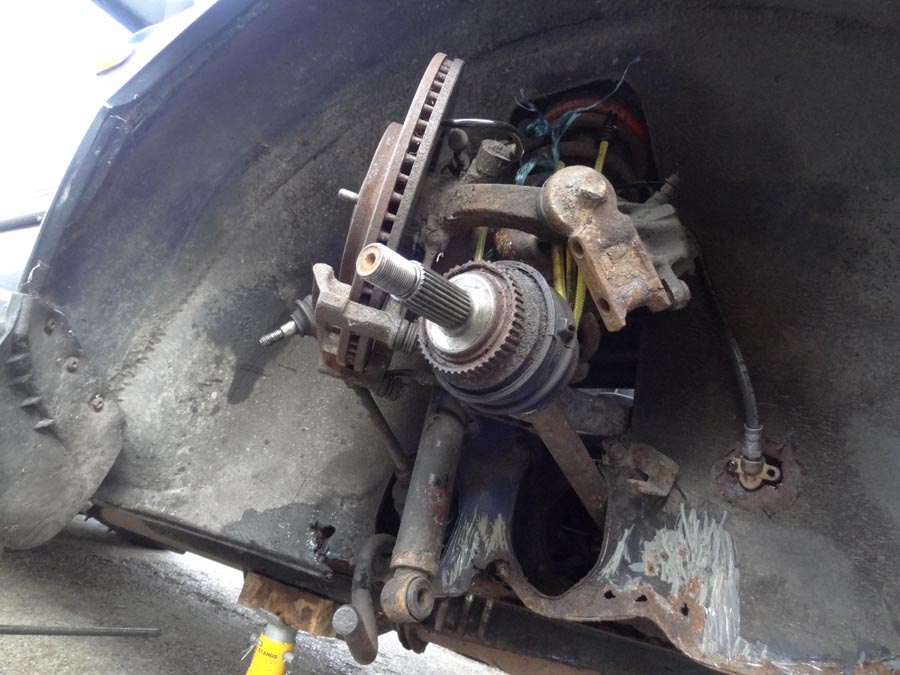 Not looking good at all. 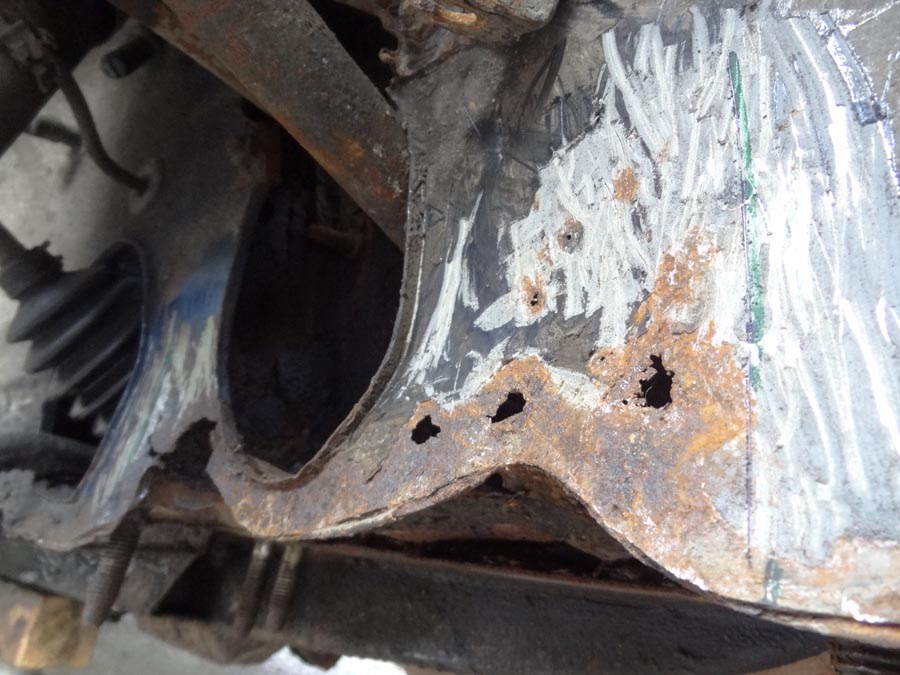 Getting scary at this point. The member across the bottom looks ok though. Just plenty of holes elsewhere. 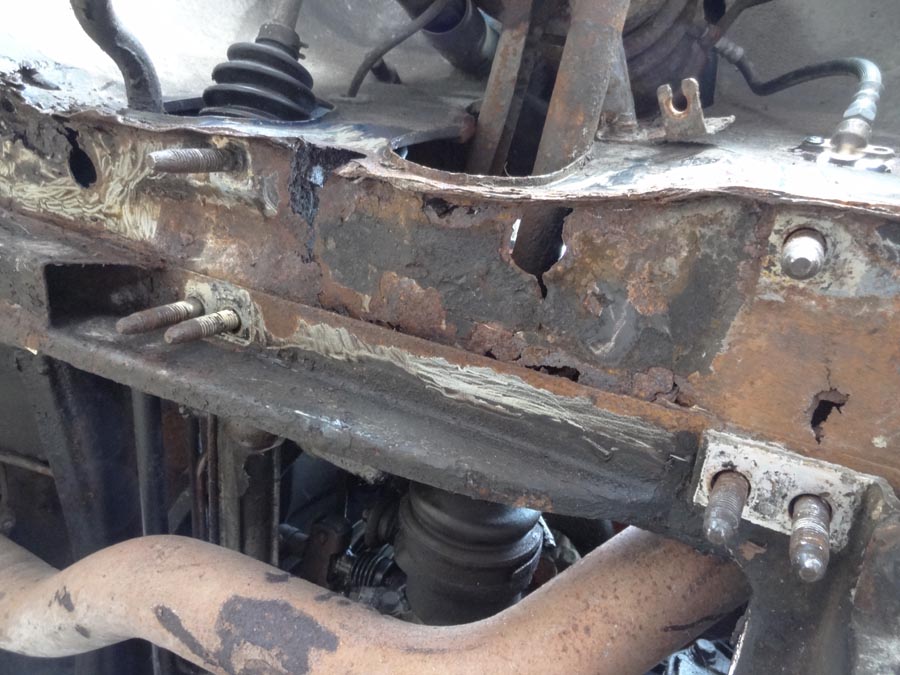 Didn't pass a light poke here either. Job is growing rapidly at this point and to be quite honest without Retro Rides I might have stopped at this point. But its amazing how much it helps you after plenty of reading, browsing through the readers rides etc. Big slice of cheese here but thank you Retro Rides So onwards it is.  Card tempplate made from a cornflake box made and offered up. 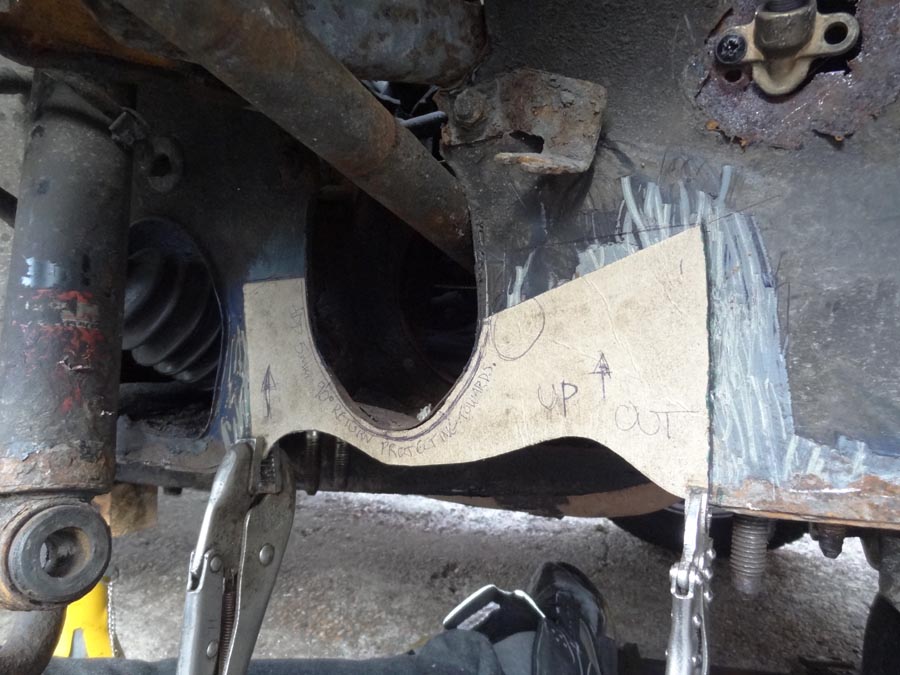 More site inspecting was needed apparently. 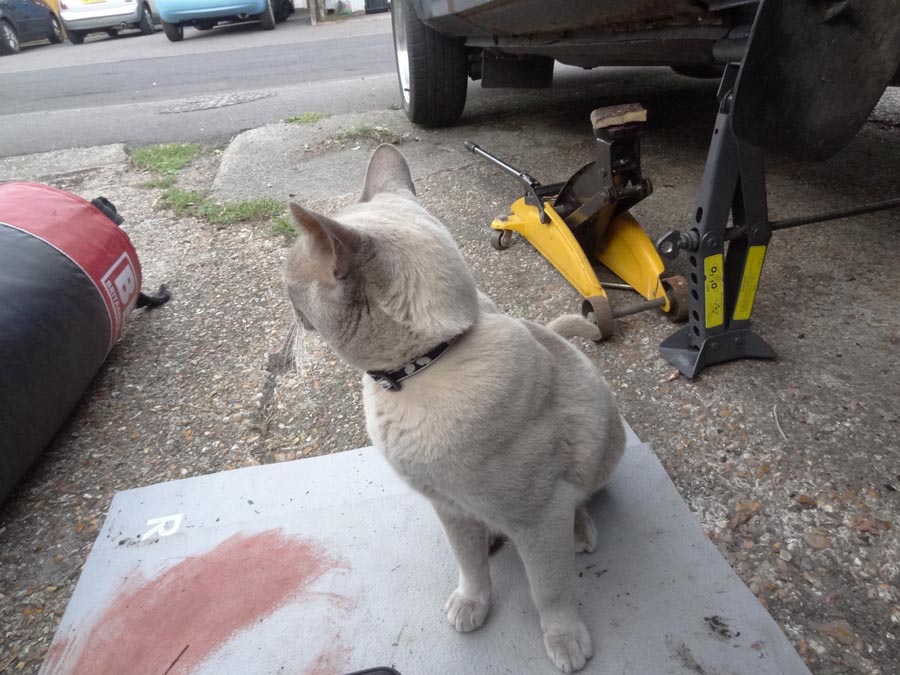 Marked it all up ready to go. 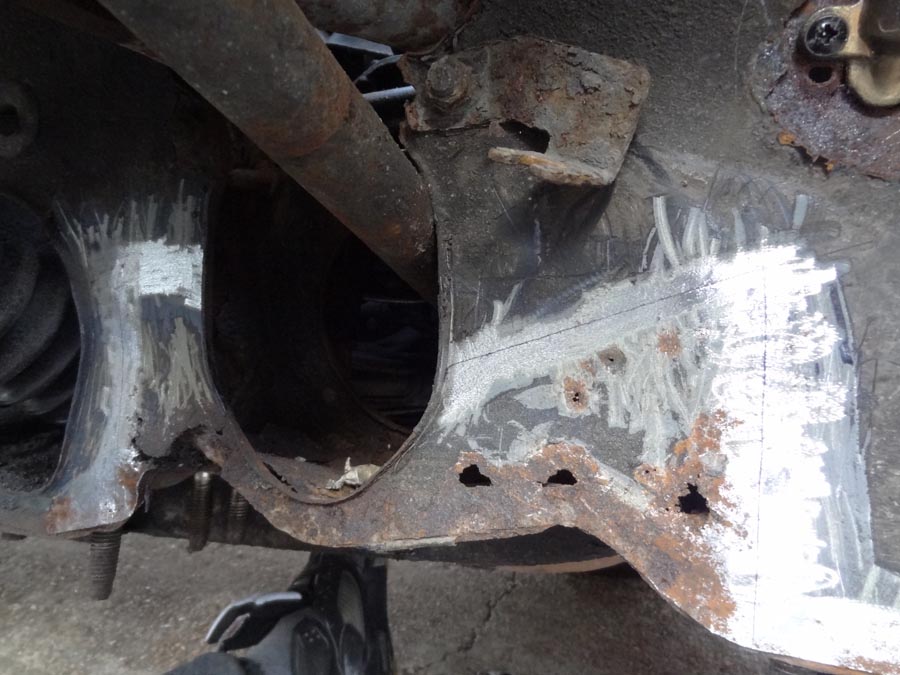 Got a little miny disk cutter on my favourite rotary tool. 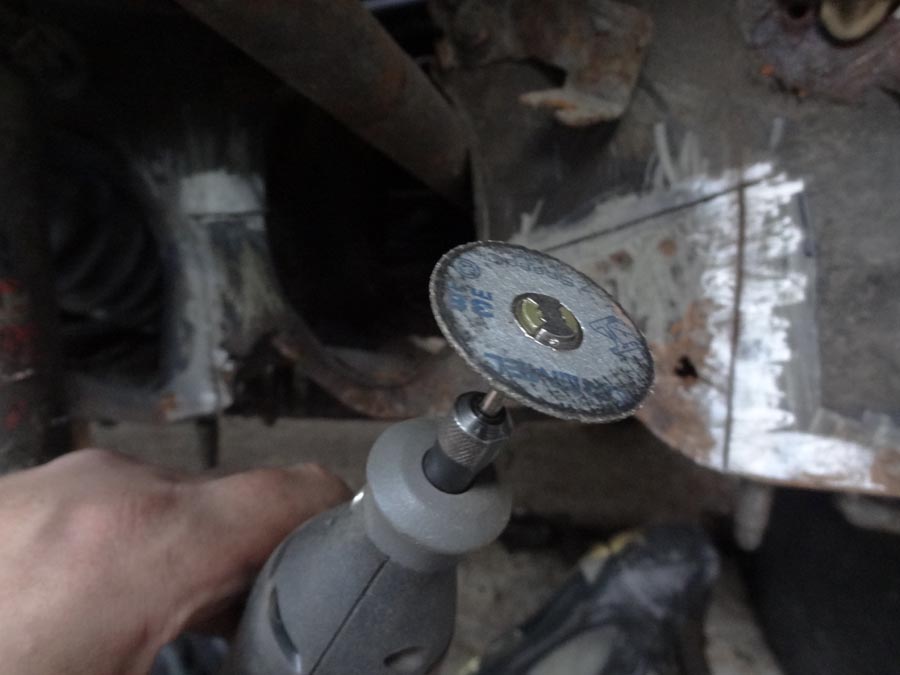 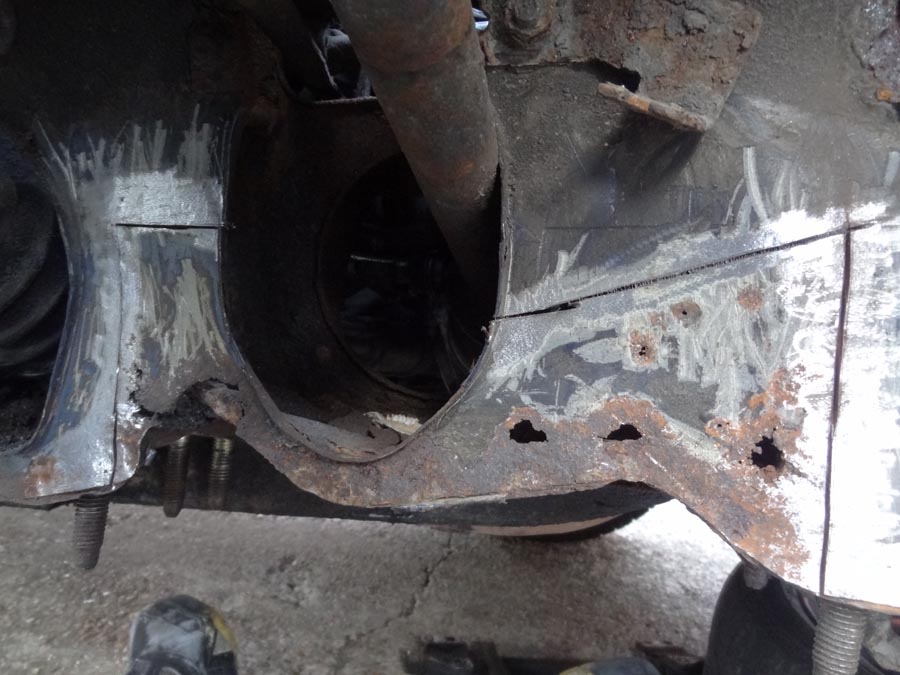 Which left me with this.................... 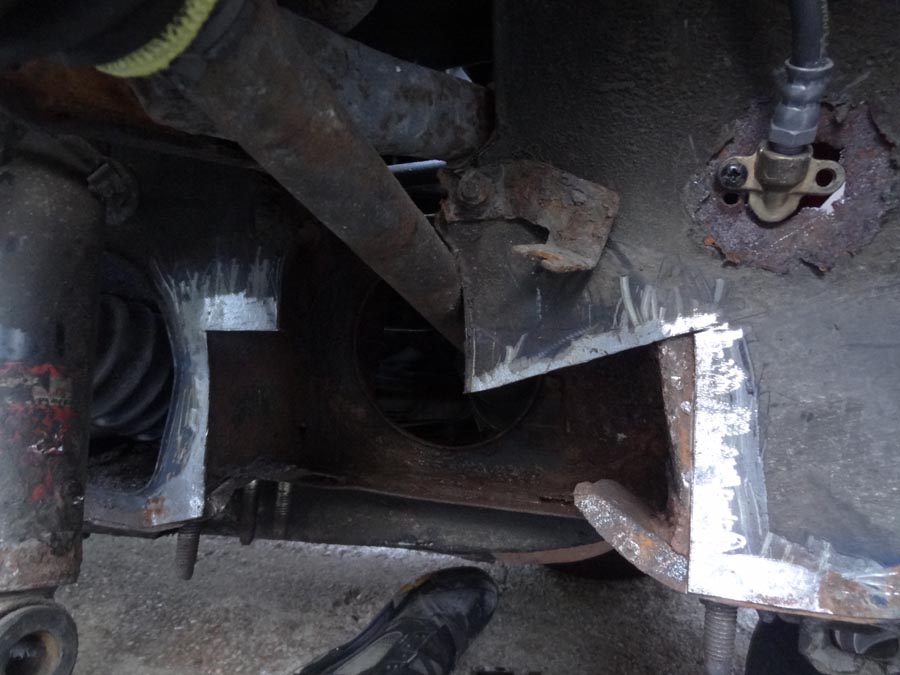 and this. 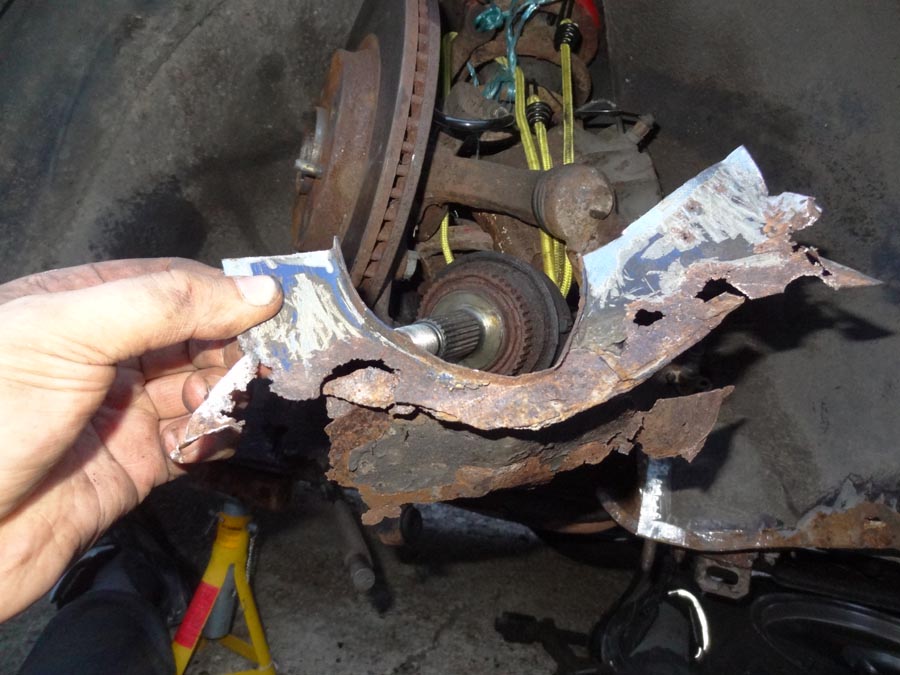 |
| |
|
|
|
|
|
|
|
Nov 16, 2015 23:20:17 GMT
|
|
|
| |
|
|
|
|
|
|
|
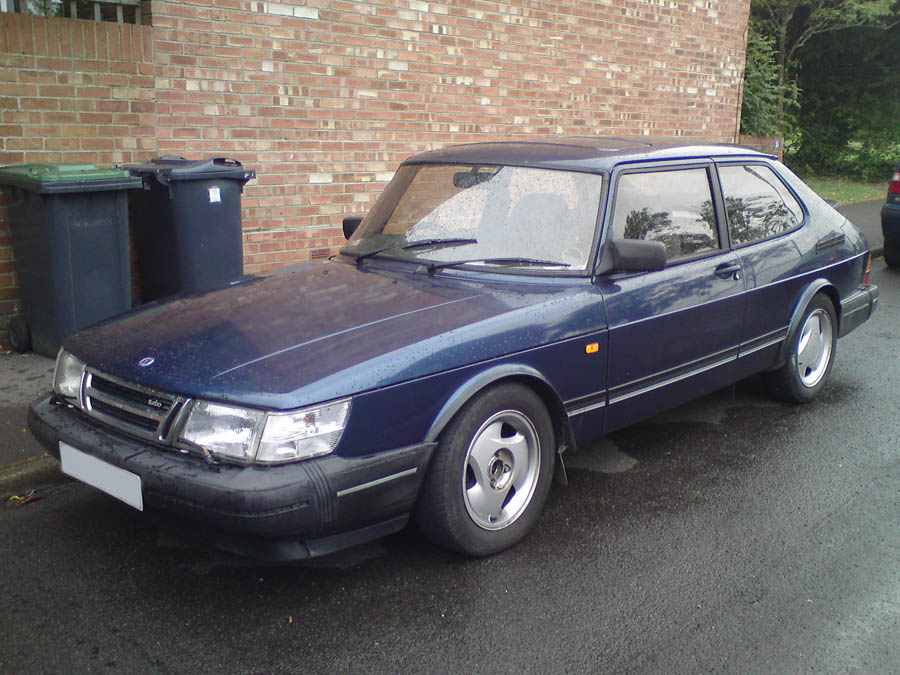
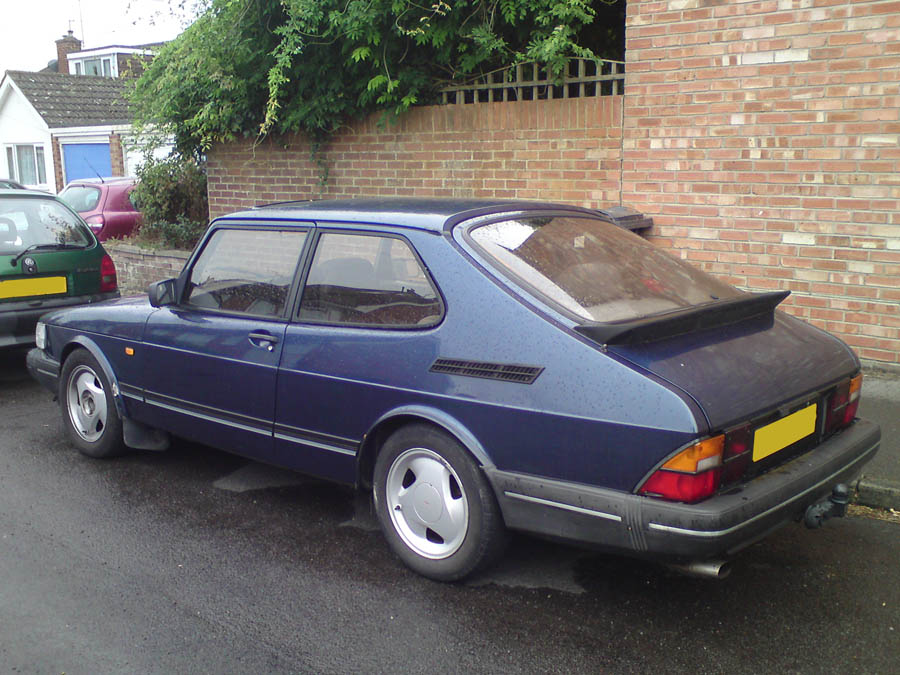
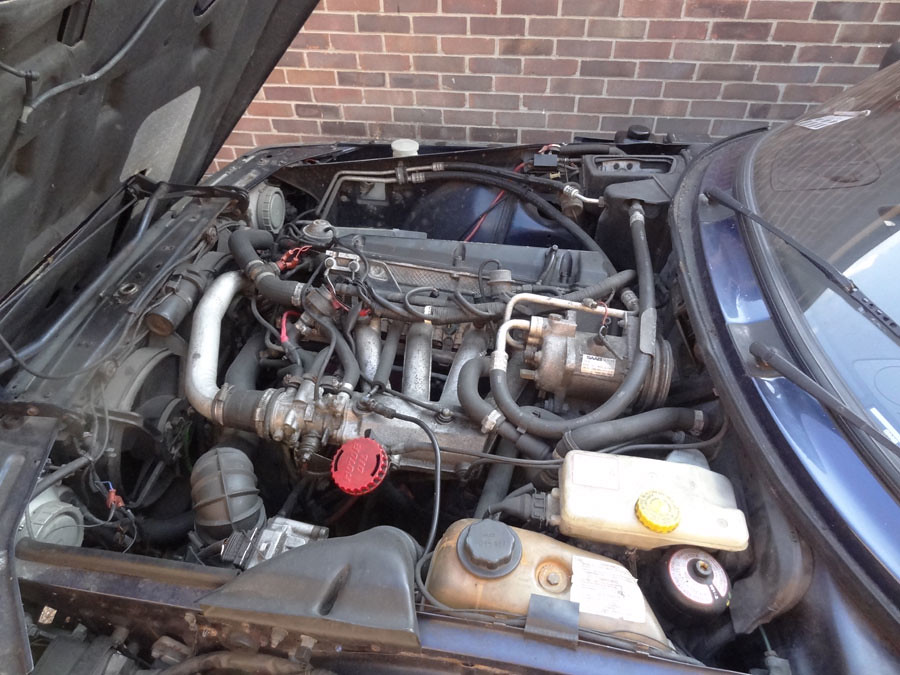
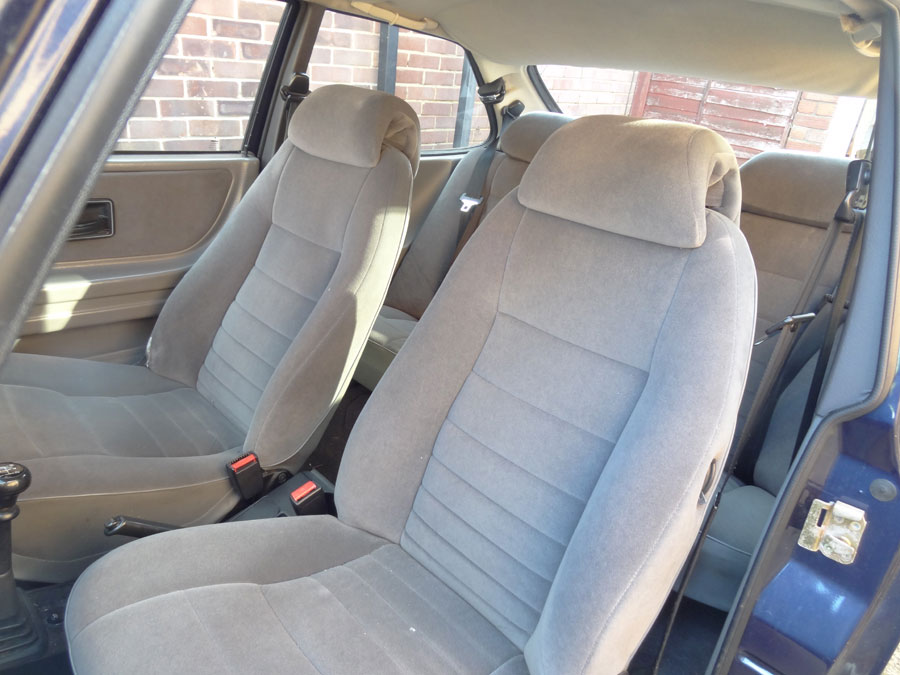
I managed to get lucky last year and found 900 T16s for £300. It drove, but had its fair share of issues. Driveshaft tunnel completely rotted out on the drivers side, passanger side wasn't as bad, but still needed work. One front caliper was seized partially on, the other was seized off. one of the lower wishbones had a hole rotten through it.  But it's not too tatty, the engine and turbo seems good. So they are out there, but you might need a bit of luck timing wise. I seem to see a lot being broken and sold for bits at the moment, most look saveable in my mostly unskilled mind, always seems a shame and bugs me a little bit. There was a grey carlsson 9000 on ebay a few months back, I would have snapped it up if I had more means. Fella wanted £1200 for it, I suspect its been / being broken now. Good luck on your hunt anyway, they are still out there I think. Edit: Forgot to say that gearbox is missing fourth gear. Picked up another box for £160 though. |
| |
|
|
|
|
|
|
|
Hotwire: Don't want to go off topic, but would it be legal if you bought a 635 say and chopped it about yourself to make one of those ? It really does have to be real. I can't imagine much could top it if you were beemer kind of folk. |
| |
|
|
|
|
|
|
|
Brushed Steel, Open lug Alpinas................. Can't go wrong.  |
| |
|
|
|
|
|
|
|
Activate Plan A: Recover all parts / vehicles that still retain ability to be recomissioned. Store and protect aforementioned. Weigh in all randomly littered 'Land Sculptures'. Decontaminate land. Grow food / return to wilderness. Eat well, see deer graze and wolves return. Am I alone ? |
| |
|
|
|
|
|
|
|
Fantastico |
| |
|
|
|
|
|
|
|
While I'm in awe of the sheer heritage etc I cant help but think what sort of F**knut would let this stuff rot. Love is one thing, blind stupidity is another. ( Mildly Beered Up Rant ) |
| |
|
|
|
|
|
|
|
Hi Elmo, just signed in to update that I'd managed to straighten it up. I was going to try it the way you suggested, then I got mad cause it was cold and dark and sh*t outside. So I put a big lump of wood onder the chassis rail, turned the wheels facing the right way, wedged my feet against the garage wall and pushed and shoved it over / back. Job done. Thanks for the suggestion though, it made me get out there to have a go. |
| |
|
|
|
|
|
|
|
Thanks for the suggestions fellas. I tried jacking it up from the other side, same thing happened, it wants to start going over when the passenger side tire hits the ground, I suppose where the tire hits the ground on the outside edge of the tire first. Compo: Yeh I can do, but I'm still quite a learner and it will take me half a day to get the wishbones back on and the hub and all the other bits. Was trying to find a quick cheat. Did think I might have to just get on and do it the long way though. Thanks for your thoughts chaps. |
| |
|
|
|
|
|
Nov 30, 2014 17:39:09 GMT
|
|
Hi all, I've got a small issue that I can't seem to get my head round. I've got the drivers side front hub etc off my saab so its up on blocks in that area. No problem there, but where i lift it up to work on it and then lower it back down onto the blocks it has skipped sideways a bit. So over the last month or so the car has shifted on the drive and I can no longer open the garage door to get to my tools etc easily.
The drive is too rough to put a jack under it and shove it back over and I don't really fancy jacking it up and pushing it over as it lowers and crossing my fingers it lands in the right spot.
I'm sure there's an embarrassingly simple way that I'm missing to put it square again. Any ideas ?
|
| |
|
|


 I've really enjoyed what I've done so far and I'm thinking not worrying about spending loads on gas will play its part in me getting better, so thanks again mate.
 I haven't really driven it properly yet, but I've already got a thing for it. Puts a smile on my face. Would love to have a 99 one day too. I've got a distant memory of my dad driving one when he had a garage in the early 80's. He only had it for a few weeks, was a black turbo I remember that much. Some idiot drove up the motorway the wrong way in the snow coming towards us one evening. After both of us swerving to miss each other we ended up spinning up a big embankment covering the car in snow. "Dad.......are we upside down?"............"No son"........