|
|
|
|
|
|
|
|
|
|
|
|
Looking forward to seeing the lady uncloaked.
In as much as the Molvo is a chimera of P1800 and Miata chassis, the project has given me a very good education on P1800 tub anatomy. What I see so far would not scare me away.
Biggest issue with these cars is that nobody did a proper job of fixing the front tin when required because it is such a colossal PITA being one piece welded in place. Pretty much any panel behind the scuttle is easy enough to deal with.
Have you had a peak at the front frame rails, especially where they kick-up in front of the firewall?
I posted a "how to" on removing the front end in one piece over on sweedspeed, should that be of interest.
|
| |
Last Edit: May 5, 2018 22:18:26 GMT by bjornagn
|
|
|
|
|
|
|
|
This thread and the thawing of the roads, reminds me that I need to go figure out where I stored the MGB GT for the winter.
|
| |
|
|
|
|
|
|
|
OK, no real progress in any real measurable way, but back to where I was with the dash Recall how much fun it was to install the dash, only to have to rip it and the newly welded in brackets back out so that I could re-adjust the dash position. The new dash position made the upper mounts difficult to fabricate and weld in because I could not get the MIG gun in there and see at the same time. If I am being honest, the frustration with this might be what led me to pick up the filler trowel rather than complete the wiring and drive the car this summer in an un-painted condition. The good news is that after only 3 hours I managed to blindly get the upper brackets on each side tacked in place.That is right, 3 bleeping hours to get two brackets fabbed and tacked in place. And I am happy with that! I can now pull the dash and complete the welds and pray I don't have to ever re-visit this corner of the project.  |
| |
|
|
|
|
|
|
|
Refitting the heaterbox is a total and utter curseword of a job, yet some old boy at the factory probably did it with his eyes closed. In the end, I was upside down in the drivers footwell, and I had to refit the heater with the cable disconnected. I then poked a spanner through the drivers side footwell airvent to reconnect the cable to it. Yup, that is how I do it. Up there with changing out a piston via the exhaust pipe. You forgot to take credit for getting the heater box assembly shoved back in the hole in the first place. Using a new rubber seal makes it about impossible. |
| |
|
|
|
|
|
|
|
Here are the seats you want for running around the track.Made by Kirkey and not terribly expensive either. Makes a huge difference when you are trying to go around corners. They are more comfortable on the street than you would think.  The current interior is more civilized. I carved up and stitched a cow into new seats and installed the MOMO prototypo steering wheel. It is a bit of a arm-wrestle when parking, but very nice once moving.  |
| |
|
|
|
|
|
Apr 30, 2018 15:46:25 GMT
|
|
The other tip for POR 15 is to store the can upside down in the fridge. This way, if it does go hard, the hardened layer on "Top" will be at the bottom of the can
Never trusted the lid to keep the paint in myself!
I don't know cause I have not tried, but it might be possible to use the "Air in a can" electronic duster products to push moisture laden air out of the POR container?
Pete
|
| |
|
|
|
|
|
Apr 28, 2018 22:56:08 GMT
|
|
Bit late maybe, but a tip for working with POR.
The stuff is bloody $$$$ and what is left in the can wants to harden as soon as it feels moisture. As in "as soon as you open the lid"
don't open the can.
Punch two small holes near opposite edges and pour into a job sized tupperware container.
When done, seal the holes with tape. I use an aluminum tape made for ductwork
Before sealing, pop the wire drive on your MIG welder and flood the can with CO2 by holding the nozzle over one of the holes. Then put the can in the back of the beer fridge. I have kept the stuff for a year this way.
|
| |
|
|
|
|
|
Apr 27, 2018 18:32:29 GMT
|
|
Very well done. Obviously know your way around a sheet-metal brake the way the chassis "slip covers" came out so nice.
Always a fan of the unassuming vintage vehicle.
Pete
|
| |
|
|
|
|
|
|
|
Apr 25, 2018 23:54:27 GMT
|
|
Looks better in the pictures at your place. I see less rust and more just dents and poor filer repairs.
Are you anticipating a delay before you get started?
Pete
|
| |
|
|
|
|
|
Apr 25, 2018 17:44:27 GMT
|
|
This will be fun!
Subscribed for the duration.
Pete
|
| |
|
|
|
|
|
Apr 23, 2018 20:57:13 GMT
|
Wow - did they even know what they were doing when they blasted it?? That's atrocious. Love the grill mesh. Obviously not...they hit it with enough pressure that they embossed the inner bracing on to the roof panel. I don't know the previous history of the car since it passed one or two owners on the way to the guy I bought it from, but I suspect that the project was over when the owner showed up to collect it from the blasters. Or maybe it was an amateur owner who did the blasting and had no idea of what could go wrong? |
| |
|
|
|
|
|
Apr 23, 2018 17:12:57 GMT
|
Extremely educational. Never knew you could do such a thing or that such a tool exists. I'm a little confused by the term "oil can" though? An "oil can" dent is a dent that you can push out with your hand and it looks fixed, except that if you give it a slight push, it pops back in to the depressed state. The term comes from the good old days before general purpose lubricants came in a spray can, and the dispensing tool of choice was a can with the bottom that sprung back and forth to act as a pump. Yeah, I am giving away my age!  |
| |
|
|
|
|
|
Apr 23, 2018 15:10:15 GMT
|
The other thing that happened yesterday is that I spent 6 hours on the roof panel. It went well all things considered and I have to say that, as we learn to get along, me and the Shrinking disc are becoming good friends. Whoever sandblasted this car used enough pressure that it drove the roof panel into the support structure inside and left the imprint of the inner structure embossed on the roof panel. So , while this is all quite boring to most, It serves as inspiration to me to keep going if I make records of my work. ( If I look back at all I have done, it encourages me to keep going so as not to have wasted the past effort) This is the RH side before and after: The front had a good 1/4" depression that would oil-can up, but pop right back if given the chance The rear three depressions are linked and while also an oilcan, had a soft flacid feel to the area. Kinda like the soft spot on a new-born's head. So we attacked that  After a few hours ( did I mention this is slow and physical) with the disc, dollies and slappers, I got this far on the RH side The front back to the B post is pretty much good-enough for the girls I go with. The three interconnected depressions are much better, and while the oilcan syndrome is gone, the panel is still in need of a Viagara wipe or some sorcery to firm it up. Actually, more beating is the answer, but my arms were getting tired.  Pretty much the same show on the LH side. Did not take any before pics, but it was almost the exact same series of depressions. I have been working the edges about 8" from the rails so far leaving the damage in the middle alone for now. The reason for this is that I don't know that the work to be done in the middle was not caused by the metal being messed up around the edges. Everything affects everything in a large low-CROWN panel. I do know that the soft spot at the front has firmed up consideralby since I worked both edges of the roof panel. Not enough, but it is obvious that the shrinkng that I do on the sides is affecting the middle...hope that does not come back to bite me!  Still a lot to do on this panel. The circles are soft spots for the most part that need to have some shape put into them. Figure 6 hours in and about 14 more before I am ready to just mud over the small ripples on this panel. I will probably literally pour half a can of filler on the roof, add the hardener and mix it on the roof panel, then psread with a drywall spreader. Of course I will then sand it all off twice or thrice before I call it done.  |
| |
|
|
|
|
|
Apr 22, 2018 22:00:34 GMT
|
 So, while me and the shrinking disc spent about 6 hours arriving at a working agreement, the Minions who show up on Sundays to help did the above. The mesh is SS from a gravel sorting screen that is worth more than I want to know. I just cant hate it. |
| |
|
|
|
|
|
Apr 20, 2018 18:58:32 GMT
|
OK...4.5 years in denial, but now right on the critical path to paint, so I cant avoid it any longer. .  The roof Panel  The first step was to remove the sound damping tiles that were stuck on with what I believe is contact cement. That as a few hours of my life that I don't want to re-live. Still need to find a way to get the rest of the adhesive off. The stuff is still tacky enough that it will glue your palm to the ceiling. The only good hews here is that I can get to both sides of the panel without too much trouble.  |
| |
|
|
|
|
|
Apr 20, 2018 11:49:48 GMT
|
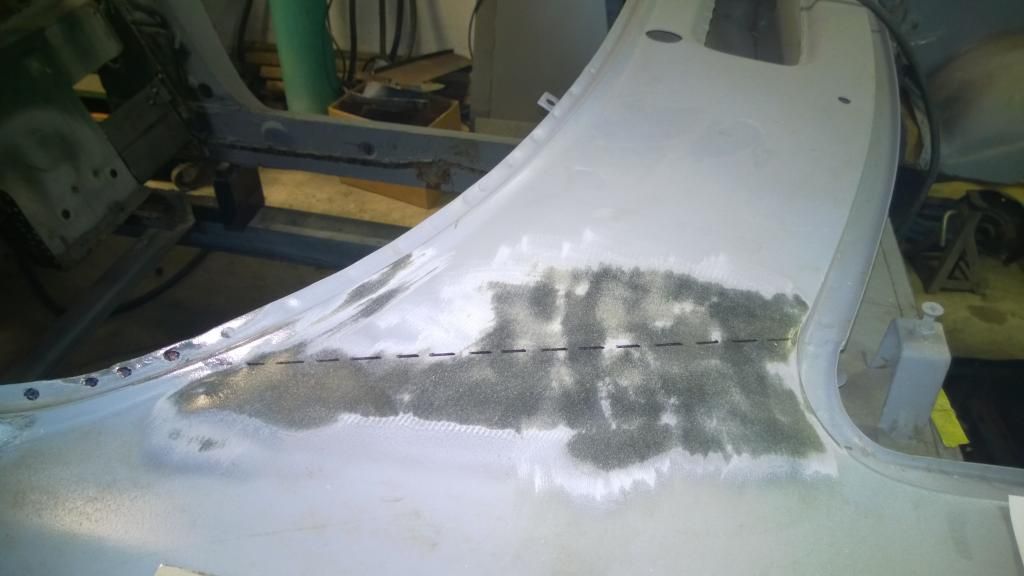
I know what you mean by knowing it is done right. It is virtually impossible to tell with a painted car how bad the rust damage is hidding on the backside of a panel. When I bought my project, having been sandblasted, it looked pretty solid.  Even though the only rust damage visible is some pinhole rust, by the time I was done the bottom 6 inches of the shell had been replaced. I also did the innermost sill panel . The kind of sad news is that the frame members on this car were in really great condition. Sad because they were not going to be used in the finished car.  |
| |
|
|
|
|
|
Apr 19, 2018 14:15:39 GMT
|
|
Standing ovation for this one! Bravo.
|
| |
|
|
|
|
|
Apr 19, 2018 14:12:40 GMT
|
|
If strength is a requirement, then I think version #1 wins. If form over function, then #2.
Been following along to learn new stuff and techniques for my own projects. One thing that I see you doing and is worth pointing out is that you don't settle for your first effort or solution. I often see you execute and at the end realize that there could have been a better way to to that and then re-execute. That is an important lesson because a project car is going to be the sum of many many little projects, and if they were left as less than ideal solutions, the end product could not help but be the same.
Look forward to stealing more ideas as you move along!
Pete
|
| |
Last Edit: Apr 19, 2018 14:13:29 GMT by bjornagn
|
|
|
|