filly
Part of things

Posts: 62 
|
|
Mar 22, 2021 20:38:16 GMT
|
|
Evening,
Thanks for the positive comments!
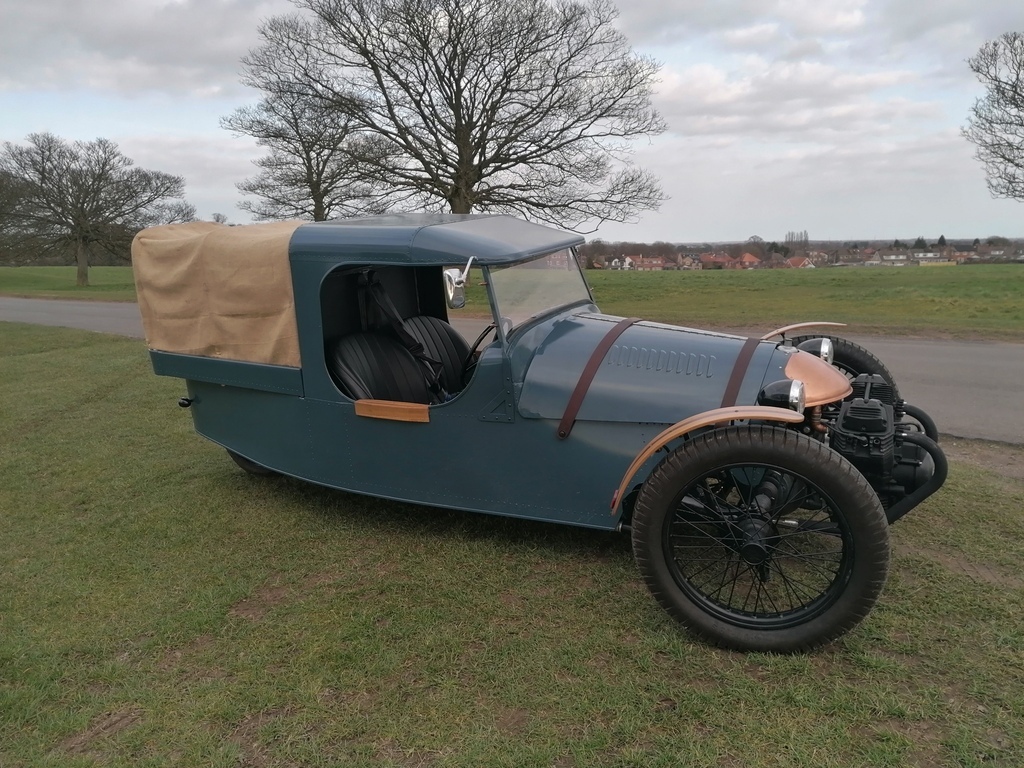
Getting in and out is surprisingly easy - one hand on the screen pillar, left leg in then just swing in. You can remove the wheel to make it easier but it's been okay so far. My 6'4 father in law got in yesterday quite well!
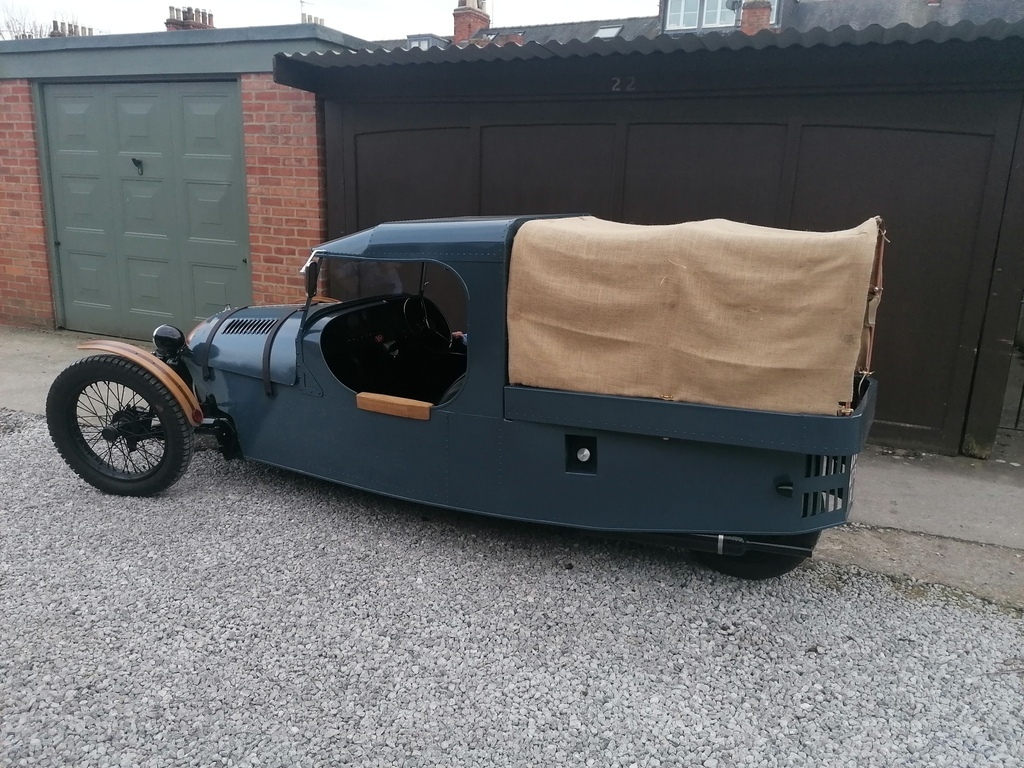
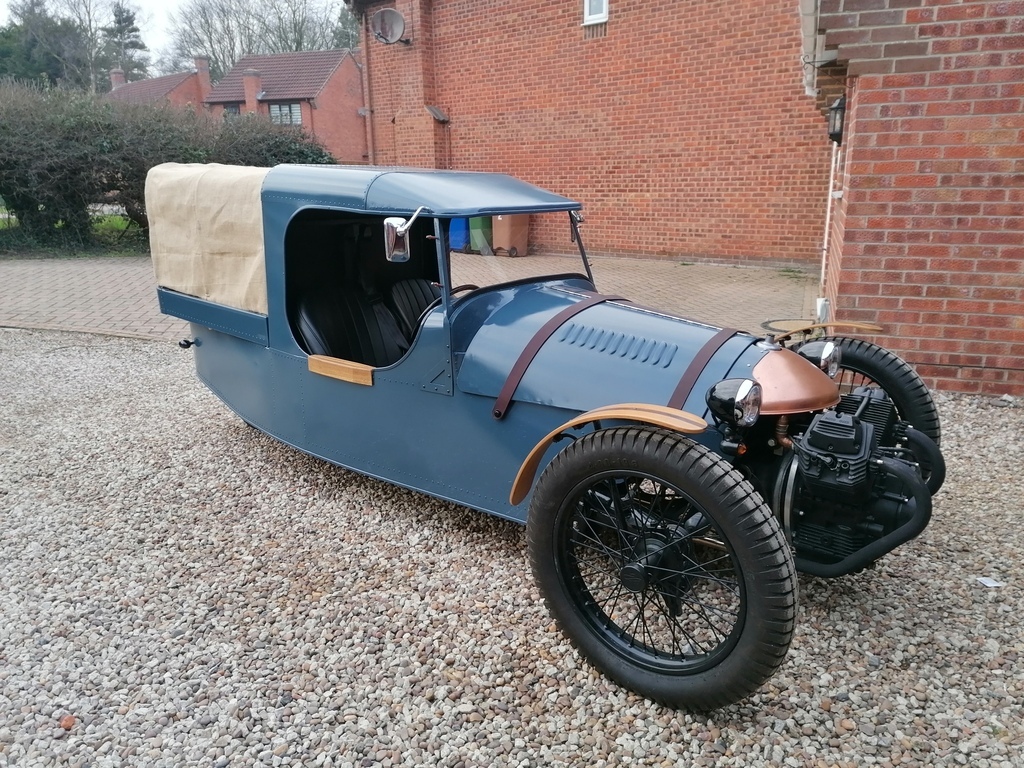
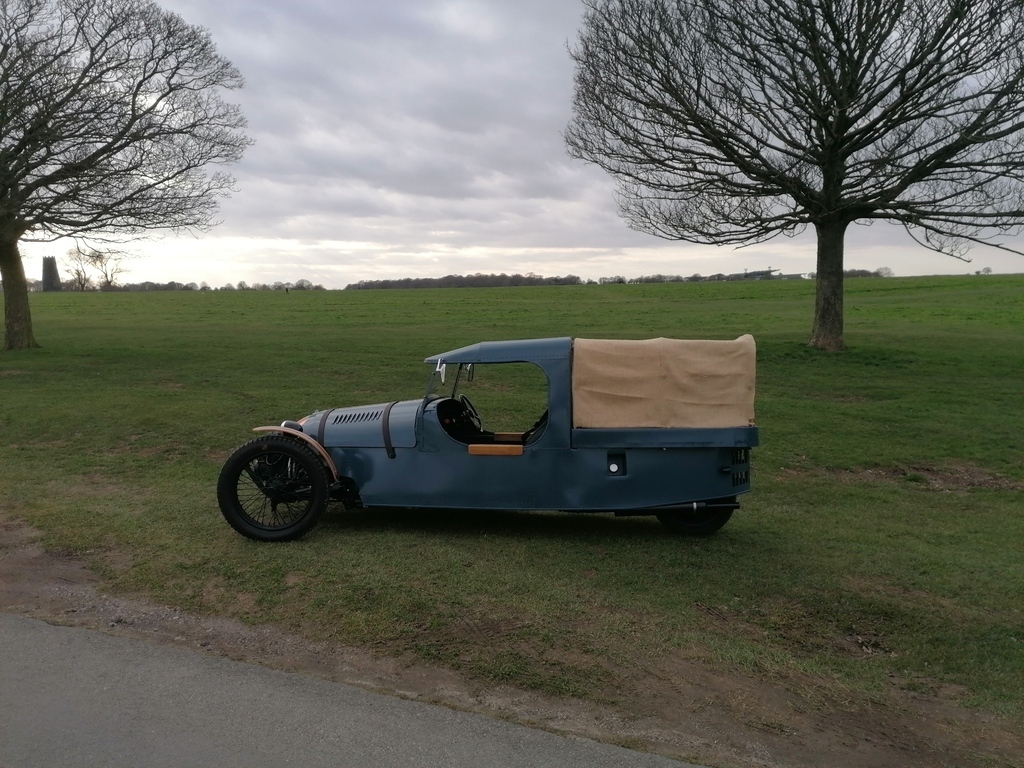
A few jobs remaining and the rear tilt is just a mock up - plans for a canvas version in the future.
Phil
|
| |
|
|
|
|
filly
Part of things
Posts: 62
|
|
Mar 21, 2021 20:00:28 GMT
|
|
|
| |
|
|
filly
Part of things
Posts: 62
|
|
Apr 22, 2019 18:50:32 GMT
|
|
Thanks for the kind comments - Keeps me going!
I've splashed out on some radio gear today from eBay - just an intercom system and a 20watt transceiver good for road trips and the like - ages away from fitting it but buying the bits that interest me help to keep motivation to a maximum!
P
|
| |
|
|
filly
Part of things
Posts: 62
|
|
Apr 21, 2019 17:14:58 GMT
|
Slow progress but we're getting there...  P |
| |
|
|
filly
Part of things
Posts: 62
|
|
Mar 11, 2019 19:39:08 GMT
|
|
Pic links now fixed!
|
| |
|
|
filly
Part of things
Posts: 62
|
|
Mar 10, 2019 22:12:12 GMT
|
Sorry this has taken forever but as usual I’ve got lots to report but what seems like little to see. I’m sure that I could have got further with the build if I’d just followed my previous build design and ideas, but I’ve really enjoyed researching and planning each individual section which in turn has led to design changes and ideas which have taken up my time. In reply to the message above the Guzzi revs upto about 7k, so more than the 2CV, but I've not touched the gearbox. The plan is to run it as is and if it goes bang then it's a fairly quick job to pull the whole lot back out again. It seems impossible but I’m now 18 months into the build. We also now have a 7 month old who is beginning to sleep a little more so hopefully I’ll be able to get into the garage post bedtime as the nights get longer. We shall see! The last update was a link to the Pembleton forum and showed my engine in, and work starting on an underslung gear change and custom handbrake pull. Hopefully this picture shows these, along with the aluminium steering column mount as made by my dad.  At about the same point I decided that the goal was to get it running. I knew that my head studs would need sorting as both had snapped on one side. There was approx. 15mm of the stud remaining on each side to get a grip of but after soaking in what seemed like every fluid available, heating them, welding on nuts and some other forms of voodoo, the result was both sheared flush with the head. Initial drilling out looked positive until I used a stud extractor which promptly broke off in the middle of the stud! Frustrated I tried to get this out which caused even more of a mess – I should have stopped when I began to get angry. What I haven’t mentioned was that this was happening on the floor with engine and head in situ – a rookie error I now know. After calling it a day I came back the next morning with a clear head and removed the head (joke there somewhere I’m not sure how to place it). The job was now much easier and the result being that we now had two studs in the correct place.   Alan Osbourne at AO services had been very helpful in supplying a reluctor, pickup and plate to fit the small block and go with the RITA amplifier I already had and following his instructions I managed to get the engine timed up (with a few ‘user’ mistakes along the way). A rudimentary electrics set up, along with my newly fixed exhaust studs meant I would be able to get her running. The short version of this is that my Dellorto’s had been stood for so long that the petrol inside had turned into a varnish-like substance and blocked everything. A rebuild kit + buying an ultrasonic cleaner + lots of time did see the car running, albeit very poorly, which was just the most fantastic experience and resulted in me jumping in the car and driving it up the drive with dog in tow. The video can be found here:  During the process above, the issue of carb mounting had also come into play. Swapping inlet stubs around L to R was not enough as this meant the carbs were facing down at quite an angle:  I tried some silicone hose but it wasn’t the strongest, resulting in too much vibration, so have ended up making some L shaped pieces of steel which hold the inlet stubs in place at the correct angle. I’m not sure the pictures are clear but hopefully they help a little.   The disclaimer here is that I’m not sure they work as I stripped back the electrics and exhaust around the same time and haven’t had chance to test them again. Here is the finished setup, along with some copy Keihin PWK carbs from eBay which I'm interested in testing - at an incredible £30 for the pair it doesn't really matter what the result is but if they run then it would be great as they fit against the frame better than the Dellortos.  A battery tray was quick to follow, along with a SU ‘Sucker’ pump , the same item used in the Morris minor. I was planning to use a header tank with a return and you can see the return pipe in the pic below which is now redundant – depending on the success of the SU. My hope is that the SU produces such a low pressure, and cuts off once pressure is reached, it won't overfill my carbs however I will report later.  Next up was a seat. Again this was a plan change as I’d been planning to use a Land Rover Defender centre seat. I can’t remember why changed my mind but there was some reason the LR seat wasn’t going to work as planned so I needed an alternative. There are some lovely seats out there and the extended cockpit plus cab design means that I could fit a full backed seat in – something I had seriously considered until a friend suggested that a bench/deckchair style seat might suit the car better. A quick call to a local 2cv guru and I was offered a 2CV rear bench seat gratis. I’m sad to say I didn’t get a picture but to give you an idea, we were going for Sunday lunch straight from there and the seat was in such a state that I had to take it out the car and leave it in the pub car park while we ate! I stripped it down and shortened the main tubes so it would fit in the car:   I was also able to make a front hinge and a rear bracket which incorporated the spring loaded catch at the rear, giving me a lift forward seat (there is quite a bit of room behind/underneath.   At this point I decided to go for it and bought 4 sheets of 1.2mm aluminium. I’d also picked up some cardboard to help with the templating process as every panel was going to be different from the PG templates I had – typical! I’m still struggling to get the card I need but the stuff on the picture is very thin corrugated isn’t too difficult to use. Hopefully you get the idea…    My first metal work job was the dashboard. I’ve always admired vintage dashes which curve under and wanted to follow the same idea, however this didn’t quite go to plan. I found the process quite difficult if I’m honest but at least I’m learning. Will let the pictures do the talking…     The most recent piece of metalwork was the rear side panels. I had planned on louvres but didn’t have much luck with making a homemade tool. About the same time I spotted some bonnet vents on another car which were made from cutting ‘C’ profiles into the metal and bending the centre section inwards. The effect was good and I thought it would suit the van. Marking commenced..  The dilemma was now how to cut the slits in the metal. I own a jigsaw but worried about getting it started without making a mess. I’ve never been good at the chain drilling method and my dremel (which I thought would be ideal for the job) made a nice cut but each inch of metal used a new cutting disk – not sustainable. In the end I put a slitting disk on the angle grinder and went free style. With some careful filing after I was happy with the results.  Which brings me up to date. I’ve been manically buying ‘toys’ for the inside such as switchgear, clocks and steering wheels, however all of that is under wraps! Phil |
| |
|
|
filly
Part of things
Posts: 62
|
|
|
|
Well it's been a while.. A small update before I update properly on here - apologies but it seems silly to copy the whole thing across and re-upload the pics etc. Follow linky here: www.thepembleton.org.uk/ePAG/ePAG70/philip1.shtmlLet me know what you think... Phil |
| |
|
|
filly
Part of things
Posts: 62
|
|
|
|
|
Ha - the idea was stolen but it's a godsend when drilling into the ali!
|
| |
|
|
filly
Part of things
Posts: 62
|
|
|
|
Good evening all, Sorry for a lack of replying before - but thanks for the messages. Also a good point about making the bulge in the actual panel - to be completely honest I'd just not thought about it, but it would have been a good idea! I can't remember if mentioned that I'd made my bulkhead panel too which had been stored in the loft until now. I'd been itching to it fitted but was waiting to get my pipe work sorted first.  I don't have a picture but I'd found some aluminium double pipe clips/holders on eBay which with a bit of modification (a big hole drilled in one) meant that I could attach one half of the clip to the chassis rail, before sandwiching the pipe with the other side which screws into the first half. I've not done a very good job of explaining them but basically it left me with the ability to neatly run two pipes down each chassis rail. The plan being to have a fuel send and return on the near side, with brake and electric cable on the off. Because I moved the rear upright back by 6" it meant the floor needed extending by the same to the rear which was why there was a huge gap on the earlier pics. I also needed to make up my footwells and ideally the bulkhead top. With this in mind, and half term providing me with some time, I made a trip to see Duncan near Ripon. Duncan's help is second to none and I wouldn't have managed either build without him. He helped me to make the footwells and other bits needed, and after an enjoyable day I was back home getting them fixed in.    This has also allowed me to look at fixing the pedals and gearbox, although I found the ‘box to be too far back. To fix this I've cut a rudimentary inspection hole in the front bulkhead so I can get to the mounting bolts. I didn't think much more about this until today when I was looking at the front gearbox mount and found that the whole gearbox needed to be moved forward by almost 20mm, in order to both fit the mounts and not catch the steering arms. I'm not sure why this is but can only think that my rear mounting is wrong in some way. I've fixed it using 20mm spaces to bring the box out which seems a reasonable solution. In more exciting news my new tank has also arrived! I have no connection to SM engineering in Wales but I would recommend them one hundred times over. Spencer was great to deal with and made me a tank which is quite beautiful. I think the turnaround was only about 10 days from initial call to delivery and it's millimetre perfect. In fact it's so good I think I'd like to lacquer the aluminium to keep the look. Has this been done before?   For the filler I'd wanted a similar set up to a Landrover defender or old truck. The tank has a welded neck with screw cap which I want to fill directly into from the side of the car. Hand on heart I think I've set the neck slightly too short, but initial mock-ups with cardboard suggest I can do what I want, as long as the exhaust is moved lower onto the bottom rail of the body. This is not a real problem as I wanted a lower exhaust run anyway. I had contemplated trying to run an exhaust under the car but as yet I'm not convinced it's the right method due to both clearance and looks as the side exhausts provide quite a bit of the look of the car. I had also tasked my dad with making an engine mount - the standard way is a piece of flat plate with two 90 degree bends either side, but he had an idea to make it out of a single piece aluminium. Trial fitting is in the pic below, and it might need a bit of adjustment still as the holes are so close to the side of the ali and I worry they'll crack when it gets the weight of the engine hanging over the front too. Would be a shame to re-do after all that work though! I did try fitting my new disks onto the box today but couldn't find a bolt to match - bit of googling and the thread is M9 x 1.25 - so thats another £20 to a 2CV slavage place for a set. The money seems to be flowing out at the moment on parts as I've just blown a fair bit with ECAS 2cv on brake lines and new neoprene gaiters. The problem with the brake pipes is they don't use a flare like normal cars so you can't make them yourself without buying the tool which is a fortune. Ordering specific sizes is a bit of a pain to be honest too.  Also getting together a shelf of cleaned parts to fit - my calipers have come up well so will be rebult with new seals etc. Also some gauges and switches I'm getting together ready. I was given the CB and think it would look cool in the dash, but maybe a more retro version??  Final pic shows the handbrake mechanism ready to roll. I'm working on the gear change lever as it should be up in the dash but I want this one to hang below so I have room for more gauges etc in the dash itself. Mocked up shows it running under so that's something else to consider.  So that's where we are. Hopefully the next update the geabox, driveshafts and brakes will all be done. Fingers crossed! |
| |
|
|
filly
Part of things
Posts: 62
|
|
May 15, 2018 20:56:31 GMT
|
Now now now, Bit of an update but again not as much as I would have liked. We found out that my wife is expecting our first child a few months back so my attention has been diverted towards getting the house something like before arrival in September! All the chassis welding had made a mess of the powder coat - I know an option would have been to get the whole thing blasted and re-coated but I'm not always the biggest fan of PC on chassis and lots of other builders had recommended POR15 or similar. Had a search round and the POR wasn't cheap, but for slightly less and equally good results I invested in some Frost Chassis Black which has come out really well. Here we are after painting the finished chassis and putting the floor in. Intimidate problem was that my uprated springs have a larger diameter and were stopping the floor sitting flush on the frame. I had tried to change the hanger (they sit horizontally under the floor) but it wasn't enough so I decided to make some 'blisters' to put in the floor. Floor loosely on without blisters:  I don't have many pics of the process but I made 2 x female moulds and then one 'plug'. Clamp the aluminium sheet between the two female moulds and then put the plug on top and hit with a hammer. Hard. Many times. Ali sheet on top of female mould:  Finished product:  Then it was time to take the floor back out and cut some holes:  When rivited in it will look something like this. It will all be covered over by floor rubber so tidyness not a must right now...  So that's about it - not much to write home about but it's good to be in the garage. I've cleaned up the gearbox but not sure weather to just leave it or paint matt black? I've seen a black one before and thought it looked nice, although I think to do a decent job it means taking much if it apart which I don't really want to do.  Until next time.... Phil |
| |
|
|
|
|
filly
Part of things
Posts: 62
|
|
Mar 28, 2018 22:20:38 GMT
|
Thanks Dan, that's a kind offer. I may need a hand when I get to the body! Quick update whilst I'm here too - although not much to look again I'm afraid as it's all chassis work. The good news is that I've finally finished welding... So in the last update I was mocking up the roof frame - little bit of welding and here were are:  The problem was going to be getting the windscreen mounted. The Pembleton scuttle has too much of a curve for a windscreen (especially the Westfield one) so I needed to make a new scuttle strap which the ali would follow. I'm still not entirely sure how to put a nice curve on flat bar but in the end a mixture of bending it round a gas bottle and using the pipe bender produced the profile of the bottom of the windscreen. In the pic below the screen is sat on the new scuttle curve.  At this point I was about there with the welding - some additional supports for seatbelts etc and some primer and we had this:   And that's where I got up to as of today. As I said, not much to look at but hopefully now we'll see some real progress as I'm about to start bolting bits on! Phil |
| |
|
|
filly
Part of things
Posts: 62
|
|
Feb 18, 2018 19:17:10 GMT
|
Almost a month since my last update - apologies. In some ways it seems like I've come a long way since the last pictures - I've finished the lower rail and am beginning to get to the end of the frame mods, but in others there isn't really much progress to see. I always knew this would be the worst bit as I'm having to re-engineer the whole frame. Hopefully once I'm done here, I can start to add bits to the chassis and we'll see some progress! I'll start from where we left off, I had a Triumph 2000 screen which was too wide and I was just tackling the lower frame. I can't remember if I had explained but one issue was I can't weld. I have an arc welder from Aldi for tacking bits, which I'd got pretty good with - but it was useless with anything thin. I'd looked online and saw it was possible to convert the Aldi inverter welder to a TIG setup, so I spent £££ on a TIG torch, Argon, rods and tungstens only to find out the Aldi welder had some kind of circuit protection which wouldn't let me TIG. I'm not knocking the £60 Aldi welder - she's a beast. But I was curse word off. It left me with the option of either going out and buying a TIG setup (expensive), getting a friend round to weld it (all fine but hard work when I'm designing it on the hoof) or just buy a MIG and get on with it. I always buy stuff second hand but I thought that this time I'd have a treat and get a decent one new. Cue lots of youtube research and I decided on a Clarke 135TE in go-faster red.So, Sunday morning comes and I'm up early and on my way to Machine Mart in Hull. I have a love hate relationship with the place (Hull, not Machine Mart) because generally its a dump which is full of smack heads, but there are some gems - both people and places - hidden inside. That weekend Banksy had just done a new piece round the corner from MM so it made sense to combine the visits. Just a shame that some complete knob had decided to whitewash over the whole thing. Anyway, I got to see what was left and it was pretty impressive. I was also super excited about welding. I make no bones that I'm a poor welder, but I enjoy learning things and most of the work here was an 'add on' rather than structural. I spent the rest of the weekend practicing with scraps of metal before just deciding to have a blast (so don't look closely at the welding!). As promised, here's the story from where I left off: I had a lower rail and it needed fixing in place. A bit of practise with the old angle grinder and I was notching those pipes like a bad boy. At this point I didn't have MIG power so was tacking together with 5000 Volts for Arc power.  About the same time I found a Westfield Narrowbody screen on the WSCC site. I was a member years ago when I had mine and the classifieds usually have some interesting stuff. Quick chat with a man called Sean and it was mine. Can't remember the price but I think it was about £50 delivered, and the lower frame size is perfect. The other benefits to using the Westifeld Screen is that there are lots of other bits I can use such as wind deflector mounts, wipers etc. Also, it's not uncommon to have a heated screen, which would be great for MSVA regs as I need a demist function and I don't really want to run half a Dyson's piping over my dash. Got the Triumph offloaded on the 'Bay for £75 (so a hit but at least it was gone) and had a go with the new screen. The stanchions will go but they're handy for this.  The post man was busy that week as he also delivered me this NOS Landrover Defender Duckie seat. I've not decided on seat choice yet, but I needed something which would help me mock up head height for the roof. I'm still toying with using 2 x defender middle seats with the 'deluxe' trim from Britpart. It's a cheap option and fits the 90cm max I have to play with. There are some other seats made from narrow body 7's etc but I want the vintage feel without paying a fortune and this might just do.  Deluxe seats in situ:   At this point in my story I'd been to Machine Mart, seen Banksy's work and started welding. The bits of angle are a complete mess I know but they'll get trimmed down and they will allow for post-MSVA light fittings either side, a-la Morgan 3 wheeler. Don't ever say I'm not prepared! The two bits of flat should give me better definition for the shape of the rear.  Next was moving the rear seatbelt and fuel tank mount backwards in the chassis. The original was 6" forward and sloped back about 25 degrees which then made the support for the seat back. As I was making a 'cab' I needed a vertical cab back with 'propper' seats up front. Out with the grinder (angle, not the app) and I had chopped the main support and made up the new one. I've left the original cross-member in as it will be under the floor and add to the rigidity of the chassis. You can just see that I've made some mountings for the tank. With the frame mods I need to have a custom tank made - nothing exciting, just rectangular with a send and return. I'm looking at having one made with an extended filler neck which goes directly to the bodywork in the side, but struggling to find what angle I need to make filling not too difficult. Any ideas??  Nice shot of my new boots from Yorkshire trading. £30 seems like good value to me... Next was a bit of roof-line mock up. Using the most advanced of engineering tools (I'm looking a bit unsure here!). Happy with the line of the lower rear rail though.    Which brings me back to this morning. Out with the trusty tube bender and I've made the main hoop. This pic shows it much further forward than it will actually be, but it was useful to sort the roof height. I'm happy with the gap between chassis top rail and lower roof (the big gap bit you look out of), but I can't work out how much higher the top of the roof needs to be above that. I want a Landrover style roof line but it can't look too cumbersome. I think 100mm between horizontal roof rail and max roof height at the back of the cab would be enough.   Phil |
| |
|
|
filly
Part of things
Posts: 62
|
|
Jan 21, 2018 18:02:37 GMT
|
Evening all, Turns out it was longer than I thought since I posted here. Sadly not much to see but I've been in the garage every weekend getting bits done. The fabrication side is completely new to me so everything seems to take ages. I've only got a little arc welder too so okay for plate or tacking things up but not great for anything else. I think the plan is to get a friend to come round and buzz round my tube welds once they're all in place. So at the end of the last update I had chopped off the back. This sat up at 45 degrees or so and would foul the load bed. The plan was to chop it off, bring the sides together and then weld back together so it all sat flat. It wasn't as simple as that but here was the result.  I needed a rounded back, so thought that if I bent some round bar using my tube bender (more about that in a bit), then I could make a nice curve between the outer rails and the 'flat' on the back. Quickly knocked up this.  Which I just wasn't happy with - the rear was too rounded and stubby. Looking at pictures of old Morgans, there needs to be an obvious flat part where the number plate sits. What made it doubly annoying was that I'd already bent some new bottom rails to fit the profile. I was going to leave it but thought this morning that I'd go in and have another play. After cutting off my (crappy) welds I tried again with one flat piece of bar. Also bought the rearmost section out by 50mm to give some definition. Not many pics but you can see the underside here:  I've not decided what to do with the original section that connects the two side rails but I think I'll leave it in as it takes most of the load. The bar coming down can be used to support a mud guard and I as it won't be seen I think I'd rather have the strength of an extra brace. I've been thinking about a windscreen for a while. In the Jon Wells design there was one flat windscreen (a la Caterham) but I initially thought about a split 'v' screen which comes back at the sides. I've been following an american fabrications company on instagram who made a B52 inspired side car and was planning to copy the 'screen' design from there. Then late one evening scouring eBay I saw a dickie windscreen from a triumph roadster:   Perfect - looks gangster as the kids would say. Bidding was at £13.00 with a day to go but the seller wasn't answering my emails or calls about widths. Chose the technical option and got my ruler out along with a picture on my screen (no kidding) and guessed it would be about right. Won the action (went up a little and ended up paying £100 :s) and it was delivered on Tuesday. About 2" too wide on each side..  It did look good though, and I'm still undecided on chopping 2" from each side and having it re-welded (its ali). The only thing thats stopped me is I'm worried that once I've taken 2" from each side there won't be much left to see though. I'm back looking at Westfield and Caterham screens as I think they'll be a similar (34") width. Although if anyone has one and want's to measure that would be great. Next was to make a bottom rail which runs parallel to the top rail. They don't usually have these on Pembletons, but with me not having the top hoop I thought it would be good for keeping strength in the frame. Also it gives me too fixed points to attach the side panels to. I knew this was coming and a few months back I bought an electrician's tube bender off gumtree. Electricians because conduit is 1" diameter - the same as I'm using. It's been sat in the garage unused until this weekend when I got it out and realised that apart from having the mandrels it's missing almost everything I need to bend the pipe - stop bar, the guide on the bending arm etc. A PITA but a bit of time with some spare steel and I got it to a usable standard.  I used the top frame as a guide and to be honest I was really happy with the results. The only tricky bit was that I wanted the side panels to come up towards the rear - staying parallel all the way along can make them look a bit slab sided and on the old Morgans they were 'kicked' up towards the back wheel. This meant a small bend at 90degrees to the others. Judged by eye in a dark single garage. But either way it worked and I had this to show for it:  Welding my flat section meant I finished with this:  Just tacked in place but it should look good when welded and tidied up. At this point it looked like this outside and my two 70's electric heaters where struggling to keep me warm so I called it a day...  So all in all a good couple of weekends work I think - I need to get the bottom rail held in place somehow and then look at making some bracing. After that it's onto putting in a new rear bulkhead which will support the cab back and seat belt mountings. Thanks for reading, Phil |
| |
|
|
filly
Part of things
Posts: 62
|
|
|
|
Is that a swb or lwb chassis? Like this a lot.😁 Evening Jonny, This is a LWB chassis - the first one I built was a SWB and to be honest I think the SWB is a neater design - but not much good if you're over 6ft. Phil Gregory (Mr Pembleton) has a son called Guy and he makes lovely cars which I think are somewhere between a long and short wheelbase. Would recommend a build - it's good for the soul! Phil |
| |
|
|
filly
Part of things
Posts: 62
|
|
|
|
Evening, Thanks for all the love - and Happy New Year to all etc. Not too much to report - I won some flooring off eBay - the EVA interlocking stuff - not perfect but it's better than the concrete floor. Then struck lucky with some Ikea PS cabinets on Gumtree - a quick hour and a half to Nottingham one morning and I now have a garage stocked by Ikea. I always think those Ikea metal cabinets are perfect for the garage - and some bargains to be had secondhand. Plus I enjoy the roadtrip of picking them up. Next plan was a little chat with the old man who mends lawnmowers - some sweet talking and he lent me his lawnmower lift. Good result! A little moving around late one night and voila:   Having a single garage is tough going at times. Before I make the roof and screen section, I needed to sort out the rear. The spaceframe chassis is designed t take a spare wheel on the back - Morgan Barrel Back style - but I wanted a rounded rear more like the current M3W - and in line with the Jon Wells drawing. I took a deep breath and got the angle grinder out... Before:  The first cut is the deepest....  Next - it needed some wood to brace it and then pulling in by about 60mm on each side  Which leaves this...  I know it looks like the left side is bend in more, but the two tubes and main chassis rails are not central on the chassis - hence the piece of rope! I've just ordered some steel so it's time to start getting some fabrication done. Watch this space... Phil |
| |
|
|
filly
Part of things
Posts: 62
|
|
Dec 28, 2017 22:02:50 GMT
|
|
|
| |
|
|
filly
Part of things
Posts: 62
|
|
Dec 28, 2017 22:01:15 GMT
|
Right. Well.... It's been a while since I've been on here. I got the Pembleton finished (http://forum.retro-rides.org/thread/166979/pembleton-wheeler-update-30-03?page=5) and it became obvious that it was time for a change because: 1) I wanted MotoGuzzi power (double that of the 2cv engine but the same weight) 2) I wanted something which I could go on long trips with. The noise and wind had finally got to me and I was getting fed up. The sensible(ish) option would be to fit a Guzzi motor and the car to give a comfortable cockpit. I even sat Chloe – suffering and quite tall wife – in the driver’s seat while I made measurements for a roof and screen. The problem was that I just couldn’t bring myself to starting cutting up a car I’d spent ages building (and painting!). The decision was made to sell and, using the funds, build my idea of the ‘ultimate’ Pembleton. I put the car up for sale and got a decent first offer from ‘Box Fast Classics’ in Knaresborough, near Harrogate. A little haggling later and we settled on a price which I was happy with and reflected the fact that I wouldn’t have to worry about any come back. The guy I dealt with was excellent and a day after agreeing a price, the money was in my bank and a low loader was waiting to collect her/him/it. I could recommend them as a happy customer. I had expected to be more upset to be honest, but I think knowing that a new build was to come made it much easier…  A few months previous I had seen an article in ‘MOG’ magazine. It was a Morgan 3 Wheeler utility (van) concept, drawn by Jon Wells – who I believe is head of design at Morgan. I loved the design and somehow the idea was formed to make my own, Pembleton version, of his design with a few of my own ideas thrown in for good luck. 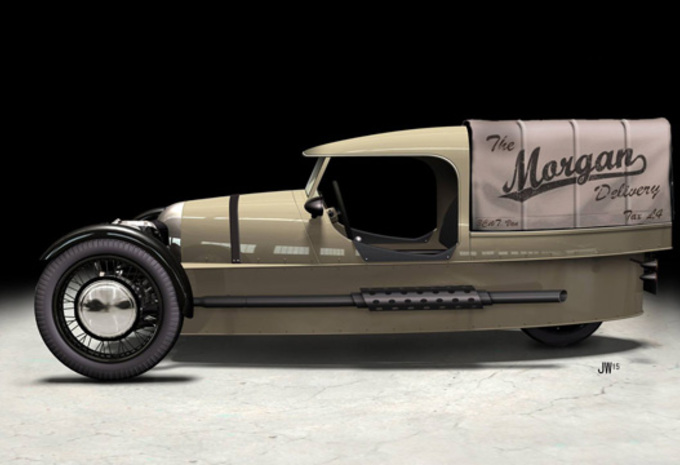 Art isn't my strong point but you get the idea....  With the money from the sale burning a hole in my pocket (and keen to spend some to stop it going on a new bathroom), I set about looking for a donor engine and car. Someone on the Pembleton forum had previously offered me a Guzzi, and a quick call confirmed it was still available. Not only this, but he had the remains of a – pretty grotty - 2CV which would work as a donor. A deal was struck and the seller agreed to deliver it to Yorkshire – lucky really as he lives in the South West. Did I mention that the donor was rough?!   The bike was better but had been stood for a long time.  Next is was a chassis. I had planned to order a new one from Pembleton, but as luck would have it another forum member in Scotland got in touch. He had built his own frame, using a Pembleton ‘original’ as a template. This meant the original was now available to be sold. Perfect timing, except that I had a car and bike to dismantle quickly in my little single garage. Anyway, I got the bike stripped and the parts sold for decent money....  So now I had the basis for a Pembleton built from the far reaches of the country - Running gear from the South Coast and a Chassis from Scotland. I just needed something from the middle, so another plan was hatched… One downside of my cheap donor was that I was in a bit of a state. I knew this and had planned to clean everything up and then fit new bearings etc. Not really my favourite job and the reason why I got fed up with old cars – cleaning rust and dealing with bolts which hadn’t been worked on for decades does not do it for me. After searching eBay I found a complete front end; steering box, arms and hubs, which had been refurbished to use as a kit but when not used. A lot of haggling down the line and I was leaving work early to get to Oxford on a rainy Tuesday afternoon.  I had to swap the arms as the Pembleton ones are modified due to the car sitting lower than on a standard 2CV. With that done I just needed to paint all the other bits and bobs.  One of the big problems with the last build was the handling. This time I was going to do it properly and have invested in adjustable dampers and 100% uprated springs all round. Again the old springs were grotty anyway so it was no loss.  Also managed to pick up a decent rear arm. Although 2cv parts prices are a funny thing – second hand parts from specialists can be strong money, but there isn't much of a second hand market otherwise - the result being you spend good money buying parts but nobody wants the leftovers when you sell. I bought a whole rear axle for £150. Took a single arm from it and I couldn't sell the remainder at 99p! Can make it tough going sometimes. The Pembleton lot are a good bunch. One friend I've made lives about an hour away and works with Zinc. The result being amazing skills and a full workshop with specialist tools to hand. He even opens it up to fellow builders once a year at no cost.  He was offering this to the forum in November and I needed to make the floor. It looks simple but once the template is cut, it needs a lip forming on the long curved edge – almost impossible to do without the right tools. With it being on the curve it also needed the shrinking machine after to give a decent finish. Here's the floor cut out ready to bend:  And here it is sat in..  I even had chance to make the front bulkhead using MDF formers he had ready. One day up at his workshop must have saved me a good week at home. Back home with bonnet sat on:  So here we are today – floor is out while I sort the suspension and tracking etc. The front end is all refurbed and all bearings etc. are new. Anyone into 2CV's will see that I've replaced the old fashioned track rod design for a modern ball joint type - much more control and easy to replace when needed.  Some parts from the donor were actually salvageable , like this steering column, but most were junk. The garage is currently just a store of 2cv/guzzi bits.   Guzzi engine yet to be tackled:  Sorry it's so long – I think this covers from about August! Have a great New Year all... Phil |
| |
Last Edit: Mar 10, 2019 23:07:04 GMT by filly
|
|
filly
Part of things
Posts: 62
|
|
Jun 21, 2017 21:00:29 GMT
|
|
SOLD.
Thanks.
Phil
|
| |
|
|
filly
Part of things
Posts: 62
|
|
|
|
Sorry - been away for a few days... Logicaluk - I know where you mean - would be keen to pop down as love old bikes too. Will the Pemb be acceptable transport to arrive in?! I got back yesterday so had a few minutes today to make adapt my plate. I quite like the exposed flywheel but a few people I know have suggested it's a big dangerous and to be honest they're probably right. So far I'm here:  This is just a mock up - planning to have the whole guard made up properly next week by a fabricator. I just need to get the design onto CAD for them. The plan is to move the oil cooler behind the guard. I'll put the holes on the section which is lower (at 45 deg) and the cooler behind that. That then gives me a space at the front for some embossed vintage style number plate letters. Maybe even a number on the pulley cover section? I'm still considering an offset driving lamp on the right to cover the alternator though. Cheers, Phil |
| |
|
|
filly
Part of things
Posts: 62
|
|
Mar 31, 2016 18:18:19 GMT
|
Armando - yes I have lots of info. Where abouts are you? I ask because there are a few 'ready made' frames which people just pass around. You really need to get onto the thepembleton.org.uk and sign up for the forum - really helpful and I couldn't have finished without them. Now - thanks for the ideas - reminded me why I love RR so much. I knew someone would be on the same wavelength as me! I bloody love a driving lamp. Have a look at the new Morgan electric 3 wheeler for offset driving goodness. I've made some ideas based on what's been said: Driving lamp offset with numberplate:  Rally 'media' plate:  Or how about this - central driving lamp?!  Any thoughts? I'm away this weekend but might head down to the local fabricator and pick up some ali next week. Phil |
| |
|
|
|
|