logicaluk
Posted a lot
 Every days a school day round here
Posts: 1,373
Member is Online
|
|
Sept 5, 2020 14:22:09 GMT
|
Good progress, bottom end looks pretty normal, new bearings and rings are all they often need. What's the cam like, they are usually the first thing to go, standard cam kits are pretty cheap though. If you use a 3.9 cam make sure you get a 3.5 front cover gasket, there is one hole in a different place which means you won't get any oil pressure ,(I found out the hard way). Are you keeping the injection, If not and it's a flapper I may be interested in some parts. Yes cam looks shot. Yep (just checked) I did order the 3.5 gasket kit. I'm not using the injection as its missing its ecu and I have a pair of strombergs. But i think its a hot wire. Is the 3.9 cam good with carb? Thank Dan |
| |
Last Edit: Sept 5, 2020 15:15:16 GMT by logicaluk
|
|
|
|
logicaluk
Posted a lot
Every days a school day round here
Posts: 1,373
Member is Online
|
|
Sept 5, 2020 14:15:22 GMT
|
cleaned up and did a bit more, both sheared bolts came out the front cover, one wound out with some heat, the other had to be drilled out and re-tapped. Upon close inspection I think the camshaft has had it.  20200905_125905 20200905_125905 by logicaluk, on Flickr the cam follower that lost its clip, took out a push rod.  20200905_131753 20200905_131753 by logicaluk, on Flickr Both of the rocker shafts are well worn, and ones bent.  biscuit. So the shopping list looked like this Full gasket setRocker shaft x2 Push rod x1 Piston rings Main bearings Big end bearings Timing chain Cam and followers Core plugs Any one have a Lucas hotwire ECU they would like to part with? |
| |
Last Edit: Sept 5, 2020 15:57:04 GMT by logicaluk
|
|
logicaluk
Posted a lot
Every days a school day round here
Posts: 1,373
Member is Online
|
|
Sept 5, 2020 10:28:26 GMT
|
The third job for today is clean up the workshop, the First, make even more mess by completing the strip down of the V8, second make a bacon butty whilst posting this lot. The crank pulley thought it had the best of me but I bolted a bit of box section to the crank and attacked the other end with the big breaker and wound it out, the sump was much cleaner than I had expected.  20200905_103001 20200905_103001 by logicaluk, on Flickr The front cover came off with a total of 2 sheared bolts one for the water pump with a nice bit to grab on to and one for the oil pump that broke off flush, curse word. I think at this point it realised there was no point in fighting me so it capitulated and came apart fairly easily. By the looks of it was taken out of use just before major damage occurred.  20200905_100020 20200905_100020 by logicaluk, on Flickr  20200905_100214 20200905_100214 by logicaluk, on Flickr  20200905_102754 20200905_102754 by logicaluk, on Flickr  20200905_100338 20200905_100338 by logicaluk, on Flickr 1  20200905_103511 20200905_103511 by logicaluk, on Flickr 2  20200905_103520 20200905_103520 by logicaluk, on Flickr 3  20200905_103526 20200905_103526 by logicaluk, on Flickr 4  20200905_103551 20200905_103551 by logicaluk, on Flickr 5  20200905_103602 20200905_103602 by logicaluk, on Flickr 6  20200905_104812 20200905_104812 by logicaluk, on Flickr 7  20200905_103632 20200905_103632 by logicaluk, on Flickr 8  20200905_103611 20200905_103611 by logicaluk, on Flickr |
| |
Last Edit: Sept 5, 2020 10:29:22 GMT by logicaluk
|
|
logicaluk
Posted a lot
Every days a school day round here
Posts: 1,373
Member is Online
|
|
Sept 3, 2020 20:09:17 GMT
|
Before Barry collected his cleaning tank, I managed to put the entire valve train from the left bank through just to get the worst off. Started off like this  20200903_183159 20200903_183159 by logicaluk, on Flickr Ended up like this.  20200903_184209 20200903_184209 by logicaluk, on Flickr I did find one hydraulic lifter was missing its clip, hopefully it's in the sump. Dan |
| |
Last Edit: Sept 3, 2020 20:11:36 GMT by logicaluk
|
|
logicaluk
Posted a lot
Every days a school day round here
Posts: 1,373
Member is Online
|
|
Sept 3, 2020 19:46:32 GMT
|
|
Mr Darkspeed I think that's for the ZF box, but its nicely oversized and could be turned down, as long as it won't matter that the holes are too big.
Thank you. Ill PM you.
|
| |
|
|
logicaluk
Posted a lot
Every days a school day round here
Posts: 1,373
Member is Online
|
|
Sept 2, 2020 20:27:19 GMT
|
|
Managed to get the engine unloaded this evening, whilst taking off the ZF flexplate adapter I noticed a glaring omission, the BW 35 flex plate didn't come with the spacer, the person I got the gear boxes and flexplate off, no longer has the block. Oh carp.
There is one on eBay but its 25 quid, don't suppose any one in here has one, it's the 5/8 thick one apparently.
My mate called, he's doing some electro plating experiments and needs his ultrasonic cleaner back, so I've just pushed the button on a 10l one, whilst on the subject of my overdraft.
I've ordered the rebuild kit for the BW, eBay was 75 quid, the chaps GNR suggested wanted 90+ but JR Wadhams got the order for £69
I also ordered a couple of gasket kits, One of which is worthy of a mention, order placed for a head gasket set on eBay for £25 with a seller called shirley9293 at about 1pm, was delivered next day. Brilliant service. Also, a bottom end set for 12 quid which will probably turn up in October.
|
| |
Last Edit: Sept 2, 2020 20:28:34 GMT by logicaluk
|
|
logicaluk
Posted a lot
Every days a school day round here
Posts: 1,373
Member is Online
|
|
Sept 1, 2020 19:26:26 GMT
|
I've just seen this in the back of the car  20200901_185627 20200901_185627 by logicaluk, on Flickr About 4.30 it looked like this 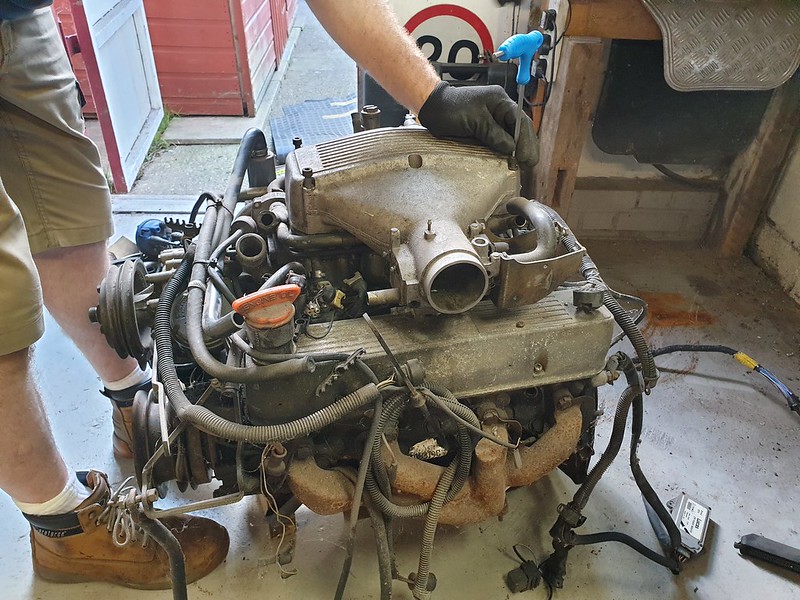 20200901_163206 20200901_163206 by logicaluk, on Flickr It's a 3.5 from an EFI auto Range Rover, so nothing special, which by the look of the heads has missed a few oil changes, but there's no lip on the bores and the cross-hatching is still just visible.  20200901_181526 20200901_181526 by logicaluk, on Flickr  20200901_181609 20200901_181609 by logicaluk, on Flickr  20200901_181540 20200901_181540 by logicaluk, on Flickr  20200901_181636 20200901_181636 by logicaluk, on Flickr Not many pics were taken as it needed to be made lighter to put in the car. There were a couple casualties the Allen head counter sunk bolt in the back of the alternator bracket, eventually came out 3 turns before refusing to go any further, the bracket came off after decapitating the bolt. Also, 2 bolts sheared off in the water pump housing, now I need to look in to what options there are for the water pump, cam cover oil pump housing as this one has 3 belts which I only need one of and looks ugly. An evening well spent. Dan |
| |
|
|
logicaluk
Posted a lot
Every days a school day round here
Posts: 1,373
Member is Online
|
|
Sept 1, 2020 19:03:27 GMT
|
Looks very close to a BE cam GNR, I also have a spare too.  20200901_193824 20200901_193824 by logicaluk, on Flickr Dan Edited to include the pic of the cam |
| |
Last Edit: Sept 1, 2020 19:27:55 GMT by logicaluk
|
|
logicaluk
Posted a lot
Every days a school day round here
Posts: 1,373
Member is Online
|
|
Sept 1, 2020 18:09:30 GMT
|
|
As it was an unknown quantity I couldn't have done anything else Peter.
|
| |
|
|
logicaluk
Posted a lot
Every days a school day round here
Posts: 1,373
Member is Online
|
|
Aug 31, 2020 18:23:26 GMT
|
Good work. 15/16" is as near as dammit 24mm (and 1/2" WW), and I think a lot of manufacturers use the same blanks. As GnR says, maybe investigate some options while it's apart? Did you find where the stray tooth came from? Thanks and yes I did, the planet gear has shed 2 teeth, bizarrely 2 teeth apart from each other.  20200831_185153 20200831_185153 by logicaluk, on Flickr Lucky I have a spare box to dive in to. Dan |
| |
|
|
|
|
logicaluk
Posted a lot
Every days a school day round here
Posts: 1,373
Member is Online
|
|
Aug 31, 2020 18:17:23 GMT
|
Good bit of progress there, and judging by what you found it certainly looks like the rebuild was warranted! I found that the locations of the ball & spring check valves in my valve body also didn't match any of the manuals I had to compare to. I can only presume that some of the subtle variations in the type 35s is made by adding and removing some of these valves. Have you checked out the downshift valve cam to see if which type you've got? One type allows for part throttle down shifts, the other will only down shift when the speed drops low enough (and it's low like 10mph or slower when it does the 3-2 shift and basically wont 2-1 shift unless you're stopped) or when you push the throttle far enough to enable the kick down. My box doesn't have the part throttle downshift and I'm sort of regretting not changing it when I had the gearbox apart now I've had chance to do some miles in the car. There more I've just discovered,(see next post) No I haven checked the cam, didn't realize there was a difference have you got pics?, I have got a range control valve which gives the normal P R N D 2 1 rather than P R N D2 D1 L gear pattern, I've got a spare range control valve if you need one. A c&p from wiki Early models have two drive positions marked with a "2" and a "1" (P-R-N-D2-D1-L; Park, Reverse, Neutral, D2, D1 and Lock). These models start off in Second gear when in the D2 position. This is useful for economy in relatively flat terrain and for starting on slippery surfaces (wet mud, snow, ice, etc.). When placed in the D1 position the transmission shifts through all three forward gears. In "Lock" the transmission can be locked to prevent upward gear changes and will provide maximum engine braking in 1st gear and moderate engine braking in 2nd gear. By selecting L from stationary, or before an upward gear change into 2nd gear, the transmission will become locked in 1st gear. By selecting L from D2 or D1 while in 2nd gear, the transmission will become locked in 2nd gear or from D2 or D1 when cruising below 55 m.p.h (88 k.p.h.) will effect an immediate downward change and lock in 2nd gear. In both these instances, the transmission will automatically change down into 1st gear when the car speed drops below 5 m.p.h. (8 k.p.h.). Should 1st gear be required earlier, reduce the car speed to below 30 m.p.h. (48 k.p.h.) and effect a "kick-down" gear change. Many people assume they have a two speed transmission because they expect the first Drive position (D2) to shift through all three gears as all automatic transmissions have done since 1968. Some vehicles had the same system without the D1 and D2, instead just having D, and only 5 stations on the quadrant The Rover P6 manual is far better than the BW one. This is the valve that changed the gear pattern  20200831_200258 20200831_200258 by logicaluk, on Flickr Dan |
| |
Last Edit: Aug 31, 2020 19:17:03 GMT by logicaluk
|
|
logicaluk
Posted a lot
Every days a school day round here
Posts: 1,373
Member is Online
|
|
Aug 31, 2020 16:40:27 GMT
|
Last night I spent several hours, looking at and editing the video id shot for the tube of you, then decided it was carp and deleted it. Today's Mission which I gladly accepted, was to use my big spanners and complete the strip down and inspection, but mostly using the big spanners. So today's exciting episode is bought to you by Hilka and Gedore. The first bit was so easy I didn't take a pic of it, unbolting the brake band servos but here's a pic of where they were instead.  20200831_114116 20200831_114116 by logicaluk, on Flickr Then the front pump comes off so the input shaft, front and rear clutch and the sun gears can come out along with the front brake band. But not before you have realized that the end float needs to be measured, bolted it back up measured and undone all the bolts again. The end float was 0.65mm should be 0.25 to 0.75mm, so not out of spec but well on its way.  20200831_120338 20200831_120338 by logicaluk, on Flickr While parts cooked in the cleaning tank it was time for big spanners to get the governor off 1 1/8 Hilka spanner, possibly the first time I've used this spanner, I've had it for 25 years.  20200831_122739 20200831_122739 by logicaluk, on Flickr The rear brake band was a fiddle to get out it took me 20 mins to work out how to get it came out, close it up and tilt the bottom out, easy when you know how. Then the adaptor for the dip tube a 15/16 Gedore spanner (which incidentally is a metric casting that been re stamped with the AF size, feels very nice in the hand)  20200831_124901 20200831_124901 by logicaluk, on Flickr Input shaft and front clutch pack came apart easily. 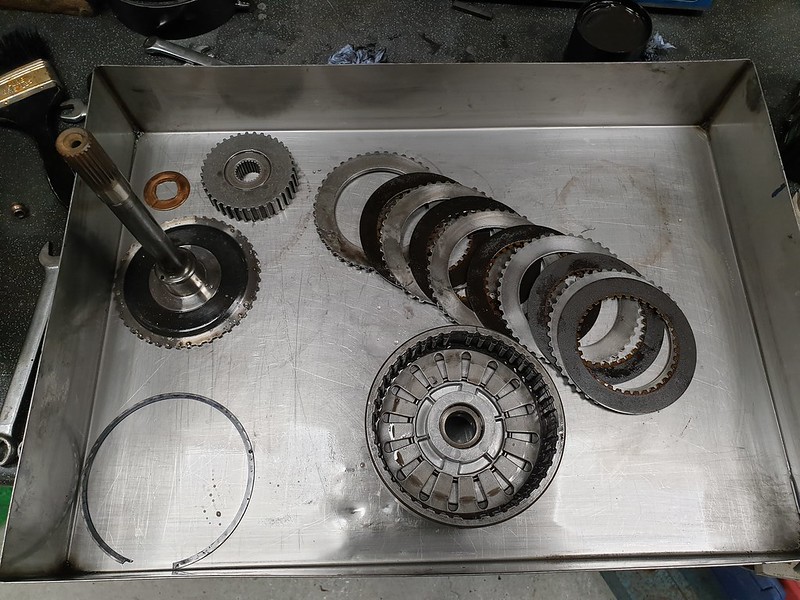 20200831_135027 20200831_135027 by logicaluk, on Flickr The clutch pack looked in good condition but as I have NOS ones I might as well fit them. 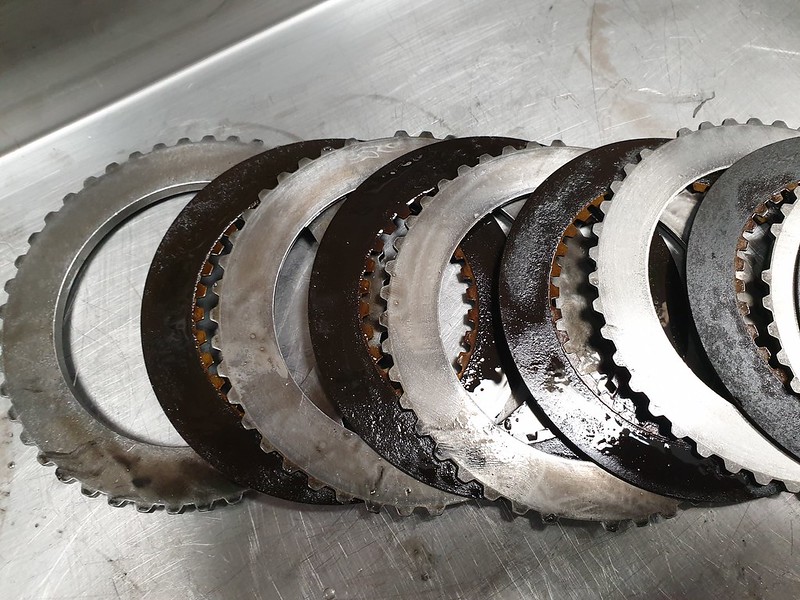 20200831_135031 20200831_135031 by logicaluk, on Flickr Under the diaphragm spring there is a plate with a one way valve and a seal which needs to come out to be changed.  20200831_140336 20200831_140336 by logicaluk, on Flickr All looked fine until...  20200831_140410 20200831_140410 by logicaluk, on Flickr Luckily there's one in the clutch kit. Whilst that cooked in the tank I cleaned the planet gear no point in even trying tio strip it as all moves smoothly, then on to the rear clutch pack and that couldn't have been a more different story to the front. 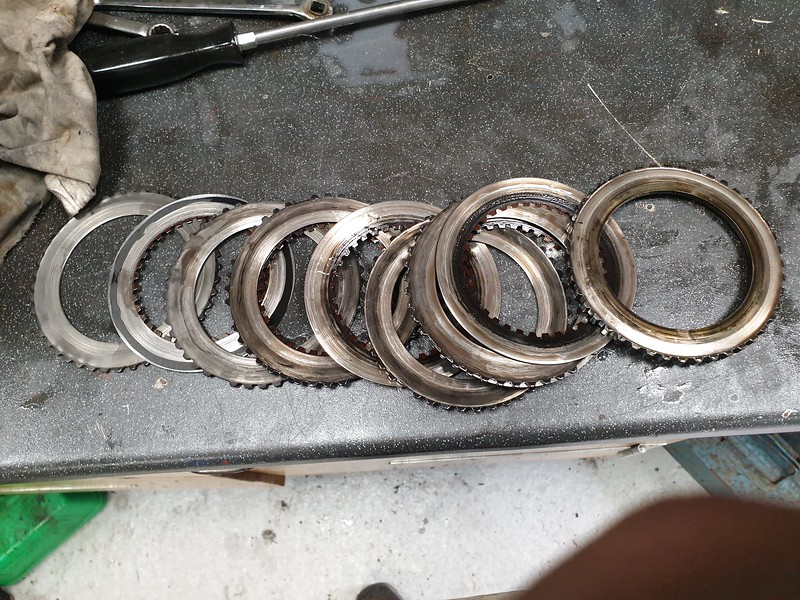 20200831_143804 20200831_143804 by logicaluk, on Flickr No friction material left, bent plates. Toast I tell you toast, at least that's one question answered. Now we know where the sludge came from. Then I hit a problem the spring-loaded rear clutch. And I think it needs a special tool to get the clip out and release the spring.  20200831_143849 20200831_143849 by logicaluk, on Flickr I gave it the best clean I could, soaked it in brake cleaner and blew it out with the air line but I think there is a high probability of sludge behind that plate. Suggestions on the back of a post card or down below which ever you feel suits you. I didn't feel the need to remove the selector mech or the parking pawl, so just cleaned them up and scrubbed the case off before blowing it off with an air line.  20200831_154902 20200831_154902 by logicaluk, on Flickr the tail shaft got cleaned up too 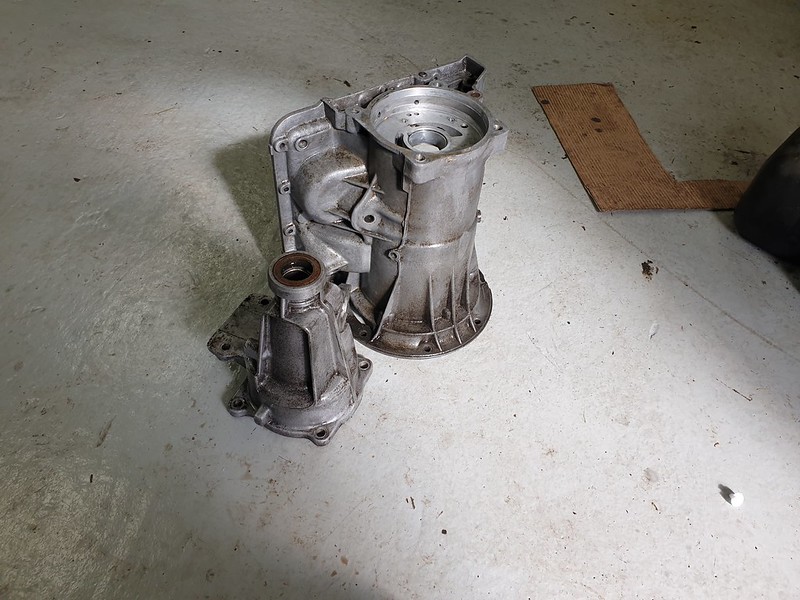 20200831_153150 20200831_153150 by logicaluk, on Flickr And that's what comes out of a Borg Warner 35 gear box.  20200831_154856 20200831_154856 by logicaluk, on Flickr Let's hope it all fits back in. Oh, and the brake bands were shot too, the front was missing chunks of surface  20200831_160021 20200831_160021 by logicaluk, on Flickr And the rear was almost worn through to the steel. 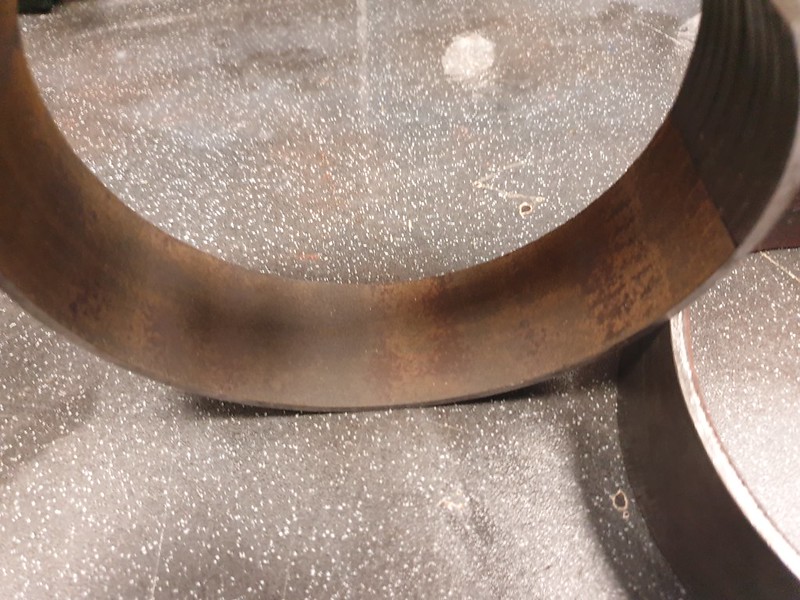 20200831_160015 20200831_160015 by logicaluk, on Flickr And that was the easy bit done. |
| |
Last Edit: Aug 31, 2020 16:52:15 GMT by logicaluk
|
|
logicaluk
Posted a lot
Every days a school day round here
Posts: 1,373
Member is Online
|
|
Aug 30, 2020 22:20:04 GMT
|
Whoops didn't I say!! Oh! How remiss of me, it's going in a Triumph. I'm trying my hand as shooting video for the YouTube, so not as many pics as usual. I finally managed to get most of a day clear to start on the gearbox, BW manual printed out and a set of brushes delivered from eBay for 4 quid. 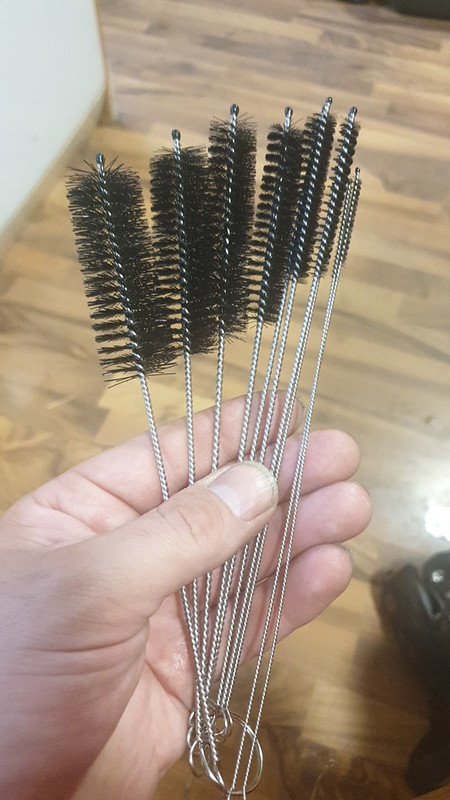 IMG_20200827_190857_779 IMG_20200827_190857_779 by logicaluk, on Flickr After seeing the state of the ATF the thick paste in the bottom of the pan wasn't much of a surprise. The magnet was attached to this bolt, had an iron filing fur coat  20200830_133409 20200830_133409 by logicaluk, on Flickr After gently levering out the pipes I could unbolt the valve body, which was also covered in a thick black paste.  20200830_133859 20200830_133859 by logicaluk, on Flickr Everything went through the ultrasonic bath, with nothing more than warm water and washing up liquid. Followed by either a wipe off with a cloth or a rince with brake cleaner. Then I found this lovely fellow, I wounder where you have come from? I guess I will find out eventually. 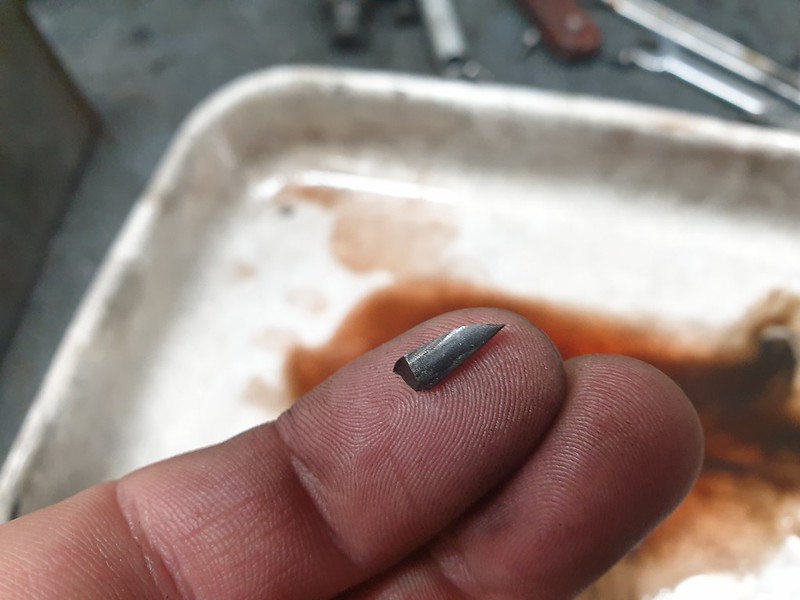 20200830_135404 20200830_135404 by logicaluk, on Flickr The grey black sludge seems to have got everywhere, note the spring, this pic came in very useful later. 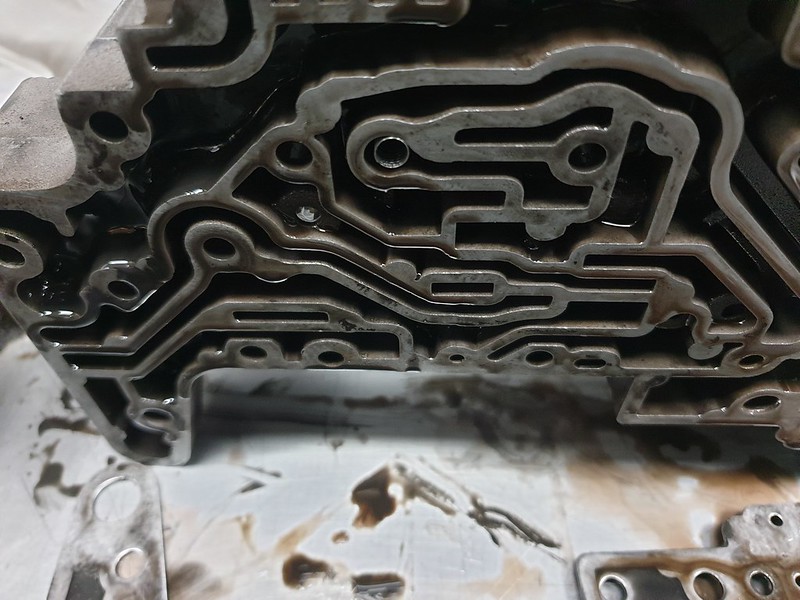 20200830_144819 20200830_144819 by logicaluk, on Flickr these ultrasonic baths are great  20200830_153449 20200830_153449 by logicaluk, on Flickr I guess this is an upgraded separating plate.  20200830_155449 20200830_155449 by logicaluk, on Flickr When I started putting the valve body back together everything was going better than expected, till the manual suddenly made no sense. 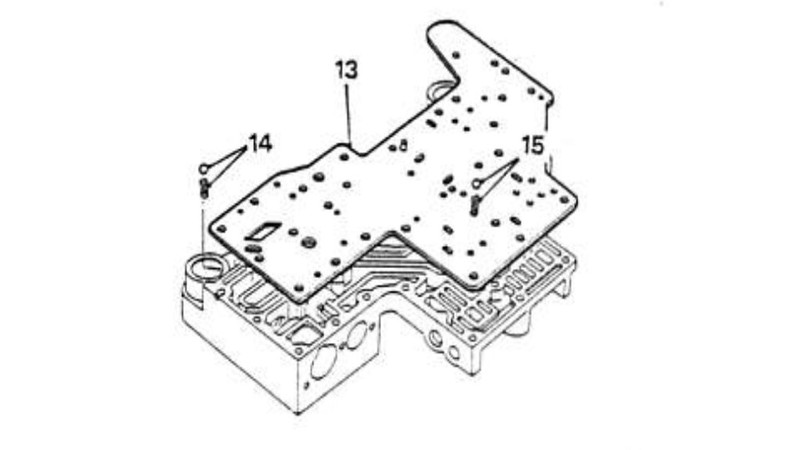 balls balls by logicaluk, on Flickr #14 is supposed to be a converter nylon ball and spring, nope haven't got one of those and the hole it goes into appears to be blind, #15 2-3 shift restrictor steel ball and spring, I've got that but there's nowhere for it to go in the upper valve body, so I checked the Rover P6 manual.  20200830_230257 20200830_230257 by logicaluk, on Flickr That shows #11b the converter check valve ball and spring I still don't have and #11a rear pump check valve and spring that I also don't have and no sign of the shift restrictor........ lucky I took the pic with the spring in place earlier the sodding thing goes under the separator plate not on top of it. not sure what to make of this, I've read about BW35 boxes puking on the floor overnight as the torque converter drains back down. That was the only difficulty, just being methodical and trying not to rush got me through, TBH nowhere near as bad as I was expecting. Oh, it looked like this when I was finished  20200830_172012 20200830_172012 by logicaluk, on Flickr Dan |
| |
Last Edit: Aug 30, 2020 22:30:00 GMT by logicaluk
|
|
logicaluk
Posted a lot
Every days a school day round here
Posts: 1,373
Member is Online
|
|
|
|
I run my shed (garden office) on effectively a hard wired extension lead, plug to a fused switch then 3 core cable to the shed. Worked fine, was using ethernet over power (PowerLine adaptors) but as the cable has deteriorated I can't get a signal in the shed. Need to rewire it properly with armoured cable run along the fence, either to a new fuse box in the garage or just a 3 pin plug. p.s. don't do what I did and lay in a pipe under the path and leave a piece of string in to pull cable through with, then leave it a few years so the string rots away and I can't feed a cable through. I have an ingenious trick to solve this problem, a 5p plastic shopping bag, a ball of string and a hoover. Depending on the size of your pipe cut up the plastic bag to make a loose bung in the tube once the string is tied around it. Suck it through the conduit with the hoover, just remember to tie a rope to the end of the string before it disappears down the conduit. Dan |
| |
|
|
logicaluk
Posted a lot
Every days a school day round here
Posts: 1,373
Member is Online
|
|
|
|
|
Mines the 700nm 1/2 inch gun. But Its not working in a busy workshop.
|
| |
Last Edit: Oct 2, 2020 20:48:34 GMT by logicaluk
|
|
logicaluk
Posted a lot
Every days a school day round here
Posts: 1,373
Member is Online
|
|
Aug 26, 2020 19:34:10 GMT
|
|
Ingenious sir, love the way this build looks like it's going.
As you were.
Dan
|
| |
|
|
logicaluk
Posted a lot
Every days a school day round here
Posts: 1,373
Member is Online
|
|
Aug 26, 2020 19:23:46 GMT
|
|
I, too, rebuilt a horn recently, iirc I put a multimeter across the terminals and found a few Ωs resistance, wound the screw out till it went open circuit then back in till it just made connection again. Put on ear defenders, connected it up to the battery and "adjusted" the screw till it worked.
Dan
|
| |
|
|
logicaluk
Posted a lot
Every days a school day round here
Posts: 1,373
Member is Online
|
|
Aug 23, 2020 19:03:06 GMT
|
|
6 month update.
I'm totally smitten with the 1/2 inch impact, its yet to be defeated, the noise from the drill I'm getting used to, it's a lot quieter under load and the 1/4 inch impact get used far more than I thought it would.
Totally happy would and do recommend, money well spent.
Dan
|
| |
|
|
logicaluk
Posted a lot
Every days a school day round here
Posts: 1,373
Member is Online
|
|
Aug 22, 2020 21:28:11 GMT
|
|
thanks GNR, ive got the rover p6 manual and printed out a copy of the Borg Warner manual.
I'm just waiting for a full day but that may not be possible to start off.
Dan
|
| |
|
|
logicaluk
Posted a lot
Every days a school day round here
Posts: 1,373
Member is Online
|
|
Aug 22, 2020 19:19:59 GMT
|
I like many others on this forum spend a lot of time acquiring as may parts as one deems necessary to get my project if not 100% then as close to it as possible before commencing, I've been pretty close to 95% for about 3 years but, Frank my Acclaim had to be moved from project to stable release before this could move from planning to project, which was fine and not a problem, I have limited space, so have a 3 car policy (one strictly policed by the secretariat) 1 daily (no mods), 1 classic to play in and 1 project. Then I put my back out and realized I needed a bigger workshop one with the headspace for a lift. Read about the garage build here which all put this project on hold. Then my best mate goes and throws a huge spanner in the works, id popped over for a brew, chat and a look at what ever he was working on this week & he says "I'm having a clear out do you want this lot"? Pointing under the work bench at an ex Range Rover classic V8 and gearbox. After another cup of tea a plan was hatched. The gearbox and transfer box was of no use so that went on eBay, but that left me with nothing to connect the engine to the propshaft, LT77 or R380 are way out of my budget and probably not ideal for a variety of reasons, one being my inability to press the clutch pedal when the disks in my back decide to go for a meet up with the local nerves for a bit of a sesh. So slush-O-matic is the way to go, the ZF box looks to be too big. So I put an add-on here for a Borg Warner 35, which found one not too far from hull from an MGC but obviously didn't come with a bell housing or flex plate for an RV8, but it did come with a box of NOS front pumps, brake bands and clutch packs. 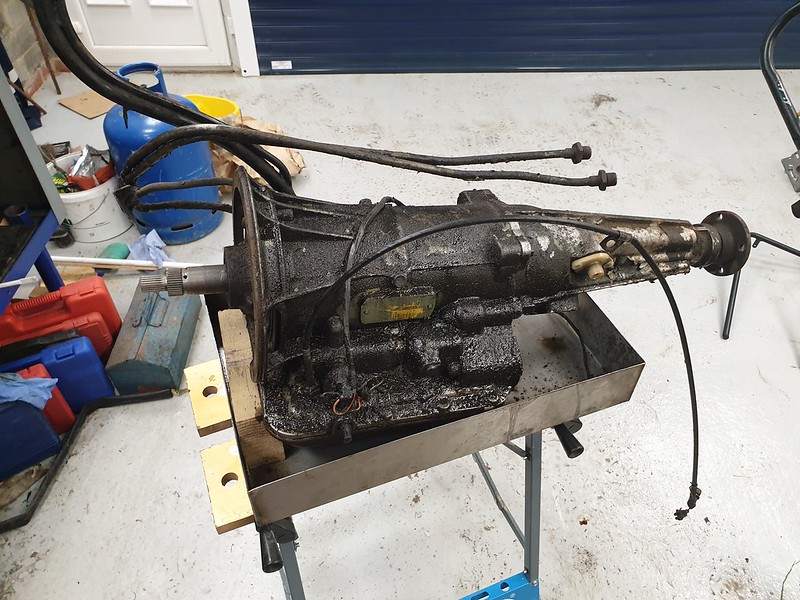 20200728_191711 20200728_191711 by logicaluk, on Flickr I even managed to find a bell housing and flex plate on eBay before I went to pick it up, but it turns out I'm a hoofing great idiot who didn't know the difference the between a BW35 and BW65 bell housing whoops, back on the hunt. First job was to clean it up, it's a 17EA what ever that means and a dirty one at that.  20200727_182125 20200727_182125 by logicaluk, on Flickr Which after a liberal application of stale petrol over a couple of days, turned out like this.  20200729_195304 20200729_195304 by logicaluk, on Flickr A couple of weeks does by and I spot an ad on Facebook for a pile of bits that equates to, 2 rover V8s whilst what catches my eye is the gearbox half hidden, under a table. Now the thing is they don't want to split the lot and the price is a bit steep but after chatting for a while I decide its worth going for a look, lovely people but I can't justify the money they are asking, but they are starting to think about splitting the lot up so a week later when I message then we come to an acceptable price and 1 complete BW35 with bell housing, torque converter and flex plate arrive at my workshop with a second gearbox with the sump pan sitting loosely on top a bell housing and some internal gearbox bits. So to add to the 17ea I also have a 303  20200822_155927 20200822_155927 by logicaluk, on Flickr and a 387 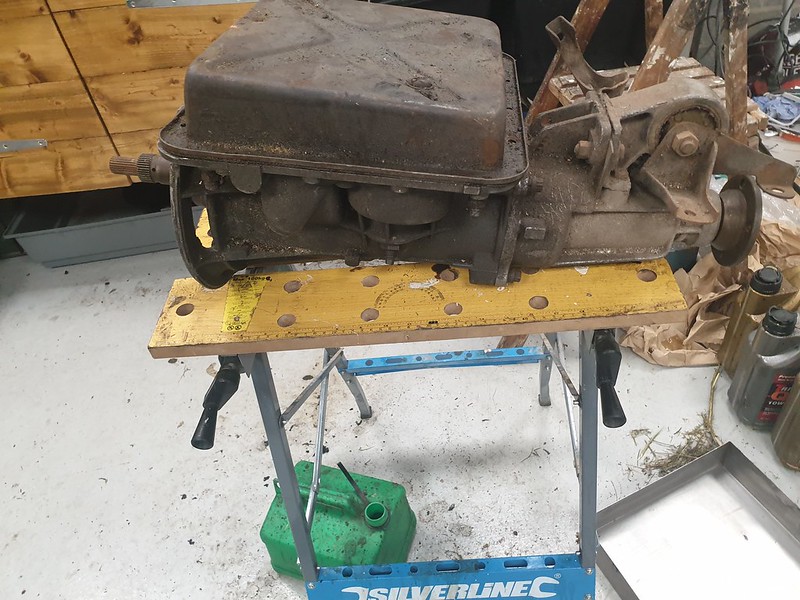 20200817_202339 20200817_202339 by logicaluk, on Flickr which I believe is an earlier gearbox built to the 303 spec the 303 cleaned up nicely  20200822_164044 20200822_164044 by logicaluk, on Flickr I had removed the starter interlock switch to clean under it so when I went to move it the gearbox puked all down my leg and on my shoes. Never ever assume it makes an ASS out of U and ME, so I drained the gearbox the fluid was almost black but smelled fine.  20200822_163643 20200822_163643 by logicaluk, on Flickr The question is now which box to strip clean and rebuild, the shorter tail shaft of the other 2 rules out the 17EA, the 287 with the loose sump pan has 82 stamped on it so maybe it was rebuilt in 82, what remains of the ATF in it seems a good colour and smells good. |
| |
Last Edit: Nov 10, 2020 16:57:17 GMT by logicaluk
|
|
|
|


