logicaluk
Posted a lot
 Every days a school day round here
Posts: 1,373
|
|
|
|
Oops walked away from the thread forgot to check back. As for the fitting kit it's only if you want to look like a professional installation, mine sit one side on a block of OSB, the other has a chain that supports but is angled back to pull them in to the other support.  20200501_160058 20200501_160058 by logicaluk, on Flickr The panels are very light and don't need a heavy support structure, on a flat surface I would mount them with a baton down either side and a one on top to support them. Make sure the transformers are in free air and can keep cool. Or just screw them to something through the outer 10mm of the frame as there is nothing there, I took one apart, 3 layers of defusing sheet, a spacer with a strip of LEDs down 2 sides and a backing plate. I think I wrote about the paint I used in the workshop and so far its doing what I would expect, sticking to the floor. It's had every conceivable (garage related) fluid on it and it's not shown any issue. I did do a lot of prep to the floor First. I did as a test and painted the outside step by the personnel door without all the prep work and it's flaked off in one big sheet. One thing I will say is if your floor has a lot of air bubbles in the surface water your primer coat down to water to fill them towards the end. The company I used had a great website with loads of DIY info and were more than happy to help on the phone. All the info is on my Garage build thread. |
| |
Last Edit: Nov 9, 2020 11:00:21 GMT by logicaluk
|
|
|
|
logicaluk
Posted a lot
Every days a school day round here
Posts: 1,373
|
|
|
|
|
Thanks john, it's driving me potty.
Kevin, I don't think going any further back than the tail lights would look right and the inside of that point is fairly narrow.
A small problem and the main reason I've spent so long wandering down the pickup path, is the lack of available courier/estate roof and tubs. I've been looking and had found a very rough example for OK money, turned up to collect it, only to find the owner was on holiday and hadn't told her parents we were coming or where the keys or docs were then started upping the price, so I walked away.
Without the longer roof, I would have to fabricate the back few feet of roof panel to keep the profile which I think is beyond my skill set, but having watched GN rebuild the Jowett Bradford van, I did think that style of ally skinned wood frame would be possible, but it would have to deviate from the Herald style roof giving extra useful space.
Or what about making a truck cab losing the entire rear body and building a bespoke body on the back one that could act as sleeping quarters with a tent supplying the rest of the space. Or a micro caravan sat on the back
Dan
|
| |
Last Edit: Nov 9, 2020 6:31:45 GMT by logicaluk
|
|
logicaluk
Posted a lot
Every days a school day round here
Posts: 1,373
|
|
|
|
The Herald van is a great idea 👍👍 Standard or courier max? Dan |
| |
|
|
logicaluk
Posted a lot
Every days a school day round here
Posts: 1,373
|
|
|
|
It's amazing how quickly things change, this weekend I was hoping to get the gearbox and engine trial fitted together, to work out the size of the spacer behind the flex plate, but it's not Covid-19 more, my discs got lonely and decided they wanted a quick pre-lock down meetup with the local nerves, It went like this, Wednesday they had a grumble about missing each other and it looked like lock down was going happen which calmed but didn't let it go. Friday I'm thinking easy weekend may be a little light tidying In the workshop and a walk. Sat turns out I can't walk to the kitchen without having to closely inspect the carpets for a few min while I get my carp together to try again. Monday I got to inspect the lino at Hull A&E (which was very good quality) when I went to wash my hands and completely forgot I really needed them to help retain a semi upright position when on crutches and had to put my self on the floor quickly before I screamed, later after a thorough check a nice lady gave me a pill which really chilled me out, and they took me for an MRI and a neuro surgeon checked me over and said if it's not right in 4-6 weeks get a referral from the GP. Later in the day my(I say my as I don't think I've had the same one twice in a good few years) GP spent a good amount of time talking to me, adjusted my medication, so I've got an emergency painkiller, and now I have to wait. Tuesday and Wednesday I don't remember much about as the painkillers were very Good, Thursday I made it out the house and around the back garden, which is small. X2 Friday walked to workshop. Sit on chair (think about the project) walk back to house x3 Sat as above x5 So that's why now I've got to tell you about the project. I've always liked Pickups, but they are not exactly plentiful, but what I do have is most of a stalled triumph herald rebuild, the chassis was done a few years ago. I've got most of the body parts which I have been picking up for a while but I've no idea how they will be after being in storage for many years. I was going to run with a 1200 bonnet as I prefer the shape but then, the V8 fell on my lap and I had the perfect somewhere for it to go, with that, the new workshop it and then casually being offered a GRP 13\60 bonnet for the collecting, the gears aligned and I thought it's time to do it. But now I'm lying most of the day resting getting up as often as I can and having a short walk around the garden or to the workshop and back, whilst waiting for my back to get better. I need something to look forward to So it's time for some imagineering, I've been kicking this idea about for ages, herald pick up something for taking stuff to the tip or going to a show in, parts runner, it's never going to take big loads it's got a small load area, it's just for fun. It's also a rebody so all legal From Google this is the best one full for sale ad here linkThis car by Quiller triumph is probably the best roof job I've seen. I'd like to bring the rear pillar further back change and the rear window to a more conventional pick up type, but it looks like there's not much space behind the bucket seat  2 2 by logicaluk, on Flickr The roof also has to unbolt like a herald one. But there's not much space in the bed already (could the bed be lengthened could I do it?)  93 93 by logicaluk, on Flickr But then another thought occurred to me, the triumph courier.  Triumph_Couriervan6266 Triumph_Couriervan6266 by logicaluk, on Flickr What if there was a big brother, one with sides that came up further out, maybe at the tip of the fin and went straight up,and the rear roofline went up a bit like an Astra Max van. It would still have herald charm but be a far more useful van. Also having a slightly larger motor in it would help overcome come the wind resistance media.gettyimages.com/photos/triumph-herald-1360-estate-picture-id1175887296?s=2048x2048There you go that's what I've been thinking. What do you think? Dan |
| |
Last Edit: Nov 8, 2020 12:34:00 GMT by logicaluk
|
|
logicaluk
Posted a lot
Every days a school day round here
Posts: 1,373
|
|
|
|
|
Could a webbing strap under each spring and secured to the frame be used to take the weight and look like tank protection.
Dan
|
| |
|
|
logicaluk
Posted a lot
Every days a school day round here
Posts: 1,373
|
|
|
|
what sort of kerb weight were the spitfires ? just a random question really as the body almost looks beefy enough to be monocoque, but its resting ontop of a ladder chassis Got it in one Darren, spitfire cills are structural. |
| |
|
|
logicaluk
Posted a lot
Every days a school day round here
Posts: 1,373
|
|
|
|
|
Ok I've re-Read the thread and there's no mention of miracle paint, what is it, where did you get it and how much was it?
Love the colour.
Dan
|
| |
|
|
logicaluk
Posted a lot
Every days a school day round here
Posts: 1,373
|
|
|
|
A piece of broken piston ring is an excellent tool to clean the groves in the pistons Keep up the good work! Peter I found a seal pick invaluable to break up the carp i found in mine, as well as a cunning grind on a ring end. the pistons I did spent atleast 30 mins in the sonic bath at 80deg about a week before I cleaned the grooves out, aiming for 2 a day was an achievable goal, as i found it sooooo boring. Nice work love the car. Dan |
| |
Last Edit: Oct 30, 2020 9:54:03 GMT by logicaluk
|
|
logicaluk
Posted a lot
Every days a school day round here
Posts: 1,373
|
|
Oct 25, 2020 20:27:13 GMT
|
Guess what, the box had to come apart again this time it was to get the tail shaft out to find some seals, the manual seemed to show them, but they looked like the metal/hard plastic bearing type rings called oil control rings in the manual but nothing like it in the rebuild kit, I found a proper old school hydraulic engineering company, the guy running it was sat behind a kneehole desk with a huge pile of job cards on the desk, real card job cards, with a wall of different sized seals behind him, a 1950s bus sized trolley jack on the floor that had just come in for repair, I was happy I had found the right place. I showed Dave the shaft and explained what I was after and pointed to the similarly described rings on the shaft and the diagram In the manual, they are piston rings says save I don't think They do them that small, besides it's not moving you want an O ring, odd size for an O ring, says Dave with his vernier caliper in hand. Dave picks up the phone and calls a supplier and orders 6 pairs of different sized rings one of them will fit as it. I went in the next day and met his son who took one look at the pile of O rings and slipped one on the shaft bingo First try, when I proffer a £10 note he says they are 12p each I think I can let you off with that. Top chaps D&A hydraulics, 24-30 Francis St, Hull HU2 8ED. I'd got quite Good at this so the box was back together in about half an hour  20201018_172358 20201018_172358 by logicaluk, on Flickr  20201024_120257 20201024_120257 by logicaluk, on Flickr With that back together It's time for a workshop tidy up. Oh, I did have a quick go with the new welder I need a hammer rack. This was just a fill weld where I had cut the angle to bend it, 0.6 wire full power 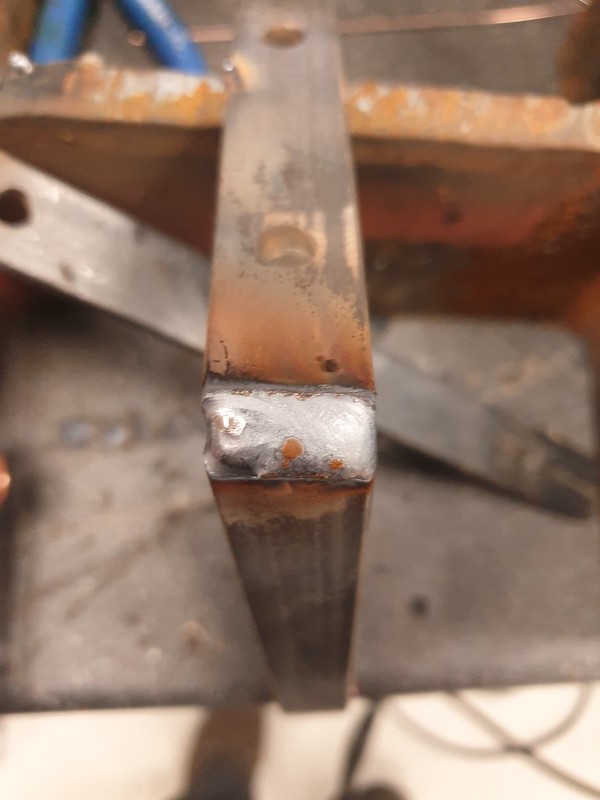 20201024_143228 20201024_143228 by logicaluk, on Flickr Happy with that, less happy with my esab auto darkening mask, the head strap had broken and I've had to use a normal mask, so all the rest of the welds looked shocking. Dan |
| |
|
|
logicaluk
Posted a lot
Every days a school day round here
Posts: 1,373
|
|
Oct 22, 2020 16:43:25 GMT
|
|
So right yet so wrong. Yes, love it.
Dan
|
| |
|
|
logicaluk
Posted a lot
Every days a school day round here
Posts: 1,373
|
|
Oct 22, 2020 16:37:02 GMT
|
|
Yep, that needs to be done. With pics, many pics.
Dan
|
| |
|
|
logicaluk
Posted a lot
Every days a school day round here
Posts: 1,373
|
|
|
|
Plus 1 for the R tech. I bought one and its great. Mention to them you are on Retro Rides and the RR deal. Think it's expired now but they still seem to honour it if you ask (about 10% if you are lucky). Didn't get the RR deal but did get a roll of wire and some tips. Very helpful, could have tried to sell me a bigger machine but didn't, it arrived yesterday but haven't unpacked it yet. Going to save that till the gearbox is back together. Dan |
| |
Last Edit: Oct 21, 2020 8:47:43 GMT by logicaluk
|
|
logicaluk
Posted a lot
Every days a school day round here
Posts: 1,373
|
|
|
|
Nice. 😃 I have a little updating to do at some point. Will try to get some pictures and write it up shortly. Have hurted my hand though, so stuff is currently on hold (or not, if it involves my right paw). Hope its not serious and you is recovered quickly. Dan |
| |
|
|
logicaluk
Posted a lot
Every days a school day round here
Posts: 1,373
|
|
Oct 18, 2020 20:06:18 GMT
|
80kg would even go in a skateboard! I keep a skateboard in the workshop for just this sort of job, just tighten the trucks up first. Dan |
| |
|
|
logicaluk
Posted a lot
Every days a school day round here
Posts: 1,373
|
|
Oct 18, 2020 19:52:03 GMT
|
Today I have mostly building a gearbox, but First, an addendum to yesterday's post.  20201018_121653 20201018_121653 by logicaluk, on Flickr Here is a full GAB505 kit top and GAB507 bottom, I didn't use the last clutch plate on the bottom row, time will tell if it should have gone in. I started off building up the rear clutch pack and got the case up on the bench cleaned the bearing surfaces and started to assemble it, all went well, the parts follow a fairly logical order, with help from the BW manual's exploded diagram I made it all the way up to the front clutch pack and realized I'd missed the rear clutch brake band, no problem whip it all out ad fit it(I even managed to get it in the right way up First time, as the fit in opposite directions) Refit all the parts following the diagram there one thrust bearing I can't find a place for, take it all out again, find place for it and refit it all, get to the front pump,(which is the front face of the box) and thought hang on a minute there's a bit missing, it's rolled under a piece of cardboard, and as it was on a separate line of the exploded diagram id missed it.  20201018_140744 20201018_140744 by logicaluk, on Flickr Take it all out again, fit missing shaft, put it all back together again. Get a NOS front pump out of stock, BAU1798.  20201018_140211 20201018_140211 by logicaluk, on Flickr Which even comes with a new oil pick up pipe.  20201018_140249 20201018_140249 by logicaluk, on Flickr Bolt the front pump on after a quick clean up, try to turn the gears over and the whole lots jammed solid, unbolt the front pump and take the front clutch pack back out realize I've missed a thrust bearing put it all back together again, no it won't go back together as a shim has moved in the middle of the clutch pack and it won't go on the shaft, luckily the shim moves back with a seal pick and I don't have to strip the clutch pack down, so put it all back together, and look at the break band pistons which are just need lubing and new O'rings, But I've missed the rear brake band adjusting bolt out and will it go in with the brake band in position? Will it curse word so because I missed this out 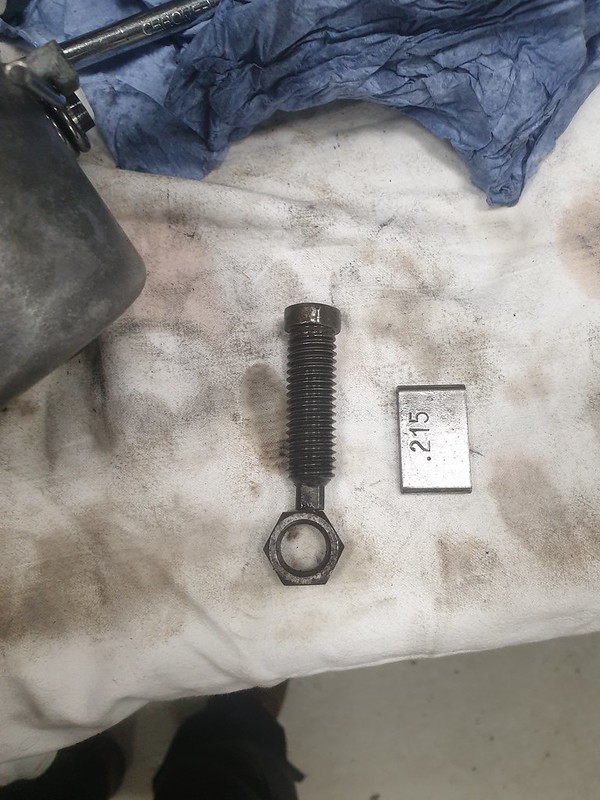 20201018_155546 20201018_155546 by logicaluk, on Flickr I have to do this, again.  20201018_145405 20201018_145405 by logicaluk, on Flickr Build it all up again, only to find out the head of the bolt won't sit nicely in the brake band, take it all apart and change the brake band for a different one, and rebuild the box again, luckily for the last time(fingers,toes and testicles crossed) then add the valve block and all its pipes which took some head scratching as I seemed to have an extra pipe, I did wonder if Mrs badger had played cunning trick on me, but it turned out it went on the back of the valve block. Then I hit an actual real problem that wasn't of my own making, the BW manual says there should be oil sealing rings here, which is where the governor goes.  20201018_154614 20201018_154614 by logicaluk, on Flickr And there is none left in the rebuild kit. That is going to have to be a problem for another day. Dan |
| |
Last Edit: Oct 19, 2020 3:51:41 GMT by logicaluk
|
|
logicaluk
Posted a lot
Every days a school day round here
Posts: 1,373
|
|
Oct 17, 2020 16:43:37 GMT
|
I just had a rush of blood to the head and bought a Kemppi Minarcmig Evo200. I can honestly say I’ve never used a better welder. That’s a serious rush... Kempii are excellent. OMG as the Young ones say, I'm surprised you can still stand up, what with there being no blood left anywhere in your body. Have you been working 29 hours a day overtime? Seriously though they are supposed to be very Good machines, I had a go with an old one a while a go in a mates shop with Good results. Unfortunately well out of my pocket. Dan |
| |
Last Edit: Oct 17, 2020 16:45:00 GMT by logicaluk
|
|
logicaluk
Posted a lot
Every days a school day round here
Posts: 1,373
|
|
Oct 17, 2020 16:39:01 GMT
|
Yes the odd ball filter fits. Today was planned as a clean-up the workshop day, which I got mostly done in time for a social distanced visit from mrbadger and Mrs badger, who made me a lovely gluten free cheesecake, so we had tea and cake in the workshop. mrbadger is going to start a thread about his engine analyser he's bought and is currently rebuilding, aren't you mrbadger...... Now being the proud owner of a moderately clean workbench, I selected a piece of gearbox to clean and rebuild. But First a problem, a BW35 box takes type-f ATF, dextron type fluid is like poison to it and I guess is what happened to destroy the original friction plates. Type-f is proving prohibitively expensive to purchase, £16 a litre type expensive, I have been doing a fair amount of research and found an alternative, John Deere Hy Gard tractor transmission fluid, which is backwards compatible with type-f and at £17 for 5l much more acceptable to my naturalized Yorkshire pocket. Apparently also popular with drag racers in auto boxes.  20201017_170818 20201017_170818 by logicaluk, on Flickr The front clutch pack The box of NOS spares I bought has two different clutch packs kits, labelled GAB 505 & 507. After several mins of checking the manuals and kits I figure out 505 is the front and 507 the rear, the difference appeared to be seals and circlip (I'll double-check this bit tomorrow) what was rather worrying was the manual and the old clutch pack had 5 friction plates whereas all the kits I looked in had 4. There was only one way to see if it would all fit and that was to build it up. So First job is to soak the friction plates in not ATF  20201017_150758 20201017_150758 by logicaluk, on Flickr Then get all the bits together, re clean with brake cleaner and lay out artistically.  20201017_153705 20201017_153705 by logicaluk, on Flickr Then get the piston in to its bore, which was a complete bore as it's a square cut seal, lube every surface up with Hy Gard then mess about for at least half an hour trying different ideas until working out the trick is to press down on the piston with a large ball-peen hammer and carefully go around the seal pressing its front edge in to the bore, then when all the way round (using the one way valve as a marker) use a block of wood and smack it home with the said fore mentioned large ball-peen hammer.  20201017_155220 20201017_155220 by logicaluk, on Flickr The rest went together rather easily in about 10mins, which was lucky as the CEO just got home from a 70-mile bike ride.  20201017_155724 20201017_155724 by logicaluk, on Flickr And it all fitted, yes. As I can't find this anywhere else here's the part numbers. Borg Warner front clutch pack kit GAB 505 18G8622 35EA-505-3 Dan |
| |
Last Edit: Oct 17, 2020 17:29:42 GMT by logicaluk
|
|
logicaluk
Posted a lot
Every days a school day round here
Posts: 1,373
|
|
Oct 17, 2020 13:20:25 GMT
|
One thing my workshop is missing is the capability to stick bits of metal together, I used to have the long term loan of an old Clarke set but that had to go back home. After a not inconsiderable amount of research the best MIG set for the money has to be the 180A RTec. At the best part of £500 inc www.r-techwelding.co.uk/mig-welder-r-tech-i-mig180/In steps the new contender, 200A Blackline from Rally Designs. Cheap looking torch and lead, only takes 5kg rolls of wire. But at £230 + a regulator, its very tempting. www.rallydesign.co.uk/product_info.php?products_id=22932Ahhhhh choices.... any opinions or suggestions? Dan |
| |
Last Edit: Oct 17, 2020 13:21:22 GMT by logicaluk
|
|
logicaluk
Posted a lot
Every days a school day round here
Posts: 1,373
|
|
|
|
|
Nice progress, has the weight of the carpet has made much difference?
I have a pair of lazy tounges what a difference that made to my outlook on installing the 100 or so rivets in a trailer floor pan. Interested to see how you go with that laptop.
Dan
|
| |
|
|
logicaluk
Posted a lot
Every days a school day round here
Posts: 1,373
|
|
|
|
|
Thanks peter ill have a look but, due to the pulley positions I've got to use the outer groove so it probably won't work but thanks.
Cheers DS that looks exactly like what i was thinking except made with 30mm box due to the excessive stick out required to get to the outer pulley groove.
I think I might have an odd ball ford filter instock.
Dan
|
| |
Last Edit: Oct 14, 2020 8:56:38 GMT by logicaluk
|
|
|
|


