|
|
|
|
|
The idea was to have a compartment for the welders, and also storage for the gas bottles. Like so:  This compartment will have a door, of course. Now - what I don't like on work benches are open doors. But the door would have to be open when using the welder. To avoid a door sticking out, I made these:  Established a position for them & some more guide rails...   ...and then made this:  Which goes here:  Basically a cheap version of a hidden hatch: Not perfect, but does the job. I like it! So much better than having a door that swings open and sticks out... |
| |
|
|
|
|
|
|
|
|
|
Hi! I actually started to write about this little side project in my Taxi thread. But I feel it's somewhat off-topic and may have it's own thread. I wanted to build me a solid workbench for a long, long time. But never had enough time to really do it without having big breaks in between the build. I feel this is always distracting and I tend to not finish such projects. Anyway. I went to the local steel yard and bought about 16m of square tube, 50x50x2mm. Cut to size. Once I had it about level & square, I started welding the top frame and then put in the legs and braces.   Looks a bit naked, doesn't it? After the weekend, I went to the steel yard again and bought some more square tube and U profiles. These will serve as guides for drawers. Made a very fancy contraption to bring them all to the same level... Some wood cutoffs and g-clamps. Lol.   Also put a bit of angle iron into the bottom and welded in a sheet of 1.5mm tin I had left. You can see that the drawer rails on the right are shorter. This is for a reason.  Follow up in the next post... |
| |
|
|
|
|
|
Aug 31, 2016 18:17:04 GMT
|
Sounds expensive  as I said, all options open. I'll start thinking about it when it comes to actually doing it. Today; I made these: Then I made this: Put some more steel into my construction: And now the front end is closed. Or open. Needs a brace here & there and end stops both sides - but my concept works. I hate the door on the work bench my lathe is bolted to. Closed all the stuff is inaccesible, open it's always in the way. On this work bench, I wanted to avoid this. First I though about making the hinges myself, but those articulating hinges are so dead cheap - I just bought them and bolted them on some guides. It works. Just like I wanted it. Cheers, Jan |
| |
|
|
|
|
|
Aug 31, 2016 11:23:21 GMT
|
It's far less spectacular, but still makes 50% of the price  Do you also need to cover the top in Australia? So concret doesn't fall off the earth? I'll be giving it a little more effort, if I'm perfectly honest Also thought about a wooden floor, which wood be nice for working on it - but I have second thoughts about longevity - and oil spills. A concrete floor I could easily seal off with resin. Easy to clean, ecological. Don't know, I have no fixed plan yet Cheers, Jan |
| |
|
|
|
|
|
Aug 29, 2016 20:16:55 GMT
|
Hi! Thanks! It used to be semi-outdoors, but is not any longer. One end has big glas-front, the other a big barn door. The floor is the next big project... replacing the paving with concrete. I thought about rust proofing the inside, I'm probably going to do it. The outside I'll leave bare steel. And once it has rusted, it'll get a good coating with lin seed oil. Should give it a nice patinated look. The floor... Blöödy hell, it has a drop of almost 23cm from the rear right to the front left corner...  Not going to be flattened out this year, though. Bu it's the next thing on the list of things that need urgent adressing. Cheers, Jan |
| |
|
|
|
|
|
Aug 29, 2016 19:44:31 GMT
|
So, I poked an eye out.  Because, with the headlight in place, it's nigh on impossible to replace the dryer...  Didn't manage to get the system filled, though. I felt more like welding up the new work bench. So far there's over 23 meters of pipe & profiles in there... Over half a bottle of welding gas and a notable amount of wire. And it's still not finished. Also ordered a top - for an eye watering price, but it's what I wanted for this. Cheers, Jan |
| |
|
|
|
|
|
Aug 26, 2016 18:36:56 GMT
|
Oh, and this happened a couple of days ago:  |
| |
|
|
|
|
|
Aug 26, 2016 18:33:13 GMT
|
Hi! I think the car has allready been converted to R134a. Not sure, though. There's a replacement refrigerant for R12, called 413a. But - it's not cheap... The chap that fills our R12 cars always does a leak-test with a test-gas and a sniffer. Because the stuff is not cheap, so a fill with 413a can easily sum up to 400€+!  And then of course there's the "doesn't matter, runing 134 in my R12 system for decades no issues"-brigade... The pressure switched should be replaced if a complete fill is required - but mainly since you can't replace them without evacuation/loosing the refrigerant if one turns out te be faulty. So - I'm replacing the dryer & both pressure switches and then get a fill and see what happens... Though I'm making use of my vacation with other stuff - like, buying lots of square tube and FINALLY building a proper work bench! Still needs a bit here & there welded in, that's how far I got today (starting at 11:30). Need to buy some more steel tomorrow and find a top. Think I'm going for 2-3cm wood with a 3-5mm steel plate on top. So far it's 160€ in steel, I'd like to try and keep the cost below 250€. And once this is done, I plan to get TÜV on the Coupé and take the Taxi off the road for some time for a major rebuild of rear & front suspension and a lot of welding & painting. Mainly the rear window frames and A-pillars will need a lot of attention. So - I'd like to take my time with this. And I've not driven the Coupé in nearly 2 years now... So - that's my plan. Cheers, Jan |
| |
|
|
|
|
|
Aug 12, 2016 19:03:12 GMT
|
So the exhaust had another hole - I'm not giving up on it yet  Apart from that... Nothing to report. 966.500km. Cheers, Jan |
| |
|
|
|
|
|
|
|
We are talking about these: 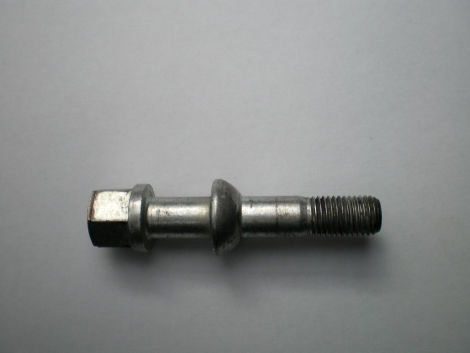 You can see that they are basically designed as shear bolts... And the head is flush with the top of the wheel; means they sit in a reaaaly deeep hole. Tremendously stupid design, if you ask me. My take would be to try and weld on a nut and try a rattle gun. |
| |
|
|
|
|
|
|
|
|
|
|
A mobile beer dispenser unit, very clever!
|
| |
|
|
|
|
|
|
|
Sooo - since I knew that the vacuum system was OK - I was finally sure that the last leaky thing remaining was - the brake booster. Ever since I got the car, it almost immediately lost it's vacuum after the engine is turned off. As a reference; the booster in the Coupé holds vacuum for over 5 months. Resp. I don't know how much longer, that the longest period I tested So - out with the old...  Removed a good 1.5 hands full of compost, old fuses and dirt and put the new booster back in. Together with a cleaner reservoir and a brand new vacuume hose (around 37€ at MB's, very reasonable!).  It's incredibly fiddly to slot the booster in there, almost impossible. Half a millimeter off and it doesn't go in without destroying it. Unbelievable... One of the less joyful tasks when working on a 124. The double-membrane booster fits much easier, I was half tempted to fit one. Anyway - bled the brakes and went for a test drive... Oh boy. Do the brakes perform now! They have always been "heavy" and without a lot of bite... Fitting a new (2nd hand) booster totally transformed the brakes! Wow. I didn't think the old leaky booster was THAT bad... Well worth the hassle. Should have done this a lot earlier, but never wanted to since it's such a fiddly task. Anyway. All good, big improvement! I know it's sort of safety-related and may seem stupid to not replace a leaking booster - but it was still miles from not working (and the brakes work without it, too). The last two days I noted a hissing noise when I was on the brake pedal - and that was the point at which I decided enough is enough. Cheers, Jan |
| |
|
|
|
|
|
|
|
We replace evaporators & condensers very frequently, at least 3-4 evaporators per year. We replace more condensers, yes - but the evaps are not unknown to leak after 20-30 years. They always leak on the soldered(?) pipes. My guess is, vibration kills the joints over the years. Or the cold/hot expansion cycles kill them - I don't know. But it's not uncommon for them to leak. In some cases they leak so bad that the refrigerant escapes over night... Fan is fine, working like a charm. One of the switches in the dash can turn it on  There was still refrigerant inside, I guess the A/C wasn't dead for a very long period of time. Anyway, I'll order a dryer and pressure switches, some O-rings and then I'll try it. If it works - fine, if it doesn't - fine as well. All good! varelse: replacing all the rubber in vacuume-systems can truly transform them! Always worth the work on old cars. Cheers, Jan |
| |
|
|
|
|
|
|
|
Yes, Sir! Had a couple of hours off of work today, so I investigated further - with the vacuume tester at hand. Which quickly lead me into the right direction... Remove glove box to gain access to the main A/C vacuume controll valve...  The main vacuume feed line splits form the valve to the blower switch. The valve was holding vacuume, the line runing to the switch didn't. So out with the heater controlls and stuff... and there it was, a real classic:  The hose had slipped off, causing a MAJOR vacuume leak. Put on a new - longer - hose. All good. Now I need to find a connector for the A/C compressor (someone cut it off). Then have the A/C filled & leak tested - probably find out EVERTHING has more holes than Swiss cheese, cry a little and then decide to not fix it We'll see... A/C stuff can get realy bothersome, if the evaporator is leaking, the whole dashboard need to come out. And then there's that issue with the decreasing quality of replacement parts. And speaking of evaporators; today we installed the very last 190E evaporator that MB had on theyr shelfes into a customer's car. The very last one. There will be no more... and our parts supplier doesnt stock any aftermarket parts. Though for 124s there's no supply issue, A/C on the 124 is MUCh more commo than with 190s. Ok, enough of the blablabla - have a nice evening, Jan |
| |
|
|
|
|
|
|
|
So, yesterday the car got an oil change. And during which I wanted to see if the A/C system was still filled, so I unscrewed one of the filler nipples - which lead to a broken anti-return valve for the brake booster. Resp. the nipple that feeds the shut-off valve on the ignition lock broke off (just by touching it). So I tried to replace the valve with one I got on the OM606 engine... Which ended - disastrous. So the Coupé got broken for spare parts...  Needed to make an adapter, since the hose is adjusted to fit the double-membrane booster in the Coupé. But this is the offending item, the anti-return valve with it's take-off port.  And since I was allready at it, I wanted to finally trace down my vacuume issue... Ever since I got the car, the headlight adjuster didn't work. Which is, on Mercs, vacuume operated. I traced it down to this restrictor piece:  Which was clogged with dirt. But still no worky worky... More investigating. Ripped out all the vacuume lines...  I have no leak tester, only a vacuume gauge. I found another clogged hose - but still it didn't work. And then I remembered that there are a couple of vacuume actuators on the A/C heater unit. And then I noticed that the rubber Y piece that feeds the headlights also feeds the A/C. Blocked off A/C with a drill bit - and the headlight adjuster was finally working!  Which means - my vacuume leak is somewhere under the dashboard... And that's my very brief idea of looking into making the A/C working canceled. I'm not going to pull the dashboard out to fix that. Eventhough there was still a wee bit of pressure left in the A/C system, which may indicate it's not that bad. I have 1 or 2 thingy that I can look at without pulling the heater unit, but that's it. Anyway, another issue finally sort-of solved. Cheers, Jan |
| |
|
|
|
|
|
Jul 24, 2016 20:19:20 GMT
|
|
This thread, which I have just finished reading, isn't helping to cure my itch to buy a 60 series at all.
|
| |
|
|
|
|
|
Jul 24, 2016 11:04:51 GMT
|
I don't think I can pin it on a specific era... The other way around; my interest has a massive drop after the 80's, there's hardly anything in and past the 90's that wets my appetite |
| |
|
|
|
|
|
|
|
Well, it's good enough for television... And it is. The car got it's original series 1 hub caps and TAXI roof sign back yesterday. And someone stuck some old pre-Euro plates with fake TÜV badges on both ends.  I don't know if the scene will be in the movie, but it was a new experience standing in front of a camera in the center of a big film crew. Hopefully I'm not in frame The movie guys contacted me some weeks ago, they needed a period correct Taxi (actually the car-guy came to our company and wanted to borrow some other cars and spotted the Taxi). I agreed to have my car filmed. What I didn't know was that I also had to drive it during the shot. It's only a very brief unimportant scene, basically a woman came out some office, entered my car and off I drove. My presence on the set was about 1.5h, the actual shoot was like 10 minutes. And for that I got 150€ compensation. Not bad! So if they show the scene in the movie, this will be a movie car. Ha! The camera dude was a bit pi§$ed though, since I didn't agree to remove the non-smoking stickers for like 10 seconds of movie "fame". They'r part of the car's history. Told him he could get another Taxi and I'm leaving - and so the stickers could stay. Lol. Anyway, an interesting day, but at the end of the day I was glad it was over... Not a business I want to get involved more with. On the way home I took the B-roads and enjoyed watching a storm cell moveing over the river Rhine.  Cheers, Jan |
| |
|
|
|
|
|
Jul 20, 2016 19:20:00 GMT
|
Ha! That's a very neat idea!!! Thanks a lot for this! This was actually my fear, that I rub through the thin paint sourounding the run... Much appreciated!! Cheers, Jan |
| |
|
|
|
|
|
|
|
Hi! I advertised it for 5k€ right now. Having massive second thoughts, though. |
| |
|
|
|
|


 as I said, all options open. I'll start thinking about it when it comes to actually doing it.
 Not going to be flattened out this year, though. Bu it's the next thing on the list of things that need urgent adressing.
 There was still refrigerant inside, I guess the A/C wasn't dead for a very long period of time. Anyway, I'll order a dryer and pressure switches, some O-rings and then I'll try it. If it works - fine, if it doesn't - fine as well.