teaboy
Posted a lot
   Make tea, not war.
Posts: 2,125
|
|
|
|
We still had high winds this afternoon but, touch wood, my tent is hanging in there. I spent another couple of hours getting things ready, a bit more wire wheeling in the wheel wells, a bit of sanding and then vacuuming and cleaning everything up. I also treated the areas in the wells where the dampers mount up at the top. They had been spooged ages ago with the old stuff but I felt that I needed to check so I wire wheeled them off and gave them the phosphoric acid stuff. To be fair, the spooge had done ok but it put my mind to rest.  Once everything was ready it was finally time to cover myself in epoxy.  It is reassuringly difficult to wash off my skin so hopefully it will stick to the car just as well. I did the inside first.  I put on an old pair of specs, just in case. I used a roller to apply the paint this time otherwise it would have been pointless spending hours sanding out the brush marks from the previous job. I did have to use a brush for the tricky areas of course. I started at the heel panel at the base of the rear seat and worked my way back.  Above is part way through the first coat, I took this before I went to get a bigger brush to paint the spring seats. Working backwards I gave myself a break from working laid on my back working overhead and did the passenger side wheel well.  Then I pressed on towards the back and under the boot floor.  Then the driver side wheel well.  Once it had flashed off I mixed another batch of paint and gave it a second coat.  The light was fading by then and my head torch had gone flat so there may be a few missed bits but they will be taken care of in due course. It is starting to feel like there is a light at the end of the tunnel but I need to remind myself of yesterday's revelation. 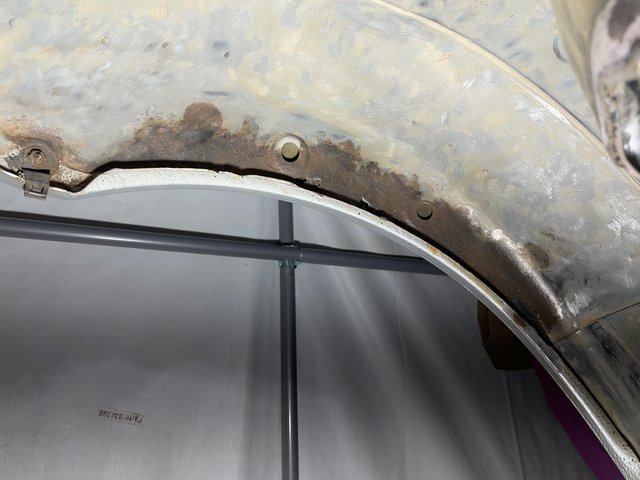 That light that I am seeing may well be an express train, driven by Satan... Cheers. |
| |
|
|
|
|
gazzam
Part of things
 
Posts: 740 
|
|
|
|
|
The finish sure looks good in the photos.
I imagine it would have a bit of texture to it? Like smooth underbody schutz?
Are you topcoating it?
|
| |
|
|
|
|
|
|
|
|
It looks like new now Mr T. Except for that last bit
|
| |
|
|
|
|
|
|
|
|
It's tantilisingly close now, you've done a good chink of the work on the inner arches in cleaning them all up already, at least you have something clean to rest your head on while you are welding the inner arches now, Last time I did this I also discovered I needed stronger reading glasses to weld that close up.
|
| |
|
|
teaboy
Posted a lot
   Make tea, not war.
Posts: 2,125
|
|
|
|
The finish sure looks good in the photos. I imagine it would have a bit of texture to it? Like smooth underbody schutz? Are you topcoating it? There is a bit of a texture to it, I will drop a picture in to show it. It will be getting something else on top but I have yet to decide what that will be. It looks like new now Mr T. Except for that last bit It does look a bit better now, Phil. It's tantilisingly close now, you've done a good chink of the work on the inner arches in cleaning them all up already, at least you have something clean to rest your head on while you are welding the inner arches now, Last time I did this I also discovered I needed stronger reading glasses to weld that close up. Yes, I really do need to book a specsavers visit for some new readers. The Doc was working late tonight so I was going to dive straight in and give it another coat of paint but as I arrived home I got a message saying that it is 'green bin day' (garden waste) tomorrow and could I fill them up. I hate gardening, that is normally the Doc's department. I cut a couple of the lawns and got a load of hedge clippings loaded up. We have three green bins.  When I had done that I decided that I wasn't going to bother with the car because I had had enough so I went inside. I was only sitting down for five minutes when I changed my mind and went back outside and mixed another batch of paint. This is the finish I got off the roller.  I gave it all another going over but it looks more or less the same as it did yesterday so I didn't take any pictures. Yesterday I didn't take a picture of the rear seat area, so I took one tonight.  I was just finishing off when the Doc got home so I timed it to perfection. I also got three brownie points for filling the bins so all is well with the world. Cheers. |
| |
|
|
|
|
|
|
|
|
Were you given a chocolate brownie for each point gained?
|
| |
|
|
teaboy
Posted a lot
   Make tea, not war.
Posts: 2,125
|
|
|
|
Were you given a chocolate brownie for each point gained? I got three croissants that she got from the reduced shelf at the Co-Op  |
| |
|
|
|
|
teaboy
Posted a lot
   Make tea, not war.
Posts: 2,125
|
|
Apr 10, 2024 19:25:54 GMT
|
100 pages and still no oil tank... I don't fancy doing the inner arches just yet so I found something else. If you cast your minds back almost two years, I had this. 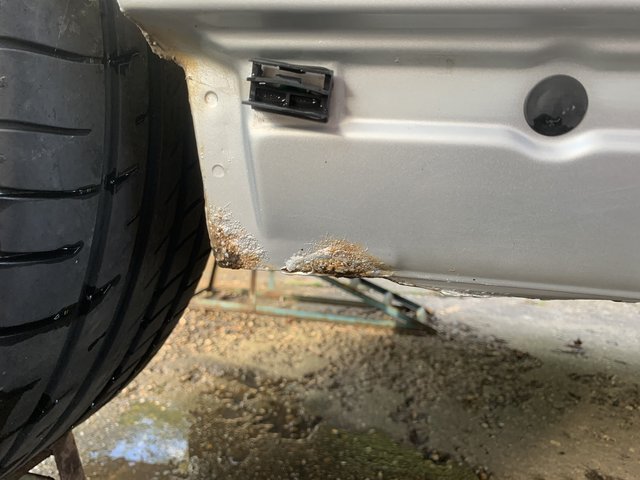 The back of both sills were like that and this is what was under the bubbles. 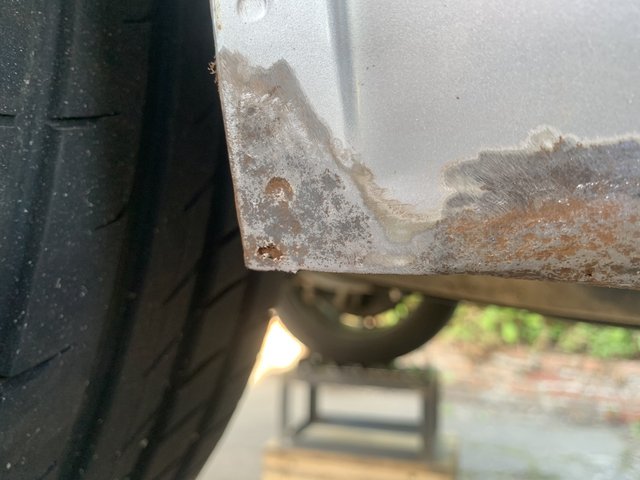 At the time I just spooged them up and left it to be a job for another day.   It seems like today is the day. I have got an aftermarket coupe rear outer arch repair panel which I am hoping that I will be able to adapt to repair the inner arch and it has the back end of the sill section on it so I was hoping to be able to use that. When I looked at it, however, the pressing is very poor and ill defined in that area.   That's no good to me for this bit. Looks like I will have to make something. I started by cutting the old bit off. There was a spot weld to drill out first.  When I pulled that piece away loads of rust fell out and I feared that the job might have just doubled in size but, luckily, the rust was from the piece I was removing.  The inner was almost perfect, so I cleaned it up and gave it some of my original BH spooge.  Here is the piece I need to make.  I was thinking that this would be a really straightforward, bish bash bosh and it would be in and like brand new again. This turned out to be slightly optimistic on my part because it is actually quite a nasty little piece to make. There are all kinds of curves and wiggles all over it.  I marked on it the main curvy, creasy and wiggly bits so that I wouldn't forget any of them.  I didn't really have a plan on how to make it so I just went at a bit of tin with various percussion instruments for several hours and then tried it in place.  I had almost fogotten about the walking back-and-forth between the tent and the shed routine but I am fully back in it again now. So, after about four hours I had this.  Which is nowhere near fitting and is now in the bin. I have to tell myself that at least I have learnt how not to do it... Cheers. |
| |
Last Edit: Apr 11, 2024 6:33:37 GMT by teaboy
|
|
Norman
Part of things
 
Posts: 449 
|
|
Apr 10, 2024 19:58:55 GMT
|
|
Hi Tom, I feel your pain, I have often tried to make a repair panel and after some time took a big hammer to it in frustration and chucked it in the bin. You will get there, I have no doubt in your skills. Keep at it, Norman
|
| |
|
|
eurogranada
Europe
To tinker or not to tinker, that is the question...
Posts: 2,556
|
|
|
|
Well it looked pretty nice...  shame it didn't fit. |
| |
|
|
|
|
|
Apr 11, 2024 18:55:09 GMT
|
Teaboy - can you tell me, does this hole give access to the bottom of the sill, or are there plates/baffles in the way? As I want to put cavity wax in through the hole to get to the bottom of the sill? Thanks Looking at the bit you cut out, it looks like there was only rust on the outside rather than rusting from inside out?? 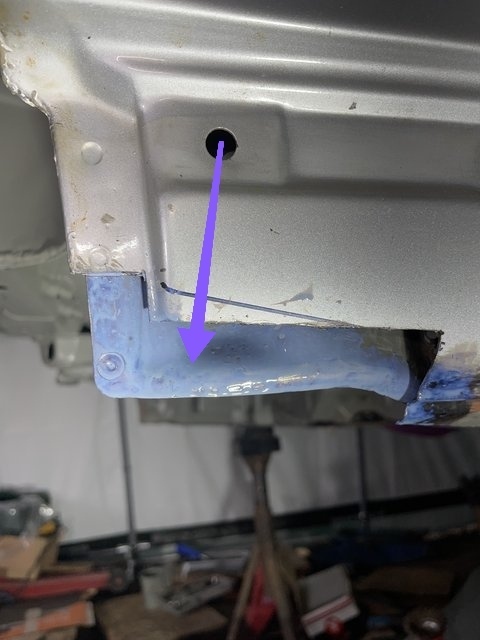 Mine had started to rust just like yours. 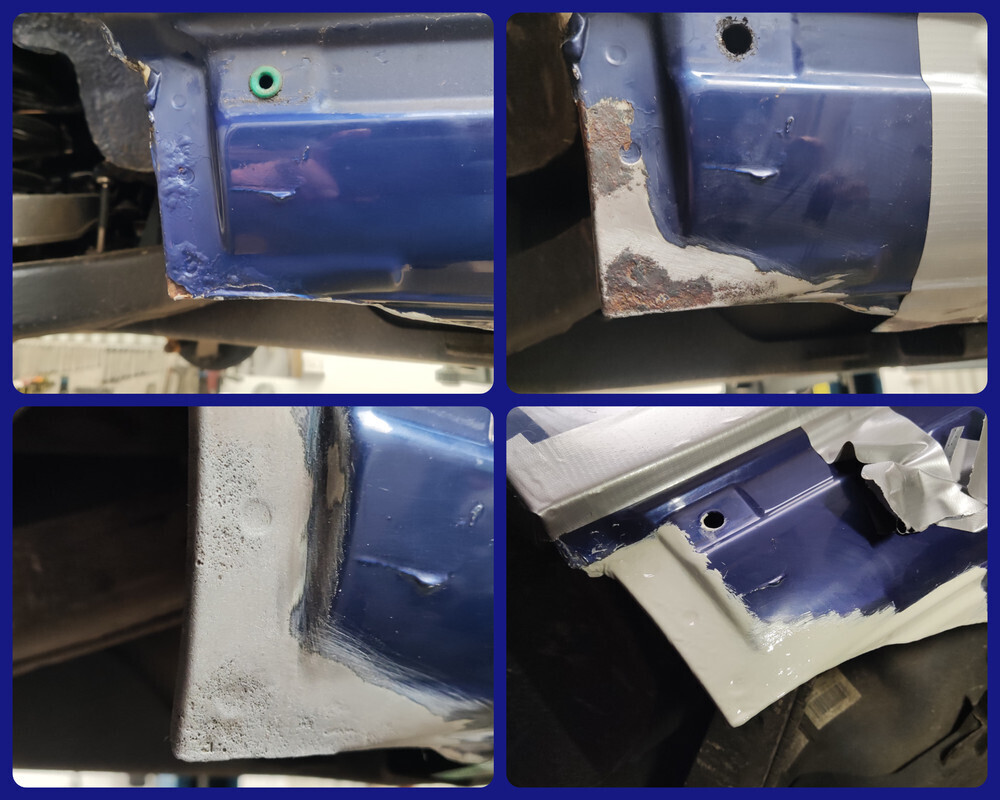 |
| |
|
|
teaboy
Posted a lot
   Make tea, not war.
Posts: 2,125
|
|
Apr 11, 2024 20:39:58 GMT
|
Teaboy - can you tell me, does this hole give access to the bottom of the sill, or are there plates/baffles in the way? As I want to put cavity wax in through the hole to get to the bottom of the sill? Thanks Looking at the bit you cut out, it looks like there was only rust on the outside rather than rusting from inside out?? Hi, Ian, you will be ok to use that hole for cavity wax. You are right about the rust going from outside in. |
| |
|
|
teaboy
Posted a lot
   Make tea, not war.
Posts: 2,125
|
|
Apr 12, 2024 20:48:21 GMT
|
Hi Tom, I feel your pain, I have often tried to make a repair panel and after some time took a big hammer to it in frustration and chucked it in the bin. You will get there, I have no doubt in your skills. Keep at it, Norman It isn't the first time I've made a duff piece, Norman, and it probably won't be the last. I just tell myself it was a practice run. Well it looked pretty nice...  shame it didn't fit. It is very important that these pieces look good, Alex, despite the fact that they will never be seen again.  It was a very long day at work yesterday, thirteen hours long and I wad nothing left to give when I got home. Because of yesterday's long shift, today went very well and I got home when the sun was still shining. As my first attempt at the sill end didn't go as well as I would like I had to start again. I marked out two blanks.  Which I then cut out.  The reason for the two blanks is not that I expected to fk it up again but because I have to make a mirror image to repair the other side of the car. Or it could be a spare if I do happen to fk it up again... Last time I started at the top and worked my way down, which I decided was not the best course of action because more of the foldy wigglyness was going on at the bottom. I did the curved foldy steppy bit at the bottom to begin with.  Then I worked my way up. Turns out that it wasn't really much easier that way, it was still a nasty thing to make.  I didn't take loads of pictures because I was too busy making a meal out of the job. Eventually, after another four hours of bishing, bashing and a small ammount of boshing, coupled with an indeterminate number of excursions between the shed and the tent I had this.  It even has a small flange on the end too.  Isn't that just lovely? I made it slightly longer than the piece that I had originally cut out because I wasn't fully happy with the condition of the lower flange on the remaining bit. I removed this extra bit, which had a spot weld in it.  The condition of the inner sill was quite lovely, so I gave it a once over with the wire wheel and daubed a drop of spooge on there.  So does the new-new piece fit then? Well, sort of.  It does need a few tweaks and a final fettling, but it should be ok. Cheers. |
| |
|
|
gazzam
Part of things
 
Posts: 740 
|
|
|
|
|
Glad it seems to have worked out in the end!
'I didn't really have a plan on how to make it so I just went at a bit of tin with various percussion instruments for several hours and then tried it in place.'
If I was half the wordsmith you are, I would have written that about 10 years ago!
Describes my general approach to a 't'.
Lovely work.
|
| |
|
|
|
|
|
Apr 13, 2024 12:47:52 GMT
|
100 pages and still no oil tank Haven’t commented much on this forum, for various reasons, felt the need to just say I was here at the start for the Porsche but stayed for the m3. Yours is one of the 1st threads I look for and enjoy your updates. I’m surprised nobody else has figured out what happens to the oil tanks, if you’re like me, if you start thinking about something else while completing a task you find yourself in autopilot and once you realise, it’s too late. you’ve got a garage full of these now haven’t you?  🤣 |
| |
|
|
teaboy
Posted a lot
   Make tea, not war.
Posts: 2,125
|
|
Apr 13, 2024 19:20:55 GMT
|
Glad it seems to have worked out in the end! 'I didn't really have a plan on how to make it so I just went at a bit of tin with various percussion instruments for several hours and then tried it in place.' If I was half the wordsmith you are, I would have written that about 10 years ago! Describes my general approach to a 't'. Lovely work. Thanks Gazza. 100 pages and still no oil tank Haven’t commented much on this forum, for various reasons, felt the need to just say I was here at the start for the Porsche but stayed for the m3. Yours is one of the 1st threads I look for and enjoy your updates. I’m surprised nobody else has figured out what happens to the oil tanks, if you’re like me, if you start thinking about something else while completing a task you find yourself in autopilot and once you realise, it’s too late. you’ve got a garage full of these now haven’t you?  🤣 Thanks Nick and yes, it looks like my secret is out... Right then, this easy job that I was on with, I got back to it this afternoon. I said that the piece needed 'a few tweaks and final fettling' which was actually another two hours of faffing about before I was ready to think about fitting it. First I cleaned out the inner sill area then gave it some 'weld through' primer.  The back of my highly battered piece of tin also got a coat.  This was the perfect opportunity for me to have a lovely cup of tea whilst the paint dried. After that it was time to stick it in permanently.  It looked horrible so I filed the welding down to tidy it up.  There were a couple of spot welds that needed to be replaced, one was on the back corner, which I didn't get a picture of and the other was on the lower flange, which I did.   I tried to make it as close to the original piece as I could, I even put in this bulgy curvy bit that I am pointing at, although I'm sure it wouldn't have made a blind bit of difference if I hadn't bothered.  Because of my recent 'spooge crisis' I decided to go straight for the epoxy.  I was therefore able to finish off the epoxy round the back, I had left this area for when I did the sill.  That's the driver's side sill end repair completed. I have to do the passenger side next, aren't I a lucky boy. Cheers. |
| |
|
|
teaboy
Posted a lot
   Make tea, not war.
Posts: 2,125
|
|
Apr 14, 2024 18:08:30 GMT
|
I was planning on making a start on the other side sill repair today but I didn't do that in the end. The Doc has been asking me to sort out some of my 's**t' in the garden for a while so I thought it best not to incur her displeasure and get it sorted out. As ever, this 'little job' took far longer than I expected. Most of the afternoon in fact, so I didn't feel like starting the sill job. I did have a look in the tent to see if there was something that I could do to kill a couple of hours. I ended up looking at this bit.  I have looked at it a few times recently and thought, 'I must do something about that'. You are probably thinking that you can't see anything that needs doing because it isn't at all visible in the picture. The problem is that the area at the front of the 'spare wheel well' has had a lot of things going on there recently. The axle panel has been plug welded and stitch welded to it and the top part has been removed then welded back in. This has left the surface a little bit wiggly and I don't like that. I decided that a bit of filler would tidy it up nicely.  I hate doing filler. I've seen people on instagram applying filler and it goes on and spreads like butter. I have never experienced that. It is always thicker than you would like and doesn't spread anywhere near as nicely so if anyone has any recommendations for a brand of filler that is nicer to use, I'm all ears. I sanded it back, did a second pass and sanded that back.  The amount of dust I made was unreal, I had to empty my vacuum twice. Did I mention that I hate sanding? It needs at least another coat of filler yet but I ran out so, before I buy some more, any experts please speak up. Cheers. |
| |
|
|
|
|
|
Apr 14, 2024 20:23:38 GMT
|
|
Pay someone else to do it. That’s what I did. There’s actually people out there that enjoy sanding so much, they do it for a living!
|
| |
|
|
teaboy
Posted a lot
   Make tea, not war.
Posts: 2,125
|
|
Apr 14, 2024 20:36:11 GMT
|
Pay someone else to do it. That’s what I did. There’s actually people out there that enjoy sanding so much, they do it for a living! There are! Absolute lunatics if you ask me. My mate Keith is going to take care of the outer bodywork stuff but the inside is up to me.  |
| |
|
|


