grant
Part of things

Posts: 206
|
|
Aug 30, 2009 16:53:01 GMT
|
I got this compressor from my friend a couple of years ago, it was in use until i took it, well I finally got my finger out and wired it up last week. I have a few questions 1) I want the air switch to cut in sooner due to the age of the compressor I don't want it compressing to the limit  On the air switch there is an arrow pointing anti clockwise, will rotating the bolt anticlockwise make it cut in sooner?? and how much would i need to screw it in? 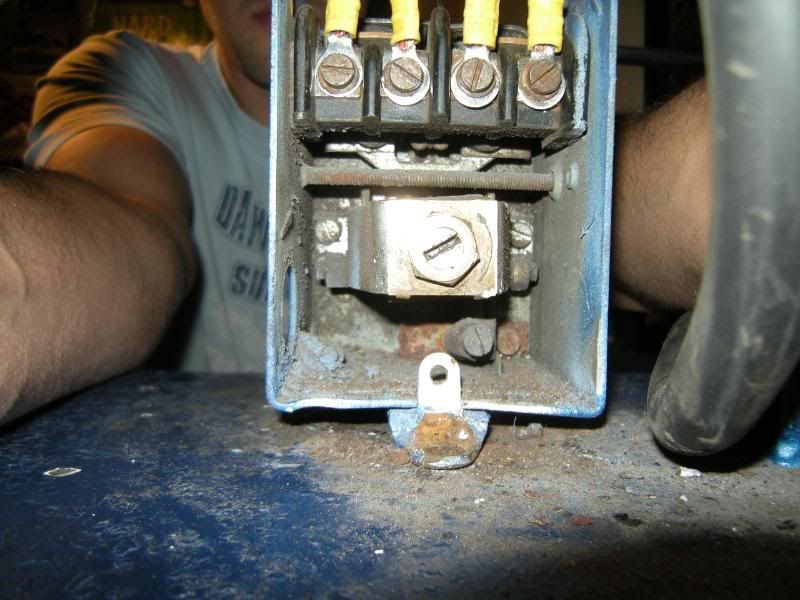 2) I've been looking at the machine mart book for things, I will need a regulator with pressure gauge, I'll need a hose, and fittings but theres so many  Can people recomend what would be best, reg etc heres my fittings that i will need to replace and use new ones suitable to convert to the hoses i will buy 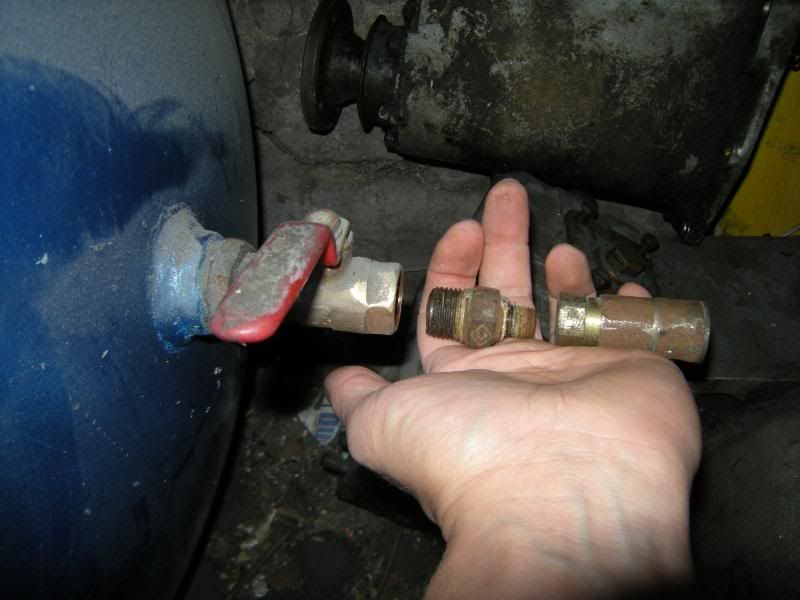 3) Where is best to mount the regualtor height wise? 4) Heres the specs?? Anybody know what this means in todays money 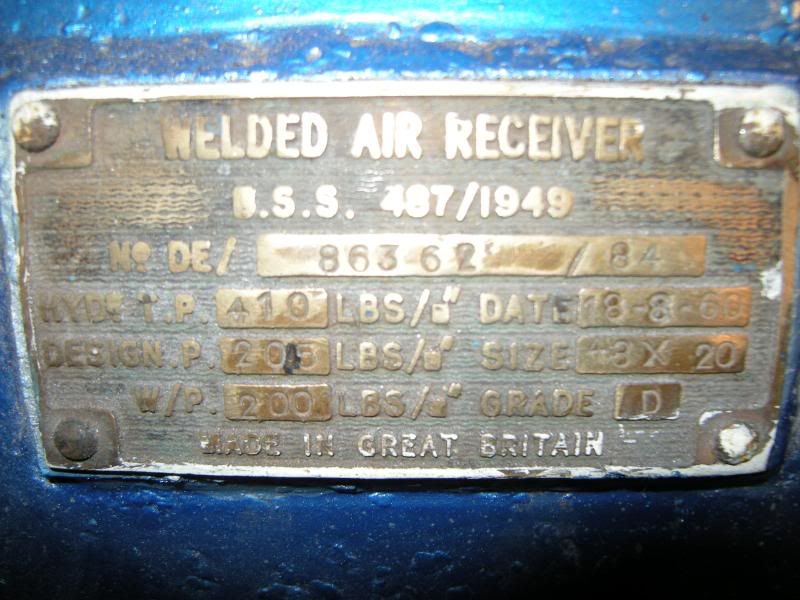 And the beast its self complete with carbon fibre induction kit  lol 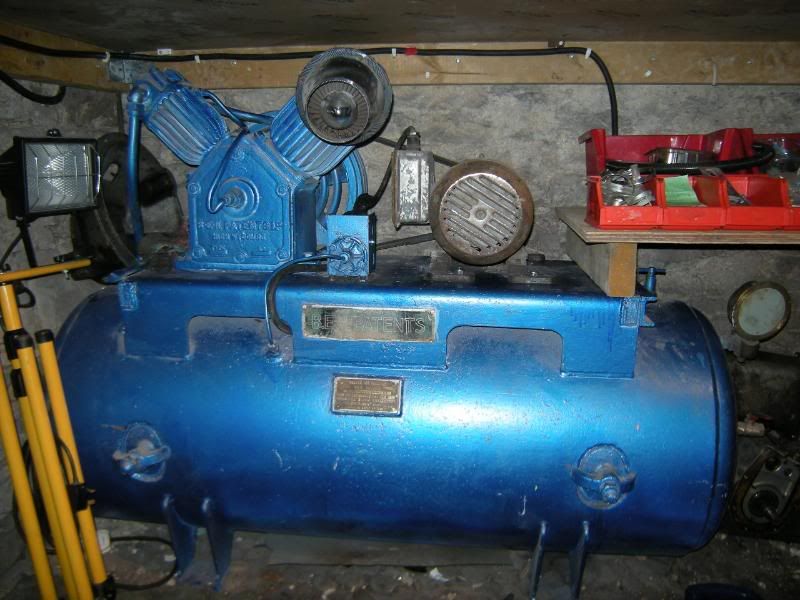 Thanks guys!!!!!! |
| |
|
|
|
|
93fxdl
Posted a lot
Enter your message here...
Posts: 2,013
|
|
Aug 30, 2009 17:42:18 GMT
|
|
not sure on question 1 but i would suggest trying it as is first, to find out what pressure it cuts out at then if you wish to change it give the screw a turn and try it again if the pressure goes up higher give the screw a twist the other way
question 2 personally i would use a filter/moisture trap and then if you need one a pressure rgulator they are all pretty much the same but they vary in capacity so the ones to choose will depend on the air consumption of the toys you will be running as for where to mount the regulator anywhere will do provided you can get access to adjust it
q 3
hyd/tp is the pressure the tank was tested to and the date it was tested
design p is the pressure it was designed for and the size is the measurements of the air tank
w/p is the working pressure
hope this is of help, ttfn glenn
|
| |
|
|
grant
Part of things
Posts: 206
|
|
Aug 30, 2009 21:34:13 GMT
|
Glenn, Thank you very much, thats a big help, I know more about it now.  |
| |
|
|
|
|
|
Aug 31, 2009 11:13:08 GMT
|
That tank looks very similar to my one which is an Ingersoll-Rand. They are very heafty things, the actual air tank is way thicker than the modern stuff so shouldn't have a problem with the pressure. (it weighs twice what my old Fiac one did) Oh and those big nuts and brackets on the front of the tank allow you access inside it to check its condition, or wipe out moisture etc. Never undone mine yet as i have no idea what you have to do to get them to reseal airtight, oh and its working so i'm leaving it alone  When i got mine the pressure switch decided not to cut out the motor one day (after a week or so of working) and it kept pumping until the pressure relief valve blew (the little 2" high thing on the top right of the tank in your pics) When i looked at the switch the contacts had arc'd and worn away the tips so with the large current through them they pretty much welded themselves together, and couldn't release. So i bought a new pressure switch and have not had a problem since. For the oulet/ pressure regulator i've got something similar to this on mine cgi.ebay.co.uk/Air-Compressor-Filter-Regulator-Oil-Lubricator-New_W0QQitemZ180334447670I only use it for the moisture trap and occasionally the regulator, never used the oiler part as i oil the tools directly as and when. For fittings i have a 90 elbow out of the tank then the above setup and a Y splitter with 2 airline female quick release ends in. So i can run 2 airlines out of it if required. Just take your existing ends to your local pipe fittings place and tell them what you want, they'll work out what threads they are. |
| |
|
|
grant
Part of things
Posts: 206
|
|
Aug 31, 2009 16:43:42 GMT
|
Thank you for that great reply, Yes it is HEAVY 4 of us were really really struggling to get it an inch off the ground. That gives me greater convidence if that happened to yours, the part on the top right of mine has a tap I turned it but no air came out  Cant find the water drain, maybe its on the lower edge of the other side but no way of getting to it as its to heavy to move and I've forgotten as its been in there for 2 years. its certinally not underneath. Will the moisure trap do its job for spraying? Yeah was just going to put oil in the tools when i get some 93fxdl would you kknow what those figres are in psi/bar? Thanks guys |
| |
|
|
93fxdl
Posted a lot
Enter your message here...
Posts: 2,013
|
|
Aug 31, 2009 21:00:40 GMT
|
if i remember correctly (2 chances slim and ??) 1 bar=14psi as for those bungs in the side don't touch them i used to service the air system in the factory i worked in and for insurance inspection all air tanks had to be opened and getting them to reseal could be a real pita find the drain and use it regularly, reduces moisture in the air and in the long term gives the compressor an easier life ttfn glenn |
| |
|
|
grant
Part of things
Posts: 206
|
|
Aug 31, 2009 22:48:29 GMT
|
|
Thats great thank you glenn!! Yeah I think i will leave them, as you say getting them to seal would be an experiance lol
|
| |
|
|
grant
Part of things
Posts: 206
|
|
Sept 2, 2009 11:10:34 GMT
|
Got all my bits yesterday, adjusted the air switch, all good but... The crankcase is leaking air threw a breather when ive got the tank full and switched it off, its a pain becasue i don't want to fill the tank everytime i go to use the compressor as its using ALOT of electricity, the lights dim with every compression |
| |
|
|
grant
Part of things
Posts: 206
|
|
Sept 2, 2009 17:17:26 GMT
|
|
Its emptied its tank threw the crank breather, grrrr.
|
| |
|
|
93fxdl
Posted a lot
Enter your message here...
Posts: 2,013
|
|
Sept 2, 2009 17:24:59 GMT
|
|
by crank breather do you mean the safety valve because if it is these can tend to need a bit of tlc now and again usually cracking them open and snapping shut again a couple of times when up to pressure is usually all they need
ttfn glenn
|
| |
|
|
|
|
grant
Part of things
Posts: 206
|
|
Sept 2, 2009 18:25:03 GMT
|
|
No its the breather, on the top of the crank, in its behind the large right hand cylinder,( barrel) it has alot of perforated holes in it and unscrews, its plastic. I took it off earlier and cleaned it out in the bizzare hop it may help - nope.
|
| |
|
|
93fxdl
Posted a lot
Enter your message here...
Posts: 2,013
|
|
Sept 3, 2009 10:32:58 GMT
|
|
sounds to me like air is draining back from the tank through the one way valve and past the rings into the crankcase it may be a case of run it for a while to get the valve freed up but if it dosent sort itself with a bit of use you will have to pull the valve and give it a service, from what i can see in the picture this will porobably mean pulling the head off the second cylinder
ttfn glenn
|
| |
|
|
grant
Part of things
Posts: 206
|
|
Sept 3, 2009 20:10:34 GMT
|
Thanks glenn, I've been out to it took the 2 round domed caps off and gave the head a few taps with a copper mallet. I started it with both the caps off and air was puffing out of the bolt hoses of both. Put it back together but no change. Could you have a wee look at thes pics of it. Thank you very much for your help. 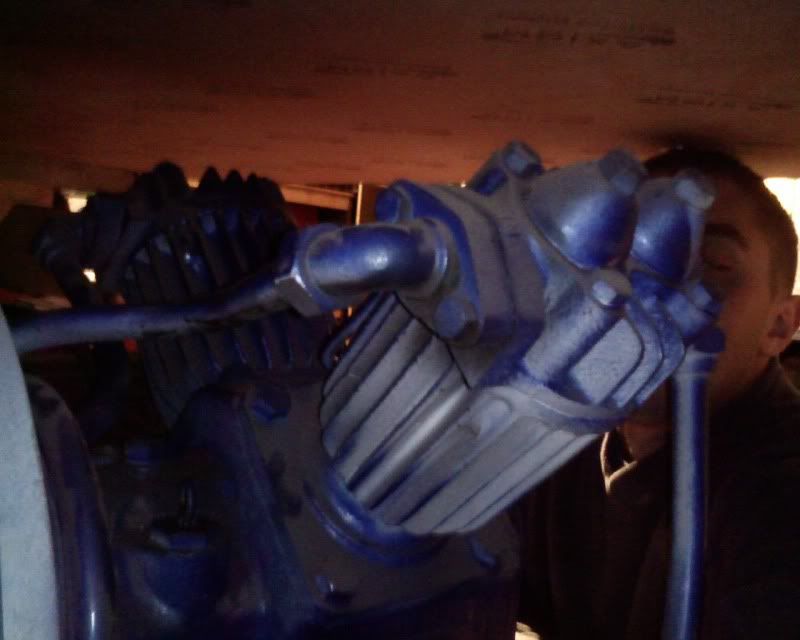 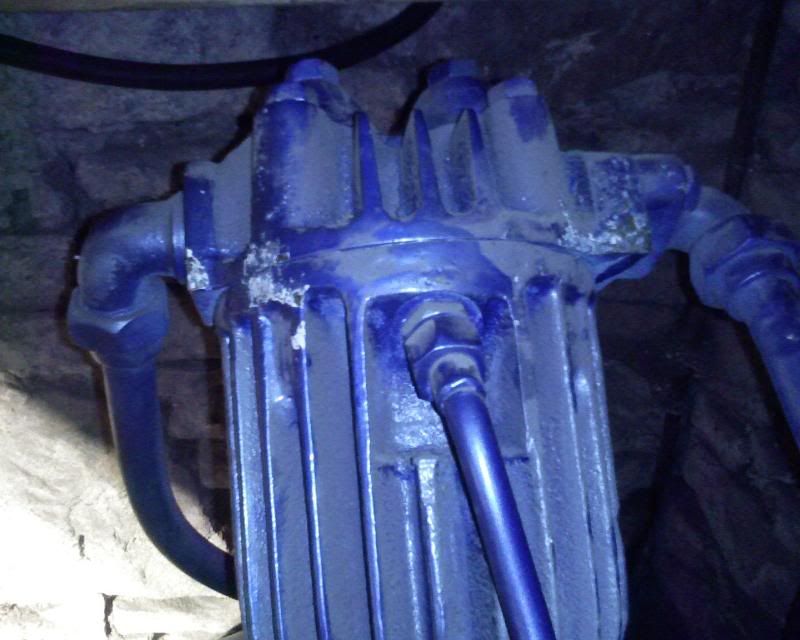 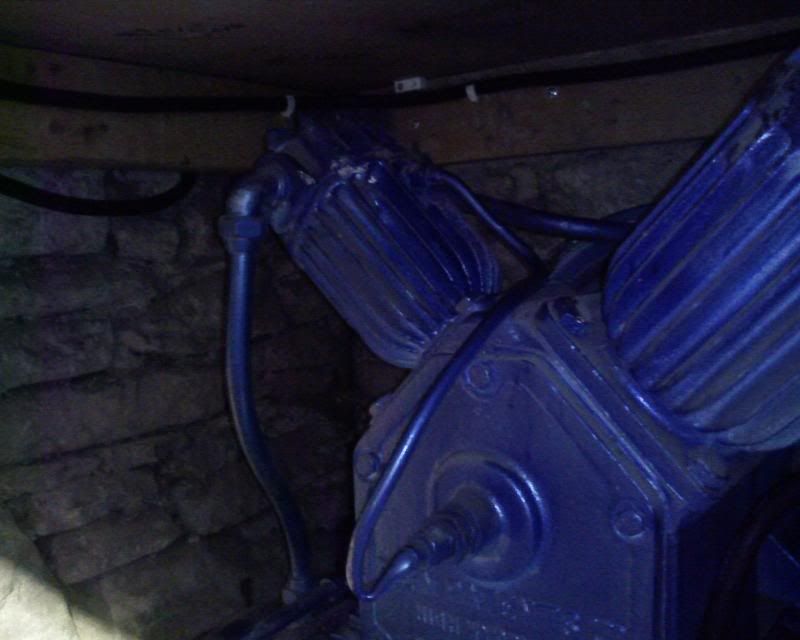 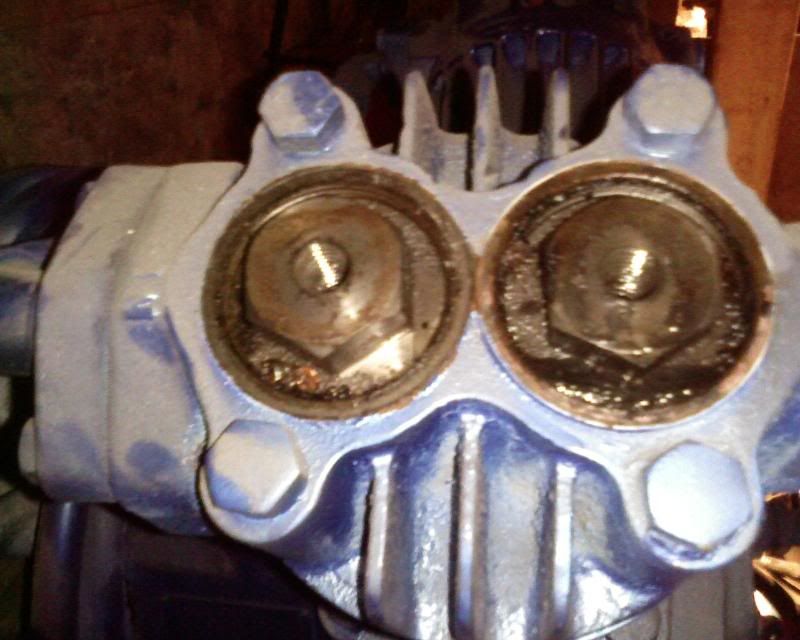 |
| |
|
|
93fxdl
Posted a lot
Enter your message here...
Posts: 2,013
|
|
Sept 3, 2009 20:38:37 GMT
|
|
bit of a job to tell from the pics but it does look similar to some high pressure compressors i used to work on (450+psi!!!!) but it looks like to pull the valves you will have to extract the circlips and then the plugs and the valves will be underneath but beware there will be springs in there . they will be nothing like car valves (if they are the type i think they are) just a flat washer and they wear against the seating and to refurb them you can (if it hasnt already been done is flip the washer over) but if not you will need a sheet of glass and some lapping paste and lap the washer flat again
BEFORE ANY DISMANTLING DRAIN THE TANK AND LEAVE THE TAP OPEN
i was nearly killed by a cretin loosening a valve on the high pressure system i was working on
i had a 1 kilo valve with cretin dragged behind miss my head by 2 inches
ttfn glenn
ps despite the thing being bl***y heavy pull it out to give you better access or move the bench
|
| |
|
|
grant
Part of things
Posts: 206
|
|
Sept 3, 2009 21:31:25 GMT
|
Noted; about letting the air out, thats scarry So do I remove the whole head or just the big bolts that i've exposed? Are the valves your speaking about the one way ones similar to the process of a car letting the exhaust air out to the tank? or does it also have seperate valves for this, excuse my ignoance. I can strip and rebuild an engine no probs, but this is almost duanting, would it be easier to fit an inline valve in the pipework dow to the tank? Yeah i could probably tie a rope round it and attach it to the land rover ;D Once again thank you so much |
| |
|
|
93fxdl
Posted a lot
Enter your message here...
Posts: 2,013
|
|
|
|
|
those "big bolts" are the valves and they are held in by circlips so clean off all the gunge
take out the circlips and pull the valves out they will probably be pretty stuck so once the clips are out put the bolts which hold the caps on back in and pull the valve assembly out the ones I used to play with were a complete assembly and once out I stripped them on the bench there will probably be o rings around them also they willbe 2 types 1 in and 1 out so do them one at a time to ensure you don't get them mixed up. while you are at it I would advise doing all 4 as they will most likely all need doing. almost cetainly you will not have to pull the heads off which is as well as then you would need to replace the head gaskets or if they are copper just anneal them
yes compressed air can be VERY dangerous but its safe if you
A drain the system
B don't have to work with a cretin
ttfn glenn
|
| |
Last Edit: Sept 4, 2009 8:30:46 GMT by 93fxdl
|
|
grant
Part of things
Posts: 206
|
|
Sept 4, 2009 16:54:13 GMT
|
Thank you very much Glenn you are a star!! I'll inform you how I get on, think i'll start on it tomorrow. |
| |
|
|


 On the air switch there is an arrow pointing anti clockwise, will rotating the bolt anticlockwise make it cut in sooner?? and how much would i need to screw it in?
 lol
lol


 Cant find the water drain, maybe its on the lower edge of the other side but no way of getting to it as its to heavy to move and I've forgotten as its been in there for 2 years. its certinally not underneath.