Now I'm sure a lot of you have all seen the fruits of my labour already but over the last few weeks ive been inundated with questions about banded, re-rimmed and wide steels. This thread is an attempt to answer those questions. Ive also been writing a bit on it for college so il use that to help explain! 
Steel wheels - To understand banding you must first understand the construction of steel wheels.
They are usually constructed from 2 main parts, the rim and the centre. The rim is manufactured from sheet steel that is ‘spun’ into the correct shape. The centre is also made from sheet steel but is usually pressed into shape. Material thickness varies between types and sizes of wheel but most of the car wheels I have come across are made from steel between 2.5mm and 4mm thick. The thickness of the rim and centre may be different!
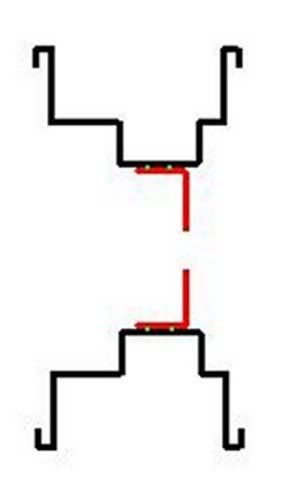
x-section of a wheel showing centre in red, rim in black and the possible location of some spot welds
The rim is usually joined to the centre by large spot welds but occasionally by a manually welded joint (MIG etc.). Sometimes rivets are present but these are only there to align the rim and centre before it is welded and are not really there to form any kind of permanent load bearing joint.
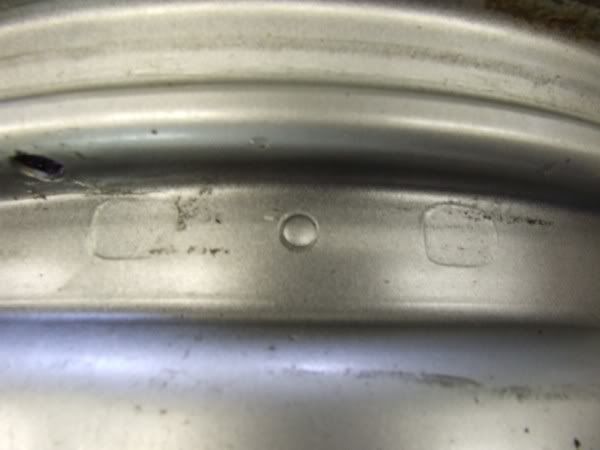
2 spot welds and rivet
So what is a banded wheel?
I would define it as any wheel that has been cut around its rim and has had a band of metal welded in to make the rim wider.
So what is re-rimming?
Re-rimmed wheels are wheels that have had their rims removed and then a whole wider outer rim fitted. The new rim is not cut and welded in any way apart from being welded to the centre of course! The new outer rim can come from a set of aftermarket wide steels (such as Wellers) or can sometimes be brought as a new part. To remove a rim from a set of Wellers you must sacrifice the original centre as you must cut /grind it out leaving just the outer rim (can also be removed using a lathe if you have one)
This method is regarded as being a lot safer than banding as you are only cutting/ joining where the original designer of the wheel intended. So long as you can weld the new rim on straight and with good penetration etc. there is no reason the wheel would be any weaker then the original. Trouble is you need a set of wide wheels to start with!
So How’s it done?
Well first you need to work out how wide and what offset they need to be. Usually you can just add a metal band into the outer section of the rim which will increase both the width and the offset. If your really picky and want to change the offset and width by a different amount then you either have to weld in 2 bands, one on each side of the centre or move the centre in relation to the rim which means you need 2 sets of wheels, one for the rim and one for the centre.
A really cheeky way of doing it is getting 2 sets of wheels, cutting the outer rim off both, the centre out of one, then welding the 2 together. This eliminates any band and means you only have one welded joint which is easier to hide behind the wheel centre. The problem is you are limited on how wide you can make the wheel by the original width of the 2 wheels you cut up. Take my metro wheels for example. If I had used this method the max width I could have achieved was 5” wide (just 1 inch wider than stock) because there simply was not enough material to play with in the centre of the rim (1 inch to be exact).
My metro wheels started off as 4” wide and I identified 7” wide as my desired width due to the widest tyre available being a 165/60. The wheels were very inset as standard so I needed to gain as much offset as possible to counteract this. With a little measuring I found that a 3 inch wide band in the outer part of the rim would give me my desired width and the wheel would be smack bang on the right offset too! A bit of luck goes a long way!.
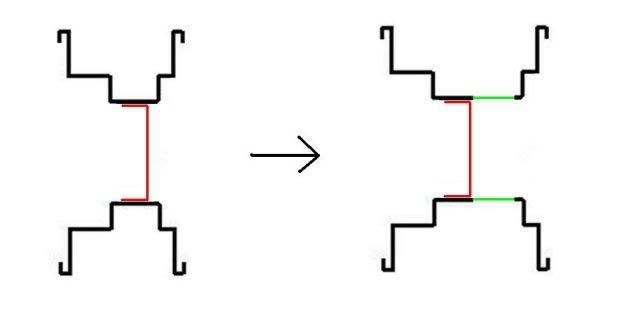
Adding a band to the outer part of the rim increases width and offset
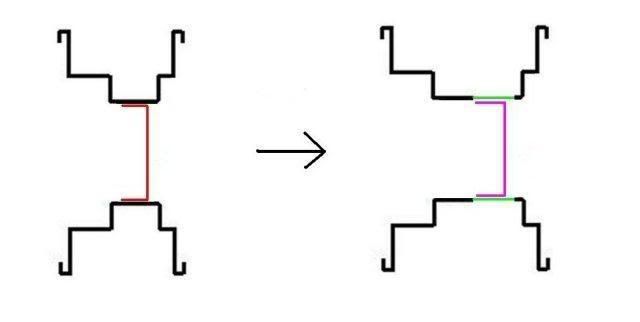
To change width and offset by a different amount out a band in and relocate the centre (2 sets of wheels needed)
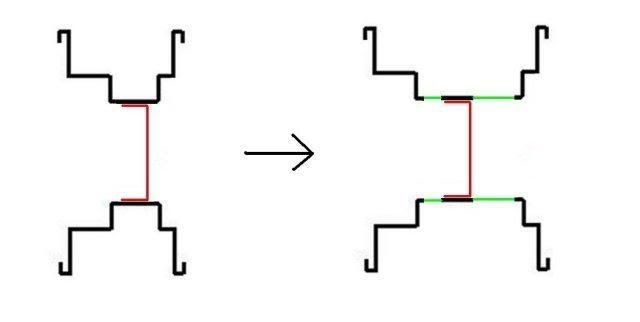
The same outcome done the dodgy way by using 2 bands! 2 bands = twice the chances of getting it wrong imo!
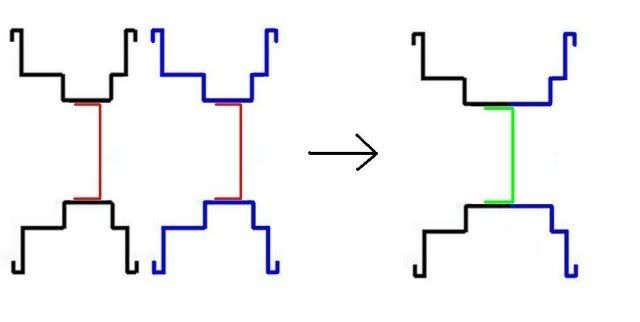
the cheeky way using 2 wheels and no band.
Cutting
Once you have decided where you want to put your band in and how big it needs to be you need to cut the rim in some way. When I did my metro wheels I used a parting off tool in the lathe to neatly cut the rim in half. It’s a good way to do it as you end up with a nice even and concentric cut (so long as you hold the wheel in the chuck properly!) However its bloody hard as parting off big diameters means you need and extremely low speed and an even lower freed rate, we are we are talking 40rpm and maybe 1thou a revolution here. So that’s 40 thou (1mm) a min. Its very easy to break a tool, (I broke one when doing the metro wheels and do parting off at work nearly every day!) tools aren’t cheap at £40+, luckily I have an infinite supply of used ones from work!
Due to the slight run out of the wheel and the fact that if I had kept going I would have parted off through the wheel centre as well I stopped before I got the whole way through (leaving about 0.5mm at thickest point) and split the wheel in half by striking the groove left by the parting off tool with a 90deg chisel, I then just de-burred the edge with a angle grinder sanding disc, crude by effective!
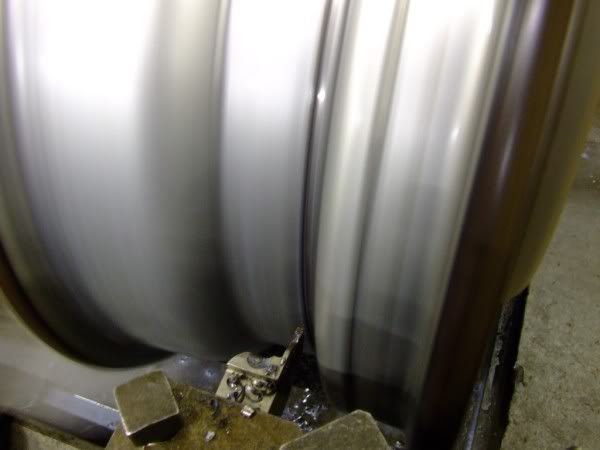
Parting off
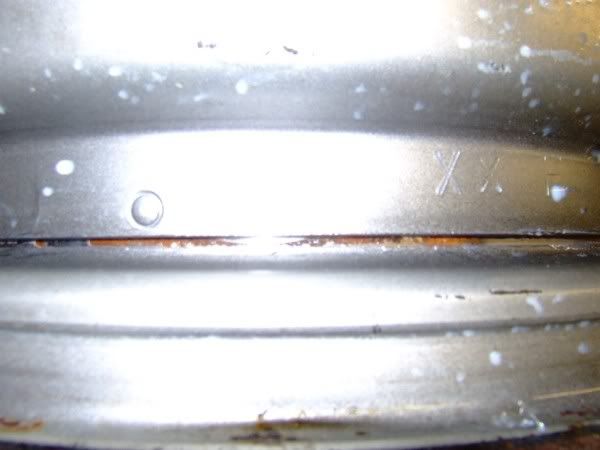
Groove left by parting off tool, ive gone right the way through here but on the other side of the wheel it had not.
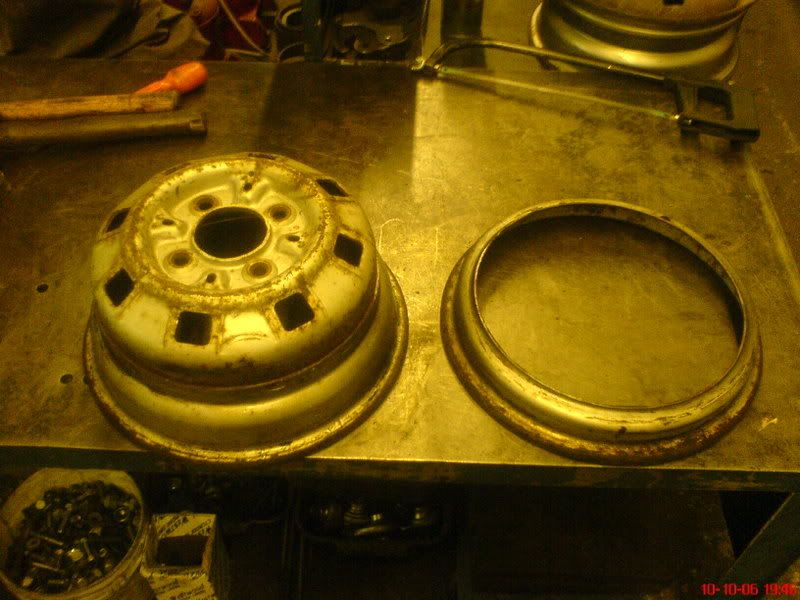
In half!
Another possibility is to simply use a cutting disc to slice around the rim, although of course this makes it difficult to get it all 100% straight. Id say at the very least you need to mark it out with a surface table and height gauge to give you the best chance of getting the cut straight. I’m struggling to think of an easier way to do it with common tools or machinery tbh.
Making the Band
Well to start with you should use some sheet steel the same thickness that your wheel is made from. You need to cut strips out to the required width of your band (don’t forget to allow for the width of your parting off tool or cutting disc!) but make them a little longer than the desired circumference to start with. The strips need to be cut to a very tight parallelism tolerance (that basically means they need to measure the same at each end and in the middle.) If they aren’t parallel your wheels will come out wobbly!
To do mine I bolted the sheet down on the mill and simply milled a long slot across the sheet which effectively cut it in half giving a perfectly straight and parallel band. It’s a bit overkill but I don’t have a guillotine that will cut 3mm steel sheet! Again you could do it with a cutting disc or something but then it’s down to you to get it right and it isn’t easy over a 1m+ length!
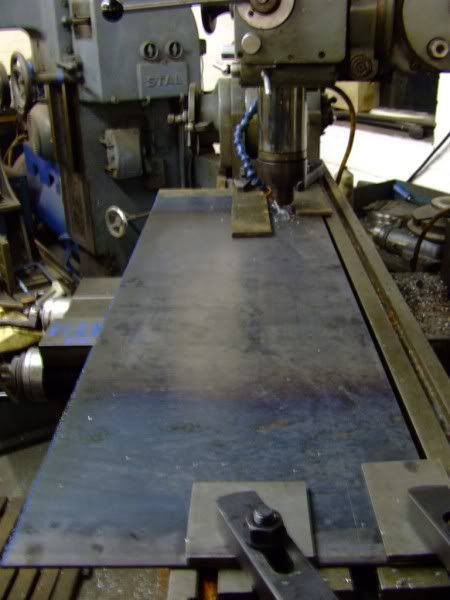
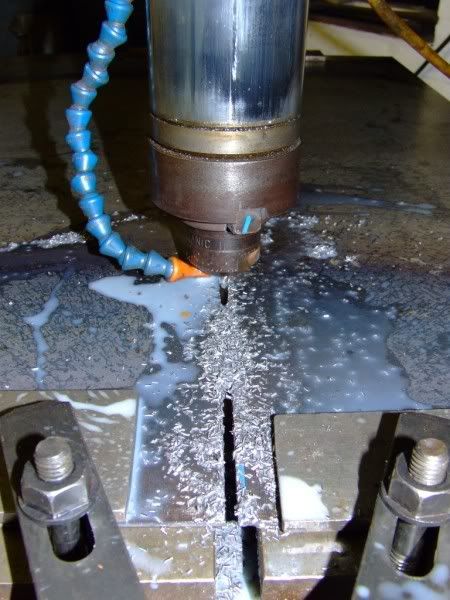
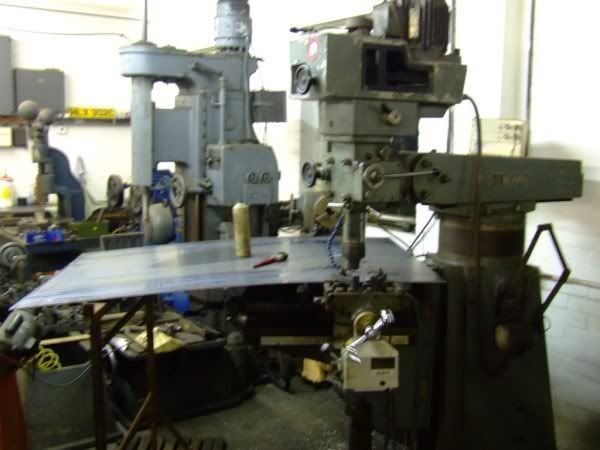
Cutting the bands on the mill
At this point you should think about putting a chamfer on the edge of the bands to get greater penetration when welding! I did this with an angle grinder, easy!
Once you have the band you need to roll it up in to a cylinder so you need a set of rolls, Ensure you don’t end up rolling it into a cone shape as this can cause a lot of problems later on!
My own set of rolls is totally knackered so I had a bit of trouble getting a perfect cylinder What I did was to get it somewhere close and then because the wheel centre was still attached to the rim I bent the band around the centre clamping and tack welding it as I went ensuring it was butted up nice and tight to the rim and it was a nice even curve. When I got round to the join in the band I had an overlap (better then a gap!!) so I used a cutting disc to slice off the exact amount I didn’t need and it butted up perfectly
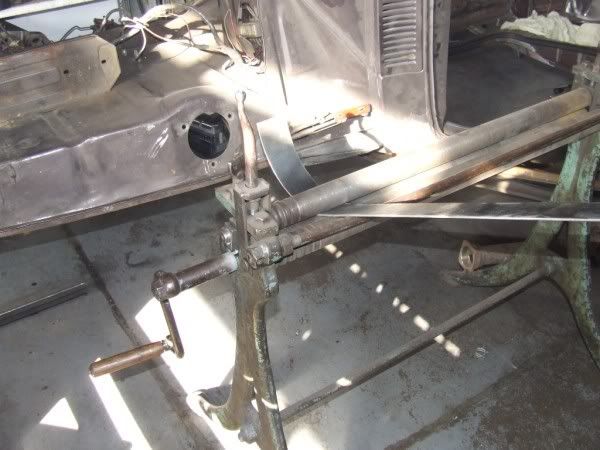
Rolling the band on my shonkey rolls
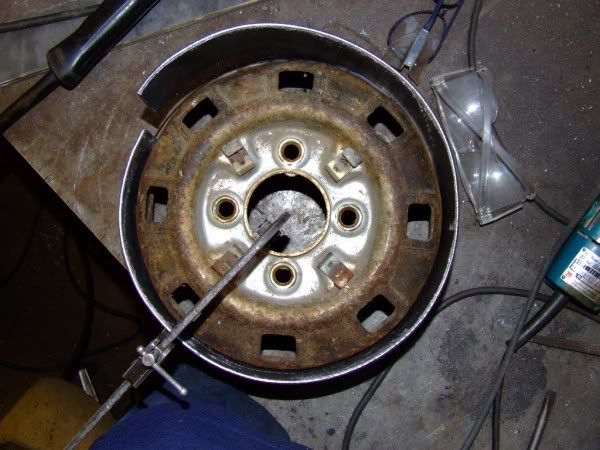
Using a clamp to bend it around the wheel centre
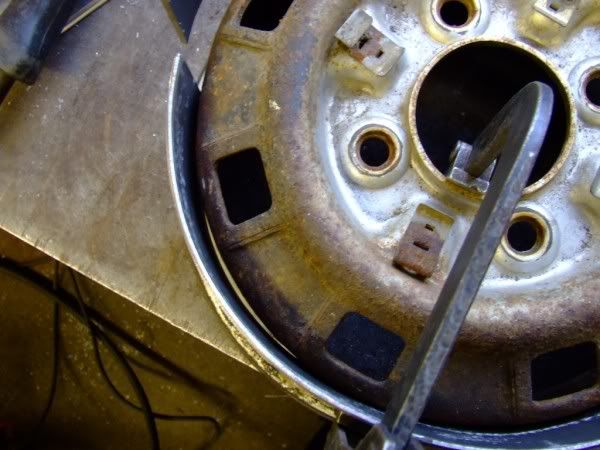
You don’t want a gap like that!
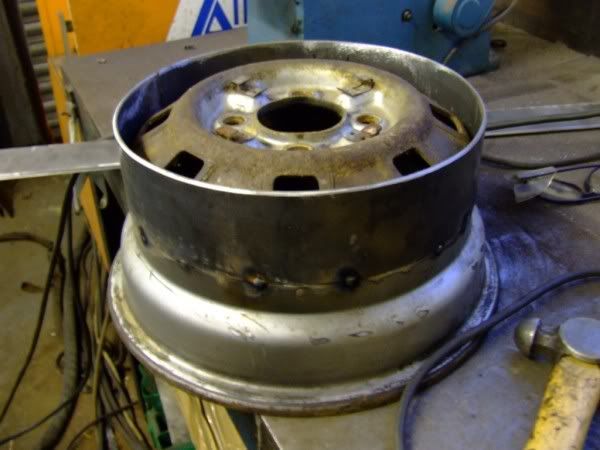
Done
Alignment
So we’ve now got the band tacked onto the inner part of the rim, Next job is to get the outer section of the rim tacked back on.
This is where a bit of trial and error is needed. It needs to be pretty good but not perfect. People have the delusion that wheels are some kind of highly accurate tight tolerance piece of engineering, they are most defiantly not! Put most rims on a car and spin the hub and you will see they run out by at least 1-2mm and that’s from the factory! It seems sensible to me to aim for something close to what they were originally. What they don’t need to be is perfect!
To check alignment I simply bolt the wheel onto a cars non driving hub (back wheel on a fwd and front on a rwd) then spin the wheel by hand and watch the edge of the wheel if it wobbles back and forth its not straight. You might find it easier if you have a fixed pointer of something to compare to, just stand an axle stand or something next to the wheel and you will see the run out a lot more clearly.
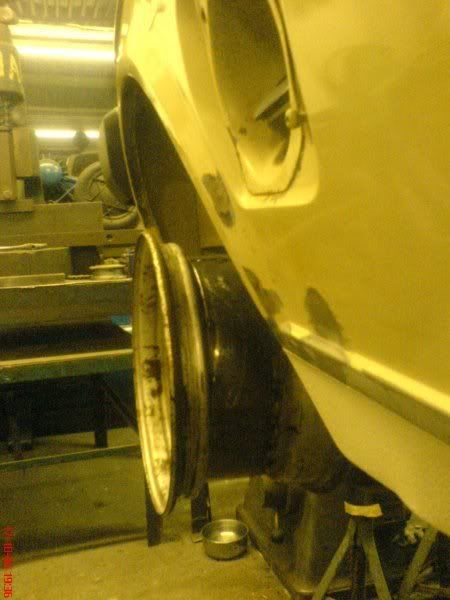
Checking alignment on the car
Tack the outer rim onto the band with 2 tacks, aligning it by eye on the bench to start with. Then bolt it on the car and spin it making a note with a marker pen or chalk of what direction and roughly how much you need to adjust it to get it right, and then remove it, re tack and re check until your happy. I found with 2 of my wheels it was good enough 1st time but the other 2 needed it adjusting. Its just trial and error. Shouldn’t take long.
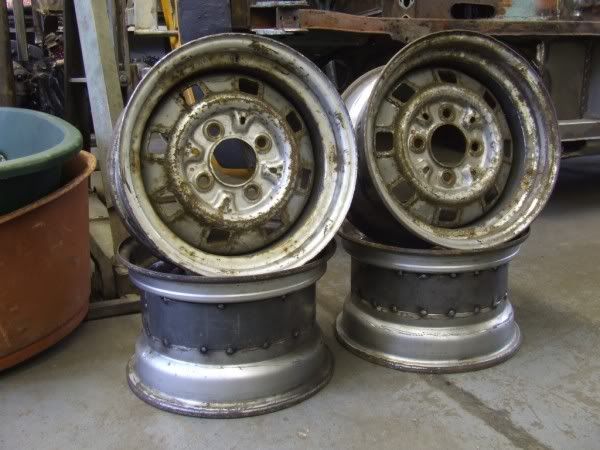
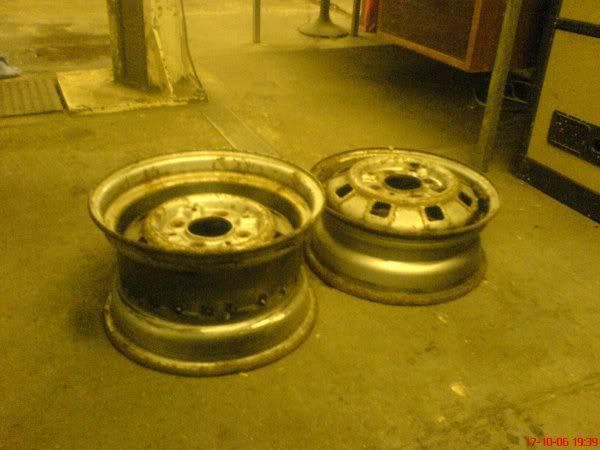
All tacked up
Welding
So now its all tacked up it needs to be welded, I’m not going to go into the details because you can find that elsewhere but I will say there’s a couple of points you need to take care with.
First off, if you’re not going to use tubes in your tyres then you need to be really careful that your welds are not porous or your tyres will keep going flat!.
If you use tubes as I did make sure you dress of the weld smooth on the tyre side of the rim to avoid the weld cutting into the tube!
I welded my wheels from the tyre side of the rim as I found this easier and one of the welds was hidden by the wheel centre so I couldn’t do it from the other side. I don’t think it really matters too much but he weld does look neater from the side you are welding from so maybe it makes sense to do it the other way around where possible. Il leave it up to you!
Don’t dress of the weld too much! Its tempting to dress it off until you get a smooth join but if the outer rim is slightly offset from the band then you will end up weakening the weld considerably! It’s better to just run around with the welder and leave a neat welded joint than try and hide it and end up with your weld breaking!
MIG or TIG? Well I used TIG but I’m sure MIG would have done the job.
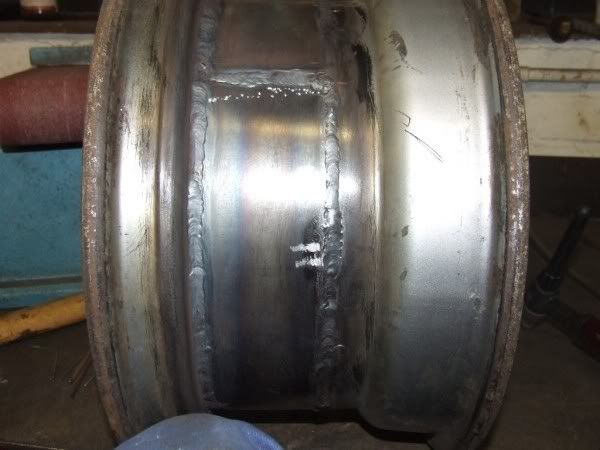
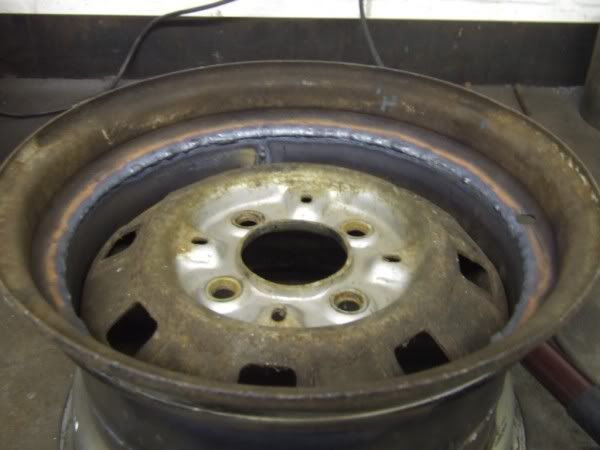
Welded!
To Finish
To finish the rims I gave them a light blast with the sand blaster and a coat of silver hammerite!
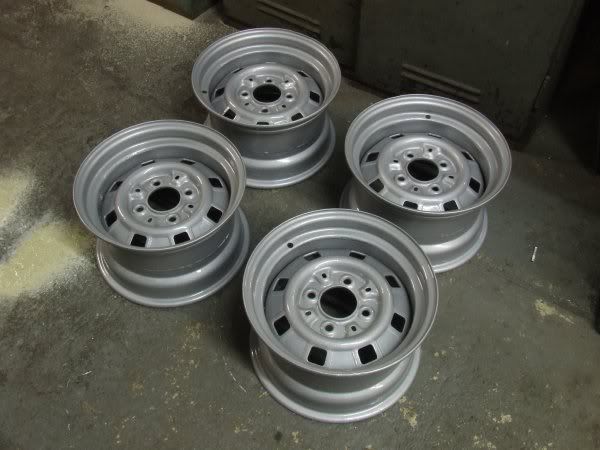
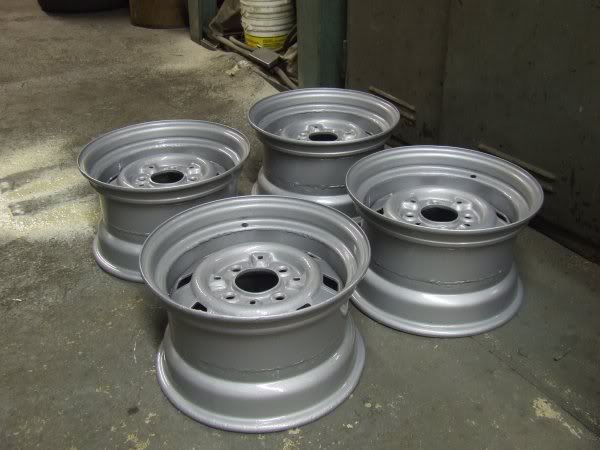
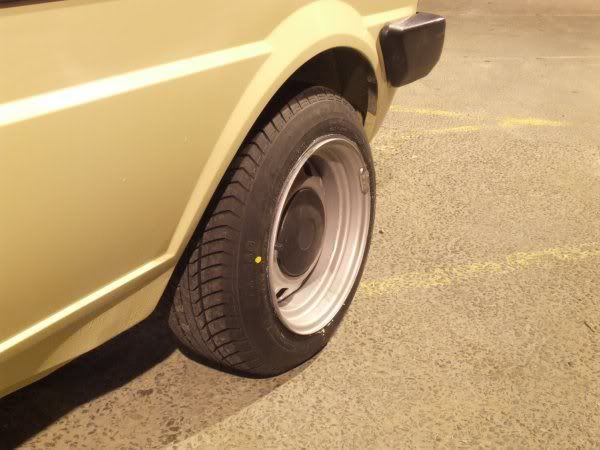
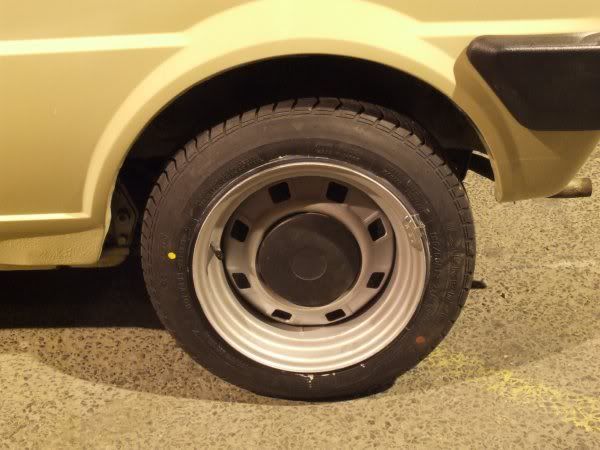
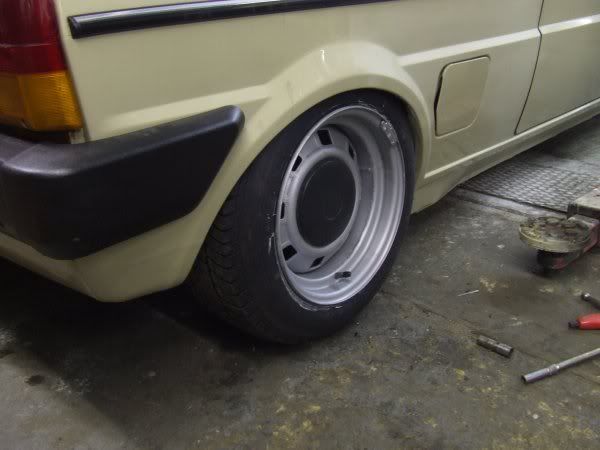
The finished article
Legality
The subject of much discussion is the legality of banded and re-rimmed wheels. However it is far form complicated and it can be covered by simply stating a number of facts
• It is ‘common knowledge’ that banded wheels are ‘illegal’ and that they became illegal in the late 80s/early 90s due to badly banded wheels failing and causing accidents
• However no one appears to be able to find proof that this is the case
• Re-rimmed wheels are legal
• Banded wheels may give you trouble come MOT time or if you happen to be the victim of a ‘random police check’ for any reason.
• They will void your insurance if you don’t declare them!
Safety
A lot of people are scared of banded wheels because they fear them to be ‘unsafe’ (whatever that means, driving a car at all is unsafe imo!)
The principles involved in banded wheels are no different to that involved in manufacturing and repairing other critical parts of your car. For some reason it is deemed perfectly acceptable for any old novice to pick up a curse word 80amp welder and plop up his rear sub frame mounts so that his car scrapes though it’s next MOT. (In a lot of cases it is even encouraged!) The same goes for people who make their own wishbones or 4 linked axle or any thing like that really. Yet when I comes to wheels everyone gets scared and even a trained engineer is branded as an idiot for attempting it!
The fact of the matter is if you do the job right they will be perfectly safe. If you do it wrong then they won’t
The point I'm trying to make is that you shouldn’t attempt it unless your 100% confident that you know what you are doing. You must be able to weld properly (and I mean properly!) and of course you must have a good understanding of basic engineering principles to get them aligned correctly and understand the tolerances involved.
The same rules apply to banding wheels as they do to working on any other pats of your car. If in doubt don’t! If it breaks it’s your fault!
Well that turned out longer than expected! Enjoy!
slater

Steel wheels - To understand banding you must first understand the construction of steel wheels.
They are usually constructed from 2 main parts, the rim and the centre. The rim is manufactured from sheet steel that is ‘spun’ into the correct shape. The centre is also made from sheet steel but is usually pressed into shape. Material thickness varies between types and sizes of wheel but most of the car wheels I have come across are made from steel between 2.5mm and 4mm thick. The thickness of the rim and centre may be different!

x-section of a wheel showing centre in red, rim in black and the possible location of some spot welds
The rim is usually joined to the centre by large spot welds but occasionally by a manually welded joint (MIG etc.). Sometimes rivets are present but these are only there to align the rim and centre before it is welded and are not really there to form any kind of permanent load bearing joint.

2 spot welds and rivet
So what is a banded wheel?
I would define it as any wheel that has been cut around its rim and has had a band of metal welded in to make the rim wider.
So what is re-rimming?
Re-rimmed wheels are wheels that have had their rims removed and then a whole wider outer rim fitted. The new rim is not cut and welded in any way apart from being welded to the centre of course! The new outer rim can come from a set of aftermarket wide steels (such as Wellers) or can sometimes be brought as a new part. To remove a rim from a set of Wellers you must sacrifice the original centre as you must cut /grind it out leaving just the outer rim (can also be removed using a lathe if you have one)
This method is regarded as being a lot safer than banding as you are only cutting/ joining where the original designer of the wheel intended. So long as you can weld the new rim on straight and with good penetration etc. there is no reason the wheel would be any weaker then the original. Trouble is you need a set of wide wheels to start with!
So How’s it done?
Well first you need to work out how wide and what offset they need to be. Usually you can just add a metal band into the outer section of the rim which will increase both the width and the offset. If your really picky and want to change the offset and width by a different amount then you either have to weld in 2 bands, one on each side of the centre or move the centre in relation to the rim which means you need 2 sets of wheels, one for the rim and one for the centre.
A really cheeky way of doing it is getting 2 sets of wheels, cutting the outer rim off both, the centre out of one, then welding the 2 together. This eliminates any band and means you only have one welded joint which is easier to hide behind the wheel centre. The problem is you are limited on how wide you can make the wheel by the original width of the 2 wheels you cut up. Take my metro wheels for example. If I had used this method the max width I could have achieved was 5” wide (just 1 inch wider than stock) because there simply was not enough material to play with in the centre of the rim (1 inch to be exact).
My metro wheels started off as 4” wide and I identified 7” wide as my desired width due to the widest tyre available being a 165/60. The wheels were very inset as standard so I needed to gain as much offset as possible to counteract this. With a little measuring I found that a 3 inch wide band in the outer part of the rim would give me my desired width and the wheel would be smack bang on the right offset too! A bit of luck goes a long way!.

Adding a band to the outer part of the rim increases width and offset

To change width and offset by a different amount out a band in and relocate the centre (2 sets of wheels needed)

The same outcome done the dodgy way by using 2 bands! 2 bands = twice the chances of getting it wrong imo!

the cheeky way using 2 wheels and no band.
Cutting
Once you have decided where you want to put your band in and how big it needs to be you need to cut the rim in some way. When I did my metro wheels I used a parting off tool in the lathe to neatly cut the rim in half. It’s a good way to do it as you end up with a nice even and concentric cut (so long as you hold the wheel in the chuck properly!) However its bloody hard as parting off big diameters means you need and extremely low speed and an even lower freed rate, we are we are talking 40rpm and maybe 1thou a revolution here. So that’s 40 thou (1mm) a min. Its very easy to break a tool, (I broke one when doing the metro wheels and do parting off at work nearly every day!) tools aren’t cheap at £40+, luckily I have an infinite supply of used ones from work!
Due to the slight run out of the wheel and the fact that if I had kept going I would have parted off through the wheel centre as well I stopped before I got the whole way through (leaving about 0.5mm at thickest point) and split the wheel in half by striking the groove left by the parting off tool with a 90deg chisel, I then just de-burred the edge with a angle grinder sanding disc, crude by effective!

Parting off

Groove left by parting off tool, ive gone right the way through here but on the other side of the wheel it had not.

In half!
Another possibility is to simply use a cutting disc to slice around the rim, although of course this makes it difficult to get it all 100% straight. Id say at the very least you need to mark it out with a surface table and height gauge to give you the best chance of getting the cut straight. I’m struggling to think of an easier way to do it with common tools or machinery tbh.
Making the Band
Well to start with you should use some sheet steel the same thickness that your wheel is made from. You need to cut strips out to the required width of your band (don’t forget to allow for the width of your parting off tool or cutting disc!) but make them a little longer than the desired circumference to start with. The strips need to be cut to a very tight parallelism tolerance (that basically means they need to measure the same at each end and in the middle.) If they aren’t parallel your wheels will come out wobbly!
To do mine I bolted the sheet down on the mill and simply milled a long slot across the sheet which effectively cut it in half giving a perfectly straight and parallel band. It’s a bit overkill but I don’t have a guillotine that will cut 3mm steel sheet! Again you could do it with a cutting disc or something but then it’s down to you to get it right and it isn’t easy over a 1m+ length!


Cutting the bands on the mill
At this point you should think about putting a chamfer on the edge of the bands to get greater penetration when welding! I did this with an angle grinder, easy!
Once you have the band you need to roll it up in to a cylinder so you need a set of rolls, Ensure you don’t end up rolling it into a cone shape as this can cause a lot of problems later on!
My own set of rolls is totally knackered so I had a bit of trouble getting a perfect cylinder What I did was to get it somewhere close and then because the wheel centre was still attached to the rim I bent the band around the centre clamping and tack welding it as I went ensuring it was butted up nice and tight to the rim and it was a nice even curve. When I got round to the join in the band I had an overlap (better then a gap!!) so I used a cutting disc to slice off the exact amount I didn’t need and it butted up perfectly

Rolling the band on my shonkey rolls

Using a clamp to bend it around the wheel centre

You don’t want a gap like that!

Done
Alignment
So we’ve now got the band tacked onto the inner part of the rim, Next job is to get the outer section of the rim tacked back on.
This is where a bit of trial and error is needed. It needs to be pretty good but not perfect. People have the delusion that wheels are some kind of highly accurate tight tolerance piece of engineering, they are most defiantly not! Put most rims on a car and spin the hub and you will see they run out by at least 1-2mm and that’s from the factory! It seems sensible to me to aim for something close to what they were originally. What they don’t need to be is perfect!
To check alignment I simply bolt the wheel onto a cars non driving hub (back wheel on a fwd and front on a rwd) then spin the wheel by hand and watch the edge of the wheel if it wobbles back and forth its not straight. You might find it easier if you have a fixed pointer of something to compare to, just stand an axle stand or something next to the wheel and you will see the run out a lot more clearly.

Checking alignment on the car
Tack the outer rim onto the band with 2 tacks, aligning it by eye on the bench to start with. Then bolt it on the car and spin it making a note with a marker pen or chalk of what direction and roughly how much you need to adjust it to get it right, and then remove it, re tack and re check until your happy. I found with 2 of my wheels it was good enough 1st time but the other 2 needed it adjusting. Its just trial and error. Shouldn’t take long.


All tacked up
Welding
So now its all tacked up it needs to be welded, I’m not going to go into the details because you can find that elsewhere but I will say there’s a couple of points you need to take care with.
First off, if you’re not going to use tubes in your tyres then you need to be really careful that your welds are not porous or your tyres will keep going flat!.
If you use tubes as I did make sure you dress of the weld smooth on the tyre side of the rim to avoid the weld cutting into the tube!
I welded my wheels from the tyre side of the rim as I found this easier and one of the welds was hidden by the wheel centre so I couldn’t do it from the other side. I don’t think it really matters too much but he weld does look neater from the side you are welding from so maybe it makes sense to do it the other way around where possible. Il leave it up to you!
Don’t dress of the weld too much! Its tempting to dress it off until you get a smooth join but if the outer rim is slightly offset from the band then you will end up weakening the weld considerably! It’s better to just run around with the welder and leave a neat welded joint than try and hide it and end up with your weld breaking!
MIG or TIG? Well I used TIG but I’m sure MIG would have done the job.


Welded!
To Finish
To finish the rims I gave them a light blast with the sand blaster and a coat of silver hammerite!


The finished article
Legality
The subject of much discussion is the legality of banded and re-rimmed wheels. However it is far form complicated and it can be covered by simply stating a number of facts
• It is ‘common knowledge’ that banded wheels are ‘illegal’ and that they became illegal in the late 80s/early 90s due to badly banded wheels failing and causing accidents
• However no one appears to be able to find proof that this is the case
• Re-rimmed wheels are legal
• Banded wheels may give you trouble come MOT time or if you happen to be the victim of a ‘random police check’ for any reason.
• They will void your insurance if you don’t declare them!
Safety
A lot of people are scared of banded wheels because they fear them to be ‘unsafe’ (whatever that means, driving a car at all is unsafe imo!)
The principles involved in banded wheels are no different to that involved in manufacturing and repairing other critical parts of your car. For some reason it is deemed perfectly acceptable for any old novice to pick up a curse word 80amp welder and plop up his rear sub frame mounts so that his car scrapes though it’s next MOT. (In a lot of cases it is even encouraged!) The same goes for people who make their own wishbones or 4 linked axle or any thing like that really. Yet when I comes to wheels everyone gets scared and even a trained engineer is branded as an idiot for attempting it!
The fact of the matter is if you do the job right they will be perfectly safe. If you do it wrong then they won’t
The point I'm trying to make is that you shouldn’t attempt it unless your 100% confident that you know what you are doing. You must be able to weld properly (and I mean properly!) and of course you must have a good understanding of basic engineering principles to get them aligned correctly and understand the tolerances involved.
The same rules apply to banding wheels as they do to working on any other pats of your car. If in doubt don’t! If it breaks it’s your fault!
Well that turned out longer than expected! Enjoy!
slater



 god I'm jealous of your skillzorz


 bt the only differance is i'm doing n with a grinder & cutting disks, defo the info of the yr award, really commendable, well done slater, hope to see the metro on those rims one day! i'll be reading this ova & ova