|
|
|
May 19, 2007 19:23:12 GMT
|
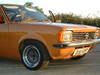
Well it was the misuse's birthday today, so never one to miss an oportunity, I grabbed two of the largest relatives that came around and dragged them down the garage ;D. A couple of minutes straining had the cab of the body, the chassis rolled back, and the cab stood on end, all looking like this.  Close examination of this  Revealed lots of this,  The chassis has virtually snapped though in two places, on the o/s side by the rear of the torsion bar mount, on the nearside about 10 inches further back. Its also flexible on the nearside front chassis leg around the front mount for the torsion bar, where previous(and there's lots of it!) dodgy welding had broke allowing the chassis leg to move in a badly welded sleeve. At this point I'm beginning to hope I can still repair it, I've ordered a decent metal folder, and need to collect a sheet of 18 guage steel next week. I've a full bottle of gas, half a roll of mig wire, I've got me shades and its about a hundred hours to completion   ;D |
| |
Last Edit: Dec 31, 2007 19:01:37 GMT by dean36014
1992 Citroen zx
|
|
|
|
Ether
Posted a lot

Posts: 4,450
|
|
|
|
Stick it with it, man. It'll be amazing when it's done. Better fire up the MIG, eh? Best of luck  |
| |
|
|
|
|
|
Sept 17, 2007 16:30:41 GMT
|
;DTime for an update on this. Chassis all welded up now, and looks a bit more presentable and solid.  So time to reunite the cab with the chassis.  My mate wanted to get on with building his garage, so the rear van body i've aquired and stored there needed bring home. Much scratching of heads, one camping trailer later and the van body sat on top of the trailer, I set of back to mine. The looks I got were amazing with the body perched on top of the trailer, but it was safe and secured well so all legal  . unfortunately I forgot to take a picture of this. So the van body was lobbed on the chassis, and moved away from the cab so work can commence.  Much scratching of head again, as to where to start on the cab. the fllors, all the sills, inner wings, A/B posts,and cab back are all rotten. So I cut the floor and sills out on one side, and started there. The inner sill is tacked in, along with the B post. I need to replace the A post, but to do this means repairing the inner wing first, guess I should have started there  . Cut the door mounting panel of to reveal more rust, and eventually got back to the kidney panel, which was rotten.  A quick look on T'internet reveal a relacement to be £30+ vat and postage, a good incentive to repair it me thinks, so todays work was doing this.  Next job is remove all the innerwing and replace with new, then replace the A post, and get the door fit right. At this rate I reckon the welding will be done by Xmas........2008  |
| |
Last Edit: Dec 31, 2007 19:04:24 GMT by dean36014
1992 Citroen zx
|
|
archieboy
Posted a lot
Volvo Amazon 2 door
Posts: 1,168
|
|
Sept 17, 2007 17:48:33 GMT
|
Well at least your going in the right direction  Tis looking good! |
| |
|
|
|
|
|
Oct 21, 2007 23:12:08 GMT
|
Just found this - a man after my own heart. I've got 5 of the things in the garden, 3 with original beds. One of them should be back on the road very soon, just an undersill to weld in now Some pics (wish I was a half way decent welder) and some drivel here - bigginger.blogspot.com/ - should anyone care |
| |
Last Edit: Oct 21, 2007 23:14:35 GMT by bigginger
|
|
|
|
|
Dec 31, 2007 17:11:47 GMT
|
An update: Well its took along time, due to the cold/lack of enthusiasm etc, etc. The floor now looks like this  New inner wings,   Another coat of zinc paint, then lift the cab back onto the chassis. Not finishing off the painting of the floors as there are reinforcing rails to add when i've decided what seats to fit, and seat belt mounting points to add to suit the seats. I need the cab back on as i've also bought one of these, (google image, not mine) 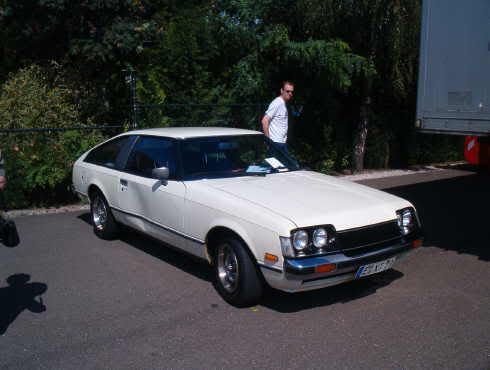 Which is structally perfect, cosmectically challenged, but mot'ed 'till Nov '08. New exhaust, wheel bearing and n/s wing awaiting fitment, and then a respray to this colour methinks. 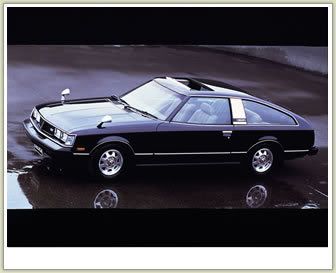 So when i get fed up of the moggie, I can swap over to the celica for a change |
| |
1992 Citroen zx
|
|
|
|
|
Feb 14, 2008 19:09:17 GMT
|
Haven't updated this for a while, haven't really been down the garage that much lately due to the cold and the shock of discovering I've got two daughters(18 and 17) I never knew about. I bare metalled the engine bay, and etched primed it. Stone chipped the inner wings due to the fact that the repair panels would have looked terrible without lots of filling when top coated. Seam sealed and a coat or two of primer later it looks like this.  I was going to top coat the engine bay, but decided against it as it would probably get ruined while doing the rest of the vehicle. So I lobbed all the suspension back in, which involved lots of head scratching and this, as it was so long ago it was stripped.  Now its rolling again, i can start on the last bits of welding on the cab. Starting with the drivers side, first job is to chose a suitable door out the pile of 99p ones bought of ebay. Then to hang it, a couple of shims later and it fits nicely around the frame, but the bottom of the B post needed some tweaking. Cut the tacks, sectioned the side of the B post repair panel, judious use of a bolster chisel and lump hammer resulted in a nice fit. Just needs welding up again, a job for tomorrow.  Next job is to fit the wing and check the door gap, and general fit to the wing,  pretty good eh! Dropped the bonnet on and check wing gaps  not too bad, looks like part of the inner wing will need slide hammering to close a gap near the bulkhead end. Chucked on the front panel, and it looks like this  Got carried away then, so trialed fit on my 99p bargain nissan 200sx seats of ebay. I want to keep the spoked steering wheel as I kinda like it, so need to sort out a nice seating position.   Not too bad, but i would like the seat back a bit further, so when the van body is bolted on, a bit of surgery to the rear of the cab, and van floor will allow the seat to go back some more. i want to put the pedals in first though, just to make sure before i start cutting. So one side of the cab nearly done, same to do on the other side, and then time to start on the cab. The roof of which is like this nearly all the way around.  Luckily I've found a company that makes a fibreglass roof, so need to save up, and then cut the complete roof off and bond on a plastic one. Hopefully that will stop any condensation in the van body. then its wheel arches, inner and outer, and rear corners to do. |
| |
1992 Citroen zx
|
|
Colonelk
Posted a lot
Posts: 3,740
Club RR Member Number: 83
|
1971 Austin Minor Van. Colonelk
@colonelk
Club Retro Rides Member 83
|
Feb 14, 2008 19:53:39 GMT
|
Wowsers! Thats some dedicated rust-eradication gone on in this thread. Glad to see you still pushing forward Did you get the Toyota in the end? |
| |
|
|
|
|
|
Feb 14, 2008 20:13:57 GMT
|
|
Yes I did get the celica, fixed the wheel bearing and put a new exhaust on it. I used it for a few weeks and then passed it on to someone who was going to restore it properly. Having one major project ^^^, and getting another wasn't one of my best ideas.
|
| |
1992 Citroen zx
|
|
Anglia68
Posted a lot
Powered By Boredom.
Posts: 2,049
|
|
Feb 14, 2008 21:11:11 GMT
|
It looks like you're doing a first rate job there.Excellent,can't wait to see this hit the road. |
| |
|
|
|
|
|
|
|
|
|
|
top work, I'm working on a similar scale on a morrie at the moment, great to see you salvaged the chassis, looked like a huge task.
|
| |
Remade In Australia
thereimaginarium.com.au
|
|
luckygti
Posted a lot
I need to try harder!
Posts: 4,912
|
|
Feb 15, 2008 14:03:45 GMT
|
|
Wow! Bit of a weldathon there mate! Well done for persevering though. Was wondering what had happened to this!
|
| |
|
|
street
Posted a lot
6.2 ft/lbs of talk
Posts: 4,662
|
|
Feb 15, 2008 16:42:37 GMT
|
Nice work! I was worried when I saw the pics of the chassis but you've made light work of that! Starting to come together now, good luck with it! |
| |
|
|
|
|
|
Feb 15, 2008 17:34:34 GMT
|
Finished welding the driver side B post up today, and then the angle grinder promptly blew up, while trying to dress the welds. So a trip to B&Q, and £9 later (well I am a bit broke at the moment) new angle grinder. So welds dressed up, a couple of old doors stripped of there useful parts yielded a decent door top. Trial fitted the van body on, and then loosely bolted up, and then tried the seat in again. Looks like the front of the van body is going to have about 4" removed, and then boxed in so i can get a decent seating position. Not to much of a worry as the front panel of the van body was rotten anyway Now just need a couple of mates around to help me push it out and turn it around, so i can finish the A and B posts on the other side. Need to sort through my door pile and find the best door for that side as well. |
| |
1992 Citroen zx
|
|
|
|
|
Feb 18, 2008 16:59:38 GMT
|
Right remembered the camera today, so got piccies. first off, went down the tyre place and had my tyres fitted to the rims. Unfortunately the second one of my matched pair showed a bleb in the side when blown up, I'm pretty sure the fitter damaged it fitting it, as he took ages to get in on the rim and took it of twice as he couldn't get them on. Oh well, luckily I had another tyre, but not a matched one so that got fitted instead. Straight home and bolted them on for a looksee.   I'm quiet happy with that, fills out the arch nicely and best of all the overall diameter is the same as a standard size tyre. Obviously when its all back together a set of lowering blocks will be needed ;D So onto the passengerside B post. This was in far better condition than the otherside, actually its about the only usuable panel i've found on the cab I'd already replaced the innerwing on this side, and I removed the A post coverplate to check it wasn't rotten inside, which it wasn't, so its had a new cover plate welded on. Howver the bottom of the B post needed some repairs, so a bit of cutting made a hole like this,  Which was soon welded up, and as I was feeling lazy, I cut a section out of the new repair panel i didn't use to repair the bottom edge where the wing monting bracket was. Welde in like this.  So onto door fitting and the best door out of my pile was bolted up, and the gaps checked. The fir to the wing needs work, but thats down to the wing being a cheap s/h one, a replacement will be ordered and fettled to fit. however the clearance to the bottom of the B post was terrible.  These repair panels are really badly made, they are all wrong, and don't fit well. off with the van body and some sectioning of the panel and use of a large hammer and chisel had a reasonable fit, so it was quickly welde up.  Doesn't look much different, but the door shuts better now, and when looking down on the repair panel it isn't lobsided now. There was some heavy rust on the back of the B post so this was cleaned up, and a few pinholes welded up, and ground back.  It doesn't have to be pretty as a seal fits between the cab and body, so you don't see it anyway. While studying my door I had fitted I then noticed it had some filler in, and while the grinder had a flap disc in it, it would have been rude not to have seen how much was there....so now I need decide whether to refill the dent(about 6" square), or fit a new skin to the door, as the frame is good. None of my other doors has a rot free frame. Well, its been a nice week of work, but its back to the grindstone tonight, need to earn some money to buy the panels for the rear body. |
| |
1992 Citroen zx
|
|
stealthstylz
Club Retro Rides Member
Posts: 14,867
Club RR Member Number: 174
|
1971 Austin Minor Van. stealthstylz
@stealthstylz
Club Retro Rides Member 174
|
Feb 18, 2008 17:11:22 GMT
|
|
Just read this from the start you've put in an incredible amount of work well done.
Matt
|
| |
|
|
|
|
|
Feb 18, 2008 18:44:00 GMT
|
Excellent Dean, like Matt I`ve just read it through from the start.... I had no idea you had so much work to do on it when I met you last year  Cracking effort and are you still looking for an Axle ? As Dave thought his dad may have one still  |
| |
|
|
|
|
|
|
|
|
Yes still need an axle, although I have found i can buy new brackets for it now, so its not the end of the world.
|
| |
1992 Citroen zx
|
|
|
|
|
May 30, 2008 19:48:18 GMT
|
Haven't updated this for a while, mainly as I've been broke , and busy decorating two bedrooms and building Ikea flatpacks  So, the cabs all welded up, engine bay primed, and floor pans welds dressed up.  Repaired some damage to the dash board where someone had enlarged a switch hole, so washer welded in, built up with weld and dressed up. Decided i didn't like the chrome trim that goes around the speedo, so welded the holes up for that as well, going for the full painted dash look. Bare metalled the dash, and a coat of stopper leave's it looking like this.  Flushed with success of stripping the dash, I bought 2 tins of Wickes finest paint stripper and starting stripping the paint of the cab roof, doors and van body. The cab has previously been, red, two shades of blue, red again, and originally white.  The passenger door chosen to be used was remarkably solid, with just a couple of pin holes, and a slight crease in the bulge on the door.  The van body dates from '56 apparently, and was on the original paint, except for where it had been repaired around the arches. Soon got that off, not bothered doing the roof as its being replaced with a plastic one.   Also made a start on repairing/modifying the rear lights, a '56 body only had a single rear light, where as mines a '71 and needs two rear lights each side. Repair panels bought(poor quality panels again), and test fitted on the drivers side.  I'm waiting on some repair panels being hand made for the rear door pillars of the van body, when these turn up, everything can be welded in. All in all, i'm amazed at how good the van body is, other than the roof, and the arches its virtually rot free. I wish my mercs metal was this good. Hopefully now my finances have improved work should progress nicely this year. |
| |
1992 Citroen zx
|
|
|
|
|
May 30, 2008 19:52:41 GMT
|
Oh, forgot to add, fancy some camber ;D  Think I've got the splines on the torsion bars set wrong, and having no engine fitted makes it a bit high at the front. |
| |
1992 Citroen zx
|
|
|
|


 ;D
;D


 . unfortunately I forgot to take a picture of this.
 . Cut the door mounting panel of to reveal more rust, and eventually got back to the kidney panel, which was rotten.